CHAPTER 21 Simultaneous Fractures of the Scaphoid and Distal Radius
Although uncommon, simultaneous fractures of the distal radius and scaphoid can be challenging to treat. Once the decision has been made to surgically treat these injuries, the question arises on the order of treatment of these combined fractures. The goal of surgical treatment is rigid fixation. Once fixation is achieved in one fracture, the treatment of the second fracture risks disruption of fixation of the first fracture. If the scaphoid is fixed first, there is potential for screw pullout or loosening during the substantial forces applied during reduction of the distal radius. If the first fracture treated is the radius, reduction of the second fracture, that of the scaphoid, may result in a loss of reduction and a malunion in the radius. The purpose of this chapter is to present a tactical approach to the surgical treatment of these combined fractures, which results in rigid fixation of both fractures using arthroscopic and percutaneous techniques.
The incidence of combined injuries varies from 0.7% to 6.5% of all distal radius fractures.1–4 The mechanism is a high-energy injury with rapid forced loading of an outstretched radial-deviated dorsiflexed wrist.1,3,5,6 These injuries are often associated with a displaced and angulated scaphoid fracture.
The rare isolated stable nondisplaced scaphoid fracture and distal radius fracture might be safely managed with plaster immobilization for periods of 3 to 4 months. Unfortunately, this period of immobilization for the treatment of distal radius fractures, at best, results in delay in recovery of hand and wrist function and, at worst, permanent stiffness.6,7
A review of the relatively few published reports on combined scaphoid and distal radius fractures demonstrates that treatments have evolved over the past decade. Historical references site the primacy of addressing the distal radius fracture, but this predated the operative treatment of acute scaphoid fractures.5,8,9 We now understand that both fractures must be adequately reduced and treated. The arthroscopic care of both distal radius and scaphoid fractures and the use of percutaneous techniques have permitted the rigid fixation of these fractures while preserving uninjured tissues.10–13 This has allowed for the early recovery of hand function with minimal complications.
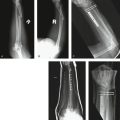
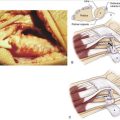
The techniques presented in this chapter will describe in a step-by-step manner the evaluation and fixation of a specific case to help provide clarity. This injury occurred in a 22-year-old right-handed skateboarder who had a fracture through an old scaphoid nonunion and a distal radius fracture (Figs. 21-1 and 21-2).
Overview of Surgical Technique
Setup
Equipment includes a headless cannulated compression screw for scaphoid fixation to permit percutaneous fixation and some type of distal radius fixation system that can provide rigid fixation with the least complications. We prefer screws of standard size for scaphoid fractures of the middle third, because the larger core shaft increases the ability to resist lateral displacement forces.14 Mini-fluoroscopy permits real-time imaging during surgery. Although standard fluoroscopy units can be used, they are cumbersome and emit a significant amount of radiation. Additional equipment includes 0.045-inch and 0.062-inch double-cut Kirschner wires (K-wires), a wire driver, and a small joint arthroscopy setup, including a traction system.
Surgical Technique
Scaphoid Fracture Reduction and Dorsal Guidewire Placement along the Scaphoid Central Axis
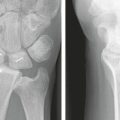
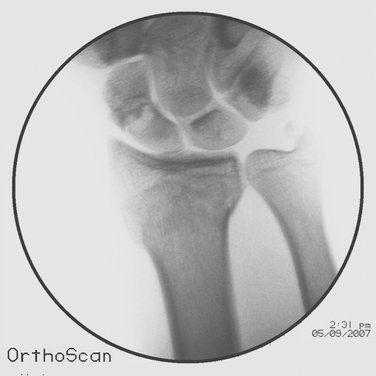
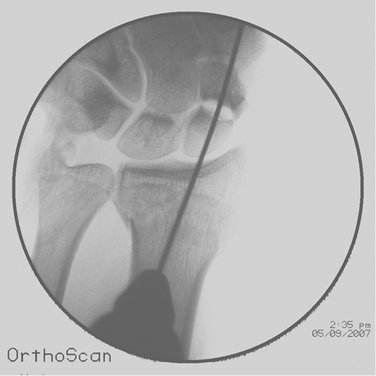
The wrist is in an ulnarly deviated position extended on the arm table with a mini-fluoroscopy unit placed horizontal on the arm table and perpendicular to the wrist. The starting position for the guidewire is the proximal scaphoid pole at the 3-4 arthroscopic portal (Fig. 21-3). This dorsal approach permits easy access to the central scaphoid axis because the base of the scaphoid is covered only by soft tissue. The distal scaphoid is covered by the trapezium and obstructs direct line of sight, making central axis wire placement difficult. With the wrist supported by a roll and mini-fluoroscopy perpendicular to the wrist, a guidewire is placed at the proximal scaphoid pole and driven dorsally along the central axis of the scaphoid passing through the trapezium. The wrist is maintained in a flexed position to avoid bending the guidewire. As the wire is advanced, its position in two planes is confirmed using fluoroscopy (Fig. 21-4). The wire is advanced from a dorsal to volar position until the dorsal trailing end of the wire clears the radiocarpal joint, permitting full extension of the wrist. The volar end of the wire exits from the radial base of the thumb, which is a safe zone devoid of tendons and neurovascular structures. Once the dorsal trailing end of the guidewire has been buried into the proximal scaphoid pole, the wrist can be extended for imaging to confirm scaphoid fracture alignment and correct positioning of the guidewire.
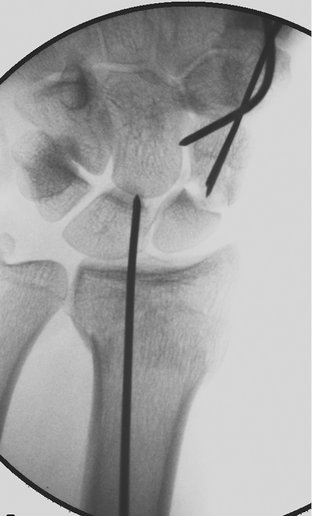
If the scaphoid is displaced, the proximal pole is ignored and the guidewire is placed through the distal scaphoid fragment along its central axis and withdrawn volarly beyond the fracture site (Fig. 21-5). A second antirotation wire is usually added, particularly in less stable displaced fractures (Fig. 21-6).
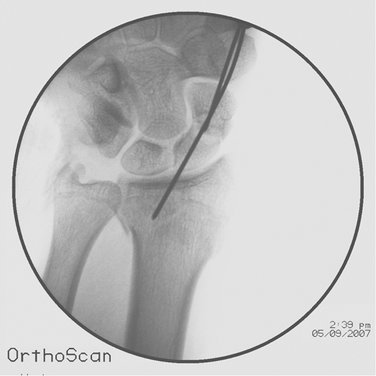
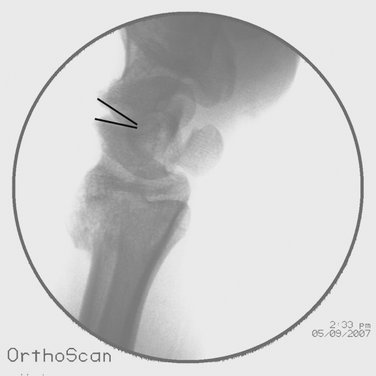
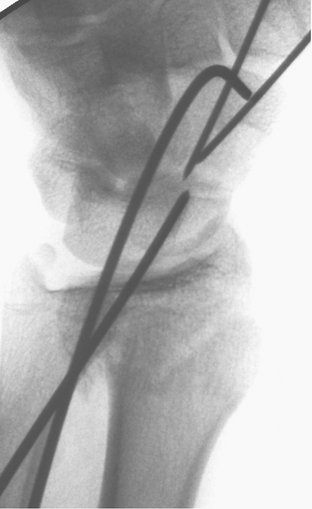
Often the lunate sits in a dorsiflexed intercalated segment instability (DISI) position. This is corrected by hyperflexing the wrist and driving a 0.062-inch wire from the distal radius into the lunate to capture the lunate in a corrected position (Fig. 21-7). This also helps stabilize the proximal pole of the scaphoid, assisting with the reduction. The scaphoid fracture is reduced percutaneously using dorsally placed 0.062-inch K-wires as joysticks in each fracture fragment. When the dorsal joysticks are brought together, the flexion deformity of the scaphoid is corrected. This is best confirmed on lateral fluoroscopy (Fig. 21-8). The previously placed distal wires are driven retrograde to capture the reduction.
Distal Radius Fracture Reduction
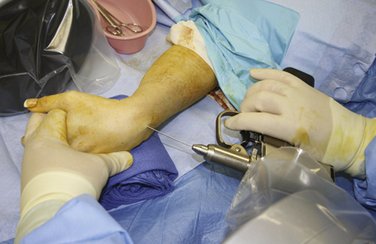
Once the scaphoid fracture is reduced and provisionally stabilized, attention is turned to the distal radius fracture. Again, like the scaphoid, the distal radius is percutaneously reduced using mini-fluoroscopy, 19-gauge needles to locate the fracture site, a small curved hemostat placed percutaneously to achieve reduction, and K-wires to provide provisional fixation (Fig. 21-9). Depending on the fracture type and stability, the patient’s needs and desires, and, finally, the surgeon’s skill and experience, an appropriate wrist fracture system is selected. As a rule, the simplest system that achieves rigid fixation and permits early recovery of hand function with the least complication is the best. Our goals should be restoration of a congruent joint surface and of the native metaphyseal cortical architecture. It has been the senior author’s experience that every patient sustains two injuries. The first is his or her misfortune, and the second is our treatment. If we can limit the second injury by avoiding any additional injury to the uninjured structures, the patient often has fewer complications and a quicker recovery of hand function. The use of fluoroscopy and arthroscopy permits the use of percutaneous techniques, which limits these secondary injuries but still facilitates our ultimate goals of fracture reduction and rigid fixation. The wrist is placed in a neutral position perpendicular to a mini-fluoroscopy unit with the ulna supported by a towel roll. Imaging locates the fractures, and 19-gauge needles are placed dorsally, identifying the fracture site. Limited stab incisions are made, and a small curved hemostat is introduced into the fracture site. The distal fracture fragment is leveraged into a reduced position and a percutaneous 0.062-inch K-wire is placed to provide provisional fixation. Both the radial height and dorsal tilt should be restored. If an intra-articular fracture is detected on imaging, than this fracture is reduced and secured first, using the just-described techniques.

Arthroscopy and Soft Tissue Injuries
After fluoroscopy confirms fracture reduction of the scaphoid and the radius, arthroscopy can be used as a valuable tool to provide direct confirmation of articular fracture reduction of both the scaphoid and the radius.10–1215
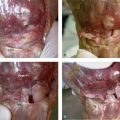
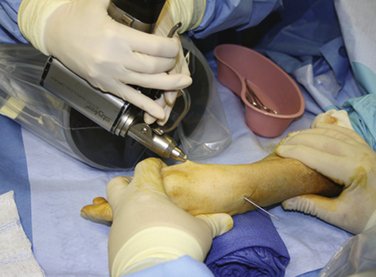
Longitudinal traction is applied through all fingers to allow for safe entry of the small joint arthroscope and instruments. With the use of mini-fluoroscopy, the midcarpal and radiocarpal portals are located and 19-gauge needles are used to mark these portal sites. After a small longitudinal incision is made, a small hemostat is used to dissect bluntly the soft tissue down to the joint capsule. A blunt trocar is used to enter the joint. An angled, 2.7-mm 30-degree small joint arthroscope is placed in the radial, midcarpal portal to confirm scaphoid fracture reduction.
Rigid Fixation of the Distal Radius
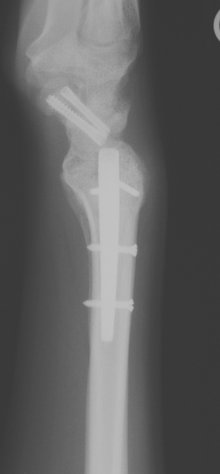
Intramedullary rods are inserted just dorsal to the radial styloid between the first and second dorsal compartment (Fig. 21-10). The largest nail is inserted close to the radial cortex, and distal locking screws are used to provide secure distal radius fixation. Next, proximal locking screws are placed percutaneously into the intramedullary nail, completing fixation (Fig. 21-11).


Scaphoid Length and Screw Size
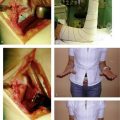
After distal radius fixation, the scaphoid fracture can now be rigidly fixed. In the case presented here, an added wrinkle is the need to percutaneously curet and bone graft the nonunion. One K-wire is withdrawn from the distal part of the scaphoid and the cannula for a Jam-Sheedy bone biopsy needle is placed up the reamed path for the screw to the nonunion site (Fig. 21-12). Cores of bone graft previously harvested from either the hip, distal radius, or tibial tubercle are passed through the cannula and deposited into the fracture site with the use of an obturator (Fig. 21-13). The nonunion site has now been filled with graft, and the K-wire is advanced back across the fracture site (Fig. 21-14).


FIGURE 21-14 The nonunion site has now been filled with graft, and the K-wire is advanced back across the fracture site.
The scaphoid length must now be determined.15 The guidewire is adjusted until the distal end is in contact with the distal cortex of the scaphoid. A second wire of equal length is placed at the tip of the cortex of the proximal pole. The difference in length between these two wires is the exact length of the scaphoid.
Once the length of the screw has been determined, the appropriate width must be selected. Biomechanical studies suggest that the widest screws provide the strongest fixation.14 One concern about introducing larger screws dorsally is the consequences of the resulting cartilage defect, but these defects have been shown to heal over with cartilage in time without degenerative changes.16
Screw Implantation
Headless compression screws are implanted dorsally for scaphoid fractures of the proximal pole and implanted volarly for distal pole fractures, because this permits maximum fracture compression.15 Fractures of the waist may be fixed from a dorsal or volar approach as long as the screw is implanted along the central scaphoid axis. Blunt dissection along the guidewire exposes a tract to the dorsal wrist capsule and scaphoid base. Before drilling, the guidewire should be advanced so that both ends are exposed equally (Fig. 21-15). This will permit the wire from becoming dislodged during reaming. The scaphoid is prepared by hand drilling the scaphoid cortex with a cannulated hand drill. This allows the implantation of a headless compression screw completely within the scaphoid. The screw is advanced under fluoroscopic guidance to within 1 to 2 mm of the opposite cortex with excellent compression (Fig. 21-16). If the screw is advanced to the distal cortex, attempts to advance the screw farther will displace or penetrate the distal fragment. With unstable fractures, a joystick is left in the distal scaphoid fragment for screw implantation. As the screw is implanted, a counterforce is exerted through the joystick, compressing both fracture fragments and ensuring rigid fixation.


FIGURE 21-16 The screw is placed while keeping the wrist flexed to prevent bending of the guidewire.
Occasionally, as in the case presented, the unstable nature of the fracture requires additional fixation (screw and supplemental K-wires or two screws) (Fig. 21-17).

Postoperative Care
At the first office visit, the surgical dressing is removed and a volar splint is applied. A vigorous hand and wrist therapy program is initiated to recover a full arc of motion of the digits and forearm. Patients with fractures of the scaphoid waist are started on an immediate wrist range-of-motion protocol. Patients with proximal pole fractures are protected for 6 weeks before the initiation of therapy. All patients are started on an immediate strengthening program. The purpose of this is to axially load the fracture site now secured with an intramedullary screw to stimulate healing. Adjustments to this protocol are made to take into account any concerns for suboptimal fixation or bone quality. Heavy lifting and contact sports are restricted until the patient’s arm is no longer tender and computed tomography (CT) confirms healing by bridging callus.
Authors’ Case Results
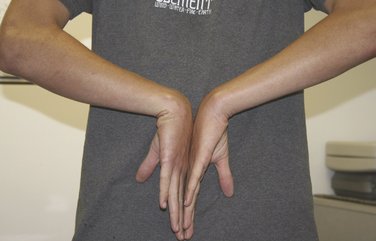
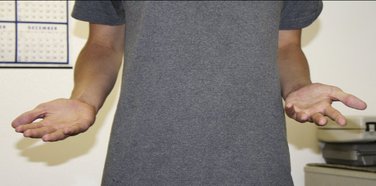
The case presented here healed at 7 weeks based on both clinical evaluation and bridging bone on CT scan. Careful percutaneous technique permits fast recovery with limited morbidity. Figures 21-18 through 21-22 demonstrate this patient’s postoperative radiographs and his functional recovery.


All scaphoid fractures were displaced greater than 1 mm. Seven of the scaphoid fractures were located at the waist, and one involved the proximal pole of scaphoid. One scaphoid fracture involved a fresh fracture through and distal to a preexisting nonunion. An additional carpal fracture was identified on arthroscopic examination that involved a coronal split of the lunate (and was also percutaneously repaired). The distal radius fractures included two displaced radial styloid fractures and one volar shearing fracture. The remaining distal radius fractures were a “Colles” type fractures with dorsal comminution, and two fractures were intra-articular.
Discussion
Because of the relative infrequency of this injury combination, the actual incidence is difficult to determine with precision; reports vary from 0.7% to 6.5% of all distal radius fractures.3 In 1983, Osterman and associates noted that concurrent distal radius fractures and scaphoid fractures constituted 1.9% of all distal radius fractures treated at their institution.2 This number differs significantly from that of Vukov and colleagues, who reviewed 650 patients with fractures of the distal radius and noted that concomitant scaphoid fractures occurred in 4% of patients.17 Because of the conflicting reports, Hove and coworkers attempted to specifically address this question. They performed a prospective 3-year study in which they enrolled all distal radius fractures and scaphoid fractures seen at their institution. During that time, they treated 2330 adults with distal radius fractures and 390 adults with scaphoid fractures. They noted only 12 combined injuries—0.05% of all distal radius fractures and 3% of all scaphoid fractures were combined injuries.1
Much of the early literature addressing these combined injuries focused on defining the “primary fracture,” usually that of the distal radius. Treatment algorithms focused on the primary fracture. Smith and associates expressed concern that traction placed across the wrist in the reduction of the distal radius leads to displacement of the scaphoid.5 They retrospectively reviewed nine patients with concurrent distal radius and scaphoid fractures and concluded that the reduction maneuvers used for the displaced distal radius fractures had no adverse affect on scaphoid healing. Although they used pins and plaster in their series, they advocated the use of external fixation placed across the wrist.5
Proubasta and Lluch presented two patients with displaced intra-articular fractures of the distal radius and nondisplaced scaphoid fractures who were treated by closed reduction and external fixation. They noted dorsal comminution of the distal radius and suggested that placing the wrist in a flexed position would adversely affect healing of the scaphoid. Their solution was to hold the wrist in neutral with an external fixator. They reported that both distal radius and scaphoid fractures healed uneventfully in this fashion.8
Tountas and Waddell suggested that treatment is dictated by the radius fracture alone. In their series all scaphoid injuries were typically nondisplaced stable fractures and treatment of radius fracture took precedence.3 These observations were based on the mistaken belief that standard radiographs could confirm scaphoid healing at 12 weeks.
Richards and colleagues expressed renewed concern about placing traction across a carpus that contained a scaphoid fracture9 and presented two patients who had combined scaphoid and distal radius fractures. In both cases the scaphoid was treated with Herbert screw internal fixation, prior to placing traction across the wrist, to avoid distraction across the scaphoid fracture.
Trumble and coworkers recognized that the closed treatment of the scaphoid often requires extended periods of immobilization and expressed concern that this would adversely affect the outcome of the distal radial fracture.6 They also recognized that placing traction across the wrist would create a distraction force across the scaphoid and cautioned that this may decrease union rates. They recommended internal fixation of the scaphoid before reducing or fixing the radius with distractive forces, but forces required to reduce the radius fracture after scaphoid fixation could lead to scaphoid fracture displacement or reduction in compression at the fracture site. Because the most significant forces used in scaphoid fracture fixation appear to be the reduction and alignment of the fracture and the percutaneous screw fixation, it seems logical to divide these maneuvers to address reduction of the distal radius. This ensures rigid fixation of both fractures. These observations are supported by our small clinical series, which permitted the initiation of an immediate rehabilitation program without loss of reduction or motion at either fracture site.
1. Hove LM. Simultaneous scaphoid and distal radius fractures. J Hand Surg [Br]. 1994;19:384-387.
2. Osterman AL, Bora FW, Dalinka MK: Simultaneous fractures of the distal radius and scaphoid injuries. Presented before the American Academy of Orthopaedic Surgeons, Anaheim, CA, 1983.
3. Tountas AA, Waddell JP. Simultaneous fractures of the distal radius and scaphoid. J Orthop Trauma. 1987;1:312-317.
4. Tumilty JA, Squire DS. Unrecognized chondral penetration by a Herbert screw in the scaphoid. J Hand Surg [Am]. 1996;21:66-68.
5. Smith T, Keeve JP, Bertin KC, Mann RJ. Simultaneous fractures of the distal radius and scaphoid. J Trauma. 1988;28:676-679.
6. Trumble TE, Schmitt SR, Vedder NB. Factors affecting functional outcome of displaced intra-articular distal radius fractures. J Hand Surg [Am]. 1994;19:325-340.
7. Trumble TE, Clarke T, Kreder HJ. Non-union of the scaphoid: treatment with cannulated screws compared with treatment with Herbert screws. J Bone Joint Surg Am. 1996;78:1829-1837.
8. Proubasta IR, Lluch A. Concomitant fractures of the scaphoid and distal radius: treatment by external fixation: a report of two cases. J Bone Joint Surg Am. 1991;73:938-940.
9. Richards RR, Ghose T, McBroom RJ. Ipsilateral fractures of the distal radius and scaphoid treated by Herbert screw and external skeletal fixation. Clin Orthop. 1992;282:219-221.
10. Doi K, Hattori Y, Otsuka K, et al. Intra-articular fractures of the distal aspect of the radius: arthroscopically assisted reduction compared with open reduction and internal fixation. J Bone Joint Surg Am. 1999;81:1093-1110.
11. Geissler WB, Freeland AE. Arthroscopically assisted reduction of intraarticular distal radial fractures. Clin Orthop. 1996;327:125-134.
12. Geissler WB, Freeland AE. Intercarpal soft-tissue lesions associated with an intra-articular fracture of the distal end of the radius. J Bone Joint Surg Am. 1996;78:257-265.
13. Slade JF3rd, Grauer JN, Mahoney JD. Arthroscopic reduction and percutaneous fixation of scaphoid fractures with a novel dorsal technique. Orthop Clin North Am. 2001;32:247-261.
14. Toby EB, Butler TE, McCormack TJ, et al. A comparison of fixation screws for the scaphoid during application of cyclic bending loads. J Bone Joint Surg Am. 1997;79:1190-1197.
15. Slade JF3rd, Gutow AP, Geissler WB. Percutaneous internal fixation of scaphoid fractures via an arthroscopically assisted dorsal approach. J Bone Joint Surg Am. 2002;84(Suppl 2):21-36.
16. Slade JF3rd, Moore AE. Dorsal percutaneous fixation of stable, unstable, and displaced scaphoid fractures and selected non-unions. Atlas of the Hand Clinics: Scaphoid Injuries; 2003; 1-18.
17. Vukov V, Ristic K, Stevanovic M, et al. Simultaneous fractures of the distal end of the radius and the scaphoid bone. J Orthop Trauma. 1988;2:120-123.