CHAPTER 39 Secondary rhinoplasty
Patient evaluation
• Determine the patient’s top three concerns (airway and aesthetic).
• Obtain thorough, but targeted history.
• External exam: Assess skin envelope, asymmetries, support of all three vaults and shape of the radix, dorsum, sidewalls, tip, base and alar regions.
• Internal exam: Assess septum, internal valve, bone spurs and turbinates.
• Septal support: Use a Q-tip to push on septum; apply Afrin spray to rule out perforations and synechiae.
• Include an ear, scalp and chest wall exam for potential graft material.
Anatomy
The tip
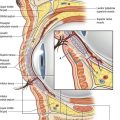
The usual concerns in the tip are volume, definition, width, rotation and projection. In secondary cases, distortion, deformity and deficiency must also be considered. The tip is composed of the paired lower lateral (alar) cartilages, each of which is composed of three crura; medial, middle and lateral (Fig. 39.1). The medial crus is comprised of the lower footplate segment and the superior columellar segment. The columellar–lobular junction marks the transition from the nasal base to the tip lobule and usually corresponds to the nostril apex (1–2 mm). The middle crus extends from the columellar–lobular junction to the lateral crus. The middle crus consists of the medial lobular segment and the more lateral domal segment. It is the domal segment that normally contains both the medial genu (the transition with the infralobular segment) and the lateral genu (the transition to the lateral crus). It is these two genu that bracket, and therefore create the anatomy of the “domal notch”. The lateral crura are made up of the lateral crus and accessory cartilages. The lateral crus is the main component of the nasal lobule. Medially, the lateral crus–domal junction line determines tip definition. Cephalically, the lateral crus has a scroll formation adjacent to the upper lateral cartilages. Caudally, the inferior border of the lateral crus diverges away from the nostril rim. Laterally, the crus passes away from the nostril rim and tapers in size. Configuration, axis of orientation and axis of curvature of the lateral crus all affect its aesthetic fabric.
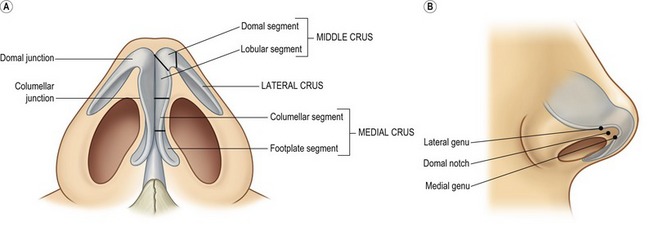
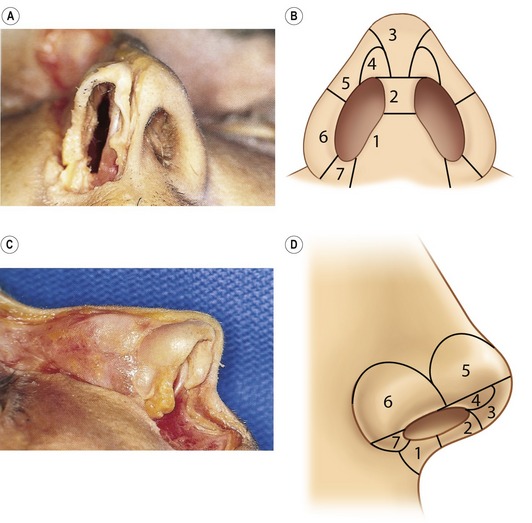
The nasal base
The nasal base is not a distinct anatomical entity; its aesthetic is frequently impacted by adjacent tip structures. The nasal base is subdivided into eight separate components (Fig. 39.2). The columella base consists of soft tissue, depressor septi nasalis muscle centrally, the nasalis muscles laterally and the medial crural footplates. The transverse width of the columella base is related to the separation of the footplates and the quantity of intervening soft tissue. The central columellar pillar is created by medial crura apposition; its length determined by the medial crura termination at the columellar lobular junction. The infralobular triangle and soft triangle are the capstone of the basilar pyramid and are determined by the configuration of the middle crura. The soft triangle is a reflection of the width of the domal notch and is comprised of a web of opposed skin and vestibular mucosa, which is devoid of cartilage. The lateral wall reflects the support and proximity of the lateral crura to the alar rim. The alar base is composed of subcutaneous tissue and muscle and serves as an external baffle for the nose, which determines the amount of alar flare and width. The nostril sill varies widely on its vestibular and cutaneous surfaces, and is intimately affected by the configuration of the adjacent alar base. The nostril is the central void that is determined only by its surrounding structures and is highly variable between individuals.
Technical steps
Assessing the septum and turbinates
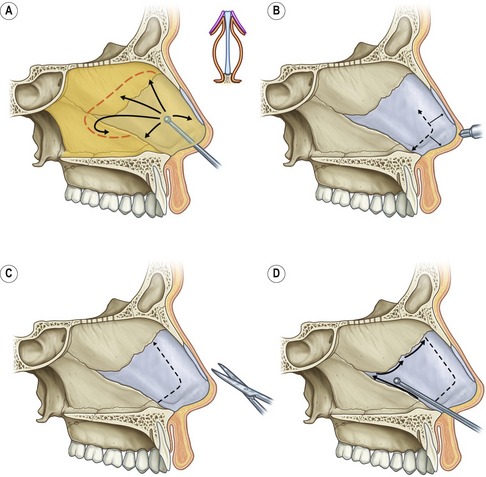
Following Betadine preparation and subperichondrial injection with 1% Xylocaine with epinephrine, a right vestibular hemi-transfixion incision is performed and the caudal septum is identified. Sharp dissection with a Converse–Daniel scissor is performed down to the perichondrium. In order to facilitate the dissection and guarantee that you are in fact in the subperichondrial plane, cross-hatches are made on the caudal septum and then a Cottle elevator is used to elevate the mucoperichondrium and reveal the Robin’s-egg blue color beneath. The elevator is inserted dorsally parallel to the septum and a vertical sweep is done back and over the perpendicular plate of the ethmoid, and then down onto the vomer (Fig. 39.3). The inferior portion is then dissected from back to front coming from the posterior vomer forward, allowing easier separation of the fused perichondrial/periosteal fibers. If the septum has been previously harvested, this dissection is done only over the dorsal aspect of the L-strut. One must be careful separating the mucosa–mucosa adherence if the septal body has been previously harvested. If still present, cartilage harvest is accomplished with a #15 blade, septal scissors and a Cottle elevator taking great care to preserve at least a 10 mm wide L-shaped strut. If a dynamic septal collapse is present, then septal replacement grafts must be considered.
Opening and assessing the skin envelope
1. Closed: It is indeed the small minority of secondary cases that will be able to be performed using a closed approach. In these rare cases, either a retrograde/intercartilaginous incision, intracartilaginous/transcartilaginous incision, or an infracartilaginous incision can be utilized. The infracartilaginous incision can be used with an intercartilaginous incision for a “delivery” approach, or with a transcolumellar incision for an open approach.
2. Open: The transcolumellar incision used most commonly consists of an inverted “V” with wings, unless a different transcolumellar scar is already in place (Fig. 39.4). The apex of this 3 mm equilateral V is at the narrow waist of the columella, beneath the breakpoint. The transverse wings are made across and behind the columellar pillars. To help minimize cutting the crura, first the infracartilaginous incision is made down to the level of the transcolumellar incision, then the columella is elevated before the transcolumellar incision is made. Each incision is facilitated by using a 10 mm double hook held between the thumb and index finger, and using the non-dominant ring finger to provide posterior counterpressure. Converse scissors are inserted beneath the columellar skin from the columellar component of the infracartilaginous incision, spreading gently to elevate the skin off of the medial/middle crura. A columella to tip dissection is used with 3-point traction. In very scarred tips, sometimes the order of dissection should be altered such that a “bidirectional” exposure is performed. Here, the infracartilaginous incision is made followed by dissection over the lateral crura with blunt tip tenotomy scissors. Dissection is then continued toward the columella to elevate the skin off of the cartilage.
Providing support: spreader grafts, extension grafts and columellar struts
Spreader grafts
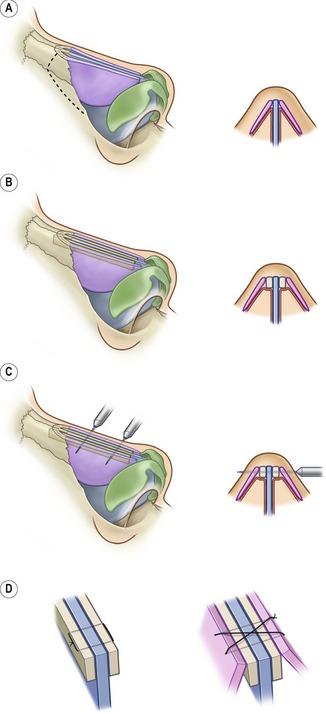
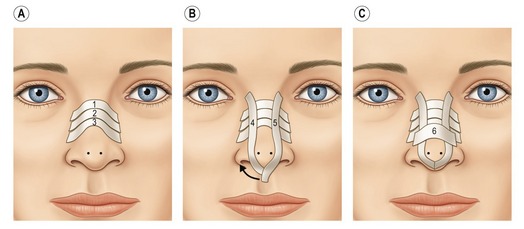
Spreader grafts are matchstick-sized pieces of cartilage placed between the septum and the upper lateral cartilage that are used to restore the normal dorsal width of the septum which is lost during dorsal reduction (Fig. 39.5). In addition to holding open the internal valve, they can also help to correct existing asymmetries of the dorsum, and correct or prevent an “inverted-V deformity” as seen on the anterior view. Creating spreader grafts that are larger on one side than the other will help achieve balance of the dorsal lines, and can bracket the dorsal septum, helping to straighten it somewhat. Spreader grafts also come into play when they serve as a strong neo-base on which to place augmentation grafts.
Columellar struts
Columellar struts have become a universal necessity in open structure rhinoplasty, being incorporated in varied fashions to provide tip support prior to tip suturing or grafting. A crural strut provides support for shaping the middle and medial crura. A columellar strut is larger, influencing both the columellar inclination and the columella labial segment. Finally, a structural graft has even more integrity and can increase the total projection. The most common form is a straight (20 × 3 mm) crural strut that is placed into a vertical pocket which has been dissected between the medial/middle crura down towards the anterior nasal spine. The strut is temporarily held in place to the crura with #25 needles and then secured with 5-0 PDS mattress sutures from the columella breakpoint and down toward the nasal spine. Domal height inequalities can be adjusted at this point by asymmetrically securing each dome to the strut.
Osteotomies: when, where and how?
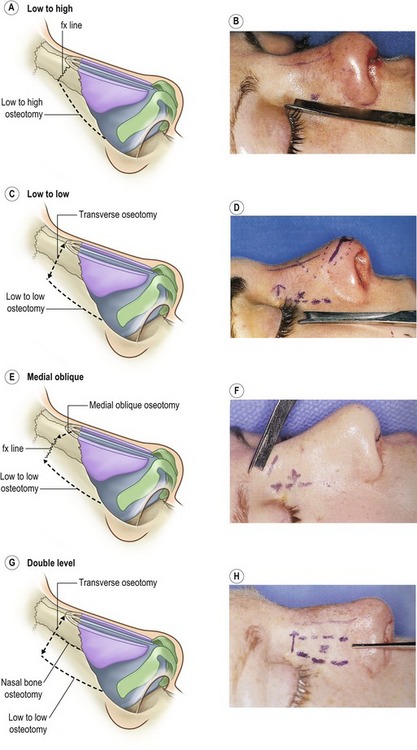
The purpose of lateral osteotomies is to narrow the base bony width of the nose. Medial oblique osteotomies, in contrast, narrow the wide nasal dorsum. Although many surgeons obtain excellent results with percutaneous osteotomies, the authors prefer an endonasal approach. The two most common methods are the low-to-high and low-to-low osteotomies (Fig. 39.6). The low-to-high osteotomy begins at the pyriform aperture on the nasal process of the maxilla and passes tangentially across it to the nasal bone suture line at the level of the medial canthus. Subsequent digital pressure on the lateral wall results in a greenstick fracture of the transverse portion and a gentle tilt of the lateral nasal wall. In the low-to-low osteotomy, first a transverse osteotomy is done with a 2 mm osteotome placed through a small vertical stab incision just above the medial canthus. Then, a low-to-low lateral osteotomy is performed with a straight osteotome beginning at the pyriform aperture on the nasal process of the maxilla and passing straight up the lateral wall to end at the level of the medial canthus. Here, a slow but forceful 90 degree rotation of the osteotome (with the blade against the maxilla) produces complete inward mobilization of the lateral wall and subsequent nasal narrowing.
The tip: suturing and grafting
Suturing
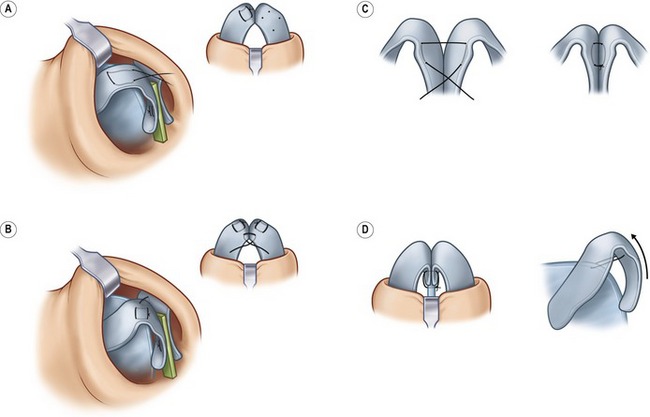
The domal creation suture is a medially tied asymmetric horizontal mattress suture of 5-0 PDS placed at the domal segment which is defined by the “domal notch” on the caudal border of the middle crura (Fig. 39.7). When placed correctly this suture will produce a curl, juxtaposing a convex domal segment next to a concave lateral crura. The domal equalization suture is passed through the cephalic portion of each domal segment, narrowing the inter-domal distance and ensuring symmetry. If additional upward tip rotation is needed, a 4-0 PDS tip rotation suture can be placed, essentially hitching the columella-crura complex to the dorsal septum just above the anterior septal angle.
Grafting
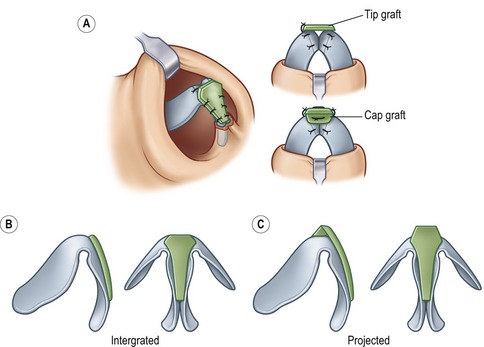
The popularity of closed tip grafting (both on-lay and multilayer grafts) in secondary rhinoplasty has declined with the increasing application of open secondary surgery. On-lay grafts usually are designed from concha and placed through an infra-cartilaginous incision. To avoid displacement (even in appropriately created small pockets), a double-armed 5-0 plain gut suture is placed through the graft in a “U” fashion and then the needles are brought retrograde through the skin at each dome point to both guide and secure the graft. The multilayer tip graft (aka Sheen shield graft) is most frequently used in closed cases when a patient presents with a flattened infra-lobule. The graft is composed of several layers, with a solid ethmoid buttress graft at the base, followed by solid grafts to set the dome points and then covered with bruised and crushed cartilage grafts to provide more infra-lobular fill. For open tip grafting, the most commonly used graft is a tapered modification of the shield graft that looks more like a golf-tee and is 1–12 mm wide cephalically, only 4 mm wide caudally and about 15–18 mm long. The graft can be integrated into the divergent middle crura so that the tip is accentuated and lies just slightly above the domes (Fig. 39.8). Noses with thicker skin or with a poorly defined tip sometimes require that the graft be projected above the domes. This creates more projection and definition, but should be supported by a backing cap graft when it lies more than 2 mm above the top of the domes.
Altering the base and vestibules: rim grafts, composite grafts, and sill excisions
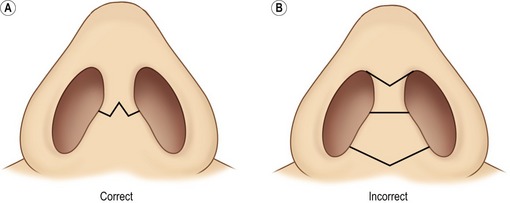
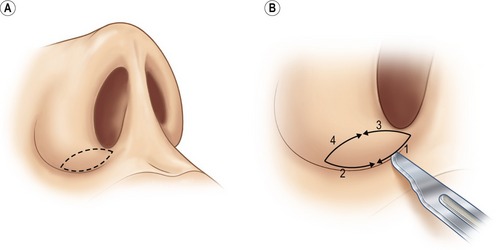
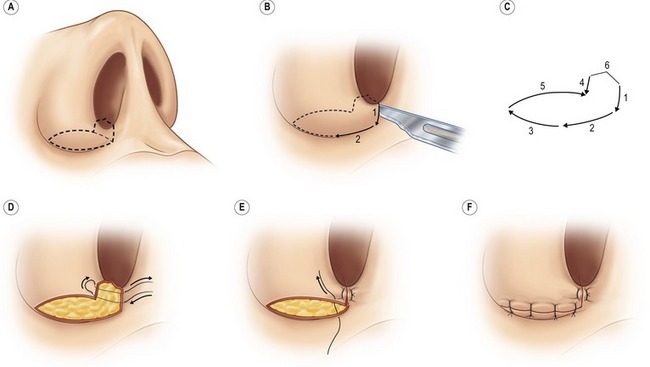
Alar base modification should be carefully planned and conservatively executed; overly aggressive excisions can be disastrous. In secondary cases, two possible indications exist: the patient should have had (but did not have) alar base excision during the first operation, or the patient has had poorly performed resections. One must very carefully inspect the nostril apices to ascertain what type of excision was performed originally and approach any alar base revision with great caution. The decision about the type and amount of excision is based upon nostril shape, sill width, degree of alar flare, and alar width in relation to the inter-canthal width. Alar width is measured at the alar crease; alar flare is measured at the widest point of the alar. The critical decision to make is whether the alar width is greater than inter-canthal width preoperatively or will become greater as dorsal support and tip projection are reduced intra-operatively. For nostril sill excisions, a 2.5–3.5 mm wide inverted trapezoid is drawn with vertical sides that then triangulate to a point inside the vestibule in a fashion similar to a lip excision (Fig. 39.9). Following excision, sill closure is performed with a 4-0 plain catgut that everts the edges; the skin is closed with a 6-0 nylon. Alar wedge excisions are carefully marked with calipers and then injected with local. A single hook stabilizes the portion to be excised while the skin is carefully cut, taking care to avoid the underlying mucosa (Fig. 39.10). When combined excisions are performed, the supra-crease alar line of incision (the more caudal line of incision) extends around the base to the medial vertical component of the nostril sill excision. The lateral sill excision should be drawn narrow (2–3 mm) before widening out to the 3–4 mm alar wedge component. This “L-shaped” combined excision then tapers as it extends laterally (Fig. 39.11).

Fig. 39.9 A&B, Nostril sill excision.
With kind permission from Springer Science & Business Media: Daniel R. Rhinoplasty: An atlas of Surgical Techniques. 2002.
Ear grafts (conchal and composites), rib grafts and deep temporal fascia
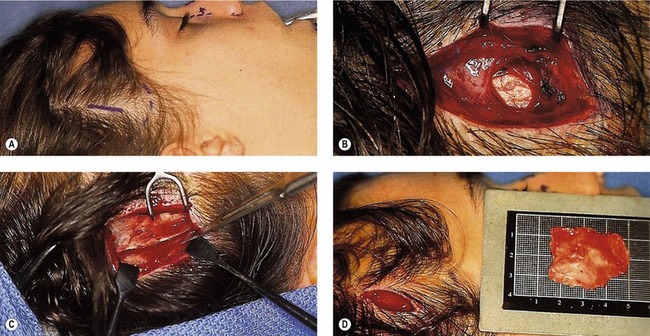
Harvesting conchal grafts is simple and begins by generous betadine prep followed by infiltration with 5 mL of 1% lidocaine with epinephrine both anteriorly and posteriorly. The anterior line of the conchal bowl is transferred posteriorly with methylene blue and a 25-gauge needle. With the ear helix retracted forward, a longitudinal incision is made above the blue marks. The cartilage is incised below and the anterior skin is elevated centrally. Once completely elevated, the entire conchal bowl can be removed. Following hemostasis, the incision is closed with a running, locking 5-0 plain gut suture and then a tie-over bolster of xeroform gauze is applied (Fig. 39.12).
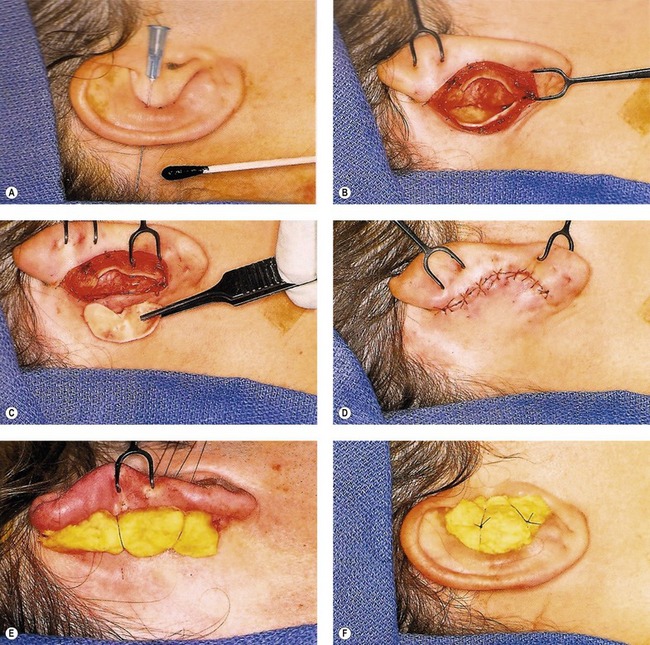
Fig. 39.12 A–F, Conchal graft harvesting.
With kind permission from Springer Science & Business Media: Daniel R. Rhinoplasty: An atlas of Surgical Techniques. 2002.
For costo-chondral graft harvest, the patient is placed supine and a 3–4 cm incision is made over the junction between the floating 9th rib tip and the 8th rib (Fig. 39.13). Dissection is carried down through the external oblique muscle. For a 9th rib graft, the mobile, medial cartilaginous tip is identified and dissected extra-perichondrally in a retrograde fashion. Since it is a “floating rib”, the extraperichondrial dissection is extremely quick with a total harvest time of less than 20 minutes in most cases. For the 8th rib, sub-perichondrial hydrodissection is performed with lidocaine 1% with 1 : 100,000 epinephrine. Serial “H” incisions are cut through the ventral perichondrium to allow a sub-perichondrial dissection. The rib is freed from the caudal aspect of the 7th rib (at the syncytium) and then dissected in a retrograde fashion to the bony–cartilaginous junction under direct vision. After the rib is cut and removed, a pleural integrity check is performed. The wound is closed in layers. A cantilevered osteo-chondral rib graft harvest is utilized if a dorsal replacement graft is needed to support a severely shrunken skin envelope as occurs typically in the cocaine nose. The patient is placed into the lateral decubitus position on a bean-bag. The incision may need to be located slightly more lateral for the cartilage only graft. The lateral portion of the osseous rib is first dissected with a Doyen to allow rib division. Then anterograde dissection is performed toward the medial cartilaginous portion.
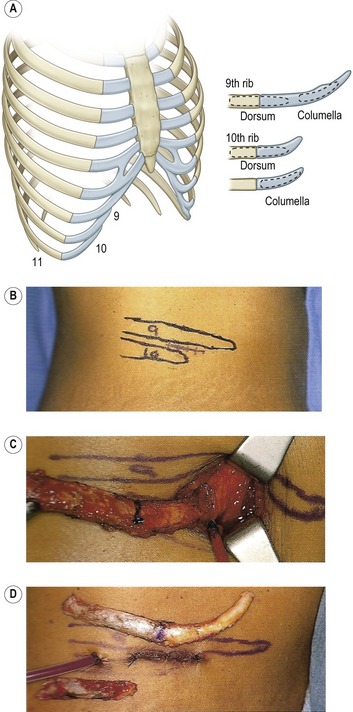
Fig. 39.13 A–D, Rib harvest.
With kind permission from Springer Science & Business Media: Daniel R. Rhinoplasty: An atlas of Surgical Techniques. 2002.
Deep temporal fascia can routinely be harvested through a 2.5 to 3.5 cm incision in the scalp, anterior to the auricle and directly overlying the temporalis muscle belly. Following marking and injection with lidocaine with epinephrine, sharp dissection is performed through the superficial temporal fascia, down to the shiny deep temporal fascia. An incision of appropriate size and configuration is made with a #15 blade in the deep temporal fascia to reveal the underlying muscle, and then carefully elevated off of the muscle while the more superficial scalp layers are carefully retracted. Care should be exercised as the fascia is elevated off of the middle temporal vessels (Fig. 39.14).
Postoperative care
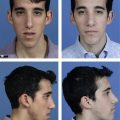
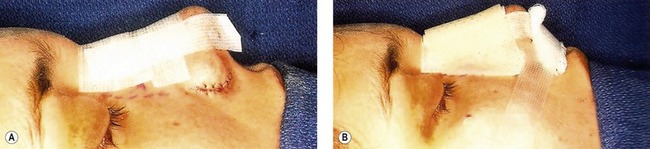
Care of the postoperative secondary patient is similar to that for the primary patient. If septal work is performed, lubricated Doyle splints are placed to provide compression of the septal mucosal leaflets. Occasionally, minimal septal dissection is required in cases where alar support grafts or rim grafts are placed. In these cases, Doyles are trimmed shorter and the side vents are left intact to provide internal support against contracting forces for the first four to six weeks of healing. The dorsum is routinely taped with Steri-Strips from the radix to the supratip, and then a padded moldable plastic splint is applied to provide dorsal compression (Figs 39.15 and 39.16). The patient is instructed to clean all suture lines 2–3 times daily with peroxide solution. The patient is called the evening of the day of surgery for assessment and to answer any remaining questions, and is then seen back on postoperative day six. At this time, columellar and alar sutures as well as the dorsal and Doyle splints are carefully removed. The patient is retaped for the next week, and then instructed how to tape nightly for three to four weeks to help reduce edema. Nasal lavage with standard saline sprays is allowed to remove any vestibular crusting. The patient is seen again at two weeks, six weeks and then at three, six and twelve months to review progress and take postoperative photographs.
Complications
Pearls & pitfalls
Pitfalls
• Being too conservative. Be aggressive in making changes when needed; do not let history repeat itself.
• Thinking that your camouflage graft is a cure-all. Dorsal grafting has come a long way, but DCF grafts can have complications too.
• Second guessing graft harvesting. If you think ear cartilage, rib cartilage or fascia will be necessary before the operation, commit to it early. It is easy to talk yourself out of additional harvesting and talk yourself into settling for suboptimal residual grafting material.
• Thinking that the infrastructure will withstand recurrent scar contracture just because you are a good surgeon. If you have heavy scar, make sure you have a strong support foundation.
• Being too aggressive with base modification. Unlike the supporting structures, once you excise skin it is gone forever. It is better to come back and take out more tissue later, than to take too much at the outset.
Summary of steps
1. Assessing the septum and turbinates.
2. Opening and assessing the skin envelope.
3. Defining the existing, or non-existing alar anatomy and internal lining.
5. Providing support: spreader grafts, extension grafts, and columellar struts.
6. Osteotomies: when, where and how?
7. The tip: suturing and grafting.
8. Altering the base and vestibules: rim grafts, composite grafts, and sill excisions.
9. Ear grafts (conchal and composites), rib grafts and deep temporal fascia.
Converse JM. Corrective and reconstructive surgery of the nose. In: Converse JM, ed. Reconstructive plastic surgery. Philadelphia: Saunders, 1977.
Daniel RK, Calvert JW. Diced cartilage grafts in rhinoplasty surgery. Plast Reconstr Surg. 2004;113:2156–2171.
Daniel RK. Aesthetic plastic surgery: rhinoplasty. Boston: Little, Brown; 1993.
Daniel RK. Rhinoplasty and rib grafts: evolving a flexible operative technique. Plast Reconstr Surg. 1994;94(5):597–609.
Daniel RK. Rhinoplasty: an atlas of surgical techniques. New York: Springer; 2002.
Daniel RK. Rhinoplasty: septal saddle nose deformity and composite reconstruction. Plast Reconstr Surg. 2007;119(3):1029–1043.
Daniel RK. Secondary rhinoplasty following open rhinoplasty. Plast Reconstr Surg. 1995;96:1539.
Gunter JP, Rohrich RJ, Adams WP. Dallas rhinoplasty: nasal surgery by the masters. St. Louis, MO: Quality Medical Publishing; 2002.
Meyer R. Secondary rhinoplasty, 2nd edn. Berlin: Springer; 2002.