[level-membership-for-basic-science-category]
Role of Microscopy
1. Explain the role of microscopy in the identification of etiologic agents including bacteria, fungi, viruses, and parasites.
2. List the four types of microscopy available for diagnostic evaluation, explain their basic principles, and list a clinical application for each.
3. Define the three main principles of light microscopy, magnification, resolution, and contrast.
4. List the staining techniques used to aid in the visualization of bacteria, explain the chemical principle and limitations for each, and provide an example of a clinical application for each stain.
5. Include the following stains: Gram stain, the Kinyoun stain, the Ziehl-Neelsen stain, the Calcofluor white stain, the Acridine orange stain, and the Auramine-Rhodamine stain.
6. Explain the chemical principle for fluorescent dyes in microscopy, and list two examples routinely used in the clinical laboratory.
1. Direct examination of patient specimens for the presence of etiologic agents
2. Growth and cultivation of the agents from these same specimens
3. Analysis of the cultivated organisms to establish their identification and other pertinent characteristics such as susceptibility to antimicrobial agents
Microscopy is the most common method used both for the detection of microorganisms directly in clinical specimens and for the characterization of organisms grown in culture (Box 6-1). Microscopy is defined as the use of a microscope to magnify (i.e., visually enlarge) objects too small to be visualized with the naked eye so that their characteristics are readily observable. Because most infectious agents cannot be detected with the unaided eye, microscopy plays a pivotal role in the laboratory. Microscopes and microscopic methods vary, but only those of primary use in diagnostic microbiology are discussed.
The method used to process patient specimens is dictated by the type and body source of specimen (see Part VII). Regardless of the method used, some portion of the specimen usually is reserved for microscopic examination. Specific stains or dyes applied to the specimens, combined with particular methods of microscopy, can detect etiologic agents in a rapid, relatively inexpensive, and productive way. Microscopy also plays a key role in the characterization of organisms that have been cultivated in the laboratory (for more information regarding cultivation of bacteria, see Chapter 7).
The types of microorganisms to be detected, identified, and characterized determine the most appropriate types of microscopy to use. Table 6-1 outlines the four types of microscopy used in diagnostic microbiology and their relative utility for each of the four major types of infectious agents. Bright-field microscopy (also known as light microscopy) and fluorescence microscopy have the widest use and application within the clinical microbiology laboratory. Dark field and electron microscopes are not typically found within a clinical laboratory and are predominantly used in reference or research settings. Which microorganisms can be detected or identified by each microscopic method also depends on the methods used to highlight the microorganisms and their key characteristics. This enhancement is usually achieved using various dyes or stains.
TABLE 6-1
Microscopy for Diagnostic Microbiology
| Organism Group | Bright-Field Microscopy | Fluorescence Microscopy | Dark-Field Microscopy | Electron Microscopy |
| Bacteria | + | + | ± | – |
| Fungi | + | + | – | – |
| Parasites | + | + | – | ± |
| Viruses | – | + | – | ± |
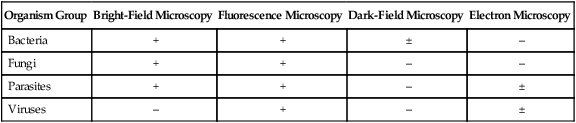
+, Commonly used; ±, limited use; –, rarely used.
Bright-Field (Light) Microscopy
Principles of Light Microscopy
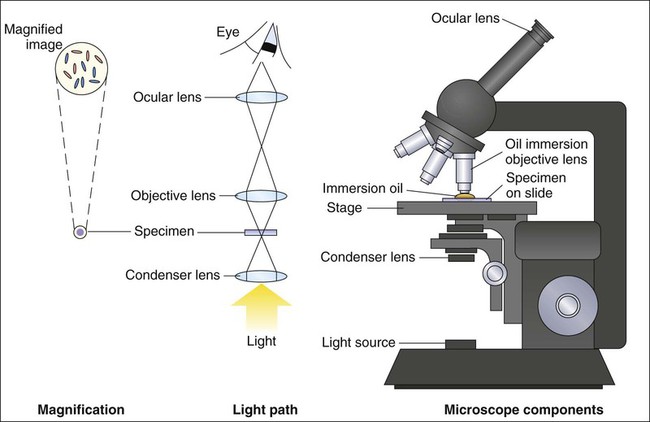
For light microscopy, visible light is passed through the specimen and then through a series of lenses that bend the light in a manner that results in magnification of the organisms present in the specimen (Figure 6-1). The total magnification achieved is the product of the lenses used.
Magnification
In most light microscopes, the objective lens, which is closest to the specimen, magnifies objects 100× (times), and the ocular lens, which is nearest the eye, magnifies 10×. Using these two lenses in combination, organisms in the specimen are magnified 1000× their actual size when viewed through the ocular lens. Objective lenses of lower magnification are available so that those of 10×, 20×, and 40× magnification power can provide total magnifications of 100×, 200×, and 400×, respectively. Magnification of 1000× allows for the visualization of fungi, most parasites, and most bacteria, but it is not sufficient for observing viruses, which require magnification of 100,000× or more (see Electron Microscopy in this chapter).
Contrast
The third key component to light microscopy is contrast, which is needed to make objects stand out from the background. Because microorganisms are essentially transparent, owing to their microscopic dimensions and high water content, they cannot be easily detected among the background materials and debris in patient specimens. Lack of contrast is also a problem for the microscopic examination of microorganisms grown in culture. Contrast is most commonly achieved by staining techniques that highlight organisms and allow them to be differentiated from one another and from background material and debris. In the absence of staining, the simplest way to improve contrast is to reduce the diameter of the microscope aperture diaphragm increasing contrast at the expense of the resolution. Setting the controls for bright field microscopy requires a procedure referred to as setting the Kohler illumination (see Procedure 6-1 on the Evolve site).
Staining Techniques for Light Microscopy
Smear Preparation
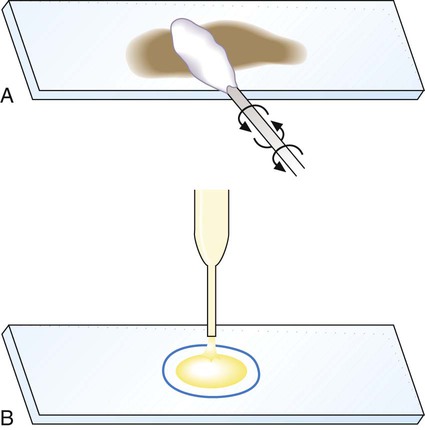
Generally, specimen samples are placed on the slide using a swab that contains patient material or by using a pipette into which liquid specimen has been aspirated (Figure 6-2). Material to be stained is dropped (if liquid) or rolled (if on a swab) onto the surface of a clean, dry, glass slide. To avoid contamination of culture media, once a swab has touched the surface of a nonsterile slide, it should not be used for subsequently inoculating media.
As listed in Table 6-1, light microscopy has applications for bacteria, fungi, and parasites. However, the stains used for these microbial groups differ extensively. Those primarily designed for examination of parasites and fungi by light microscopy are discussed in Chapters 47 and 60, respectively. The stains for microscopic examination of bacteria, the Gram stain and the acid-fast stains, are discussed in this chapter.
Gram Stain
Procedure Overview.
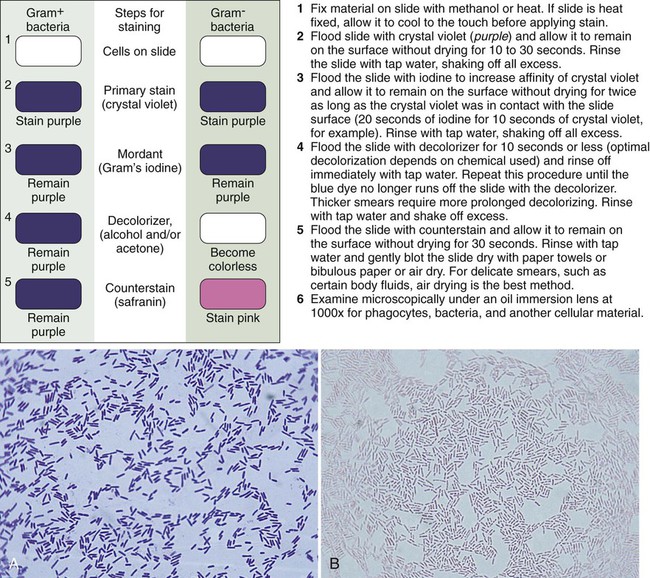
Although modifications of the classic Gram stain that involve changes in reagents and timing exist, the principles and results are the same for all modifications. The classic Gram stain procedure entails fixing clinical material to the surface of the microscope slide, either by heating or by using methanol. Methanol fixation preserves the morphology of host cells, as well as bacteria, and is especially useful for examining bloody specimen material. Slides are overlaid with 95% methanol for 1 minute; the methanol is allowed to run off, and the slides are air-dried before staining. After fixation, the first step in the Gram stain is the application of the primary stain crystal violet. A mordant, Gram’s iodine, is applied after the crystal violet to chemically bond the alkaline dye to the bacterial cell wall. The decolorization step distinguishes gram-positive from gram-negative cells. After decolorization, organisms that stain gram-positive retain the crystal violet and those that are gram-negative are cleared of crystal violet. Addition of the counterstain safranin will stain the clear gram-negative bacteria pink or red (Figure 6-3). See Procedure 6-2 on the Evolve site for detailed methodology, expected results, and limitations.
Gram Stain Examination.
Once stained, the smear is examined using the 10× objective (100× magnification). The microbiologist should scan the slide looking for white blood cells, epithelial cells, debris, and larger organisms such as fungi or parasites. Next the smear should be examined using the oil immersion (1000× magnification) lens. When clinical material is Gram stained (e.g., the direct smear), the slide is evaluated for the presence of bacterial cells as well as the Gram reactions, morphologies (e.g., cocci or bacilli), and arrangements (e.g., chains, pairs, clusters) of the cells seen (Figure 6-4). This information often provides a preliminary diagnosis regarding the infectious agents and frequently is used to direct initial therapies for the patient.

The direct smears should also be examined for the presence of inflammatory cells (e.g., phagocytes) that are key indicators of an infectious process. Noting the presence of other host cells, such as squamous epithelial cells in respiratory specimens, is also helpful because the presence of these cells may indicate contamination with organisms and cells from the mouth (for more information regarding interpretation of respiratory smears, see Chapter 71). Observing background tissue debris and proteinaceous material, which generally stain gram-negative, also provides helpful information. For example, the presence of such material indicates that specimen material was adequately affixed to the slide. Therefore, the absence of bacteria or inflammatory cells on such a smear is a true negative and not likely the result of loss of specimen during staining (Figure 6-5). Other ways that Gram stain evaluations of how direct smears are used are discussed throughout the chapters of Part VII that deal with infections of specific body sites.
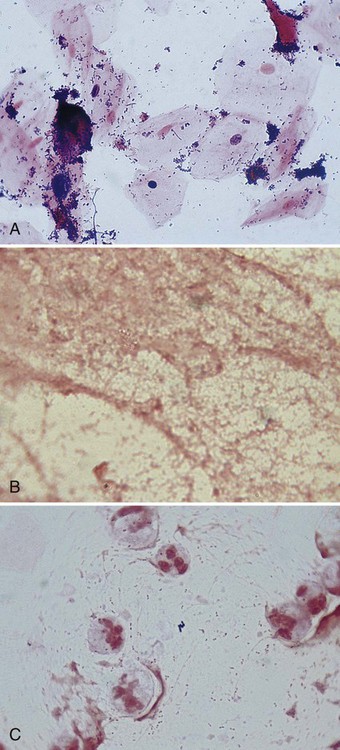
Several examples of Gram stains of direct smears are provided in Figure 6-6. Basically, whatever is observed is also recorded and is used to produce a laboratory report for the physician. The report typically includes the following (see Procedure 6-2):
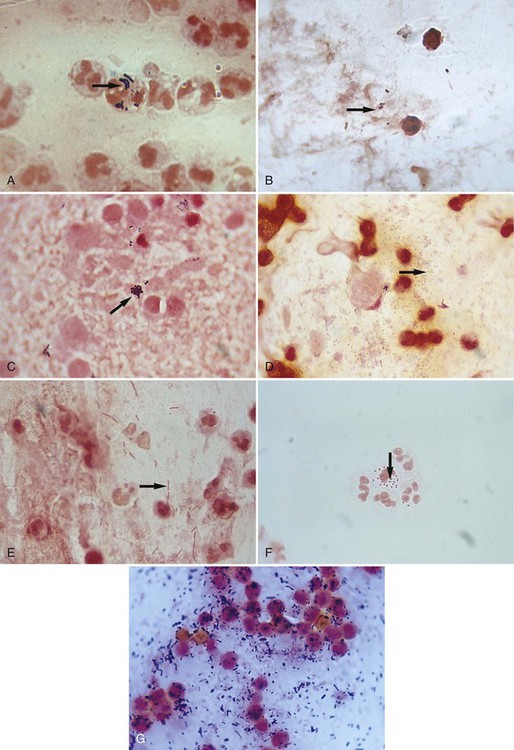
• The presence of host cells and debris.
• The Gram reactions, morphologies (e.g., cocci, bacilli, coccobacilli), and arrangement of bacterial cells present. Note: Reporting the absence of bacteria and host cells can be equally as important.
• Optionally, the relative amounts of bacterial cells (e.g., rare, few, moderate, many) may be provided. However, it is important to remember that to visualize bacterial cells by light microscopy, a minimum concentration of 105 cells per 1 mL of specimen is required. This is a large number of bacteria for any normally sterile body site and to describe the quantity as rare or few based on microscopic observation may be understating their significance in a clinical specimen. On the other hand, noting the relative amounts seen on direct smear may be useful laboratory information to correlate smear results with the amount of growth observed subsequently from cultures.
Although Gram stain evaluation of direct smears is routinely used as an aid in the diagnosis of bacterial infections, unexpected but significant findings of other infectious etiologies may be detected and cannot be ignored. For example, fungal cells and elements generally stain gram-positive, but they may take up the crystal violet poorly and appear gram-variable (e.g., both pink and purple) or gram-negative. Because infectious agents besides bacteria may be detected by Gram stain, any unusual cells or structures observed on the smear should be evaluated further before being dismissed as unimportant (Figure 6-7).
Gram Stain of Bacteria Grown in Culture.
The Gram stain also plays a key role in the identification of bacteria grown in culture. Similar to direct smears, indirect smears prepared from bacterial growth are evaluated for the bacterial cells’ Gram reactions, morphologies, and arrangements (see Figure 6-4). If growth from more than one specimen is to be stained on the same slide, a wax pencil may be used to create divisions. Drawing a “map” of such a slide allows different Gram stain results to be recorded in an organized fashion (Figure 6-8). The smear results will be used to determine subsequent testing for identifying and characterizing the organisms isolated from the patient specimen.

Acid-Fast Stains
The acid-fast stain is the other commonly used stain for light-microscopic examination of bacteria.
Procedure Overview.
The classic acid-fast staining method, Ziehl-Neelsen, is depicted in Figure 6-9 and outlined in Procedure 6-3 on the Evolve site. The procedure requires heat to allow the primary stain (carbolfuchsin) to enter the wax-containing cell wall. A modification of this procedure, the Kinyoun acid-fast method (see Procedure 6-4 on the Evolve site), does not require the use of heat or boiling water, minimizing safety concerns during the procedure. Because of a higher concentration of phenol in the primary stain solution, heat is not required for the intracellular penetration of carbolfuchsin. This modification is referred to as the “cold” method. Another modification of the acid-fast stain that is used for identifying certain nonmycobacterial species is described and discussed in Part III, Section 14. When the acid-fast–stained smear is read with 1000× magnification, acid-fast–positive organisms stain red. Depending on the type of counterstain used (e.g., methylene blue or malachite green), other microorganisms, host cells, and debris stain a blue to blue-green color (Figures 6-9 and 6-10).
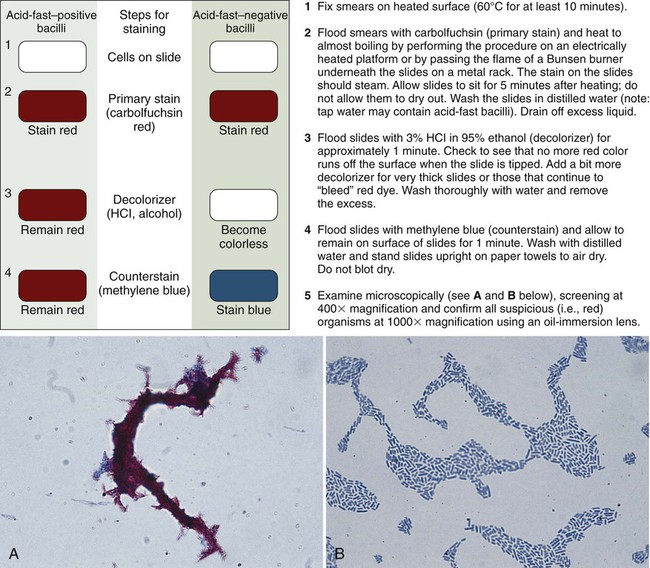

As with the Gram stain, the acid-fast stain is used to detect acid-fast bacteria (e.g., mycobacteria) directly in clinical specimens and provide preliminary identification information for suspicious bacteria grown in culture. Because mycobacterial infections are much less common than infections caused by other non–acid-fast bacteria, the acid-fast stain is only performed on specimens from patients highly suspected of having a mycobacterial infection. That is, Gram staining is a routine part of most bacteriology procedures, whereas acid-fast staining is reserved for specific situations. Similarly, the acid-fast stain is applied to bacteria grown in culture when mycobacteria are suspected based on other growth characteristics (for more information regarding identification of mycobacteria, see Chapter 43).
Phase Contrast Microscopy
Smear preparations and permanent staining is used to visualize cellular structures from nonliving or dead microorganisms. Because staining is not part of phase contrast microscopy, this method offers the advantage of allowing observation of viable microorganisms. The method is not commonly used in most aspects of diagnostic microbiology, but it is used to identify medically important fungi grown in culture (for more information regarding the use of phase contrast microscopy for fungal identification, see Chapter 60).
Fluorescent Microscopy
Principle of Fluorescent Microscopy
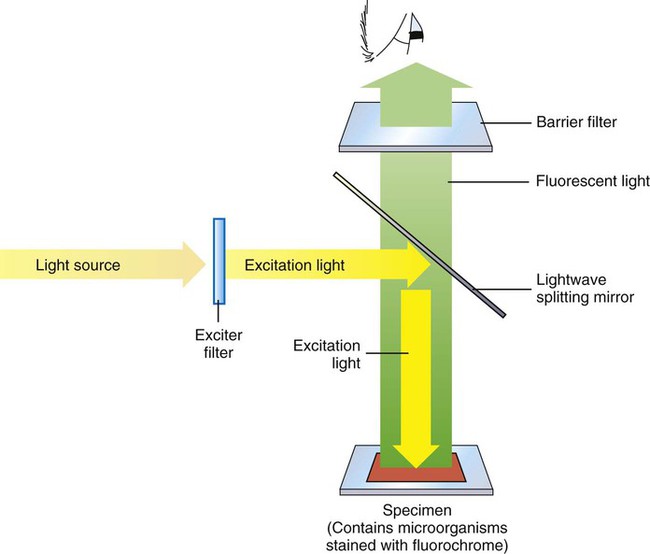
Figure 6-11 depicts diagrammatically the principle of fluorescent microscopy in which the excitation light is emitted from above (epifluorescence). An excitation filter passes light of the desired wavelength to excite the fluorochrome that has been used to stain the specimen. A barrier filter in the objective lens prevents the excitation wavelengths from damaging the eyes of the observer. When observed through the ocular lens, fluorescing objects appear brightly lit against a dark background.
Staining Techniques for Fluorescent Microscopy
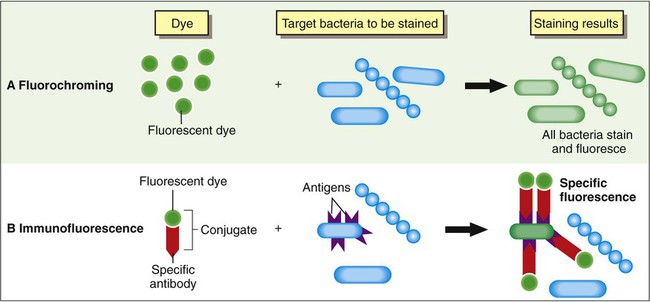
Based on the composition of the fluorescent stain reagents, fluorescent staining techniques may be divided into two general categories: fluorochroming, in which a fluorescent dye is used alone, and immunofluorescence, in which fluorescent dyes have been linked (conjugated) to specific antibodies. The principal differences between these two methods are outlined in Figure 6-12.
Fluorochroming
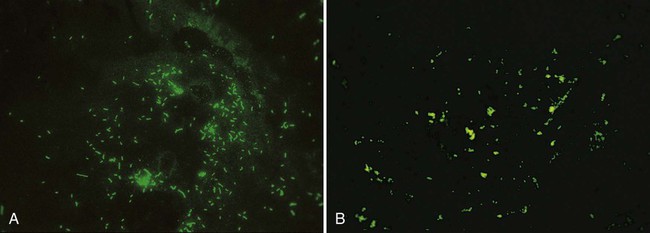
Acridine Orange.
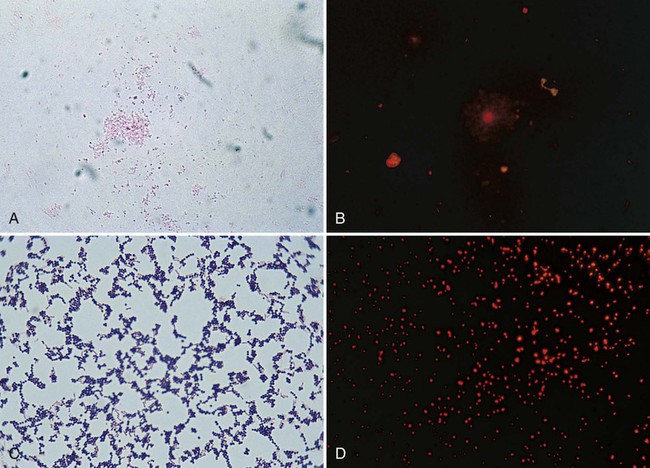
The fluorochrome acridine orange binds to nucleic acid. This staining method (see Procedure 6-4) can be used to confirm the presence of bacteria in blood cultures when Gram stain results are difficult to interpret or when the presence of bacteria is highly suspected but none are detected using light microscopy. Because acridine orange stains all nucleic acids, it is nonspecific. Therefore, all microorganisms and host cells will stain and give a bright orange fluorescence. Although this stain can be used to enhance detection, it does not discriminate between gram-negative and gram-positive bacteria. The stain is also used for detection of cell wall–deficient bacteria (e.g., mycoplasmas) grown in culture that are incapable of retaining the dyes used in the Gram stain (Figure 6-13) (see Procedure 6-5 on the Evolve site).
Auramine-Rhodamine.
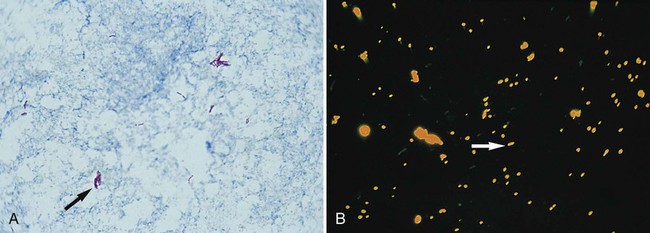
The waxy mycolic acids in the cell walls of mycobacteria have an affinity for the fluorochromes auramine and rhodamine. As shown in Figure 6-14, these dyes will nonspecifically bind to nearly all mycobacteria. The mycobacterial cells appear bright yellow or orange against a greenish background. This fluorochroming method can be used to enhance detection of mycobacteria directly in patient specimens and for initial characterization of cells grown in culture.
Calcofluor White.
The cell walls of fungi will bind the stain calcofluor white, which greatly enhances fungal visibility in tissue and other specimens. This fluorochrome is commonly used to directly detect fungi in clinical material and to observe subtle characteristics of fungi grown in culture (for more information regarding the use of calcofluor white for the laboratory diagnosis of fungal infections, see Chapter 60). Calcofluor white may also be used to visualize some parasites such as microsporidia.
Immunofluorescence
As discussed in Chapter 3, antibodies are molecules that have high specificity for interacting with microbial antigens. That is, antibodies specific for an antigen characteristic of a particular microbial species will only combine with that antigen. Therefore, if antibodies are conjugated (chemically linked) to a fluorescent dye, the resulting dye-antibody conjugate can be used to detect, or “tag,” specific microbial agents (see Figure 6-12). When “tagged,” the microorganisms become readily detectable by fluorescent microscopy. Thus, immunofluorescence combines the amplified contrast provided by fluorescence with the specificity of antibody-antigen binding.
This method is used to directly examine patient specimens for bacteria that are difficult or slow to grow (e.g., Legionella spp., Bordetella pertussis, and Chlamydia trachomatis) or to identify organisms already grown in culture. FITC, which emits an intense, apple green fluorescence, is the fluorochrome most commonly used for conjugation to antibodies (Figure 6-15). Immunofluorescence is also used in virology (Chapter 66) and to some extent in parasitology (Chapter 47).
Fluorescent in situ hybridization using peptide nucleic acid probes is a powerful technique used in the clinical laboratory and is discussed in further detail in Chapter 8.
Dark-Field Microscopy
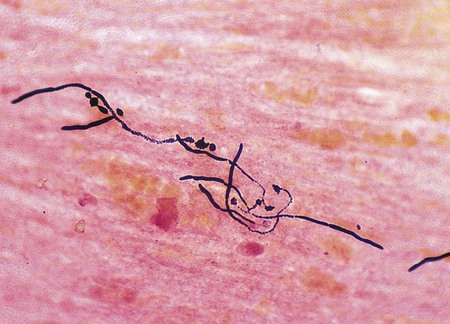
Dark-field microscopy is similar to phase contrast microscopy in that it involves the alteration of microscopic technique rather than the use of dyes or stains to achieve contrast. By the dark-field method, the condenser does not allow light to pass directly through the specimen but directs the light to hit the specimen at an oblique angle (Figure 6-16, A). Only light that hits objects, such as microorganisms in the specimen, will be deflected upward into the objective lens for visualization. All other light that passes through the specimen will miss the objective, thus making the background a dark field.
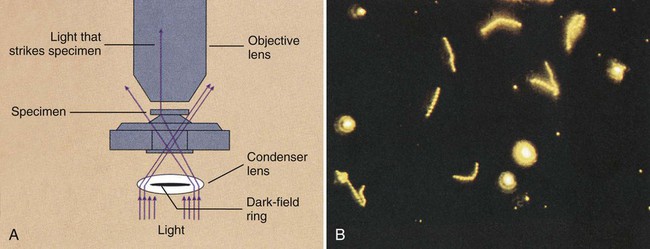
This method has greatest utility for detecting certain bacteria directly in patient specimens that, because of their thin dimensions, cannot be seen by light microscopy and, because of their physiology, are difficult to grow in culture. Dark-field microscopy is used to detect spirochetes, the most notorious of which is the bacterium Treponema pallidum, the causative agent of syphilis (for more information regarding spirochetes, see Chapter 46). As shown in Figure 6-16, B, spirochetes viewed using dark-field microscopy will appear extremely bright against a black field. The use of dark-field microscopy in diagnostic microbiology has decreased with the advent of reliable serologic techniques for the diagnosis of syphilis.
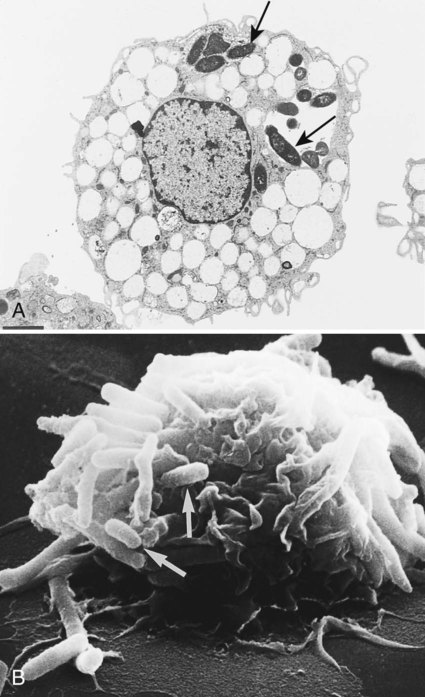
Electron Microscopy
Electron microscopes are of two general types: the transmission electron microscope (TEM) and the scanning electron microscope (SEM). TEM passes the electron beam through objects and allows visualization of internal structures. SEM uses electron beams to scan the surface of objects and provides three-dimensional views of surface structures (Figure 6-17). These microscopes are powerful research tools, and many new morphologic features of bacteria, bacterial components, fungi, viruses, and parasites have been discovered using electron microscopy. However, because an electron microscope is a major capital investment and is not needed for the laboratory diagnosis of most infectious diseases (except for certain viruses and microsporidian parasites), few laboratories employ this method.
[/level-membership-for-basic-science-category][not-level-membership-for-basic-science-category]
Role of Microscopy
1. Explain the role of microscopy in the identification of etiologic agents including bacteria, fungi, viruses, and parasites.
2. List the four types of microscopy available for diagnostic evaluation, explain their basic principles, and list a clinical application for each.
3. Define the three main principles of light microscopy, magnification, resolution, and contrast.
4. List the staining techniques used to aid in the visualization of bacteria, explain the chemical principle and limitations for each, and provide an example of a clinical application for each stain.
5. Include the following stains: Gram stain, the Kinyoun stain, the Ziehl-Neelsen stain, the Calcofluor white stain, the Acridine orange stain, and the Auramine-Rhodamine stain.
6. Explain the chemical principle for fluorescent dyes in microscopy, and list two examples routinely used in the clinical laboratory.
1. Direct examination of patient specimens for the presence of etiologic agents
2. Growth and cultivation of the agents from these same specimens
3. Analysis of the cultivated organisms to establish their identification and other pertinent characteristics such as susceptibility to antimicrobial agents
Microscopy is the most common method used both for the detection of microorganisms directly in clinical specimens and for the characterization of organisms grown in culture (Box 6-1). Microscopy is defined as the use of a microscope to magnify (i.e., visually enlarge) objects too small to be visualized with the naked eye so that their characteristics are readily observable. Because most infectious agents cannot be detected with the unaided eye, microscopy plays a pivotal role in the laboratory. Microscopes and microscopic methods vary, but only those of primary use in diagnostic microbiology are discussed.
The method used to process patient specimens is dictated by the type and body source of specimen (see Part VII). Regardless of the method used, some portion of the specimen usually is reserved for microscopic examination. Specific stains or dyes applied to the specimens, combined with particular methods of microscopy, can detect etiologic agents in a rapid, relatively inexpensive, and productive way. Microscopy also plays a key role in the characterization of organisms that have been cultivated in the laboratory (for more information regarding cultivation of bacteria, see Chapter 7).
The types of microorganisms to be detected, identified, and characterized determine the most appropriate types of microscopy to use. Table 6-1 outlines the four types of microscopy used in diagnostic microbiology and their relative utility for each of the four major types of infectious agents. Bright-field microscopy (also known as light microscopy) and fluorescence microscopy have the widest use and application within the clinical microbiology laboratory. Dark field and electron microscopes are not typically found within a clinical laboratory and are predominantly used in reference or research settings. Which microorganisms can be detected or identified by each microscopic method also depends on the methods used to highlight the microorganisms and their key characteristics. This enhancement is usually achieved using various dyes or stains.
TABLE 6-1
Microscopy for Diagnostic Microbiology
| Organism Group | Bright-Field Microscopy | Fluorescence Microscopy | Dark-Field Microscopy | Electron Microscopy |
| Bacteria | + | + | ± | – |
| Fungi | + | + | – | – |
| Parasites | + | + | – | ± |
| Viruses | – | + | – | ± |
+, Commonly used; ±, limited use; –, rarely used.
Bright-Field (Light) Microscopy
Principles of Light Microscopy
For light microscopy, visible light is passed through the specimen and then through a series of lenses that bend the light in a manner that results in magnification of the organisms present in the specimen (Figure 6-1). The total magnification achieved is the product of the lenses used.
Magnification
In most light microscopes, the objective lens, which is closest to the specimen, magnifies objects 100× (times), and the ocular lens, which is nearest the eye, magnifies 10×. Using these two lenses in combination, organisms in the specimen are magnified 1000× their actual size when viewed through the ocular lens. Objective lenses of lower magnification are available so that those of 10×, 20×, and 40× magnification power can provide total magnifications of 100×, 200×, and 400×, respectively. Magnification of 1000× allows for the visualization of fungi, most parasites, and most bacteria, but it is not sufficient for observing viruses, which require magnification of 100,000× or more (see Electron Microscopy in this chapter).
Contrast
The third key component to light microscopy is contrast, which is needed to make objects stand out from the background. Because microorganisms are essentially transparent, owing to their microscopic dimensions and high water content, they cannot be easily detected among the background materials and debris in patient specimens. Lack of contrast is also a problem for the microscopic examination of microorganisms grown in culture. Contrast is most commonly achieved by staining techniques that highlight organisms and allow them to be differentiated from one another and from background material and debris. In the absence of staining, the simplest way to improve contrast is to reduce the diameter of the microscope aperture diaphragm increasing contrast at the expense of the resolution. Setting the controls for bright field microscopy requires a procedure referred to as setting the Kohler illumination (see Procedure 6-1 on the Evolve site).
Staining Techniques for Light Microscopy
Smear Preparation
Generally, specimen samples are placed on the slide using a swab that contains patient material or by using a pipette into which liquid specimen has been aspirated (Figure 6-2). Material to be stained is dropped (if liquid) or rolled (if on a swab) onto the surface of a clean, dry, glass slide. To avoid contamination of culture media, once a swab has touched the surface of a nonsterile slide, it should not be used for subsequently inoculating media.
As listed in Table 6-1, light microscopy has applications for bacteria, fungi, and parasites. However, the stains used for these microbial groups differ extensively. Those primarily designed for examination of parasites and fungi by light microscopy are discussed in Chapters 47 and 60, respectively. The stains for microscopic examination of bacteria, the Gram stain and the acid-fast stains, are discussed in this chapter.
Gram Stain
Procedure Overview.
Although modifications of the classic Gram stain that involve changes in reagents and timing exist, the principles and results are the same for all modifications. The classic Gram stain procedure entails fixing clinical material to the surface of the microscope slide, either by heating or by using methanol. Methanol fixation preserves the morphology of host cells, as well as bacteria, and is especially useful for examining bloody specimen material. Slides are overlaid with 95% methanol for 1 minute; the methanol is allowed to run off, and the slides are air-dried before staining. After fixation, the first step in the Gram stain is the application of the primary stain crystal violet. A mordant, Gram’s iodine, is applied after the crystal violet to chemically bond the alkaline dye to the bacterial cell wall. The decolorization step distinguishes gram-positive from gram-negative cells. After decolorization, organisms that stain gram-positive retain the crystal violet and those that are gram-negative are cleared of crystal violet. Addition of the counterstain safranin will stain the clear gram-negative bacteria pink or red (Figure 6-3). See Procedure 6-2 on the Evolve site for detailed methodology, expected results, and limitations.
