CHAPTER 46 Primary otoplasty and reconstruction
Physical evaluation
• Overall size and shape. Evaluate the overall size/shape of the ear: Is it prominent with an otherwise normal size and configuration, or are there abnormalities in addition to the prominence? Excessively large ears, Stahl’s ears, cryptotia, underdeveloped shell-like helical rims, postoperative deformities, cauliflower ears, elongated lobules or earring-related deformities are noted.
• Upper  . Evaluate the upper
  : Is the upper pole prominent, is the antihelix/superior crus of the triangular fossa well formed, and is the helical rim well developed?
• Middle  . Evaluate the middle
  : Is the concha overly deep or protruding?
• Lower  . Evaluate the lower
  (lobule): Is the lobule prominent? It is important to note that even if the lobule is not particularly prominent on initial examination, it may be excessively prominent once the upper
  of the ear has been corrected intraoperatively.
• Asymmetry. Asymmetry is noted, mostly because patients and families will always comment on it. In asymmetric cases it is almost always preferable to operate on both ears rather than attempt setting back only the prominent ear to match the less prominent ear.
Technical steps
Standard otoplasty for prominent ears of normal size
• Incision. The incision is made in the retroauricular crease.
• Dissection. No skin is excised except a small triangle from the medial surface of the lobule (not from the retrolobular skin), taking care to preserve enough tissue for a normal earlobe and retrolobular sulcus. The cartilage is exposed on its posterior surface and soft tissue is excised from deep to the concha. In the region of the earlobe, deep dissection is performed under the concha in preparation for lobule repositioning.
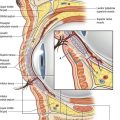
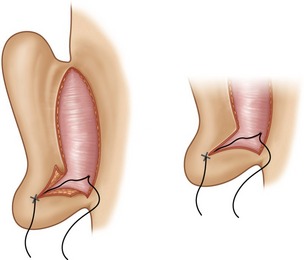
• Correction. (Fig. 46.1). Mustarde concha-scapha and triangular fossa-scapha sutures are placed using 4-0 clear Nylon sutures. The number of sutures depends on how far into the middle  of the ear the antihelical deficiency extends. These sutures are used to create a soft curvature to the antihelix and no attempt is made to correct the prominence at this point. A small crescent of cartilage (3 mm or less at its widest point) is excised from the posterior wall of the concha, at its junction with the conchal floor. The defect is closed primarily using numerous 4-0 Nylon interrupted sutures. A conchal setback is performed using a single 3-0 PDS suture between the concha and the mastoid fascia. This combination of a small conchal resection and a small conchal setback avoids the distortion of a large conchal resection and the unreliability of a large conchal setback. The earlobe is repositioned employing a method similar to that described by Gosain. Two 5-0 PDS sutures are placed which not only approximate the skin where the skin excision was performed, but incorporate a bite of cartilage on the undersurface of the concha (Fig. 46.2). The sutures are tightened until the lobule is slightly over-corrected.
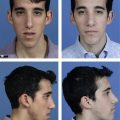
• Endpoint. Otoplasty is all about the endpoint. How do you know how tight to make the Mustarde sutures? How do you know how tight to tie the Furnas conchal-mastoid sutures. How do you know how sharp to make the antihelical fold? The answers to these questions are apparent if the surgeon remembers what the ear is supposed to look like: (1) When viewed from the front, the helical rim should be visible, poking out from behind the antihelix. (2) When viewed from the side, the contours should be round and soft, never sharp. (3) Finally, and most helpful to the surgeon who is sitting behind the patient intraoperatively: When viewed from behind the patient, the contour of the helical rim should be a straight line, not a “C” or a “hockey stick” or any other shape. If there is one lesson to take from this chapter, this is it. The final position of the ear should be over-corrected minimally to allow for some relapse, but not enough to create an unsatisfactory result if no relapse should occur.
• Closure. The skin is approximated using 5-0 plain gut, without excising more skin.
Otoplasty for large, prominent ears
• Incision. An incision is made on the lateral (visible) surface of the ear, just inside the helical rim (or where the helical rim would be if it is underdeveloped).
• Dissection. The incision is extended through the cartilage to achieve the posterior surface of the auricle where the cartilage is exposed.
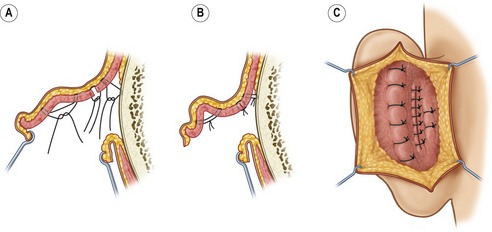
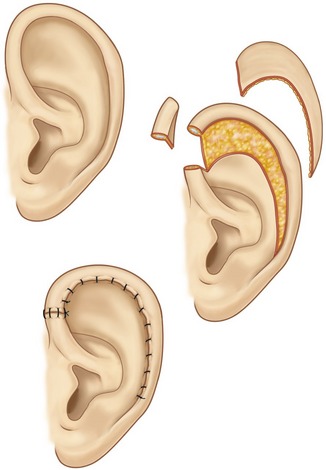
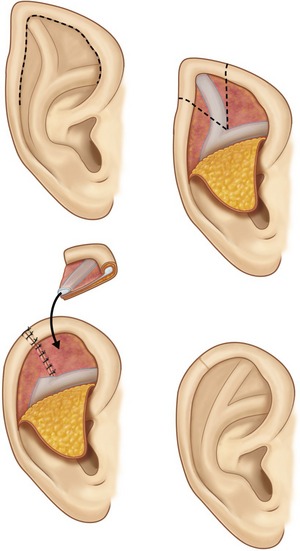
• Correction. The scapha cartilage and skin are trimmed to the desired size and shape, taking care to excise more cartilage than skin (Fig. 46.3). An incision is added in the retroauricular sulcus and, if lobule repositioning will be necessary, skin is excised from the medial surface of the lobule. Otoplasty techniques are then performed as described above for prominent ears of normal size.
• Closure. The helical rim is then reapplied to the scapha, but it will be too long for the reduced scapha. A wedge of helical rim and posterior skin is excised. The helical redundancy can be removed wherever the surgeon feels the small incision in the rim will be least visible. In the case of a helical rim which is flat and lacking in overhang, slight tension on the helical rim closure will correct this deformity.
Otoplasty for constricted ears
• Incision. An incision is made within the helical rim (as in large ears, above) and continued around the crus of the helix and back up in the preauricular region to the junction of the ear and the temporal scalp. The crus of the helix, consisting of three layers (skin, cartilage and skin), is fully mobilized.
• Correction. The otoplasty is performed as in the case of standard ears which will recruit the crus of the helix into the helical rim.
• Closure. The donor site in the concha is closed primarily, as if the crus of the helix had been taken for a composite graft to the nose. The incision in the scapha is closed with a running absorbable suture. Any excess or unusable crus of the helix is discarded.
Otoplasty for cryptotia
A detailed description of the surgical correction of cryptotia is beyond the scope of this chapter but a few guidelines will be outlined. The term cryptotia is used to describe the condition where the upper portion of the ear is buried beneath the temporal scalp. The ear can literally be pulled out of the scalp to examine it. Correction involves pulling the ear out of its bed in the scalp, incising around it in order to release it fully, and resurfacing the defect behind the upper pole of the ear with a skin graft or a local flap. If the shape of the auricular cartilage is abnormal, in addition to being buried, then additional cartilage maneuvers are indicated.
Otoplasty for Stahl’s ears
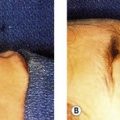
As in cryptotia, a detailed description of the available techniques is beyond the scope of this chapter. The deformity consists of a third crus, in addition to the superior and inferior crura of the triangular fossa, which extends towards the helical rim. The deformity is variable. In mild cases the extra crus is barely noticeable and can be ignored and the otoplasty performed as if it were a standard case. In more severe cases the crus is more prominent and may cause a deformity of the auricular shape with a pointed, “Dr. Spock” appearance. In the most severe cases, in addition to the pointed shape of the ear, the superior crus of the triangular fossa is absent. Correction involves resection of the abnormal crus. There are a variety of opinions on what to do with the resected cartilage, from turning it upside down to using it to replace the absent superior crus. While the Stahl’s ear deformity can be improved significantly, it is important to manage expectations in the severe cases where the result will fall short of a completely normal ear (Fig. 46.4).
Reduction of aging or elongated earlobes
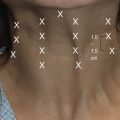
• Incision. The ideal contour is drawn on the earlobe. The wedge is designed asymmetrically so that the incision is made caudal to this line on the lateral surface and cephalad to it on the medial surface. The idea is to create a longer skin flap on the lateral surface of the lobe. This lateral flap is thinned so it is also more mobile than its medial counterpart.
• Closure. When closed, the incision will be located on the medial surface of the lobule so it is less visible. The ends of the wedge excision are placed slightly on the medial surface of the lobule, which also encourages the final scar to roll under where it is not visible. Numerous sutures, meticulous tapering and some patience are required for the best outcome.
Complications
Pearls & pitfalls
Pearls
• Less is more. Don’t do anything to the ear that can’t be reversed by removing a few sutures and lysing some scar tissue.
• Endpoint, endpoint, endpoint. Knowing what the auricle is supposed to look like will dictate when to stop tightening, setting back, correcting etc.
• Assess the ear, and determine plan, in thirds: upper, middle and lower  .
.
• Include earlobe setback (or at least consider it) in every otoplasty.
Pitfalls
• Don’t perform cartilage scoring, weakening or burring, especially in young children with thin, weak cartilage.
• Don’t remove skin except behind earlobe
• Don’t rely on conchal setback without conchal excision unless very mild correction.
• Don’t rely on large conchal excision. Combine with conchal setback.
• Don’t deform the tragus, lobule or sulcus when performing a facelift.
Summary of steps for standard otoplasty
1. Incision. The incision is made in the retroauricular crease.
2. Dissection. No skin is excised except a small triangle from the medial surface of the lobule (not from the retrolobular skin), taking care to preserve enough tissue for a normal earlobe and retrolobular sulcus. The cartilage is exposed on its posterior surface and soft tissue is excised from deep to the concha. In the region of the earlobe, deep dissection is performed under the concha in preparation for lobule repositioning.
3. Correction. Mustarde concha-scapha and triangular fossa-scapha sutures are placed using 4-0 clear nylon sutures. These sutures are used to create a soft curvature to the antihelix and no attempt is make to correct the prominence at this point. A small crescent of cartilage is excised from the posterior wall of the concha, at its junction with the conchal floor. The defect is closed using numerous 4-0 nylon interrupted sutures. A conchal setback is performed using a single 3-0 PDS suture between the concha and the mastoid fascia.
4. The earlobe is repositioned: Two 5-0 PDS sutures are placed which not only approximate the skin where the skin excision was performed, but incorporate a bite of cartilage on the undersurface of the concha. The sutures are tightened until the lobule is slightly over-corrected.
6. Over-correction: the final position of the ear should be over-corrected minimally to allow for some relapse but not enough to create an unsatisfactory result if no relapse should occur.
7. Closure. The skin is approximated using 5-0 plain gut, without excising more skin.
Argamaso RV. Ear reduction with or without setback otoplasty. Plast Reconstr Surg. 1990;85(2):316.
Gosain AK, Recinos RF. A novel approach to correction of the prominent lobule during otoplasty. Plast Reconstr Surg. 2003;112(2):575–583.
Janis JE, Rohrich RJ, Gutowski KA. Otoplasty. Plast Reconstr Surg. 2005;115(4):60e–72e.
Kaplan HM, Hudson DA. A novel surgical method of repair for Stahl’s ear: a case report and review of current treatment modalities. Plast Reconstr Surg. 1999;103(2):566.
Kelley P, Hollier L, Stal S. Otoplasty: evaluation, technique and review. J Craniofac Surg. 2003;14(5):643–653.
Spira M. Otoplasty: what I do now – a 30 year perspective. Plast Reconstr Surg. 1999;104(3):834.