Chapter 3 Primary Closure
PRIMARY CLOSURE DESIGN AND CONSIDERATIONS
Basic Definition and Considerations
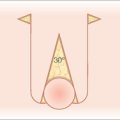
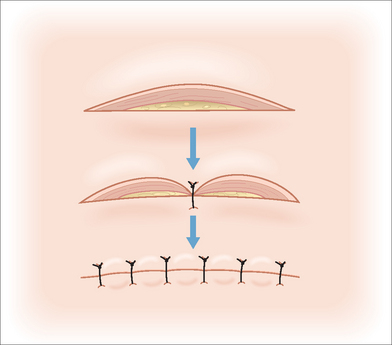
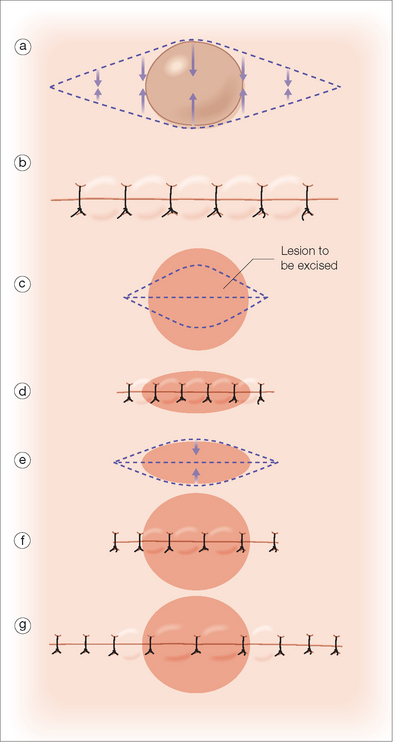
Primary closure refers to the direct side-to-side apposition of a skin defect or laceration. For a roughly circular defect, placing a suture that brings the central wound edges together will lead to a puckering of skin at either end. These puckered areas are referred to as tissue cones or “dog-ears” (Figure 3.1). Included in any primary closure is the planning for and management of tissue cones.
Designing an Elliptical Excision
Placement
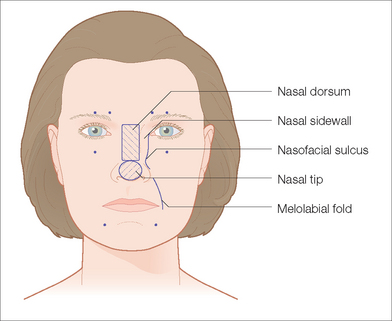
The best aesthetic result is achieved when electively placed incision lines are placed in borders of aesthetic units or in relaxed skin tension lines. Borders of aesthetic units are important in facial surgery and are natural lines separating distinct anatomic units. The upper lip and cheek are separated by the melolabial fold, for example, and a sutured wound in the melolabial fold can often heal nearly invisibly. In addition it is a general rule that lines that visibly cross the borders of aesthetic units are more likely to be noticeable. For this reason one should try to avoid elective incision lines that disrupt borders from one cosmetic unit to another. Figure 3.2 shows examples of aesthetic units on the face and their borders.
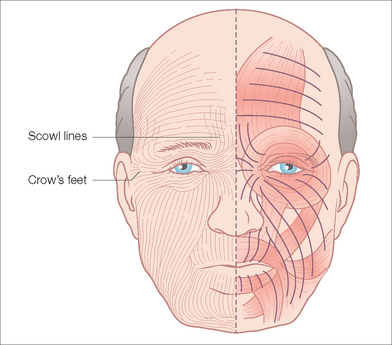
Relaxed skin tension lines (RSTLs) refer to the lines created by underlying muscle activity and are often visible in older patients. In younger people these lines are not yet visible without active use of muscles but with age these lines become increasingly apparent at rest. Diagrams of RSTLs exist to help guide the surgeon (Figure 3.3). In many cases RSTLs can be made visible on the patient by having them contract the underlying muscles to exaggerate their appearance. Changing position, for example, pursing the lips, reveals RSTLs around the lip that are radial like the spokes of a wheel. In some areas, multiple muscle groups may be at play and incision lines in more than one direction will predictably do well. Finally individual variation is common.
Design Considerations
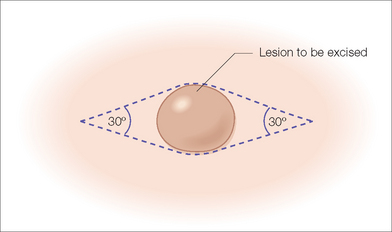
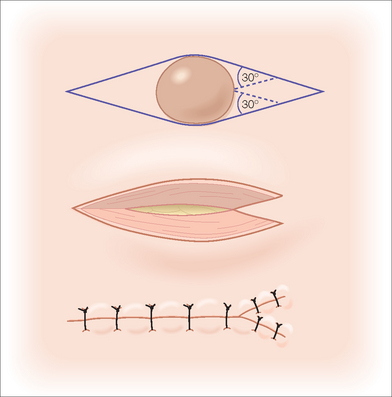
It is important to assess relaxed skin tension lines and mark the lines of an ellipse or tissue cone repair while the patient is in the upright position and prior to infiltration of large amounts of anesthesia. Anesthesia can interfere with the assessment of both the relaxed skin tension lines and the direction of maximum skin movement. The classic design of an elliptical excision involves creation of a symmetric fusiform shape that tapers to a 30° angle at each end (Figure 3.4). Angles greater than 30° tend to increase the formation of tissue cones. As a rule, the length of an ellipse is roughly three times its maximal width. This ratio is commonly altered and tailored to the individual wound being closed. For instance, it is often helpful to lengthen the ellipse over convex areas and in thick skin, and it may be shortened in concave areas and in thin skin.
Mobilization and Key Sutures
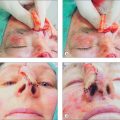
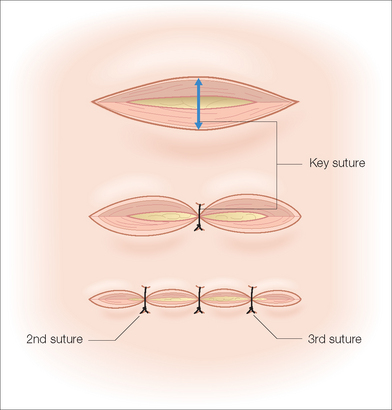
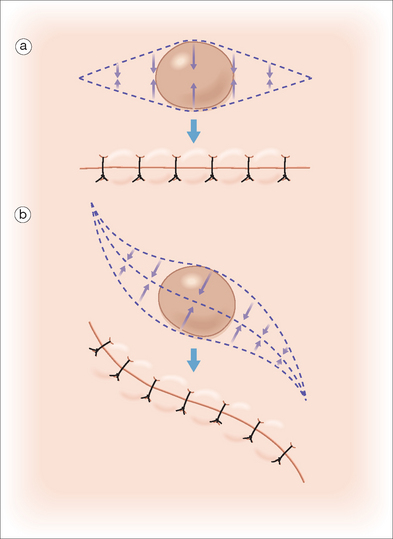
Once the elliptical excision has been designed and marked, the operative field can be prepared. Informed consent is obtained, preparation and draping of the surgical site are performed, and anesthesia is achieved. The ellipse is then excised through full-thickness skin to the appropriate depth. A common mistake is to leave more fat and dermal tissue at the tip and tail of the ellipse than in the center. This will lead to redundancies and elevations at the ends of the ellipse. Care should be taken to square the edges all the way to the tip of the excision and to excise tissue of equal depth throughout. Undermining of the edges is performed as necessary to increase mobility and make it easier to obtain wound eversion. In an elliptical excision, the suture that carries the most tension is the suture at the widest point of the ellipse (ie, in the middle). This is the key suture and in most cases should be placed first. The surgeon can then check to make sure there is no unwanted pull on nearby structures (eg, eyelid). In addition, this will confirm that the wound will close primarily and that no further undermining or alternative tissue movement is necessary. With adequate planning it should be rare to find intraoperatively that there is too much tension to close the wound. Following placement of the key suture, further sutures can be placed to bring the edges together. Because tissue movement is not symmetrical, it is generally wise to place subsequent sutures in such a way as to continually “halve” the remaining area to be closed (Figure 3.5). This helps avoid pushing any redundant tissue all to one end of the ellipse where it will then form a tissue cone. In some instances, one end of the excision is better suited to be the location of any tissue cone formation and in those situations, suturing from the opposite end first will push the tissue cone to the desired end. If it is discovered that placing the key stitch across the middle of the ellipse causes undue pull on a nearby structure, one can alter the direction of the key stitch placement so as to minimize vectors of tension pulling on the free margin (Figure 3.6).
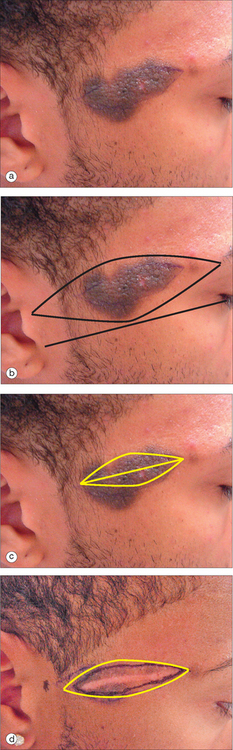
Primary Closure of a Preexisting Nonelliptical Defect
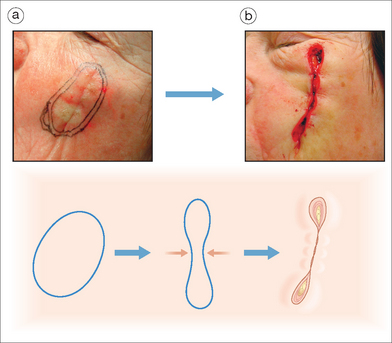
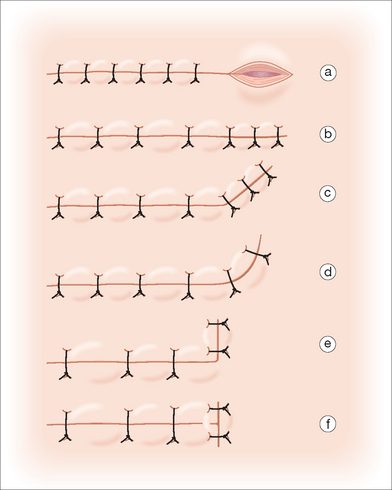
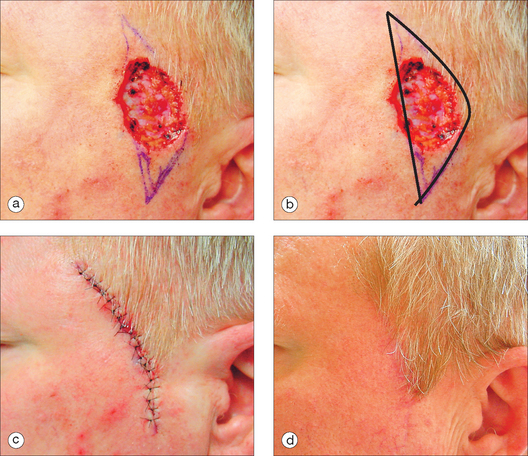
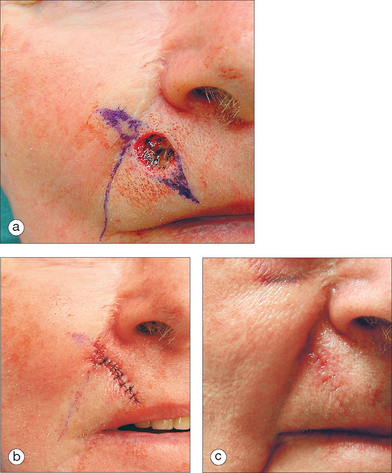
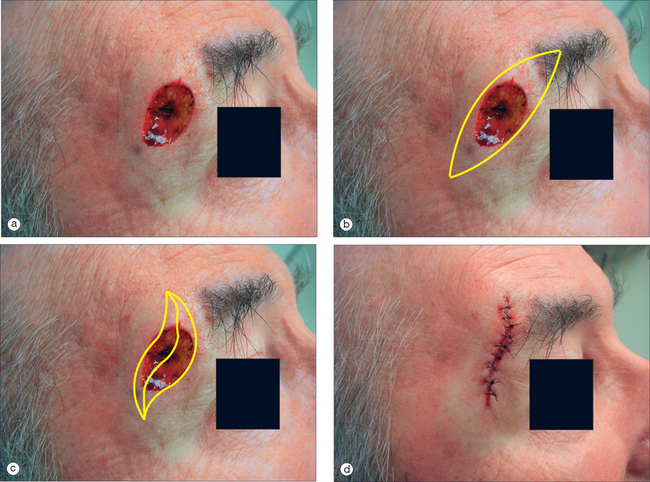
Traumatic injuries or excision techniques, such as Mohs micrographic surgery, create nonelliptical cutaneous defects. It is possible to convert the circular defect into a standard ellipse by using the principles outlined earlier. In other cases it may be wiser to undermine around the defect, place the key stitch, and then manage the resulting tissue cones independently. This allows several options for excision of tissue cones so that the final suture lines can be placed wherever they are most favorable. Several methods are useful in the excision of tissue cones: direct linear extension of the scar, curved extension of the scar, angled (hockey-stick) extension of the scar, and L- or T-shaped extension of the scar (Figure 3.7).1 An advantage of placing the key stitch prior to excising further tissue is that if there is too much tension, all other options such as skin graft or local flap remain open to the surgeon without having removed what may be important tissue for these other closures. Figure 3.8 illustrates a large defect on the chin that could be closed primarily following undermining and M-plasty (see below) despite preoperative planning for a rotation flap.

MODIFICATIONS OR VARIATIONS
Curving the Ellipse
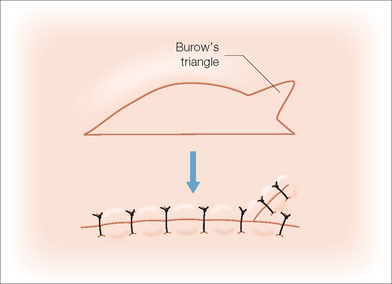
Elliptical excision leads to a linear scar. In certain anatomic areas, it is preferable to have a curving scar. The relaxed skin tension lines of the mid-cheek and the melolabial fold are examples of areas where a curved incision is more favorable than a straight one. When designing an ellipse to curve, it is simply necessary to intentionally create a modification of the ellipse such that one side is longer than the other (Figure 3.9). The resulting defect can then be closed using the rule of halves. It is important to be aware that if the discrepancy between the two sides is made too large, it will be impossible to close without removing skin from the longer side, as by means of a Burow’s triangle (Figure 3.10). Figure 3.11 shows an elliptical closure designed to create a natural curve that will hide in the temporal/sideburn area.
M-Plasty
There are occasions when it is of benefit to shorten the length of the scar that would be produced by a standard ellipse. An M-plasty allows significant shortening of one or both ends of an elliptical excision (Figure 3.12). It is useful to prevent an incision from extending across cosmetic units or into an important anatomic structure that should be avoided (Figure 3.13). Because the lines created by the “M” may not lie in the relaxed skin tension lines, it should not be considered as a routine technique and should be reserved for situations where it is useful.
S-Plasty
By design, the vectors of tension in closing an ellipse are all oriented perpendicular to the long axis of the ellipse and lead to a linear suture line and scar. There are occasions when it is beneficial to make vectors of tension more diagonal. There are also occasions when a curved S-shaped line is preferred to a straight line. S-plasty is a variation on the ellipse that allows for the formation of an S-shaped line.2 The vectors of tension in an S-plasty are diagonal as shown in Figure 3.14. Locations where an S-plasty may be helpful are on extremities where they minimize tissue cone formation and on the cheek where curved lines are often more ideal than straight ones. Figure 3.15 shows an S-plasty at the lateral brow.
Relaxing Incision
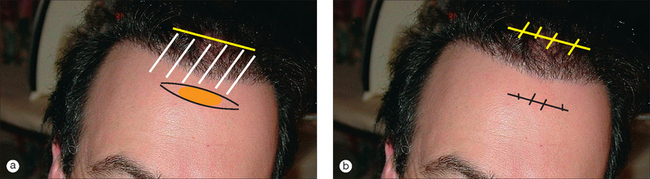
A relaxing incision may allow primary closure of wounds on the upper forehead or scalp that otherwise are too large to close primarily. These locations often have little tissue laxity of the surrounding skin. Lack of tissue movement on the forehead or scalp is due to the galea, which has very little elasticity. By making a full-thickness incision through the galea near the defect to be closed primarily, further tissue movement is gained by allowing separation of the galea at the point of the incision. The relaxing incision can be sutured, being careful to leave the galea unsutured. This is most useful when the relaxing incision can be well hidden. For example a defect on the upper forehead will be given more tissue movement by a horizontal incision behind the hairline (Figure 3.16).
Serial Excision
For benign and even some very slow-growing malignant lesions, complete removal in one operation may require a large ellipse or complex reconstruction. The resulting scar may be large. By performing a partial excision and primary closure with subsequent re-excision 2 months later, the resulting scar is much smaller (Figures 3.17 and Figure 3.18).
APPLICATIONS AND DISADVANTAGES
In the hierarchy of options for management of cutaneous wounds, primary closure is the simplest of all surgical repairs. Only second intention healing is a less invasive approach to a surgical wound. Primary closure is always an excellent option if it meets the functional and cosmetic goals of the patient. In some cases, primary closure may be impossible due to excess tension, or undue pulling and distortion of an adjacent anatomic structure (eg, lip, nose). More complex repairs should obviously be chosen in these situations. Finally in some situations, primary closure may lead to a long visible scar that is less desirable than that obtainable with more advanced techniques.
1 Robertson D. Dog ear repairs. In: Wheeland RG, editor. Cutaneous surgery. Philadelphia: WB Saunders; 1994:295-303.
2 Paolo B, Stefania R, Massimiliano C, Stefano A, Porta A, Giorgio L. Modified s-plasty: An alternative to the elliptical excision to reduce the length of suture. Dermatol Surg. 2003;29:394-398.
Leffell DJ, Brown MD. Manual of skin surgery: A practical guide to dermatologic procedures. New York: Wiley-Liss, 1997.
Leshin B. Proper planning and execution of surgical excisions. In: Wheeland RG, editor. Cutaneous surgery. Philadelphia: WB Saunders; 1994:171-177.
Weisberg NK, Nehal KS, Zide BM. Dog-ears: A review. Dermatol Surg. 2000;26:363-370.