[level-membership-for-plastic-reconstructive-surgery-category]
CHAPTER 37 Primary closed rhinoplasty
Physical evaluation
• Take a complete medical history.
• Evaluate entire face for shape, size, symmetry and proportion including the chin.
• Evaluate the nasal tip for size, shape, position of tip defining points and skin quality, especially thickness. Feel the nasal tip.
• Evaluate the nasal base and alae in relationship to the tip lobule and nasal pyramid.
• Evaluate the columella for position in the midline, straightness, width, length and position relative to alar rims.
• Observe the dorsal lines and the cartilaginous mid vault. Are the upper lateral cartilages providing midvault support. Do the internal valves collapse with inspiration?
• Evaluate the length of the nasal bones, width of the bony pyramid and the junction of the upper lateral cartilages and the nasal bones.
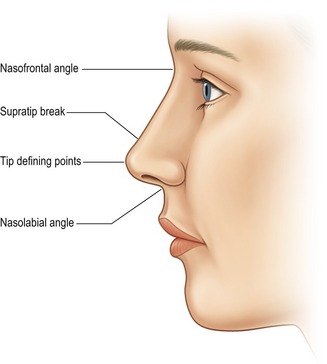
• Evaluate the profile for nasal length, height, contour, tip projection, radix depth and nasolabial angle.
• Evaluate the nose during facial animation (smiling from the front and profile) and observe changes in the alar base width, downward tip movement, and upper lip retraction.
• Careful examination of the septum, turbinates, internal and external valves.
• High quality photographs: front view, worms eye, three-quarter right and left views and profiles in repose and smiling.
Anatomy
Nasal tip
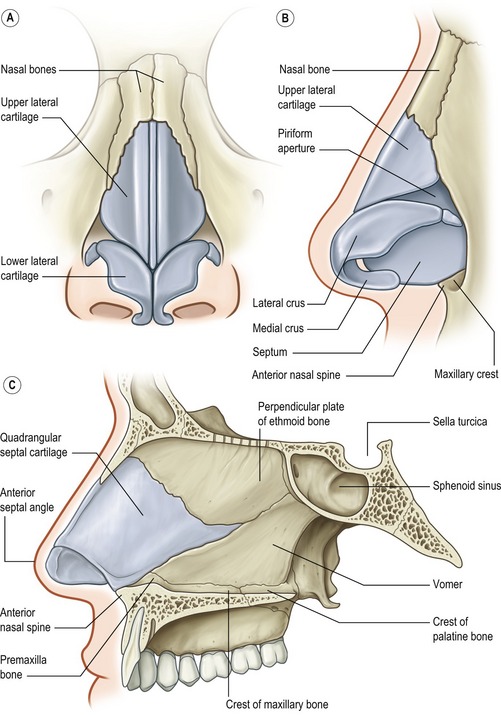
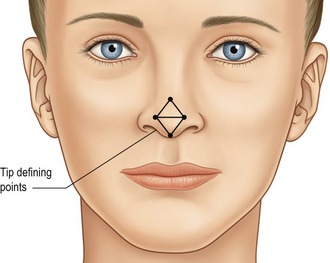
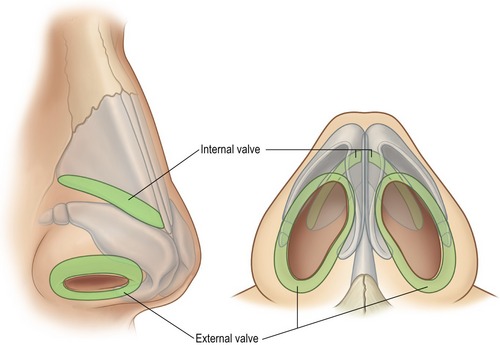
The nasal tip shape, size and projection is for the most part determined by the paired (though not necessarily symmetrical) alar cartilages, each of which have medial, middle and lateral crura, and their relationship to the adjacent structures (Fig. 37.1). The medial crura consists of flared (usually) footplates and the columella segment. The middle crus is a continuation of the medial crura and joins the lateral crus. The columella lobular junction is the transition from the nasal base to the tip lobule. The middle crus extends from the columella lobular junction to the lateral crus. The tip defining points, usually at the apex of the junction of the middle crus and lateral crus (the most projecting point on each side of the tip), produces an external light reflex (Fig. 37.2). The lateral crura make up the largest part of the nasal tip and join the accessory cartilages, which join the lateral crura to the pyriform aperture. The cartilages are supported by suspensory ligaments to each other and the caudal border of the upper lateral cartilages. The caudal edge of the lateral crura of the lower lateral cartilages, the nostril sills, the membraneous septum and the alae make up the external nasal valve (Fig. 37.3).
Upper lateral cartilages
The upper lateral cartilages and their attachment to the septum make up the cartilaginous mid-vault. The junction of the upper lateral cartilages with the cephalic margin of the lower lateral cartilages defines the scroll area. The angle of the junction of the septum and upper lateral cartilages at this point determine the internal valve (usually 10 to 15 degrees). The cephalic end of the upper lateral cartilages is overlapped by the nasal bones for several millimeters. This is important in maintaining mid-vault support. The junction of the upper lateral cartilages with the nasal bones and septum has a T-shaped contour and is known as the keystone area.
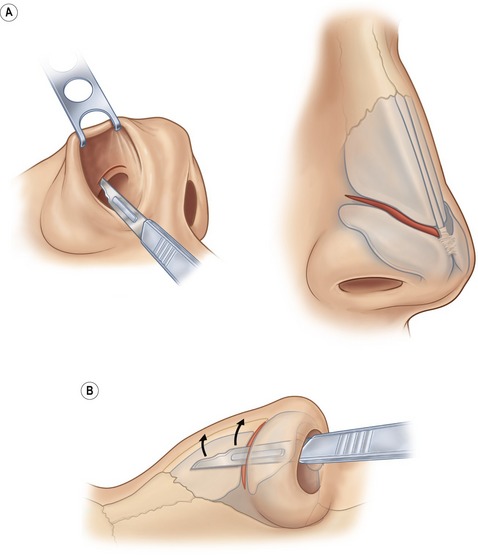
Nasal bones
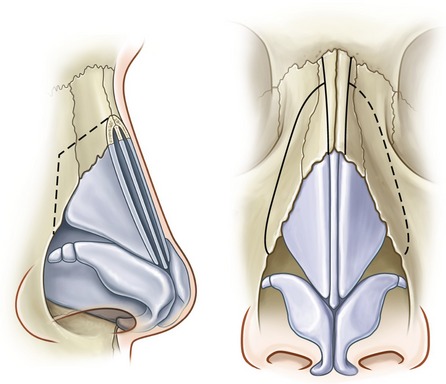
The nasal bones vary in length and thickness and along with the ascending frontal process of the maxilla make up the bony vault. The nasal bones articulate with each other medially, the upper lateral cartilages inferiorly, the maxilla laterally, the frontal bones superiorly and the perpendicular plates of the ethmoid posteriorly. Nasal osteotomies (Fig. 37.4) are best performed through the thinner bone along the transition zone in the ascending frontal process of the maxilla that exists from the pyriform aperture to the radix.
Nasal profile
The nasal profile (Fig. 37.5) is dictated by the osteocartilaginous vault and its relationship to the alar cartilages. Understanding this relationship is important when one considers reducing the dorsal hump (which is often more cartilage than bone). The amount of resection should be guided by the amount of tip projection, the nasal frontal angle and the supratip break on the lateral views. Tip projection is the distance the nose projects from the face, or more anatomically defined as the distance from the tip of the nose to the most posterior point of the nose-cheek junction. The nasal frontal angle, which approximates 115 to 130 degrees, its location and depth, will dictate if it should be left alone, lowered, augmented or if the dorsal hump should be reduced. Similarly, if the nose lacks tip projection, increasing tip projection (tip augmentation, strut graft) may alleviate the need for, or influence the amount of dorsal hump reduction.
Columella and nasolabial angle
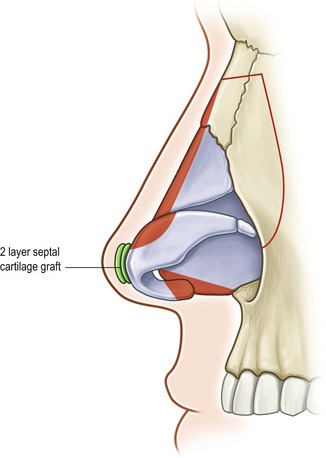
In the lateral view the preferred appearance of the columella is a slow curving structure traveling from the nasal tip to the base of the nose with a slight overhang in comparison to the alar base. In the basal view, a 2 : 1 ratio of the length of the columella to the length of the lobule is desirable (Fig. 37.6) and the base should be slightly wider than the confluence of the columella with the tip. In patients with a deficient columella, one will find a disruption of the length ratio between the columella and the lobule along with a distortion or the flaring of the alae. This is a common finding in some ethnic noses such as African and Asian. A retracted columella may occur in isolation or in combination with other abnormalities like a plunging tip. Even though the medial crura, the membraneous septum and the caudal septum all contribute to the shape of the columella, augmentation of the medial crura with a cartilage graft is the most common option for correction of a retracted columella. In comparison, an overhanging columella can often be corrected by a simple trim of the caudal septum or a reduction of the most caudal edge of the medial crura.

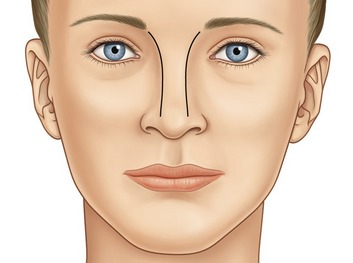
Nasal deviation
External deviation is primarily a result of deformities present in the nasal bones, cartilaginous septum or the nasal tip. A thorough pre-operative exam that evaluates the dorsal lines (Fig. 37.7) will help define the anatomic areas where the deviation occurs (upper, middle or lower third of the nose). The dorsal lines begin in the infra-brow area, curving gently, to converge at the level of the medial canthus, then diverge slightly at the keystone area and continue to diverge slightly as they continue down to the tip defining points. With this information the deviation can be addressed at different steps of the procedure: Infracture of asymmetric nasal bones for an upper third deviation, septoplasty and/or placement of unilateral spreader grafts for middle third deviations and revision of tip asymmetry or nasal spine repositioning for lower third deviation. Even in cases without deviations, the location of the nasal bones in reference to the nasal base width will dictate whether infracture is necessary. In most instances a wide nasal base, which is greater than 80% of the alar base width, will require infracture to improve the frontal view proportions.
Technical steps
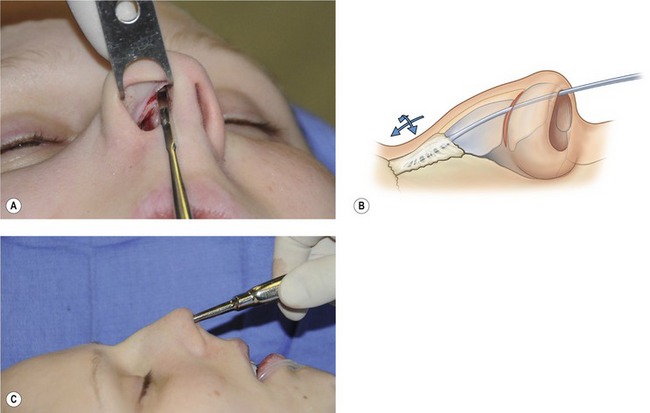
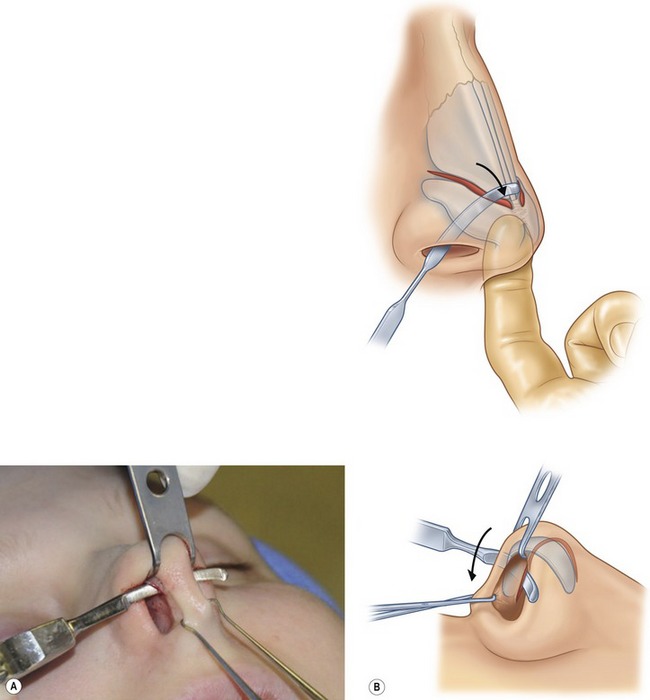
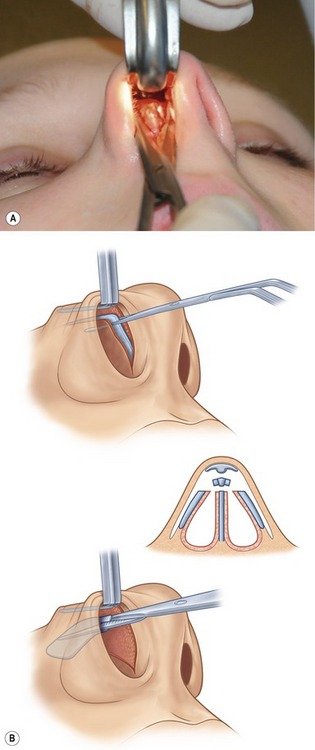
A double-prong retractor placed along the alar rim lifts superiorly and the intercartilaginous grove is visualized (Fig. 37.8). Bilateral intercartilaginous incisions are made from medial to lateral keeping the back of the number 15 blade flush with the most caudal border of the upper lateral cartilages (Fig. 37.9). Care is taken not to retract too aggressively so as to place the incision in the mucosa on the edge or intranasal surface of the caudal end of the upper lateral cartilages, as scar contracture is likely to occur. The blade on each side is reversed and swept across the distal third of the nasal dorsum. Next, the soft tissue envelope covering the dorsum of the cartilaginous and bony framework is dissected in the subperichondral and subperiosteal planes with a Joseph periosteal elevator (Fig. 37.10). Dissection is limited to the dorsum so as to preserve the attachment of the soft tissue envelope to the lateral portions of the nasal bones. A transfixion incision is then performed with a curved button knife placed through each intercartilaginous incision and moved down against the caudal border of the septum (Fig. 37.11). The integrity of the membraneous septum and the columella is maintained by two skin hooks placed at the base of the columella and retracted caudally. Further inferior extension of the transfixion incision may be made with small curved Stevens scissors to permit access to the nasal spine and to the depressor septi nasi muscles.
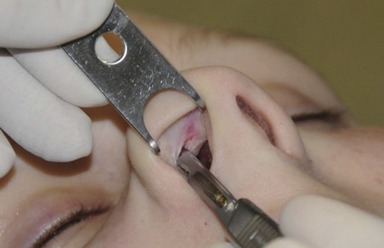
Fig. 37.8 Intercartilaginous incision, which is used for skeletinization and access to the nasal dorsum.
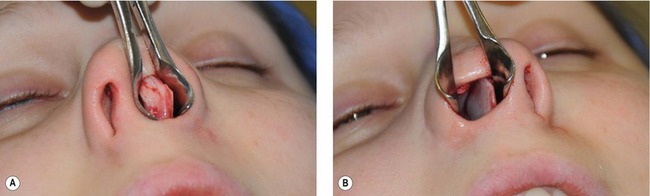
Direct visualization of the alar cartilages is facilitated by the placement of a double-pronged retractor along the most inferior edge of the nasal rim and eversion of the lateral crura by applying pressure to the overlying skin with the surgeon’s middle finger. The lateral crura is easily visualized. With the assistance of a small caliper, a 4 to 6 mm strip is marked along the caudal portion of the alar cartilage ensuring that the intrinsic support of the tip will be maintained following cephalic margin resection. Going through mucosa and the alar cartilage, an intracartilaginous incision is made with a number 15 blade (Fig. 37.12). The soft tissue superiorly and the vestibular lining inferiorly is released with small sharp angled scissors (Fig. 37.13). A single-prong skin hook is useful when releasing the vestibular lining from the portion of the cartilage being resected (Fig. 37.14). A small caliper is used to mark the opposite alar cartilage rim in order to leave symmetrical amounts of cartilage on the caudal border of the lateral crura (Fig. 37.15). Once the resected cephalic rim of alar cartilages are removed they should be compared for symmetry. Assuming that no variations between the two cartilages exist in the pre-operative exam, these two specimens should be identical in size and shape. In patients with large bulbous tips and/or mildly separated domes or, with other deformities requiring more than cephalic margin resection to obtain the desired tip shape, an infracartilaginous (rim or marginal incision permits delivery of the entire lateral crura (Fig. 37.16) dome and upper medial crura. The lateral crura can be delivered, measured and resected under direct vision and interdomal and intradomal sutures placed as desired for tip contouring (Fig. 37.17A–C; Fig. 37.18). In addition, various cartilage grafts for tip contouring can be placed through a rim incision and secured into position (Fig. 37.19A,B; Fig. 37.20).
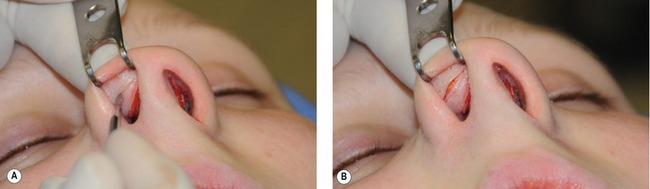
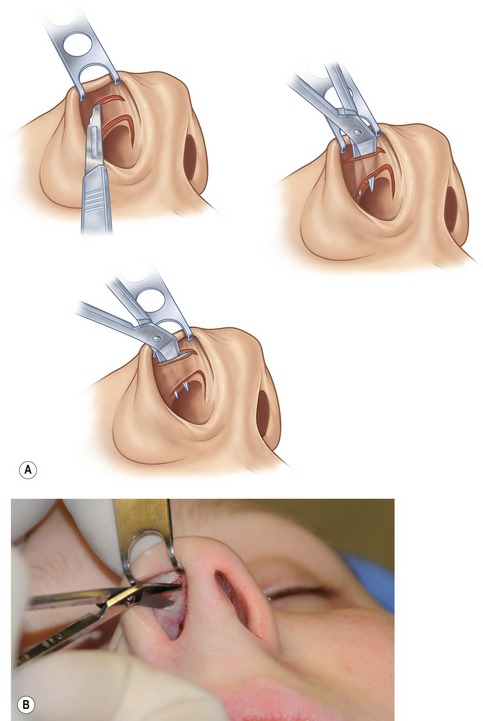
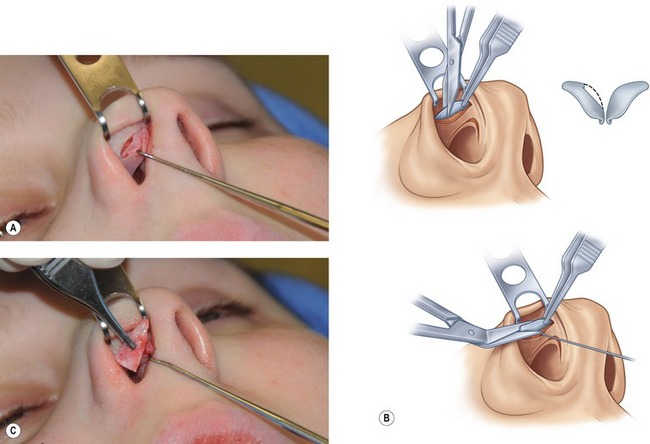
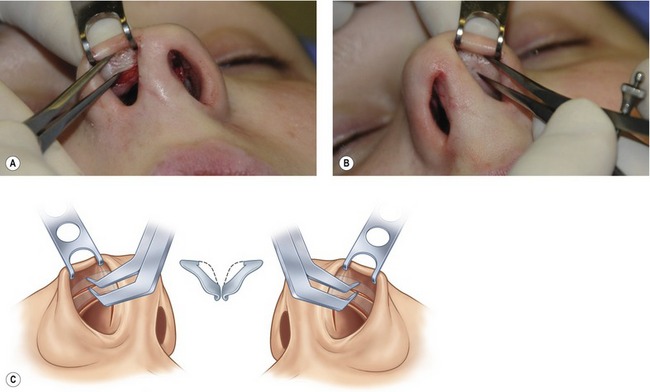
Fig. 37.15 Caliper measurements of remaining cartilaginous rim on right side of nasal tip transferred to left nasal tip for identical resection.
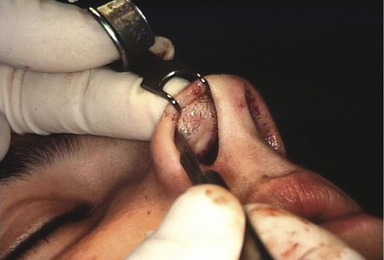
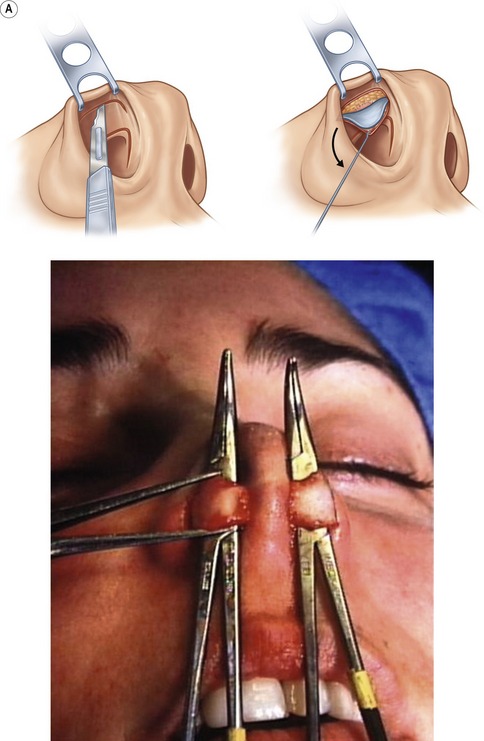
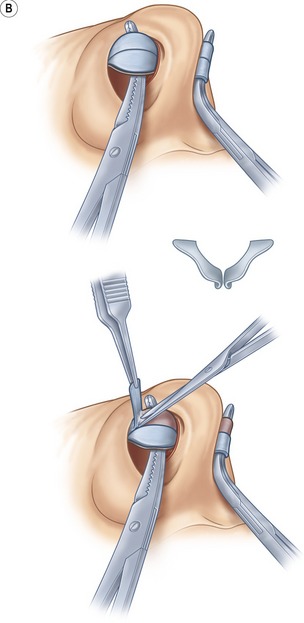
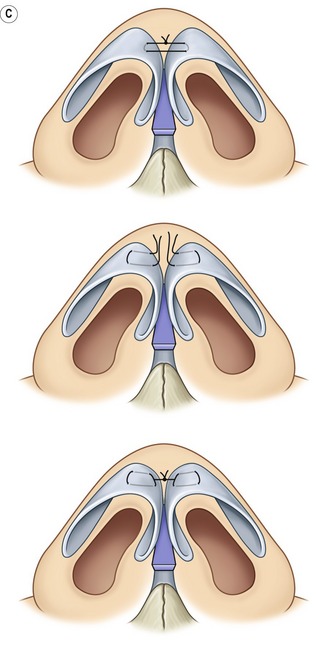
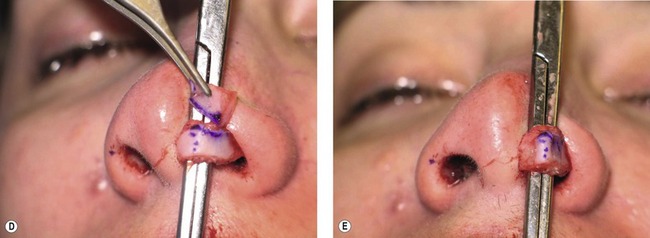
Fig. 37.17 A, Lateral crura dome and upper medial crura of alar cartilage delivered and measured. B, Cephalic margin of alar cartilage symmetrically resected right and left sides. C, Intradomal and/or interdomal sutures. D, Left cephalic margin resection. E, Intradomal stitch contouring domes left side.
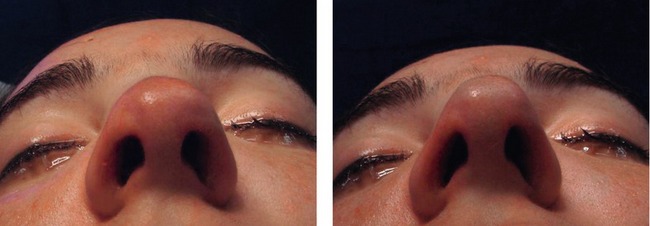
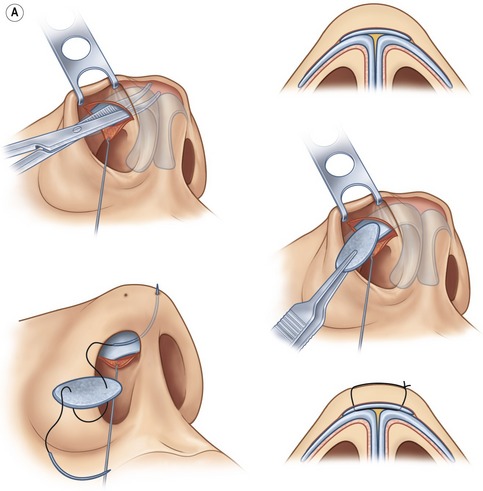
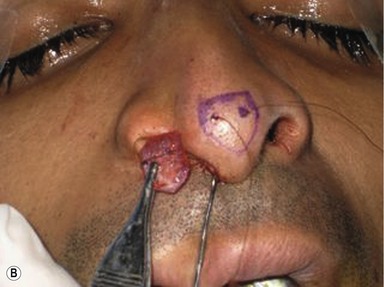
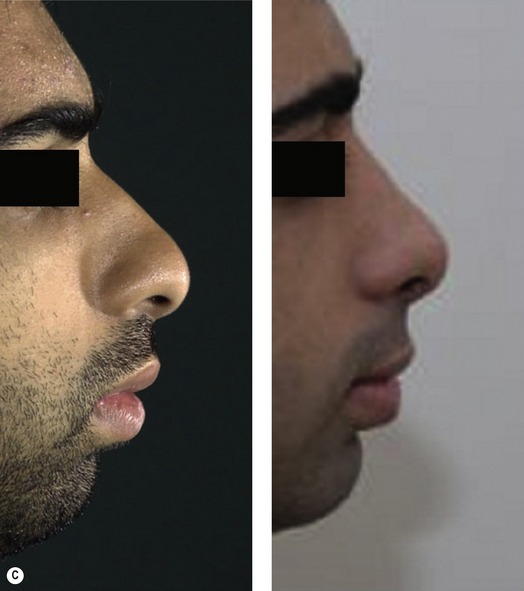
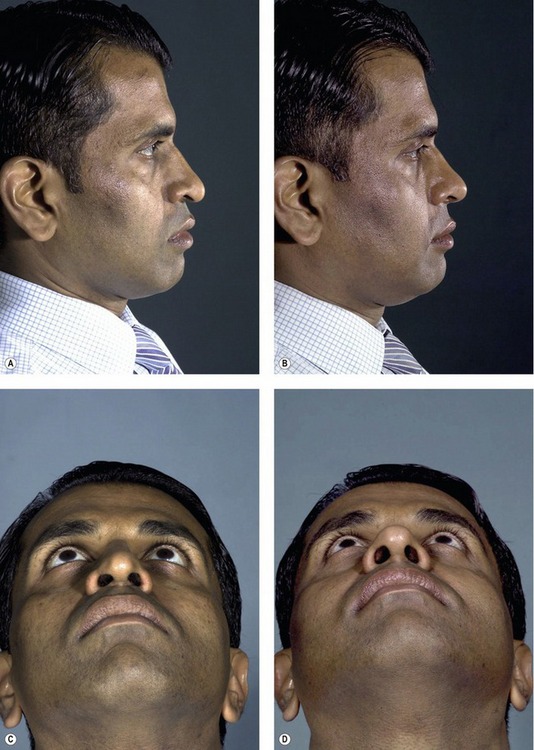
Fig. 37.19 A, Infracartilaginous incision used for nasal tip grafts. B, Infralobular graft ready for insertion. C, Young male with infralobular tip graft and strut graft, pre and post-operative views.
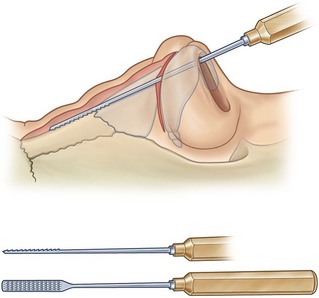
Even though the reduction of a prominent nasal hump may be the most intuitive component of cosmetic rhinoplasty to inexperienced surgeons, it actually requires more complex understanding of the structural components that formulate a specific nasal profile. In all noses, a delicate balance exists between the need for reduction of the osteocartilaginous vault, augmentation of the nasal frontal area and tip projection. It is these differences in treatment of a prominent nasal profile that ultimately controls whether a patient’s nose will have a natural or operated appearance. Pre-operative examination should reveal the deficiencies in each profile and thus dictate the surgical approach. Further information is obtained from the intraoperative exam and the changes that occur in each step of the operation. An adequate release of the surrounding soft tissue, visualization of the dorsum with a lighted retractor and a bloodless dissection are all critical to assist in the intraoperative evaluation of the nasal dorsum. Furthermore, skeletization of the nose should be limited to the dorsum, or more specifically, the area of hump removal. By preserving the soft tissue attachments to the nasal bones laterally, a structural framework is left in place that will support the nasal bones if they are comminuted during lateral osteotomy. Lowering of a prominent dorsum should be completed in a systematic fashion. The cartilaginous hump is lowered first with sharp angled scissors (Fig. 37.21). Care should be taken to avoid undue resection of the upper lateral cartilages and underlying nasal mucosa during this portion of the procedure. In cases that require a large reduction in the cartilaginous vault, an extramucosal release of the nasal lining from the septum and upper lateral cartilages may be required. The excess osseous portion of the nasal dorsum is lowered with a double-guarded osteotome (usually 10 mm in width), carefully engaged at the caudal end of the nasal hump after the more distal cartilaginous hump has been removed (Fig. 37.22). An osteotome allows for a cleaner cut with less debris in comparison to a rasp. Following removal of the resected nasal bone with a hump removal forceps, further tailoring of the bony edges of the dorsum can be completed with a sharp rasp followed by a polishing rasp (Fig. 37.23). Continuous evaluation of the lateral view of the dorsum is critical. In many cases, further trimming of the upper lateral cartilages is necessary, especially at their confluence with the nasal bones.
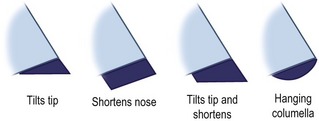
Although there is extensive variation in the columella alar angle and the nasolabial angle between patients, in general the columella should hang slightly lower than the alar base in the frontal view (“seagull in flight”) and the nasolabial angle, as stated earlier, should normally approximate 90 to 95 degrees in males and 100 to 105 degrees in females. Tailoring the resection of the caudal border of the septum permits varying alterations of the nasolabial angle. For example, in a patient with an obvious acute nasolabial angle and a tip that plunges in the caudal direction, a simple resection of the caudal border of the septum in an oblique fashion can rotate the tip in the cephalic direction. This resection changes the nasolabial angle by progressively resecting more caudal septal cartilage as one nears the septal angel (Fig. 37.24). In a patient that has a long nose but a normal nasolabial angle, the caudal septal cartilage resection is completed in a parallel fashion, thus only shortening the nose. The type of resection depends on the specific deformities present (Fig. 37.25). It is prudent to shorten the nose while cephalically rotating the tip with a caudal cartilage resection after the tip and the dorsum have been addressed. This allows for cartilage resection to remain conservative, as over resection of cartilage in this area can result in an aesthetically undesirable outcome. The resection of the cartilage is easily completed with a number 15 blade and the assistance of a single-prong retractor that retracts the columella in a caudal direction. The resection should proceed from the nasal spine to the dorsum, and the septal angle should be rounded off. Resection of any excess nasal mucosa at the end of the septum is often required following cartilage resection, but this must be conservative.

External deviation of the nose is often associated with abnormalities of the cartilaginous septum, which serves as the central support for the nasal bones and the dorsum. Thus any patient with a deviated nose, or specifically, deviated dorsal lines, should have a thorough examination of the septum in the pre-operative setting. If septal surgery is required for external deviation, airway issues or for cartilage harvesting, this should most often be addressed after the dorsum and tip have been altered and before an infracture has been completed. Once the nasal packing is removed and the septum is visualized, a local anesthetic hemostatic solution is injected under the mucoperichondrium. This not only provides a hemostatic effect but can also assist with hydro-dissection if the local anesthetic is injected correctly into the subperichondrial plane. With the assistance of a nasal speculum and utilizing a number 15 blade, mucoperichondrial flaps are dissected free from the caudal septal cartilage (Fig. 37.26). A submucoperichondrial dissection is mandatory, as a dissection in any other layer will result in unwanted bleeding and damage to the nasal mucosa. A helpful sign that the correct dissection plane has been entered is the appearance of the blue-grey hue of the septal cartilage. The mucoperichondrial flaps are elevated to the osseous support of the septum (vomer and perpendicular plate of the ethmoid) with a Freer elevator. It is advantageous to leave the mucoperichondrial attachments of the dorsal septum intact cephalically near the junction of the cartilaginous and bony septum to stabilize the cephalic end of spreader grafts if needed. This will allow for the creation of a submucoperichondral pocket into which the cephalic end of a spreader graft can be secured. Once the submucous dissection is complete bilaterally, the area of septal deviation can be visualized. In planning the resection of the septal cartilage, it is imperative that an L-strut of 8 to 10 mm width or greater be left in place along the dorsal and caudal septum. This will allow for adequate residual support of the dorsum once the septal cartilage is removed. It is not uncommon for resection of perpendicular plate of the ethmoid, maxillary crest or vomer to be necessary to straighten a nose and/or open the airway. If no external deviation exists and the cartilage is being harvested for use as a graft, then resection should be limited to the amount of cartilage needed.
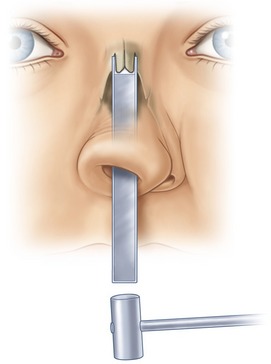
Infracturing of the nasal bones is most often needed during a cosmetic rhinoplasty to narrow a widened nasal base, correct an open-roof deformity secondary to dorsal hump resection or modify asymmetric nasal bones. An internal or external approach with an osteotome provides the most accurate means of controlling the level and length of the nasal bone infracturing. Specific to a lateral osteotomy, the internal approach avoids external scarring along the nasal base and confirms placement of the osteotome at the desired level of the piriform aperture. As bleeding from the fracture site and edema of the nose is common after an infracture, this portion of the procedure should be reserved for near the end of the operation. With the assistance of a nasal speculum, the base of the piriform aperture is visualized. The line of the osteotomy was injected at the outset of the procedure. A stab incision is made through the vestibular mucosa at the desired entrance point of the osteotome; a sub-periosteal tract is created with the osteotome. Low-to-low osteotomies are indicated for noses with a wide nasal base and widely open roof. A medial osteotomy is frequently performed to help mobilize the bones precisely without fracturing the bone at an undesirable location. A low-to-high osteotomy which starts low at the piriform aperture and rises to approximately 2 mm above the medial canthus is used for less wide nasal bases and less of an open roof. Utilizing a 3 mm osteotome, a series of perforations are made along the infracture line. Externally, the osteotome is continually palpated to confirm its placement at the base of the nasal pyramid while an assistant taps the osteotome with a mallet (Fig. 37.27). The gentle arc of the infracture line with low-to-low or low-to-high osteotomies is made by medial movement of the osteotome as one progresses to the upper nose. Once the osteotomies are complete, careful digital pressure is applied between the thumb and forefinger, allowing for a greenstick fracture of the nasal bones without comminution.
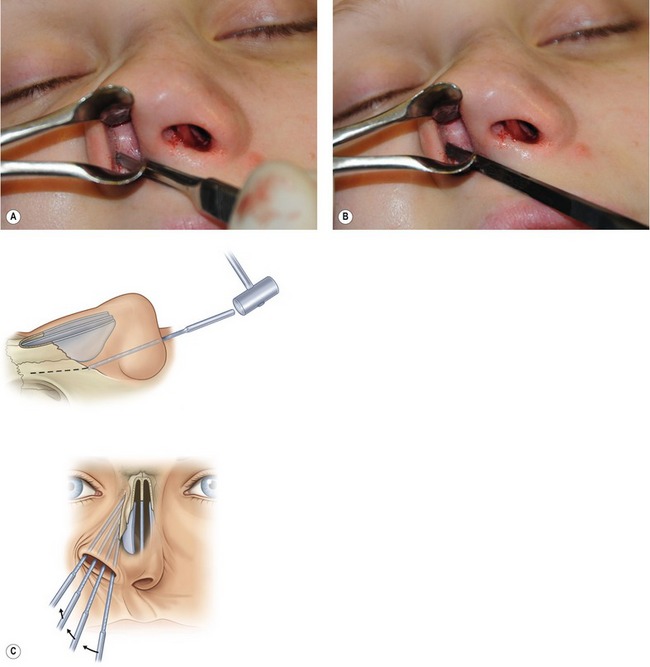
Fig. 37.27 Small stab incision made inside the piriform aperture and 3 mm osteotome used to perform osteotomy along thinner bone along the transition zone of the ascending frontal process of the maxilla.
A spreader graft, for example, is easily harvested and placed in through the closed technique. Spreader grafts are commonly used for correction of external deviation, internal nasal valve reconstruction, nasal elongation, support of the mid-vault and establishing good dorsal lines. The spreader grafts lie between the upper lateral cartilage and the septum with the cephalic end secured in a submucoperichondrial pocket above the osteocartilaginous junction of the septum (Figs 37.28, 37.29). The more caudal portion of the spreader graft is sutured to the septum with 5.0 PDS sutures. The portion of the spreader graft near the septal angle is most likely to migrate; therefore securing it in this area is critical. The upper lateral cartilages can be sutured to the spreader grafts and septum or permitted to lie gently against it (Fig. 37.30). Columella strut grafts are frequently used to provide tip stability, tip projection and columella positioning. An incision (infracartilaginous) is made along the caudal margin of the medial crura of the alar cartilage. Small angle scissors separate the medial crura. Straight Stevens scissors are passed from cephalad to caudal, establishing a space between the medial crura. A strut graft of septal cartilage is placed between the medial crura and stops just above the surface of the maxilla (Fig. 37.31A,B and Fig. 37.32). The typical grafts are 4 to 5 mm in width and 22 to 25 mm in length. Once the graft is placed into the pocket between the medial crura, it is sutured into position with a 4.0 chromic mattress suture placed through both medial crura and the strut graft. A second suture is placed between the caudal border of the septum and the columella (right and left crura and strut graft) to stabilize the strut during the initial healing period. The infracartilaginous incision can also be used to gain exposure to the caudal margin of the medical crura in those cases where the medial crura is convex and the primary cause of a hanging columella (Fig. 37.33A,B). In addition, this incision along the caudal medial crura margin can be used to place shield grafts and transect the medial crura. Exposure of the footplates of the medial crura is more easily done by retrograde dissection from the transfixation incision (Fig. 37.34). Trimming the medial footplates can decrease an over projected tip and/or narrow a wide columella base (Fig. 37.35).
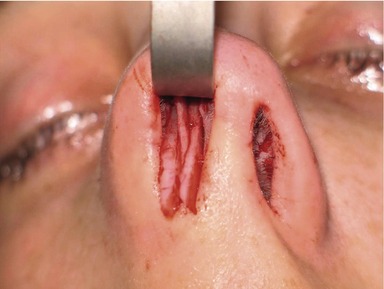
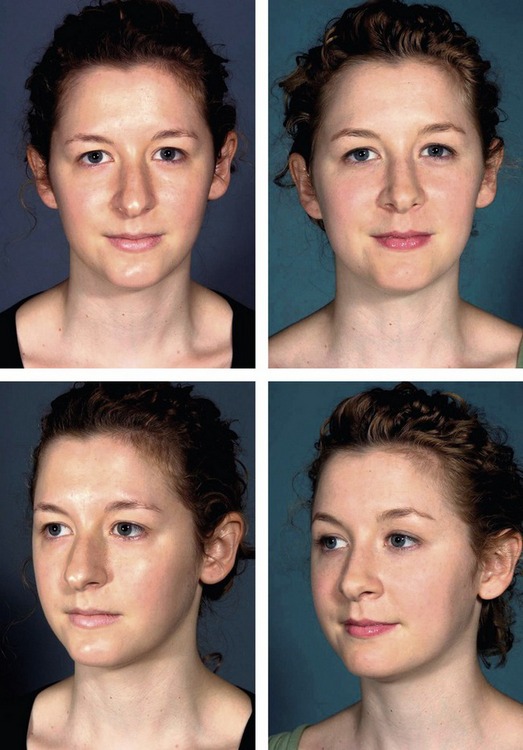

Fig. 37.29 A 25-year-old patient postop cephalic margin alar cartilage resection, dorsal lowering, right spreader graft caudal septal shortening, septal straightening and infracture.
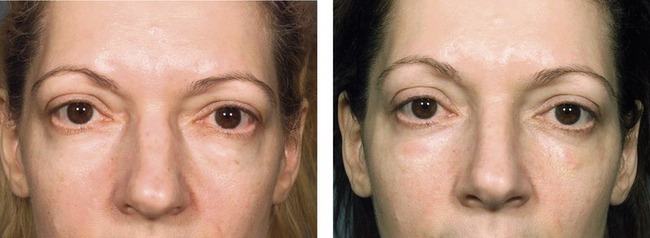
Fig. 37.30 One year postop following cephalic resection, bilateral spreader grafts, dorsal lowering and cephalic margins alar cartilage resection.
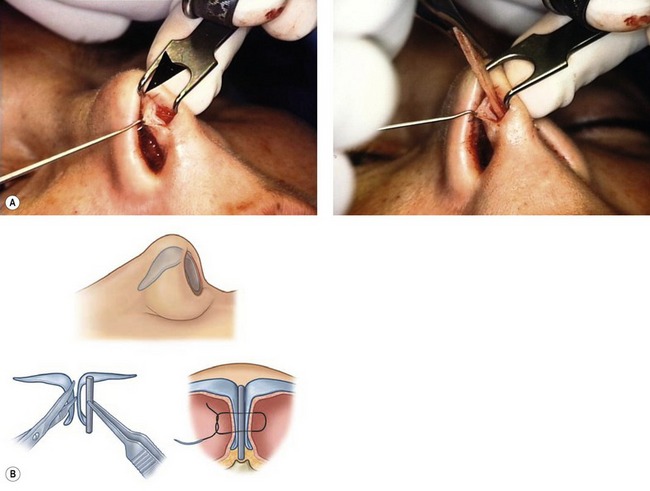
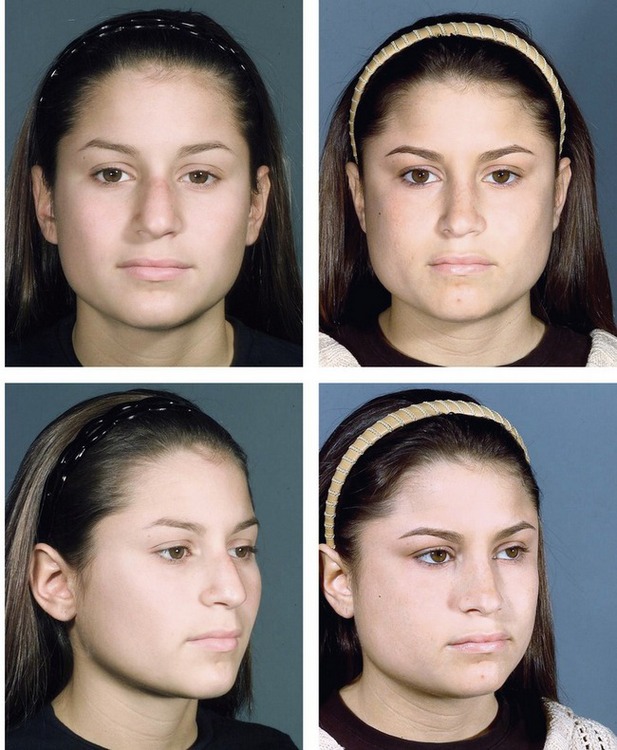
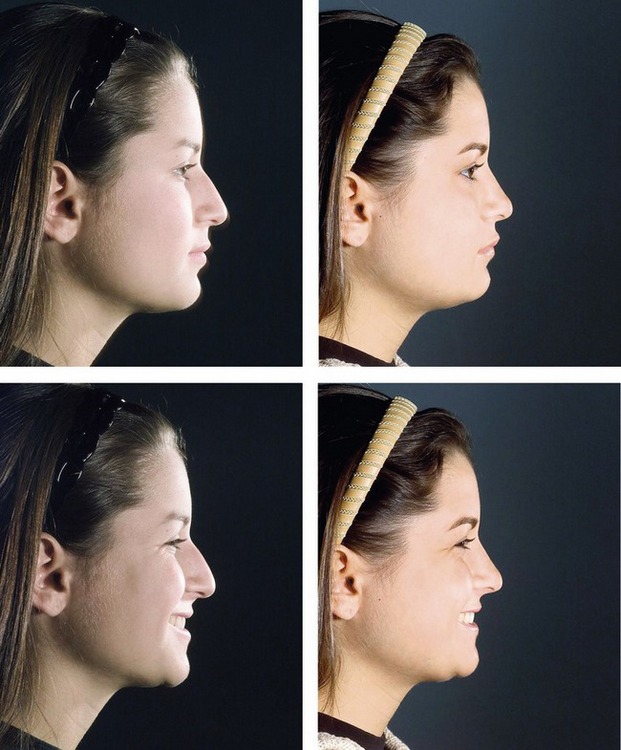
Fig. 37.32 A 17-year-old patient 1 year postop cephalic margin resection, dorsal lowering, lateral osteotomy and strut graft for nasal tip support on animation.
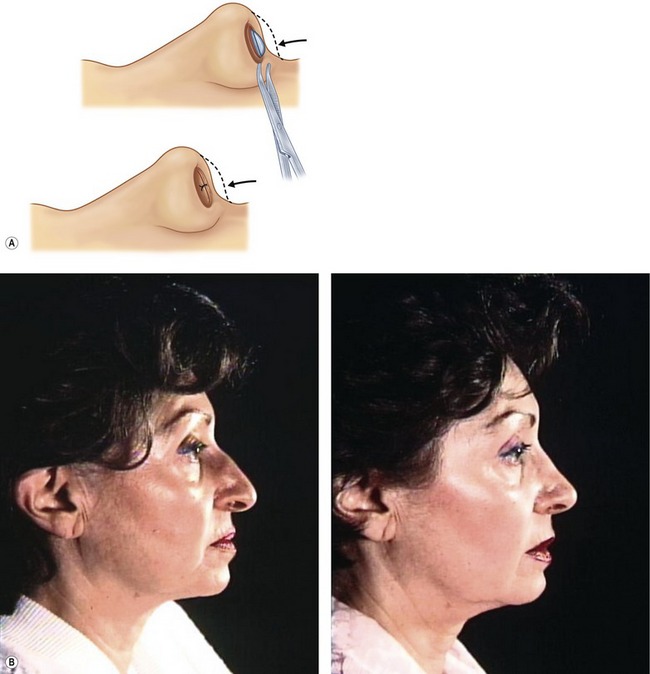
Fig. 37.33 A, Infracartilaginous (vertical columella incision) and exposure of convex medial crura. This incision can also be used for shield grafts and transection of medial crura. B, Patient before and following resection of medial convex medial crura.
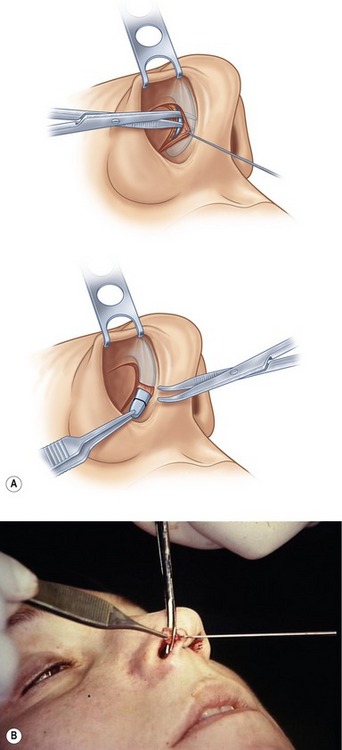
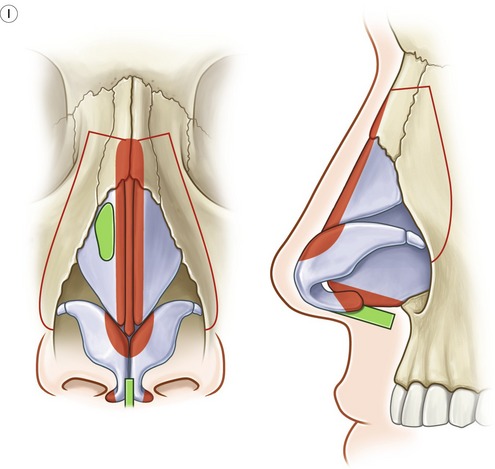
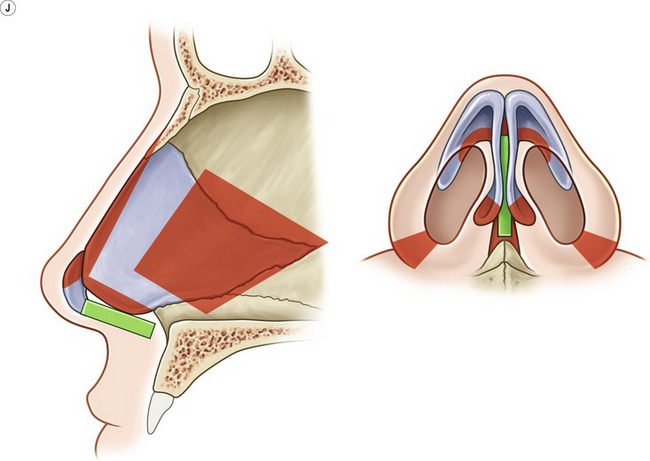
Fig. 37.35 1 year postop right alar cartilage delivery and repositioning, cephalic margin resection, dorsal lowering, alar footplate resection to correct projecting tip, lateral osteotomy and on-lay cartilage graft over right upper lateral cartilage.
Alar base resection is usually the last step in closed rhinoplasty. The general principle states that an alar base resection is indicated if the alar base is wider than the intracanthal distance, however the surgeon’s aesthetic judgment regarding the individual nose has merit. The decision to make an alar base resection that involves the nostril sill or floor of nose, or part of both, depends on the nose. In general, the resection should be designed so as to place the scar at the junction of the nostril sill and the floor of the nose. The midline of the columella is marked. The design of the first side for resection is drawn. A caliper is used to transfer to the opposite side the most medial point of the resection along the nasal floor and the most lateral and inferior point of resection on the first side (Fig. 37.36). The resection may be different on the two sides, if indicated by anatomy, but greater symmetry is established if the points noted above are symmetrically placed on the two sides.
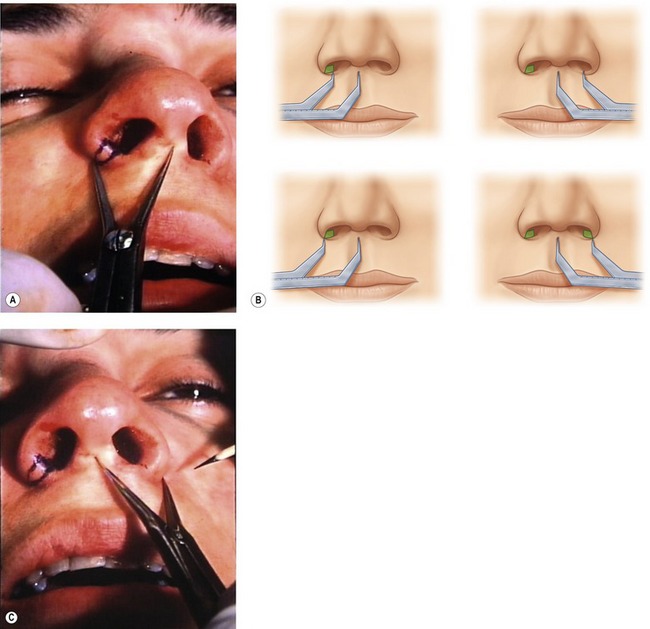
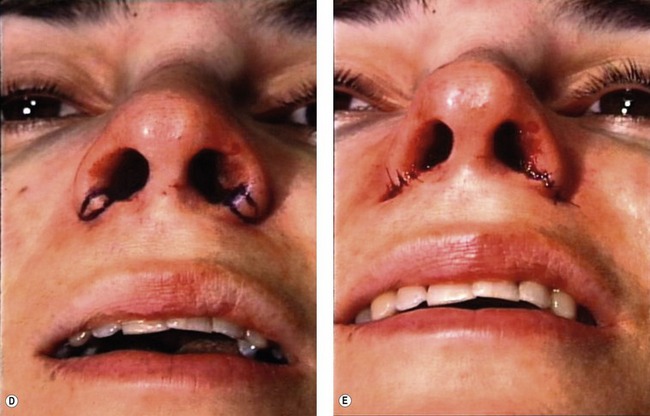
Fig. 37.36 Key points of markings established by caliper on each side of nose for a symmetrical alar base resection to produce more symmetrical nostrils.
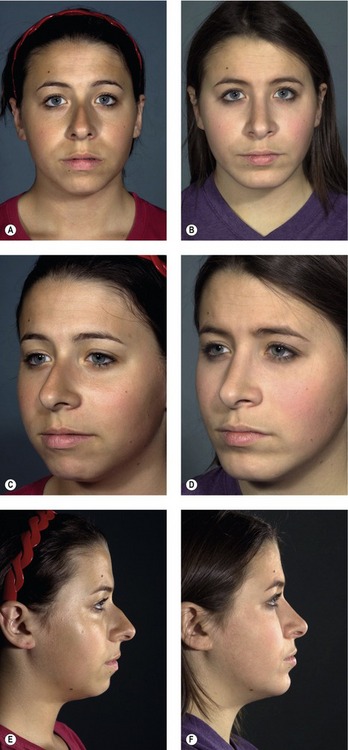
Fig. 37.37 18-year-old female with narrow dorsum and wide pyramid requiring bilateral spreader grafts, infracture and cephalic margin resections to establish good dorsal lines.
 -inch tape is wrapped around the tip of the nose and the loop cinched to place pressure on the alar cartilages in such a way as to hold the alar cartilages in the planned position and reduce swelling in the tip. Mastisol adhesive is applied to the tape and an Aquaplast custom designed cast is applied to the nose.
Complications
Bleeding, airway obstruction, and infection are the most common complications with nasal surgery. Severe nasal hemorrhage is rare but possible. One must consider a coagulopathy or an injury to the dorsal nasal artery (branch of the anterior ethmoidal artery) during lateral osteotomy. Nasal packing and Valium for sedation will control most nasal bleeds postoperatively. However, should brisk bleeding persist, one should not be hesitant to take the patient back to the operating room for proper control. Airway obstruction from failure to protect the internal or external valves is a distinct possibility and should be considered during the execution of every step of the surgical procedure. Infections following routine cosmetic rhinoplasty are rare, especially one involving the skin envelope. More likely to occur is an infection of one or both of the inferior turbinates following partial resection or cauterization. Systemic antibiotics and nasal lavage with antibiotic solution are recommended in those rare cases.
Pearls & pitfalls
Pearls
• Don’t be afraid to do it closed. Mentally visualize the anatomy through the skin.
• Do not distort the anatomy with excessive injection of anesthetic hemostatic solution.
• Protect the most dorsal cephalic mucoperichondrium attachment to the septum if spreader grafts are planned.
• A strut graft can help stabilize any tip.
• A carefully controlled medial osteotomy makes infracture and bone positioning easier.
Pitfalls
• Using grafts that will be visible when the skin contracts. Sculpture grafts and make them as small as possible for the intended purpose.
• Failure to deliver the alar cartilages (rim incisions) when tip sculpturing is needed.
• Failure to curette the subcutaneous pocket after rasping or scissor trimming of the nasal dorsum.
Summary of steps
1. General anesthesia is established with a laryngeal mask in place.
2. Inject nose with 3.5 to 4 mL 1% xylocaine with 1 : 100,000 epinephrine.
3. Nose is packed with 4% cocaine impregnated cotton strips (neosynepherine).
4. Bilateral intercartilaginous incisions with a number 15 scalpel blade.
5. Dorsum undermined in subperichondral/subperiosteal plane with Joseph periosteal elevator.
6. Transfixion incision made with button knife followed by curved Stevens scissors.
8. Distal cartilaginous dorsum lowered with angled scissors.
9. Bony dorsum lowered with double guarded osteotome and rasp.
10. Subcutaneous skin pocket curetted for debris.
11. Caudal border of septum shortened if indicated.
12. Submucous resection, septal straightening, cartilage harvesting performed.
13. Lateral osteotomy, medial osteotomy and infracture.
14. Spreader grafts placed if indicated.
15. Strut grafts placed through columella rim incision if indicated.
16. Tip contouring grafts placed as indicated
17. All incisions sutured with 4.0 chromic catgut.
18. Inspection of final result.
19. Telfa applied to nasal skin, paper tape applied to hold in position, Mastisol applied to tape and Aquaplast cast applied.
Gunter J, Rohrich R, Adams W. Dallas Rhinoplasty, 2nd edn, St. Louis, MO: Quality Medical Publishing, 2007.
Janis J, Rohrich R, Rhinoplasty. Thorne CM, Beasley RW, Aston SJ, Bartlett SP, Gurtner GC, Spear SL. Grabb and Smith’s plastic surgery, 5th edn, New York: Lippincott-Raven, 1997.
Millard DR, ed. Symposium on corrective rhinoplasty. St. Louis, MO: CV Mosby, 1976.
Peck GC, ed. Complications in aesthetic surgery. Baltimore: Williams and Wilkens, 1992.
Peck GC. Techniques in aesthetic rhinoplasty, 2nd edn. New York, NY: Thieme-Stratton; 1984.
Rees T, Latrenta G. Aesthetic plastic surgery. Philadelphia: WB Saunders, 1994.
Rees T, Wood-Smith D. Cosmetic facial surgery. Philadelphia: WB Saunders, 1973.
Sheen JH, Sheen AP. Aesthetic rhinoplasty. St. Louis, MO: CV Mosby; 1987.
Sheen JH. Rhinoplasty: personal evolution and milestones. Plast Reconstr Surg. 2000;105(5):1820–1852.
Sheen JH. Spreader graft: a method of reconstructing the roof of the middle nasal vault following rhinoplasty. Plast Reconstr Surg. 1984;73(2):230.
[/level-membership-for-plastic-reconstructive-surgery-category][not-level-membership-for-plastic-reconstructive-surgery-category]
CHAPTER 37 Primary closed rhinoplasty
Physical evaluation
• Take a complete medical history.
• Evaluate entire face for shape, size, symmetry and proportion including the chin.
• Evaluate the nasal tip for size, shape, position of tip defining points and skin quality, especially thickness. Feel the nasal tip.
• Evaluate the nasal base and alae in relationship to the tip lobule and nasal pyramid.
• Evaluate the columella for position in the midline, straightness, width, length and position relative to alar rims.
• Observe the dorsal lines and the cartilaginous mid vault. Are the upper lateral cartilages providing midvault support. Do the internal valves collapse with inspiration?
• Evaluate the length of the nasal bones, width of the bony pyramid and the junction of the upper lateral cartilages and the nasal bones.
• Evaluate the profile for nasal length, height, contour, tip projection, radix depth and nasolabial angle.
• Evaluate the nose during facial animation (smiling from the front and profile) and observe changes in the alar base width, downward tip movement, and upper lip retraction.
• Careful examination of the septum, turbinates, internal and external valves.
• High quality photographs: front view, worms eye, three-quarter right and left views and profiles in repose and smiling.
Anatomy
Nasal tip
The nasal tip shape, size and projection is for the most part determined by the paired (though not necessarily symmetrical) alar cartilages, each of which have medial, middle and lateral crura, and their relationship to the adjacent structures (Fig. 37.1). The medial crura consists of flared (usually) footplates and the columella segment. The middle crus is a continuation of the medial crura and joins the lateral crus. The columella lobular junction is the transition from the nasal base to the tip lobule. The middle crus extends from the columella lobular junction to the lateral crus. The tip defining points, usually at the apex of the junction of the middle crus and lateral crus (the most projecting point on each side of the tip), produces an external light reflex (Fig. 37.2). The lateral crura make up the largest part of the nasal tip and join the accessory cartilages, which join the lateral crura to the pyriform aperture. The cartilages are supported by suspensory ligaments to each other and the caudal border of the upper lateral cartilages. The caudal edge of the lateral crura of the lower lateral cartilages, the nostril sills, the membraneous septum and the alae make up the external nasal valve (Fig. 37.3).
Upper lateral cartilages
The upper lateral cartilages and their attachment to the septum make up the cartilaginous mid-vault. The junction of the upper lateral cartilages with the cephalic margin of the lower lateral cartilages defines the scroll area. The angle of the junction of the septum and upper lateral cartilages at this point determine the internal valve (usually 10 to 15 degrees). The cephalic end of the upper lateral cartilages is overlapped by the nasal bones for several millimeters. This is important in maintaining mid-vault support. The junction of the upper lateral cartilages with the nasal bones and septum has a T-shaped contour and is known as the keystone area.
Nasal bones
The nasal bones vary in length and thickness and along with the ascending frontal process of the maxilla make up the bony vault. The nasal bones articulate with each other medially, the upper lateral cartilages inferiorly, the maxilla laterally, the frontal bones superiorly and the perpendicular plates of the ethmoid posteriorly. Nasal osteotomies (Fig. 37.4) are best performed through the thinner bone along the transition zone in the ascending frontal process of the maxilla that exists from the pyriform aperture to the radix.
Nasal profile
The nasal profile (Fig. 37.5) is dictated by the osteocartilaginous vault and its relationship to the alar cartilages. Understanding this relationship is important when one considers reducing the dorsal hump (which is often more cartilage than bone). The amount of resection should be guided by the amount of tip projection, the nasal frontal angle and the supratip break on the lateral views. Tip projection is the distance the nose projects from the face, or more anatomically defined as the distance from the tip of the nose to the most posterior point of the nose-cheek junction. The nasal frontal angle, which approximates 115 to 130 degrees, its location and depth, will dictate if it should be left alone, lowered, augmented or if the dorsal hump should be reduced. Similarly, if the nose lacks tip projection, increasing tip projection (tip augmentation, strut graft) may alleviate the need for, or influence the amount of dorsal hump reduction.
Columella and nasolabial angle
In the lateral view the preferred appearance of the columella is a slow curving structure traveling from the nasal tip to the base of the nose with a slight overhang in comparison to the alar base. In the basal view, a 2 : 1 ratio of the length of the columella to the length of the lobule is desirable (Fig. 37.6) and the base should be slightly wider than the confluence of the columella with the tip. In patients with a deficient columella, one will find a disruption of the length ratio between the columella and the lobule along with a distortion or the flaring of the alae. This is a common finding in some ethnic noses such as African and Asian. A retracted columella may occur in isolation or in combination with other abnormalities like a plunging tip. Even though the medial crura, the membraneous septum and the caudal septum all contribute to the shape of the columella, augmentation of the medial crura with a cartilage graft is the most common option for correction of a retracted columella. In comparison, an overhanging columella can often be corrected by a simple trim of the caudal septum or a reduction of the most caudal edge of the medial crura.
Nasal deviation
External deviation is primarily a result of deformities present in the nasal bones, cartilaginous septum or the nasal tip. A thorough pre-operative exam that evaluates the dorsal lines (Fig. 37.7) will help define the anatomic areas where the deviation occurs (upper, middle or lower third of the nose). The dorsal lines begin in the infra-brow area, curving gently, to converge at the level of the medial canthus, then diverge slightly at the keystone area and continue to diverge slightly as they continue down to the tip defining points. With this information the deviation can be addressed at different steps of the procedure: Infracture of asymmetric nasal bones for an upper third deviation, septoplasty and/or placement of unilateral spreader grafts for middle third deviations and revision of tip asymmetry or nasal spine repositioning for lower third deviation. Even in cases without deviations, the location of the nasal bones in reference to the nasal base width will dictate whether infracture is necessary. In most instances a wide nasal base, which is greater than 80% of the alar base width, will require infracture to improve the frontal view proportions.
Technical steps
A double-prong retractor placed along the alar rim lifts superiorly and the intercartilaginous grove is visualized (Fig. 37.8). Bilateral intercartilaginous incisions are made from medial to lateral keeping the back of the number 15 blade flush with the most caudal border of the upper lateral cartilages (Fig. 37.9). Care is taken not to retract too aggressively so as to place the incision in the mucosa on the edge or intranasal surface of the caudal end of the upper lateral cartilages, as scar contracture is likely to occur. The blade on each side is reversed and swept across the distal third of the nasal dorsum. Next, the soft tissue envelope covering the dorsum of the cartilaginous and bony framework is dissected in the subperichondral and subperiosteal planes with a Joseph periosteal elevator (Fig. 37.10). Dissection is limited to the dorsum so as to preserve the attachment of the soft tissue envelope to the lateral portions of the nasal bones. A transfixion incision is then performed with a curved button knife placed through each intercartilaginous incision and moved down against the caudal border of the septum (Fig. 37.11). The integrity of the membraneous septum and the columella is maintained by two skin hooks placed at the base of the columella and retracted caudally. Further inferior extension of the transfixion incision may be made with small curved Stevens scissors to permit access to the nasal spine and to the depressor septi nasi muscles.
[/not-level-membership-for-plastic-reconstructive-surgery-category]
