30 Pre- and post-treatment photography
Summary and Key Features
• Photography is an essential part of the care of the aesthetic patient
• To be credible in the eyes of patients, and of maximum utility for follow-up, photographs should be of consistent quality, with reproducible lighting, standard poses, camera angles, and color rendition
• Pre-treatment photographs contribute to patient satisfaction and retention by helping patients to appreciate the benefits of treatment when they return for follow-up
• Pre-treatment photographs are of great value in the efficient and satisfactory management and resolution of disappointments, misunderstandings, and complications
• The efficient, consistent use of photography during the pre-treatment consultation, and at follow-up visits as the years go on, saves time and makes money
• The only photographs I have ever regretted are the ones I did not get!
Technical considerations
 Lighting
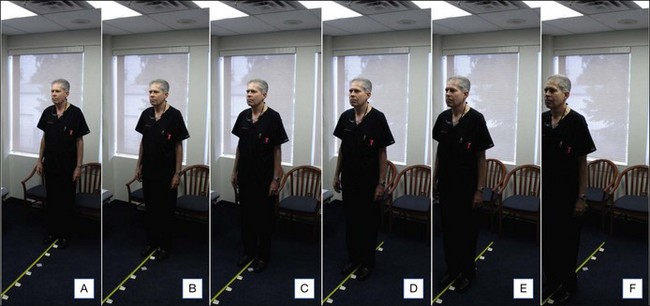
Consistent, symmetrical overhead lighting is vital for credible pre- and post-treatment photography of both the filler patient and the patient being treated with botulinum neuromodulator type A (BoNT-A). This can be done in many offices by finding a point in each examination room where the patient will be standing equidistant between two overhead fluorescent lights (Fig. 30.1 and Video 1), and in a position where the lines and contours of the face will be properly lit. If the overhead lights in your office are not suitable, an electrician can install a couple of light-emitting diode (LED) panels on a single light switch to provide symmetrical illumination for patients standing in a predetermined location in each examination room and / or treatment room (search for the key words ‘led panels ephoto photography’ on www.amazon.com to see a selection of such panels). LED panels have the advantages of very long life (thousands of hours of use), low energy consumption, stable color temperature immediately after being switched on, diffuse light output, and small size.
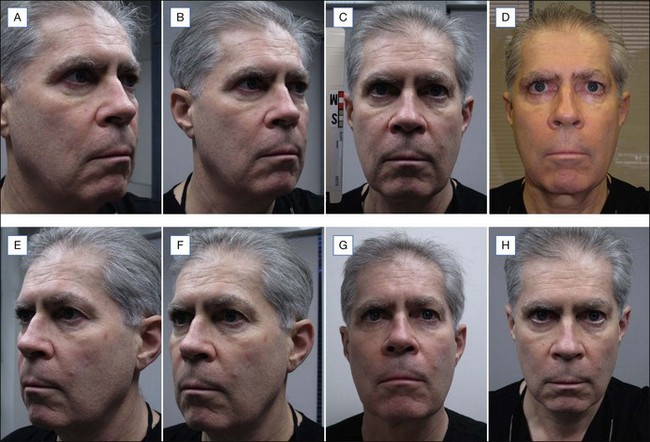
It is important not to use a camera-mounted flash when photographing patients before or after fillers or BoNT-A, because the flash will fill in and obscure facial lines, creases, and contours (Fig. 30.2, compare C versus D; Table 30.1). Flash photography is excellent for the assessment of skin color and telangiectasia, and so is essential in that aspect of the management of the aesthetic patient.
| Characteristic of photograph | Camera-mounted flash | No flash, symmetrical overhead lighting |
|---|---|---|
| Color rendition | Best | Good |
| Fine detail | Best | Good |
| Contour | Poor – filled in by flash | Good when properly lit |
| Lines and creases | Poor – filled in by flash | Good when properly lit |
Color

To ensure consistent color rendition, the settings I use are detailed in Table 30.2. You will note that a relatively high ASA of 400 is used, in order that the shutter speed will be at least  second during handheld non-flash shots, thus minimizing the effect of motion. I have found it useful to apply Scotch-Tape® over the ASA and exposure adjustment dials on the camera body, to reduce the chance that the settings will be accidentally changed over the course of thousands of photographs.
| Example of custom settings for Canon G12 | C1: flash | C2: no flash |
|---|---|---|
| Exposure adjustment* | 0 | 0 |
| ASA * | 400 | 400 |
| Exposure | Center weighted | Center weighted |
| Macro | On | On |
| Dynamic range correction | 0 | 0 |
| Light source and custom color balance (blue / amber and magenta / green) | Flash | Fluorescent |
| B2, M2 | B3, 0 | |
| My colors | Off | Off |
| Bracketing | Off | Off |
| Single shot | On | On |
| Flash power adjustment | 0 | n/a |
| Flash | On | Off |
| Neutral density filter | Off | Off |
| Aspect ratio | 4 : 3 | 4 : 3 |
| JPEG / RAW | JPEG | JPEG |
| Maximum resolution | On | On |
*Exposure adjustment and ASA dials are taped down, to reduce the chance that they will accidentally be changed.
Considering that there can be substantial variation between the color of an image as it is displayed on the camera and the color of that image when printed by a color laser printer, and considering that it is the printed images that will be viewed by myself and my patients, I have found it vital to set a custom color balance in each of the settings C1 and C2 so that the color rendition of the printed images will have maximum credibility and consistency. This custom color balancing is worth the effort, considering the great value it adds to the thousands of photographs per year that are taken in a busy aesthetic practice (for example, I took about 7000 patient photographs in the first 6 months of 2011). Custom color balancing is done by taking a series of shots (Fig. 30.3) under standard lighting, varying only the color balance settings (green / magenta and blue / amber), printing out the results, picking the most accurate color rendition, then iterating if necessary until the best possible solution is found. The process is repeated to determine the best color balance for use with the built-in flash on the camera. Then the custom color balance for C1 or C2 (if you are working with a Canon G11 or G12) is set. You will probably not need to change that setting until you switch to another camera or another color laser printer, perhaps in a few years. You should carefully record a list of all of the settings on your camera, so that the settings can be restored if necessary (for example, if you send the camera away to be serviced or repaired).
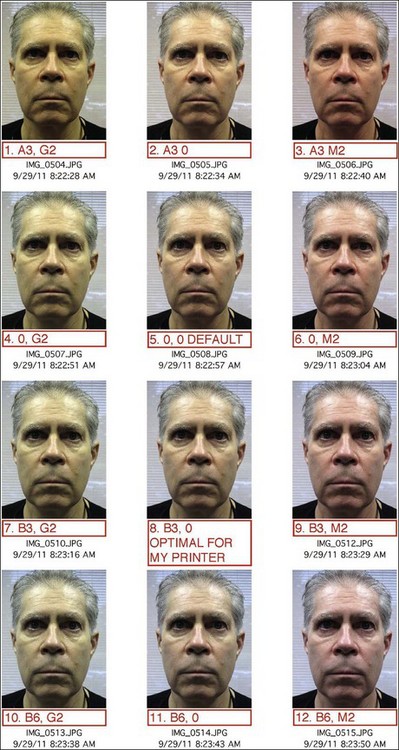
Figure 30.3 Method of finding the best color balance settings for standard flash or non-flash photographs. This array of images illustrates a range of custom color balance setting. In order to determine the correct setting for accurate output on a given printer, simply shoot an array of standard photographs, carefully recording the camera settings, then after printing the images pick the most accurate print(s), and take another array of photographs with parameters tightly grouped around those used for the best photographs from the first series. After a couple of iterations, you will zero in on the ideal parameters for your lighting and your printer (see Table 30.1, Camera settings).
Consent
Photography procedure
My usual procedure for photography is:
1. I briefly explain that before treatment I will take some photographs to help the patient see how they are responding to treatment when they return for follow-up.
2. I ask the patient to stand centered behind the photograph marker on the carpet (Fig. 30.4, inset) with their back to the window. By positioning the patient with their back to the window I eliminate window light as a variable.
3. The camera is switched to the appropriate preset mode (on my Canon G12, C1 is used for flash photographs, and C2 for non-flash photographs).
4. The camera is held at the level of the patient’s nose, at a distance of about 40 cm from the face.
5. For at least one photograph in each series, the patient’s chart tab is held close to the face, so that the patient’s name and chart number are included in the photograph (see Fig. 30.2C). This ensures positive identification when the photographs are printed. The chart tab also provides objective black and white references, which can be helpful in rare cases where a photograph is being color balanced for publication; the tab furthermore provides an objective size reference if it is necessary in the future to determine the size of a mole or other feature in the photograph.
6. Anterior and oblique photographs of the patient’s relaxed face are obtained (see Fig. 30.2), as necessary, to illustrate the features that will be treated. If fillers are to be used on the nose, lateral photographs are also taken. When the pre-jowl sulcus is to be treated, it can be helpful to take a photograph with the camera held at the level of the top of the head, at a distance of about 40 cm, pointing downward at about a 30° angle at the face (see Fig. 30.2H).
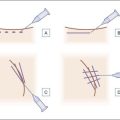
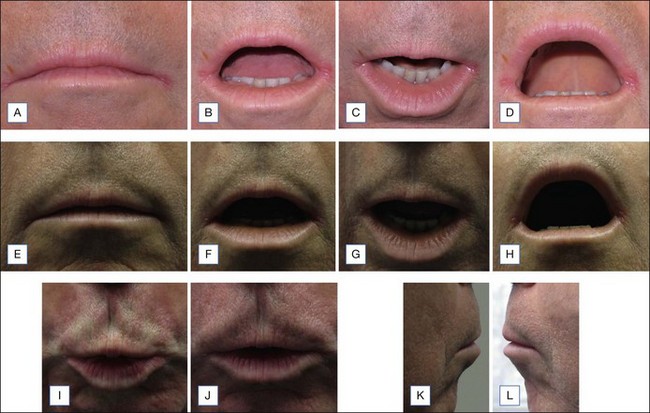
7. If treatment of the lips with fillers is anticipated, it is quick, cheap, and easy to obtain the pre-treatment series shown in Figure 30.5. Without these baseline images, follow-up visits can occasionally be stressful and difficult to resolve whether the patient notices real or imagined asymmetry, ‘duck lips’, ‘trout lips’, or ‘bumps’ along the wet–dry junction. Because many individuals eventually develop vertical lines, in particular above the vermilion border of the upper lip, it is valuable to obtain photographs of the upper lip with the camera pointing down at the upper lip, with the lips relaxed, then at full contraction, and finally with the lips partially relaxed. (This sequence seems to be the one that patients are most easily able to comprehend and cooperate with.)
8. If treatment with BoNT-A is anticipated, photographs of the face showing activity of the facial muscles are taken – for example, before treatment of the forehead the sequence would be: relax, brows up, scowl, crinkle your nose (to illustrate ‘bunny lines’). For crow’s feet, oblique photos are taken: relax, close your eyes tightly (orbicularis oculi), relax your face, now give me a big toothy smile (zygomaticus major and minor, +/− orbicularis oculi). Similarly, relaxed and full-contraction photographs are taken of other muscle groups to be treated (Box 30.1).
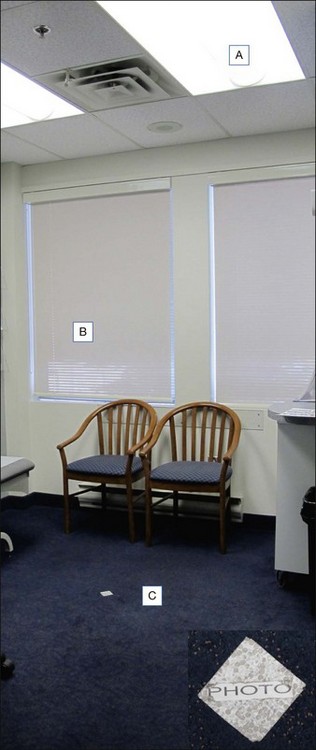
Figure 30.4 Examination room layout for photography. A = overhead fluorescent lights: if symmetrical overhead lights are not available, a pair of light-emitting diode panels can be installed to provide illumination during non-flash photography. B = roller blinds in front of Venetian blinds on windows, providing a neutral backdrop, and privacy if the patient disrobes; also reduces glare and heat load on bright days. C = marker on the floor, which the patient stands behind with their back to the window when being photographed before and after filler and BoNT-A treatment. The marker is equidistant between the overhead lights and is at the point determined as shown in Figure 30.1, which gives the best balance of light and shadow. It is a 5 cm square of SOLAS Marine Tape, with a label saying ‘PHOTO’ (inset). (Without the label, many patients try to peel the tape off the carpet and put it in the garbage for me.) Patients also stand behind this marker during flash photography, before and after laser and intense pulsed light treatment for telangiectasia and dyschromia.
Box 30.1
Standard poses
Anterior view
 *Relaxed – to illustrate relaxed state, and to visualize static lines and creases, and areas of volume depletion or excess, alignment, and contours of the nose and lips
 *Brows up – frontalis
 *Frown – glabellar complex
 Crinkle nose – bunny lines: nasalis and levator labii superioris alaeque nasii
 Perioral wrinkles – orbicularis oris

 Turn corners of mouth down – depressor angui oris and platysma

Right and left oblique view
 *Relaxed – static lines and creases, areas of excess and deficient volume, contours of the nose and lips, contours of nose
 *Close eyes tightly – orbicularis oculi
 *Open eyes, big toothy grin – zygomaticus major and minor, and orbicularis oculi
 Crinkle nose – bunny lines: nasalis and levator labii superioris alaeque nasii
 Perioral wrinkles – orbicularis oris

 Turn corners of mouth down – depressor angui oris and platysma


Viewing photographs at follow-up
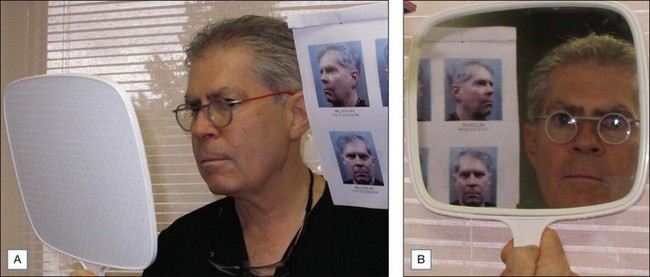
Patients who are allowed to view their pre-treatment photographs seem to estimate their degree of improvement as being greater, and have higher satisfaction, than patients who are not allowed to view their pre-treatment photographs. It is often helpful to give the patient a large, square hand mirror (Fig. 30.6) and to hold the pre-treatment photograph beside the patient’s face, so that the patient can look in the mirror and simultaneously see their face and also their pre-treatment image (which will be reflected in the mirror so that the right side of the image will be on the patient’s right-hand side, and the left side of the image will be on the patient’s left). This helps many patients to assess their response to treatment, and to discuss additional treatment. For the most accurate comparison, the patient is sometimes invited to stand at the same point in the room under symmetrical lighting where the pre-treatment photographs were shot, so that post-treatment lighting will be very similar to that used when the photographs were taken.
Hawkins SS, DeSantis C, Matzke M, et al. Consumer evaluation of before and after photographs increases perception of anti-aging benefits. Journal of the American Academy of Dermatology. 2004;50(suppl):P27. (poster abstract)
http://fr.wikisource.org/wiki/La_B%C3%A9gueule, 02 October 2011.
http://www.amazon.com/s/ref=nb_sb_noss?url=search-alias%3Daps&field-keywords=led+panels+ephoto+photography&x=0&y=0, 02 October 2011.
http://www.steves-digicams.com/camera-reviews/canon/powershot-g12/canon-powershot-g12-review.html, 02 October 2011.
http://www.xerox.ca/office/printers/colour-printers/colorqube-8570/enca.html, 02 October 2011.
http://www.xerox.ca/office/printers/colour-printers/phaser-6500/enca.html, 02 October 2011.
1877 Voltaire 1772 La Béguele. In: Œuvres Complètes X. Paris: Garnier; 1877:50.