[level-membership-for-surgery-category]
8 Practical procedures and patient investigation
General precautions
• Needles should not be resheathed and all disposable sharp instruments discarded by the operator should be placed in an appropriate container to minimize the risk of needle-stick injury
• Drapes and other soiled equipment should be placed in appropriate containers
• Gloves and gown should only be removed after all used instruments and disposable equipment have been placed in appropriate containers.
Aseptic technique
Transmission of infection is an ever-present problem, and the risk of spread should be minimized. As a minimum precaution, the skin should be cleansed with an antiseptic solution before all procedures, and sterile instruments used. For some procedures, such as central venous catheterization, bladder catheterization, insertion of chest drains and lumbar puncture, a full aseptic technique must be employed. The steps required are outlined in Table 8.1.
Suturing
Suture materials
Non-absorbable sutures
Non-absorbable sutures may be classified into three groups:
1. Natural braided sutures (e.g. silk, linen) have good handling qualities and knot easily and securely. Their disadvantage is increased tissue reaction and suture line sepsis, caused by the capillary action of the braided material drawing micro-organisms into the suture track. Such materials also lose tensile strength quickly with time, or when wet.
2. Synthetic braided materials (e.g. Nurolon, Ethibond, Mersilene) cause less tissue reaction than natural materials. They have good handling qualities and knot easily and securely.
3. Synthetic monofilament materials (e.g. nylon, polypropylene) have less drag through the tissues and cause little tissue reaction. They are free from the capillary effect of braided sutures and cause less suture track sepsis. However, they handle less well because of increased ‘memory’ (i.e. they retain the configuration in which they were packaged). Knots in monofilament sutures are less secure than those in braided or natural sutures, requiring multiple throws on each one.
Suturing the skin
• Tissue should be handled gently. The wound should not be rubbed with swabs. Blood in a wound is removed by pressing a swab on to it
• Haemostasis should be meticulous to prevent wound haematoma
• All foreign material and devitalized tissues should be removed. Where this is prevented by heavy contamination, delayed primary suture or secondary suture should be considered
• Potential spaces (dead space) in the wound should be closed using absorbable suture material such as Vicryl. Where this is not possible, a suction drain is led from the potential space before more superficial layers are closed
• The tension on knots is critical. If they are tied too tightly, the suture line may become ischaemic, leading to delayed healing or non-healing and an increased risk of wound infection. Equally, insufficient tension on the suture may result in failure to appose the wound edges or inadequate haemostasis.
Similar principles apply when using a continuous suture. A subcuticular continuous suture is preferred by some surgeons and avoids the small pinpoint scars at the site of entry and exit of interrupted sutures, or the ugly cross-hatching that results if sutures are tied too tightly or left in too long. Table 8.2 gives the suggested times for removal of sutures. Cosmetic results as good as those achieved by subcuticular suturing can be obtained by removing sutures in half the times listed in Table 8.2 and by replacing them with adhesive strips (e.g. Steristrip). Skin stapling is commonly used for closure of wounds at any site, as it can be undertaken rapidly. The staples are supplied in disposable cartridges for single patient use and are easily removed.
Airway procedures
Maintaining the airway
Procedure
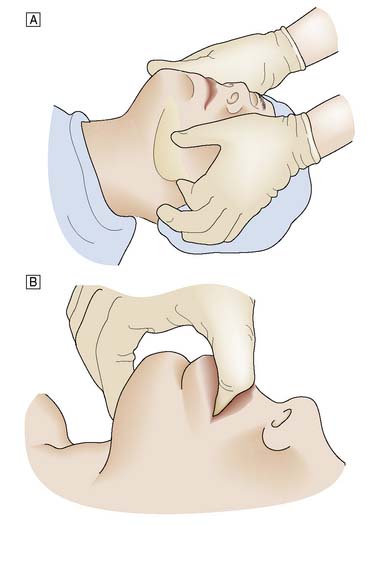
When the patient has to be kept supine, the neck should be extended. The mouth is opened slightly and the mandible pulled firmly forward by pressure applied behind both angles of the jaw. The mandible is held in this position by closing the mouth and using the teeth as a splint. Forward pressure is maintained behind the angles of the jaw (jaw-thrust manoeuvre) or submentally (chin-lift manoeuvre), avoiding pressure on the soft tissues (Fig. 8.1). In some cases, particularly in edentulous patients, an oropharyngeal airway helps to maintain a patent airway.
The laryngeal mask airway
Procedure
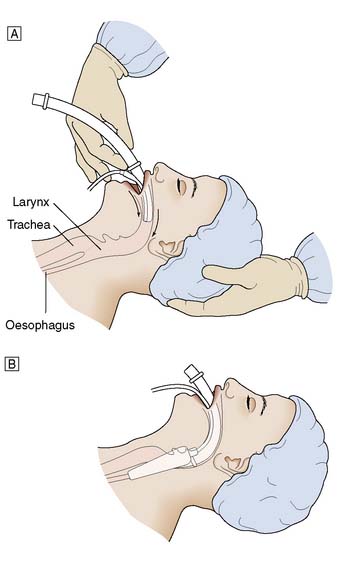
For men a size 4 is suitable, and for women a size 3, with smaller sizes being available for children. The cuff should be deflated and lubricated with gel. The patient’s head is maintained in an extended position using the left hand, and the airway is held in the right hand and introduced into the mouth (Fig. 8.2). The airway is passed backwards over the tongue until resistance is felt. It should then be at the level of the larynx. The cuff is inflated and the airway should be seen to rise slightly out of the mouth. Position is confirmed by the ability to ventilate the lungs.
Endotracheal intubation
Procedure
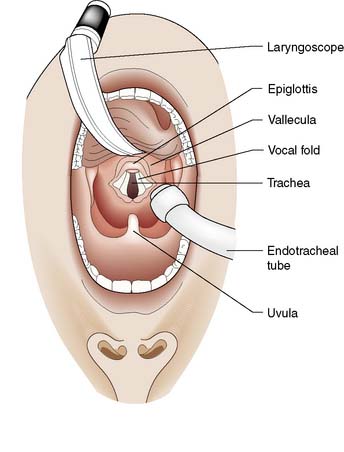
The laryngoscope is held in the left hand; its blade is inserted into the right side of the patient’s mouth and passed backwards along the side of the tongue into the oropharynx. The blade is designed to push the tongue over to the left side of the mouth. Care is taken to avoid damage to the lips and teeth. The laryngoscope is pulled upwards and forwards, not used as a lever, to lift the tongue and jaw and reveal the epiglottis (Fig. 8.3). The blade is then advanced to the base of the epiglottis and the laryngoscope pulled further upwards and forwards to reveal the vocal cords.
Surgical airway
Procedure
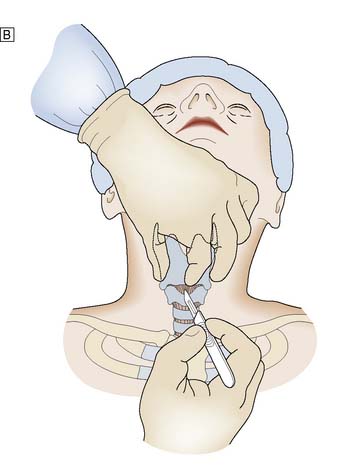
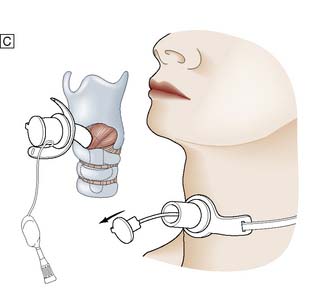
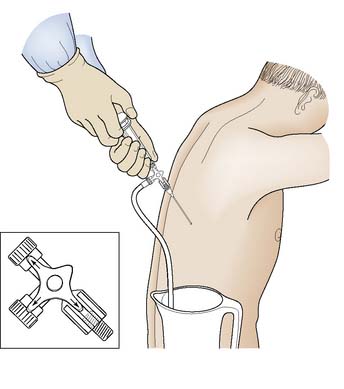
It is important to check all equipment and connections before starting. With the patient in the supine position and the neck in a neutral position, the thyroid cartilage (Adam’s apple) and cricoid cartilage are palpated. The cricothyroid membrane lies between the lower border of the thyroid cartilage and the upper border of the cricoid cartilage. The skin is cleansed with antiseptic solution and local anaesthetic infiltrated into the skin, if the patient is conscious. The thyroid cartilage is stabilized with the left hand and a small transverse skin incision made over the cricothyroid membrane. The blade of the scalpel is inserted through the membrane and then rotated through 90° to open the airway. An artery clip or tracheal spreader may be inserted to enlarge the opening enough to admit a cuffed endotracheal or tracheostomy tube (Fig. 8.4). The central trocar of the tube is removed and the tube connected to a bag-valve or ventilator circuit. The cuff is then inflated and air entry to each side of the chest is checked. The tube is secured to prevent dislodgement.

Thoracic procedures
Intercostal tube drainage
Procedure
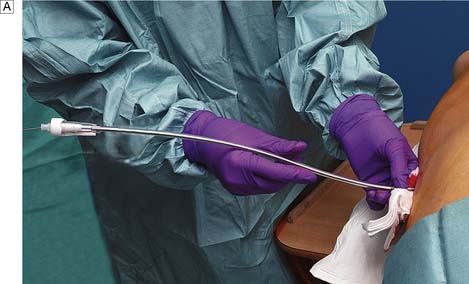
If a low lateral approach is to be used, reference should be made to the chest X-ray to ensure that the drain will not be inserted subdiaphragmatically. A strict aseptic technique must be used. The skin, intercostal muscles and pleura are infiltrated with local anaesthetic. If a rib is encountered by the needle, the tip is ‘walked’ up the rib to enter the pleura above the rib edge. The depth at which the pleural space is entered is determined by aspiration with the syringe. A 3 cm horizontal incision is now made in the skin. A tract is developed by blunt dissection through the subcutaneous tissues and the intercostal muscles are separated just superior to the top of the rib to avoid damage to the neurovascular bundle. The parietal pleura is punctured with the tip of a pair of artery forceps and a gloved finger is inserted into the pleural cavity (Fig. 8.5). This ensures the incision is correctly placed, prevents injury to other organs, and permits any adhesions or clots to be cleared. The trocar is removed from the thoracostomy tube, the proximal end is clamped, and the tube is advanced into the pleural space to the desired length. The tube is sutured to the skin with a heavy suture to prevent accidental dislodgement. A ‘Z’ suture is placed around the incision, wrapped tightly around the drainage tube and tied, thus securing the tube. A sterile dressing and an adhesive bandage are applied to form an airtight seal and prevent aspiration of air around the tube. The drainage tube is attached to an underwater drainage system and a chest X-ray is then obtained. Low-pressure suction may be applied to the drainage bottle to assist drainage or re-expansion of the lung.
Pleural aspiration
Procedure
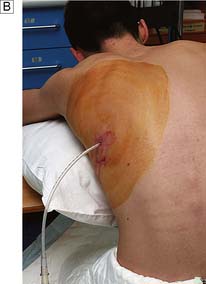
If the volume of fluid to be removed is greater than the volume of the syringe being used, a three-way tap greatly reduces the risk of air entry and allows the syringe to be emptied into a collection vessel (Fig. 8.6); this avoids having to disconnect the syringe each time it is filled. It is normally recommended that no more than 1–1.5 litres of fluid be removed at any one time. This reduces the risk of sudden mediastinal shift or the development of pulmonary oedema associated with rapid re-expansion of a collapsed lung. Coughing or pain on aspiration is an indication that visceral pleura is in close contact with the end of the cannula, which should be repositioned or withdrawn.
Abdominal procedures
Nasogastric tube insertion
Procedure
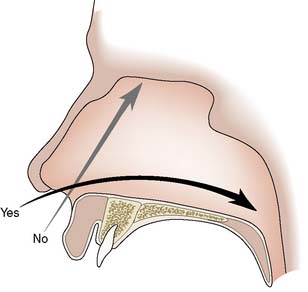
The nose is inspected for any deformity and the more patent nasal passage is chosen for insertion. The patient is placed in the sitting position and a local anaesthetic spray may be used to anaesthetize the nasal passage. The tube is well lubricated with gel and passed backwards along the floor of the nasal passage (Fig. 8.7). A slight resistance may be felt as the tube passes from the nasopharynx to the oropharynx, and the patient should be warned that a retching sensation may be experienced at this point.
Oesophageal tamponade
The Sengstaken tube is a gastric aspiration tube with inflatable gastric and oesophageal balloons, which may be used for emergency treatment of bleeding oesophageal varices. A modification, the Sengstaken–Blakemore or Minnesota tube (see Fig. 14.9), has an additional channel to allow the aspiration of saliva from the oesophagus above the level of the oesophageal balloon.
Abdominal paracentesis
Procedure
A 3 mm stab incision is made in the skin with a scalpel. The trocar is introduced into the catheter and the shaft of the catheter is held firmly between left thumb and index finger some 4–5 cm higher than the estimated depth of the peritoneum. This prevents ‘overshoot’ as the right hand inserts the trocar and catheter through the abdominal wall into the peritoneum (Fig. 8.8).
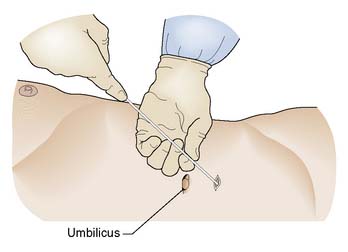
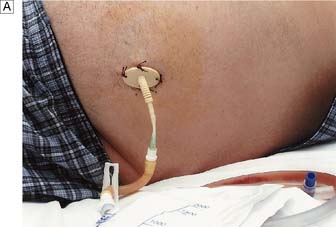
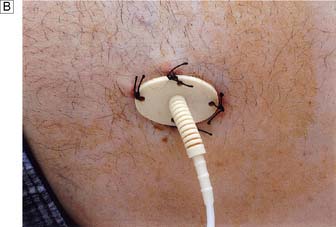
The catheter is then advanced further with the left hand while the trocar is withdrawn with the right. If any resistance is encountered, the catheter is withdrawn 2–3 cm, rotated 180° and then advanced again. The minimum final length of catheter within the peritoneal cavity must be 10 cm. If this position is not obtained, the side perforations of the catheter may lie within the abdominal wall and allow troublesome extravasation of ascitic fluid into the subcutaneous tissues. The catheter is secured to the skin and attached via a connection tube with a flow-control clamp to a sterile drainage bag (Fig. 8.9).
Vascular procedures
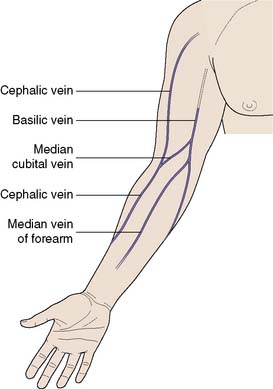
Venepuncture
The antecubital fossa is the most convenient site, as the median cubital vein, median vein of the forearm and the cephalic vein are all easily accessible (Fig. 8.10). Care must be taken to avoid the brachial artery. Sampling from smaller veins on the forearm or the back of the hand may at first sight appear more attractive, but these veins collapse easily on aspiration and adequate samples are difficult to obtain. In cases of extreme difficulty, the femoral vein should be considered. This vessel lies medial to the femoral artery, which is used as a landmark. In adults, a 21-gauge needle is used; in children, a 23- or 25-gauge will suffice.
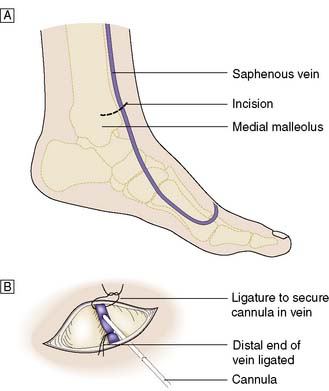
Venous cutdown
Venous cutdown for fluid replacement is rarely required, except in seriously hypovolaemic patients, usually following trauma and should only be regarded as a temporary measure for resuscitation. The most common site is the long saphenous vein at the ankle (Fig. 8.11) or at the saphenofemoral junction in the groin. Other sites include the basilic vein in the antecubital fossa or the cephalic vein at the wrist.
Central venous catheter insertion
Internal jugular vein cannulation
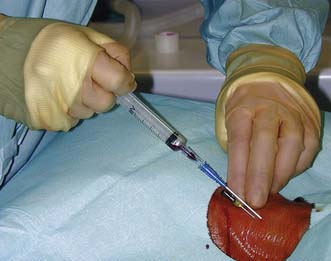
Procedure
Using ultrasound guidance an 18-gauge needle on a 10 ml syringe held in the right hand, the needle is advanced through the skin just lateral to the carotid pulsation, at an angle of 60° to the skin and in the line of the vein (Fig. 8.12). Free aspiration of blood confirms the position of the vein. This manoeuvre is repeated to place a larger (16-gauge) needle in the vein. The flexible ‘J’ end of the guidewire is now passed through this needle into the vein, and the needle removed over it. This leaves the guidewire in the internal jugular vein. A dilator is now passed over the wire into the vein and then withdrawn. The catheter is advanced over the wire and then the wire is removed, leaving the catheter in situ. In most adults, no more than 15 cm of catheter need be advanced into the vein to ensure correct placement. Blood is then aspirated from the catheter to confirm its position in the major vein. Heparinized saline (5 ml) is injected and the catheter is sutured to the skin to fix it in position. A chest X-ray is taken to check the position of the catheter and to exclude the presence of a pneumothorax, which is a recognized complication.
Subclavian vein cannulation
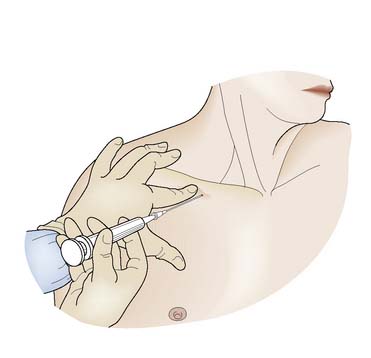
Procedure
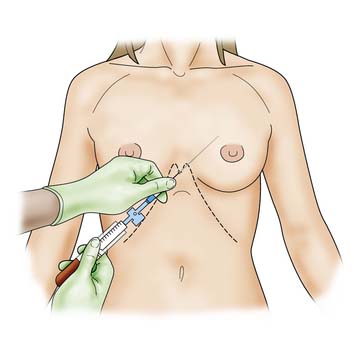
The Seldinger technique is generally used to insert a subclavian catheter. The patient should be placed in a supine position, with head-down tilt of at least 15°. A small pad is placed between the shoulder blades to allow the shoulders to drop backwards. Local anaesthetic is infiltrated into the skin and subcutaneous tissue. Under aseptic conditions, a large-calibre needle attached to a 10 ml syringe is introduced 1 cm below the junction of the middle and medial thirds of the clavicle. The needle is directed medially, slightly cephalad and posteriorly behind the clavicle towards the tip of a finger placed in the suprasternal notch (Fig. 8.13). Applying suction, the needle is advanced until blood is withdrawn into the syringe. The syringe is then disconnected, a flexible guidewire inserted through the needle and the needle removed. The catheter is subsequently passed over the guidewire and the latter is withdrawn. The catheter is flushed with heparinized saline and fixed in position. A chest X-ray is taken to check the position and exclude a pneumothorax. An occlusive dressing covers the skin entry point.
Peripheral venous catheterization
Summary Box 8.1 Central venous cannulation
• Air embolism is always a risk, even in the head-down position
• When using a guidewire, always hold it at some point along its length while it remains in the patient
• Blood should be easily aspirated from the catheter, if it is correctly positioned
• A chest X-ray should always be taken to confirm the absence of a pneumothorax and correct positioning. A rough guide to position is that the tip of the catheter should lie at the level of the carina on X-ray
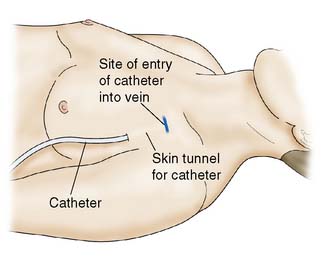
• Cannulae inserted for intravenous nutrition are tunnelled in the subcutaneous tissue to emerge on the chest wall at a distance from the site of entry into the vein (Fig. 8.14). This minimizes the risk of sepsis spreading down the tract into the vein.
 ]. The radial artery at the wrist is the site of choice. The femoral artery or brachial artery at the elbow may also be used.
Needle pericardiocentesis
Procedure
The patient should be monitored throughout this procedure, with particular reference to the vital signs, CVP and electrocardiogram (ECG). An aseptic technique is used and the skin in the subxiphoid region is infiltrated with local anaesthetic. The skin is punctured 1–2 cm inferior to the left xiphochondral junction, using a wide-bore plastic-sheathed needle (at least 15 cm in length) with a syringe attached. The needle is angled at 45° and aimed towards the tip of the left scapula (Fig. 8.15). The syringe is aspirated as the needle is advanced, until it easily fills with blood. ECG changes suggest the needle has been advanced too far. Positive pericardiocentesis must be followed by surgical exploration.
Urinary procedures
Urethral catheterization
Procedure in the male
The urinary catheter is introduced into the urethra with a ‘no-touch’ technique and advanced fully to ensure the balloon on the catheter is within the bladder (Fig. 8.16). Correct placement is confirmed by the passage of urine down the catheter. If this does not occur, suprapubic pressure may help. Alternatively, a bladder syringe can be attached to the catheter and aspiration used. With the passage of urine, the balloon on the catheter is inflated with the recommended volume of sterile water (generally, 10–30 ml). The catheter is gently withdrawn until the balloon engages the bladder neck, and it is then connected to the drainage tubing. It is very important that the foreskin, where present, should be replaced over the glans to prevent paraphimosis.
Suprapubic catheterization
Procedure
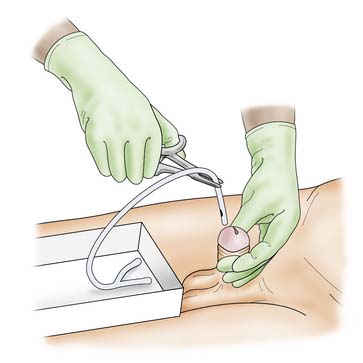
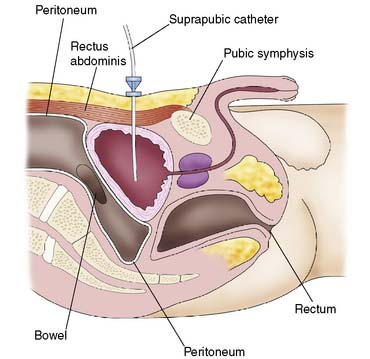
The area is cleansed and draped. Local anaesthetic is then infiltrated through all layers of the anterior abdominal wall, using an 18-gauge needle. The depth and position of the bladder can be gauged by the free aspiration of urine through this needle. The needle is withdrawn and a stab incision made in the skin. The trocar and catheter are advanced through the incision, into the bladder (Fig. 8.17). Entry into the bladder is confirmed by the loss of resistance, at which point the catheter is advanced as the trocar is withdrawn. Free passage of urine confirms correct placement. The catheter must be advanced far enough into the bladder so that the balloon, when inflated, is well within the bladder. The balloon is then filled with 10 ml of water and a sterile dressing is applied.
Central nervous system procedures
Lumbar puncture
Procedure
Lumbar puncture is carried out using a strict aseptic technique. Patients are placed on one side (usually the left), with their back at the edge of the bed or trolley. They are then asked to curl up as much as possible, to flex the lumbar spine and open up the interspinous spaces (see Fig. 5.4).
Imaging
[/level-membership-for-surgery-category][not-level-membership-for-surgery-category]
8 Practical procedures and patient investigation
General precautions
• Needles should not be resheathed and all disposable sharp instruments discarded by the operator should be placed in an appropriate container to minimize the risk of needle-stick injury
• Drapes and other soiled equipment should be placed in appropriate containers
• Gloves and gown should only be removed after all used instruments and disposable equipment have been placed in appropriate containers.
Aseptic technique
Transmission of infection is an ever-present problem, and the risk of spread should be minimized. As a minimum precaution, the skin should be cleansed with an antiseptic solution before all procedures, and sterile instruments used. For some procedures, such as central venous catheterization, bladder catheterization, insertion of chest drains and lumbar puncture, a full aseptic technique must be employed. The steps required are outlined in Table 8.1.
Suturing
Suture materials
Non-absorbable sutures
Non-absorbable sutures may be classified into three groups:
1. Natural braided sutures (e.g. silk, linen) have good handling qualities and knot easily and securely. Their disadvantage is increased tissue reaction and suture line sepsis, caused by the capillary action of the braided material drawing micro-organisms into the suture track. Such materials also lose tensile strength quickly with time, or when wet.
2. Synthetic braided materials (e.g. Nurolon, Ethibond, Mersilene) cause less tissue reaction than natural materials. They have good handling qualities and knot easily and securely.
3. Synthetic monofilament materials (e.g. nylon, polypropylene) have less drag through the tissues and cause little tissue reaction. They are free from the capillary effect of braided sutures and cause less suture track sepsis. However, they handle less well because of increased ‘memory’ (i.e. they retain the configuration in which they were packaged). Knots in monofilament sutures are less secure than those in braided or natural sutures, requiring multiple throws on each one.
Suturing the skin
• Tissue should be handled gently. The wound should not be rubbed with swabs. Blood in a wound is removed by pressing a swab on to it
• Haemostasis should be meticulous to prevent wound haematoma
• All foreign material and devitalized tissues should be removed. Where this is prevented by heavy contamination, delayed primary suture or secondary suture should be considered
• Potential spaces (dead space) in the wound should be closed using absorbable suture material such as Vicryl. Where this is not possible, a suction drain is led from the potential space before more superficial layers are closed
• The tension on knots is critical. If they are tied too tightly, the suture line may become ischaemic, leading to delayed healing or non-healing and an increased risk of wound infection. Equally, insufficient tension on the suture may result in failure to appose the wound edges or inadequate haemostasis.
Similar principles apply when using a continuous suture. A subcuticular continuous suture is preferred by some surgeons and avoids the small pinpoint scars at the site of entry and exit of interrupted sutures, or the ugly cross-hatching that results if sutures are tied too tightly or left in too long. Table 8.2 gives the suggested times for removal of sutures. Cosmetic results as good as those achieved by subcuticular suturing can be obtained by removing sutures in half the times listed in Table 8.2 and by replacing them with adhesive strips (e.g. Steristrip). Skin stapling is commonly used for closure of wounds at any site, as it can be undertaken rapidly. The staples are supplied in disposable cartridges for single patient use and are easily removed.
Airway procedures
Maintaining the airway
Procedure
When the patient has to be kept supine, the neck should be extended. The mouth is opened slightly and the mandible pulled firmly forward by pressure applied behind both angles of the jaw. The mandible is held in this position by closing the mouth and using the teeth as a splint. Forward pressure is maintained behind the angles of the jaw (jaw-thrust manoeuvre) or submentally (chin-lift manoeuvre), avoiding pressure on the soft tissues (Fig. 8.1). In some cases, particularly in edentulous patients, an oropharyngeal airway helps to maintain a patent airway.
The laryngeal mask airway
Procedure
For men a size 4 is suitable, and for women a size 3, with smaller sizes being available for children. The cuff should be deflated and lubricated with gel. The patient’s head is maintained in an extended position using the left hand, and the airway is held in the right hand and introduced into the mouth (Fig. 8.2). The airway is passed backwards over the tongue until resistance is felt. It should then be at the level of the larynx. The cuff is inflated and the airway should be seen to rise slightly out of the mouth. Position is confirmed by the ability to ventilate the lungs.
Endotracheal intubation
Procedure
The laryngoscope is held in the left hand; its blade is inserted into the right side of the patient’s mouth and passed backwards along the side of the tongue into the oropharynx. The blade is designed to push the tongue over to the left side of the mouth. Care is taken to avoid damage to the lips and teeth. The laryngoscope is pulled upwards and forwards, not used as a lever, to lift the tongue and jaw and reveal the epiglottis (Fig. 8.3). The blade is then advanced to the base of the epiglottis and the laryngoscope pulled further upwards and forwards to reveal the vocal cords.
Surgical airway
Procedure
It is important to check all equipment and connections before starting. With the patient in the supine position and the neck in a neutral position, the thyroid cartilage (Adam’s apple) and cricoid cartilage are palpated. The cricothyroid membrane lies between the lower border of the thyroid cartilage and the upper border of the cricoid cartilage. The skin is cleansed with antiseptic solution and local anaesthetic infiltrated into the skin, if the patient is conscious. The thyroid cartilage is stabilized with the left hand and a small transverse skin incision made over the cricothyroid membrane. The blade of the scalpel is inserted through the membrane and then rotated through 90° to open the airway. An artery clip or tracheal spreader may be inserted to enlarge the opening enough to admit a cuffed endotracheal or tracheostomy tube (Fig. 8.4). The central trocar of the tube is removed and the tube connected to a bag-valve or ventilator circuit. The cuff is then inflated and air entry to each side of the chest is checked. The tube is secured to prevent dislodgement.
