CHAPTER 28 Positioning in Peripheral Nerve Surgery
Anatomy, Positioning, and Surgical Exposure
Upper Extremity
Brachial Plexus
Anatomy
The brachial plexus is formed by the ventral primary rami of C5-T1. It provides innervation to the muscles and skin of the upper extremity. Less often, C4 will contribute a branch to C5 (pre-fixed) and T2 will contribute a branch to T1 (post-fixed).1 The roots of the plexus emerge between the anterior and middle scalene muscles and descend over the first rib, posterior to the clavicle. In the lower part of the posterior cervical triangle, after traversing between the anterior and middle scalene muscles, the C5 and C6 roots unite to form the upper trunk. Before this union, C5 gives off the dorsal scapular nerve to the rhomboids and a branch to the phrenic nerve. The C5 root, along with the C6 and C7 roots, gives off contributions to the long thoracic nerve to the serratus anterior muscle. The C7 root continues on as the middle trunk, and the C8 and T1 roots unite to form the lower trunk. The upper trunk gives off the suprascapular nerve to the supraspinatus and infraspinatus muscles as well as the nerve to the subclavius muscle.
Although many variations have been reported, true anomalies of this basic anatomy are rare.2
Positioning
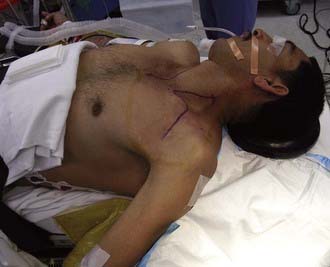
For an anterior approach to the brachial plexus, the patient is placed in the supine position with a bolster under the ipsilateral shoulder (Fig. 28-1). The head is placed in a slight amount of extension and is turned 45 degrees to the contralateral side. The arm is abducted on an arm board. Both lower extremities below the knee are sterilely prepared and draped to allow sural nerve harvesting for grafts. If other sources in the upper extremity, such as medial brachial and antebrachial cutaneous nerves, are to be used for grafting, the entire arm should be prepared. The surgeon should have the ability to work from superior to the clavicle and inferior to it. The arm board should be mobile enough to allow the surgeon to abduct or adduct the arm at the shoulder as necessary.
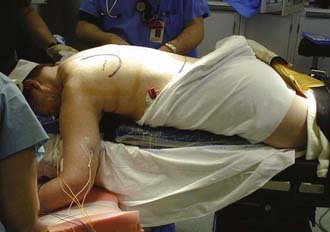
For the posterior approach, the patient is placed in the prone position (Fig. 28-2). Abdominal bolsters are placed to allow the abdomen to hang freely. An additional bolster should be placed under the patient at the level of the clavicle and upper sternum so that the anterior chest wall is lifted slightly off the operating table. The head is turned to the contralateral side. The contralateral arm is protected and tucked next to the patient’s body. The ipsilateral arm is abducted approximately 30 degrees and bent at the elbow. The elbow is then placed on a padded Mayo stand to the patient’s side. The operating table is slightly tilted in a reverse Trendelenburg position. The surgeon works from above the patient’s head as well as from below the patient’s shoulders and side.
For further details of this position and approach, the reader is directed to the paper published by Kline and associates3 or the text by Maniker.4
Surgical Exposure
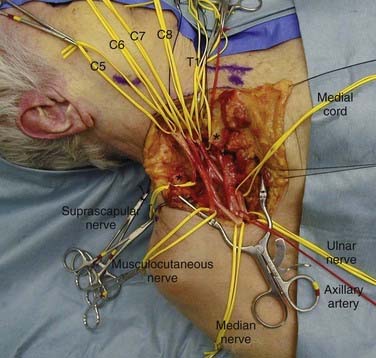
Exposure of the brachial plexus anteriorly may be divided into the supraclavicular and infraclavicular approaches (Fig. 28-3). They can be combined for the full exposure of the plexus or tailored to expose the desired area of the plexus. The supraclavicular portion of the approach exposes the roots, trunks, and proximal portion of the divisions. The infraclavicular portion of the approach exposes the distal portion of the divisions, the cords, and the branches of the brachial plexus.
Median and Anterior Interosseous Nerve
In Forearm
Surgical Exposure
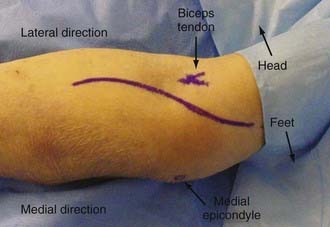
The incision begins 2 to 3 cm above the medial epicondyle over the medial intermuscular septum. Moving inferiorly, it crosses the elbow flexion crease obliquely and just medial to the biceps brachii tendon (Fig. 28-4). The incision continues distally over the bicipital aponeurosis in a gentle curve toward the midline of the forearm. The incision then moves distally down the forearm, following the interval between the flexor digitorum superficialis and brachioradialis. The incision is opened proximally, and the median nerve is located in the interval between the biceps brachii and the medial intermuscular septum. The nerve is traced into the forearm, and the lacertus fibrosus crosses its path obliquely. The nerve next passes deep to the pronator teres muscle. As the nerve is traced, it dives between the two heads of this muscle. The nerve then moves deep to the arch of the flexor digitorum superficialis, and this arch is divided. The median nerve may then be traced to the wrist, where it lies between the flexor carpi radialis and the flexor digitorum superficialis.
The anatomy and surgical exposure of the median nerve in the wrist are covered in other chapters.
Radial and Posterior Interosseous Nerve
In Arm
Surgical Exposure
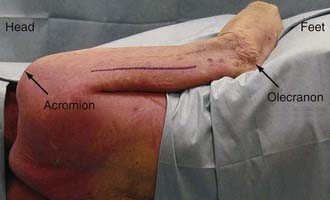
The incision is made on the posterolateral aspect of the arm. An incision in a line connecting the acromion and olecranon, both of which are easily palpated, exposes the sulcus between the long and lateral heads of the triceps (Fig. 28-5). The fascia is incised along the lateral border of the long head of the triceps. The interval between the long and lateral heads is divided bluntly. Retraction of the superficial muscle exposes the radial nerve and profunda brachii artery. The radial nerve may then be traced distally as it passes from the posterior compartment into the anterior compartment of the arm.
In Forearm
Surgical Exposure
The incision begins 3 to 4 cm proximal to the elbow flexion crease in the interval between the biceps brachii and brachioradialis muscles. It crosses the elbow flexion crease obliquely and then curves down onto the forearm lateral to the biceps brachii tendon. The incision should reach the midline of the forearm 4 to 5 cm distal to the elbow flexion crease and then continue distally in the forearm just radial to the midline. The nerve may be identified in the interval between the biceps and brachioradialis just proximal to the elbow flexion crease. The nerve is then traced down into the plane between the brachioradialis and extensor carpi radialis longus muscles. The posterior interosseous nerve should be traced distally as it passes under a vascular leash of vessels, inferior to the arcade of Frohse and into the supinator muscle.5
Ulnar Nerve
In Elbow and Forearm
Surgical Exposure
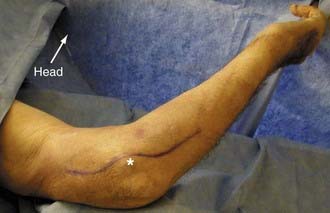
Exposure of the nerve within the cubital tunnel begins with a skin incision 5 cm proximal to the medial epicondyle that curves gently up and over the epicondyle (Fig. 28-6). The incision then continues down onto the forearm for another 4 to 5 cm. The posterior cutaneous nerve of the forearm may cross the operative field, and it should be identified and protected. Once the skin is retracted, the nerve may be found within the cubital tunnel and traced both proximally and distally as needed. Further details may be found in Chapter 28.
Lower Extremity
Sciatic Nerve
Anatomy
The tibial nerve continues the line of the sciatic nerve after its bifurcation in the mid to distal third of the thigh. In the popliteal fossa, the tibial nerve becomes more superficial, first lying posterior and lateral to the popliteal vessels and then crossing obliquely to their medial side before moving into the leg. It travels distally in the leg between the gastrocnemius and the tibialis posterior muscles. Finally, the nerve curves anteroinferiorly into the sole of the foot behind the medial malleolus, deep to the flexor retinaculum and between the tendons of the flexor hallucis longus and the flexor digitorum longus. The nerve in the so-called tarsal tunnel ends at this level as it divides into medial and lateral plantar nerves. A calcaneal branch is also given off at this level. The sural nerve, a cutaneous branch of the tibial nerve, arises at the mid or lower aspect of the popliteal fossa. It gives off branches to the skin on the lower lateral leg and heel.6 The terminal portion of the sural nerve is the lateral dorsal cutaneous nerve that supplies sensation to the lateral foot and small toe.
Surgical Exposure
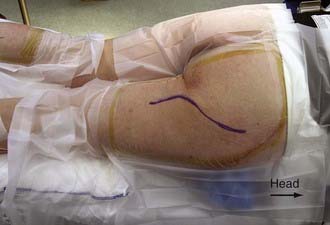
A curvilinear incision in a reverse question mark shape is fashioned. The stem of the question mark will follow the midline of the posterior aspect of the thigh; the curve will follow the inferior margin of the gluteus muscle around the contour of the buttock and up onto the lateral aspect of the buttock (Fig. 28-7). After the skin is incised, the inferior margin of the gluteus maximus muscle is located. At the midline of the leg, just inferior to the edge of the gluteal muscle, a fat pad is found. The sciatic nerve is located within this fat. For more proximal exposure, the gluteus muscle must be divided. A cuff of muscle both medially and laterally must be left for reattachment at the completion of the case. Once the muscle is divided, it is reflected in a unit medially for exposure of the sciatic nerve in the buttock. Exposure of the sciatic nerve more proximal to the sciatic notch will require an abdominal extraperitoneal approach.7
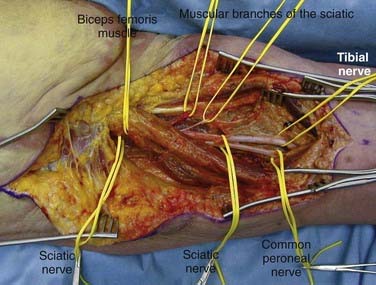
In exposure of the nerve distally, the posterior femoral cutaneous nerve travels superficially and should not be confused with the sciatic nerve. For more distal exposure, the incision may be extended distally along the posterior midline of the thigh, tracing the nerve beneath the long head of the biceps femoris muscle and on to its division into the common peroneal and tibial nerves (Fig. 28-8).
Tibial Nerve
Sural Nerve
Positioning and Surgical Exposure
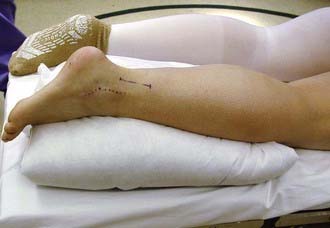
Positioning for exposure of the sural nerve will most often depend on the reason for operation. If sural nerve exposure is required for harvesting a cable graft and the primary nerves to be operated on require the body to be placed in a supine position (e.g., brachial plexus, femoral nerve), the sural nerve may be harvested from a supine position. It is somewhat awkward to perform in this position, particularly as the nerve is traced more proximally, but it can be accomplished. The knee should be bent and the leg tilted medially to facilitate exposure. An incision is laid out two fingerbreadths posterior and two fingerbreadths superior to the lateral malleolus. If sural nerve exposure is required for operations that are performed in the prone position (e.g., harvesting of a cable graft for sciatic nerve), the sural nerve is easily exposed through the same incision as outlined for a supine position. This positioning is much less awkward for the operator, but the exposure and anatomy are identical to those encountered in supine positioning (Fig. 28-9).
DeMaura W, Gilliert A. Surgical anatomy of the sural nerve. J Reconstr Microsurg. 1984;1:31-39.
Hall HC, Mackinnon SE, Gilbert RW. An approach to the posterior interosseous nerve. Plast Reconstr Surg. 1984;74:435-437.
Henry AK. Exposures in the lower limb. Section IV. In: Henry AK, editor. Extensile Exposure. 2nd ed. New York: Churchill Livingstone; 1973:180-307.
Kerr AT. The brachial plexus of nerves in man, the variations in its formation and its branches. Am J Anat. 1918;23:285-395.
Kline DG, Kott J, Barnes G, Bryant L. Exploration of selected brachial plexus lesions by the posterior subscapular approach. J Neurosurg. 1978;49:872-880.
Maniker A. Operative Exposures in Peripheral Nerve Surgery. New York: Thieme; 2005.
Walsh JF. The anatomy of the brachial plexus. Am J Med Sci. 1877;74:387-399.
1 Kerr AT. The brachial plexus of nerves in man, the variations in its formation and its branches. Am J Anat. 1918;23:285-395.
2 Walsh JF. The anatomy of the brachial plexus. Am J Med Sci. 1877;74:387-399.
3 Kline DG, Kott J, Barnes G, Bryant L. Exploration of selected brachial plexus lesions by the posterior subscapular approach. J Neurosurg. 1978;49:872-880.
4 Maniker A. Operative Exposures in Peripheral Nerve Surgery. New York: Thieme; 2005.
5 Hall HC, Mackinnon SE, Gilbert RW. An approach to the posterior interosseous nerve. Plast Reconstr Surg. 1984;74:435-437.
6 DeMaura W, Gilliert A. Surgical anatomy of the sural nerve. J Reconstr Microsurg. 1984;1:31-39.
7 Henry AK. Exposures in the lower limb. Section IV. In: Henry AK, editor. Extensile Exposure. 2nd ed. New York: Churchill Livingstone; 1973:180-307.