[level-membership-for-neurosurgery-category]
CHAPTER 26 Positioning for Cranial Surgery
Pterional (Frontotemporal) Craniotomy
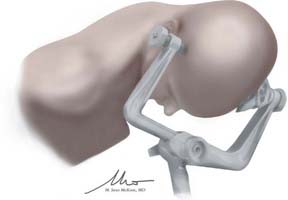
Positioning for the pterional craniotomy begins with placement of the patient supine on the operative table. The patient is then placed in the Mayfield-Kees head fixation or similar cranial immobilization apparatus. When possible, we prefer to position the pins such that the single pin is placed in the frontal bone contralateral to the operative target, approximately 2 to 3 cm above the brow. The dual pins are then placed in the occipital bone on the ipsilateral side. It is usually preferable to place the pins along the axial plane; however, depending on the extent of the planned skin flap, it may be necessary to orient the pins along the sagittal plane. Others, however, advocate placing the single pin posteriorly, a decision that typically comes down to the surgeon’s preference.1 Regardless of this decision, careful attention should be paid to avoid the frontal sinus anteriorly and the mastoid air cells posteriorly. Once the patient is in pins, a shoulder roll is placed under the ipsilateral shoulder along the long axis of the patient. This allows adequate rotation without compromising venous return by obstructing the jugular veins in the neck. We also generally place the patient in some reverse Trendelenburg to promote brain relaxation and to allow the head to be fixed higher than the level of the heart.
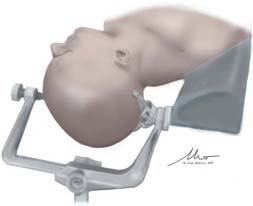
Once the patient’s body has been positioned correctly, the head can be adjusted. Appropriate positioning of the head requires a combination of head flexion, rotation, and neck extension that is designed to provide the ideal surgical trajectory while minimizing brain retraction. The head is first rotated toward the contralateral shoulder. The degree of rotation can vary greatly and is largely dependent on the desired surgical target. For example, internal carotid artery disease is often approached from 5 to 20 degrees of contralateral rotation; anterior communicating artery aneurysms may require up to 60 degrees of rotation to allow optimal visualization of the anterior communicating artery complex. In general, for approaches requiring wide opening of the sylvian fissure, avoidance of excessive rotation is preferred because the greater the contralateral rotation, the more the temporal lobe and its operculum obstruct the trajectory into the sylvian fissure. Once the desired degree of rotation is obtained, the head is laterally flexed slightly, followed by an extension of the neck. This last maneuver should present the malar eminence as the highest point on the patient and aids in retraction by allowing gravity to pull the frontal lobe from the skull base. Once it is in position, the head fixation device is secured to the table (Fig. 26-1). The patient’s arm that is adjacent to the scrub nurse or technician is padded and tucked close to the body; the other arm is supported on an arm board to provide unfettered access for the anesthesiologists. Pillows and padding are placed under the patient’s knees and feet, and the patient is secured to the table with a padded safety belt or padding and tape. In cases in which significant bed rotation is anticipated during the surgery, additional tape or belts are applied to secure the patient to the table.
Temporal and Subtemporal Approach
The temporal or subtemporal craniotomy (or derivatives such as a middle fossa, extended middle fossa approach) may be performed alone (such as for petrous apex disease, other disease of the middle fossa, or basilar apex aneurysms). It may also be performed in conjunction with another approach, such as the pterional or lateral suboccipital craniotomy.2
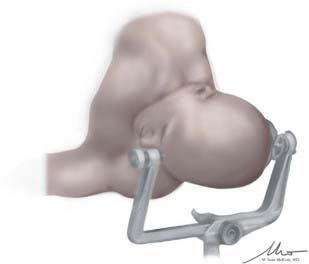
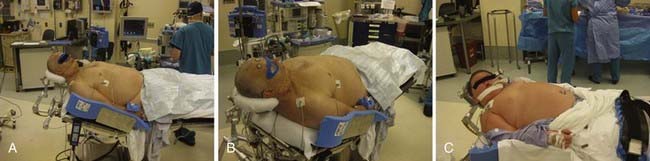
In preparation for the subtemporal craniotomy, the pins are placed for a lateral park bench position. This is accomplished by placing the single pin of the Mayfield-Kees head clamp into the frontal bone 2 to 3 cm above the ipsilateral brow and the dual pins in the occipital bone along the axial plane at midline and contralateral to the surgical site. Once in pins, the patient is placed on the side opposite the operative site on top of a vacuum-ready beanbag, with the inferior arm extended perpendicular to the patient’s body on an arm board. In this position, it is critical to place a small axillary roll under the inferior axilla to avoid compression or other injury to the axillary artery or brachial plexus. Once the dependent arm is properly positioned and the beanbag is hardened, padding is placed between the superior arm and the patient’s body. The arm is then placed in neutral position along the long axis of the torso, with slight flexion at the elbow before it is secured. For the subtemporal approach or middle fossa approach, correct head positioning is critical. The patient is placed in reverse Trendelenburg position to place the head above the level of the heart. In addition, the neck is laterally flexed, with the dependent ear being brought toward the ipsilateral shoulder. This also uses gravity to facilitate gentle retraction of the temporal lobe. The head fixation apparatus is then secured to the table, and the patient’s body is supported with safety belts and tape (Fig. 26-2).
Anterior Parasagittal and Subfrontal Approaches
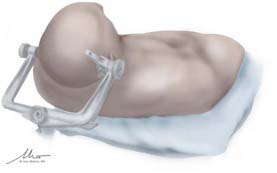
Once in pins, the patient is strapped in with a waist belt, and the head of the bed is raised until the vertex of the patient’s head is within the focal length of the neurosurgeon. The bed may be flexed slightly with concomitant lowering of the legs so that the thighs are elevated while the knees are flexed. Once the bed is in an appropriate position, the head is adjusted to the desired point. For the anterior parasagittal craniotomy, the head is flexed until the point of the planned craniotomy and the planned target are along a comfortable trajectory for the neurosurgeon. For the subfrontal approach, it is often necessary to actually extend the head slightly until the brow is the most superior point on the operative field. This will allow the frontal lobe to fall away from the anterior cranial fossa, minimizing retraction. During this extension, it is important to be mindful of the planned incision so as not to position it out of comfortable range of the surgeon. Despite the degree of flexion or extension, the head is kept in a neutral midline position along the long axis of the patient. Once it is in the desired position, the head is secured. The patient is then secured to the table with pressure points padded as outlined before (Fig. 26-3).
An alternative positioning strategy for the anterior parasagittal approach is to have the patient in a lateral position, with the side down depending on the pathologic process and the angle of attack. The head is then tilted upward until the surgical target is in the appropriate location, placing the pathologic process in the horizontal plane. This can be used, for example, with parasagittal meningiomas, whereby the ipsilateral frontal lobe may be placed dependent, facilitating brain retraction with the assistance of gravity. This position may also be used for approaches to the contralateral hemisphere through a transcallosal approach.3
Midline Suboccipital Craniotomy
Once the bed is positioned correctly, the head is flexed until the chin is at least two fingerbreadths from the sternal notch. Although the patient’s neck may permit further flexion, it is important to leave at least two fingerbreadths to prevent complications with the endotracheal tube. Once flexed, the head is lifted upward while maintaining the same degree of flexion, effectively distracting the neck while keeping the head in fixed position. This last maneuver ensures that the intended craniotomy site is the most superior point of the patient before final clamping into place. The patient is secured to the table and padded (Fig. 26-4A).
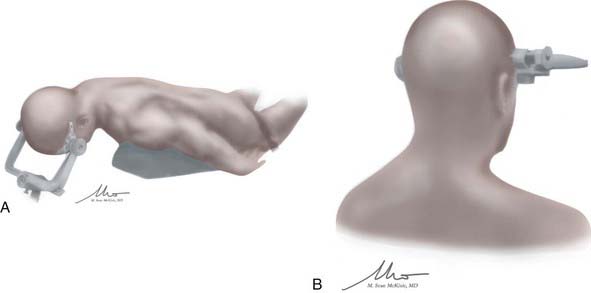
For the supracerebellar infratentorial position, the midline suboccipital approach is often best accomplished in the seated position. Although we think that this position can be awkward for the surgeon, it is perhaps ideally suited for this approach. The cerebellum falls away from the tentorium after arachnoidal adhesions are divided, and it provides a bloodless field. For the seated position, the patient is placed in pins with a configuration similar to that described earlier. Once in pins, the patient is strapped in with a waist belt, and the back is elevated until the patient is in the seated position. The bed is then flexed, with an elevation of the thighs and flexion of the knees until an adequate seated position is obtained. The head is then flexed slightly before the Mayfield-Kees head clamp is secured (Fig. 26-4B). This is done with a specific bed adapter that allows the Mayfield to be secured easily. The arms are then placed across the patient’s abdomen and secured. The lower extremities are often wrapped in compression stockings or wrap to facilitate venous return. Appropriate anesthesia precautions against air embolism, such as a central line and precordial Doppler probe, are placed, but that discussion is beyond the scope of this chapter.
Lateral Suboccipital Approach
Our preference for many lateral suboccipital procedures is the modified Concorde position. For this, the patient is positioned exactly as with the midline suboccipital approach, with a slight modification to bring the site of the craniotomy or craniectomy into a more prominent location. By rotation of the patient’s head approximately 45 degrees to the shoulder ipsilateral to the lesion before the head is fixed in the Mayfield clamp, the planned surgical field is adequately exposed. The patient should be well secured to the table to facilitate additional bed rotation to achieve a far lateral trajectory (Fig. 26-5).
Each of these positions for the lateral suboccipital approach has advantages and disadvantages. The modified Concorde position may be more comfortable for the surgeon, and for cerebellopontine angle disease, it takes advantage of gravity to aid in retraction of the cerebellum. There is a risk of air embolus, although it is decreased compared with the seated position. It also carries the risk of pressure sores and blindness from elevated intraocular pressures that are not typically seen with the park bench or seated position; however, these risks can be minimized with proper padding of pressure points and by ensuring that the head is above the level of the heart. The park bench position is more likely to have brachial plexus injuries or other stretch injuries; however, it facilitates cerebellar retraction and is also considered a comfortable position for the operating surgeon as long as the ipsilateral shoulder does not encroach. It also provides a lateral perspective anterior to the brainstem for the far lateral approach. The sitting position aids in lowering intracranial pressure as well as venous congestion and gives the anesthesiologist superior access to the face. It also provides a clear, bloodless field. However, it carries a higher risk of venous air embolism, tension pneumocephalus, and subdural hematomas.4 It is usually avoided in instances of patent foramen ovale (although not universally so), and it can create fatigue for the surgeon operating for extended periods with outstretched arms. The decision to select one position over another depends largely on the surgeon’s preference but also on the pathologic process at hand and the patient’s morphologic features.
Transsphenoidal Approach
At our institution, we use two different positions, depending on whether the patient is undergoing an endoscopic endonasal approach or the more traditional sublabial microscopic approach (Fig. 26-6). Ultimately, however, the position chosen and the approach taken come down to the physician’s preference.
Batjer HH, Chandler JP, Getch CC, et al. Intracranial aneurysm. In: Rengachary SS, Ellenbogen RG, editors. Principles of Neurosurgery. 2nd ed. Philadelphia: Elsevier Mosby; 2005:215.
Clatterbuck RE, Tamargo RJ. Surgical positioning and exposures for cranial procedures, 5th ed. Winn HR, editor. Youmans Neurological Surgery, Vol 1. Philadelphia: WB Saunders. 2004:623.
Goodkin R, Mesiwala A. General principles of operative positioning, 5th ed. Winn HR, editor. Youmans Neurological Surgery, Vol 1. Philadelphia: WB Saunders. 2004:595.
Lawton MT, Golfinos JG, Spetzler RF. The contralateral transcallosal approach: experience with 32 patients. Neurosurgery. 1996;39:729.
1 Batjer HH, Chandler JP, Getch CC, et al. Intracranial aneurysm. In: Rengachary SS, Ellenbogen RG, editors. Principles of Neurosurgery. 2nd ed. Philadelphia: Elsevier Mosby; 2005:215.
2 Clatterbuck RE, Tamargo RJ. Surgical positioning and exposures for cranial procedures, 5th ed. Winn HR, editor. Youmans Neurological Surgery, Vol 1. Philadelphia: WB Saunders. 2004:623.
3 Lawton MT, Golfinos JG, Spetzler RF. The contralateral transcallosal approach: experience with 32 patients. Neurosurgery. 1996;39:729.
4 Goodkin R, Mesiwala A. General principles of operative positioning, 5th ed. Winn HR, editor. Youmans Neurological Surgery, Vol 1. Philadelphia: WB Saunders. 2004:595.
[/level-membership-for-neurosurgery-category][not-level-membership-for-neurosurgery-category]
CHAPTER 26 Positioning for Cranial Surgery
Pterional (Frontotemporal) Craniotomy
Positioning for the pterional craniotomy begins with placement of the patient supine on the operative table. The patient is then placed in the Mayfield-Kees head fixation or similar cranial immobilization apparatus. When possible, we prefer to position the pins such that the single pin is placed in the frontal bone contralateral to the operative target, approximately 2 to 3 cm above the brow. The dual pins are then placed in the occipital bone on the ipsilateral side. It is usually preferable to place the pins along the axial plane; however, depending on the extent of the planned skin flap, it may be necessary to orient the pins along the sagittal plane. Others, however, advocate placing the single pin posteriorly, a decision that typically comes down to the surgeon’s preference.1 Regardless of this decision, careful attention should be paid to avoid the frontal sinus anteriorly and the mastoid air cells posteriorly. Once the patient is in pins, a shoulder roll is placed under the ipsilateral shoulder along the long axis of the patient. This allows adequate rotation without compromising venous return by obstructing the jugular veins in the neck. We also generally place the patient in some reverse Trendelenburg to promote brain relaxation and to allow the head to be fixed higher than the level of the heart.
Once the patient’s body has been positioned correctly, the head can be adjusted. Appropriate positioning of the head requires a combination of head flexion, rotation, and neck extension that is designed to provide the ideal surgical trajectory while minimizing brain retraction. The head is first rotated toward the contralateral shoulder. The degree of rotation can vary greatly and is largely dependent on the desired surgical target. For example, internal carotid artery disease is often approached from 5 to 20 degrees of contralateral rotation; anterior communicating artery aneurysms may require up to 60 degrees of rotation to allow optimal visualization of the anterior communicating artery complex. In general, for approaches requiring wide opening of the sylvian fissure, avoidance of excessive rotation is preferred because the greater the contralateral rotation, the more the temporal lobe and its operculum obstruct the trajectory into the sylvian fissure. Once the desired degree of rotation is obtained, the head is laterally flexed slightly, followed by an extension of the neck. This last maneuver should present the malar eminence as the highest point on the patient and aids in retraction by allowing gravity to pull the frontal lobe from the skull base. Once it is in position, the head fixation device is secured to the table (Fig. 26-1). The patient’s arm that is adjacent to the scrub nurse or technician is padded and tucked close to the body; the other arm is supported on an arm board to provide unfettered access for the anesthesiologists. Pillows and padding are placed under the patient’s knees and feet, and the patient is secured to the table with a padded safety belt or padding and tape. In cases in which significant bed rotation is anticipated during the surgery, additional tape or belts are applied to secure the patient to the table.
Temporal and Subtemporal Approach
The temporal or subtemporal craniotomy (or derivatives such as a middle fossa, extended middle fossa approach) may be performed alone (such as for petrous apex disease, other disease of the middle fossa, or basilar apex aneurysms). It may also be performed in conjunction with another approach, such as the pterional or lateral suboccipital craniotomy.2
In preparation for the subtemporal craniotomy, the pins are placed for a lateral park bench position. This is accomplished by placing the single pin of the Mayfield-Kees head clamp into the frontal bone 2 to 3 cm above the ipsilateral brow and the dual pins in the occipital bone along the axial plane at midline and contralateral to the surgical site. Once in pins, the patient is placed on the side opposite the operative site on top of a vacuum-ready beanbag, with the inferior arm extended perpendicular to the patient’s body on an arm board. In this position, it is critical to place a small axillary roll under the inferior axilla to avoid compression or other injury to the axillary artery or brachial plexus. Once the dependent arm is properly positioned and the beanbag is hardened, padding is placed between the superior arm and the patient’s body. The arm is then placed in neutral position along the long axis of the torso, with slight flexion at the elbow before it is secured. For the subtemporal approach or middle fossa approach, correct head positioning is critical. The patient is placed in reverse Trendelenburg position to place the head above the level of the heart. In addition, the neck is laterally flexed, with the dependent ear being brought toward the ipsilateral shoulder. This also uses gravity to facilitate gentle retraction of the temporal lobe. The head fixation apparatus is then secured to the table, and the patient’s body is supported with safety belts and tape (Fig. 26-2).
