Plastic surgery
GENERAL PRINCIPLES
Prepare


1. In the region of the proposed operation, identify the lines of tension within the skin described by the Professor of Anatomy in Vienna, Carl Ritter von Langer (1819–1887). Try to make all incisions parallel to these lines. When this is not possible, consider using a Z-plasty or local flap in closing the wound to help prevent the formation of scar contracture postoperatively.
2. When planning a large flap or a sophisticated reconstruction, mark out a plan of the flap on the patient with a skin marker the day before operation. For smaller flaps and simple incisions, mark out the area of incision on the patient after preparing the area, before incising the skin. Use a fine pen and ink for marking out the lines of incisions on the face. Use a broad proprietary marking pen in other areas. Try to follow these lines, as they provide a useful guide once the skin has been incised and tension in the surrounding skin has changed. Be prepared, however, to make adjustments on occasions according to the circumstances.
3. While general anaesthesia is now very safe, do not forget that many operations can be carried out under regional anaesthesia or local anaesthesia (see Chapter 2), especially on the hand, including cases of replantation. Large areas of split skin graft can be taken from the lateral aspect of the thigh by infiltrating the lateral cutaneous nerve of the thigh in the region of the inguinal ligament with local anaesthetic. Many other procedures can be carried out under regional anaesthesia, if necessary with the assistance of a sedative. Many simple skin lesions can be excised under local anaesthesia with 1% lidocaine. To excise small lesions in the head and neck region, where the skin is highly vascular, use 2% lidocaine with 1:80 000 adrenaline (epinephrine). Wait 5 minutes after injecting the mixture, to provide a relatively avascular field as well as anaesthesia. When carrying out extensive excisions of the face or scalp under general anaesthesia, inject a dilute solution of 0.5% lidocaine with 1:200 000 adrenaline (epinephrine).
Technique
Sutures
1. On the face, approximate the deep dermis of the skin edges with interrupted 5/0 polyglactin sutures. Accurately appose the skin edges with 6/0 interrupted nylon sutures. Remove them on the third or fourth postoperative day. If they remain longer, suture marks form, which are unsightly and may prove impossible to remove.
2. Elsewhere on the body, approximate the deep dermis of the wound edges with 3/0 polyglactin sutures and use subcuticular polypropylene sutures whenever possible, tying a knot at either end to prevent slipping. Leave these sutures in for 10 days, or longer if there is a tendency for the scar to stretch because of its site.
Instruments
1. Respect tissues and their viability by handling them with care and using the appropriate instruments. Control and steady the skin with skin hooks or fine-toothed forceps. Do not crush it by grasping it with non-toothed forceps.
2. For accurate suturing, use a fine needle-holder with a clasp that feels comfortable. Practise using needle-holders with their own cutting edges for cutting sutures so you can use them effectively. They are particularly useful when you are inserting many interrupted sutures, the accuracy of which is not crucial to the overall result.
SKIN COVER
1. Close skin wounds primarily to provide ideal skin cover following incisions of the skin, excisions of skin lesions and simple lacerations.
2. Use split skin grafts to repair wounds with significant skin loss, to avoid skin closure with tension, or following trauma with an appreciable degree of crush injury to the local tissues. Skin graft survival depends on adequate vascularity of the base of the wound.
3. Use skin flaps, which carry their own blood supply and are temporarily self-sufficient, in primary or secondary repair or reconstruction. Use them as primary cover for vital structures such as exposed neurovascular bundles or for structures that have an inadequate blood supply to support a graft, such as bare bone, bare cartilage, bare tendons and exposed joints.
SKIN CLOSURE
Action
1. Whenever possible, make incisions following the direction of the tension lines, particularly on the face.
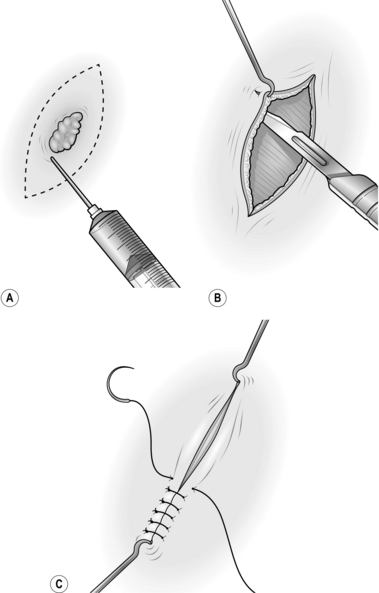
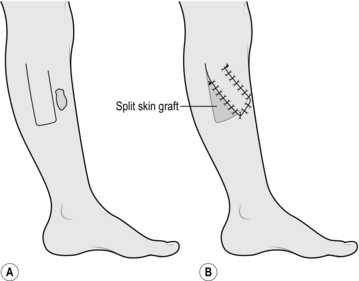
2. For excisions, mark the skin in ink, planning to excise the minimal necessary amount of tissue. Draw an ellipse with pointed ends around this mark, parallel to the tension lines (Fig. 33.1A).
3. On the face, inject the surrounding tissue with 2% lidocaine and 1:80 000 adrenaline (epinephrine) and wait 5 minutes for both components to take effect.
4. Make a vertical cut through the skin along the lines of the ellipse. Ensure that you adequately clear the lesion in depth.
5. Undermine the skin edges beneath the layer of subcutaneous fat to facilitate approximating the edges without tension (Fig. 33.1B).
KEY POINTS
Skin viable?


6. Place a skin hook in each end of the wound and ask your assistant to draw them apart. This manoeuvre approximates the edges (Fig. 33.1C).
8. Apply a small dressing, or use no dressing at all if practical.
SKIN GRAFTS
Appraise
1. A skin graft (Greek: graphion = a style; something inserted) is a piece of skin detached from its donor site and transferred to a recipient site. It may contain part of the thickness of the skin (a split skin graft, described by the German surgeon Karl Thiersch in 1874) or the full-thickness graft of skin, described in 1874 by the Austrian ophthalmologist John Wolfe, who settled in Glasgow.
2. A skin graft depends for its survival on receiving adequate nutrition from the recipient bed. Thus, thin split skin grafts survive more readily than thick split skin grafts or full-thickness grafts.
3. If there is a poor vascular bed, or infection, no graft will survive. In these cases prepare the graft bed appropriately with dressings (see below), or consider using a flap.
4. Choose an appropriate donor site for each individual patient.
SMALL SPLIT SKIN GRAFT
Appraise
1. A split skin graft is a sheet of tissue containing epidermis and some dermis taken from a donor site. It is obtained by shaving the skin with an appropriate knife or blade. A layer of deep dermis is preserved at the donor site and, when dressed appropriately, this is re-epithelialized from residual skin adnexae.
2. Use a small split skin graft to repair traumatic loss of small areas of skin from the hand or fingers, and occasionally in other parts of the body. Avoid using them on the tips of the thumb and index fingers since they tend to become hyperaesthetic.
3. Choose the donor site carefully. On the upper limb prefer skin from the medial aspect of the arm where the donor site is inconspicuous; on the forearm an ugly resultant scar may be visible.
Action
1. Mark out on the medial aspect of the arm an area of skin which is more than sufficient to cover the recipient site.
2. Inject 2% lidocaine and 1:80 000 adrenaline (epinephrine) intradermally into and beyond the marked area and wait for 5 minutes.
3. Lubricate the marked area with liquid paraffin.
4. Grip the arm on the lateral aspect with your left hand so that the skin which is marked out becomes tense, with a convex surface.
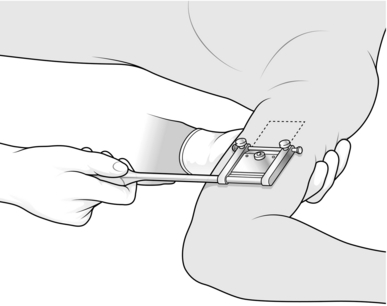
5. Cut the graft from the marked area using a Da Silva knife (Fig. 33.2).
6. Dress the donor site with a calcium alginate dressing, one layer of paraffin gauze, several layers of dressing gauze and a crepe bandage.
7. Apply the split skin graft directly on to the recipient site, spread it and anchor it using a minimal number of sutures.
8. Apply paraffin gauze, dressing gauze and a crepe bandage.
LARGE SPLIT SKIN GRAFT
Appraise
1. Use these grafts following extensive skin loss from burns, trauma or radical excisional surgery.
2. Adequately prepare the recipient site to ensure a good ‘take’ of the graft. Grafts take best on exposed muscle or well-prepared granulation tissue. They do not reliably survive on exposed fat where there is a poor vascular supply.
3. The take of a graft can be improved in certain circumstances by meshing it, quilting it, or by delaying its application and then exposing it. These are described below.
4. Use an electric dermatome, if available, to harvest the graft using the same principles outlined below.
Prepare
1. Following ‘cold’ surgical excisions apply pressure to obtain haemostasis. Avoid diathermy if possible since skin grafts do not take over diathermy burns.
2. Where subcutaneous fat is exposed, suture the overlying skin down to the muscle or deep fascia to cover it.
3. For infected wounds, take swabs for bacterial culture and prepare the recipient site with dressings of Eusol (Edinburgh University solution of lime) and paraffin. Change them 3–4 times a day. The recipient site is ready to receive a graft when it appears healthy and compact and has red granulation tissue with minimal exudates.


4. Choose the donor site most readily available to provide a large area of skin graft; this is usually the thigh. In young people, use the inner aspect of the thigh, where the donor site will be hidden. In elderly people, use the outer aspect of the thigh, where the skin is slightly thicker, so that if healing is delayed the wound is accessible and is easily managed.
Action
1. Prepare both recipient and donor sites by applying skin antiseptic.
2. Have your assistant spread a large swab on the side of the thigh opposite to the proposed donor site. With a hand on the swab it is possible to support the thigh and tense the skin at the donor site by gripping the skin firmly with the swab.
3. Set the blade on the Watson knife to take the appropriate thickness of skin graft. Use a medium setting at first and then adjust it accordingly.
4. Apply liquid paraffin on a swab to the donor site and along the knife blade.
5. Ask your assistant to hold the edge of a graft board at the starting point with the other hand (Fig. 33.3).
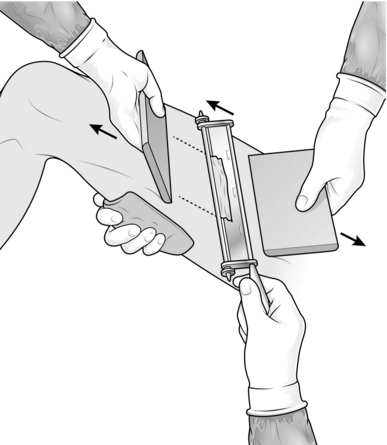
6. Cut a skin graft with the Watson knife, holding a board in your non-cutting hand and advancing this a few centimetres in front of the knife. Start with the knife at 45° to the skin and once the blade has entered the dermis rotate it axially so that it runs just parallel with the skin surface. Use a ‘sawing’ action with the knife, advancing the blade only a few millimetres at a time. When you have harvested an adequate length of skin, turn the blade upwards and cut the graft off with one firm movement. If the graft is not detached with this movement, cut along its base with a pair of scissors.
7. Place the skin graft, outer surface downwards, on a damp saline swab and make sure that you have obtained sufficient skin; in case of doubt, take another strip of split skin.
8. Dress the donor site with calcium alginate dressing, one layer of paraffin gauze, dressing gauze, cotton wool and a crepe bandage.
9. Apply the skin graft to the recipient defect, ensuring that it is placed with its cut surface applied to the wound. The outer surface is opaque, the inner surface is shiny. Spread it, using two pairs of closed non-toothed forceps.
10. Cut off the surplus skin at the wound edge, leaving a margin of 3 mm around the periphery.
11. If the skin has been applied on a site to which you can apply a satisfactory compression dressing, do not use sutures.
12. Dress with several layers of paraffin gauze, dressing gauze, wool and crepe bandage, immobilizing the joints above and below the graft with a bulky dressing.
13. In areas where it is difficult to apply a compression dressing, immobilize the graft with interrupted sutures at the edge or insert a circumferential continuous suture around the graft.
14. Dress with paraffin gauze, dressing gauze, wool and strips of adhesive dressing.
15. Keep the graft site elevated postoperatively.
16. For grafts on the lower limb below the knee, do not allow the grafted area to be dependent for 7 days; fluid will collect between the graft and the base unless the graft is meshed. Then arrange progressive mobilization with compression support to the leg and foot, including the graft.
DELAYED EXPOSED GRAFTS
Appraise
1. Use a delayed graft when the graft in its recipient site can be exposed indefinitely by the patient without being disturbed.
2. Apply a delayed graft to surgical wounds when haemostasis is difficult to establish perioperatively. Since the graft is exposed, it can be monitored regularly to ensure that it has taken.
Action
1. Prepare the recipient site during the operation to excise all dead or doubtful tissue and any foreign material, after achieving haemostasis.
2. Dress with several layers of paraffin gauze, dressing gauze, wool and a crepe bandage.
3. Harvest large split skin grafts adequate to cover the defect and dress the donor site (see below).
4. Spread the split skin graft on paraffin gauze with the external opaque surface on the gauze. Fold and wrap this in a saline-soaked swab and place it in a sterile jar to be stored in a refrigerator at 4 °C.
5. On the following day, remove the dressing from the recipient site.
6. Apply the skin graft to the defect and spread it to cover all areas. Trim and store any excess skin at the margin.
7. Remove the paraffin gauze and leave the skin graft exposed.
8. Observe the graft at regular intervals. If serum collects beneath it, roll this out with cotton wool budded sticks soaked in saline, either to the edge or through a small incision made in the graft.
9. Be sure that the exposed area is well protected from any injury, particularly while the patient is asleep.
MESHED GRAFTS
Appraise
1. Meshed grafts are useful for providing skin cover to large areas, particularly when there is limited availability of donor skin, as often occurs in extensive burns.
2. They survive more reliably, as any underlying seroma that collects escapes through the interstices of the graft, leaving the graft elements intact.
3. They are effective in covering irregular surfaces as they can be moulded to these.
4. Unfortunately the resultant appearance is less satisfactory than a sheet graft.
Action
1. Prepare the donor site in the usual way.
2. Harvest long, thin strips of split skin graft, as described above.
4. Pass the skin graft through the skin mesher. It may need to be placed on a carrier for this, depending on the type of instrument (Fig. 33.4).

5. Apply the mesh graft directly on to the recipient site using two pairs of non-toothed forceps.
6. Spread the skin out appropriately to cover all suitable recipient areas.
7. Suture the graft with continuous sutures at the periphery only if the area is difficult to dress.
8. Dress the area with a calcium alginate dressing, one layer of paraffin gauze, dressing gauze, cotton wool and crepe bandage.
10. Continue to re-dress at approximately 3-day intervals until the interstices have epithelialized.
QUILTED GRAFTS
Action
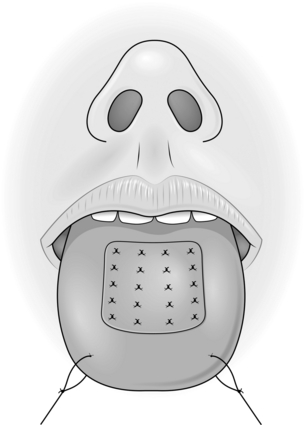
3. Put two large sutures in the anterior aspect of the tongue and pull it forwards.
4. Apply the skin graft to the tongue and trim the excess at the edges.
5. Place multiple 3/0 absorbable sutures at the edge of the graft and throughout its surface (Fig. 33.5).
FULL-THICKNESS GRAFTS
Appraise
1. These give better cosmetic results than split-thickness grafts as they contract less. The quality of the skin is better but they need a very good vascular bed in order to survive.
2. Their most common application is on the face following excision of small lesions, and the best results are achieved in the eyelid region and around the medial canthus.
3. They can occasionally be used on the hand, but are not generally used elsewhere, as large grafts leave a large primary defect.
4. The best donor sites are those with surplus skin so that the skin can be closed primarily with an insignificant scar. The most common donor areas are post-auricular, pre-auricular, upper eyelid, nasolabial and supraclavicular skin.
Action
1. Mark the area of skin to be removed and measure it.
2. Mark out a similar area in the donor site, allowing an extra 2.5 mm or more at each margin for the contour difference that will be present at the recipient site.
3. Plan an ellipse at the donor site around the proposed graft to allow primary closure.
4. Inject local anaesthetic at the excision and donor sites.
5. Create the defect at the recipient site.
6. With a size 15 blade, cut around the margins of the planned donor skin.
7. Raise the full ellipse of skin and subcutaneous tissue.
8. Undermine the skin edges at the donor defect and close this primarily.
9. Place the skin graft on to a wet saline swab, skin surface down.
10. Using small, curved scissors cut the subcutaneous fat off the skin graft and excise the redundant skin.
11. Place the skin graft into the defect and suture the edges at the periphery. Leave the suture ends long.
12. Use tie-over sutures to fix the dressing of paraffin gauze and proflavine wool.
COMPOSITE GRAFTS
Action
1. Mark out the defect that will be left after excision of diseased or damaged skin, with excision of traumatized or contaminated wound edges, if necessary.
2. Identify a site on either pinna that corresponds in both size and shape to the planned defect.
3. Mark out this area with ink.
5. Plan the reconstruction of the donor defect.
6. Inject 0.5% lidocaine and 1:200 000 adrenaline (epinephrine) into both sites and wait for 5 minutes.
RANDOM PATTERN SKIN FLAPS
Introduction
1. Skin flaps are used to repair or reconstruct defects where there is an inadequate blood supply to support a skin graft. They survive on their own blood supply, which they bring with them, and this may be beneficial to the recipient site. It may help by introducing a new blood supply to an avascular area following irradiation, or to a fracture site where there is delayed union.
2. The quality of the skin in a skin flap is almost normal and its texture and cosmetic appearance are much better than a graft. A skin flap may, however, lose its nerve supply and have its vascular supply and lymphatic drainage partly compromised in the transfer.
3. Until relatively recently, all skin flaps were based on a random vascular pattern. It was recognized that flaps with a length greater than their base would survive in certain areas. It is now realized that the reason for this survival is that these flaps had, unknowingly, been based on an axial pattern basis. If a flap is designed around a recognized artery and vein, with these vessels passing down its central axis, it may be safely transferred with a very large length-to-breadth ratio. Indeed, the breadth need be the artery and vein alone, providing they remain patent.
4. Many of the superficial muscles of the body have one principal vascular hilum, and these muscles can be rotated about the hilum on a single pedicle. It has further been realized that the skin overlying these superficial muscles receives its vascular supply from them. Consequently, the muscle with its overlying skin can be transposed as a single unit, forming a myocutaneous flap. A large number of these flaps have been described, but the more commonly used ones alone will be described below.
5. Special terms are traditionally used in relation to flaps. Delay indicates partial division of a flap at its base and re-suturing. This procedure encourages an improved blood supply to the flap from the opposite attachment. Complete division at the base carried out a few days later is then usually safe. After a flap has been transferred safely, the bridging portion may be divided. The two ends are trimmed and one is sutured into the new recipient area while the other is replaced in the donor site. This is referred to as in-setting.
6. When planning a flap, it is useful to employ a sheet of sterile paper or other similar material to act as a template. This can be cut to shape and used as a trial flap.
Z-PLASTY
Appraise
1. Z-plasties are used for releasing linear contractions. These usually develop along linear scars that traverse Langer’s lines.
2. These linear contractions are often most evident when crossing the concavity of the flexor aspect of a joint, but they can occur on extensor surfaces and in other areas unrelated to joints.

Action
1. Draw a line along the full extent of the contracture (Fig. 33.6).
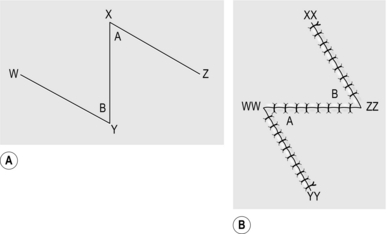
2. From one end, draw a line at 60° to the first line and of the same length.
3. From the opposite end, draw a line at 60° on the opposite side of the line for the same length.
4. Incise along the central line and excise any scar tissue.
5. Incise along the two lateral lines through the full thickness of skin and subcutaneous tissue.
6. Raise the flaps so formed, lifting the skin and subcutaneous tissue as one, holding the tip of each flap with a skin hook.
7. Interchange the two skin flaps.
8. If the flaps do not meet comfortably, undermine the skin and subcutaneous tissue around the periphery of the wound to allow them to lie correctly.
9. Suture the tips of the two flaps into place first.
Technical points
1. The angle of the Z-plasty can be varied according to circumstances.
2. If the scar contracture is particularly long, use two or more Z-plasties, either in series or at intervals along the length of the contracture.
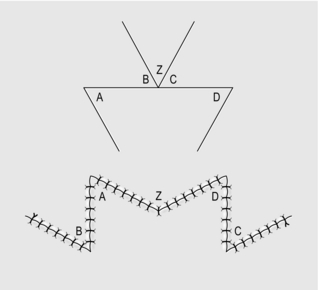
3. For scar contractures across a web space, use a W-plasty (Fig. 33.7). This consists of two Z-plasties, placed in reverse direction to each other, meeting at the base of the web space.
TRANSPOSITION FLAP
Appraise
1. Small transposition flaps on the face have long been used. It is well recognized, that in this region, because of the vascularity of the skin, flaps with a large length-to-breadth ratio can be used safely.
2. Transposition flaps allow skin from an area of abundance to be moved to a defect where primary closure is inappropriate.
3. On the face, there is an abundance of skin appropriate for transposition flaps in the nasolabial area, the glabellar area and the upper eyelid.
4. In other parts of the body, many axial pattern flaps are used as transposition flaps.
Action
1. Mark out the defect in ink.
2. Plan the transposition flap in an adjacent area with superfluous skin and mark this out (Fig. 33.8).
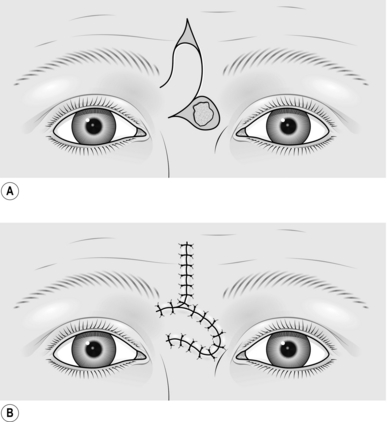
3. Check that the margin of the flap most distal from the defect is long enough from the fulcrum at its base to reach the most distal part of the defect. This is the limiting factor of the flap.
4. Excise the lesion to create the defect.
5. Raise the flap, including skin and subcutaneous tissue, and support the tip of the flap on a skin hook.
6. Transpose the flap into the defect and check that it fits.
7. Undermine the edges of the donor site defect and also the edges of the excision area to allow the flap to sit more comfortably in the defect.
8. Close the donor defect in layers.
10. Leave the flap exposed if possible, so you can monitor it.
RHOMBOID FLAP
Appraise
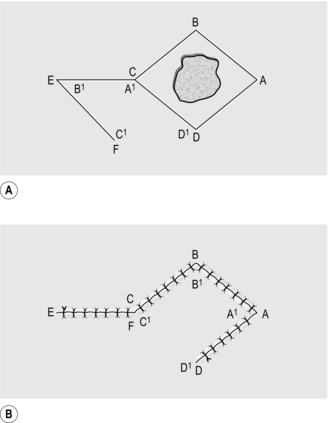
1. A rhomboid flap is, as its name suggests, a flap with the shape of an equilateral parallelogram – a lozenge shape.
2. The rhomboid flap is most useful when the appropriate ellipse for excision of a defect is at right-angles to Langer’s lines. It has a similar effect to a transposition flap carried through 90°.
ROTATION FLAP
Appraise
1. These are large flaps used to close relatively small defects.
2. They use excess skin at a distance from the defect and borrow small amounts of skin from a large area.
3. They are principally used to borrow skin from the neck to take up to the face. They can be used on the scalp and for treating sacral pressure sores.
Action
2. Draw an isosceles triangle around the defect, with the apex of the triangle at or pointing towards the centre of the arc of rotation of the flap (Fig. 33.10).
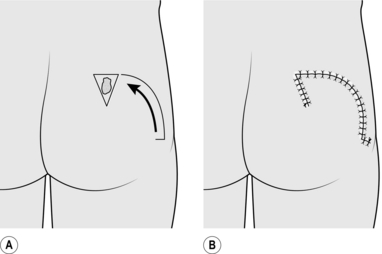
3. Draw the arc of the rotation flap.
4. Raise the skin and subcutaneous tissue of the flap.
5. Undermine the skin at the edge of the defect and along the skin margin opposite the flap.
6. Rotate the flap into the defect.
8. If necessary, excise a wedge of tissue along the skin edge opposite the flap to assist rotation. If necessary, ‘cut-back’ into the flap at the opposite end of the arc of the flap from the defect, to create a better fit.
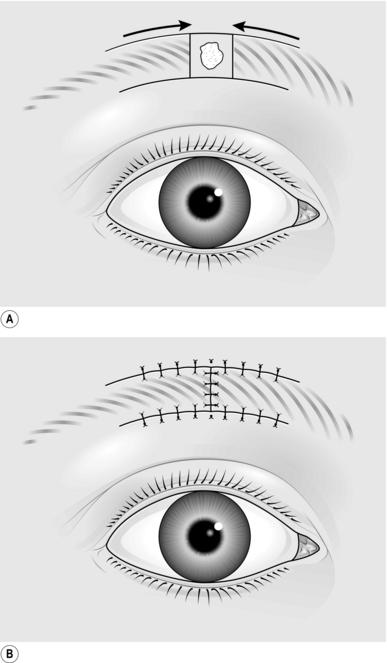
ADVANCEMENT FLAP
Action
2. Mark out the smallest possible square or rectangle enclosing this defect, with lines parallel and at right-angles to Langer’s lines.
3. Extend the marks of the sides running parallel to Langer’s lines in each direction from the defect, thus delineating two flaps (Fig. 33.11).
EXPANSION FLAP
Appraise
1. These flaps are used specifically for repairing and reconstructing defects of the scalp.
2. Flaps on the scalp are notorious for their inability to stretch because of the inelasticity of the galea (Latin: = a helmet).
3. Division of the galea allows some stretching of the skin to take place, especially in younger patients.
Prepare
1. Pay particular attention to the preoperative planning of the flap. Remember that the scalp flap will move in three dimensions.
2. Shave the patient’s hair over the whole scalp to a length of 1 cm. Leave long locks of hair only if you can confidently cope with these during the operation.
3. Make a careful plan of the flap to be used, and mark the outline of this.
4. Completely shave the hair for 1 cm on either side of this line and for 1 cm around the outline of the defect.
5. Wash the hair thoroughly to remove all cut and shaved hairs.
Action
1. Place the patient, face downwards, on the operating table. Use a neurosurgical head-rest to support the head, if this is available.
2. Mark out the defect on the scalp.
3. Mark out the flap as previously planned. The flap may be of transposition, rotational or advancement design.
4. Plan a wide base to the flap around the periphery of the scalp to ensure that at least one principal vascular system enters its base.
5. Inject the planned outline of the flap with 0.5% lidocaine and 1:200 000 adrenaline (epinephrine) and wait at least for 5 minutes.
6. Excise the lesion and create the defect.
7. Incise along the margins of the flap to elevate it with the underlying galea so that this is included with the flap.
8. Reflect the flap backwards, exposing the galea.
9. Support the flap on the palm of the hand and make multiple incisions just through the galea with a no. 15 blade, across the full width of the flap (Fig. 33.12).
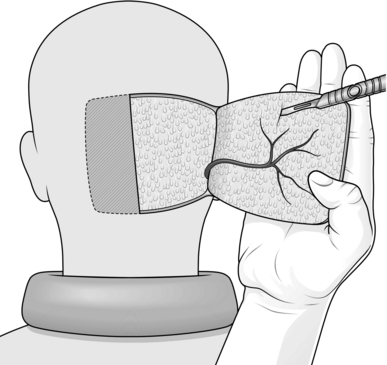
10. Identify the principal vessels beneath the surface of the galea and avoid dividing them.
11. Make multiple transverse incisions at right-angles to the first set, along the whole length of the flap.
12. Reflect the flap back into the defect.
13. Suture the flap into place with one layer of 3/0 non-absorbable sutures.
14. Always insert suction drains under the flap.
15. Dress with paraffin gauze, dressing gauze, cotton wool and crepe bandages.
16. Re-dress after 48 hours and, if possible, leave exposed.
CROSS-LEG FLAP
Appraise
1. This used to be the most commonly used flap to cover open (compound) fractures of the tibia and fibula with extensive soft tissue loss.
2. There are now many fascio-cutaneous and free flaps described that are more suitable but, on rare occasions, cross-leg flaps may be useful.
3. Cross-arm flaps and cross-thigh flaps can be created using the same principle.
Prepare
1. Mark out the minimal defect on the leg.

2. Plan a flap from the calf of the donor leg, based medially, preserving the long saphenous vein superiorly. Do not exceed a 1:1 length-to-breadth ratio.
3. Enlarge the defect to a size that will receive a safe flap; that is, make the defect fit the flap.
4. Using tapes, ensure that with the legs kept closely together, the flap when hinged on its medial axis will stretch to the distal part of the defect, allowing enough tissue to create a bridge between the two legs.
5. Place the patient’s legs on top of a bead bag and apply vacuum so the patient’s legs are fixed in what will be their postoperative position.
6. Maintain the patient’s legs in this bead bag for as much of the next 24 hours as is practical so that he becomes used to the position preoperatively.
Action
1. With the patient under general anaesthesia, apply a tourniquet to reduce bleeding.
2. Create the planned defect, obtain haemostasis, then remove the tourniquet from the leg.
3. Elevate the planned flap from the opposite leg, raising the deep fascia with the flap.
4. Check that with the legs in the appropriate position, the flap fits the defect.
5. Take a split skin graft from the thigh of the recipient leg and dress the donor area.
6. Apply and suture the split skin graft to the flap donor site and to the back of that part of the flap which will form a skin bridge between the two legs (Fig. 33.13).

7. Suture the four corners of the flap into place and subsequently suture the edges.
8. Dress the skin graft at the flap donor site and use minimal other dressings.
9. Splint the two legs in the bead bag and apply vacuum.
10. Ensure that there is no tension or torsion on the flap and that it is viable.
Complete
1. Perform a ‘delay’ procedure after 2 weeks using local anaesthesia only, partially dividing the base and then re-suturing this wound.
2. Take the patient back to the operating theatre after the third week and divide the flap completely under general anaesthesia, allowing a generous portion to be in-set at the recipient site.
CROSS-FINGER FLAP
Action
1. Mark out the defect on the flexor aspect of the finger.
2. Apply a tourniquet and create the defect.
3. Mark out a flap on the dorsum of the adjacent finger opposite the defect, or as near as possible, avoiding the skin over the joints.
4. Elevate the rectangular flap with its base adjacent to the injured finger.
5. Place the flap over the defect (Fig. 33.14).
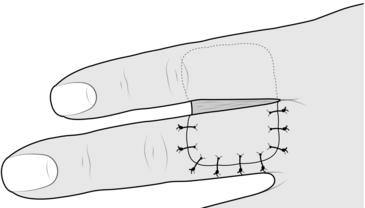
6. Increase the size of the defect to fit the flap.
7. Remove the tourniquet and achieve haemostasis.
8. Take a small split skin graft with a Da Silva knife.
9. Apply the skin graft to the donor defect.
10. Suture the flap into the defect.
11. Dress the wounds and splint the two fingers together after inserting some dressing gauze between the fingers.
12. Plan to divide the flap at 2 weeks, in-setting the skin bridge at both recipient and donor sites, and re-dress the wounds.
REVERSE DERMIS FLAP
Action
2. Use a tourniquet to control bleeding and create the defect.
3. Mark out an appropriate flap on the dorsum of an adjacent finger, as with a cross-finger flap.
4. Shave the planned flap with a Da Silva knife, removing a thin sheet of epidermis and superficial dermis.
5. Elevate the rectangular flap with subcutaneous tissue, leaving it attached at its base adjacent to the finger with the defect.
6. Increase the size of the defect to fit the flap.
7. Remove the tourniquet and achieve haemostasis.
9. Take a small split skin graft and apply this to the donor site and the flap.
10. Splint the two fingers together with some gauze dressing between the fingers.
11. Plan to divide the flap at 2 weeks, and in-set the bridge portion of the flap at both donor and recipient sites.
ABDOMINAL TUBE PEDICLE FLAP
Appraise
1. These flaps were formerly used as the standard technique for transferring a large amount of skin and subcutaneous tissue from the abdomen to a distant site such as the foot, the face, or elsewhere where there was extensive loss of tissue. They have been superseded almost totally by the introduction of axial pattern flaps, applied either as pedicle flaps or transferred as free flaps using microvascular surgical techniques. However, they may be useful in a few isolated situations.
2. Raise a planned rectangular area of abdominal skin and subcutaneous tissue by dividing along each side and, while still attached at each end, form the middle part into a tube. After a delay procedure, detach one end and transfer it to a wrist. When it has established a local blood supply, detach the other end and transfer it to the side of the defect. In further stages the whole flap is transferred to the defect and spread over it.
3. The patient requires approximately 5 months of hospitalization, with many operations, and failure is not uncommon at some stage.
4. Tube pedicle flaps can be raised from other sites, including the back and thigh.
ACTION
Raising the tube pedicle
1. Mark out a rectangular area 20 cm x 8 cm obliquely on the lower abdomen.
2. Incise along the long edges down to the deep fascia.
3. Dissect along the deep fascia between the two edges to elevate a bridge of skin and subcutaneous tissue.
4. Approximate the two skin edges of the bridge beneath the subcutaneous tissue to form a tube and suture as far as possible in each direction.
5. At either end suture the skin down to the base to create a closed tube (Fig. 33.15A).
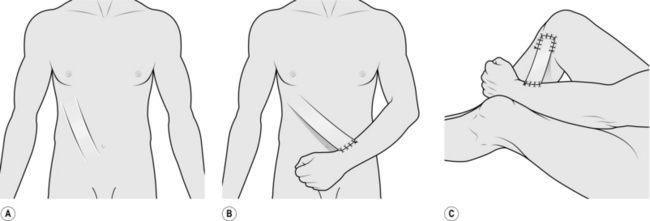
6. Apply a large split skin graft to the residual raw area beneath the skin tube if this defect cannot be closed primarily.
Division of the tube
1. Three weeks after raising the tube, divide the base of the tube completely, passing through the delay incision.
2. Close the residual defect on the abdomen using a split skin graft if necessary.
3. Place the patient’s contralateral arm on to the abdominal wall and find a suitable recipient site at the level of the wrist to insert the tube pedicle.
4. Mark out an appropriate sized circle on the wrist.
5. Elevate the skin and subcutaneous tissue from half of this circle and reflect it backwards as a flap. This produces a circular defect.
6. Suture the free end of the abdominal tube pedicle to the circular defect (Fig. 33.15B).
7. Splint the arm to the chest wall after applying plenty of padding beneath the axilla.
Transfer of flap to defect
1. Free the abdominal tube flap from the abdominal wall by dividing the tube at its residual attachment to the abdomen, passing through the delaying incision.
2. Close the donor defect with a split skin graft if necessary, and dress the wound.
3. Transfer the arm with its attached pedicle to the site of the defect.
4. Mark out a recipient site for the tube pedicle, preferably on the distal side of the defect, so that the seam of the flap overlies the defect.
5. Create a circular defect with a healthy skin margin at the edge of the main defect.
6. Excise any scar tissue from the end of the tube pedicle, and insert the tube pedicle into the skin defect (Fig. 33.15C).
Delay of tube pedicle
Carry out a delay of the tube pedicle at the wrist end using the same technique as before.
Transfer of whole flap to defect
1. Divide the flap from the wrist, incising through the site of the delay incision.
2. Return the original skin flap from the wrist to its former site, thus leaving a residual semicircular wound, and suture this.
3. Mark out a circular area on the opposite side of the defect from the initial attachment of the tube pedicle.
4. Create a circular defect with healthy skin margins at this site.
5. Insert the free end of the tube pedicle into this defect, keeping the seam over the defect.
Insert the flap
1. Allow the flap to ‘soften’ before in-setting. This may involve waiting for 4 or 5 weeks or more.
2. Excise any doubtful tissue in the base to ensure that it is healthy.
3. Excise the seam of the tube pedicle and spread the skin of the tube pedicle over the defect.
4. Suture the edges into the edge of the defect.
5. Do not carry out any further revisions of the flap until it has been allowed to settle for at least several weeks and preferably for several months.
AXIAL PATTERN SKIN FLAPS
SCALP FLAP
Appraise
1. Scalp flaps are most commonly used for reconstructing defects of the hair-bearing skin on the face. They are usually used for reconstructing the upper lip, lower lip and chin areas in males, but there are many other occasional applications.
2. The flap is based on the posterior branch of the superficial temporal artery.
Prepare
1. Plan the flap on the day before operation.
2. Cut all the hair in the area of the operation to less than 1 cm in length.
3. Shave the hair completely in the area of the planned incisions.
4. Check that the posterior branch of the superficial temporal artery is palpable and that there are no significant scars on the scalp, suggesting previous damage to this vessel.
5. Wash the head thoroughly to remove all cut and shaved hair.
Action
2. If appropriate, increase the defect to the shape of a whole cosmetic unit.
3. If appropriate, increase the defect to make it symmetrical on either side of the midline.
4. Make a template of the defect with sterile paper.
5. With one end of a tape attached to the template, and a second fixed on the zygomatic arch below the point where the artery was palpated, swing the template up on to the vertex of the scalp using the point on the zygomatic arch as the pivot.
6. Mark out an appropriate area on the scalp behind the anterior hairline around the template.
7. Infiltrate the scalp along the marked line with 0.5% lidocaine and 1:200 000 adrenaline (epinephrine), and wait for 5 minutes.
8. Elevate the flap together with the underlying galea, starting at its distal extremity.
9. Identify the posterior branch of the superficial temporal vessels in the pedicle of the flap as it is raised, and adjust the shape of the pedicle if necessary to include these vessels (Fig. 33.16).
10. Taper the pedicle to 2 cm at its base, so that it can be rotated.
11. Transpose the flap into the defect, and in-set.
12. Cover the posterior aspect of the flap with paraffin gauze.
13. Close the donor defect primarily if possible. If it is too large, cover it with a split skin graft.
14. Plan to divide the flap at 2 weeks, providing there is a large inset. If you are in doubt, divide the flap at 3 weeks and return the pedicle.
FOREHEAD FLAP
Appraise
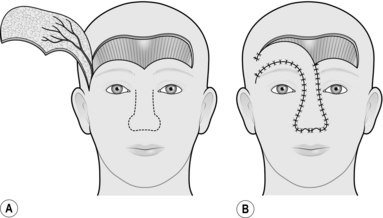
1. The forehead flap has been used extensively in the past to provide lining of the oral cavity after major resections for tumour. It is occasionally used for resurfacing defects of the scalp and of the cheek. It is the best flap available for total nasal reconstruction.
2. It has been largely superseded by other myocutaneous and free flaps in its use for oral lining, but it remains an easy, safe and reliable flap to use, especially in the elderly and debilitated patient.
3. Its main disadvantage is the relatively poor cosmetic defect of its donor site.
4. It is not a true axial pattern flap, but it simulates one, surviving on the anterior branch of one superficial temporal artery and its accompanying vein. The distal part of the flap normally acquires its vascular supply from the opposite anterior branch of the superficial temporal artery and the supraorbital and supratrochlear vessels. When these vessels to the flap are divided, the vascular network between the branches of the various vessels is adequate to allow the flap to survive on the supply from the single vascular pedicle.
Action
1. Create the defect and measure its dimensions.
2. Mark out the flap on the forehead, making this symmetrical and preferably including the whole of the forehead skin as a cosmetic unit.
3. Increase the defect to accommodate the flap.
4. If the flap is to be used for intraoral lining, excise the coronoid process of the mandible to allow the flap to pass inside the zygomatic arch.
5. Elevate the flap, commencing at the margin distal to the flap pedicle.
6. Identify and ligate the anterior branch of the contralateral superficial temporal artery and the supraorbital and supratrochlear vessels on both sides.
7. Lift the flap in the plane beneath the frontalis muscle.
8. Identify the anterior branch of the superficial temporal artery and its accompanying veins on the undersurface of the flap, and taper the pedicle to a 2-cm margin, including these vessels (Fig. 33.17).
9. If the flap is to be used intraorally, pass this through to the mouth beneath the zygoma.
10. If there is inadequate space to carry this out, excise a segment of the zygomatic arch.
11. To avoid a further operation some 2 weeks later, shave the epidermis and superficial dermis from that part of the pedicle that will remain buried between the skin surface and the intraoral surface.
13. Use 3/0 polyglactin sutures to elevate the skin of the eyebrows on either side symmetrically.
14. Lay several layers of paraffin gauze on the donor site.
15. Harvest a large split skin graft to cover the defect in one sheet. In a young person, use the inner aspect of the arm in preference to the thigh as this gives a better colour match.
17. Apply this skin as a delayed graft 24 hours later.
18. After 2 weeks, divide the pedicle and return it, to provide symmetry to the face.
TONGUE FLAP
Appraise
1. Tongue flaps are used for repairing large palatal fistulae, providing mucosa in lip reconstruction and reconstructing defects of the pharynx and oral cavity.

2. They are not easily tolerated by young children since they are unable to co-operate. Tongue flaps are, therefore, rarely useful below the age of 6 years.
3. Most tongue flaps are not true axial pattern flaps but rely on the rich vascular network within the muscles of the tongue.
4. Flaps for palatal fistulae are taken from the dorsum, those for lining the oral cavity or the pharynx are taken from the lateral aspect, and those providing a vermilion border are taken from the anterior part. In all cases close the defect primarily.
Action
1. Create the defect and measure the dimensions.
2. Insert a large stay suture in the tip of the tongue and pull it forwards.
3. Place two large stay sutures as far to the back of the tongue as possible and use these as the principal stay sutures.
4. Plan and mark out the flap on the tongue. Flaps for palatal fistulae can be based anteriorly or posteriorly, but this depends on the position of the defect.
5. Elevate the flap of mucosa together with a sheet of muscle approximately 4–5 mm thick.
6. Check that the flap fits the defect.
7. Close the donor defect primarily (Fig. 33.18).
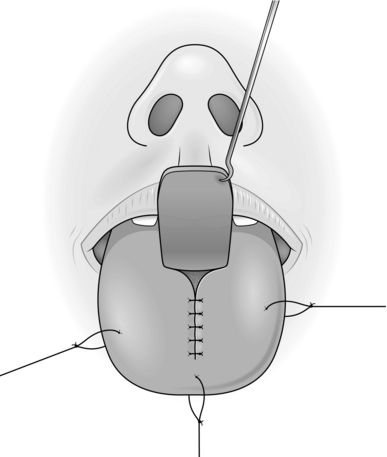
8. Suture the most inaccessible part of the flap into the defect first with interrupted sutures.
9. Work proximally, leaving the easiest, most anterior, suture until last.
10. Observe the flap carefully; it may require re-suturing at any time.
DELTOPECTORAL FLAP
Appraise
1. This flap, sometimes known as a Bakamjian flap after its innovator, is used for providing skin flap cover to the chin, the cheek, the region of the pinna and the neck. It can be used to provide lining to the oral cavity and pharynx but may require the development of a temporary oral or pharyngeal fistula, which is unsatisfactory.
2. When raised conventionally there is necrosis of the tip in approximately 15% of cases. Because of this and its unsightly donor defect, it has been superseded by other flaps for mucosal replacement but is occasionally useful for large skin defects.
Action
2. Mark out the flap based on the second, third and fourth perforating branches of the internal thoracic artery (Fig. 33.19).
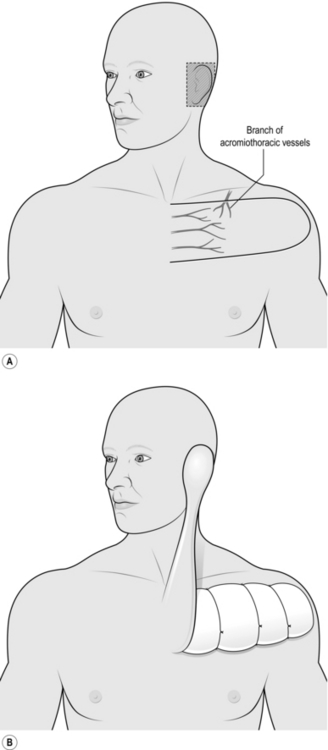
3. Mark the upper margin of the flap along a line parallel with the clavicle, along its inferior margin. Use a line along the superior margin if a block dissection of the neck has been carried out with a McPhee incision.
4. Mark the inferior border of the flap parallel to and 10 cm below the upper border.
5. Mark the distal end of the flap as a semicircle extending to the midlateral line over the deltoid muscle.
6. Elevate the flap from its lateral margin including the fascia overlying the deltoid and pectoralis muscle.
7. Divide the branch from the acromiothoracic artery, as this perforates the clavipectoral fascia.
8. Divide and ligate the cephalic vein at the margin of the flap.
9. Reflect the flap medially to within 4 cm of the midline.
10. Dissect further medially, very carefully, to avoid dividing the perforating branches on which the flap survives.
11. Pass the flap up to the defect.
12. If the flap passes directly to the defect on the external surface, tube the intervening bridge over the neck.
13. If a block dissection has been carried out and the flap is for intraoral use, shave the epidermis from the central portion of the flap and pass the flap subcutaneously up to the defect. This manoeuvre converts the reconstruction into a one-stage operation.
14. Suture the flap into the defect.
15. Establish haemostasis on the donor site and cover it with paraffin gauze.
16. Take a split skin graft, store it and apply it to the donor site at 24 hours as a delayed graft.
17. At 3 weeks, divide the pedicle if exposed and in-set the flap.
18. Return the remainder of the pedicle to the donor site after excising the split skin graft in the appropriate area.
PECTORALIS FLAP
Appraise
1. This is a versatile flap for reconstruction following excision of tumours in the head and neck region. It will reach the pharynx, the lower cheek, the neck and shoulder and will just reach the floor and lateral walls of the oral cavity as well as the area of the pinna.
2. It is a myocutaneous flap based on the pectoral vessels supplying the pectoralis major muscle. These in turn supply skin overlying the muscle.
3. Its most useful application is for intraoral reconstruction, where an island or paddle of skin the size of the defect is transferred from the lower chest wall on the distal part of the flap. The muscle is transposed subcutaneously with this island of skin and protects the carotid vessels when a block dissection has been carried out. The donor site can be closed primarily.
4. Web contractures may develop in the neck postoperatively when the flap is used in the anterior part of the oral cavity.


Action
2. Measure the size of the defect.
3. Measure and mark an appropriate area of skin overlying the distal inferior portion of the pectoralis major muscle just above the costal margin (Fig. 33.20). Do not include skin across the midline or skin more than 2 cm below the lower margin of the pectoralis muscle.
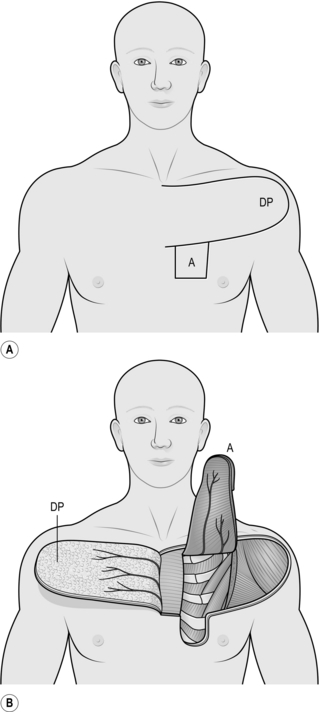
4. Mark out a deltopectoral flap (see above) above the skin paddle.
5. Elevate the deltopectoral flap medially; you can omit this step if you are experienced, by passing the pectoralis flap under the deltopectoral flap.
6. Identify the lateral margin of the pectoralis muscle and elevate its border.
7. Dissect this distally to the sternal attachment, freeing the muscle from its attachments to the chest wall.
8. Dissect the distal element free from the midline.
9. Elevate the muscle with its attached skin island up to the clavicle. In doing this, look for and protect the two vascular pedicles on the undersurface.
10. Divide the attachment of the muscle to the humerus at the margin of the deltoid muscle.
11. Pass the flap subcutaneously beneath the neck skin if a block dissection has been carried out and pass the island of skin into the defect. Some rotation of the muscle pedicle may be necessary. Make sure the flap sits comfortably in place, and suture the skin paddle into the defect.
12. Suture the edges of the muscle to adjacent tissue to support it when the patient sits up.
13. If neck skin has been incised or excised to accommodate the muscle pedicle, take a split skin graft and apply this to the exposed muscle.
14. Close the donor defect primarily. This may require wide undermining to allow approximation of the skin edges.
LATISSIMUS DORSI FLAP
Appraise
1. The most useful application of this flap is as a myocutaneous flap in breast reconstruction and reconstruction of chest wall defects. It can be used in pharyngeal reconstruction and for defects of the back up to and just above the nape of the neck.
2. It can be used as a muscle flap alone to cover a large defect, or the muscle can be used to transfer a small island of skin, as in breast reconstruction, or a large island of skin. If a large island is transferred, primary closure of the donor site is not possible.
3. The flap has wide application in free tissue transfer (see below).
4. The flap is based on the thoracodorsal vessels, and these enter the muscle just below its insertion into the humerus.
Action
1. For an anterior chest wall defect, lay the patient on the table in the lateral position.
2. Create and measure the defect on the anterior chest wall.
3. Mark out the island of skin on the back overlying the latissimus dorsi muscle appropriate to the defect (Fig. 33.21).
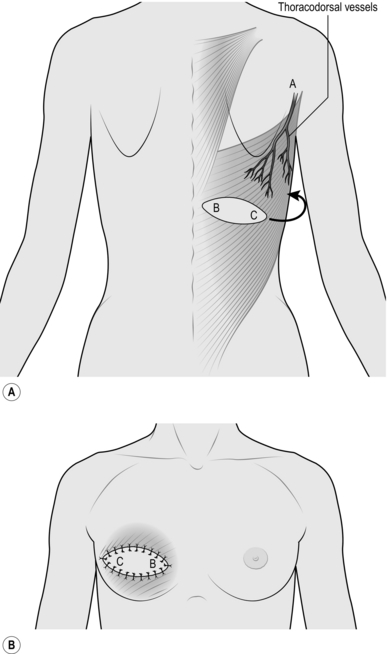
4. Check that the island will reach the defect, using a tape based in the region of the vascular hilum at the lower margin of the posterior axillary fold. Remember, the most posterior point of the flap has to reach the most anterior point of the defect.
5. Incise the skin along the marked lines around the island down to the muscle.
6. Dissect the skin and fascia off the upper surface of the whole muscle proximal and distal to the skin paddle.
7. Identify the anterior border of the muscle.
8. Separate the muscle from the underlying serratus muscles and ribs.
9. Divide the muscle from its attachment, distally and posteriorly.
10. Separate the muscle up to its pedicle, identifying and preserving the principal vessels on the underlying surface.
11. Dissect gently at the hilum to avoid damaging the principal vessels.
12. Identify the vessels to the serratus anterior muscle arising from the thoracodorsal vessels, and divide them.
13. Develop a subcutaneous tunnel between the defect of the flap and the anterior chest wall defect.
14. Pass the flap subcutaneously through this tunnel into the anterior wall defect.
15. Close the donor site defect primarily, if possible, even if this means extensive undermining. Insert a large suction drain.
16. Change the patient to the supine position, re-towelling if necessary.
17. Undermine the skin edges of the defect where appropriate.
18. Suture the latissimus dorsi muscle to the chest wall.
19. If this is a breast reconstruction, insert a prosthesis beneath the latissimus dorsi muscle.
TRAM FLAP
Appraise
1. The transverse rectus abdominis muscle (TRAM) provides an alternative flap for breast reconstruction to the latissimus dorsi muscle. It has the advantage that it can normally transfer sufficient autologous tissue to avoid the necessity of using an implant.
2. The flap can also be used for reconstructing chest wall defects and defects of the perineum. In either of these circumstances the skin paddle may be taken in the vertical plane (a vertical rectus abdominis muscle or VRAM flap), with the skin paddle lying completely over the muscle.
3. The flap may be used as a pedicled flap based either on the superior deep epigastric vessels for breast reconstruction or chest wall defects, or on the inferior deep epigastric vessels for perineal defects.
4. When used as a free flap, most commonly for breast reconstruction, prefer to use the inferior deep epigastric vessels, which are larger and more reliable. These vessels can be dissected through the muscle, avoiding harvesting of the muscle to raise a deep inferior epigastric perforator (DIEP) flap.
5. The abdominal skin wound closure is similar to that of an abdominoplasty (see below).


Action
1. Mark the patient preoperatively in the standing position.
2. For breast reconstruction plan to excise the mastectomy scar if possible.
3. Avoid large skin flaps if the patient has been treated by radiotherapy.
4. Mark the midline and edges of the rectus abdominis muscles.
5. Plan and mark the skin island to be transferred centrally over the contralateral muscle just below the level of the umbilicus. If you are an experienced surgeon, you will centre the flap in the midline.
6. Mark a symmetrical ellipse to be excised that includes the planned skin island of the flap.
7. In the operating theatre, excise the mastectomy scar and raise the adjacent skin flaps to accommodate the flap.
8. Shave the epidermis off the skin adjacent to the planned skin island but within the marked outer ellipse. The residual dermis protects the subdermal pedicle, which in turn contributes to the viability of the subcutaneous flap beyond the boundaries of the skin paddle. Excise the residual skin of the symmetrical ellipse, the skin paddle and the subcutaneous fat (Fig. 33.22).
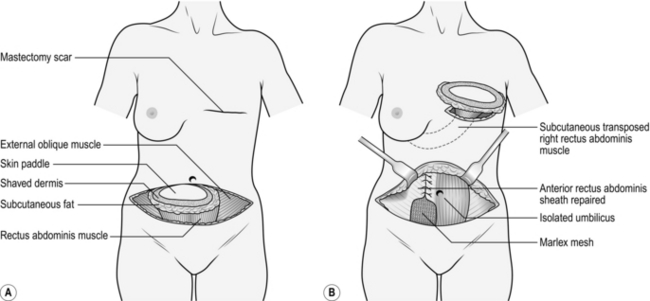
9. Cut through the deep fascia around the base of the subcutaneous fat to be included on the flap. Include in this the perforating vessels close to the midline both below and just above the umbilicus.
10. Gently pass your finger around the rectus abdominis muscle distal to the flap until the whole muscle is isolated. Cut through it with a cutting diathermy, identifying and ligating the inferior epigastric vessels when you encounter them on the undersurface.
11. Cut vertically through the middle of the anterior sheath of the muscle superiorly.
12. Elevate the muscle with the overlying subcutaneous fat and skin up to the costal margin.
13. Create a subcutaneous tunnel from the abdominal wall cavity through to the mastectomy wound and pass the skin paddle through this.
14. Orientate the skin paddle and fat and tack the base into place, checking there is no tension on the pedicle.
15. Suture the flap into place in layers and insert a Redivac drain.
16. Close the donor defect by suturing the upper part of the anterior rectus sheath first with a continuous 1 polypropylene suture.
17. Repair the residual defect in the anterior sheath with Marlex mesh sutured firmly in place with a continuous 1 polypropylene suture.
18. Close the abdominal wall in layers, transposing the umbilicus to its new site as appropriate. Insert two Redivac drains.
19. Support the abdomen with a pressure garment and lightly dress the breast wounds.
20. Remove the drains when the drainage has diminished and remove the sutures at 3 weeks.
GROIN FLAP
Appraise


Action
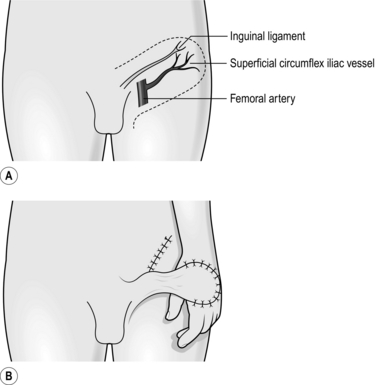
1. Create the defect on the hand.
2. Identify the femoral artery by palpation.
3. Mark a point over this 2 cm beneath the inguinal ligament.
4. Draw a line from this point to the anterior superior iliac spine, which acts as the axis of the flap.
5. Mark an area over the iliac crest close to the mid-axillary line, which is to be used for the definitive skin cover.
6. Mark the flap to include this with parallel lines on either side of the central axis at an equal distance from it (Fig. 33.23).
7. First incise the skin laterally down to the deep fascia and include the fascia with the flap.
9. At the edge of the sartorius muscle include the fascia, overlaying it with the flap, and so ensure that the superficial circumflex vessels are retained within the flap.
10. Dissect the flap free to within 3 cm of the femoral vessels.
11. Check that the defect on the hand will accommodate the flap.
12. Close the donor defect primarily up to the pedicle of the flap, if necessary flexing the knee and hip.
13. Tube the portion of the flap that will bridge the gap between groin and hand by suturing the two skin edges together.
14. Suture the distal part of the flap into the defect.
15. Immobilize the limb against the trunk after placing padding between the limb and the trunk.
16. Perform a delay procedure at 2 weeks by incising half of the skin at the base of the pedicle opposite the suture line.
17. Identify the axial vessels; ligate and divide them.
19. Three weeks after the initial procedure, divide the pedicle completely at its base and in-set it into the groin wound.
20. In-set the flap into the hand defect with a few sutures. If tension is apparent in the skin, do not suture it at all, but cover the exposed part of the flap with a paraffin gauze dressing.
21. Insert the flap 2 days later.
22. Thin the flap 3 months later, if necessary, by excising the subcutaneous tissue in stages.
TENSOR FASCIA LATA FLAP
Appraise
1. This flap is useful in treating trochanteric pressure sores and defects of the groin, particularly when the femoral vessels are exposed.
2. It can also be used for ischial pressure sores and defects of the upper thigh and lower abdominal wall.
3. It is a myofasciocutaneous flap and is based on the vessels to the tensor fascia lata muscle.
4. Inclusion of the lateral cutaneous nerve of the thigh within the flap allows it to be used as a sensory flap.
Action
1. Place the patient supine on the table, rotate the pelvis through 30 degrees and support this and the leg on the side of the defect.
2. Create and measure the defect in the groin.
3. Identify the site of entry into the muscle of its vascular pedicle, the transverse branch of the lateral femoral circumflex artery. This point is 8 cm distal and just lateral to the anterior superior iliac spine.
4. Keep this point in the base of the flap.
5. Draw a line from the anterior superior iliac spine to the lateral margin of the patella and use this as the anterior margin of the flap.
6. Mark the posterior margin of the flap using a width of 6–10 cm (Fig. 33.24).
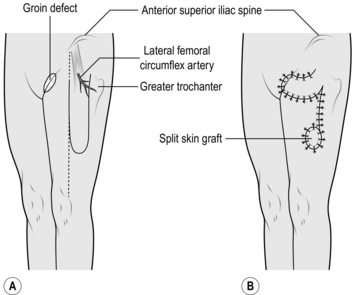
7. Mark the distal extremity of the flap so that it is not more than two-thirds of the length of the thigh. Check that the flap will reach the defect.
8. Incise the skin distally down to the deep fascia.
9. Incise the skin on the anterior and posterior margins and elevate the flap together with the fascia lata.
10. As the flap is reflected proximally, the tensor fascia lata muscle comes into view. If necessary, divide any small distal vascular pedicle into the muscle after first identifying the large vascular pedicle proximally.
11. Check that the flap will rotate into the defect.
12. Incise the skin between the flap and the defect, and undermine it on either side, allowing the flap to lie in this defect.
13. Excise any excess thigh skin to allow the flap to sit comfortably.
14. Suture the flap into place.
15. Close the donor defect primarily as far as possible.
16. Take a skin graft from the opposite thigh and apply it to the residual flap donor defect.
17. Dress the graft and its donor site with paraffin gauze, dressing gauze, cotton wool and crepe bandage.
18. Leave the flap exposed and nurse the patient on his contralateral side.
BICEPS FEMORIS FLAP
Appraise
1. This flap is particularly useful for ischial pressure sores.
2. It is a myocutaneous flap but can be used as a simple muscle flap.
3. The biceps femoris muscle receives a segmental blood supply from several vessels which are branches of the profunda femoris artery. In order to preserve all these vessels the flap is transferred as an advancement flap.
4. An advantage of this flap is that it can be advanced more than once.
Action
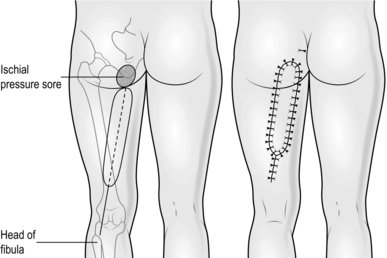
1. Place the patient prone on the table.
2. Create the defect by excising the whole lining to the ischial pressure sore cavity. With an osteotome reduce the prominence of the ischial tuberosity.
3. Draw a line from the ischial tuberosity to the head of the fibula. Use this as the axis of the flap and mark an elliptiform flap, 8–10 cm broad around this, extending proximally to the defect and distally to within 5 cm of the crease of the knee joint (Fig. 33.25).
4. Incise along the lines down to the margins of the biceps femoris muscle.
5. Divide the origins of the biceps femoris, semitendinosus and semimembranosus muscles at the ischial tuberosity.
6. Divide the biceps femoris tendon at the distal margin of the flap. Divide the semimembranosus and semitendinosus distally if necessary to provide greater mobility of the flap.
7. Advance the flap into the defect and suture the muscle to obliterate the dead space.
8. Suture the skin of the flap into the skin defect after inserting a large suction drain.
9. Suture the distal portion of the flap defect primarily and apply minimal dressings.
GASTROCNEMIUS FLAP
Appraise
1. Both heads of the gastrocnemius muscle can be used separately for covering defects on the anterior aspect of the leg.
2. They can be used as simple muscle flaps or as myocutaneous flaps.
3. The flaps are used for covering exposed bone in the upper third of the tibia and for covering the exposed knee joint, sometimes even in the presence of a metal prosthesis.
4. The muscle flap alone is more malleable and versatile than a myocutaneous flap.
5. Although the lateral head is slightly longer, use the nearest muscle head to the defect. Do not use both heads simultaneously.
Action
1. Place the patient in the lateral position, with the affected leg uppermost.
2. Mark out and create the defect.
3. Make a vertical incision through skin and subcutaneous tissue down the midline of the calf, posteriorly.
4. Identify the muscle bellies of gastrocnemius and their relevant attachments to the tendo calcaneus (Fig. 33.26).
5. Separate the fascia overlying the respective belly of the muscle to be used.
6. Incise the tendon just distal to the muscle attachment.
7. Elevate the muscle belly proximally by dissecting laterally and medially, dividing its attachment to the opposite belly.
8. Free the muscle belly to the level of the popliteal fossa, preserving the vascular pedicle passing into it.
9. Create a subcutaneous tunnel from the base of the muscle belly to the defect and enlarge to accommodate the muscle flap.
10. Pass the muscle belly through this tunnel into the defect.
11. Suture the muscle to the edges of the defect.
12. Close the donor defect in layers and insert a suction drain.
13. Take a thick split skin graft from the thigh and apply it to the exposed muscle in the defect.
14. Splint the leg for 10 days.
15. Allow weight-bearing at 10 days and mobilize progressively. Fit an elastic support stocking to cover the graft overlying the muscle. This should be worn for 3 months.
FASCIOCUTANEOUS FLAP
Appraise
1. These flaps have their greatest use in providing skin cover to exposed bone in the middle third of the leg.
2. When based proximally, they may not be true axial pattern flaps but depend on preserving the rich vascular network lying superficial to the deep fascia.
3. You may use flaps with a 3:1 or more length-to-breadth ratio.
4. With intimate knowledge of the anatomy of the vessels which perforate the deep fascia, long flaps based distally can be designed and may be useful in covering the exposed distal third of the tibia.
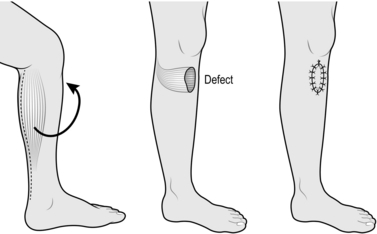
Action
1. Mark out and create the defect.
2. Mark out the flap based proximally with a 2:1 ratio.
3. Check that the flap will reach the defect when transposed (Fig. 33.27).
4. Incise the flap distally, passing through skin, subcutaneous tissue and deep fascia.
5. Elevate the flap proximally, incising along the lateral margins and preserving the deep fascia with the flap.
6. Transpose the flap into the defect.
7. Suture the flap into the defect in layers.
8. Take a split graft from the opposite thigh.
9. Apply the split skin graft to the flap donor defect. Dress with paraffin gauze and dressing gauze and retain with tie-over sutures.
TISSUE EXPANSION
Appraise
1. The principle of tissue expansion is exemplified by the stretched abdominal wall resulting from pregnancy.
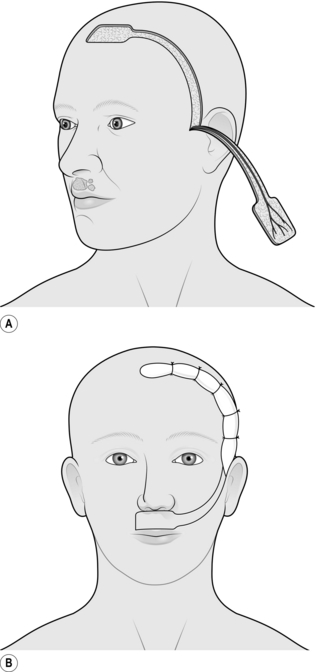
2. A tissue expander (Fig. 33.28) is inserted beneath the deep fascia or superficial muscle and expanded serially by injections of saline into an attached reservoir to stretch the overlying skin.
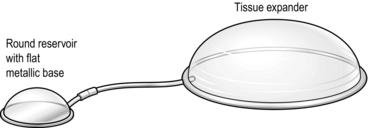
Fig. 33.28 Tissue expander and reservoir.
3. Following expansion, the expander is removed and the surplus skin used to cover the adjacent defect.
4. Expanders are most effective when placed on a bone base. They are particularly effective when placed on the calvaria (Latin: = skull) to expand scalp, and on the chest wall to expand skin for breast reconstruction. They have limited value in limbs.

5. There are some more sophisticated tissue expanders available specifically designed for breast reconstruction. Some of these have a double lumen, one of which is filled with silicone. Others have a reservoir that can be detached from a valve linking it to the expander, allowing the expander to be left in situ.
Action
1. Identify an area of normal skin to be expanded which is adjacent to the defect.
2. Choose an appropriate tissue expander whose base will lie within the boundaries defined.
3. Make an incision beyond the chosen area in a radial direction.
4. Attach the reservoir to the expander and insert saline. Remove air from the system and check its patency.
5. Make an appropriate pocket for the expander and insert it. This pocket should be submuscular or subfascial, but may be subcutaneous.
6. Make a separate pocket for the reservoir in a suitable accessible adjacent subcutaneous area and insert it.
7. Recheck the patency of the system and close the wound.
8. Serially inject saline into the reservoir as an outpatient procedure.
9. When sufficient expansion or more has been achieved, re-admit the patient for the second stage.
10. Remove the expander and stretch the expanded skin over the defect.
GRAFTS OF OTHER TISSUES
NOSE
1. Composite defects of skin and cartilage at the nostril margin can be reconstructed using composite grafts from the ear, as described under composite skin grafts (see above).
2. Most other small cartilaginous defects of the nose can be reconstructed using cartilage from other parts of the nose during a corrective rhinoplasty.
3. If there is extensive cartilaginous loss and the nasal tip requires support, take an L-shaped bone graft from the iliac crest and insert it through a midcolumellar incision.
4. More sophisticated techniques include the insertion of homo-graft cartilage (see below) or calvarial bone graft inserted from above after reflecting a bicoronal scalp flap.
EYELIDS
1. You rarely need to provide cartilage support for the upper eyelid.
2. Large defects of the lower eyelid often require the introduction of cartilage for support and the best donor site for this is the septum of the nose. This provides a composite graft of cartilage and mucous membrane. The latter is used to reconstruct the conjunctival surface.
Action
1. Create the defect and measure it.
2. Mark an appropriate area of the septum using a nasal speculum, commencing at least 3 mm behind the anterior limit of the septum.
3. Infiltrate the marked area with 0.5% lidocaine and 1:200 000 adrenaline (epinephrine).
4. Infiltrate the septum on the opposite side with the same preparation.
5. After allowing at least 7 minutes for the adrenaline (epinephrine) to take effect, incise the mucosa, passing through this and the underlying cartilage but avoid penetrating the nasal mucosa on the contralateral side.
6. Separate the contralateral nasal mucosa from the cartilage using a mucosal elevator.
7. Cut around the full margin of the graft and remove it.
8. Stop the bleeding with pressure for 5 minutes timed by the clock.

9. Insert the graft into the defect and stabilize it with an absorbable suture through the cartilage at each margin.
10. Suture the conjunctival surface with 6/0 absorbable suture.
EAR
1. Costal cartilage is used for total ear reconstruction.
2. Reconstruction of a major portion of the ear may be difficult. It is sometimes justifiable to discard those cartilaginous segments already present and perform a total ear reconstruction.
3. If there is inadequate skin available, you must employ preoperative tissue expansion (see above) or use a temporoparietal flap.
Action
1. Measure the normal ear and make a template for the new ear.
2. Make a straight, oblique incision over the medial end of the seventh and eighth costal cartilages.
3. Retract the skin and subcutaneous tissue and expose an area of cartilage equivalent to the size and shape of the ear.
4. Mark out an outline of cartilage from the template using the seventh and eighth costal cartilages and excise this.
5. Close the donor defect in layers.
6. Place the graft on a wooden board on a table and carefully shape the cartilage, creating a well-defined helical rim and an antihelical fold.
7. Make an incision along the hairline of the posterior margin of the auricular skin where it meets hair-bearing scalp skin.
8. Create a subcutaneous pocket beneath the auricular skin to accommodate the cartilage graft.
9. Insert the graft and close the skin.
10. Insert sutures through the skin in the region of the scaphoid fossa and concha, to highlight the contour of the grafts.
11. After 6 months, reflect forwards the cartilage graft together with the underlying subcutaneous tissue and insert a split skin graft on to the posterior surface of the reconstructed ear and the postauricular region to create a postauricular sulcus.
VASCULAR GRAFTS
Appraise
1. Large vascular grafts are described in Chapter 23. Employ small-vessel grafts for replanting and free-flap transfer. They are occasionally used when limb vessels have been injured.
2. Vein grafts are used to replace both damaged arteries and veins.
3. Choose a vein graft that matches the vessel that has been destroyed.
4. Use magnification for the repair and a microscope when repairing grafts under 2 mm in diameter.
Action
1. Identify the length of vessel that has been damaged.
2. Place an appropriate size clamp on normal vessel on either side of the damaged section and resect this damaged section.
3. Inspect the cut ends under magnification and check that the endothelium is normal. If it is not, resect further.
4. Check that there is good flow of blood from the cut proximal arterial stump, or the cut distal venous stump, by holding the adventitia of the vessel with jeweller’s forceps, and temporarily releasing the clamp.
5. Select a superficial vein of appropriate size and length for insertion as a graft into the defect. For vessels greater than 2 mm diameter, use the long saphenous vein, which is the best available vein graft for both arteries and veins. For vessels smaller than this, use veins from the dorsum of the foot or from the flexor aspect of the forearm.
6. Make an incision through the skin directly over the full length of the chosen vein.
7. By blunt dissection, isolate the full length of the vein to be used.
8. Ligate all branches of the vein graft or use the bipolar coagulator to seal minute branches. Do not use unipolar diathermy, which will damage the graft.
9. Isolate a segment of vein graft longer than that required. Ligate and divide the vessel proximally and distally.
10. Remove the graft and irrigate it gently with warm heparinized Hartmann’s solution or saline to exclude leaks.
11. Place the graft in the site of the defect, ensuring that the blood flow in the graft will be in the usual direction.
12. Choose an appropriate double clamp. Place one portion of this clamp on the proximal end of the divided normal vessel and the other on the vein graft.
13. Under magnification, clean the adventitia from the vessel walls of both stumps using small scissors.
14. Flush the stumps with heparinized Hartmann’s solution, being careful not to grasp the endothelium with forceps.
15. Dilate the vessel with vessel dilators and approximate the ends.
16. Suture the anterior wall with interrupted 8/0 or 10/0 nylon sutures. Turn the clamp over and suture the opposite wall.
17. Before inserting the final two sutures, check that the anastomosis is patent.
18. Carry out a similar anastomosis at the distal end, checking that the graft has been stretched to its original length and that there is no torsion.
19. Remove the distal clamps first and then remove the proximal clamps.
20. If there is small leak at either anastomosis, cover it with a warm swab but do not occlude the vessel.
21. If there is a gross leak, reapply a single clamp to obstruct the flow and insert extra sutures. Remove the clamp and observe.
22. If flow is not established, resect the anastomosis and repeat.
OTHER GRAFTS
1. Nerve grafts, tendon grafts and bone grafts are described in Chapter 30.
2. Homograft (Greek: homos = same; from the same species) bone, xenograft (Greek: xenos = strange, foreign; from a different species) cartilage and xenograft collagen are all used, after appropriate preparation, in reconstruction. Theoretically, they act as a scaffold into which the patient’s own tissue grows. The benefit with xenograft cartilage and xenograft collagen may be only temporary as the graft tends to be absorbed.
3. Homograft and xenograft skin may be used as temporary biological dressings in burns, but they are eventually rejected.
MICROVASCULAR SURGERY
1. Microvascular surgery involves the anastomosis and repair of small vessels.
2. It has clinical application in cases of re-plantation and free tissue transfer.
3. The surgery is highly specialized. Operations may take many hours and require special instruments in addition to an appropriate microscope.
4. This type of operation should be carried out only in specialized units.
REPLANTATION


Action
1. Control bleeding from the amputation stump by simple pressure and elevation.
2. Avoid clamping vessels to stop haemorrhage unless essential, as this may cause unnecessary damage.
KEY POINTS
Care of the amputated part to be replanted


3. Contact the nearest microvascular surgery unit and take advice.
4. Prepare the patient and amputated part for urgent transfer.
MACROREPLANTATION
Appraise
1. The force required to sever a major portion of a limb is considerable and patients who have suffered such an injury may have other injuries to their body which may take priority in treatment.


Action
1. Debride and clean both the proximal stump and the wound of the amputated part.
2. Shorten the skeletal structures and fix these. This should allow primary anastomosis of vessels and nerves.
3. Revascularize the amputated part by anastomosing the appropriate artery, or arteries, using vein grafts if necessary.
4. If the warm ischaemic time has been relatively long, revascularize the part prior to skeletal fixation. Allow perfusion of the amputated part for several minutes, discarding the venous blood. Transfuse the patient appropriately. Revise the anastomoses after skeletal fixation if necessary.
5. Anastomose twice the number of veins as the number of arteries repaired, again using vein grafts if necessary.
6. Repair the tendons and muscles.
8. Carry out extensive fasciotomies, incising through skin, subcutaneous tissue and deep fascia on the proximal stump and on the amputated part.
9. Harvest a split skin graft and apply this to the fasciotomy sites and any other residual raw areas where there has been skin loss.
10. Monitor the limb carefully postoperatively, and be prepared to return the patient to theatre at any time if there is doubt about viability of the replanted or revascularized part.
FREE TISSUE TRANSFER
Appraise
1. Free tissue transfer is used in many forms of reconstruction. It consists of transferring tissue from one part of the body to another.
2. Isolate the tissue on a recognized vascular pedicle and, after transfer to its distant site, anastomose the vessels of the vascular pedicle to appropriate nearby vessels, either directly or with vein grafts.
3. The arterial supply to the tissue is usually established with an end-to-side anastomosis to an adjacent artery, so that the distal flow of this artery is not terminated.
4. The venous drainage of the tissue is usually established via end-to-end anastomoses to superficial veins or to venae comitantes of a nearby artery. Occasionally, if the venous drainage is inadequate, you can apply leeches to the compromised tissue temporarily until adequate venous drainage is established.
5. Most free flaps currently used in reconstruction consist of cutaneous or myocutaneous flaps. Apart from the flaps described above there are many other cutaneous and myocutaneous flaps which are occasionally used.
6. Other free tissue transfers include the following:
 Vascularized bone grafts from rib, iliac crest, fibula, radius and metatarsal
 Osseocutaneous flaps from the iliac crest, fibula, radius or metatarsal with overlying skin

 Muscle flaps with motor innervation

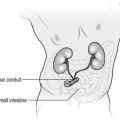
 Small bowel, for oesophageal reconstruction
 Omentum, for soft tissue defects
 Testis, re-siting a high undescended testicle in the scrotum

7. One of the most common free flaps used in reconstruction is the radial forearm flap. It is based on the radial artery and either the venae comitantes or superficial veins, usually the cephalic, can be used for venous drainage.
8. The flap can be raised as a fasciocutaneous flap providing a small, thin, pliable flap useful in intraoral reconstruction, as an osseo-cutaneous flap for bone reconstruction, or simply as a fascial flap with a skin graft for covering small soft tissue defects on the limbs.
9. It is only occasionally used as a pedicled flap, although in these circumstances it may be based distally for use in the hand. Its elevation for use as a free flap is described below (Fig. 33.29).
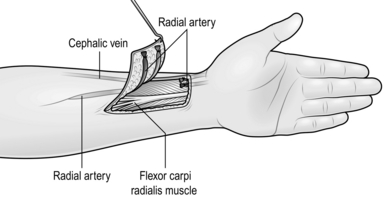
Action
1. Perform an Allen’s test prior to surgery to confirm that the ulnar artery alone will provide sufficient blood flow to the hand. The radial and ulnar arteries are occluded to the raised, fisted hand, which then appears pale on opening it if either artery is released. The whole hand should flush within 10 seconds.
2. Use a template of the defect to determine the size and shape of the flap to be harvested. Mark this out on the ventral aspect of the forearm with the distal limit extending to within 2 cm of the wrist joint. Check that the flap overlies the radial artery, which can be palpated. Confirm that the distal end of the cephalic artery also lies within the area of the flap.
3. Exsanguinate the limb with elevation alone and apply the tourniquet.
4. Raise the flap from the medial side first and include the underlying fascia.
5. Dissect laterally, raising the fascia but being careful not to remove the paratenon of the flexor tendons.
6. Beyond the flexor carpi radialis retain the loose areolar tissue passing down to the radial artery and its accompanying venae comitantes and include these with the flap.
7. Isolate and divide these vessels distally beyond the distal limit of the flap.
8. Continue the dissection laterally by dividing the flap at its distal and then its lateral border preserving, if possible, the branches of the radial nerve by dissecting these out from the under surface of the flap.
9. Identify the radial artery and cephalic vein in the proximal attachment of the flap. Divide the skin proximally with one longitudinal incision, keeping these in sight.
10. Dissect the cephalic vein up to the cubital fossa.
11. Dissect the radial artery up to its origin from the brachial artery if this length of artery is required.
12. When appropriate, divide and clamp the artery and vein and transfer the flap.
13. Ligate the stumps of the two vessels.
14. Repair the donor defect with a split skin graft and immobilize.
15. If you are experienced you may wish to use a transposition, rotation or other local flap to close the donor defect primarily.
16. Dress the donor site and subsequently remove sutures as appropriate.
BURNS


Assess
1. Take a careful history, paying attention to the time and nature of the accident. Was smoke present and did the accident occur in an enclosed space? Note what kinds of clothes were worn by the patient and what first aid was given.
2. Find out the patient’s normal medication.
3. Examine, looking for signs of an inhalation burn. Record the extent and distribution of superficial and full-thickness burns. Pinprick sensation is usually preserved in superficial burns but do not rely on it.
4. The best guide to the depth of burn is found by taking an accurate history of the mechanism of the burn:
 Thermal burns with gases usually cause superficial burns.

 Contact with hot solids and flames usually causes full-thickness burns.
 Electrical burns usually cause full-thickness skin loss.


5. Estimate the area of the burn using a Lund and Browder chart or ‘the rule of nines’.
Action
1. Give oxygen if you suspect an inhalation burn. Consider ventilation, particularly if the blood PO2 is low (normal range 10.5–13.5 kPa).
2. Set up a reliable intravenous line after taking blood for a full blood count and biochemical profile.
3. Catheterize and record the urine output hourly.
4. Give PPF (plasma protein fraction) using a Muir and Barclay formula as a guide to the volume to give to replace plasma lost through the burn. This involves giving a volume in millilitres of half the weight in kilograms multiplied by the percentage burn in each of six periods. These periods start at the time of the burn and include three of 4 hours, two of 6 hours and one of 12 hours. Use the packed cell volume (PCV), urinary output and clinical state of the patient to adjust the volume of PPF given.
5. Prescribe appropriate medication, including:


6. Do not give antibiotics for the burn per se but reserve these for use later.
SUPERFICIAL BURNS
Action
1. Clean the burn wound and remove the roof of all blisters.
2. Expose superficial burns of the face but apply sterile liquid paraffin to reduce crusting.
3. For burns of the perineum, clean these and expose but apply silver sulfadiazine (Flamazine) cream. Nurse the patient without dressings on a sterile sheet on a low-air-loss or water bed but keep him warm.
4. Cover superficial burns of other areas with two layers of paraffin gauze and a bulky absorptive dressing. Leave this dressing for 1 week unless it becomes soaked, whereupon you should change it. Change the dressing at 1 week and subsequently twice per week until the wound is healed.
DEEP DERMAL BURNS
1. Tangentially shave with a graft knife between the second and fifth day.
2. Continue to shave until you observe punctate bleeding from the surface.
3. Achieve haemostasis with pressure and apply a split skin graft.
5. When fully healed, measure and apply a pressure garment. This is an elasticated garment specifically measured for the individual to cover the area of the burn wound. Advise the patient to wear this for 6 months or longer if necessary, to minimize hypertrophy and contracture of the resulting scars.
6. If you do not have facilities or expertise for this management, treat the burn conservatively and re-dress twice each week.
7. Treat areas that are not healed at 3 weeks as full-thickness burns.
EXTENSIVE FULL-THICKNESS BURNS
ESCHAROTOMY
1. Note the areas of full-thickness burns that are circumferential around digit, limb or trunk. If the viability of the distal part is jeopardized, or if respiration is hindered, as with partial circumferential burns of the chest wall, carry out an escharotomy (Greek: eschara = a hearth; the mark of a burn).
2. Give an appropriate intravenous dose of diazepam.
3. Take a scalpel and incise along the full length of the full-thickness burn, allowing subcutaneous fat to bulge out of the escharotomy wound.
4. Repeat the longitudinal escharotomy at different sites of the circumference until you have restored satisfactory perfusion of the distal part.
5. Dress the wounds with paraffin gauze or silver sulfadiazine (Flamazine).
ACTION
1. Identify a suitable area, not exceeding 20% of the body area, to treat primarily.
2. Identify a suitable donor site for the skin graft.
3. Excise the chosen area of full-thickness burn with a scalpel and be sure that the resultant bed consists of viable tissue. It is often safer to excise all subcutaneous fat to leave a graft bed of deep fascia. Achieve haemostasis.
4. Harvest a split skin graft and mesh this (see above).
5. Apply the mesh graft to the burn wound site and dress with several layers of paraffin gauze and an absorbent dressing.

7. Do not excise further burn until the donor site has healed and is ready for reharvesting, or another donor site is available.
SMALL AREAS
1. Operate between the second and fifth day.
2. Excise all burn tissue and apply a split skin graft.
3. If the viability of subcutaneous fat is in doubt, excise this down to the deep fascia.
4. If the viability of the tissue is still in doubt, dress the wound and bring the patient back to the theatre 48 hours later. Re-assess viability at this second operation. Excise further if necessary and graft.
OTHER WOUNDS
1. Do not close infected wounds primarily. They arise in a multitude of different situations.
2. Two common causes presenting to plastic surgeons include pressure sores and necrotizing fasciitis. Their management is described below.
WOUNDS FROM PRESSURE INJURIES
Appraise
1. Pressure injuries are common and difficult to detect in the early stages of development. The tissues between the skeleton and an external surface are compressed, causing a variable degree of ischaemia, which may be sufficient to cause necrosis. Necrosis may involve the superficial skin, the full thickness of skin or all the tissues overlying the skeleton.
2. Pressure injuries can occur in many sites but are most frequently found in well-recognized ‘pressure areas’ over the backs of the heels and around the pelvis, over the ischial tuberosity, the sacrum and the greater trochanter.
3. They result from the patient lying on or against a hard surface for a prolonged period. They may occur when the patient is comatose or under general anaesthesia or when the area is insensate, as in diabetic neuropathy or paraplegia. They are more likely to occur in these circumstances if the patient is thin, poorly nourished, cachectic and relatively immobile. Some surgical patients are therefore at particular risk.
4. There may be no significant evidence of the injury for some time after the event. Usually the first sign is erythema in the damaged area. Blistering usually indicates a superficial injury only. If the damage is deep the skin colour changes to blue and then to black as a thick eschar develops over a period of many days. This remains dry for several weeks before the necrotic tissue starts to separate.
5. Spontaneous separation of the underlying necrotic tissue may take many weeks or even months. When the necrotic tissue has separated, the wound will heal by secondary intention. A residual sinus will persist if necrotic tissue remains buried or if the underlying bone becomes infected.
6. As many patients with these injuries are debilitated, the above process may take many months and treatment is aimed at accelerating the healing process without insulting the patient further with unnecessary surgery.
Action
1. Avoid these injuries by identifying those patients particularly at risk.
2. Attend to their general health, specifically their nutrition and other medical disorders.
3. Take appropriate precautions when they are on the operating table and when in bed on the ward. Use one of the many specialized mattresses or beds to distribute the weight of the patient where possible. If these are not available the nursing staff may need to assist a change of position of the patient at least every 2 hours.
4. Cover superficial wounds with non-adherent dressings such as paraffin gauze and change on alternate days until healed.
5. Cover hard eschar with simple protective dressings only, or leave exposed if appropriate.
6. When the eschar starts to separate use a debriding agent such as Eusol and paraffin dressings changed daily.
7. Assist separation of the eschar by using a forceps and scissors during a dressing change. Repeat this with every change of dressing and avoid formal debridement in theatre and an unnecessary general anaesthetic.
8. Take wound swabs at regular intervals to monitor the organisms present but use antibiotics sparingly, for example if there is evidence of surrounding cellulitis.
9. Advise the patient to have a regular bath or shower, if appropriate, to help clean the wound and improve the patient’s morale.
10. When a cavity is established use a vacuum dressing. After irrigating and cleaning the wound with saline, insert the foam dressing, introduce the drain and cover with an occlusive dressing. Apply negative pressure to the drain via the pump and leave for 2–3 days before repeating.
11. If a vacuum pump is not available, change the dressings to calcium alginate when the necrotic tissue has separated and a surface layer of red granulation tissue is evident. Change this daily.
12. If a large cavity persists consider introducing a large cutaneous or myocutaneous flap (see above, Rotation flap, Biceps femoris flap, Tensor fascia lata flap).
13. Also consider continuing with dressings until healed, avoiding surgery and allowing uninterrupted mobilization.
NECROTIZING FASCIITIS
Appraise

1. This is a rare condition but you must recognize it immediately as serious and life-threatening.
2. There is a focal point where the infection commences, and this often arises from a surgical intervention.
3. The condition results usually from the symbiotic effect of the coincidental occurrence of an aerobic staphylococcus and an anaerobic streptococcus.
4. The bacteria appear to spread initially and preferentially along fascial planes. The overlying subcutaneous fat and skin are subsequently rendered ischaemic and necrotic.
Action


2. Take wound swabs and blood specimens for culture of organism and sensitivities.
3. Commence on appropriate antibiotics.
4. Mark the edge of the area of erythema on the skin.
5. If the area of erythema is seen to progress beyond the marked line within a few hours, take the patient to theatre immediately.
6. Use a cutting diathermy to remove all skin showing erythema as well as underlying subcutaneous fat and deep fascia.
7. Remove any tissue suspicious of being involved in the infective process.
8. Dress the wound with gauze soaked in saline and further absorbent dressings, leaving the skin adjacent to the wound available for inspection.
9. Take the patient back to theatre after 24 hours, or earlier if there are signs of progression of the disease.
10. Carry out further debridement of infected tissue.
11. Repeat this after a further 24 hours, remaining vigilant until all signs of infection have been eradicated.
12. When the patient is stable, consider covering the residual defect with split skin grafts or skin flaps or a combination of these.
FACIAL CLEFTS
KEY POINTS
 These descriptions are reminders for surgeons working in isolation but who have been trained in the procedures. They are also included for trainees helping at operations who can offer intelligent and effective assistance at these highly skilled procedures.
 Do not attempt them if you are inexpert because you may create disastrous results.
CLEFT LIP
Appraise
1. The treatment of clefts of the lip and palate may be very complex. Refer patients for treatment at specialist centres with a paediatrician, a paediatric anaesthetist, an orthodontist, an ENT surgeon, an oral surgeon, a dentist, an audiologist and a speech therapist as well as the plastic surgeon.
2. The extent of the cleft of the lip is variable and ranges from a slight notch in the vermilion border to a complete cleft of the whole lip.
3. The cleft may be bilateral and there may be an associated cleft of the palate.
4. Midline clefts of the lip, with absence of philtrum (Greek: philtron = love potion; median groove of upper lip) and columella (Latin: = a little column) and associated hypoteleorism, are rare. Refer patients to a specialized unit, as also those with rare oblique clefts of the face involving the lip.
5. Repair clefts of the lip at 3 months of age or soon after birth.
6. If the cleft is bilateral, repair the two sides separately with a 1-month interval between operations. Repair the more severe cleft first.
7. A prominent philtrum, particularly obvious in bilateral cleft lips, can be corrected preoperatively with orthodontic appliances. If these are not available, apply simple Elastoplast strapping from cheek to cheek across the prominent philtrum, to help reduce it before operation.
8. There are many techniques for repairing a cleft of the lip, but the Millard repair as described below is popular. The steps are outlined.
Prepare
1. Identify the midpoint of the philtrum on its vermilion border, and mark (Fig. 33.30, point 1).
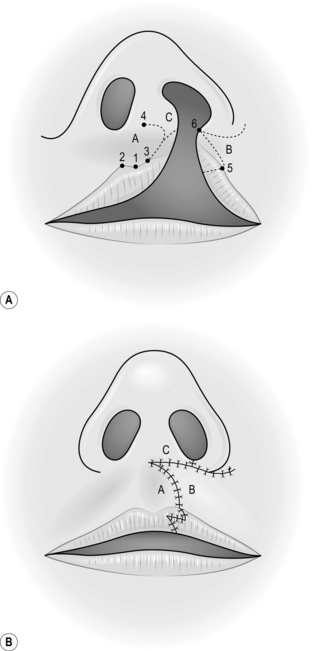
2. Identify the vermilion border at the base of the normal philtral column and mark (point 2).
3. Mark the corresponding point on the vermilion border at the base of the projected contralateral philtral column (point 3).
4. Mark the midpoint of the junction of the columella with the philtrum (point 4).
5. On the lateral segment of the lip, mark the vermilion border at a point where the white roll disappears (point 5).
6. On the lateral segment, mark the most medial point of normal skin, horizontally level with the base of the nostril (point 6).
7. Draw a straight line between points 5 and 6 and a curved line between points 3 and 4 of equal length.
8. Infiltrate the area with local anaesthesia using 0.5% lidocaine and 1: 200 000 adrenaline (epinephrine).
Action
1. With a size no. 11 blade, cut through the full thickness of the lip along the curved line of the medial segment.
2. Excise the mucosal surface lateral to this, preserving a small triangular flap of normal skin (the ‘C’ flap).
3. Excise the mucosa medial to the straight line on the lateral segment.
4. Incise the lateral segment from point 6 laterally around the base of the ala.
5. Reflect back the skin and identify the muscles inserted into the alar base.
6. Divide these muscles and dissect them free from their attachment to the alar base.
7. Identify and dissect free the muscle in the medial segment.
8. Suture together the orbicularis oris muscle from each segment with 4/0 absorbable suture.
9. Approximate the skin using 6/0 polyglactin as a subcutaneous suture.
10. Approximate point 6 to point 4.
11. Approximate point 5 to point 3.
12. Use the ‘C’ flap to create a nostril sill.
13. Suture the skin with 6/0 nylon.
14. Suture the skin and mucosa within the nostril with 6/0 polyglactin.
15. Adjust the mucosa of the lip and suture. If necessary incorporate a small Z-plasty.
CLEFT PALATE
Appraise
1. A cleft palate often occurs in conjunction with a cleft lip, but may occur separately.
2. The extent of the cleft palate varies from a complete cleft to a submucous cleft, where the palate is apparently intact but there has been failure of fusion of the levator palati muscles across the midline.
3. Repair the muscle in submucous clefts of the palate to ensure satisfactory function of the palate during speech.
4. Repair clefts of the palate at about 6 months of age to restore the speech mechanism to normal as early as is practical.
5. The bone defect may be constructed with a bone graft after the secondary dentition has erupted.
Prepare
1. Insert a suitable mouth gag such as the Dingman.
2. Pack the pharynx with ribbon gauze.
3. Mark out bilateral flaps on the palate passing from the uvula along the side of the cleft to its apex and anteriorly along the midline to within 3 mm of the alveolus (Fig. 33.31).

4. Continue marking laterally, keeping just within the margin of the alveolus and passing backwards behind the hamulus to the anterior pillar of the fauces.
5. Infiltrate the flaps with 0.5% lidocaine and 1:200 000 adrenaline (epinephrine).
Action
1. Incise along the marked edges of one flap, commencing at the tip of the split uvula.
2. Elevate the flap from its anterior margin as a mucoperiosteal flap.
3. Scrape the periosteum off the palate using a Mitchell trimmer.
4. On approaching the greater palatine artery, identify this as it emerges through its foramen and dissect the flap away from the bone around its perimeter.
5. Using the Mitchell trimmer, separate the nasal mucosa from the palatal bones.
6. Identify the levator palati muscle inserted into the posterior margin of the hard palate and place a spatula between this attachment and the nasal mucosa.
7. Cut down through this attachment on to the spatula, freeing the levator palati muscle completely from the hard palate.
8. Dissect the levator palati free from both underlying nasal mucosa and its covering palatal mucosa.
9. Repeat the dissection on the opposite side.
10. Repair the nasal mucosa with 4/0 polyglactin, commencing anteriorly and work posteriorly to reconstruct the uvula.
11. Suture the two ends of the levator palati together in the midline with 4/0 polyglactin sutures.
12. Repair the oral mucosa in the midline using 4/0 polyglactin sutures. Use deep mattress sutures in the central portion.
13. The anteriors tips of the two flaps when sutured together may protrude into the mouth. They need not be sutured down as they adhere to the palate very early in the postoperative phase if left free.
ANTERIOR CLEFT PALATE
Appraise
1. A cleft of the anterior palate co-exists with a cleft of the lip.
2. It can be partially closed at the time of the lip repair but is usually closed at the time of the palate repair when this is also present.
3. Repair in specialized centres is usually achieved in layers by mobilizing the nasal mucosa on the cleft side first and suturing this to the vomerine mucosa. The lateral and medial mucoperiosteal flaps are closed over this.
4. For the inexperienced or isolated surgeon a more reliable closure is achieved by overlapping and suturing the mucoperiosteal flap of the cleft side to the vomerine flap.

PHARYNGOPLASTY
Appraise
1. A pharyngoplasty is necessary to reduce the velopharyngeal space when this is responsible for nasal escape during speech. This is usually due to the soft palate being too short to reach the posterior pharyngeal wall.
2. Carry out preoperative assessment with a nasendoscope wherever possible.
3. There are many different kinds of pharyngoplasty. Most provide a reduction in the anatomical size of the velopharyngeal space.
4. A few, including the Ortichochea repair described below, attempt not only to reduce the anatomical size of this space but also to provide a dynamic sphincter, which helps closure during speech.
Action
2. Mark a rectangular pharyngeal flap, based inferiorly and reaching as high as can be visualized on the posterior pharyngeal wall.
3. Infiltrate the flap with 0.5% lidocaine and 1:200 000 adrenaline (epinephrine).
4. Identify the palate-pharyngeus muscle within the posterior pillar of the fauces, and insert a McIndoe scissors behind this after penetrating the mucosa.
5. Separate the blades of the scissors and dissect free the muscle along its length. Dissect it free to its lower limit and divide it at this point.
6. Dissect the opposite muscle free in the same manner, preserving some overlying mucosa.
7. Raise the posterior pharyngeal flap down to its base and achieve haemostasis of its bed.
8. Suture the muscle belly of each of the two flaps to the raw surface of the pharyngeal flap with 4/0 polyglactin sutures.
9. Improve the attachment by suturing the mucosa of the muscle flap to the mucosa of the pharyngeal flap along the various attachments with 6/0 polyglactin.
CRANIOFACIAL SURGERY
Appraise
1. Craniofacial surgery involves correction of abnormalities of the facial and cranial bones and overlying soft tissues.
2. Many cranial abnormalities occur as part of well-recognized syndromes. Others result from premature fusion of one or more of the cranial sutures.
3. This surgery was pioneered by Tessier, who has classified the different types of facial cleft.
4. Craniofacial surgery is now recognized as a specialty in its own right. It often involves combined expertise from several specialists, including a neurosurgeon, ophthalmic surgeon, maxillofacial surgeon, ENT surgeon and paediatric surgeon, as well as the plastic surgeon.
5. These cases are rare but often much can be done to help these patients in specialized centres where this surgery is carried out.
GENITALIA
HYPOSPADIAS
Appraise
1. The male urethral meatus may appear on the surface at any point in the midline between its normal position at the tip of the glans penis and the perineum.
2. In many cases of hypospadias (Greek: hypos = under + span = to draw), a tight fibrous band, the chordee, is evident distal to the ectopic meatus, which causes curvature of the penis when in the erect position.
3. Reconstructive surgery to place the meatus in its normal position at the tip of the glans is intended to produce an apparently normal penis without urethral fistula.
4. Many operations have been designed to treat the condition but none consistently fulfils the above criteria.
5. Experienced surgeons advocate a one-stage procedure, but if you are an inexperienced surgeon, proceed with a staged reconstruction.
6. Ideally, carry out operation in infancy. Some surgeons prefer to wait until the child is continent of urine to release the chordee and then reconstruct the urethra just before the child starts school.
Release of chordee
1. Under general anaesthesia, carry out a Horton test. Place some rubber tubing around the base of the penis and pull it tight. Inject the corpora with physiological saline to produce an erect penis and note the extent of chordee. Release the rubber tubing.
2. Mark the extent of the chordee in ink. Mark out a Z-plasty for reconstruction following excision of the chordee.
3. Incise down the central line overlying the chordee.
4. Excise all underlying fibrous tissue.
5. Use a bipolar coagulator to achieve haemostasis.
6. Raise the flaps of the Z-plasty, transpose them and suture them with 6/0 polyglactin. Do not dress the wound.
Distal shaft correction
1. Under general anaesthesia, carry out a Horton test as above.
2. If any chordee is still evident, excise this and defer reconstruction for a further 6 months.
3. If no chordee is apparent, mark out a rectangular flap proximal to the meatus with its base at the meatus. The flap should be 1 cm broad and long enough to reach the glans when turned distally (Fig. 33.33).
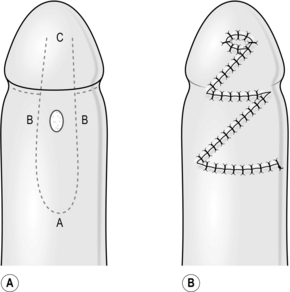
4. Mark out a strip of skin distal to the meatus from the meatus to the glans.
5. Catheterize the urethra with a small Foley catheter.
6. Elevate the flap and reflect it distally.
7. Cut along the margins of the strip of skin and elevate the edges.
8. Suture the flap to the cut edges of the strip of skin using 6/0 absorbable suture.
9. Elevate lateral flaps of skin by incising around the attachment of preputial skin to the glans. Mobilize the flaps round to the dorsal surface.
10. Suture the flaps across the reconstructed urethra, so that the suture line between the two flaps traverses the reconstructed urethra. Use 6/0 polyglactin.
11. Suture a foam dressing around the reconstructed penis. This prevents interference from the patient. Suture or strap the catheter to the upper thigh.
PROXIMAL SHAFT, SCROTAL AND PERINEAL HYPOSPADIAS
1. As with distal shaft hypospadias, there are many operations to correct these deformities. Reconstruct the urethra with flaps of preputial skin from the redundant foreskin or use a free graft of preputial skin.
2. Use local skin flaps to cover the reconstructed urethra.
3. In perineal hypospadias, use the hairless strip of skin in the middle of the scrotum for the urethral reconstruction in this region.
EPISPADIAS AND ECTOPIA OF THE BLADDER
Action
1. If specialized treatment is not available do not carry out a pelvic osteotomy.
2. Close the bladder wall with abdominal flaps.
3. Tighten the bladder neck at a second stage.
4. In a third stage, close the residual epispadias by passing a funnel of mucosa through the base of the penis to the ventral surface and reconstruct the resultant hypospadias.
SCARS
HYPERTROPHIC SCARS
Appraise
1. These present as red, raised, broad, hard, itchy scars that are unsightly and uncomfortable. They develop a few months after the wound has healed.
2. Beware of excising or revising them unless there was failure of primary healing or unless a marked contraction has developed. Simple excision of the scar alone will probably cause a larger one to develop.
Action
1. Inject the scar tissue only with triamcinolone.
2. Repeat the injections at monthly intervals for 3–6 months, or longer if necessary, until the scar is soft.
3. Avoid excessive injections and avoid injecting the triamcinolone into the surrounding skin. This may cause skin atrophy.
4. If the scars are extensive, fit and apply a pressure garment as early as possible. Advise the patient to wear this garment for 6–12 months.
Pressure garments
1. A pressure garment is a synthetic elastic garment that is specifically measured to fit part of an individual.
2. In applying pressure to a scar, it modifies the maturation and limits hypertrophic scar formation, provided it is applied early.
3. Pressure garments are most useful in reducing hypertrophic scar formation and preventing the development of contractures, particularly from burn wounds.
4. They are also used in controlling progressive lymphoedema.
KELOIDS
Appraise
1. Keloids (Greek: kelis = scar + eidos = like) have a different histological appearance from hypertrophic scars.
2. They are most commonly found in patients of African origin but can be found in all races.
3. Excision of keloids, like excision of hypertrophic scars, only temporarily cures the problem. A larger lesion will develop in its place and this treatment is to be condemned.
4. Treatment with triamcinolone, as used for hypertrophic scars (see above), reduces the size of most keloids but does not eliminate them. This may, however, be the best treatment.
5. Excision of the whole keloid followed by radiotherapy to the resultant scar can be very effective. This requires expertise in radiotherapy but may not be suitable for young patients.
Action
1. Identify the boundaries of the keloid.
2. Excise its central bulk, keeping the margin of excision at the lateral borders and in depth within the keloid tissue. Close the wound primarily, preserving a rim of keloid tissue at all margins. Keep all sutures within this rim.
3. Give monthly injections of triamcinolone into the residual scar as for a hypertrophic scar (see above).
4. Apply pressure to the area for at least 3 months afterwards with a pressure garment specifically fitted for the patient if appropriate.
5. If the keloid is extensive, take a split skin graft from the surface of the keloid and apply to the raw surface after removing the major bulk of the keloid. Again, keep all sutures within the keloid tissue and apply pressure postoperatively.
AESTHETIC SURGERY
1. You should undertake these operations only if you are an expert. Aesthetic (Greek: aisthanesthai = to feel, perceive) operations demand specialist management, since they are intended to be pleasing to the patient.
2. These operations can nearly always be deferred until specialist treatment is available, but a brief outline of the more common operations is given below.
3. Careful preoperative assessment and full explanation of the expectation of the results of surgery and all potential complications are vital parts of management of patients in this field of surgery.
FACELIFT
Appraise
1. The principal aim of a facelift is to resuspend the soft tissues of the face, which have fallen as a result of gravity and other factors. This may involve tightening or reducing muscles and removal or replacement of subcutaneous fat and skin.
2. There are many different types of facelift, some involving the use of an endoscope.
3. There are also many associated procedures that can be carried out at the same time, such as an endoscopic brow lift to elevate and stretch the forehead skin and a platysmaplasty to increase the cervicomental angle.
4. In the cheek, the skin may be elevated by dissecting in the subcutaneous plane or in the plane of the superficial musculoaponeurotic system (SMAS) or in both.
Action
1. Make a vertical incision in the temple hairline down to the pinna. Extend this around the lower two-thirds of the pinna and backwards horizontally into the lateral occipital hairline (Fig. 33.34).
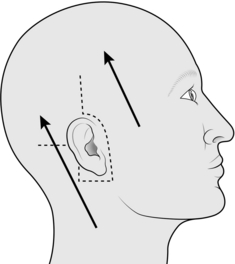
2. Raise the skin anterior to this incision and undermine it halfway to the nasolabial fold and an equivalent distance towards the chin and the neck. Avoid dividing branches of the facial nerves.
3. Plicate the superficial fascia (the SMAS layer) to reduce subsequent tension on the skin.
4. Retract the skin flap towards the incision line and excise the excess tissue.
5. Suture the flap into place along the original incision margin.
6. Insert a small corrugated drain beneath the postauricular skin.
7. Repeat the process on the opposite side to produce symmetry.
RHINOPLASTY
Action
1. Shave or cut the vibrissae in the nostrils.
2. Make an intercartilaginous incision on each side through mucosa between the alar and lateral cartilages.
3. Extend this incision over the vault of the nostril down to the front of the septum.
4. Through this incision separate the skin on the top of the nose from the underlying septum.
5. Incise the mucosa along the roof of each nostril and divide the upper lateral cartilages from the septum.
6. Reduce the upper lateral cartilages as necessary.
7. Reduce the septal hump with a knife.
8. Remove the hump of the nasal bones with an osteotome and hammer.
9. Make a small incision in each pyriform fossa.
10. Insert a periosteal elevator through this incision on the lateral margin of the nose and elevate the periosteum from the lateral margin of each nasal bone.
11. Insert a nasal saw along each incision in turn and cut halfway through the nasal bone.
12. Insert an osteotome along each incision in turn and complete the nasal osteotomy.
13. Manipulate the nasal bones into the new position.
14. Rasp the nasal septum as necessary.
15. Through the intercartilaginous incision, evert the alar cartilages and reduce as necessary.
16. Expose the anterior margin of the nasal septum and adjust as necessary.
17. Suture the nasal mucosa with 3/0 absorbable thread.
18. Pack each nostril with paraffin gauze.
19. Dress with tape and a nasal splint.
BLEPHAROPLASTY
Action
1. Under local or general anaesthesia, mark the excision margins of the skin of the upper eyelid as a crescent with an accessory tail laterally.
2. Mark the excision margin on the lower eyelid with a minimal reduction in height.
3. Infiltrate with local anaesthetic, if indicated.
4. Excise the skin from the upper eyelid and excise the underlying fat pads from beneath the orbicularis muscle if any are present. Achieve haemostasis and suture with subcuticular 5/0 polypropylene.
5. Raise the lower eyelid skin and, with a skin hook, pull the skin upwards and laterally.
6. Excise a triangle of skin at the lateral margin and a minimal amount of skin along the eyelid margin.
7. Reflect the skin flap and excise the fat pads from beneath the orbicularis muscle.
CORRECTION OF PROMINENT EARS
Appraise
1. This operation is carried out to reduce prominence of the ears (‘bat ears’), which may be due to a deep concha, but is more commonly due to an absence of the antihelical fold.
2. The principle of the operation is to remould the shape of the cartilage.
3. Operations that depend on skin and cartilage excision are unsatisfactory.
4. Defer surgery in children until the age of 6 years, as the cartilage is thin and children do not normally appreciate or suffer from any psychological problem before this age.
Action
1. Use general or local anaesthesia.
2. Infiltrate the pinna with local anaesthesia.
3. Mark the site of the proposed antihelical rim and tattoo the underlying cartilage by passing a needle covered with ink through the full thickness of the pinna at several points along this line.
4. Excise a narrow vertical ellipse of skin from the posterior surface of the pinna.
5. Incise the cartilage posteriorly along the tattoo marks.
6. Dissect the cartilage away from the anterior skin of the pinna.
7. Score the anterior aspect of the cartilage with circumferential and radial incisions, to allow the cartilage to fold backwards.
8. When you have obtained adequate reduction, re-drape the skin over the cartilage and suture the skin wound with subcuticular polypropylene.
9. Repeat the process for the opposite ear to provide symmetry.
10. Dress both ears with proflavine wool to ensure apposition of skin to cartilage.
11. Cover both ears with cotton wool and a supportive bandage.
12. Remove the dressing at 10 days and remove the sutures.
13. Maintain a protective dressing over the ears at night for 4 weeks.
BREAST AUGMENTATION
Appraise
1. Breasts can be augmented in size by inserting prostheses in the submammary plane or in the subpectoral plane.
2. The most common complication is the development of a fibrous capsule around the prosthesis. When this contracts appreciably, the prosthesis feels hard and uncomfortable and the breast becomes distorted.
3. The size of prosthesis to be used is dependent on the size of the patient and the breast size. A history of previous surgery, previous pregnancy and lactation and weight changes all influence the choice of the size of prosthesis to be used.
Action
1. Incise the skin along the submammary fold.
2. Dissect a pocket in the submammary plane sufficient to accommodate the prosthesis.
5. Keep the breasts well supported in the postoperative phase and for the subsequent 3 months.
6. If a capsular contracture develops, carry out a closed capsulotomy by compression of the capsule in the first instance.
BREAST REDUCTION
Appraise
1. Breast reduction is carried out most commonly for physical symptoms.
2. Large breasts may be of sufficient weight to affect the posture of the patient and to cause backache.
3. Pressure marks over the shoulders may be evident where the straps of the brassiere rest.
4. The aim of surgery is to produce an aesthetic breast shape with a viable, sensitive nipple and areola. Preserve the areola on a vascular pedicle.
5. Breast feeding may be possible after breast reduction but warn the patient not to expect this.
6. There are many operations designed to reduce the mass of the breasts. The inferior pedicle technique devised by Robbins is described below.
Action
1. Mark the breasts preoperatively with the patient sitting.
2. Choose a suitable site for the new position of the nipple near the midclavicular line.
3. Use a keyhole-type breast reduction pattern based on this site and mark the lateral and medial skin flaps (Fig. 33.35).
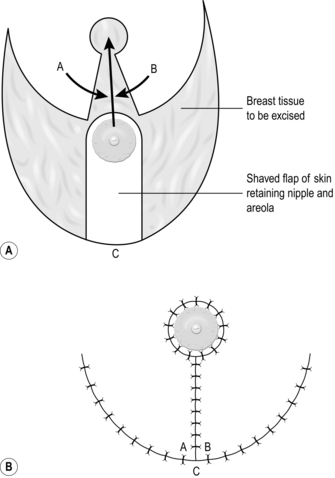
4. Mark the medial and lateral ends of the submammary crease and the submammary crease itself.
5. Perioperatively, make an intradermal incision through the skin along the patterns marked out preoperatively so that the skin marks are not lost.
6. Shave off the epidermis from the skin between the normal areola and the inframammary fold, and from a rim of skin around the areola.
7. Excise the lateral and medial segments of skin between the lower margin of the skin flaps and the inframammary fold, together with the underlying breast tissue.
8. Excise breast tissue beneath the new site of the nipple and areola.
9. Dissect the inferior pedicle to its base.
10. Elevate the medial and lateral skin flaps with their underlying breast tissue.
11. Support the inferior pedicle by anchoring it to the pectoralis muscle superiorly.
12. Suture the nipple and areola into its new site.
13. Approximate the skin flaps in the midline below the new nipple site.
15. Close the wounds in layers, using subcuticular sutures to the skin.
16. Repeat the operation on the opposite side to provide symmetry.
17. Support the breast postoperatively with light dressings and remove the sutures at 3 weeks.
18. Keep the breasts well supported for 3 months postoperatively.
DERMAL MASTOPEXY
Appraise
1. The breasts of all women have a tendency to become ptotic with increasing age.
2. Ptosis tends to be greater when there has been considerable weight reduction or excessive involution following lactation. It is also marked when the breasts have not been supported with a brassiere over a long period.
3. Dermopexy or correction of the ptosis is appropriate when the nipple can be re-sited at a higher level and the skin envelope of the breast tissue can be reduced without any change in the volume of breast tissue.
Action
1. Mark the patient as for a breast reduction.
2. Carry out the stages as enumerated in a breast reduction, but do not excise breast tissue.
3. In advancing the inferior pedicle to its new site, incise breast tissue at the new site and undermine the skin edges around the new nipple site appropriately.
4. Manage the patient postoperatively as for a breast reduction.
ABDOMINAL REDUCTION
Action
1. Mark out a symmetrical line traversing the lower abdomen. Start beneath the anterior superior iliac spine on one side and pass through the upper part of the site of the pubic hair to the other.
2. Incise along this mark and cut down to the fascia overlying the muscles.
3. Dissect upwards in this plane.
4. Incise the skin around the umbilicus and separate this from the skin flap.
5. Undermine the skin up to the costal margin on either side.
6. Stretch the skin downwards.
7. Excise the redundant skin and subcutaneous fat.
8. Identify the new site on the skin flap for the umbilicus and excise an oval piece of skin to accommodate it.
9. Break the operating table at the level of the pelvis to flex the hips.
10. Close the lower abdominal wound in layers and suture the umbilicus.
11. Insert a suction drain on each side.
12. Close the skin of the umbilical scar, if still present, in the vertical plane.
13. Postoperatively, keep the hips flexed to reduce tension on the lower abdominal wound for a few days.
LIPOSUCTION
Appraise
1. This technique of removing subcutaneous fat has a useful but limited place in aesthetic surgery.
2. It is occasionally used in refining a reconstructive procedure.
3. The technique is sometimes used alone but only a limited amount of fat can be removed without the need for excising further redundant skin.
4. The technique is often used as an adjunct to other surgery when skin is being removed, particularly in abdominoplasty and thigh and buttock reduction.
5. It can be used to remove lipomata from prominent sites on the trunk or limbs, avoiding an ugly scar and leaving a small discreet scar at some chosen distant inconspicuous site. In these circumstances excision is likely to be incomplete and the procedure may need repeating later for recurrence.
Action
1. Identify a suitable site for insertion of the liposuction cannula which is both discreet and within range of the area to be treated.
2. Make a small stab incision in the skin.
3. Through this insert the appropriate cannula and infiltrate the area with fluid made from adding 1 ml of 1:1000 adrenaline (epinephrine) and 20 ml of 0.25% bupivacaine to 500 ml of Hartmann’s solution. Then wait at least 5 minutes.
4. Insert the chosen liposuction cannula and pass it into the deepest plane of subcutaneous fat.
5. Apply suction as the cannula is passed up and down the channel formed.
6. Repeat in multiple other deep subcutaneous channels.
7. Avoid passing the cannula superficially as this may cause pitting of the skin surface.
8. Suture the incision on removal of the cannula.
9. Apply a pressure garment immediately to the area treated and retain for 3 months.
LASER SURGERY
1. Vascular lesions. Many cutaneous vascular lesions can be eradicated without leaving any significant scarring. These include all types of telangiectasia, capillary haemangiomata, including portwine stains, pyogenic granulomata and other small vascular lesions. Many of the small lesions can be treated successfully with a single treatment with one of the pulsed dye lasers. While the larger lesions can be eradicated, treatment may leave a residual area of variable pigmentation.
2. Pigmented lesions. Several lasers with short wavelengths, such as the Q-switched lasers, remove pigmented lesions limited to the epidermis and basal layer, such as lentigo simplex, solar lentigines and ephilides. They also remove pigment from the superficial dermis. Pigment in the deeper dermis requires a laser with a longer wavelength, but treatment of these lesions is less satisfactory and surgical excision may be the better option of treatment.
3. Tattoos. Removal of professional as well as accidental tattoos with lasers is now much more effective than surgical excision because of the absence of scars. The Q-switched ruby, Nd-YAG and Alexandrite lasers are all effective in removing blue-black pigment, but complete excision can be difficult to achieve even with multiple treatments and pigmentation changes may occur.
4. Skin resurfacing. The carbon dioxide laser in effect causes a predetermined superficial burn to the skin and has a similar effect to dermabrasion, which causes a physical burn, and a chemopeel, which causes a chemical burn. Treatment of wrinkles and irregular scarring of the skin surface with the carbon dioxide laser is more accurate and predictable than these treatments and is therefore replacing them. The occasional complication of a change in pigmentation remains unresolved.
PROSTHETIC IMPLANT MATERIALS
Appraise
1. All implants must be inserted under strict aseptic techniques.
2. Implants require good-quality soft tissue cover to prevent ulceration of the overlying skin.
3. If subsequently exposed, most implants will become infected and require removal. It may be possible to replace the implant when the infection has been eradicated.
4. All implants develop a surrounding fibrous capsule. This may be useful but is a disadvantage with a breast prosthesis as the fibrous capsule may contract and distort the prosthesis.
5. Several inert metals are used in reconstruction:
 Titanium plates are used in cranioplasty

 Stainless steel, vitallium and tantalum are occasionally used.
6. Hard plastics used in reconstruction include: methyl methacrylate, used in cranioplasty; polyethylene, used as a mesh in abdominal wall repair; and polypropylene. Proplast, a combination of two polymers (polytetrafluoroethylene and pyrolytic graphite), is used to augment the cheek and the chin.
7. Silicone is a general term for a class of polymers with long chains of dimethylsiloxane units [—CH3—Si—O—CH3]. These are manufactured in many forms, including liquids, gels, resins, foams, sponges and rubbers.
8. Silicone implants are used in facial bone augmentation, small-joint replacement in the hand and as a stent to reconstruct tendon sheaths prior to tendon grafting.
9. Silicone implants are commonly used in breast augmentation or reconstruction. Some breast implants consist of a silicone gel contained within a silicone elastomer shell. Others are made using a cohesive gel that maintains their shape. A textured surface modifies the fibrous reaction of the body and capsule contracture is reduced. There is no scientific evidence to show that any silicone breast implant has a significant carcinogenic risk and, although these implants may leak, there is no evidence that the silicone that does leak causes any serious complication.
STEM CELL THERAPY
The name is derived from the German word stammzelle, which could either mean the original cell of the origin of species or the cell of the origin of an organ (http://www.nature.com/stemcells/2009/0906/090625/full/stemcells.2009.90.html). For therapeutic purposes they are divided into embryonic and adult stem cells. Stem cell transplantation is still not in routine clinical practice and its use in clinical surgery is experimental.
BIOLOGICAL THERAPY
Biological therapy refers to the use of larvae (maggots) and leeches in surgery.
Larval therapy1
1. The main indications include a necrotic wound that is difficult to surgically debride and/or a patient who is not suitable for surgery. It may also be used in a sensitive area where precise debridement is required. The advantage of larval debridement is that it only removes dead tissue without affecting healthy living areas. The wound must be open and moist: cavities and dry wounds are not suitable.
2. Prepare the patient psychologically: patients and staff are often poorly tolerant of larval therapy. Maggots have a short lifespan and have to be ordered freshly. Once the maggots are introduced into the wound, use a breathable dressing to cover the area to avoid them escaping as well as hiding them from sight.
3. Use larval therapy prior to negative pressure therapy to prepare the bed and remove necrotic tissue.
Leech therapy2
1. The European medicinal leech (Hirudo medicinalis), is commonly commercially produced and used. Indications for their use are:
 Following a microsurgical procedure that is showing evidence of venous insufficiency and congestion, especially post re-implantation or revascularization. Use leeches to relieve this congestion, thus giving time for venous outflow to improve secondarily.

2. Use prophylactic antibiotics for Aeromonas hydrophila (contained in the leech).
3. Using gloves, apply the leeches over the raw area of the organ and cover it with moist gauze. When leeches are engorged and fall off, discard in a biological waste bin.
NEGATIVE PRESSURE WOUND THERAPY (VAC-PUMP™)
1. Application of sub-atmospheric pressure to the wound was originally applied for burn wounds, but any exudating wound which is difficult to close primarily or to cover with a skin graft is often suitable. Avoid application directly over bowel and vessels, and in the presence of malignancy. The decision to commence negative pressure wound therapy (NPWT) should be made in consultation with the tissue viability team and/or plastic surgeon.
2. Ensure the wound is free from necrotic material, as NPWT has no debriding effect on the wound (cf. larval therapy). Apply the dressing (either foam or gauze dressing, depending on the manufacturer); this needs to be covered by the airtight film (usually supplied), which is then connected by a length of tubing to the manufacturer’s pump device. The value and the pattern of negative pressure can be adjusted to the comfort of the patient and also to the type of the wound, the most common setting being 125 mmHg continuous suction.
3. Aim to continue the treatment for 1–3 weeks (although longer periods are possible), and change the dressing every 3–4 days depending on the type of the wound and the volume of exudate. Mobile, pocket-sized and even disposable machines are available to enable outpatient use of NPWT.
THE FUTURE


Aston, S.J., Beasley, R.W., Thorne, C.H.M. Grabb and Smith’s Plastic Surgery, 5th ed. Philadelphia: Lippincott-Raven; 1997.
A concise guide to clinical practice in plastic surgery in one volume. It is packed with information.
McCarthy, J.G. Plastic Surgery. Philadelphia: Saunders; 1990.
Whilst this, in its eight volumes, remains the commonly accepted authoritative reference book in plastic surgery, it now requires updating.
McGregor, A.D., McGregor, I.A. Fundamental Techniques of Plastic Surgery and their Surgical Applications, 10th ed. Edinburgh: Churchill Livingstone; 2000.
An excellent manual of basic techniques in plastic surgery, ideal for young trainees in the specialty and general surgeons.
Richards, A.M. Key Notes on Plastic Surgery. Oxford: Blackwell; 2002.
Settle, J.A.D. Principles and Practice of Burns Management. Edinburgh: Churchill Livingstone; 1996.
A comprehensive guide to the management of patients with burns, indicating many of the difficulties and controversies in treating these cases.
Strauch, B., Vasconez, L.O., Hall-Findlay, E.J. Grabb’s Encyclopaedia of Flaps, 2nd ed. Philadelphia: Lippincott-Raven; 1998.
Published in three large volumes, this is a comprehensive guide to flaps, with over 500 chapters, each describing one or more flaps in detail.