Chapter 35 Pinn-ACL CrossPin System for Femoral Graft Fixation
Introduction
Graft fixation has been considered the weak link in the early postoperative period, especially with the soft tissue grafts. Initial fixation requires sufficient fixation strength during the rehabilitation period while the graft incorporates into the bone tunnels. Several techniques have been used for fixing hamstring grafts. Interference screw fixation for quadrupled hamstring grafts has failure strengths that may not be adequate for daily activities and a modern rehabilitation program1; suspension techniques are related to tunnel enlargement and the so-called “bungee effect.”2–4 A recent study demonstrated that four-bundle hamstring grafts fixed with modern techniques produced higher stability rates than bone–patellar tendon–bone (BPTB) reconstructions.5
Transfixation pin fixation techniques were developed to improve femoral graft fixation; these techniques put a pin across the femur traversing the femoral tunnel. Within the transverse femoral tunnel, the pins either penetrate the graft, as with Rigidfix (Mitek, Ethicon, Westwood, MA); the two bundles of the hamstring graft fold around the pin to create a quadrupled graft, as with Bio-TransFix (Arthrex, Naples, FL), Cross-Screw (Stryker, Kalamazoo, MI) and Bone Mulch (Arthrotek, Warsaw, IN); or the two bundles are looped through a graft harness that a pin transverses to create a quadrupled graft (ConMed-Linvatec, Largo, FL). Femoral fixation of hamstring tendon grafts using transfixing pins is an accepted technique that yields excellent biomechanical properties with failure loads over 800N,1,6,7 which clearly surpasses the 500N accepted to adequately follow an aggressive rehabilitation protocol8,9 and has demonstrated results in clinical trials comparable with other fixation methods.10–13
The ConMed-Linvatec Pinn-ACL Cross-Pin System is designed to provide transverse femoral fixation in anterior cruciate ligament (ACL) reconstruction using a soft tissue graft. With existing systems, transverse femoral fixation was a blind procedure, but this surgical technique and the implant’s innovative design allow the surgeon to visualize the transverse tunnel and exact point of femoral fixation. With this system the graft is suspended in a harness and the pin transfixes the harness, not the graft. Laboratory testing has showed greater than 1700N pullout strength,14 which is superior to that of other available designs.1,6,7
Instruments and Implant Design
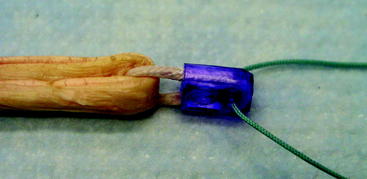
The Pinn-ACL CrossPin system for femoral graft fixation includes the implants and instrumentation to ensure accurate transverse fixation of the graft. The implant consists of two parts, the graft harness and the cross-pin implant (Fig. 35-1).
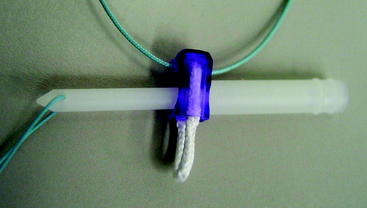
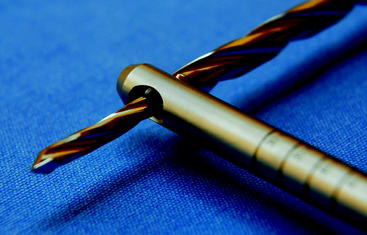
The graft harness is composed of self-reinforced poly-L-lactic acid (PLLA), it has an eyelet in which the cross-pin locks, it also has a closed loop of high-strength Dyneema suture in which the graft sits and folds, and in its proximal aspect it has a lead suture for graft construct passing. The graft harness is available in 8- and 9-mm diameters. The cross-pin implant is also composed of self-reinforced PLLA, is available in three different lengths (40, 45, and 50 mm), and has a lead suture in its tip for implant passing. A disposable transverse cannula fits in the blue frame and slides over the drill bit to maintain the entrance of the transverse tunnel as opened and accessible. The U-Guide is an external aimer with two components—the main blue frame and the positioning rod, which fit in the tunnels—and is available in 8 and 9 mm. A specially designed drill bit with two different diameters is used to create the transverse tunnel. This drill bit is the same for every procedure regarding the cross-pin implant length. Being a transverse fixation system, the tip of the drill bit engages in the tip of the positioning rod to ensure the engagement of the implants (Fig. 35-2).
Surgical Technique with Hamstring Tendons
Graft Harvesting and Preparation
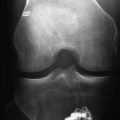
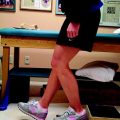
Using the graft sizing block, the entire graft bundle diameter is measured. It is important to take measurements of the femoral and tibial ends (Fig. 35-3); these diameters will determine the proper sizes of the cross-pin graft harness and tunnel. The graft harness size (8 or 9 mm) should always be selected based on the diameter of the femoral end of the graft.
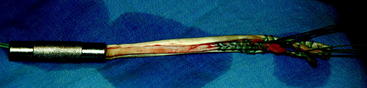
To load the graft strands into the graft harness (Fig. 35-4), place the graft harness onto the harness holder accessory and pass the graft strands individually through the continuous suture loop on the graft harness.
Tibial and Femoral Tunnel Creation
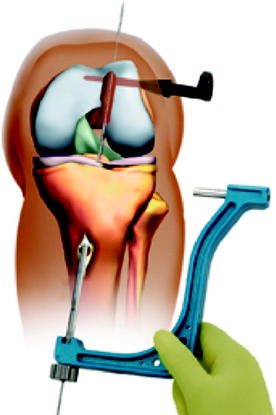
The Pinn-ACL tibial guide, set at 55 degrees, is inserted into the knee through the medial working portal. The tip of the guide is placed in the posterior aspect of the tibial ACL stump following an imaginary line along the posterior border of the lateral meniscus anterior horn and centered in the midline of the joint. The guide pin should enter the tibia 5 cm below the medial joint line and 2 to 3 cm medial to the anterior tibial tuberosity in a position adjacent to the medial collateral ligament; this alignment will create a tibial tunnel that allows a more oblique femoral tunnel, usually around the 65-degree angle.15,16 The guide pin is advanced into the tibia, and arthroscopic visualization is used to check the correct position of the guide pin in the joint. An AccuDrill reamer corresponding to the graft’s tibial size is used to create the tibial tunnel.
Cross-Pin Implant Selection
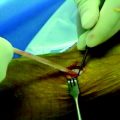
To identify the appropriate length of cross-pin to be used, utilize the U-Guide and cross-pin drill bit as a caliper to first determine the length of the cortical side of the transverse tunnel (i.e., the distance from the lateral cortex of the femur to the lateral wall of the femoral tunnel). To measure this distance, firmly press the cross-pin drill bit against the cortical surface, without drilling, and read the laser-etched depth markings where the drill bit enters the drill guide aperture (Fig. 35-5). This measurement is important in selecting the appropriate-sized cross-pin implant for cortical side fixation.
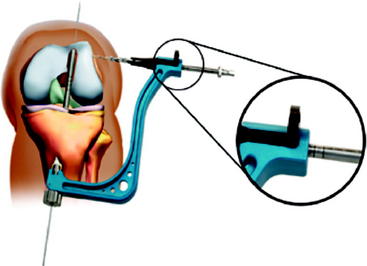
Fig. 35-5 The measurement on the transverse drill bit indicates the correct size of the cross-pin implant.
(Courtesy of ConMed-Linvatec.)
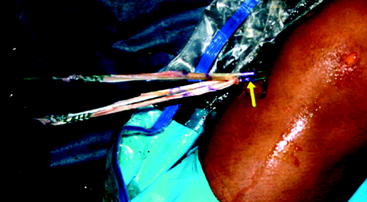
After the measurement is taken, drill the transverse tunnel until the drill bit stops against the U-Guide body. As you pull out the drill from the tunnel by hand, push the black transverse cannula into the transverse tunnel to prevent soft tissues from entering the transverse tunnel (Fig. 35-6). Note: The use of the transverse cannula is optional. The purpose of the cannula is to maintain the opening of the transverse tunnel in the event the transverse opening cannot be located.
Graft Passing
Draw the hamstring graft construct into the knee using the graft-passing guide pin. Pass the lead suture of the graft harness through the eyelet of the graft-passing guide pin and, while maintaining lateral-to-medial alignment of the axis of the eyelet in the graft harness, pass the graft construct into the tibial tunnel. It is very important to maintain the graft harness alignment; the eyelet on it must be parallel to the transverse femoral drill (Fig. 35-7).
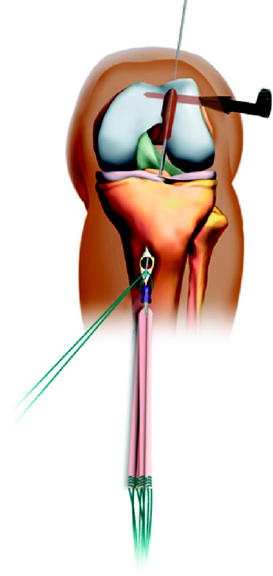
Fig. 35-7 The harness lead suture is mounted in the graft-passing guide pin.
(Courtesy of ConMed-Linvatec.)
As the graft harness enters the joint space in the intracondylar notch, use an arthroscopic probe (if necessary) to maintain the eyelet orientation lateral to medial as it passes into the femoral tunnel (Fig. 35-8).
Pull firmly on the graft construct until it is fully seated in the femoral socket.
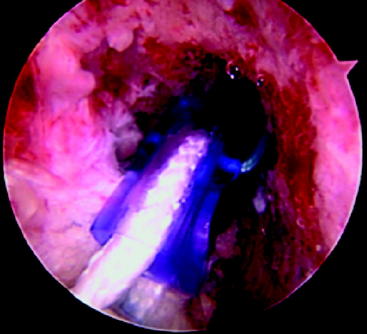
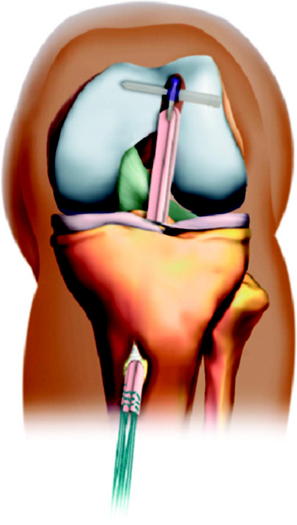
Place a sheathed scope into the black transverse cannula to view the full insertion and alignment of the axis of the graft harness eyelet with the axis of the transverse tunnel (Fig. 35-9).
Graft Fixation
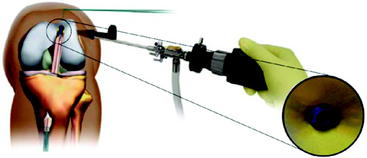
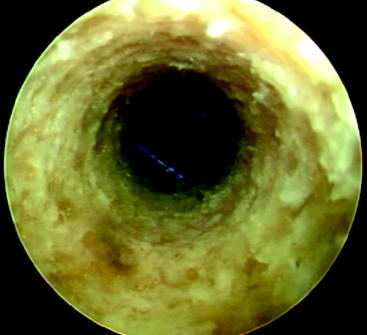
A sheathed scope should be placed into the black transverse cannula to view the lead suture passing through the eyelet of the graft harness (Fig. 35-10).
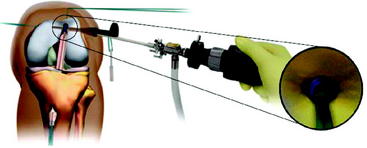
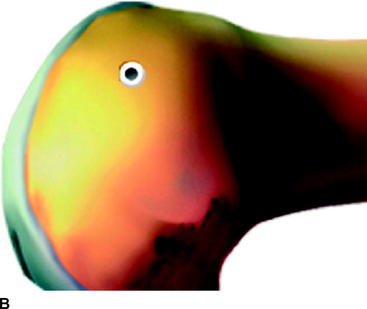
Gently pull the cross-pin lead suture until it enters the black transverse cannula and the tunnel opening. Insert the cross-pin driver into the proximal end of the implant (Fig. 35-11, A), and tap the driver with a mallet, advancing the implant until it stops. After the cross-pin is fully seated, disengage the driver and ensure the cross-pin implant is flush with or slightly below the cortical surface (Fig. 35-11, B) by palpating the proximal end of the cross-pin at the insertion site.

Apply tension to the graft construct by pulling the tibial sutures to check femoral fixation.
Finally, pull on one end of the lead suture attached to the cross-pin to remove the suture from the device. Additionally, pull on one end of the lead suture attached to the graft harness to remove its suture (Fig. 35-12).
Tips and Tricks
Several steps, which may be easily missed, facilitate the procedure as follows:
Troubleshooting
During our learning curve with the CrossPin system, we had only two intraoperative incidents. In one case we did not remove the guide pin from the positioning rod, and the cross-pin drill bit was forced and created a false way. When this was recognized, the guide pin was removed; the drill bit was introduced again, creating a correct transverse tunnel; and the rest of the case followed with no problems. In the second case, the cross-pin implant was sunken into the lateral femoral condyle; to avoid this incident, we recommend prior definite implant impaction to insert the driver through the skin incision and sit it on the femoral lateral cortex, and then put a mark in the driver using a marker pen. This mark will assist in recognizing the exact depth of implant insertion. The opposite can happen, leaving the implant too proud on the lateral femoral cortex; both incidents have already been reported with the use of transfixation pins.17,18
1 Kousa P, Jarvinen TL, Vihavainen M, et al. The fixation strength of six hamstring tendon graft fixation devices in anterior cruciate ligament reconstruction. Part I: femoral site. Am J Sports Med. 2003;31:174-181.
2 Uchio Y, Ochi M, Sumen Y, et al. Mechanical properties of newly developed loop ligament for connection between the EndoButton and hamstring tendons: comparison with Ethibond sutures and Endobutton tape. J Biomed Mater Res. 2002;63:173-181.
3 Hoher J, Scheffler SU, Withrow JD, et al. Mechanical behavior of two hamstring graft constructs for reconstruction of the anterior cruciate ligament. J Orthop Res. 2000;18:456-461.
4 Hoher J, Livesay GA, Ma CB, et al. Hamstring graft motion in the femoral bone tunnel when using titanium button/polyester tape fixation. Knee Surg Sports Traumatol Arthrosc. 1999;7:215-219.
5 Prodromos CC, Joyce BT, Shi K, et al. A meta-analysis of stability after anterior cruciate ligament reconstruction as a function of hamstring versus patellar tendon graft and fixation type. Arthroscopy. 2005;21:1202.
6 Ahmad CS, Gardner TR, Groh M, et al. Mechanical properties of soft tissue femoral fixation devices for anterior cruciate ligament reconstruction. Am J Sports Med. 2004;32:635-640.
7 Clark R, Olsen RE, Larson BJ, et al. Cross-pin femoral fixation: a new technique for hamstring anterior cruciate ligament reconstruction of the knee. Arthroscopy. 1998;14:258-267.
8 Howell SM, Hull ML. Aggressive rehabilitation using hamstring tendons: graft construct, tibial tunnel placement, fixation properties, and clinical outcome. Am J Knee Surg. 1998;11:120-127.
9 Noyes FR, Butler DL, Grood ES, et al. Biomechanical analysis of human ligament grafts used in knee-ligament repairs and reconstructions. J Bone Joint Surg. 1984;66A:344-352.
10 Wilcox JF, Gross JA, Sibel R, et al. Anterior cruciate ligament reconstruction with hamstring tendons and cross-pin femoral fixation compared with patellar tendon autografts. Arthroscopy. 2005;21:1186-1192.
11 Harilainen A, Sandelin J, Jansson KA. Cross-pin femoral fixation versus metal interference screw fixation in anterior cruciate ligament reconstruction with hamstring tendons: results of a controlled prospective randomized study with 2-year follow-up. Arthroscopy. 2005;21:25-33.
12 Fabbriciani C, Milano G, Mulas PD, et al. Anterior cruciate ligament reconstruction with doubled semitendinosus and gracilis tendon graft in rugby players. Knee Surg Sports Traumatol Arthrosc. 2005;13:2-7.
13 Wolf EM. Hamstring anterior cruciate ligament reconstruction using femoral cross-pin fixation. Oper Tech Sports Med. 1999;7:214-222.
14 ConMed-Linvatec, Pinn-ACL CrossPin System [company brochure]. ConMed-Linvatec, 2005.
15 Johnson D. Anterior cruciate reconstruction using hamstring grafts fixed with bioscrews and augmented with the EndoPearl. Tech Orthop. 2005;20:264-271.
16 Howell SM, Gittins ME, Gottlieb JE, et al. The relationship between the angle of the tibial tunnel in the coronal plane and loss of flexion and anterior laxity after anterior cruciate ligament reconstruction. Am J Sports Med. 2001;29:567-574.
17 Pelfort X, Monllau JC, Puig L, et al. Iliotibial band friction syndrome after anterior cruciate ligament reconstruction using the Transfix device: report of two cases and review of the literature. Knee Surg Sports Traumatol Arthrosc. 2006;14:586-589.
18 Marx RG, Spock CR. Complications following hamstring anterior cruciate ligament reconstruction with femoral cross-pin fixation. Arthroscopy. 2005;21:762.e1-762.e3.