CHAPTER 51 Periareolar Benelli mastopexy and reduction: The “Round Block”
History
However, the indications for the various periareolar plasty techniques have been limited.1–6 Only moderate cases of small breast ptosis have been treated using periareolar mastopexy, owing to the risk of enlargement and distortion caused by tension on the areola. The round block technique helps to eliminate this complication, and makes it possible to treat many cases of breast ptosis and hypertrophy by periareolar mastopexy.7,8
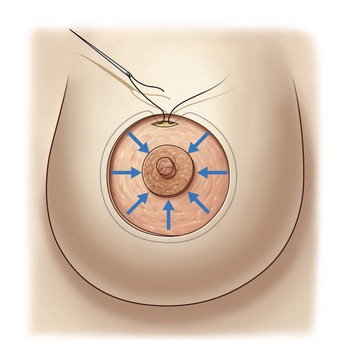
One of the principal elements of our technique is to treat ptosis and hypertrophy by using a blocked circular dermal suture passed in a purse-string fashion. The round block constitutes a cerclage, fixing a solid circular dermodermal scar block around the areola (Figs 51.1 and 51.2).
Evolution of personal technique
In 1983, we started performing periareolar mastopexy with dermal cerclage of the areola via a purse-string suture in order to prevent postoperative enlargement of the areola and the scar. In view of this procedure’s effectiveness, we extended its application, calling it the “round block” because of the solidity of the dermodermal circular scar block reinforced by the cerclage, with a non-resorbable suture passed in a purse-string manner through the edge of the periareolar dermis. By using the round block, our efforts initially enabled reduction of the length of the horizontal scar, and subsequently, to totally eliminate the horizontal scar, going from a T-inverted technique to a vertical technique.7,8 Finally, it was possible to eliminate the vertical scar with the periareolar technique.
This procedure has enabled us to treat more serious cases of ptosis and thereby extend the indications of periareolar mastopexy that in the past had been reserved only for moderate ptosis or hypertrophy, essentially because of the postoperative risk of enlargement of the areola and periareolar scar.
The inverted-T techniques that give maximum coning and the best long-term hold are those that are characterized by crossing and overlapping of two flaps (lateral and medial), which ensure a maximum of anterior projection to the areola.9,10
Materials and methods
From 1983 to December 2007, we performed this surgical procedure on over 528 patients in aesthetic, tumoral, and reconstructive surgeries (Table 51.1). We have been progressive in our advancement of this procedure for cases of serious ptosis or hypertrophy. Breast reductions have entailed an average resection of 180 g (maximum 1200 g) on each breast.
| Breast reductions | 43% | 227 |
| Mastopexies | 22% | 116 |
| Mastopexies and augmentations | 23% | 122 |
| Tumoral and reconstructive surgeries | 12% | 63 |
| Total number of cases | 100% | 528 |
Anatomy
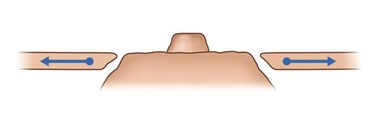
For support of the breast, the periareolar technique is used to remove the thin, elastic stretched skin around the areola, which does not have any supportive value, and to conserve the thick skin at the base of the breast and submammary fold.
Subdermal vascularization is preserved with skin excision done with scissors close to the gland. At the time of the dermal incision within the de-epithelialized ellipse, we conserve a 1 cm strip of dermis in order to protect the vascularity of the ellipse’s skin edge, especially in its lower part (see Fig. 51.5).
Physical evaluation
Technical steps
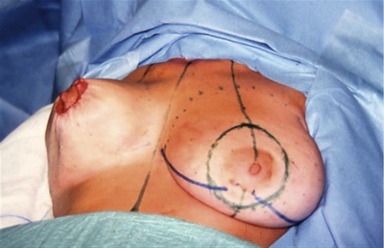
Step 1: Planning and marking
Marking in the standing position
The midline is marked to maintain symmetry. The breast meridian is marked at the beginning on the clavicle, 6 cm from the midline. The meridian is not the meridian of the ptotic breast, but the meridian of the manually reshaped breast. This new meridian will not necessarily cross the ptotic nipple, because the mammary ptosis is generally a lateralization of the breast due to chest wall convexity (Fig. 51.3).
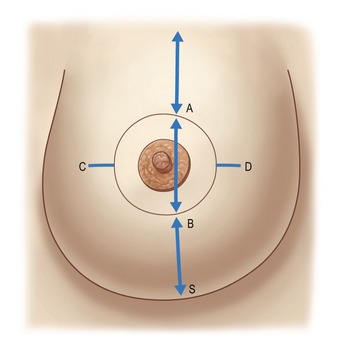
The new areola vertical position
The superior border of the areola (point A) is marked as in a Pitanguy technique on the breast meridian, 2 cm higher than the anterior projection of the submammary crease. Reshaping the breast manually, the surgeon verifies that point A is marked in the correct position. Contralateral point A is marked by measuring the distance to the sternal notch.
Marking the patient who is lying supine
Leaving an ample distance BS has two advantages
Points C and D are the lateral and medial limits of the ellipse, respectively. These points are marked symmetrically, regarding the breast meridian as a guide and aiming to mark the minimal size of the ellipse because ample skin is needed to cover, without tension, the new glandular cone, lifted and projected earlier. For this reason, point C, lateral limit of the ellipse, is usually near the lateral border of the areola (Fig. 51.3).
Step 3: Incision and dissection
De-epithelialization of the periareolar ellipse is performed by pulling on a concentric epidermal flap (Fig. 51.4). The areola is marked with a tube on the tensed skin at 1.5 cm diameter more than the desired final diameter to compensate for a stretching and retracting afterwards. It is usually cut at 5.5 cm to close at 4 cm.
Subcutaneous dissection is performed with consideration for the blood supply to the skin. Dissection extends from the ellipse to the submammary fold limits (Fig. 51.5).

At this stage, the surgeon incises the gland in order to constitute the dermoglandular flap that will be supporting the areola. This incision does not extend to the edge of the dermis, because it is often too near the areola, especially on the lateral side.
As a result of this dissection, four flaps will have been created (Fig. 51.6):

Step 4: Resection of gland following the Wise pattern
Depending on the case, resection can be executed on the different glandular flaps. To reduce the upper pole, a Pitanguy keel-like resection can be performed (Fig. 51.6). To reduce the lateral lower pole, the resection on the lateral flap is performed as for a T-inverted reduction following the Wise pattern (Fig. 51.6). If the lateral flap remains too thick, the reduction can be extended to the posterior side of the flap in the prepectoral space to obtain the desired thickness.
Step 5: Glandular modeling
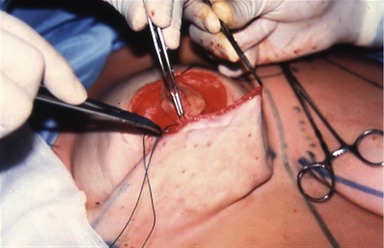
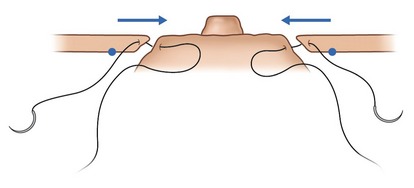
In most cases, we begin the criss-cross mastopexy by rotating and folding the medial flap behind the areola, fixing its distal part to the pectoralis muscle using a U-point (Fig. 51.7). The lateral flap is crossed over and fixed to the medial flap by additional U-points (Fig. 51.8). These glandular stitches do not squeeze the glandular tissue, thus avoiding glandular cyto-steatonecrosis. Moving the flaps reduces the base of the breast and creates a glandular cone on which we place the areola.
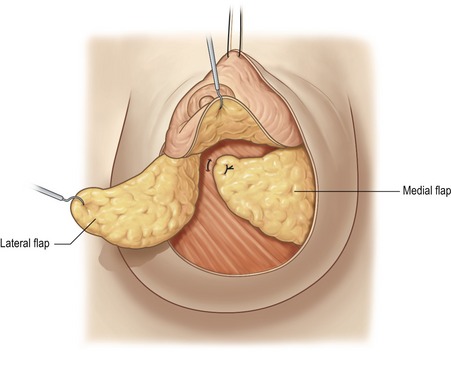
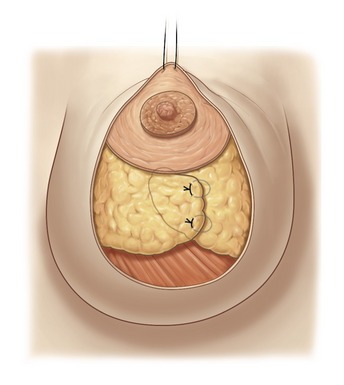
Fig. 51.8 The lateral flap is crossed over the medial flap, and the crossing line is sutured using some superficial U points, grasping the Cooper’s ligaments to prevent any constriction of the flap vascularization. Strong support of the new conic shape will be achieved after full breast lacing (Step 7).
Step 6: The dermal window for areola fixation
The fixation of the areola to the superior border of the ellipse is facilitated by a dermal window which we open with a 1 cm incision of the dermis (Fig. 51.9), 5 mm from the edge. Through this window we create a little intraglandular pocket in which we will lift and suture the supra-areolar dermis to the deep dermis of the pocket. This fixation supports the areola without tension on the skin edge.
Step 7: The full breast lacing
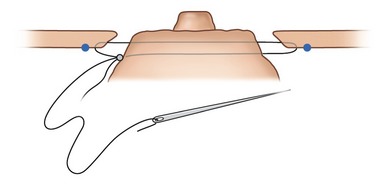
Optimally, the glandular cone will be well-shaped, with the areola at the top of the cone. The quality of the tissue determines whether this result can be maintained long term. To provide the best support of the shape, we prefer to use full breast lacing of braided polyester Mersilene 2-0, applied with a long straight needle (Fig. 51.10). This type of lacing is useful in case of poor-quality glandular tissue, especially in patients with adipose involution.
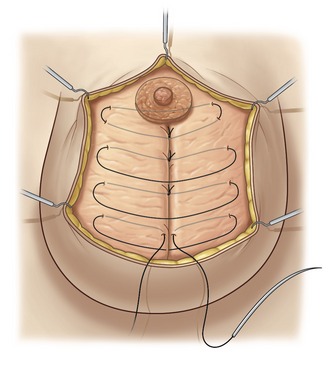
The lacing is created by some large inverted stitches, with moderate tension traversing the entire thickness of the breast diameter to maintain the crossing of the glandular flaps. The lacing, at its superior part, also passes through the areola dermoglandular flap. This passage allows control of the anterior projection of the nipple–areola complex and prevents any protrusion of it. It is important that these full breast lacing stitches be applied without tension to avoid strangulating the gland and creating fat necrosis. The role of the full breast lacing is to provide passive support of the conical shape obtained by the superficial stitches of the glandular modeling (see Step 5).
Step 8: Round block cerclage stitch
Round block cerclage stitch can be placed in two ways: outside the ellipse or inside the ellipse.
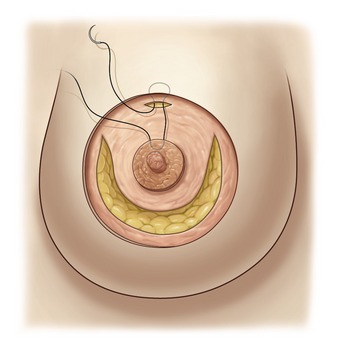
Round block outside the ellipse
The round block cerclage stitch is passed like a purse-string in the deep dermis 5 mm beyond the edge of the ellipse (Fig. 51.11). The suture begins through the dermal window over the suture fixing the areola, follows a regular plane in the deep dermis, and finishes as its starting point (Fig. 51.11). We use Mersilene 2-0 applied with a 7 cm long straight needle, allowing a regular plane in the dermis.
Round block inside of the ellipse
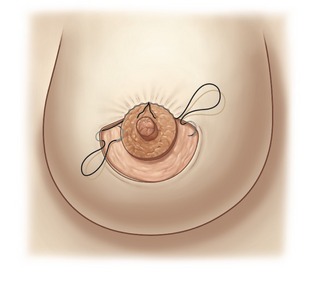
The round block cerclage stitch, again a Mersilene 2-0, is passed with a curved needle like a purse-string going alternatively in and out of the dermis at 2 mm from the edge of the de-epidermized area inside of the ellipse (Fig. 51.12).
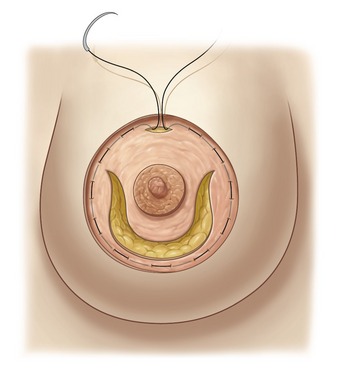
Pulling on the suture elevates all the detached skin around the areola; a sliding of the skin on the stitch allows an even distribution of the pleats. To close with symmetry of the areola diameters, we measure the diameter with a rule, or we can also use a tube of the desired diameter which is inserted and the suture tied onto it (Fig. 51.13). The knot is buried behind the skin through the dermal window. We prefer a braided polyester suture like the Mersilene 2-0 because the scar penetrates the fiber of the stitch, avoiding a sliding of the skin on the suture when moving the breast. Before the skin closure, we improve the distribution of the pleats around the areola. We avoid accumulation of some deep pleats in one area; instead, we try to have more numerous superficial pleats distributed on all the circumference of the areola. This is more a compression than a plication of the skin excess. The round block allows the elevation and the even distribution of the skin flap over the new glandular cone (Fig. 51.14).

Step 9: A second dermoareolar round block taking the retroareolar tissue
This second dermoareolar round block (Fig. 51.15) will help to achieve an even distribution of the periareolar skin excess which is adapted and fixed to the areola on eight points that are the four cardinal points, with four points between each of them.
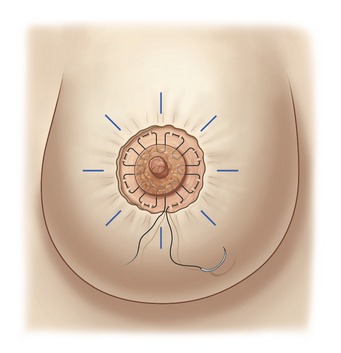
The second round block has the following goals:
• to help the final skin compensation suture by the even distribution of the pleats around the areola;
• to bury the dermis and the fat protruding between the areola and the first round block;
• to control the nipple–areola complex anterior projection, avoiding areola protrusion through the first round block;
• to close the wound and allow opening of the aspiration drainage before finishing the final skin compensation suture.
Step 10: Regulation of areola projection
We propose some specific sutures to control the anterior projection of the nipple–areola complex:
• The full breast lacing transareolar first stitch (Fig. 51.10) is the first control of the nipple–areola complex anterior projection, performed after glandular modeling (Step 7).
• Inverted dermoareolar stitches take a large vertical grip in the areola’s thickness and a horizontal grip in the edge of the dermal ellipse. The location of these stitches is also useful for an even distribution of the skin excess (as in cardinal stitches) (Fig. 51.16).
• Diametrical transareolar U points are passed with 2-0 braided polyester using a straight needle. In order to cover the knot, the suture begins and finishes buried behind the areola (Fig. 51.17). This U point is also useful to give a circular shape to the areola; in some cases the areola tends to take on an oval form. This diametrical U point is put in place at the greatest diameter of the oval areola. A little tension on the stitch gives a circular shape to the areola.
The second internal dermoareolar round block suture described in Step 9 is also very useful to control the nipple–areola complex projection.
Step 11: The skin closure
Accommodation of the big ellipse to the small areola requires a compensation suture (Fig. 51.18):
• Continuous intradermic compensation suture using a Monocryl 4-0 intradermal suture start at the top of the areola, taking a large horizontal bite on the edge of the ellipse and a vertical bite on the edge of the areola. This suture is performed to avoid creating deep pleats, but to maintain an even distribution of superficial pleats. The suture is totally intradermic and the starting and finishing knots are buried, so as not to leave any marks on the skin. All the suture will resorb by itself.
• A compensation suture by separated points will take an external small grip in the U of the areola, supporting the knot and large intradermal grip in the edge of the ellipse. This suture using separated points has the advantage of facilitating an even accommodation of the skin excess around the areola, but has the disadvantage of leaving marks of the knots on the areolar skin.
Step 12: The dressing and postoperative care
The first dressing is a wet compress on the areola and dry compresses on the detached skin. These are maintained with an adhesive bandage of moderate compression to prevent hematoma formation. Vacuum drainage exits below the axilla.
The adhesive polyurethane foam pad has many advantages:
• It prevents tension on the scar.
• It protects against trauma and bacteria.
• It controls the nipple–areola anterior projection during the swelling period.
• It allows the patient to take showers without changing the dressings.
• It is simple for the patient, who does not have to remove the dressing and who will only have to visit the office for a weekly check and change of the adhesive pad.
The patient must wear a brassiere night and day for 2 months.
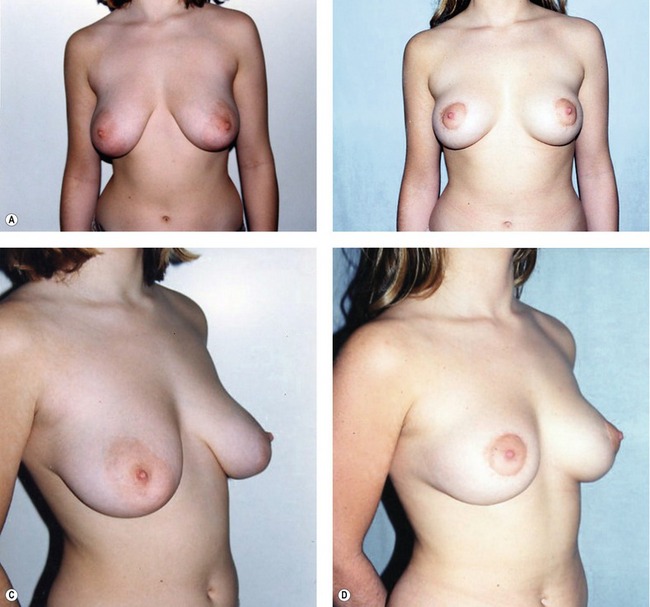
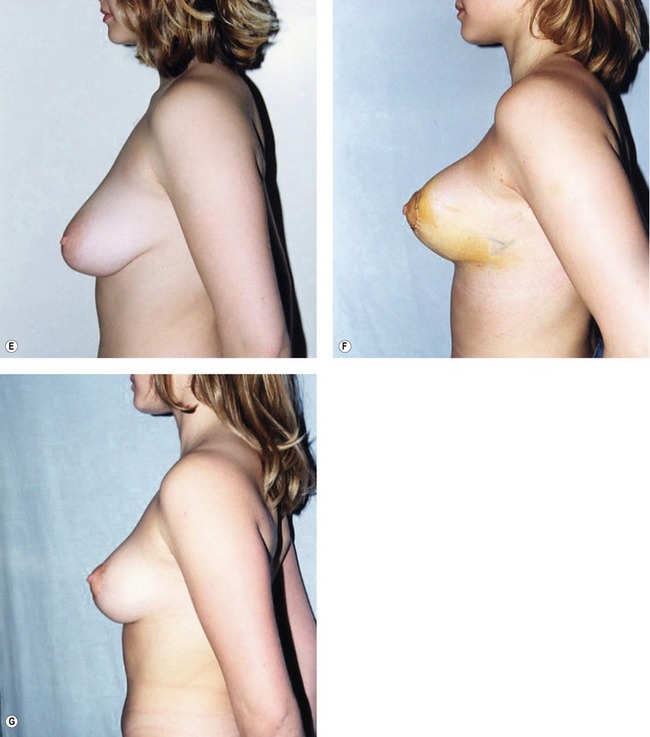

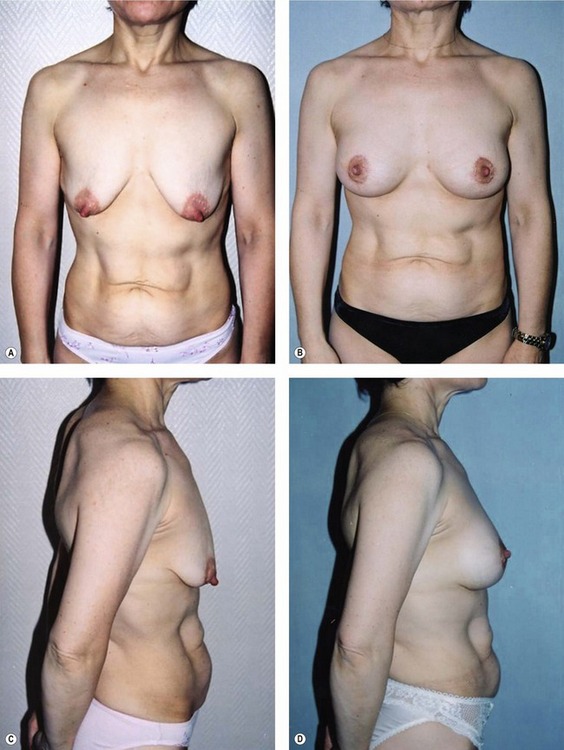
Fig. 51.C1 Patient no. 1: A, Hypertrophy and ptosis in a 20-year-old patient. B, One year after surgery, reduction of 120 g. C and D, Pre- and postop, 1 year. E and F, Profile pre- and postop, 1 week. Hyper-projection obtained by the criss-cross mastopexy. G, Profile at 1 year, after accommodation; good position of the glandular cone maintained by the breast lacing, and anchored to the pectoralis by permanent Mersilene suture. H, Areola before surgery. I, Areola at 1 month; even distribution of excess skin by the round block stitch, avoiding deep pleats. J, Areola at 1 year; the round block stitch avoids enlargement of the areola and scarring. K, Areola in the supine position at 1 year, disappearance of the pleats, and the natural aspect of the original submammary crease preserved by the dissection.
Complications
The same complications as those occasioned by the traditional mammaplasty (Table 51.2) are apparent. Cutaneoglandular detachment eases the problems of cutaneous necrosis and glandular cytosteatonecrosis. To avoid those complications, some precautionary measures must be observed.
| Hematoma | 9 | 1.7% |
| Seroma | 4 | 0.8% |
| Infection | 3 | 0.6% |
| Cytosteatonecrosic cysts | 10 | 1.9% |
| Areola necrosis | 0 | – |
| Areola sensitivity loss | 0 | – |
| Skin flap partial necrosis | 6 | 1.1% |
| Hypertrophic scar | 2 | 0.4% |
For good cutaneous vascularization
• Avoid tension by resecting as little skin as possible.
• Do not infiltrate the edge of the de-epithelialized ellipse.
• During subcutaneous dissection, preserve subdermal vascularization.
• Restrict the subcutaneous detachment to its sufficient minimum.
• Delicately manipulate the flap by only pinching the de-epithelialized dermis margin.
For a good glandular vascularization
• Do not infiltrate the glandular flap basis.
• Restrict the subcutaneous and prepectoral detachment to its sufficient minimum to allow the necessary glandular mobilization and to reduce and reshape the mammary cone.
• Execute volume reduction over the distal parts of the flaps to limit their length.
Two other cases of infection involved a severe polycystic mastosis and cytosteatonecrosis of the glandular flaps owing to tight, strangulating glandular stitches on a fatty breast and adipose involution, respectively. In these two cases, the healing was delayed but was finally satisfactory. Scar revision was undertaken using local anesthesia, but the scar remained periareolar.
Long-term problems
• Scar and areola enlargement are prevented via minimal periareolar skin resection, the correct use of the round block cerclage stitch (see Step 8), and the anchoring of the areola through the dermal window (see Step 6).
• Flattening of the shape and ptosis recurrence are prevented by good criss-cross mastopexy or glandular plication invagination maintained by full breast lacing (see Steps 5 and 7).
• The persistence of pleats is avoided by passing the round block cerclage stitch in a regular plane inside the deep dermis, by even distribution of the skin excess all around the areola, by making the skin slide over the round block cerclage stitch (see Step 8), and by applying a final intradermal compensation suture (see Step 10).
• Protrusion of the areola is prevented following by the use of different sutures that can be associated or used separately:
Use of the round block for mastopexy and breast augmentation
In the association of breast augmentation and periareolar mastopexy, the breast shape will be provided by the implant support and will help to maintain a long-term good anterior projection. We mainly use a retropectoral position. The release of the inferior attachment of the pectoral muscle allows a superior retraction of the muscle raising the breast parenchyma attached to it.11
The choice of the location of the incision in the de-epithelialized ellipse depends on many factors: the ellipse gives space for a wide incision superior, inferior or lateral to the areola. That allows good vision and large access for the pocket dissection.
After closing the round block on the reshaped breast by the breast implant, the areola is frequently strongly protruding due to the internal pressure through the round block. To control this protrusion, the sutures described in Step 10 are very helpful used separately or in association.
Pearls & pitfalls
Pearls
• The starting point of the round block technique is the use of a deep dermal periareolar cerclage stitch passed like a purse-string to treat mastopexies and hypertrophies, resulting in only a simple periareolar scar with no widening of the areola or the scar itself.
• The critical analysis of the results obtained allowed us to elaborate, step by step, a whole range of solutions for each obstacle encountered. With these improvements and the judicious selection of patients, the round block technique allows us to regularly achieve consistent and satisfying results, including a discrete scar and a satisfactory breast shape, all with a minimum rate of complications.
• The surgeon should apply this technique to cases in good anatomic condition with small ptoses or hypertrophies.
• To achieve good results, each detail of the operation – from the preoperative markings to the cutaneous sutures – requires meticulous care.
• The diverse and potential application of the round block technique in aesthetic or reconstructive tumoral surgery, aided by the improvements brought by other interested clinicians, hopefully will lead to the real improvement of our patients’ well-being as a result of reduced scar sequelae.
Pitfalls
• Patients must be willing to accept a less than perfect shape in favor of a reduced scar.
• Patients should be made aware of the potential postoperative inconveniences of mastopexy in general, and periareolar mastopexy in particular, such as the wrinkling of the periareolar skin, which may last for weeks or even months, the need to wear a bra night and day for 2 months, the possible need to revise the scar in case of poor scarring, persistence of cutaneous irregularities, and, in case of complete failure, the possible need to undergo an inverted-T mastopexy after all.
• Contraindications include breasts that are essentially fat or have a lot of additional skin. Surgeons should exercise caution when considering patients who are overweight, aged, or smokers.
1. Dartigues L. Etat actuel de la chirurgie esthétique mammaire. Monde Med. 1928;38:75.
2. Erol O, Spira M. Mastopexy technique for mild to moderate ptosis. Plast Reconstr Surg. 1980;65:603.
3. Faivre J, Carissimo A, Faivre JM. La voie péri-aréolaire dans le traitement des petites ptoses mammaires. In: Chirurgie esthétique. Paris: Maloine; 1984.
4. Gruber RP, Jones HW, Jr. The “donut” mastopexy: indications and complications. Plast Reconstr Surg. 1980;65:34.
5. Hinderer U. Plastia mammaria modelante de dermopexia superficial y retromammaria. Rev Esp Cirurg Plast. 1972;5:521.
6. Kausch W. Die Operationen der Mammahypertrophie. Zentralbl F Chir. 1916;43:713.
7. Benelli L. Technique de plastie mammaire le “round block”. Rev Fr Chir Esth. 1988;13:7–11.
8. Benelli L. A new periareolar mammaplasty: round block technique. Aesth Plast Surg. 1990;14:99.
9. Vinas J. The double breasted breast. Rev Soc Argentina Cirurg Estet. 1974;1:25.
10. Vogt T. Mammaplasty: The Vogt technique. In: Georgiade NG, ed. Aesthetic surgery of the breast. Philadelphia: WB Saunders, 1990.
11. Tebbets JB. Dual plane breast augmentation: optimizing implant–soft-tissue relationships in a wide range of breast types. Plast Reconstr Surg. 107, 2001.