[level-membership-for-emergency-medicine-category]Chapter 19
Pediatric Vascular Access and Blood Sampling Techniques
Obtaining vascular access and blood samples in an infant or child can challenge and frustrate even the most skilled emergency clinician. Vascular access can be especially challenging in children who are dehydrated or in shock. This chapter reviews the basic principles and techniques of blood sampling, as well as placement of peripheral and central intravenous (IV) and intraarterial catheters in infants and children, including the use of umbilical catheters in newborns. Also reviewed are hydration techniques for dehydrated children. For critically ill and injured children, intraosseous (IO) access is the preferred technique if peripheral vascular access cannot be secured rapidly (see Chapter 25). Though rarely required, emergency cutdown is occasionally lifesaving, and a section of this chapter is devoted to cutdown techniques.
Patient Preparation and Restraint
Fear and anticipation of pain associated with procedures or injections make the hospital experience traumatic for children. Before beginning any painful procedure in a child, explain the procedure to the parents, as well as the reasons that it needs to be done. For children capable of understanding, explain the procedure in developmentally appropriate language before starting and before each successive step. Avoid using deceptive phrases such as “this won’t hurt.” A gentle, honest explanation that the procedure will hurt a bit and a statement such as “it is okay to cry, but not to move” will provide realistic expectations for the child and set limits as well. Depending on the situation, most parents wish to remain with their child during the procedure.1 Others will not. The potential for parents to faint at the sight of blood or needles should always be addressed, and it is preferable that they sit down during the procedure. If present, the parent’s role should be to provide comfort to the child but not to assist in any potentially painful procedure. If possible, distract the child with simple conversation regarding school, friends, hobbies, pets, or TV shows to help decrease the child’s anxiety.
Anesthesia
Many products are available to decrease the pain associated with vascular access. Do not delay attempts at access in critically ill or injured children to use these medications or devices, but consider using them in stable patients. These medications and products are discussed in more detail in Chapter 29. Options include vapocoolants, topical anesthetics such as lidocaine-prilocaine (EMLA), 4% liposomal lidocaine (LMX-4), and injection of lidocaine via a needleless jet injector (J-tip). Orally administered sucrose solution (Sweet-Ease) has been demonstrated to decrease the pain response in young infants during procedures.2,3 Procedural sedation is commonly used during central venous and arterial cannulation in children (Chapter 33).
Blood Sampling Techniques
Indications and Contraindications
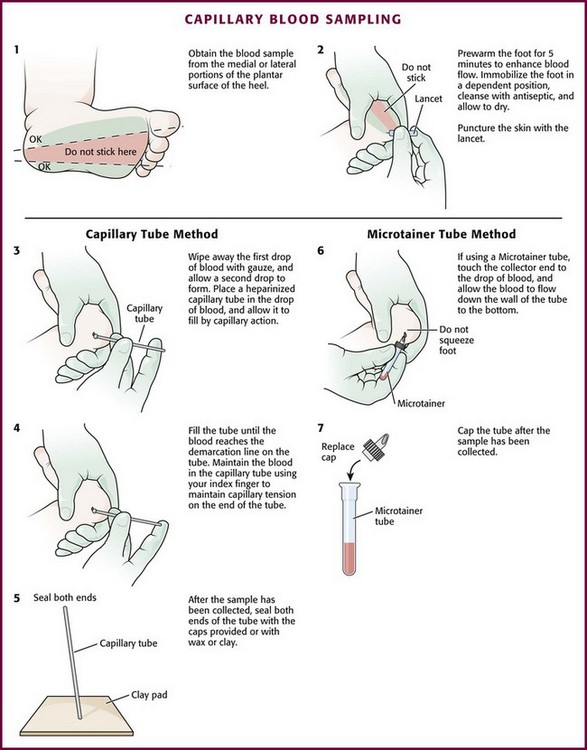
Capillary blood sampling is frequently used to obtain blood samples from young infants. In infants, the heel is the most common location for capillary blood sampling, whereas in older children and adults, blood samples are more commonly obtained from the finger, toe, or earlobe. This technique is useful when repeated measurements such as blood glucose or serial hemoglobin are needed. It is also an option for obtaining “arterialized” blood for blood gas analysis when arterial access is unavailable, such as in chronically ill neonates and young infants or when the clinician is not comfortable obtaining a percutaneous arterial blood sample. If a sufficient volume is obtained, blood from a capillary sample can also be sent for other routine laboratory studies. Do not send this type of specimen for blood culture because of the risk for contamination. Heel sticks are more painful than venipuncture but are useful in the event of difficult access or when arterialized samples are needed.4
Technique
The heel stick method of capillary blood sampling will be described, but capillary blood samples can also be obtained from a finger, toe, or earlobe (Fig. 19-1). To avoid penetration of the calcaneus and the risk for osteochondritis, puncture only the most medial and lateral portions of the plantar surface of the heel.5 Some research suggests that when using automated lancets, any site on the heel can be safely punctured in a term neonate.6 Prewarm the foot for 5 minutes to produce hyperemia and enhance blood flow. Immobilize the foot in a dependent position with one hand. First cleanse the heel with antiseptic solution and allow it to dry. Next, puncture the skin with the lancet. Allow the alcohol to dry to avoid false elevations in the glucose level. Avoid squeezing the foot because it may inhibit capillary filling and actually decrease the flow of blood. Furthermore, squeezing may lead to hemolysis and make analysis less accurate. If blood does not flow freely, another puncture may be required.
Venipuncture
Technique
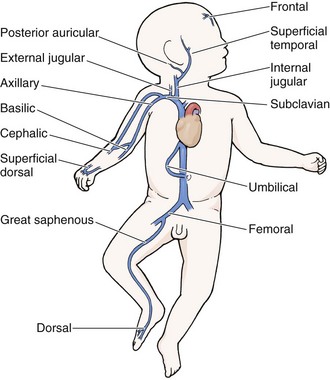
As in adults, the usual site for venipuncture in infants and children is the antecubital fossa. However, any reasonably accessible or easily visible peripheral vein may be used, such as those on the hands, feet, or scalp for very small infants (Fig. 19-2). Veins on the dorsum of the hand can be used, provided that they will not be needed for IV cannulation. The external jugular and femoral veins or arterial sites are rarely needed for routine samples in a stable patient. Imaging devices (e.g., ultrasound, transillumination, or infrared devices) may also be used to locate and identify veins for IV catheter placement. These devices are discussed later in this chapter (see “Vascular Line Placement: Venous and Arterial”).
Cleanse the area surrounding the chosen site of skin penetration with antiseptic solution and allow it to dry. Apply slight distal traction to the skin to immobilize the vein. Insert the needle quickly through the skin and advance it slowly into the vein at an angle of approximately 30 degrees with the bevel facing up (Fig. 19-3, step 1). Successful vessel penetration is heralded by a flashback, or flow, of blood into the butterfly tubing. Apply gentle suction by slowly withdrawing the plunger of the syringe. If the required amount of blood is greater than the capacity of the attached syringe, pinch off the tubing, remove the filled syringe, attach a new syringe, and apply gentle suction again after releasing the pinched tubing. After the required amount of blood is withdrawn, remove the needle and apply a sterile dressing and direct pressure to the puncture site.
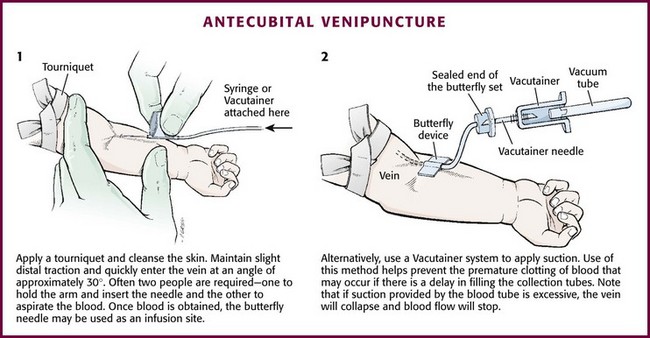
Figure 19-3 Antecubital venipuncture.
Apply suction with a Vacutainer system in which the needle punctures the sealed end of the butterfly device (see Fig. 19-3, step 2). There are also butterfly systems available with a second needle that is occluded by a rubber shield located at the opposite end of the butterfly tubing. Once the vein has been entered, the needle at the opposite end of the butterfly tubing is pushed through the top of the vacuum-sealed tube. In either case, if the suction is excessive, the vein will collapse and blood flow will stop.
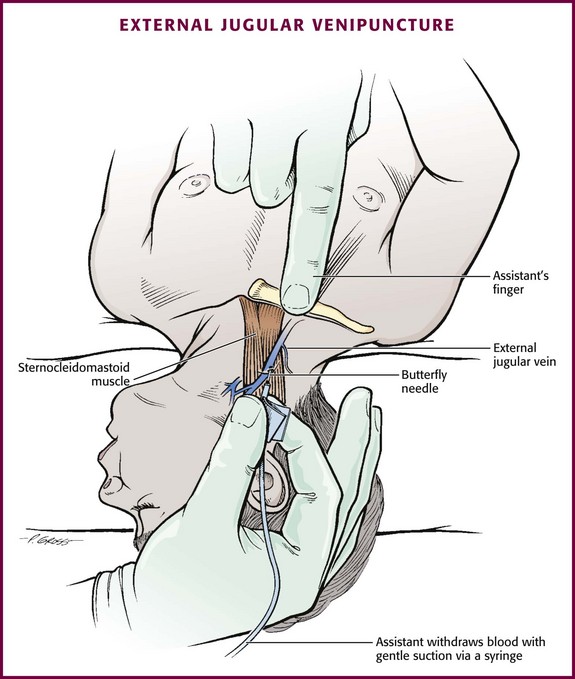
Although peripheral sites for venous blood sampling are preferable in infants, the external jugular and femoral veins may also be used for venipuncture during resuscitation or when peripheral sites are inadequate. The external jugular vein lies in a line from the angle of the jaw to the middle of the clavicle and is usually visible on the surface of the skin (Fig. 19-4). When the infant is crying, this vein is more prominent. Ask an assistant to restrain the infant in a supine position with the head and neck extended over the edge of the bed. Alternatively, place a towel roll or pillow under the child’s shoulders. Turn the head approximately 40 to 70 degrees from the midline. Cleanse the skin surrounding the area to be punctured with alcohol or another antiseptic solution. Apply finger pressure just above the clavicle to help distend the jugular vein. Use a 21- to 25-gauge straight needle or a 21- to 25-gauge butterfly needle attached to a syringe. Puncture the skin and then advance the needle slowly until the jugular vein is entered and a flashback of blood is observed. Keep the syringe connected to the needle at all times to maintain constant negative pressure and avoid air embolism. After the appropriate amount of blood is obtained, withdraw the needle and apply slight pressure to the vessel. Place the infant in an upright position after the needle is removed, and hold pressure over the puncture site for 3 to 5 minutes. Observe the puncture site closely afterward to identify persistent bleeding.
In most patients, the femoral vein lies medial to the femoral artery and inferior to the inguinal ligament (Fig. 19-5A). Ask an assistant to position the patient’s hips in mild abduction and extension while you palpate the artery. Identify its location by placing a mark on the skin just superior to the femoral triangle. If available, use ultrasound to assess the position of the femoral vessels. Prepare the femoral triangle with alcohol or another antiseptic agent. Use a povidone-iodine or chlorhexidine scrub when obtaining blood for culture. Use a technique of needle insertion that is similar to that for external jugular venipuncture (see Fig. 19-4). Puncture the skin and then direct the needle or catheter toward the umbilicus at a 30- to 45-degree angle to the skin and just medial to the pulsation of the femoral artery (see Fig. 19-5B). Apply slight negative pressure constantly throughout insertion. After the needle enters the femoral vein, withdraw the desired blood samples. Afterward, remove the needle or catheter unless an IV catheter for venous access is desired in this location. Apply pressure over the puncture site in the femoral triangle for a minimum of 5 minutes. Observe closely for recurrent bleeding.
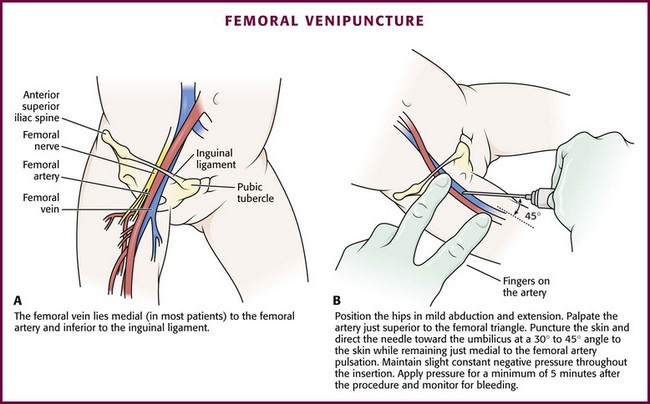
Figure 19-5 Femoral venipuncture. A, Anatomy. B, Technique.
Scalp veins can be very useful for venous sampling in small infants when other options are not possible or readily available.10 The anatomic considerations and technique are discussed later (see “Peripheral Venous Catheterization: Percutaneous” and “Peripheral Venous Catheterization: Venous Cutdown”).
Arterial Blood Sampling
Indications and Contraindications
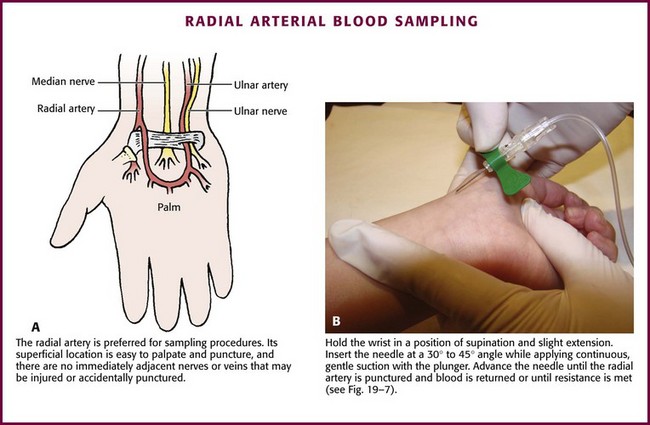
The radial artery has several advantages that make it the most commonly used artery for blood sampling. First, its location makes it easy to palpate and puncture (Fig. 19-6A). The ulnar artery is more difficult to locate. Second, no vein or nerve is immediately adjacent to the radial artery, which minimizes the risk of obtaining venous blood or damaging a nerve. Another advantage of the radial artery is the presence of good collateral circulation from the ulnar artery. The brachial artery has little collateral circulation and should be avoided unless no other options are available.11 Limit use of the ulnar artery to preserve collateral circulation to the hand. As a general rule, do not use the femoral artery for obtaining routine blood samples.
Technique
The radial artery is the one most frequently used vessels to obtain intermittent arterial samples, so the technique for arterial puncture at this site will be described. (See also Chapter 20 for a discussion of the Allen test and the effect of heparin on arterial blood sampling.)
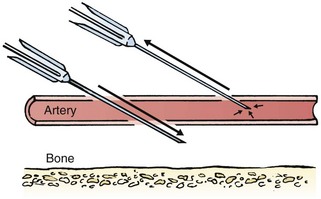
Hold the infant’s wrist and hand in your nondominant hand (see Fig. 19-6B). Hold the hand fully supinated with the wrist slightly extended (i.e., dorsiflexed). Palpate the arterial pulsation just proximal to the transverse wrist creases. Do not overextend the wrist because this can cause loss of the arterial pulse during palpation. Make a small indentation in the skin with a fingernail to mark the insertion site. Cleanse the area with antiseptic and allow the skin to dry. The topical anesthetic options discussed previously may be used if the clinical situation permits. Penetrate the skin at a 30- to 45-degree angle. While the plunger of the syringe is gently withdrawn by an assistant, advance the needle slowly until the radial artery is punctured or resistance (bone) is met (Fig. 19-7). In contrast to performing the procedure in adults, provide continuous, but gentle suction with the plunger of the syringe in infants. Pulsating or rapidly flowing blood that appears in the hub of the needle is a good indication that the radial artery has been punctured. Some clinicians prefer to attach the syringe to the butterfly needle only after blood return is noted. Suction can be applied afterward.
Complications
Complications of radial artery puncture include infection, hematoma formation, arterial spasm, tendon injury, and nerve damage.12,13 With proper technique, however, the complication rate is extremely low. If the infant starts to cry before blood is obtained, the Po2 and Pco2 values may not reflect the infant’s true steady state.
Vascular Line Placement: Venous and Arterial
Peripheral Venous Catheterization: Percutaneous
Equipment and Setup (Box 19-4)
Box 19-4 Equipment for Peripheral Intravenous Insertion in Infants and Children
Tourniquet (rubber band for infants)
Alcohol pads or povidone-iodine swabs (for blood culture)
22- or 24-gauge venous catheters
Intravenous solution, connector extension set, and microdrip tubing set
Pretorn tape ( , 1, and 2 inches)
T-extension set and protective covering such as a prefabricated cup (optional)
Vein Imaging Devices
A variety of imaging modalities, including ultrasound, transillumination, and infrared technologies, have been used to help locate peripheral veins for cannulation. In adults there are data supporting the use of ultrasound to facilitate peripheral vein cannulation in those with difficult access.14,15 However, the use of ultrasound to aid in the placement of peripheral IV lines in pediatric patients is not common practice. One recently published study demonstrated that ultrasound could be used to detect peripheral veins in young children that were not “clinically apparent” (nonvisible and nonpalpable).16 The study also found that lack of ultrasound visualization increased the chance of unsuccessful placement.16 Other small studies have shown mixed results, and further research is needed.17–19
Some emergency departments (EDs) use transillumination devices commonly found in neonatal intensive care units to assist in finding veins in infants.20,21 The Venoscope II (Venoscope LLC, Lafayatte, LA) and the Neonatal Transilluminator (Graykon Scientific, Victoria, Australia) are two such devices that work by projecting a high-intensity light into the patient’s subcutaneous tissue. The light causes the veins to contrast with the surrounding tissue, which makes them easier to locate.22
A newer vein imaging technology, VeinViewer (Luminetx Corp., Memphis, TN) uses near-infrared technology to project an enhanced image of the subcutaneous veins onto the patient’s skin. Theoretically, knowledge of the location of the venous valves and the course of the vessel can assist the clinician in selecting the best area to be cannulated.23 Early small studies have not demonstrated improved overall success rates in obtaining IV access, but the technology may be useful in patients with difficult IV access.24–26
Technique
A number of IV sites are available for placement of a peripheral IV line in an infant (see Fig. 19-2). The most common sites chosen for IV insertion in infants and children are the superficial veins of the dorsum of the hand, the antecubital fossa, the dorsum of the foot, and the scalp (in newborns and small infants). The veins of the dorsum of the hand are the vessels most frequently used. Because these veins are relatively straight and lie flat on the metacarpals, they are easily stabilized. If the hand is chosen, take the child’s age and hand preference into consideration. Avoid placing an IV line in a hand used for thumb sucking whenever possible. Veins in the antecubital fossa (cephalic and basilic veins) are easily accessible; however, the angulation across the fossa makes advancement of the catheter difficult. These veins may not be easily visible and yet may be palpable. Select the most distal vein that is large enough to accommodate the catheter and leave the larger, more proximal veins in case the initial attempts are unsuccessful or if prolonged IV therapy is needed and percutaneous central venous catheter placement (e.g., a peripherally inserted central catheter line) is being contemplated. Tributaries of the dorsal venous arch on the dorsum of the foot, like those on the dorsum of the hand, are relatively straight, and the extremity is easily immobilized after insertion. Because indwelling catheters in this location prevent mobility, consider using this site only in preambulatory patients or after attempts at other sites have been unsuccessful. The scalp veins are easy to cannulate, but their use is primarily limited to very small infants. If a peripheral vein on the hands, feet, or antecubital fossa is being used, immobilize the extremity first by taping it to an arm board, a padded splint, or a commercially available immobilization device. The particular site is a matter of preference, so choose the vein that appears to be the easiest to cannulate.
With few exceptions, the same techniques used for IV insertion in adults may be used in infants and children, especially in the veins of the distal ends of the extremities. If the peripheral end of an extremity is used, place a tourniquet proximal to the planned site of entry. Warm the extremity to induce vasodilation in the surface veins, which makes them easier to cannulate. Flush the tubing of the T-extension set before venipuncture with a sterile IV solution, such as normal saline (NS), to prevent air embolism. Direct the IV catheter through the skin at a 10- to 20-degree angle and slowly advance it until blood return is noted (Fig. 19-8, step 1). Next, advance the catheter over the needle and into the vein. Retract the needle and connect the IV line to the hub of the catheter by means of a T-extension set (see Fig. 19-8, step 2). After 1 mL of saline has been flushed through the line, inspect the site for signs of infiltration, such as hematoma or local swelling.
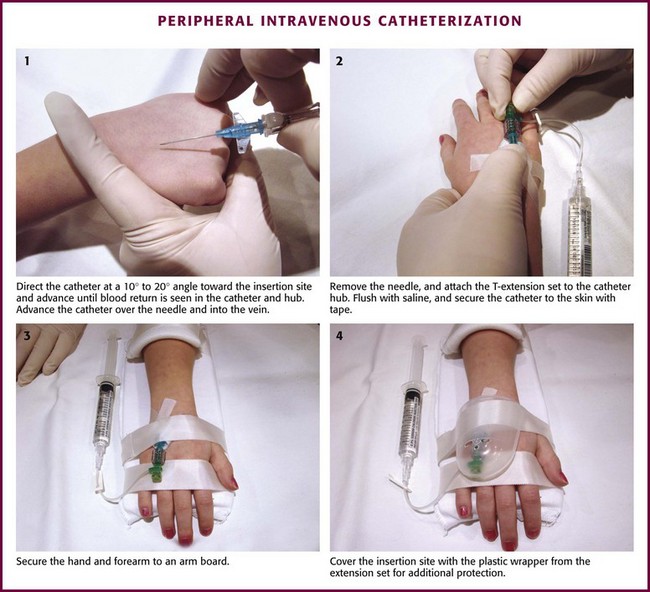
Figure 19-8 Pediatric peripheral intravenous catheterization. (See Figure 21-6 for additional details on proper intravenous technique.)
Fix the catheter to the skin with a 0.5-inch piece of tape passed over the catheter hub and skin. Place a second piece of tape adhesive side up and slip it under the catheter hub. Cross it over the catheter hub in a V shape (Fig. 19-8, step 2). After securing the catheter with tape, cover the entire area with a transparent sterile dressing such as Tegaderm (3M, St. Paul, MN) or OP Site (Smith and Nephew Medical, Massillon, OH). Loop back the tubing of the T-extension set, place a piece of tape midway over the tubing, and secure it to the skin. This ensures that the IV tubing will not be accidentally dislodged if is suddenly pulled. Securely tape the hand and forearm to an arm board for immobilization (see Fig. 19-8, step 3). Occasionally, the flow rate of the infusion may depend on the position of the catheter, especially if the catheter spans a joint or the tip abuts a venous valve. Adjust the hand position or catheter with strategically placed sterile gauze or withdraw the catheter slightly to remedy the problem.
If the scalp veins are used, trim the hair in the surrounding area to expose the vessels. To differentiate between arteries and veins on the scalp, arteries are usually more tortuous than veins.10 If an artery is entered during placement of the needle and fluid is infused, blanching will occur in the area. If this happens, remove the IV catheter, maintain slight pressure for 5 minutes, and repeat the procedure at another site. A rubber band may be used as a tourniquet around the scalp to produce venous dilation, but it is rarely required. Place a piece of tape on the rubber band before placement on the scalp to facilitate lifting the rubber band away from the scalp.
If a scalp vein butterfly infusion set is used, grasp the wings of the butterfly between the thumb and forefinger and introduce the needle beneath the skin approximately 0.5 cm distal to the anticipated site of vein entrance (Fig. 19-9, step 1). Advance the needle slowly toward the vessel until blood appears in the tubing, which indicates that the vessel has been entered. Next, remove the tourniquet. Flush the needle with 0.5 to 2 mL of IV fluid, such as NS, to ensure that the needle is properly in place within the vein. If infiltration occurs, as noted by a subcutaneous bump, remove the IV line and repeat the process at another site.
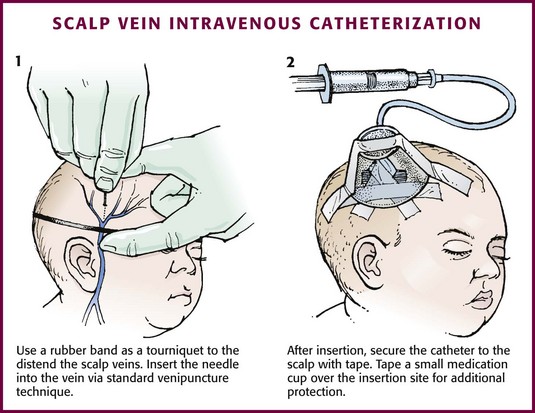
Figure 19-9 Scalp vein intravenous catheterization.
After the wings are secured, tape the tubing of the butterfly set in a loop on the scalp so that it is not pulled inadvertently. Place a wisp of cotton under the wings of the butterfly if the flow rate of the infusion is affected by the position of the catheter. Tape a small medication cup over the wings and the needle to protect the IV line (see Fig. 19-9, step 2). Connect the tubing of the butterfly set to the tubing from the IV system. It is generally preferable to use standard over-the-needle IV catheters whenever possible, whether for extremity or scalp IV lines, because they are less likely to infiltrate and will last longer. However, a small butterfly needle that can be inserted temporarily until additional access is possible is sometimes the only option short of IO access.
External Jugular Venous Catheterization: The external jugular vein is superficial and easily visible. It can be used when other attempts at peripheral IV access have been unsuccessful. The external jugular vein is undesirable as a primary catheterization site during resuscitative efforts because manipulation of the head and neck may compromise management of the airway. Moreover, it is not a suitable site for central venous catheterization because of the acute angle of entry of the external jugular vein into the subclavian vein.27
Technique.: Because central venous access is not the goal of this approach, the external jugular vein is most often entered with a standard over-the-needle IV catheter. The external jugular vein lies in a line from the angle of the jaw to the middle of the clavicle and is usually visible on the surface of the skin. The vein is more prominent when the child is crying. Ask an assistant to restrain the patient in a supine position with the head and neck extended over the edge of the bed. Alternatively, place a towel roll or pillow under the shoulders. Turn the head approximately 40 to 70 degrees from the midline (see Fig. 19-4). Cleanse the skin surrounding the area to be punctured with alcohol (or another antiseptic solution). Cover the area with a sterile drape, and infiltrate 1% lidocaine into the skin. Place a finger just above the clavicle to distend the jugular vein.
Peripheral Venous Catheterization: Venous Cutdown
Indications and Contraindications
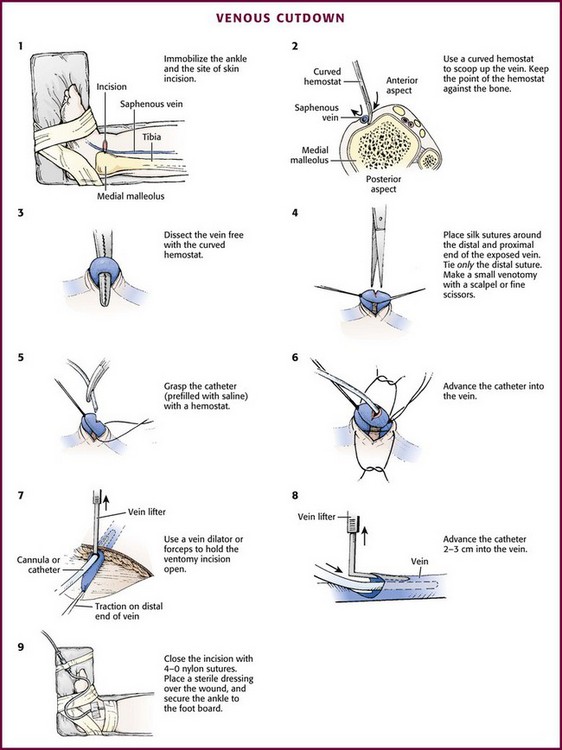
With the development of small IV catheters and the rapidity and safety of IO needle placement for emergency access (Chapter 25), peripheral venous cutdown is rarely performed in the ED. Even in experienced hands a saphenous vein cutdown may take more than 10 minutes and is associated with a higher rate of infection than other routes of vascular access are.28 Nevertheless, if peripheral venous, central venous, or IO access cannot be obtained, venous cutdown may provide an alternative means of emergency venous access. For the purpose of illustration, exposure and cannulation of the saphenous vein will be discussed (Fig. 19-10). The same principles apply when cutdown is performed on most peripheral veins.
Technique
Begin with complete immobilization of the thigh, leg, ankle, and foot by taping them to a padded leg board. Attach this board in turn to the table or bed where the procedure is being performed (Fig. 19-10, step 1). Prepare the area around the medial malleolus with antiseptic solution and drape it with sterile towels. Perform local anesthesia (intradermal 1% lidocaine) in an area about 1 cm proximal and 1 cm anterior to the medial malleolus. No major nerves or tendons accompany the vein in this location.
Place a tourniquet proximally on the leg and make a transverse skin incision (usually about 2 cm in length) in the anesthetized area. Insert a small mosquito hemostat into the wound with the concavity of the clamp upward. Advance the tip of the hemostat to the bone in one corner of the wound, and “scoop up” all tissue lying against the bone and in the subcutaneous region with the hemostat (see Fig. 19-10, step 2). This will invariably lift the vein out of the wound along with the surrounding tissue. Use fine forceps or a mosquito hemostat to separate and remove all nonvenous structures so that only the saphenous vein is left tented over the hemostat (see Fig. 19-10, step 3). To avoid injury to the vein during dissection, spread the ends of the hemostat parallel to the direction of the vein, never transversely.
Pass two 4-0 silk sutures under the vein. Pull one distally to stabilize the vein, and pull the other proximal to the site of venipuncture. The distal suture may be tied, but if left untied it can still be used for stabilization of the vein and to occlude blood flow by applying gentle traction. Removing the untied distal suture after cannulation of the vein may allow subsequent recannulation after eventual catheter removal. Use fine scissors or a scalpel blade to make an oblique or V-shaped incision (venotomy) in the anterior wall of the vein between the sutures (see Fig. 19-10, step 4).
Grasp the Silastic catheter (prefilled with saline solution) with forceps and advance it into the vein for a distance of 2 to 3 cm (see Fig. 19-10, steps 5 and 6). This is usually the most difficult and time-consuming portion of the procedure. Use a vein dilator, L-shaped lifter, or forceps to hold the venotomy incision open (see Fig. 19-10, steps 7 and 8). Pull downward on the distal tie to provide countertraction and stabilize the vein during advancement of the catheter. Remove the tourniquet and tie the proximal suture around the vein with the catheter inside while taking care to not occlude the catheter by tying the suture too tightly. If the distal suture was tied, the free ends of the suture can be tied around the catheter to provide additional stability. If the distal suture was not tied, remove it at this point. Tie the proximal suture to secure the catheter, but leave the ends long enough so that the suture can be removed to allow recannulation once the infusion is removed.
Continued infusion of saline through the catheter from an attached syringe will ensure patency. Orient the catheter into either corner of the incision and close the incision with interrupted 4-0 nylon suture. Wrap the skin suture nearest the catheter around it and tie it to hold the catheter in place. Control bleeding with direct pressure. Place antibiotic ointment over the wound, and apply a sterile occlusive dressing. Connect the IV tubing and tape it securely to the foot board to prevent inadvertent removal of the catheter (see Fig. 19-10, step 9).
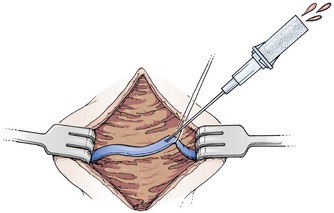
Mini-Cutdown
Cannulation of a small vein with a catheter or tube may be difficult and very time-consuming if one is not experienced in the technique. As an alternative, use the mini-cutdown procedure. For this technique, once the vein is exposed through a skin incision and subcutaneous dissection, cannulate it directly with a standard IV catheter (e.g., Medicut, Angiocath, Quikcath) rather than nicking it with a scalpel (Fig. 19-11). Place a silk suture or hemostat under the vein to immobilize it during the puncture, but do not tie off the vein after cannulation. Although the catheter will not be as secure with this modification, the technique is useful when time is critical. Moreover, the vein is not destroyed by this technique. In essence, a mini-cutdown uses the percutaneous technique of cannulation, except that venipuncture is performed through a skin incision under direct visualization (see Chapter 23).
Central Venous Catheterization: Percutaneous
Indications and Contraindications
Central venous cannulation is indicated in the ED when peripheral venous access is limited or impossible and when precise hemodynamic monitoring is needed in a critically ill or injured child. Contraindications to percutaneous placement of central venous catheters include an uncorrected coagulopathy; local infection or burns at the insertion site; malformations or deformations that may distort the vascular anatomy; vascular insufficiency of an extremity; or obstruction or compression of the access veins by tumor, abnormal vessels, hematoma, thrombus, abscess, or malformation. Peripheral venous or IO access is preferred over central access during cardiac arrest to minimize complications and interruptions in cardiopulmonary resuscitation (CPR), but if a central line is in place, medications should be given centrally rather than peripherally.29
Techniques
Percutaneous placement of central venous catheters can be accomplished with either a guidewire (Seldinger) technique or an over-the-needle catheter. Details of the femoral, internal jugular, and subclavian approaches follow. In the last several years, experience in using real-time ultrasound to facilitate placement of central venous lines in adults has prompted a number of organizations to recommend it for widespread use.30,31 The use of ultrasound to guide placement of central venous catheters in children has been studied, but the body of literature remains small.32 Pediatric studies have focused primarily on localization of the internal jugular and have shown mixed results when comparing ultrasound-guided cannulation with a landmark-based technique. One study looked specifically at femoral vein catheterization and found no difference in success rates with the use of ultrasound but a significantly lower complication rate when ultrasound was used.33
Femoral Catheterization: The safety and efficacy of percutaneous femoral venous catheterization have been demonstrated.34,35 Femoral venous catheterization is the central venous access route most commonly used in infants and children in emergency situations (Fig 19-12). The femoral anatomy is easily learned and the arterial pulse provides a landmark for insertion of the catheter. In the event of inadvertent arterial puncture or venous laceration, hemostasis can be achieved by the application of direct pressure. In addition, femoral catheterization is less likely to interfere with emergency procedures in the region of the head, neck, and chest during medical or trauma resuscitation. Femoral vein catheterization may be associated with a higher risk for infection than subclavian catheterization but has a higher success rate in children and does not carry any risk for hemothorax, pneumothorax, or puncture of the subclavian artery.36–39
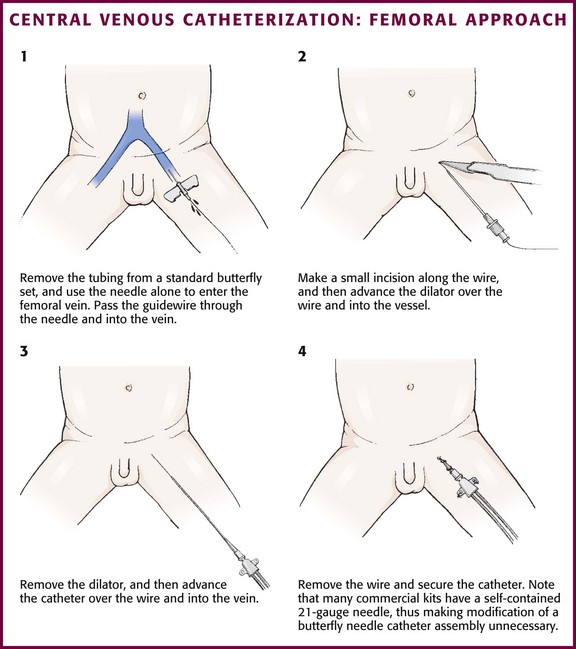
Figure 19-12 Central venous catheterization: femoral approach.
Technique.: Restrain the child adequately to permit exposure of the inguinal region. In some situations, sedation may be appropriate to facilitate successful catheterization (see Chapter 33). Use the introducer needle supplied with the kit with or without a syringe to enter the femoral vein. Palpate the femoral artery with one finger, and place the needle in the skin just medial to the artery. Enter the skin at a 30- to 45-degree angle approximately 1 cm below the inguinal ligament. Direct the general course of the needle in a line toward the umbilicus. When blood return is noted, gently pass the wire through the needle into the proximal end of the vein. If a syringe has been attached to the introducer needle, apply continuous, gentle suction while inserting the needle. When the syringe is removed to insert the wire, place a sterile gloved finger over the open hub of the needle to prevent air embolism or blood loss. The wire should not meet resistance when introduced gently. Make sure that the proximal end is always visibly protruding from the hub of the needle. If resistance to passage of the wire is encountered, remove it to assess the needle’s position within the vessel. If resistance to removal of the wire is encountered, withdraw the needle and the wire together to prevent shearing off the end of the wire.40 An alternative method that may be useful when placing the 4-Fr double-lumen Arrow catheter is to remove the tubing from a 21-gauge butterfly needle (Abbott Hospitals, Inc., North Chicago, IL) and use the needle to enter the vein (Fig. 19-12, step 1). The butterfly needle is very easy to hold in a stable position and is also shorter than the needles supplied with the preassembled kits. When blood return is obtained, pass the wire through the butterfly needle into the proximal end of the vein.
Make a small incision (1 to 2 mm) in the skin at the wire’s entry point to allow passage of the dilator (see Fig. 19-12, step 2) or the catheter itself. The incision is generally made with a No. 11 scalpel blade with the sharp edge of the blade pointed away from the wire. Advance the dilator gently over the wire and then remove it. Advance the catheter over the wire into the vein and remove the wire (see Fig. 19-12, step 3). Occasionally, it is useful to gently rotate and advance the dilator (or catheter) simultaneously as it enters the vein. Withdraw blood from the catheter ports, and then flush them with a sterile saline solution. Secure the catheter with silk or nylon sutures (see Fig. 19-12, step 4). Place a sterile transparent skin covering over the exit site for use as an impermeable dressing.
Internal Jugular Venous Catheterization: The internal jugular veins lie within the carotid sheath containing the carotid artery and vagus nerve. The lower part of the vein lies within the triangle formed by the sternal and clavicular heads of the sternocleidomastoid muscle and becomes more lateral and anterior to the artery as it joins the subclavian vein. The right internal jugular vein is preferred over the left because the internal jugular, the innominate vein, and the superior vena cava form a nearly straight line into the right atrium. This decreases the chance for pneumothorax or injury to the thoracic duct.
Technique.: Three approaches to internal jugular catheterization are possible (including the anterior, median or central, and posterior approaches, as discussed in Chapter 22). The median or central approach is recommended in pediatric patients and is described here. Use of ultrasound to guide elective cannulization of the internal jugular vein in infants has been described and appears to improve success rates (see Chapter 66).41–43 Position the child in the same fashion as that described for external jugular venous catheterization. For the medial or central approach, use the apex of the angle formed by the sternal and clavicular heads of the sternocleidomastoid muscle as the puncture site. If one could imagine a line from the mastoid process to the sternal notch, the apex of the angle formed by the two muscular heads would fall approximately along the middle third of that line.40 Cleanse the skin surrounding the area to be punctured with antiseptic solution. Cover the area with a sterile drape, and infiltrate the skin with 1% lidocaine. Introduce an 18- to 22-gauge needle attached to a syringe at the apex of the triangle at an angle of 30 degrees downward relative to the coronal plane and direct it caudad toward the ipsilateral nipple (Fig. 19-13). Advance the needle slowly until the jugular vein is entered. Keep the syringe connected to the needle at all times to maintain constant negative pressure and avoid air embolism. After blood flow is obtained, remove the syringe and place a finger over the hub of the needle. Insert a guidewire during a positive pressure breath or exhalation. Remove the needle and introduce a catheter via the Seldinger technique. Pass the catheter far enough to reach the junction of the superior vena cava and right atrium. Check the catheter for blood return, secure the line with sutures, and apply a sterile occlusive dressing. Obtain a chest radiograph to assess the proper location of the catheter, as well as to rule out pneumothorax.
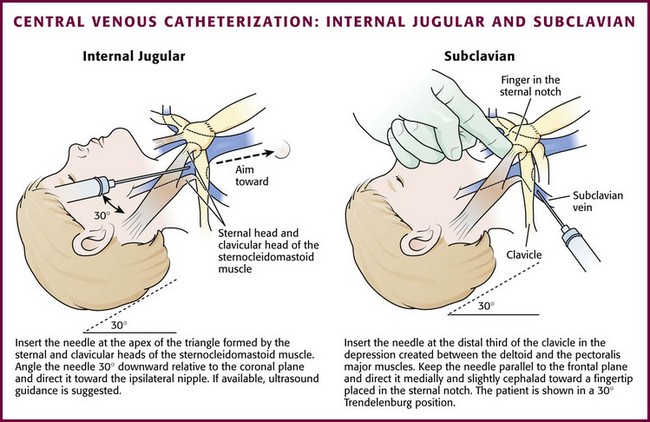
Subclavian Venous Catheterization: The subclavian vein is a popular site for central venous access in adult patients but is used far less frequently in children (see Fig. 19-13). The technique is more difficult in children because of the smaller size of the vessel, as well as a more cephalad location under the clavicles. In addition, there is a risk for pneumothorax and hemothorax, especially in younger patients and when performed during emergencies. Subclavian venous access may interfere with resuscitative efforts or be unavailable because of placement of cervical spine immobilization devices in a trauma patient.
Technique.: The technique for subclavian venous catheterization differs from that for adults in that the approach to the vein is more lateral in children. The infraclavicular approach is described. The equipment needed is the same as that used for femoral catheterization. Turn the patient’s head away from the side to be punctured and place a towel roll under the shoulders. The right side is preferred because the dome of the lung is more cephalad on the left side. The needle insertion site is at the distal third of the clavicle in the depression created between the deltoid and the pectoralis major muscles. Prepare the skin with antiseptic solution. Cover the area with a sterile drape, and infiltrate the skin with 1% lidocaine.
Complications
Infection and thrombosis are the major risks associated with central venous catheters.38,44 Subclavian and internal jugular catheters additionally carry serious risks for pneumothorax and hemothorax. Other complications include arterial puncture, accidental displacement, phlebitis, hemorrhage, hematoma, dysrhythmia, air embolism, vascular obstruction or perforation, right atrial perforation, and localized edema. Perform blood sampling from indwelling central venous lines with caution because the risk for contamination increases each time that the system is opened. Remove catheters as soon as they are no longer needed to minimize the risk for these complications.
Emergency Vascular Access
Vascular access is a key component of any resuscitation to allow the administration of fluid and medications and to obtain blood samples. However, achieving venous access during pediatric resuscitation can challenge even the most seasoned clinician.45,46 In a review of pediatric resuscitations by Rossetti and colleagues, IV access required 10 or more minutes in 24% of cases.45 The average time required for a cutdown was 24 minutes. Children who were successfully resuscitated had vascular access achieved significantly sooner than did those who were not resuscitated. Emergency IV access was most prolonged in children younger than 2 years. This last finding is important because the majority of cardiopulmonary arrests in children occur in this younger age group.
For these reasons, clinicians should obtain IO access in critical patients if IV access is not established quickly rather than delay treatment with attempts to place peripheral or central venous catheters (see Chapter 25).29 IO lines are underused in many EDs.47 If no IV or IO line is available, give certain drugs via the endotracheal tube (see Chapter 26) while attempts at venous access are initiated. However, endotracheal drug administration has been shown to be less efficacious than IV administration in adults, and this route of administration should be used only when no alternatives are available.48,49 Central venous access may be desirable in critical patients. In pediatric resuscitation, the femoral vein is generally chosen because its consistent anatomic location and large size make it the safest and easiest central vein to catheterize. The femoral vein can also be accessed with minimal interference with resuscitative efforts. However, central venous access in children takes significantly longer than IO line placement. Generally, placement of a central line in children should occur after initial stabilization through a peripheral IV or an IO line.
Umbilical Vein Catheterization
Indications and Contraindications
The major indication for umbilical vein catheterization is the need to access the vascular system for emergency resuscitation and stabilization of neonates. It may also be used for exchange transfusions and short-term central venous access in newborns. The umbilical vein may remain patent for up to 2 weeks after birth.50 In neonates who require emergency access in the ED, a peripheral vein would be preferable, but attempting to cannulate one of the umbilical vessels could be lifesaving. Moreover, umbilical vein catheterization is technically easier than umbilical artery cannulation.
Equipment and Setup
See Box 19-7 for the supplies and equipment necessary for catheterization. Place the infant beneath a radiant warmer because keeping the infant warm during the procedure is critical. Restrain the extremities. Wear a mask, cap, gown, and sterile gloves. Assess the length of catheter needed before the procedure. Methods to estimate the best length for both umbilical vein and artery lines are discussed below.
Technique
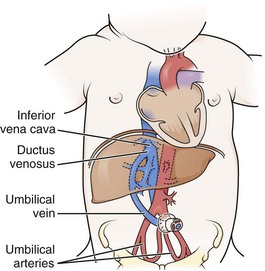
Place a loop of umbilical tape or a purse-string suture at the junction of the skin and the cord to provide hemostasis and to anchor the line after placement (Fig. 19-14, step 1). Cut the cord with a scalpel about 1 cm from the skin (often less in infants who are not newly born), and identify the vessels. The vein is usually located at 12 o’clock and has a thin wall and large lumen. It may continue to bleed after cutting. The two arteries have thicker walls and smaller lumens. Constriction reduces bleeding after the vessels are cut. Occasionally, a persistent urachus may be mistaken for the umbilical vein, but the presence of urine in the urachus may help correctly identify that structure.

Flush the catheter (3.5 Fr [preterm infants] to 5.0 Fr [term infants]) with heparinized saline and attach it to a three-way stopcock. Place the catheter into the lumen of the umbilical vein and advance it gently (see Fig. 19-14, step 2). An umbilical vein line can be placed in a fashion that is intended either for emergency use or for more chronic use. In an emergency case, advance the catheter only 1 to 2 cm beyond the point at which good blood return is obtained. This is usually only 4 to 5 cm in a term-sized infant. If the catheter is pushed farther than this distance, it may enter the ductus venosus and then move into the inferior vena cava, or it may enter a branch of the portal vein within the liver (as evidenced by resistance at 5 to 10 cm). Infusion of medications into a catheter in this location can result in liver necrosis.
The inferior vena cava site may be a desirable location in some newborn infants in whom peripheral vascular access is limited and for whom longer-term central venous access is desired. It is also useful for monitoring central venous pressure or infusion of medications, high concentrations of glucose (>10%), IV fluids, and hyperalimentation solutions. The catheter must be inserted approximately 10 to 12 cm in a term-sized infant to reach the inferior vena cava. Radiographs are required in this case to identify and prevent accidental entry into the portal vein, thereby limiting utility in an emergency situation. Note that an umbilical venous catheter will proceed directly cephalad (without making a downward loop) until it passes through the ductus venosus (Fig. 19-15).
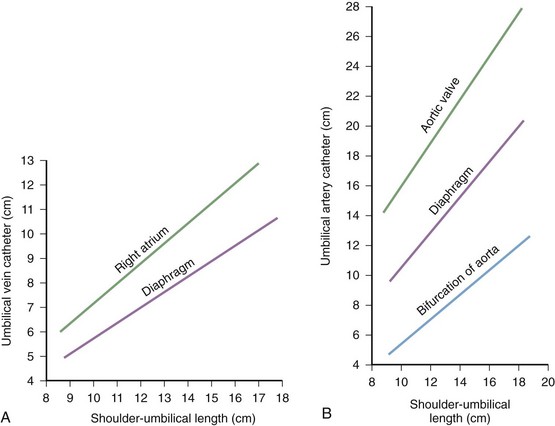
Some practitioners use standardized graphs to estimate the length of insertion. Such graphs are based on the shoulder-to-umbilicus length (Fig. 19-16A) and are useful if stored in the drawers of the warming beds used to resuscitate newborns and small infants, along with the catheters and other equipment. Shoulder-to-umbilicus length is the perpendicular line measured from the tip of the shoulder to the horizontal level of the umbilicus. If the graph is not available, the shoulder-to-umbilicus length multiplied by 0.6 gives an approximate insertion length that will result in the tip of the catheter being above the diaphragm but below the right atrium in the inferior vena cava.50 Formulas based on birth weight are also used to estimate catheter length.51
Complications
Complications of umbilical venous catheters include hemorrhage, infection, injection of sclerosing substances into the liver (resulting in hepatic necrosis), air embolism, catheter tip embolism, and vessel perforation.52,53 Follow careful technique during insertion and maintenance of catheters to minimize such complications.
Umbilical Artery Catheterization
Indications and Contraindications
Umbilical artery catheterization is a useful procedure in the care of newborn infants who require frequent monitoring of arterial blood gases and arterial blood pressure, fluid and medication administration, and exchange transfusions.53 Either one of the two umbilical arteries may be cannulated for resuscitation purposes, but an umbilical vein is generally technically easier to cannulate and may be preferred in an emergency. Complications are discussed later, but one should avoid cannulating the arteries if omphalitis, peritonitis, necrotizing enterocolitis, or intestinal hypoperfusion is present.
Equipment and Setup
The equipment required for umbilical artery catheterization is identical to that used for umbilical venous catheterization (see Box 19-7). Additional equipment needed for continuous arterial pressure monitoring and infusion should be readily available. Estimate the catheter length needed before starting the procedure. Do this by using a standard graph (see Fig. 19-16B) or a birth weight regression formula.
Technique
The technique of umbilical artery catheterization is similar to that described for umbilical vein catheterization in the preceding section. After the umbilical arteries have been located (Fig. 19-17, step 1), grasp the cord with a curved hemostat near the selected artery. Ask an assistant to use two hemostats to grasp each side of the cord and slightly evert the edges to aid in exposure of the arteries. Using curved iris forceps without teeth, gently dilate the artery (see Fig. 19-17, step 2). Sometimes, repeated passes of the forceps are required because the umbilical artery can spasm and make the procedure difficult. Attach a 3.5- to 5-Fr catheter to a three-way stopcock and flush it with a sterile heparinized solution. Introduce the catheter into the dilated artery (see Fig. 19-17, step 3). Use a 3.5- to 4-Fr catheter for infants weighing less than 2 kg and a 5-Fr catheter for those weighing 2 kg or more.

Figure 19-17 Umbilical artery catheterization.
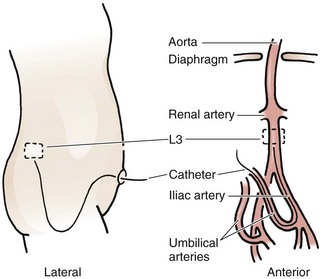
Acceptable positions of umbilical arterial catheters are between T6 and T9 (“high line”) and between L3 and L5, just above the aortic bifurcation (“low line”). High lines are associated with a lower incidence of thrombotic complications.54 Use graphs and formulas to estimate the proper catheter length for insertion at both the high and low positions (see Fig. 19-16B), but confirm placement with a radiograph. These formulas may not be as accurate in babies at the extremes of weight. Once sterile technique is broken, do not advance the line. It is therefore preferable to position the catheter too high and to withdraw it as necessary according to postinsertion radiographs. This will show the catheter proceeding from the umbilicus down toward the pelvis, making an acute turn into the internal iliac artery, continuing toward the head into the bifurcation of the aorta, and then moving up the aorta slightly to the left of the vertebral column (Fig. 19-18). After it has been properly positioned, tie the catheter with the previously placed suture and tape it to the abdominal wall (see Fig. 19-17, steps 4 and 5).
Complications
Complications of umbilical artery catheterization include hemorrhage, infection, thromboembolic phenomena (especially involving the kidneys, gastrointestinal tract, and lower extremities), aortic thrombosis, aortic aneurysm, vasospasm, air embolism, vessel perforation, peritoneal perforation, and hypertension.53
Percutaneous Arterial Catheterization
Indications and Contraindications
Despite the growing use of noninvasive devices for monitoring transcutaneous oxygen and carbon dioxide, percutaneous peripheral arterial catheterization is indicated when there is a need for frequent blood gas sampling, cotinuous monitoring of arterial blood pressure, or both. Arteries used for peripheral catheters in infants and children include the radial, ulnar,55 femoral,56 dorsalis pedis, and posterior tibial arteries. This procedure is rarely performed in the ED.
Equipment and Setup
The equipment needed for arterial catheterization is essentially the same as that required for percutaneous peripheral venous catheterization (see Box 19-4). Some centers use commercially available arterial line kits, which come with all the necessary supplies and equipment. Alternatively, standard 22- or 24-gauge over-the-needle IV catheters, a T-piece connector, and a three-way stopcock will work fine. Connect the T-piece and the stopcock and then fill them with NS solution. Prepare an infusion pump with heparinized saline.57
Technique
Perform the procedure with good lighting and an adequate work area and monitor the infant’s heart rate and respiratory rate closely. Palpate the radial artery proximal to the transverse wrist crease on the palmar surface of the wrist, medial to the styloid process of the radius. Before the procedure, compress the artery and observe the hand and fingers for change in color. If blanching or cyanosis is noted (indicating poor collateral circulation), do not perform catheterization. If locating the artery by palpation is difficult, a transillumination device,58 Doppler probe, or ultrasound may be helpful.59–61
Secure the infant’s or child’s hand and lower part of the forearm to an arm board with the wrist dorsiflexed 45 to 60 degrees by placing a roll of gauze underneath it. Take care to leave the fingers exposed to allow assessment of the peripheral circulation. Palpate the radial artery at the point of maximal impulse and mark it by making a gentle indentation with a gloved fingernail. Prepare the area over the radial artery with povidone-iodine or another antiseptic solution and wash it with alcohol. Use a topical or local anesthetic (such as 1% lidocaine without epinephrine), or both, at the planned insertion site. Insert the catheter with the needle through the skin just proximal to the transverse wrist crease at a 10- to 20-degree angle (Fig. 19-19A). Advance the catheter with the needle slowly until blood appears in the catheter hub, which signifies puncture of the anterior arterial wall. Slowly advance the catheter until blood appears in the needle and then carefully lower the angle of the needle to approximately 10 degrees. Slowly advance the catheter over the needle and into the lumen of the artery. Remove the needle. Attach the stopcock and T-piece connector to the catheter hub. Open the stopcock to the syringe to confirm return of pulsatile blood. Flush it with 0.5 mL of heparinized solution very gently to clear the catheter while observing the fingers and the hand for evidence of blanching or cyanosis.
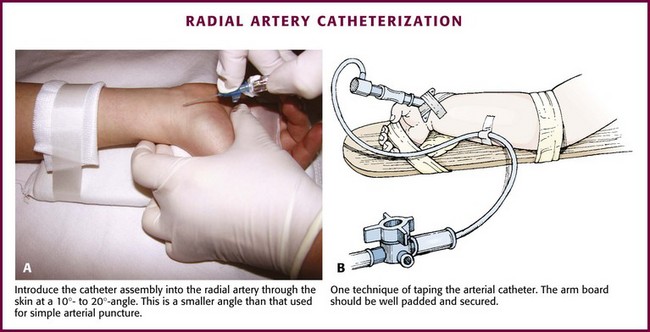
Figure 19-19 Radial artery catheterization. (See Figure 20-5 for additional details on this technique.)
Fix the catheter to the skin with a thin piece of tape placed adhesive side up under the catheter hub and cross it over the catheter in a V shape. Pass a second piece of tape around and over the catheter hub to fix it to the wrist (Fig. 19-19B). Add a transparent sterile dressing such as Tegaderm (3M, St. Paul, MN) or OP Site (Smith and Nephew Medical, Massillon, OH) for an additional layer of security and protection. Use a small piece of tape to attach the T-piece connector to the wrist area or to the splint. Be sure that the fingers are easily visible.
Complications
Complications, which have been reported with every type of arterial catheter, include hemorrhage, thrombosis, spasm, infection, scars, air embolism, retrograde blood flow, transient elevation in blood pressure with rapid (<1 second) infusion, and nerve damage. Thrombosis or spasm may result in blanching or cyanosis of the extremity or skin.53 There is the potential for loss of digits, an entire extremity, or large areas of skin. However, complications from ED-placed arterial lines are uncommon and generally minor.12
Arterial Cutdown Catheterization
Indications and Contraindications
Arterial catheterization by cutdown of the posterior tibial artery or radial artery may be indicated when frequent monitoring of arterial blood gases or blood pressure is needed and percutaneous access is not possible. Contraindications to arterial cutdown are similar to those cited for percutaneous arterial catheterization. Because of their experience with a wide variety of percutaneous vascular access techniques, emergency clinicians may find that percutaneous arterial catheterization is easier and likely to be more successful than performing an arterial cutdown.62
Technique
The anatomy (Fig. 19-20) and technique for posterior tibial arterial cutdown are described in detail (Fig. 19-21). The same technique is applicable for the radial artery. Stabilize the foot in a neutral position by taping the externally rotated lower part of the leg to a splint. Localize the posterior tibial artery with Doppler ultrasound just posterior to the medial malleolus. Prepare the skin of the foot with a povidone-iodine or other antiseptic solution.
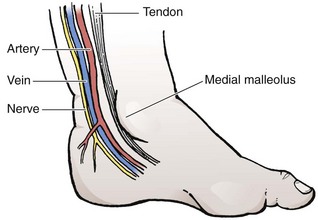
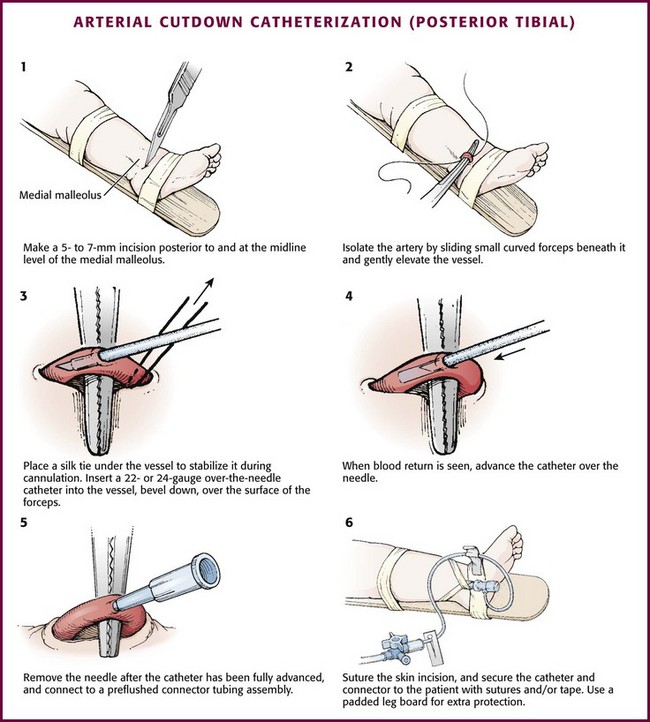
Figure 19-21 Arterial cutdown catheterization (posterior tibial).
After subcutaneous injection of 1% lidocaine, make a 5- to 7-mm transverse incision in the skin over the artery posterior to and at the midlevel of the medial malleolus (see Fig. 19-21, step 1). Using blunt dissection in a vertical direction (parallel to the vessels), separate the tissue with a pair of small, curved forceps. Identify the artery, which courses with the vein just anterior and superficial to the nerve and is usually pulsatile. Isolate the artery by sliding small, curved forceps beneath it and gently elevating the vessel (see Fig. 19-21, step 2). Excessive manipulation of the artery can cause spasm; if this occurs, apply a few drops of 1% lidocaine locally to induce dilation. Place a silk tie (without a needle) beneath the artery to stabilize it during cannulation (see Fig. 19-21, step 3).
At a 10-degree angle, insert a 22- or 24-gauge over-the-needle catheter (bevel downward) into the artery over the surface of the forceps. When blood return is seen, advance the catheter over the stylet to its full length (see Fig. 19-21, steps 4 and 5). Remove the needle stylet and connect the catheter to the T-connector tubing and a three-way stopcock that has been prefilled with heparinized flush solution. Check for patency by observing blood return with pulsations. Flush the catheter slowly and gently. Remove the silk suture and secure the skin incision with sutures. Suture the catheter to the skin over the heel. Secure the catheter and connector to the heel with tape (see Fig. 19-21, step 6). Connect the stopcock to the infusion line.
Rehydration Techniques in Infants and Children
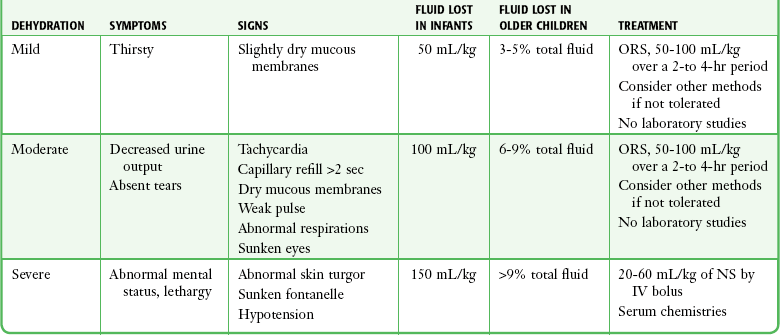
Assessing whether a child with acute gastroenteritis is dehydrated and to what degree is complicated by inconsistency in the literature. Parental report of symptoms and signs associated with dehydration (emesis, diarrhea, poor fluid intake, decreased urine output, weak cry, sunken fontanelle, sunken eyes, decreased tears, dry mouth, and cool extremities) has 73% to 100% sensitivity in predicting moderate or great dehydration but poor specificity.63 Table 19-1 presents a more thorough list of the signs, symptoms, and definitions of mild, moderate, and severe dehydration.
Oral Rehydration
Oral rehydration therapy (ORT) has been shown to be equivalent to IV therapy in children with acute gastroenteritis in terms of rehydration, subsequent diarrheal episodes, and the development of sodium abnormalities.64 Failure rates are 4.9% as compared with 1.3% for IV therapy, and use of ORT can avoid the need for IV hydration in 24 of every 25 patients.65 This is the modality of choice for rehydration of a mildly to moderately dehydrated infant or child 1 month or older. Oral rehydration solutions come in a number of commercial forms (World Health Organization rehydration salts, Enfalyte, Pedialyte, Rehydralyte, CeraLyte). A solution can be made at home with 5 cups of water, 8 teaspoons of sugar, and 1 teaspoon of salt. The target volume is 50 to 100 mL/kg over a period of 2 to 4 hours. Typically, this is started with a spoon, cup, or syringe delivering 5 mL to children younger than 2 years and 10 mL to children older than 2 years every 5 minutes and then increasing volumes slowly as tolerated (Fig. 19-22). Vomiting is not a contraindication to attempting ORT since children can typically tolerate these small volumes. Some practitioners fear accompanying electrolyte abnormalities; however, hypernatremic dehydration responds well to ORT.
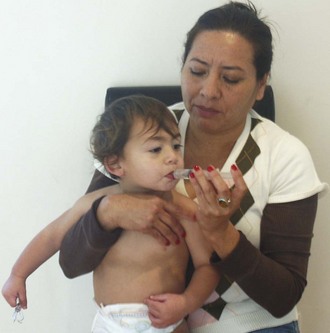
Figure 19-22 Oral rehydration with a syringe. The parent is instructed on the technique in the emergency department.
Oral rehydration can be facilitated with the use of an antiemetic. Ondansetron has been shown to decrease ED vomiting with a number needed to treat (NNT) of 5, decrease the need for IV hydration (NNT = 5), and decrease need for admission (NNT = 14).66 Ondansetron is administered at a dose of 0.15 mg/kg in the form of syrup or oral dissolving tablets. An alternative, simplified dosing regimen is to give 2 mg for children 8 to 15 kg, 4 mg for children 15 to 30 kg, and 8 mg for children greater than 30 kg.67 Most oral ondansetron studies include children 6 months and older, but several studies using IV ondansetron have included infants as young as 1 month. Concern has been raised regarding the possibility of the use of ondansetron delaying the identification of more pathologic diagnoses. A metaanalysis has shown no difference in return visit rates in those who do not receive antiemetic therapy, and it has been shown to not mask alternative diagnoses.4,68 Outpatient prescriptions for ondansetron do not affect recidivism or readmission rates. Ondansetron has recently received attention for its ability to prolong the QT interval. In children, it lengthens the duration of the QT interval by 10 to 17 msec, an amount unlikely to be induce torsades de pointes in an otherwise healthy child.69 Other antiemetics and antimotility agents are not recommended by the American Academy of Pediatrics for use in children younger than 5 years, and they have a high incidence of side effects.70 There is a Food and Drug Administration “boxed warning” against the use of promethazine in children younger than 2 years and a strong recommendation against its use even in older children.
Laboratory Tests
The American Academy of Pediatrics recommends electrolyte testing in patients with severe dehydration, those who need IV rehydration, or children with moderate dehydration and findings on the history or physical examination inconsistent with straightforward diarrheal episodes.8 A prospective study of patients 2 months to 9 years of age deemed to require parenteral rehydration on clinical grounds demonstrated a 48% rate of laboratory abnormalities, 10.4% of which changed management. More than 9% of their patients had hypoglycemia, so obtaining a glucose level urgently, as well as electrolytes when feasible in patients who require IV rehydration, is recommended.71 It is difficult to provide recommendations regarding the management of low bicarbonate because the level has been found to correlate poorly with clinical signs of dehydration. One study found a bicarbonate level of less than 16 mmol/L in 35% of patients with no dehydration and a level greater than 20 mmol/L in 15% of patients with moderate dehydration, thus indicating that it may be a poor determinant of management.72 Urine specific gravity tends to lag behind the child’s hydration status and is particularly unreliable in infants younger than 1 year.73
Parenteral Rehydration
Obtaining IV access is covered elsewhere in this section. If parenteral administration of fluids is deemed appropriate, standard therapy involves 20-mL/kg boluses of NS or lactated Ringer’s solution infused over a 60-minute period each until normalization of pulse, perfusion, and mental status occurs. Recent literature has demonstrated comparable safety and efficacy of rapid rehydration protocols involving the administration of 50 to 60 mL/kg over a 60-minute period in otherwise healthy children.74–76 Fourteen percent of children rapidly rehydrated required a return ED visit, which did not differ significantly from the proportion of children returning after a standard rehydration protocol.12
Children who have received parenteral fluids and subsequently tolerated oral fluids can typically be discharged home from the ED. If the child requires admission for continuance of maintenance fluids, isotonic saline is recommended because of a documented 17% to 45% risk for hyponatremia with the use of hypotonic fluid.77–79 The amount of maintenance fluid is calculated as 100 mL/kg for the first 10 kg of body weight, 50 mL/kg for 10 to 20 kg of body weight, and 20 mL/kg for the remaining body weight in a 24-hour period. For example, a 50-kg child would require (100 mL × 10 kg) + (50 mL × 10 kg) + (20 mL × 30 kg) divided evenly over 24 hours.
If parenteral fluid administration is required and IV access is not readily achieved, IO access has recently been made faster and easier to achieve with use of the intraosseous drill (EZ-IO) (see Chapter 25).80 Available sites are the same as those with standard insertion, with the flat area of the proximal end of the tibia two fingerbreadths below and 1 to 2 cm medial to the tibial tuberosity being widely accepted as the preferred site in children. Skin overlying the site is prepared and anesthetized, and the appropriate needle is connected to the drill. Needle options for the EZ-IO include pink 15-mm (3 to 39 kg), blue 25-mm (>40 kg), and yellow 45-mm (>40 kg with excess subcutaneous tissue) needles. The needle and drill are placed at a 90-degree angle to the bone, and the drill trigger is depressed while applying gentle pressure. A sudden “give” or “pop” is felt when the intramedullary space is reached. At this point the drill is removed from the embedded needle, and a connector is attached to the hub of the needle. A bolus of 5 to 10 mL of NS while feeling the posterior surface of the calf for evidence of extravasation will confirm appropriate placement. Pain associated with the infusion is minimized by the administration of 0.5 mg/kg of 1% preservative-free lidocaine (cardiac lidocaine is most readily available at most centers) to an adult maximum of 20 to 50 mg through the IO line.81 IV tubing is connected and the infusion initiated. Pushing fluid via a syringe or the use of a pressure bag is recommended to allow an acceptable rate of delivery.18 Securing an IO line is difficult, but a simple solution is to surround the needle and proximal tubing with a small inverted paper cup with the bottom removed and the cup taped to the leg (Fig. 19-23). Success rates are high and adverse events minimal. However, if the initial attempt is unsuccessful because of extravasation, the contralateral tibia or another site must be selected.

Figure 19-23 Intraosseous line protected by a paper cup.
Nasogastric Tube Rehydration
Nasogastric rehydration is a potentially effective technique in children who refuse to take fluids orally in the quantity required for rehydration. When compared with IV hydration, the cost is 18% less,82 and it is an option in children in whom IV access cannot be established easily. Several studies have demonstrated its safety and efficacy in mildly to moderately dehydrated patients.83,84 Studies in developing nations have found this technique effective for severe dehydration as well.85–87 Nasogastric rehydration is accomplished by placement of a nasogastric tube, with a 5-Fr feeding tube typically being adequate for children younger than 3 years. Use of topical anesthetic or nebulized lidocaine (5 mg/kg diluted in NS) before insertion is recommended for comfort. A bolus of 50 mL/kg of electrolyte solution (e.g., Pedialyte) is administered by continuous infusion via an enteral feeding pump over a 3-hour period. Twenty-four-hour rehydration regimens (50 to 100 mL/kg for the first 10 kg of body weight and then 25 to 50 mL/kg for the remaining body weight) have also been proposed but seem to have equivalent outcomes to more rapid rehydration protocols.88 In one study, 18% of patients nasogastrically rehydrated required a return visit to the ED, which was not significantly different from those who received IV rehydration.21 No study has evaluated the use of frequent, small boluses; however, experience with ORT would indicate that 5- to 10-mL parent-administered syringe boluses to equal 50 mL/kg would be an option in the event that a pump for continuous administration is unavailable.
Subcutaneous Rehydration
Subcutaneous rehydration therapy, also known as hypodermoclysis, is an option in children with mild to moderate dehydration in whom IV or IO access is not available or feasible. Its utility as a bridge to facilitating commencement of IV hydration in severely dehydrated children has been postulated, but not studied. Although the potential has been recognized since the early 1900s, the hyaluronan-containing intercellular matrix of subcutaneous tissue prevents easy delivery and absorption of large quantities of fluid, and the previous preparations of hyaluronidase (enzymes that hydrolyze hyaluronan) were animal based and allergenic. More recently, a recombinant formulation of human hyaluronidase, HuPH20 (Hylenex), has become available, thus making this technique more accessible. Its primary utility has been in geriatric and hospice patients requiring hydration, but several studies have substantiated its safety and efficacy in pediatric patients as young as 2 months.89
After sterile preparation, a 22- or 24-gauge angiocatheter or 25-gauge butterfly needle is inserted at a 30- to 45-degree angle to the hub into subcutaneous tissue. After placement of a small piece of gauze under the hub of the catheter to maintain the angle, it is secured with a sterile occlusive dressing. Although the interscapular area is often used, the thigh, abdomen (left iliac fossa), chest, and upper part of the arm are also options.90 If possible, an area with a pinchable fat fold of 1 inch should be selected. The catheter should be aspirated for absence of blood return. A 150-unit dose of hyaluronidase is injected through the catheter, and the fluid infusion is started. Typically, isotonic fluids such as 0.9% NS are used. Mean fluid infusion rates are highly variable in adults and range in children from 18.9 mL/kg over the first hour to 38.4 mL/kg for a 4-hour infusion.89 An eventual infusion rate around 20 mL/kg/hour should be selected and titrated down if the infusion pump indicates occlusion. Because the hyaluronidase requires about 15 minutes to take full effect, some providers prefer to start more slowly and titrate upward.91 Initially, an erythematous swelling may appear at the infusion site (Fig. 19-24), but it will decrease in size after 5 minutes and disappear 1 to 2 hours after cessation of the fluid infusion. Some pain may occur at infusion site. Suggestions for troubleshooting subcutaneous infusion problems can be found in Table 19-2. Maximal diffusion of fluid into the IV compartment occurs in 1 hour.92 An injection of hyaluronidase allows subcutaneous infiltration for 48 hours, and maintenance fluids, including those containing dextrose and potassium, can be infused through the catheter after the bolus if required. No special care is required following removal of the catheter.
TABLE 19-2
Troubleshooting Subcutaneous Rehydration Complications
| The catheter becomes dislodged. | Restart in the same area without an additional dose of hyaluronidase90 |
| The infusion pump indicates occlusion. | Slow the infusion rate by 10 mL/hr. |
| The area becomes firm, indurated, and painful. | Administer an additional dose of hyaluronidase. |
| The child fails outpatient therapy. | Continue infusion of fluid through the catheter for 48 hours as maintenance. |
Subcutaneous rehydration is not recommended in patients with signs of shock, coagulation deficits, gross edema, significant electrolyte abnormalities (sodium >150 or <130 mEq/L), or no intact skin sites (e.g., massive burns).30,93 The most common adverse events reported are redness, swelling, or bruising at the infusion site.94 Allergic reactions have not been reported with the newer formulation of hyaluronidase, and skin infections are rare. In one study, this technique facilitated discharge home in 84% of patients and allowed definitive rehydration in 94% of patients, with no return visits requiring admission.29
Discharge
Commonly held beliefs include avoidance of dairy products, need for formula change or overdilution of formula with water, gut rest for 24 hours or longer, and the BRAT diet (bananas, rice, applesauce, toast). These beliefs are not supported by the literature in most cases. Once rehydration has been achieved, return to a normal diet is suggested as soon as possible. Advice for discharge instructions is listed in Table 19-3.95
TABLE 19-3
Discharge Instructions for Mild to Moderate Dehydration
| Oral recommendations for acute rehydration* | ORS, 50-100 mL/kg over a 3- to 4-hr period |
| Diet recommendations following correction of dehydration | Continue breastfeeding or formula Resume a normal unrestricted diet |
| Oral intake to avoid | Juices, sodas, sports drinks (osmotic diarrhea), foods high in simple sugar |
| Fluid requirements <10 kg for ongoing losses | 60-120 mL per diarrheal stool or emesis episode |
| Fluid requirements >10 kg for ongoing losses | 120-240 mL per diarrheal stool or emesis episode |
| Return precautions | Bloody stool, signs of dehydration, altered mental status |
ORS, oral rehydration solution.
*Typically, the acute rehydration phase takes place in the emergency department. These recommendations apply to a child who is doing well and leaves to finish acute rehydration at home.
Most children seen in the ED with acute dehydration will be corrected and discharged home. Admission criteria include inadequate care at home or inability to follow return precautions, inability to take or failure of rehydration with ORT, concern for more serious pathology, severe dehydration, and neonatal dehydration.34
References
1. Wolfram, RW, Turner, ED. Effects of parental presence during children’s venipuncture. Acad Emerg Med. 1996;3:58.
2. Zempsky, WT. Pharmacologic approaches for reducing venous access pain in children. Pediatrics. 2008;122:S140.
3. Slater, R, Cornelissen, L, Fabrizi, L, et al. Oral sucrose as an analgesic drug for procedural pain in newborn infants: a randomized controlled trial. Lancet. 2010;376:1225–1232.
4. Shah, VS, Ohlsson, A. Venipuncture versus heel lance for blood sampling in term neonates. Cochrane Database Syst Rev. 10, 2011. [CD001452].
5. Duffy, S, Steele, D. Heel sticks. In: King C, Henretig FM, eds. Textbook of Pediatric Emergency Procedures. 2nd ed. Philadelphia: Lippincott, Williams & Wilkins; 2007:500.
6. Arena, J, Empananza, JI, Nogues, A, et al. Skin to calcaneus distance in the neonate. Arch Dis Child Fetal Neonatal Ed. 2005;90:F328–F331.
7. Williamson, D, Holt, PJ. Calcified nodules on the heels of children: a complication of heel sticks as a neonate. Pediatr Dermatol. 2001;18:138.
8. Harrison, AM, Lynch, JM, Dean, JM, et al. Comparison of simultaneously obtained arterial and capillary blood gases in pediatric intensive care unit patients. Crit Care Med. 1997;25:1904.
9. Yldizdas, D, Yapicioglu, H, Yilmaz, HL, et al. Correlation of simultaneously obtained capillary, venous, and arterial blood gases of patients in a paediatric intensive care unit. Arch Dis Child. 2004;89:176.
10. Bhende, MS, Manole, MD. Venipuncture and peripheral venous access. In: King C, Henretig FM, eds. Textbook of Pediatric Emergency Procedures. 2nd ed. Philadelphia: Lippincott, Williams & Wilkins; 2007:726.
11. Torrey, SB, Saladino, RA. Arterial puncture and catheterization. In: King C, Henretig FM, eds. Textbook of Pediatric Emergency Procedures. 2nd ed. Philadelphia: Lippincott, Williams & Wilkins; 2007:715.
12. Saladino, R, Bachman, D, Fleisher, G. Arterial access in the pediatric emergency department. Ann Emerg Med. 1990;19:382.
13. King, MA, Garrison, MM, Vavilala, MS, et al. Complications associated with arterial catheterization in children. Pediatr Crit Care Med. 2008;9:367.
14. Brannam, L, Blaivas, M, Lyon, M, et al. Emergency nurses’ utilization of ultrasound guidance for placement of peripheral intravenous lines in difficult-access patients. Acad Emerg Med. 2004;11:1361.
15. Constantino, TG, Parikh, AK, Satz, WA, et al. Ultrasonography-guided peripheral intravenous access versus traditional approaches in patients with difficult intravenous access. Ann Emerg Med. 2005;46:456.
16. Schnadower, D, Lin, S, Perera, P, et al. A pilot study of ultrasound analysis before pediatric peripheral vein cannulation attempt. Acad Emerg Med. 2007;14:483.
17. Doniger, S, Ishimine, P, Fox, J, et al. Randomized controlled trial of ultrasound-guided peripheral intravenous catheter placement versus traditional techniques in difficult access patients. Pediatr Emerg Care. 2009;25:154.
18. Bair, AE, Rose, JS, Vance, CW, et al. Ultrasound-assisted peripheral venous access in young children: a randomized controlled trial and pilot feasibility study. West J Emerg Med. 2008;9:219–224.
19. Oakley, E, Wong, AM. Ultrasound-assisted peripheral vascular access in a pediatric emergency department. Emerg Med Aust. 2010;22:166.
20. Zimerman, E. The Landry vein light: increasing venipuncture success rates. J Pediatr Nurs. 1991;6:64.
21. Nager, AL, Karasic, RB. Use of transillumination to assist placement of intravenous catheters in the pediatric emergency department. Pediatr Emerg Care. 1992;8:307.
22. Yucha, CB, Russ, R, Baker, S. Detecting IV infiltrations using a Venoscope. J Intraven Nurs. 1997;20:50.
23. Miyake, RK, Zeman, HD, Duarte, FH, et al. Vein imaging: a new method of near infrared imaging, where a processed image is projected onto the skin for the enhancement of vein treatment. Dermatol Surg. 2006;32:1031.
24. Perry, AM, Caviness, AC, Hsu, DC. Efficacy of a near-infrared light device in pediatric intravenous cannulation: a randomized controlled trial. Pediatr Emerg Care. 2011;27:5.
25. Chapman, LL, Sullivan, B, Pacheco, AL, et al. VeinViewer-assisted intravenous catheter placement in a pediatric emergency department. Acad Emerg Med. 2011;18:966.
26. Kim, MJ, Park, JM, Rhee, N, et al. Efficacy of VeinViewer in pediatric peripheral access: a randomized controlled trial. Eur J Pediatr. 2012;171:1121–1125.
27. Taylor, EA, Mowbray, MJ, McLellan, I. Central venous access in children via the external jugular vein. Anaesthesia. 1992;47:265.
28. Iserson, KV, Criss, EA. Pediatric venous cutdowns: utility in emergency situations. Pediatr Emerg Care. 1986;2:231.
29. Chamedides L, ed. Textbook of Pediatric Advanced Life Support. Dallas: American Heart Association, 2011.
30. Agency for Healthcare Research and Quality. Making healthcare safer: a critical analysis of patient safety practices [summary]. Evid Rep Technol Assess (Summ). 2001;43:1.
31. American College of Emergency Physicians. Use of US imaging by emergency physicians. Ann Emerg Med. 2001;38:469.
32. Skippen, P, Kissoon, N. Ultrasound guidance for central vascular access in the pediatric emergency department. Pediatr Emerg Care. 2007;23:203.
33. Iwashima, S, Ishikawa, T, Ohzeki, T. Ultrasound guided versus landmark-guided femoral vein access in pediatric cardiac catheterization. Pediatr Cardiol. 2008;29:339.
34. Sheridan, RL, Weber, JM. Mechanical and infectious complications of central venous catheterization in children: lessons learned from a 10-year experience placing more than 1000 catheters. J Burn Care Res. 2006;27:713.
35. Chiang, VW, Baskin, MN. Uses and complications of central venous catheters inserted in a pediatric emergency department. Pediatr Emerg Care. 2000;16:230.
36. Karapinar, B, Cura, A. Complications of central venous catheterization in critically ill children. Pediatr Int. 2007;49:593.
37. Ge, X, Cavallazzi, R, Li, C, et al. Central venous access sites for the prevention of thrombosis, stenosis and infection. Cochrane Database Syst Rev. 3, 2012. [CD004084].
38. Casado-Flores, J, Barja, J, Martino, R, et al. Complications of central venous catheterization in critically ill children. Crit Care Med. 2001;2:57.
39. Almuneef, MA, Memish, ZA, Balkhy, HH, et al. Rate, risk factors and outcomes of catheter-related bloodstream infection in a paediatric intensive care unit in Saudi Arabia. J Hosp Infect. 2006;62:207.
40. Lavelle, J, Costarino, AT. Central venous cannulation. In: King C, Heretig FM, eds. Textbook of Pediatric Emergency Procedures. 2nd ed. Philadelphia: Lippincott, Williams & Wilkins; 2007:247.
41. Verghese, ST, McGill, WA, Patel, RI, et al. Comparison of three techniques for internal jugular cannulation in infants. Pediatr Anaesth. 2000;10:505.
42. Verghese, ST, McGill, WA, Patel, RI, et al. Ultrasound-guided internal jugular venous cannulation in infants. Anesthesiology. 1999;91:71.
43. Hosokawa, K, Shime, N, Kato, Y, et al. A randomized trial of ultrasound image–based skin surface marking versus real-time ultrasound-guided internal jugular vein catheterization in infants. Anesthesiology. 2007;107:720.
44. Goutail-Flaud, MF, Sfez, M, Berg, A, et al. Central venous catheter–related complications in newborns and infants: a 587-case survey. J Pediatr Surg. 1991;26:645.
45. Rossetti, V, Thompson, BM, Aprahamian, C, et al. Difficulty and delay in intravascular access in pediatric arrests. Ann Emerg Med. 1984;13:406.
46. Brunette, DD, Fischer, R. Intravascular access in pediatric cardiac arrest. Am J Emerg Med. 1988;6:577.
47. Voigt, J, Waltzman, M, Lottenberg, L. Intraosseous vascular access for in-hospital emergency use: a systematic clinical review of the literature and analysis. Pediatr Emerg Care. 2012;28:185.
48. Niemann, JT, Stratton, SJ, Cruz, B, et al. Endotracheal drug administration during out-of-hospital resuscitation: where are the survivors? Resuscitation. 2002;53:153.
49. International Liaison Committee on Resuscitation. The International Liaison Committee on Resuscitation (ILCOR) consensus on science with treatment recommendations for pediatric and neonatal patients: pediatric basic and advanced life support. Pediatrics. 2006;117:e955.
50. Garro, AC, Linakis. Umbilical vessel cannulation. In: King C, Henretig FM, eds. Textbook of Pediatric Emergency Procedures. 2nd ed. Philadelphia: Lippincott, Williams & Wilkins; 2007:483.
51. Custer, JW. Umbilical artery and vein catheterization. In: Custer JW, Rau RE, eds. The Harriet Lane Handbook: A Manual for Pediatric House Officers. 18th ed. Philadelphia: Mosby; 2009:77.
52. Hogan, MJ. Neonatal vascular catheters and their complications. Radiol Clin North Am. 1999;37:1109.
53. Hermansen, MC, Hermansen, MG. Intravascular catheter complications in the neonatal intensive care unit. Clin Perinatol. 2005;32:141.
54. Barrington, K. Umbilical artery catheters in the newborn: effects of position of the catheter tip. Cochrane Database Syst Rev. 2, 2010. [CD000505].
55. Kahler, AC, Mirza, F. Alternative arterial catheterization site using the ulnar artery in critically ill pediatric patients. Pediatr Crit Care Med. 2002;3:370.
56. Dumond, AA, da Cruz, E, Almodovar, MC, et al. Femoral artery catheterization in neonates and infants. Pediatr Crit Care Med. 2012;13:39.
57. de Neef, M, Heijboer, H, van Woensel, JB, et al. The efficacy of heparinization in prolonging patency of arterial and central venous catheters in children: a randomized double-blind trial. Pediatr Hematol Oncol. 2002;19:553.
58. Pearse, RG. Percutaneous catheterization of the radial artery in newborn babies using transillumination. Arch Dis Child. 1978;53:549.
59. Schwemmer, U, Arzet, HA, Trautner, H, et al. Ultrasound-guided arterial cannulation in infants improves success rate. Eur J Anaesthesiol. 2006;23:476.
60. Shiver, S, Blaivas, M, Lyon, M. A prospective comparison of ultrasound-guided and blindly placed radial arterial catheters. Acad Emerg Med. 2006;13:1275.
61. Levin, PD, Sheinin, O, Gozal, Y. Use of ultrasound guidance in the insertion of radial artery catheters. Crit Care Med. 2003;31:481.
62. Yildirim, V, Ozal, E, Cosar, A, et al. Direct versus guidewire-assisted pediatric radial artery cannulation technique. J Cardiothorac Vasc Anesth. 2006;20:48.
63. Porter, SC, Fleisher, GR, Kohane, IS, et al. The value of parental report for diagnosis and management of dehydration in the emergency department. Ann Emerg Med. 2003;41:196–205.
64. Suh, J, Hahn, W, Cho, B. Recent advances of oral rehydration therapy. Electrolyte Blood Press. 2010;8(2):82–86.
65. Fonseca, BK, Holgate, A, Craig, JC. Enteral vs. intravenous rehydration therapy for children with gastroenteritis: a meta-analysis of randomized controlled trials. Arch Pediatr Adolesc Med. 2004;158:483–490.
66. DeCamp, LR, Byerley, JS, Doshi, N, et al. Use of antiemetic agents in acute gastroenteritis: a systematic review and meta-analysis. Arch Pediatr Adolesc Med. 2008;162:858–865.
67. Freedman, SB, Adler, M, Seshadri, R, et al. Oral ondansetron for gastroenteritis in a pediatric emergency department. N Engl J Med. 2006;354:1698–1705.
68. Sturm, JJ, Hirsh, DA, Schweickert, A, et al. Ondansetron use in the pediatric emergency department and effects on hospitalization and return rates: are we masking alternative diagnosis. Ann Emerg Med. 2010;55:415–422.
69. Metha, D, Santani, S, Whyte, SD. The effects of droperidol and ondansetron on dispersion of myocardial repolarization in children. Pediatr Anaesth. 2010;20:905–912.
70. American Academy of Pediatrics, Provisional Committee on Quality Improvement, Subcommittee on Acute Gastroenteritis. Practice parameter: the management of acute gastroenteritis in young children. Pediatrics. 1996;97:424–435.
71. Wathen, JE, MacKenzie, T, Bothner, JP. Usefulness of the serum electrolyte panel in the management of pediatric dehydration treated with intravenously administered fluids. Pediatrics. 2004;114:1227–1234.
72. Shaoul, R, Okev, N, Tamir, A, et al. Value of laboratory studies in assessment of dehydration in children. Ann Clin Biochem. 2004;41:192–196.
73. Arant, BS. Postnatal development of renal function during the first year of life. Pediatr Nephrol. 1987;1:308–313.
74. Freedman, SB, Parkin, PC, Willan, AR, et al. Rapid versus standard intravenous rehydration in paediatric gastroenteritis: pragmatic blinded randomized clinical trial. BMJ. 2011;343:d6976.
75. Nager, AL, Wang, VJ. Comparison of ultrarapid and rapid intravenous hydration in pediatric patients with dehydration. Am J Emerg Med. 2010;28:123–129.
76. Simpson, JN, Teach, SJ. Pediatric rapid fluid resuscitation. Curr Opin Pediatr. 2011;23:286–292.
77. Robroch, AH, van Heerde, M, Markhorst, DG. Should isotonic infusion solutions be routinely used in hospitalized paediatric patients? Arch Dis Child. 2011;96:608–610.
78. Alves, JT, Troster, EJ, de Oliveria, AC. Isotonic saline solution as maintenance intravenous fluid therapy to prevent acquired hyponatremia in hospitalized children. J Pediatr (Rio J). 2011;87:478–486.
79. Choong, K, Arora, S, Cheng, J, et al. Hypotonic versus isotonic maintenance fluids after surgery for children: a randomized controlled trial. Pediatrics. 2011;128:857–866.
80. Ngo, AS, Oh, JJ, Chen, Y, et al. Intraosseous vascular access in adults using the EZ-IO in an emergency department. Int J Emerg Med. 2009;2:155–160.
81. Children’s Hospital Los Angeles hospital policy II-6, approved 11-07.
82. Nager, AL, Wang, VJ. Comparison of nasogastric and intravenous methods of rehydration in pediatric patients with acute dehydration. Pediatrics. 2002;109:566–572.
83. Gremse, DA. Effectiveness of nasogastric rehydration in hospitalized children with acute diarrhea. J Pediatr Gastroenterol Nutr. 1995;21:145–148.
84. Mackenzie, A, Barnes, G. Randomized controlled trial comparing oral and intravenous rehydration therapy in children with diarrhea. BMJ. 1991;303:393–396.
85. Sharifi, J, Ghavami, F, Nowrouzi, Z. Oral vs. IV rehydration therapy in severe gastroenteritis. Arch Dis Child. 1985;60:856–860.
86. Green, SD. Treatment of moderate and severe dehydration by nasogastric drip. Trop Med. 1987;17:86–88.
87. Rouhani, S, Meloney, L, Ahn, R, et al. Alternative rehydration methods: a systematic review and lessons for resource-limited care. Pediatrics. 2011;127:e748–e757.
88. Powell, CV, Priestley, SJ, Young, S, et al. Randomized clinical trial of rapid versus 24-hour rehydration for children with acute gastroenteritis. Pediatrics. 2011;128:e771–e778.
89. Allen, CH, Etzwiler, LS, Miller, M, et al. Recombinant human hyaluronidase–enabled subcutaneous pediatric rehydration. Pediatrics. 2009;124:e858–e867.
90. Spandorfer, PR. Subcutaneous rehydration: updating a traditional technique. Pediatr Emerg Care. 2011;27:230–236.
91. Kuensting, LL. Subcutaneous infusion of fluid in children. J Emerg Nurs. 2011;37:346–349.
92. Lipshitz, S, Campbell, AJ, Roberts, MS. Subcutaneous fluid administration in elderly subjects: validation of an underused technique. J Am Geriatr Soc. 1991;39:6–9.
93. Lybarger, EH. Hypodermoclysis in the home and long term care settings. J Infus Nurs. 2009;32:40–44.
94. Fainsinger, RL, MacRachern, T, Miller, MK, et al. The use of hypodermoclysis for rehydration in terminally ill cancer patients. J Pain Symptom Manage. 1994;9:298–302.
95. King, CK, Glass, R, Bresee, JS, et al. Managing acute gastroenteritis among children: oral rehydration, maintenance, and nutritional therapy. MMWR Recomm Rep. 2003;52(RR-16):1–13.
[/level-membership-for-emergency-medicine-category][not-level-membership-for-emergency-medicine-category]Chapter 19
Pediatric Vascular Access and Blood Sampling Techniques
Obtaining vascular access and blood samples in an infant or child can challenge and frustrate even the most skilled emergency clinician. Vascular access can be especially challenging in children who are dehydrated or in shock. This chapter reviews the basic principles and techniques of blood sampling, as well as placement of peripheral and central intravenous (IV) and intraarterial catheters in infants and children, including the use of umbilical catheters in newborns. Also reviewed are hydration techniques for dehydrated children. For critically ill and injured children, intraosseous (IO) access is the preferred technique if peripheral vascular access cannot be secured rapidly (see Chapter 25). Though rarely required, emergency cutdown is occasionally lifesaving, and a section of this chapter is devoted to cutdown techniques.
Patient Preparation and Restraint
Fear and anticipation of pain associated with procedures or injections make the hospital experience traumatic for children. Before beginning any painful procedure in a child, explain the procedure to the parents, as well as the reasons that it needs to be done. For children capable of understanding, explain the procedure in developmentally appropriate language before starting and before each successive step. Avoid using deceptive phrases such as “this won’t hurt.” A gentle, honest explanation that the procedure will hurt a bit and a statement such as “it is okay to cry, but not to move” will provide realistic expectations for the child and set limits as well. Depending on the situation, most parents wish to remain with their child during the procedure.1 Others will not. The potential for parents to faint at the sight of blood or needles should always be addressed, and it is preferable that they sit down during the procedure. If present, the parent’s role should be to provide comfort to the child but not to assist in any potentially painful procedure. If possible, distract the child with simple conversation regarding school, friends, hobbies, pets, or TV shows to help decrease the child’s anxiety.
Anesthesia
Many products are available to decrease the pain associated with vascular access. Do not delay attempts at access in critically ill or injured children to use these medications or devices, but consider using them in stable patients. These medications and products are discussed in more detail in Chapter 29. Options include vapocoolants, topical anesthetics such as lidocaine-prilocaine (EMLA), 4% liposomal lidocaine (LMX-4), and injection of lidocaine via a needleless jet injector (J-tip). Orally administered sucrose solution (Sweet-Ease) has been demonstrated to decrease the pain response in young infants during procedures.2,3 Procedural sedation is commonly used during central venous and arterial cannulation in children (Chapter 33).
Blood Sampling Techniques
Indications and Contraindications
Capillary blood sampling is frequently used to obtain blood samples from young infants. In infants, the heel is the most common location for capillary blood sampling, whereas in older children and adults, blood samples are more commonly obtained from the finger, toe, or earlobe. This technique is useful when repeated measurements such as blood glucose or serial hemoglobin are needed. It is also an option for obtaining “arterialized” blood for blood gas analysis when arterial access is unavailable, such as in chronically ill neonates and young infants or when the clinician is not comfortable obtaining a percutaneous arterial blood sample. If a sufficient volume is obtained, blood from a capillary sample can also be sent for other routine laboratory studies. Do not send this type of specimen for blood culture because of the risk for contamination. Heel sticks are more painful than venipuncture but are useful in the event of difficult access or when arterialized samples are needed.4
Technique
The heel stick method of capillary blood sampling will be described, but capillary blood samples can also be obtained from a finger, toe, or earlobe (Fig. 19-1). To avoid penetration of the calcaneus and the risk for osteochondritis, puncture only the most medial and lateral portions of the plantar surface of the heel.5 Some research suggests that when using automated lancets, any site on the heel can be safely punctured in a term neonate.6 Prewarm the foot for 5 minutes to produce hyperemia and enhance blood flow. Immobilize the foot in a dependent position with one hand. First cleanse the heel with antiseptic solution and allow it to dry. Next, puncture the skin with the lancet. Allow the alcohol to dry to avoid false elevations in the glucose level. Avoid squeezing the foot because it may inhibit capillary filling and actually decrease the flow of blood. Furthermore, squeezing may lead to hemolysis and make analysis less accurate. If blood does not flow freely, another puncture may be required.
Venipuncture
Technique
As in adults, the usual site for venipuncture in infants and children is the antecubital fossa. However, any reasonably accessible or easily visible peripheral vein may be used, such as those on the hands, feet, or scalp for very small infants (Fig. 19-2). Veins on the dorsum of the hand can be used, provided that they will not be needed for IV cannulation. The external jugular and femoral veins or arterial sites are rarely needed for routine samples in a stable patient. Imaging devices (e.g., ultrasound, transillumination, or infrared devices) may also be used to locate and identify veins for IV catheter placement. These devices are discussed later in this chapter (see “Vascular Line Placement: Venous and Arterial”).
Cleanse the area surrounding the chosen site of skin penetration with antiseptic solution and allow it to dry. Apply slight distal traction to the skin to immobilize the vein. Insert the needle quickly through the skin and advance it slowly into the vein at an angle of approximately 30 degrees with the bevel facing up (Fig. 19-3, step 1). Successful vessel penetration is heralded by a flashback, or flow, of blood into the butterfly tubing. Apply gentle suction by slowly withdrawing the plunger of the syringe. If the required amount of blood is greater than the capacity of the attached syringe, pinch off the tubing, remove the filled syringe, attach a new syringe, and apply gentle suction again after releasing the pinched tubing. After the required amount of blood is withdrawn, remove the needle and apply a sterile dressing and direct pressure to the puncture site.
Figure 19-3 Antecubital venipuncture.
Apply suction with a Vacutainer system in which the needle punctures the sealed end of the butterfly device (see Fig. 19-3, step 2). There are also butterfly systems available with a second needle that is occluded by a rubber shield located at the opposite end of the butterfly tubing. Once the vein has been entered, the needle at the opposite end of the butterfly tubing is pushed through the top of the vacuum-sealed tube. In either case, if the suction is excessive, the vein will collapse and blood flow will stop.
Although peripheral sites for venous blood sampling are preferable in infants, the external jugular and femoral veins may also be used for venipuncture during resuscitation or when peripheral sites are inadequate. The external jugular vein lies in a line from the angle of the jaw to the middle of the clavicle and is usually visible on the surface of the skin (Fig. 19-4). When the infant is crying, this vein is more prominent. Ask an assistant to restrain the infant in a supine position with the head and neck extended over the edge of the bed. Alternatively, place a towel roll or pillow under the child’s shoulders. Turn the head approximately 40 to 70 degrees from the midline. Cleanse the skin surrounding the area to be punctured with alcohol or another antiseptic solution. Apply finger pressure just above the clavicle to help distend the jugular vein. Use a 21- to 25-gauge straight needle or a 21- to 25-gauge butterfly needle attached to a syringe. Puncture the skin and then advance the needle slowly until the jugular vein is entered and a flashback of blood is observed. Keep the syringe connected to the needle at all times to maintain constant negative pressure and avoid air embolism. After the appropriate amount of blood is obtained, withdraw the needle and apply slight pressure to the vessel. Place the infant in an upright position after the needle is removed, and hold pressure over the puncture site for 3 to 5 minutes. Observe the puncture site closely afterward to identify persistent bleeding.
In most patients, the femoral vein lies medial to the femoral artery and inferior to the inguinal ligament (Fig. 19-5A). Ask an assistant to position the patient’s hips in mild abduction and extension while you palpate the artery. Identify its location by placing a mark on the skin just superior to the femoral triangle. If available, use ultrasound to assess the position of the femoral vessels. Prepare the femoral triangle with alcohol or another antiseptic agent. Use a povidone-iodine or chlorhexidine scrub when obtaining blood for culture. Use a technique of needle insertion that is similar to that for external jugular venipuncture (see Fig. 19-4). Puncture the skin and then direct the needle or catheter toward the umbilicus at a 30- to 45-degree angle to the skin and just medial to the pulsation of the femoral artery (see Fig. 19-5B). Apply slight negative pressure constantly throughout insertion. After the needle enters the femoral vein, withdraw the desired blood samples. Afterward, remove the needle or catheter unless an IV catheter for venous access is desired in this location. Apply pressure over the puncture site in the femoral triangle for a minimum of 5 minutes. Observe closely for recurrent bleeding.
Figure 19-5 Femoral venipuncture. A, Anatomy. B, Technique.
Scalp veins can be very useful for venous sampling in small infants when other options are not possible or readily available.10 The anatomic considerations and technique are discussed later (see “Peripheral Venous Catheterization: Percutaneous” and “Peripheral Venous Catheterization: Venous Cutdown”).
Arterial Blood Sampling
Indications and Contraindications
The radial artery has several advantages that make it the most commonly used artery for blood sampling. First, its location makes it easy to palpate and puncture (Fig. 19-6A). The ulnar artery is more difficult to locate. Second, no vein or nerve is immediately adjacent to the radial artery, which minimizes the risk of obtaining venous blood or damaging a nerve. Another advantage of the radial artery is the presence of good collateral circulation from the ulnar artery. The brachial artery has little collateral circulation and should be avoided unless no other options are available.11 Limit use of the ulnar artery to preserve collateral circulation to the hand. As a general rule, do not use the femoral artery for obtaining routine blood samples.
Technique
The radial artery is the one most frequently used vessels to obtain intermittent arterial samples, so the technique for arterial puncture at this site will be described. (See also Chapter 20 for a discussion of the Allen test and the effect of heparin on arterial blood sampling.)
Hold the infant’s wrist and hand in your nondominant hand (see Fig. 19-6B). Hold the hand fully supinated with the wrist slightly extended (i.e., dorsiflexed). Palpate the arterial pulsation just proximal to the transverse wrist creases. Do not overextend the wrist because this can cause loss of the arterial pulse during palpation. Make a small indentation in the skin with a fingernail to mark the insertion site. Cleanse the area with antiseptic and allow the skin to dry. The topical anesthetic options discussed previously may be used if the clinical situation permits. Penetrate the skin at a 30- to 45-degree angle. While the plunger of the syringe is gently withdrawn by an assistant, advance the needle slowly until the radial artery is punctured or resistance (bone) is met (Fig. 19-7). In contrast to performing the procedure in adults, provide continuous, but gentle suction with the plunger of the syringe in infants. Pulsating or rapidly flowing blood that appears in the hub of the needle is a good indication that the radial artery has been punctured. Some clinicians prefer to attach the syringe to the butterfly needle only after blood return is noted. Suction can be applied afterward.
Complications
Complications of radial artery puncture include infection, hematoma formation, arterial spasm, tendon injury, and nerve damage.12,13 With proper technique, however, the complication rate is extremely low. If the infant starts to cry before blood is obtained, the Po2 and Pco2 values may not reflect the infant’s true steady state.
Vascular Line Placement: Venous and Arterial
Peripheral Venous Catheterization: Percutaneous
Equipment and Setup (Box 19-4)
Box 19-4 Equipment for Peripheral Intravenous Insertion in Infants and Children
Tourniquet (rubber band for infants)
Alcohol pads or povidone-iodine swabs (for blood culture)
22- or 24-gauge venous catheters
Intravenous solution, connector extension set, and microdrip tubing set
Pretorn tape (, 1, and 2 inches)
T-extension set and protective covering such as a prefabricated cup (optional)
Vein Imaging Devices
A variety of imaging modalities, including ultrasound, transillumination, and infrared technologies, have been used to help locate peripheral veins for cannulation. In adults there are data supporting the use of ultrasound to facilitate peripheral vein cannulation in those with difficult access.14,15 However, the use of ultrasound to aid in the placement of peripheral IV lines in pediatric patients is not common practice. One recently published study demonstrated that ultrasound could be used to detect peripheral veins in young children that were not “clinically apparent” (nonvisible and nonpalpable).16 The study also found that lack of ultrasound visualization increased the chance of unsuccessful placement.16 Other small studies have shown mixed results, and further research is needed.17–19
Some emergency departments (EDs) use transillumination devices commonly found in neonatal intensive care units to assist in finding veins in infants.20,21 The Venoscope II (Venoscope LLC, Lafayatte, LA) and the Neonatal Transilluminator (Graykon Scientific, Victoria, Australia) are two such devices that work by projecting a high-intensity light into the patient’s subcutaneous tissue. The light causes the veins to contrast with the surrounding tissue, which makes them easier to locate.22
A newer vein imaging technology, VeinViewer (Luminetx Corp., Memphis, TN) uses near-infrared technology to project an enhanced image of the subcutaneous veins onto the patient’s skin. Theoretically, knowledge of the location of the venous valves and the course of the vessel can assist the clinician in selecting the best area to be cannulated.23 Early small studies have not demonstrated improved overall success rates in obtaining IV access, but the technology may be useful in patients with difficult IV access.24–26
Technique
A number of IV sites are available for placement of a peripheral IV line in an infant (see Fig. 19-2). The most common sites chosen for IV insertion in infants and children are the superficial veins of the dorsum of the hand, the antecubital fossa, the dorsum of the foot, and the scalp (in newborns and small infants). The veins of the dorsum of the hand are the vessels most frequently used. Because these veins are relatively straight and lie flat on the metacarpals, they are easily stabilized. If the hand is chosen, take the child’s age and hand preference into consideration. Avoid placing an IV line in a hand used for thumb sucking whenever possible. Veins in the antecubital fossa (cephalic and basilic veins) are easily accessible; however, the angulation across the fossa makes advancement of the catheter difficult. These veins may not be easily visible and yet may be palpable. Select the most distal vein that is large enough to accommodate the catheter and leave the larger, more proximal veins in case the initial attempts are unsuccessful or if prolonged IV therapy is needed and percutaneous central venous catheter placement (e.g., a peripherally inserted central catheter line) is being contemplated. Tributaries of the dorsal venous arch on the dorsum of the foot, like those on the dorsum of the hand, are relatively straight, and the extremity is easily immobilized after insertion. Because indwelling catheters in this location prevent mobility, consider using this site only in preambulatory patients or after attempts at other sites have been unsuccessful. The scalp veins are easy to cannulate, but their use is primarily limited to very small infants. If a peripheral vein on the hands, feet, or antecubital fossa is being used, immobilize the extremity first by taping it to an arm board, a padded splint, or a commercially available immobilization device. The particular site is a matter of preference, so choose the vein that appears to be the easiest to cannulate.
With few exceptions, the same techniques used for IV insertion in adults may be used in infants and children, especially in the veins of the distal ends of the extremities. If the peripheral end of an extremity is used, place a tourniquet proximal to the planned site of entry. Warm the extremity to induce vasodilation in the surface veins, which makes them easier to cannulate. Flush the tubing of the T-extension set before venipuncture with a sterile IV solution, such as normal saline (NS), to prevent air embolism. Direct the IV catheter through the skin at a 10- to 20-degree angle and slowly advance it until blood return is noted (Fig. 19-8, step 1). Next, advance the catheter over the needle and into the vein. Retract the needle and connect the IV line to the hub of the catheter by means of a T-extension set (see Fig. 19-8, step 2). After 1 mL of saline has been flushed through the line, inspect the site for signs of infiltration, such as hematoma or local swelling.
Figure 19-8 Pediatric peripheral intravenous catheterization. (See Figure 21-6 for additional details on proper intravenous technique.)
Fix the catheter to the skin with a 0.5-inch piece of tape passed over the catheter hub and skin. Place a second piece of tape adhesive side up and slip it under the catheter hub. Cross it over the catheter hub in a V shape (Fig. 19-8, step 2). After securing the catheter with tape, cover the entire area with a transparent sterile dressing such as Tegaderm (3M, St. Paul, MN) or OP Site (Smith and Nephew Medical, Massillon, OH). Loop back the tubing of the T-extension set, place a piece of tape midway over the tubing, and secure it to the skin. This ensures that the IV tubing will not be accidentally dislodged if is suddenly pulled. Securely tape the hand and forearm to an arm board for immobilization (see Fig. 19-8, step 3). Occasionally, the flow rate of the infusion may depend on the position of the catheter, especially if the catheter spans a joint or the tip abuts a venous valve. Adjust the hand position or catheter with strategically placed sterile gauze or withdraw the catheter slightly to remedy the problem.
If the scalp veins are used, trim the hair in the surrounding area to expose the vessels. To differentiate between arteries and veins on the scalp, arteries are usually more tortuous than veins.10 If an artery is entered during placement of the needle and fluid is infused, blanching will occur in the area. If this happens, remove the IV catheter, maintain slight pressure for 5 minutes, and repeat the procedure at another site. A rubber band may be used as a tourniquet around the scalp to produce venous dilation, but it is rarely required. Place a piece of tape on the rubber band before placement on the scalp to facilitate lifting the rubber band away from the scalp.
If a scalp vein butterfly infusion set is used, grasp the wings of the butterfly between the thumb and forefinger and introduce the needle beneath the skin approximately 0.5 cm distal to the anticipated site of vein entrance (Fig. 19-9, step 1). Advance the needle slowly toward the vessel until blood appears in the tubing, which indicates that the vessel has been entered. Next, remove the tourniquet. Flush the needle with 0.5 to 2 mL of IV fluid, such as NS, to ensure that the needle is properly in place within the vein. If infiltration occurs, as noted by a subcutaneous bump, remove the IV line and repeat the process at another site.
Figure 19-9 Scalp vein intravenous catheterization.
After the wings are secured, tape the tubing of the butterfly set in a loop on the scalp so that it is not pulled inadvertently. Place a wisp of cotton under the wings of the butterfly if the flow rate of the infusion is affected by the position of the catheter. Tape a small medication cup over the wings and the needle to protect the IV line (see Fig. 19-9, step 2). Connect the tubing of the butterfly set to the tubing from the IV system. It is generally preferable to use standard over-the-needle IV catheters whenever possible, whether for extremity or scalp IV lines, because they are less likely to infiltrate and will last longer. However, a small butterfly needle that can be inserted temporarily until additional access is possible is sometimes the only option short of IO access.
External Jugular Venous Catheterization: The external jugular vein is superficial and easily visible. It can be used when other attempts at peripheral IV access have been unsuccessful. The external jugular vein is undesirable as a primary catheterization site during resuscitative efforts because manipulation of the head and neck may compromise management of the airway. Moreover, it is not a suitable site for central venous catheterization because of the acute angle of entry of the external jugular vein into the subclavian vein.27
Technique.: Because central venous access is not the goal of this approach, the external jugular vein is most often entered with a standard over-the-needle IV catheter. The external jugular vein lies in a line from the angle of the jaw to the middle of the clavicle and is usually visible on the surface of the skin. The vein is more prominent when the child is crying. Ask an assistant to restrain the patient in a supine position with the head and neck extended over the edge of the bed. Alternatively, place a towel roll or pillow under the shoulders. Turn the head approximately 40 to 70 degrees from the midline (see Fig. 19-4). Cleanse the skin surrounding the area to be punctured with alcohol (or another antiseptic solution). Cover the area with a sterile drape, and infiltrate 1% lidocaine into the skin. Place a finger just above the clavicle to distend the jugular vein.
Peripheral Venous Catheterization: Venous Cutdown
Indications and Contraindications
With the development of small IV catheters and the rapidity and safety of IO needle placement for emergency access (Chapter 25), peripheral venous cutdown is rarely performed in the ED. Even in experienced hands a saphenous vein cutdown may take more than 10 minutes and is associated with a higher rate of infection than other routes of vascular access are.28 Nevertheless, if peripheral venous, central venous, or IO access cannot be obtained, venous cutdown may provide an alternative means of emergency venous access. For the purpose of illustration, exposure and cannulation of the saphenous vein will be discussed (Fig. 19-10). The same principles apply when cutdown is performed on most peripheral veins.
