Paediatric surgery
GENERAL CONSIDERATIONS IN PAEDIATRIC SURGERY
INTRODUCTION
1. In many countries the general surgery of children from birth to early teenage years is the preserve of specialist paediatric surgeons. As these surgeons work in centres with paediatric anaesthetic care and paediatric nursing, together with a wide spectrum of paediatric medical expertise, a high level of specialist care is possible.
2. This model of care is not, however, universally available and in exceptional circumstances, in all countries, an adult general surgeon will be called upon to act. Because of unfamiliarity, general surgical junior and senior staff may be intimidated when faced with a young child with a significant surgical problem. There is justifiable concern about the evaluation of a sick child, assessment of respiratory and cardiovascular status and, of course, consideration of an unfamiliar range of potential diagnoses.
3. Attending paediatricians may be accustomed to dealing with sick children but are not usually familiar with the details of surgical disease, nor the likely effects of intervention on the child’s physiology. Although young children and adults differ in their response to surgery, the impact of surgical disease or a surgical procedure are broadly similar and predictable in all age groups.
4. Your assessment of the child prior to and following operation is critical to success.
ASSESSMENT OF THE ‘SURGICAL’ CHILD
1. Assessing a 3-day-old infant is clearly different from assessing a 12-year-old child. Nonetheless, certain features of acute surgical diseases are common throughout the paediatric age group.
2. Assess the child’s general demeanour, respiratory rate, level of activity and response to intervention. They all give an initial impression of severity of illness.
3. First assess the cardiovascular status. Ensure the peripheries are warm with palpable peripheral pulses. If you cannot palpate the radial, ankle or foot pulses, impairment of the circulation is likely and needs volume replacement. Give this either as colloid – human albumin or gelatin solution, or as crystalloid – normal (0.9%) saline or Ringer’s lactate. Give 20 ml/kilogram rapidly (<1 hour), repeated two or three times depending on the response. Confirm restoration of circulatory volume by detecting an improved pulse volume or a falling pulse rate. Institute more invasive intravascular monitoring if there is a failure to respond to two such boluses.
4. Examine the abdomen in the standard manner – each quadrant in turn. Palpate gently only in children. Do not perform deep palpation – it is unhelpful. Never seek to test for rebound tenderness; this is quite unreliable. Be patient but persistent when dealing with anxious young children.
5. Digital rectal examination is, for the most part, quite useless. Reserve it usually for those in whom you suspect an anorectal abnormality. In this case have it performed only once by the most senior person available. You rarely gain useful or important information by this manoeuvre.
6. Opinions vary on the usefulness of listening to bowel sounds. We remain convinced that auscultation consistently yields useful information on what is happening within.
7. It is impossible to stop nurses and paediatricians from measuring abdominal girth. We have never seen a patient of any age in whom this information was useful.
ASSESSMENT OF THE ‘SURGICAL’ NEWBORN
1. Respiratory distress or cyanosis at birth in a full term infant may be a consequence of congenital diaphragmatic hernia or oesophageal atresia. Order a chest X-ray as an aid to diagnosis. Diagnose choanal atresia (Greek: choane = funnel; funnel-shaped narrowing of the posterior nares) by your inability to pass a nasogastric tube beyond the nasopharynx.
2. Consider bile-stained (green) vomiting to be the result of mechanical intestinal obstruction until proven otherwise. Always order an abdominal X-ray and carry out a surgical evaluation.
3. Consider abdominal distension as pathological, particularly if it is associated with bile vomiting or a failure to pass meconium (the dark green faeces passed by neonates).
4. All but 3% of full-term infants pass meconium in the first 24 hours. Carefully inspect the perineum if meconium does not appear within this period. If you see a normally sited anus, gently insert a little finger to confirm patency – one of the few indications for this intervention.
5. Failure to pass urine in the first 24 hours is always abnormal. In a male infant, the presence of an associated distended bladder indicates the presence of urethral obstruction, most commonly caused by posterior urethral valves.
6. The majority of abdominal masses in the newborn are renal in origin. Almost all are benign.
7. The passage of blood per rectum is always significant. When the bleeding occurs on the first day of life test the blood to see whether it is fetal or maternal in origin. Subsequent bleeding is almost always from the baby and indicates the presence of intestinal disease.
PRE-NATAL DIAGNOSIS
1. Routine ultrasound examination of the fetus is part of antenatal care. This results in detection of a wide variety of structural abnormalities, often in the first trimester.
2. Detection of an abnormality early in the pregnancy may affect the subsequent management of the pregnancy or the timing and mode of delivery: detection of a lethal abnormality such as anencephaly (Greek: an = no + encephalos = brain) or bilateral renal agenesis raises the question of termination.
3. If you detect an abnormality which can be successfully treated postnatally (e.g. unilateral hydronephrosis) it changes neither the timing nor mode of delivery. Elective caesarean is the likely mode of delivery in the presence of a sacro-coccygeal teratoma or a large exomphalos (Greek: ek = out + omphalos = navel). Occasionally, subsequent scanning reveals not only the persistent abnormality but also deterioration in the condition of the fetus. This is particularly true with chest masses, such as cystic adenomatoid malformations of the lung, where progressive enlargement may result in venous obstruction, and hydrops fetalis (severe oedema of the fetus). Under these circumstances, premature delivery may be the only option available to try to save the baby.
NEONATAL TRANSPORT
1. With appropriate support, newborn infants can be safely transferred over very long distances.
2. You require transport incubators with facilities to monitor heart rate, body temperature and provide mechanical ventilation.
3. You also need facilities to allow endotracheal intubation, insertion of a chest drain and vascular access.
4. For general surgical transfer, insert an 8 or 10Fr nasogastric tube and leave on free drainage.
5. Ensure that a signed consent form for operation accompanies the baby, together with details of the pregnancy, delivery and postnatal course.
6. Finally, send 10 ml of the mother’s blood with the baby to facilitate cross-matching.
7. If the baby is significantly compromised, as a general rule undertake resuscitation prior to transfer. Only exceptionally should the baby be transferred with ongoing intensive resuscitation.

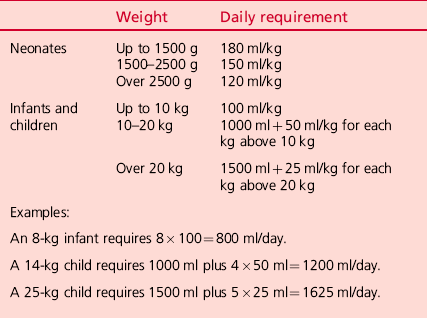
INTRAVENOUS FLUIDS – THE STANDARD MAINTENANCE
1. The standard maintenance intravenous fluid available in the UK is 0.45% saline in 5% dextrose. This is adequate for most children, although premature infants may need the dextrose level to be raised to 10%.
2. In the newborn, you may use the umbilical vein but prefer peripherally sited cannulae.
3. Replace fluid losses – nasogastric aspirate or vomiting – using 0.9% saline with 20 mmol of potassium chloride per litre.
The standard daily requirements are shown in Table 34.1.
Postoperative fluid requirement
1. In the initial 48 hours after operation, give one half of maintenance requirements.
2. On the third and fourth days, give two-thirds of maintenance requirements and full maintenance fluids from the fifth day onwards.
3. After major surgery there are substantial hidden losses within the tissues and the peritoneal cavity. Assess and replace these losses. Standard replacement fluids for this purpose include normal saline, Ringer’s lactate solution, human albumin or gelatin solutions.
4. Assess the need for such additional fluid on the basis of heart rate, pulse volume, peripheral temperature and urine output. In general, give one or two boluses of 20 ml/kilogram in the first 12–18 hours after major surgery. Calculate such losses and replacement separately from the maintenance fluid which is given in the manner noted above. Calculate nasogastric losses separately and replace them ml for ml.
GENERAL PAEDIATRIC SURGICAL TECHNIQUES
THE ABDOMINAL OPERATION IN INFANTS AND CHILDREN
Prepare
1. Cross-match 1 unit of fresh packed cells.
2. Administer vitamin K, phytomenadione 1 mg intramuscularly, if this was omitted in the immediate postnatal period.
3. Check the blood glucose using Dextrostix. Correct hypoglycaemia by giving 10% glucose intravenously.
4. Correct any fluid and acid–base imbalance (most acid–base imbalances will self-correct with adequate resuscitation).
5. In all emergencies, keep the stomach empty through a large (8FG) nasogastric tube.
6. Ensure good intravenous access through a cannula conveniently sited for the anaesthetist.
7. Use ECG, pulse, blood pressure and oxygen saturation monitors. Monitors for measuring partial pressures of oxygen and carbon dioxide in inspired and expired gases are also available.
8. For very sick infants, continuously record blood pressure through a transduced intra-arterial cannula, which also facilitates intermittent blood gas analysis and assessments of serum electrolyte and haemoglobin concentrations.
9. Use a central venous cannula when blood loss is expected to be massive or when peripheral venous access is limited, but measurements of central venous pressure are of limited value in this age group.
10. Keep the infant normothermic. Radiant heat losses, especially from the head, must be limited by wrapping the head and swaddling the infant in warm gamgee. A thermostatically controlled warm air blanket should be placed below the patient. The ambient temperature of the theatre should be kept at 26°C with doors closed to prevent draughts.


Access
1. Place the prepared infant supine on the operating table.
2. Make an adequate, transverse skin incision, 1–2 cm above the umbilicus, with a scalpel.
3. Divide the subcutaneous fat and fascia with cutting diathermy to limit blood loss.
4. Similarly, divide the anterior sheath of the left and right rectus abdominus muscles and then divide the muscle bellies.
5. Coagulate the superior epigastric vessels on the deeper surface of each rectus abdominus muscle.
6. Divide the posterior sheath and fascia down to the peritoneum.
7. Open the peritoneum on either side of the midline.
8. Identify, clamp and divide the relatively large umbilical vein. Ligate both ends of the vein with 4/0 polyglycolic acid ties.
9. After assessment, the incision may be readily extended, using cutting diathermy, into the oblique muscles of the abdominal wall at either or both ends.
Closure
1. It is unnecessary to close the peritoneum separately.
2. Close the muscles and fascia en masse with either continuous or interrupted sutures of 3/0 or 4/0 polyglactin, polyglycolic acid or polydioxanone.
3. Close the skin with a continuous subcuticular 4/0 or 5/0 suture.
4. Do not use tension sutures or through-and-through skin sutures because the cosmetic results are unacceptable.
LAPAROSCOPY IN INFANTS AND CHILDREN
Preoperative preparations (in addition to those for laparotomy)
1. Inform your anaesthetist of your intention to perform the case laparoscopically.
2. Check that the camera and light source are working correctly.
3. Check that you have an adequate supply of insufflation gas and that your insufflator is working correctly. Select your maximum intra-abdominal pressure (start with 6–8 mmHg in an infant and 8–10 mmHg in an older child). Select a low initial flow rate 0.2 L/min in an infant, 0.5 L/min in an older child.
4. Ensure that equipment and access ports of the correct size are available to you. Use 3 mm equipment for infants and 5 mm for older children. Laparoscopy in infants (e.g. inguinal hernia repair, pyloromyotomy) may be performed without access ports, passing the instruments directly through the thin abdominal wall. Occasionally a larger access port (10 or 12 mm) will be required to remove an operative specimen (e.g. appendicectomy, cholecystectomy).
5. Ensure that a full set of open operating equipment is ready in the event that conversion is required.
Access
1. Make a short transverse incision using a scalpel in the upper margin of the umbilicus long enough for the intended access port.
2. Divide the subcutaneous fat with scissors down to the linea alba.
3. Clear a short (approximately 1 cm long) section of the linea alba so that you can see it clearly. Pick up the linea alba with two artery forceps, one just above the umbilicus, the other 1 cm cranial to this.
4. Incise the linea alba transversely between the artery forceps with a knife, taking care not to incise the underlying peritoneum or umbilical vein.
5. Pick up the peritoneum with two pairs of toothed forceps, ensuring that you have not picked up bowel or omentum, and incise it with a scalpel.
6. At this stage insert a 3/0 (infant) or 2/0 (older child) polyglycolic acid suture in a purse-string around the edges of the muscular layer. A suture mounted on a ‘J’ shaped needle is preferable for this. Inserting the suture at this stage improves the seal and security of the access port.
7. Insert the access port mounted with a blunt trocar.
8. Tighten the purse-string suture around the access port, place one throw of a knot on the suture and use the long end of the suture to secure the access port in the wound.
9. Attach the gas tubing to the access port and begin insufflation. Ensure that a pneumo-peritoneum is developing by abdominal examination. There should be free flow of gas into the peritoneal cavity up to the pre-set insufflation pressure. If a pneumo-peritoneum is not developing or if the flow of gas is not free then cease insufflation, check that the access port is correctly located in the peritoneal cavity and restart.
10. Perform a laparoscopic examination of the abdominal cavity to confirm the preoperative diagnosis and identify optimal sites for working port insertion. As a general rule, these should be on either side of the camera with an adequate angle between them to allow easy vision and comfortable dissection.
11. Insert the working ports under direct vision. Make a short transverse skin incision with a scalpel. Insert a port mounted with a cutting trocar and advance it into the peritoneal cavity using a back and forth screwing type movement. Watch carefully via the laparoscope to avoid damage to abdominal viscera. Once the port is within the abdominal cavity, remove the trochar and insert a working instrument.
Closure
1. Remove all working instruments and working ports. Approximate the muscle edges using a 4/0 or 5/0 polyglycolic acid suture. Observe the inside of the incision through the laparoscope to ensure adequate closure and avoid damage to viscera with the needle.
2. Once working ports are closed, cease insufflation, remove the laparoscope and primary port and allow gas to escape.
3. Undo the single throw on the purse-string suture and tighten the suture, approximating the edges of the wound. Tie the suture, ensuring that the defect is completely closed with no viscera (especially omentum) extruding.
4. Close the subcutaneous tissue with a 4/0 polyglycolic acid suture.
INTESTINAL ANASTOMOSIS (Fig. 34.1)
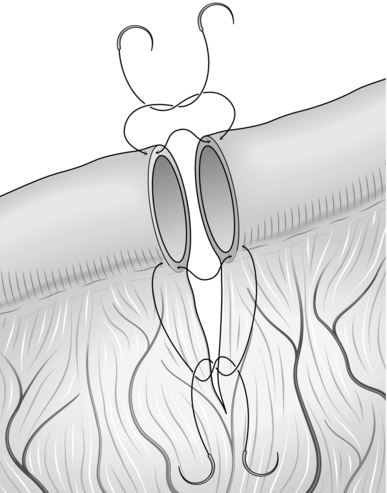
Fig. 34.1 Intestinal anastomosis.
Prepare
1. An anastomosis may be created between two intestinal ends following resection so long as there is a healthy blood supply. Discrepancy in the size of the two ends is not a contraindication to anastomosis. However, in case of doubt it is often safer to fashion a stoma.
2. Identify the ends to be anastomosed, ensuring their orientation is correct.
3. Trim each end so that the margin is straight and clean. Clear the mesentery from the serosal surface of the bowel for a few millimetres from the cut edge to create a clean margin for anastomosis, ensuring that you do not impair the blood supply.
4. Take an appropriately sized monofilament suture – 4/0 in a child, 4/0 to 6/0 in an infant.
Action
1. Starting on the mesenteric border, place a single extramucosal, seromuscular suture approximating the two edges. Place this suture adjacent to the mesentery, taking care not to damage the vessels. Leave the end of this suture long and grasp it with artery forceps to aid manipulation.
2. Place an additional single interrupted suture on either side of, but close to the first suture.
3. Place a single suture approximating the edges on the ante-mesenteric border. Leave the end long and grasp it with artery forceps.
4. Using the artery forceps to lay the anastomosis out in front of you, complete the anterior wall of the anastomosis using a single layer of interrupted extramucosal sutures. Ensure that they are adequately spaced to make a water-tight anastomosis, but not so tight as to cause ischaemia. If there is a discrepancy in size between the two ends you will need to leave a wider space between each suture on the wider end of bowel than the other.
5. Use the artery forceps to turn the bowel over, laying out the posterior wall in front of you. Complete the anastomosis as for the first side.
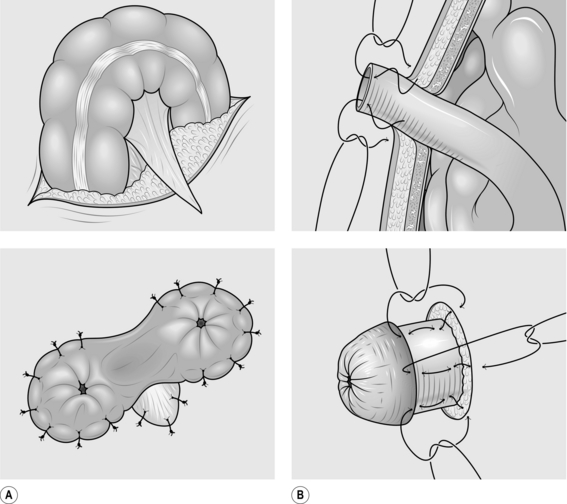
STOMA FORMATION
1. An ileostomy or colostomy may be required in a number of scenarios whenever it is desirable or essential to divert the faecal stream. The loop colostomy is one of the most commonly used stomas in paediatric surgery and is suitable in the infant with obstruction such as Hirschsprung’s disease or anorectal malformations, as well as some conditions in older children. End stomas may be created in small or large intestine.
2. When creating an ileostomy it is prudent to evert a section of the bowel to create a luminal orifice away from the skin so as to protect the skin from effluent. We describe the techniques of loop colostomy and end ileostomy. Prescribe preoperative antibiotics giving anaerobic cover.
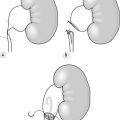
LOOP COLOSTOMY (Fig. 34.2)
Action
1. Make a V-shaped incision, either in the left iliac fossa for a sigmoid colostomy, or in the right hypochondrium for a transverse colostomy. The latter colostomy has the advantage of leaving sufficient distal colon for secondary surgery to be performed in conditions requiring mobilization of the distal colon.
2. Carry the V incision through skin and subcutaneous tissue.
3. Raise the flap of the V, exposing the underlying muscle.
4. In an older child you may need to extend the incision in the skin and subcutaneous layer to allow adequate room for passage of the colon. Turn a V-shaped incision into a W (see Fig. 34.2).
5. Split the muscle transversely, perpendicular to the V incision.
6. Open the peritoneum in the same direction as the muscle.
7. Locate the part of the intestine that will form the colostomy. Remember that the sigmoid loop may be greatly dilated and may appear in the right upper quadrant where it is easily confused with the transverse colon. The lack of an attached omentum serves to differentiate it from the transverse colon.
8. Ensure that the bowel is not twisted as it is drawn to the surface. Twisting may produce intestinal obstruction.
9. Make a small opening in the colonic mesentery.
10. Pass the apex of the V skin flap through the mesenteric defect and suture it to its original position with two or three loosely tied 4/0 polydioxanone sutures.
11. Incise the colon longitudinally with cutting diathermy.
12. Suture the full thickness of the opened colon to the surrounding skin with interrupted 4/0 polyglycolic acid sutures.
Aftercare
1. Consider the continuing need for antibiotics and the duration of postoperative starvation. In general terms, the child can take oral fluids and then a light diet once the stoma begins to function. At this point place a stoma bag.
2. This technique may also be used to form a loop ileostomy. In this case you should attempt to evert the proximal limb using the technique described below for terminal ileostomy.
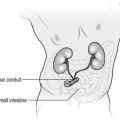
TERMINAL ILEOSTOMY
Prepare
1. Identify a suitable location on the abdominal wall for the stoma. This should be on flat skin, with a wide enough margin for application of a stoma bag.
2. Consider where you will place the mucous fistula to the distal bowel. Ideally this should be beside the functioning stoma in order to facilitate eventual stoma closure.
3. Ensure that the bowel end is healthy with an adequate blood supply and that the mesentery is long enough for the cut end to reach the anterior abdominal wall.
Action
1. Excision of a disc of skin is not usually necessary: a simple transverse incision is usually satisfactory.
2. Carry the incision through the subcutaneous tissue and split the muscle. Ensure that the peritoneum is divided adequately to avoid obstruction of the intestine.
3. Place grasping forceps through the incision and grasp the end of the bowel to be made into a stoma. Pull the bowel through, ensuring that it does not become twisted and that the entire thickness of the bowel wall passes through the opening.
4. Draw the bowel out of the wound and suture the peritoneum or deep muscular fascia to the serosa, leaving an adequate length to form a mature everted stoma.
5. Place a suture through the skin, through the adjacent serosa, then take a full-thickness bite of the cut end of the bowel and tie the knot snug with the skin, everting the bowel. Repeat this circumferentially using 4 or 6 sutures to form a spout.
6. This technique may also be used to form a terminal colostomy. In this case you do not need to evert the bowel forming a spout, but can simply suture the bowel flush with the skin edge.
Complications
1. Stenosis, which may cause partial or even complete obstruction and require dilatation or revision of the stoma.
2. Prolapse usually involves the distal limb of a loop stoma. An attempt at reduction should be made, but this is sometimes difficult and revision may be necessary. A small degree of uncomplicated prolapse is well tolerated and is best left alone.
CONDITIONS PRESENTING MAINLY IN THE NEWBORN OR NEONATAL PERIOD
NEONATAL INTESTINAL OBSTRUCTION
Appraise
1. Proximal small-bowel obstruction is usually associated with bile-stained vomiting, a failure to pass meconium and an absence of abdominal distension. Mid-small-bowel obstruction or distal intestinal obstruction is usually associated with abdominal distension from early in life and subsequently with bile-stained vomiting. Frequently, there is a failure to pass meconium.
2. Abdominal X-ray confirms whether the obstruction is high or low, depending on the number of gas-filled loops seen on the X-ray film. If the anus is present, perform a digital examination to confirm that the anus is patent and also to see if the baby subsequently passes flatus and stool. Obviously, in the presence of intestinal atresia or meconium ileus, no flatus will be passed but the reverse is true in the presence of Hirschsprung’s disease, when explosive decompression may occur.
3. Ideally, prefer to transfer the child to a regional centre, but if this is not possible, then perform a laparotomy without undue delay.
4. Do not hesitate to decompress the upper gastrointestinal tract by passing a nasogastric tube and administer intravenous fluids.
5. Administer broad-spectrum antibiotics, including cover for gram-negative organisms and anaerobic organisms.
Action
The procedure performed depends on the operative findings:
1. If duodenal atresia is encountered, tack together the two duodenal segments with three or four seromuscular sutures. Then open the two segments with parallel incisions and complete an anastomosis.
2. For jejunal atresia, the best option is an end-to-end anastomosis but this is not a straightforward anastomosis for a non-specialist surgeon as it necessitates tapering of the very dilated proximal bowel. Under these circumstances a side-to-side anastomosis may be safer.
3. For distal small-bowel atresia, either a double-barrelled stoma or end-to-end anastomosis is possible.
4. Construct all anastomoses using fine monofilament sutures – nothing larger than a 5/0 suture – using the standard anastomosis technique previously described.
5. In meconium ileus, the distal small bowel is plugged with inspissated pale meconium pellets. Proximal to this, the small bowel is dilated and filled with tenacious meconium. Preferably perform an enterotomy in the dilated bowel and patiently evacuate all intestinal content with the help of saline irrigation. Close the enterotomy.
6. With complicated meconium ileus – in the presence of a twisted gangrenous segment or an associated atresia – resect the compromised bowel, evacuate intestinal contents and, ideally, anastomose the remaining intestine. If this is not possible, then create a double-barrelled stoma.
7. In Hirschsprung’s disease, the intestine is in continuity but there is usually a change of calibre in the sigmoid colon. Under these circumstances, the best option is to perform either a right transverse colostomy or an ileostomy in the terminal ileum. This allows the baby to be fed and the length of affected bowel can be assessed at leisure.
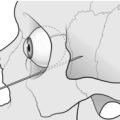
OESOPHAGEAL ATRESIA


Appraise (Fig. 34.3)
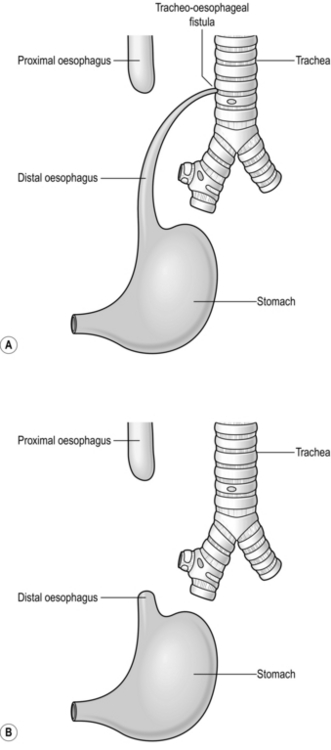
1. The diagnosis may have been suspected antenatally in a fetus with polyhydramnios (Greek: high level of amniotic fluid), and a small stomach bubble. However, the majority of cases of oesophageal atresia are not diagnosed before birth.
2. Establish the diagnosis with a plain X-ray to reveal arrest of a radio-opaque nasogastric tube in the upper oesophagus. Include the abdomen on the radiograph. Air in the stomach indicates a distal tracheo-oesophageal fistula, for which primary repair is usually possible.
3. Absence of an abdominal gas shadow usually indicates isolated oesophageal atresia in which the distance between the proximal and distal segments is too long to permit primary oesophageal anastomosis, so a feeding gastrostomy and an end cervical oesophagostomy may be required.
Prepare
1. Insert a tube into the upper oesophageal pouch to allow for suctioning of secretions and swallowed saliva. A Replogle™ tube is ideal as it has a second channel which can be flushed to ensure that the tube does not become blocked.
2. If the infant is stable, contact your regional specialist centre and arrange for urgent transfer.
3. If the infant requires intubation and ventilation for respiratory distress then there is a risk that ventilation will be further impaired by the passage of gas through the fistula under pressure into the stomach and distal intestine. Gas preferentially follows this path rather than enter the lungs, until the stomach becomes so distended that ventilation becomes impossible. Stomach rupture is very likely under these circumstances. Emergency ligation of the tracheo-oesophageal fistula may be life saving.
4. Cross match a unit of blood and arrange for emergency surgery.
LIGATION OF TRACHEO-OESOPHAGEAL FISTULA
Access
1. The incision is a right posterolateral thoracotomy. Make a transverse incision just below the tip of the scapula with one third of the incision in front of your mark and two-thirds behind.
2. Incise the subcutaneous tissue with diathermy.
3. Divide the muscles with diathermy to minimise blood loss. Be careful to avoid damage to the long thoracic nerve running in the mid-axillary line.
4. Elevate the scapula and palpate the ribs to identify the fourth or fifth intercostal space.
5. Divide the external and internal intercostal muscles just above the rib to avoid damage to the neurovascular bundle.
6. Having exposed the pleura, incise the pleura with a scalpel avoiding damage to the underlying lung, and insert a suitably sized self-retaining rib retractor, e.g. Finochietto. Open the retractor and place a non-abrasive flat retractor into the thorax to retract the lung anteriorly allowing access to the posterior mediastinum.
7. Identify the azygos vein which crosses the fistula, incise the overlying pleura on either side of the vein and gently isolate the vein. Ligate it twice with 4/0 absorbable ties and divide.
8. Next identify the distal oesophagus. Look for the vagus nerve which lies on the surface of the distal oesophagus.
9. Trace the distal oesophagus to its proximal connection with the trachea.
10. Isolate the fistula and temporarily occlude it whilst asking the anaesthetist to continue ventilation. Ensure that the right lung continues to expand with the fistula occluded. This avoids inadvertent division of the right main bronchus.
11. Divide the fistula. Suture the defect in the trachea with interrupted 5/0 or 6/0 polypropylene sutures. Ensure that the repair is airtight by submerging the repair with saline: bubbles arising from the repair indicate a leak requiring closure. Aspirate the saline before closure.
12. Do not attempt definitive repair of the oesophageal atresia. This is not an emergency and is best performed by trained specialists. Close the chest and transfer to a specialist centre.
Closure
1. Allow the lung to re-expand fully. A chest drain is not required.
2. Close the intercostal muscles if possible with interrupted 3/0 or 4/0 polyglactin sutures. If there is not enough muscle to hold the suture place the suture around the rib, taking care not to bring the ribs too close together.
3. Close the muscles anatomically with interrupted 4/0 polyglactin sutures.
EXOMPHALOS AND GASTROSCHISIS
Appraise
1. Exomphalos is herniation of abdominal viscera into the persistent fetal umbilical hernia. The viscera are covered by a thin transparent membrane consisting of an outer layer of amniotic membrane lined by peritoneum, with Wharton’s jelly between the two.
2. Gastroschisis is evisceration of the intestine through a defect in the anterior abdominal wall immediately to the right of an apparently normal umbilical cord. The intestine rapidly becomes oedematous and exudes a proteinaceous fluid that cocoons and mats together the intestinal loops.
3. Exomphalos is often associated with other major abnormalities such as serious cardiac and renal defects. Lethal chromosomal abnormalities such as Patau and Edward’s syndrome are not uncommon.
4. Gastroschisis (Greek: gaster = belly + schisis = cleft; abdomen remains open) is not associated with extra-abdominal anomalies but atresias may occur in the intestine. Do not attempt definitive treatment of associated intestinal atresias prior to abdominal wall closure. Allow the abdomen to heal, maintain the infant on parenteral nutrition and perform a laparotomy after 4–6 weeks to treat these.


Transfer
1. As soon as possible after birth pass a nasogastric tube and aspirate the stomach. Leave the tube on free drainage.
2. Insert an intravenous cannula, replace the volume of fluid aspirated from the stomach with replacement fluid (0.9% saline with 10 mmol KCl; per 500 ml bag) and give the infant a further 20 ml/kg of plasma. Ongoing fluid losses in abdominal wall defects are large and usually underestimated.
3. Check the blood sugar and correct with 10% dextrose if necessary.
4. Before transfer, wrap the herniated bowel with Clingfilm to limit fluid losses and protect the intestine. This is best done by wrapping Clingfilm around the entire abdomen. In addition, support the intestine using rolled up nappies or sheets of gamgee to prevent it moving from side to side and kinking on its mesentery, causing ischaemia. Nursing the baby on its side may help this.
5. Transfer the baby as per neonatal transport guidelines, ensuring that further fluid is given as required and that the nasogastric tube is regularly aspirated.
Principles
Exomphalos minor
1. If very minor (herniation into the umbilical cord), reduce the intestine into the abdominal cavity and ligate the base of the cord with a thick ligature, thereby avoiding operation. The alternative is to twist the cord to reduce the contents and strap the cord on to the abdomen for a few days. Only do this if you are entirely sure that all of the viscera are reduced into the abdomen.
2. If operative repair is necessary, close the defect with a purse-string suture of 3/0 or 4/0 polyglycolic acid. The sac may be used as part of the repair or excised. If part of the sac is adherent to the liver, do not try to separate it. Leave it in situ and return the liver to the abdomen.
3. Perform an upper gastrointestinal contrast study before or after surgery as 30% of infants with exomphalos will need a laparotomy and Ladd’s procedure (see below).
Unruptured exomphalos major
1. Non-operative treatment is achieved by applying a dressing to the sac, which promotes healing. An antiseptic such as silver sulfadiazine may also be used. As the sac dries out an eschar forms which separates after many weeks, leaving an epithelialized defect that grows at a slower rate than the rest of the infant. A large ventral hernia may result and this can be repaired during the second year of life.
2. Operative treatment is by application of a Prolene mesh silo to cover the unruptured exomphalos, with gradual reduction of the contents over the subsequent days or weeks. Suture the Prolene mesh to the abdominal muscles at the edges of the defect. When full reduction has been achieved, remove the Prolene mesh and close the defect.
Aftercare
1. The intestine does not function immediately, so maintain the infant on parenteral nutrition.
2. If a silo has been placed, gradually reduce the size of the silo, compressing the bowel into the abdominal cavity over a period of 7–10 days. Once the bowel is returned to the abdomen the defect can be closed using adhesive dressings in the case of a preformed silo. If a silo has been attached surgically then general anaesthesia and formal closure are necessary.
3. Once the bowel has been returned to the abdomen, start trophic feeds and increase enteral feeds as tolerated. Infants with gastroschisis will have impaired gastrointestinal motility and take a long time to achieve full enteral feeds.
Prognosis
1. In the absence of other serious anomalies, the prognosis for exomphalos minor is excellent.
2. The survival rate for gastroschisis is now over 90%. A small percentage of infants are born with loss of their herniated midgut (‘closed gastroschisis’) and these children have a much poorer outcome.
3. Because of operative difficulties and the presence of serious associated anomalies, the prognosis of exomphalos major is poorer.
CONGENITAL DIAPHRAGMATIC HERNIA
Appraise
1. Most cases of congenital diaphragmatic hernia are diagnosed antenatally in centres with such facilities.
2. Presentation is otherwise with respiratory distress in the newborn period. About 10% of patients present after the newborn period with either recurrent respiratory symptoms or, occasionally, acute gastrointestinal symptoms.
3. A chest radiograph reveals intestinal gas shadows in the involved hemithorax with displacement of the mediastinal structures to the contralateral side.
Action
1. Do not ventilate the infant with a face-mask as this will blow air down the oesophagus and into the intestine, resulting in rapid deterioration.
2. Pass a large (8 or 10F) nasogastric tube to keep the stomach empty and to limit the amount of air passing into the intestine.
3. Pass an endotracheal tube and use positive-pressure mechanical ventilation.
4. Ventilatory pressures should ideally not exceed 12 cmH2O to avoid alveolar rupture and pneumothorax. Treat tension pneumothorax by inserting a chest drain attached to an underwater seal.
5. Insert an intravenous cannula for expansion of circulating volume.
6. Insert an arterial cannula for assessment of blood gases.


Principles
1. Laparotomy is performed using the ‘general purpose’ incision but confining it to the side of the hernial defect.
2. Gently withdraw the intestines, stomach and finally the spleen from the chest.
3. Identify the diaphragmatic defect and excise the sac if present.
4. If small, primarily repair the diaphragmatic defect with non-absorbable sutures.
5. If the defect is so large that the diaphragm hardly exists, repair the defect using a prosthetic patch of woven Dacron™ (polyester) sutured with non-absorbable sutures to the chest wall.
Complications
1. Pleural effusion is extremely common but rarely requires treatment.
2. Chylous effusion may occur if posterior medial dissection has been necessary, due to damage to lymphatic trunks. Treat with medium chain triglyceride feeds ± octreotide ± TPN.
3. Recurrence of the hernia occurs in 10% of cases, more if a patch is required.
Prognosis
1. About 50% of all fetuses with antenatally detected diaphragmatic hernias have associated lethal malformations which will preclude independent existence. Overall survival for infants diagnosed at birth is about 80%. Those with a right-sided hernia have a worse prognosis.
2. Death occurs almost entirely from pulmonary hypoplasia and pulmonary hypertension.
3. A small number of infants with adequate lung size but refractory pulmonary hypertension may be saved by extracorporeal membrane oxygenation (ECMO).
4. Long-term respiratory outcome is determined by the extent of pulmonary hypoplasia.
5. Feeding problems and gastro-oesophageal reflux are common, often requiring medical treatment and sometimes fundoplication.
ANORECTAL MALFORMATIONS
Appraise
1. Undertake a detailed inspection of the perineum. It may be difficult to distinguish between high and low anomalies in the first 24 hours of life. In girls, assess the number of openings. If there is a single orifice, the baby probably has a cloacal malformation whereby the urinary, genital and gastrointestinal tracts open into a common cavity. This is the most complicated form of high anomaly in girls.
If only urethra and vagina are visible in a female infant, seek a tiny opening in the posterior fourchette. This is the commonest malformation in girls. The safest management for such infants is to perform a colostomy. Use the loop colostomy technique previously described.
2. In boys, a stenosed, ectopic anus may only become evident after 24 hours. If no meconium is seen at this time or if meconium is seen in the urine, the lesion is high and a stoma is needed.
3. All these babies need ultrasound examination of the urinary tract because of the common association of urinary anomalies and imperforate anus.
4. Once a defunctioning stoma has been fashioned, refer the infant to a specialist centre for definitive surgery.
MALROTATION WITH OR WITHOUT MIDGUT VOLVULUS
Development
Volvulus may occur at any age but occurs most commonly during the first few months of life.
Appraise
1. Consider the diagnosis of malrotation in any infant manifesting bilious vomiting. This may be intermittent, indicating twisting and untwisting of the bowel.
2. Plain abdominal radiographs may reveal a dilated stomach and duodenum with the rest of the abdomen relatively gasless when volvulus has occurred.
3. A child in whom malrotation with or without volvulus is suspected must undergo confirmation of the diagnosis by means of urgent upper gastrointestinal contrast radiography.
4. Treatment is urgent when volvulus has occurred, as untreated volvulus results in shock and gastrointestinal haemorrhage. The blood supply to the entire midgut may be compromised and delay in treatment serves only to increase the amount and extent of intestinal necrosis. Nevertheless, a short (1–2 hours) intensive period of active resuscitation to correct fluid and electrolyte loss and acid–base imbalance may be worthwhile.
Prepare
1. Correct dehydration with intravenous fluid (0.9% saline, 20 ml/kg) as rapidly as possible.
2. Administer broad-spectrum antibiotics.
3. Effect urgent transfer to a specialized paediatric surgical unit, ensuring that full resuscitative measures continue en route.
4. Where regional specialized facilities are unavailable, operation will have to be performed locally.
Assess
1. Inspect the bowel for obvious areas of gangrene. These should be handled very gently as the intestinal wall is extremely friable and prone to perforation.
2. Assess the direction of rotation and untwist the volvulus. This is usually in an anti-clockwise direction.
3. If extensive intestinal gangrene is present as a consequence of the volvulus, the bowel should be de-rotated, the abdomen closed and urgent transfer to a regional centre arranged. We generally recommend the use of tissue plasminogen activator (tPA) when compromised bowel has been untwisted and no return of colour seen. A second laparotomy is performed 36 to 48 hours later and any necrotic bowel removed. Remarkable return of perfusion may occur with the use of tPA.
4. Whilst awaiting return of circulation to compromised bowel, inspect the root of the mesentery for evidence of malrotation.
5. In a typical case, the root of the mesentery between the duodenojejunal flexure and the ileocaecal junction is very narrow and fibrotic. The caecum lies below the liver and may even be attached to the gallbladder by peritoneal bands.
Action
1. Ladd’s procedure is recommended.
2. Divide the avascular peritoneal bands arising from the caecum and attaching to the liver, gallbladder and the lateral abdominal wall.
3. Once all the bands are divided, the caecum may be placed in the left upper quadrant of the abdomen.
4. Mobilize the duodenum by Kocher’s manoeuvre and divide all peritoneal folds so that all kinks in the duodenum are straightened.
5. Incise what is now the anterior layer of peritoneum at the root of the mesentery and divide all fibrous bands so that the caecum may be moved as far to the left as possible, away from the duodenojejunal flexure, broadening the base of the mesentery.
6. Inspect the duodenum carefully, searching for areas of duodenal stenosis. This is uncommon except in patients presenting in early infancy. Correct duodenal stenosis by performing a duodenoduodenostomy.
7. Return attention to the small bowel. Measure the length of the ischaemic bowel and assess the blood supply.
8. Resect all truly gangrenous areas unless this would leave the child with less than 30 cm of small bowel. Consider whether it would be better to perform a primary anastomosis or to bring out both ends as temporary stomas. If the ends of resected intestine are viable it is preferable to perform a primary anastomosis.
9. When most of the intestine is ischaemic, return it to the abdomen, having untwisted the volvulus and divided constricting bands and adhesions. Close the abdomen en masse. Continue intensive medical treatment, and re-explore after 24–48 hours. At the ‘second-look’ laparotomy in young infants, one is often surprised at how the blood supply has improved. At the second operation, resect all bowel that is obviously gangrenous, but retain all bowel of doubtful viability. Bring the two ends out as temporary stomata. An anastomosis in compromised bowel is not advised as it is prone to disruption.
10. If all the bowel is viable, consider performing an appendicectomy, because the appendix would otherwise lie below the left costal margin and could cause diagnostic confusion at a later date. Appendicectomy is best performed by the inversion method so as not to spill intestinal bacteria in an otherwise ‘clean’ operation.
Aftercare
1. Postoperative mechanical ventilation and cardiovascular support with inotropes may be necessary in the infant with massive intestinal necrosis.
2. Even in uncomplicated malrotation with or without volvulus, ileus commonly occurs for up to 2 weeks and parenteral nutrition is often necessary.
3. After massive intestinal resections, prolonged parenteral nutrition will be required. Oral nutrition is re-introduced with considerable caution as there is frequently intolerance to lactose, lipids and proteins.
CONDITIONS TYPICALLY PRESENTING OUTSIDE THE NEWBORN PERIOD
INGUINAL HERNIA
Appraise
1. In the paediatric age range, inguinal hernia is generally due to failure of closure of the processus vaginalis. The hernia may be complete (to the scrotum) or incomplete (confined to the inguinal region). Operation is indicated in all cases.
2. Inguinal hernias become irreducible in up to 30% of infants, the peak incidence being between the ages of 6 and 12 weeks. Strangulation is rare in the neonatal period, but, when it does occur, there is appreciable postoperative morbidity and a high mortality rate.
3. If the hernia becomes irreducible, pressure upon the spermatic cord causes testicular ischaemia, and infarction may occur after as little as 4 hours. Up to 25% of neonates with an irreducible hernia develop severe testicular ischaemia.
4. Most ‘irreducible’ inguinal herniae can be reduced following sedation and ‘taxis’ – gentle to-and-fro pressure applied to the neck of the hernial sac at the level of the external inguinal ring. Following reduction, it is recommended that elective repair of the hernia is carried out about 48 hours later once the oedema has subsided.
5. Premature babies are particularly prone to develop complications. Herniotomy should be carried out at a stage when the infant has gained sufficient weight to warrant discharge from hospital or as soon as complications occur. These small infants often have co-existing medical problems including chronic lung disease. The help of an experienced paediatric anaesthetist is invaluable and sometimes the operation can be performed only by using spinal or epidural anaesthesia. These patients are prone to all of the complications associated with ‘persistent fetal circulation’, and postoperative deaths do occur, even with elective operation in a regional centre.
6. In infants under the age of 6 months, the tissues are thin and friable so operative difficulties are common. Treatment is best left to paediatric surgeons.
7. If the ipsilateral testis is not in the scrotum do not attempt to bring it into the scrotum in a child below 6 months of age. Leave the testis in position and re-assess when the child is approaching 1 year. Above 6 months of age a simultaneous orchidopexy may be performed.
8. Except in children with neuromuscular disorders, herniotomy rather than herniorrhaphy is the treatment of choice.
Action: herniotomy through the inguinal canal
1. Make an incision 2 cm long in a skin crease midway between the deep ring and pubic tubercle.
2. Divide the subcutaneous fat and Camper’s fascia using scissors.
3. Incise Scarpa’s fascia with scissors and retract it.
4. Clear a small patch of external oblique aponeurosis over an area of 2 cm2, at least 1 cm above the inguinal ligament.
5. Incise the external oblique aponeurosis along its fibres with scissors or a scalpel and retract the edges. Do not open the external inguinal ring.
6. Dissect into the inguinal canal, keeping close to the posterior surface of the external oblique aponeurosis.
7. Soon the ilio-inguinal nerve will come into view, and this provides a useful landmark.
8. Using a mosquito artery forceps, split the fibres of the cremaster muscle overlying the spermatic cord just inferior to the ilio-inguinal nerve. If you have difficulty identifying the spermatic cord, pull gently on the ipsilateral testis within the scrotum. The cord will move, helping you to identify its location within the layers of muscle.
9. Gently grasp the internal spermatic fascia with a mosquito forceps and use this to deliver the spermatic cord from its bed whilst pushing away the adherent fibres of the cremaster muscle with a delicate non-toothed dissecting forceps.
10. Create a ‘window’ behind the cord using blunt dissection ensuring that you have all of the cord anteriorly. Pass the index finger of the non-dominant hand behind the cord and use it and the thumb to rotate the cord so that its posterior aspect comes into view.
11. Using a non-toothed dissecting forceps, split the internal spermatic fascia overlying the vas and vessels in a longitudinal direction.
12. Gently sweep the vas and vessels away from the sac. Do not hold the vas or vessels with the forceps because a crush injury may occur.
13. Ensure that the sac is empty. If you have any doubt it is safest to place artery forceps on one edge to secure it and then open it. Having confirmed it is empty, place an artery forceps across the sac (proximal to the opening if you have made one) and divide the sac distal to the forceps. Allow the distal part of the sac to fall back into the wound.
14. Dissect the vas and vessels from the proximal part of the sac, until the inferior epigastric vessels are seen.
15. Rotate the artery forceps to twist the neck of the sac, so ensuring that there is no bowel or omentum within it.
16. A transfixion ligature of 4/0 absorbable suture is used to close the neck of the sac.
17. Allow the vas and vessels to drop back into the inguinal canal.
18. Close the inguinal canal with two or three sutures.
19. Approximate Scarpa’s fascia with one or two sutures.
20. Close the skin with a subcuticular stitch.
21. Gently pull the testis to the bottom of the scrotum to ensure that it does not become caught in the superficial inguinal pouch, necessitating later orchidopexy.
Action: laparoscopic inguinal hernia repair
1. Use the laparoscopic approach described previously with a 5-mm supra-umbilical access port.
2. Make a full thickness ‘stab’ incision on the left side of the abdomen (assuming you are right handed), lateral to and just above the umbilicus under direct vision. Insert an atraumatic grasper.
3. Gently move the bowel up from the pelvis with the grasper bringing the deep inguinal rings into vision (tilting the patient’s head down may help).
4. Confirm the preoperative diagnosis of a suspected open deep inguinal ring and examine the other side. If open, you will close both sides. Identify the limits of the internal ring, the vas deferens heading medially towards the bladder and the testicular vessels heading up the retroperitoneum.
5. Make a second stab incision on the right side of the abdomen under direct vision. Cut a length of 4/0 non-absorbable suture 12cm long, grasp the suture (not the needle) with a 3-mm needle-holder and pass this directly through the abdominal wall into the peritoneal cavity.
7. Pick up a fold of peritoneum at the edge of the deep inguinal ring at the 3 o’clock position. Pass the needle and suture through this fold leaving an adequate ‘tail’.
8. Create a ‘purse-string’ suture in the peritoneum around the deep inguinal ring by picking up the peritoneum and passing the needle through it. Work in a clockwise direction ensuring that you do not pick up the testicular vessels or the vas deferens nor include them in the purse string. At some point in the purse string include a deeper bite into the muscle well away from the vas, vessels and inferior epigastric vessels. This helps to prevent the suture in the internal ring from herniating down the inguinal canal after you have closed it.
9. Lift the knot away from the tissues and take up all the slack before tightening the suture. Cut the suture and remove the short cut end from the abdomen. If there is any doubt, place a second purse string or a Z-stitch over the top of the first. A 12-cm suture should allow you to tie two purse strings.
10. If the contralateral PPV is patent close it in an identical fashion. This will help to prevent metachronous hernia.
Complications
1. Recurrence of the hernia occurs in 1–2% of cases, but more frequently in ex-preterm infants.
2. Unrecognized damage to the testicular vessels may result in testicular atrophy following up to 1% of repairs.
3. Following repair of a hernia that has been incarcerated, testicular atrophy may occur due to ischaemia.
PYLORIC STENOSIS
Appraise
1. This occurs predominantly in male infants (male-to-female ratio = 6–8:1) around the second to sixth week of life.
2. The cardinal features are projectile non-bilious vomiting, failure to thrive and constipation.
3. The diagnosis is established by palpating the pyloric ‘tumour’ in the right hypochondrium.
4. Confirm by ultrasound examination when you remain in doubt about the diagnosis after examining the baby.
Prepare
1. Measure serum urea, electrolytes and acid–base status.
2. Correct hypochloraemia and hypokalaemia with intravenous infusion of half-normal saline with 10% dextrose, adding potassium (10–15 mmol KCl per 500 ml of 0.45% saline/10% dextrose).
3. It is unnecessary to correct the alkalosis, which resolves spontaneously with the saline infusion. Surgery should not be performed until the serum bicarbonate is 26 mmol/L or less.
4. Prohibit all feeds and leave a nasogastric tube on free drainage, replacing losses millilitre for millilitre with normal saline and potassium (10 mmol KCl per 500 ml of 0.9% saline).
5. Check that serum potassium levels are above 3.5 mmol/L before arranging operation.


Access
1. The infant lies supine on the operating table protected from cold.
2. There are two possible incisions:
Either a transverse incision, 3–4 cm long, in the right hypochondrium midway between the costal margin and the palpable inferior margin of the liver; the medial end of the incision ends 1–2 cm from the midline
Or a supra-umbilical incision of adequate length to allow delivery of the ‘tumour’.
Note: The operation can also be performed laparoscopically with equally good results.
3. Having incised the skin with the scalpel, divide the subcutaneous tissue and muscles using cutting diathermy to limit blood loss.
5. Retract the inferior margin of the liver superiorly by means of a broad malleable retractor protected by a moist gauze swab (not required with a supra-umbilical incision).
6. Identify the greater curvature of the stomach directly or after applying gentle traction on the omentum.
7. Do not attempt to withdraw the pyloric tumour by applying direct traction on the mass; this results in serosal tears and haemorrhage.
8. Deliver the greater curvature of the body of the stomach into the wound.
9. Apply gentle traction on the greater curvature until the firm, white, glistening pyloric tumour is brought into view. Ease it out of the peritoneal cavity and into the wound.
10. Identify the pyloric vein of Mayo. This marks the distal end of the pyloric canal.
Action: pyloromyotomy (Fig. 34.4)
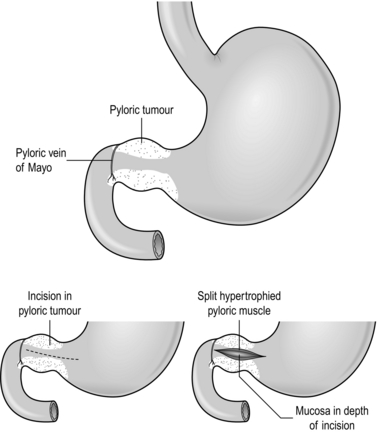
Fig. 34.4 Ramstedt’s pyloromyotomy.
1. Make an incision 1–2 mm deep with a scalpel on the anterior surface of the pyloric tumour in the relatively avascular plane midway between the superior and inferior borders. Extend the incision from the pyloric vein of Mayo, through the pyloric canal and onto the hypertrophied body of the stomach.
2. Using firm but gentle pressure on the incised pylorus with a McDonald dissector, the blunt handle of a scalpel or a blunt artery forceps, split the hypertrophied muscle down to the submucosa.
3. Split the pyloric mass from end to end using a pyloric spreader (Denis Browne) or blunt artery forceps. Ensure that all the fibres of the pyloric tumour are split.
4. Bubbles of air or bile at the duodenal end of the incision signify a perforation of the mucosa, most common in the duodenal fornix.
5. Close a perforation with a few interrupted 5/0 absorbable sutures and cover with omentum.
6. Haemorrhage from the incised pylorus is mainly due to venous congestion. Bleeding usually ceases once the pylorus is returned to the abdominal cavity. If bleeding persists, use diathermy coagulation.
Aftercare
1. Feeds can be commenced 6 hours after the operation. Start with 15–20 ml of milk and, if tolerated, increase to a full volume of feed. Warn the parents that postoperative vomiting is common.
2. Continue intravenous fluids until feeding is established.
3. The infant should be ready for discharge from hospital on the first or second postoperative day.
4. If a perforation of the mucosa occurred, withhold feeds for 24 hours while continuing nasogastric decompression and intravenous fluids. Then introduce feeds as above.
INTUSSUSCEPTION (Fig. 34.5)
Appraise
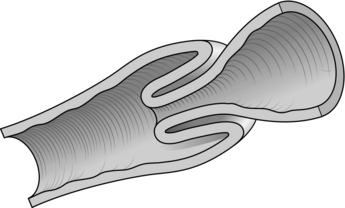
Fig. 34.5 Intussusception.
1. Between the ages of 6 months and 2 years, most intussusceptions are ‘idiopathic’, possibly caused by viral infections. The vast majority originate in the ileocaecal region. The condition is less common after the age of 2 years and rare in the neonatal period.
2. The sick infant should be resuscitated and then transferred to a specialized unit, resuscitation continuing during the journey. The usual volumes of resuscitation fluids are given – 20 ml/kg – and repeated as necessary. These infants often deteriorate rapidly after operation and may not survive unless there are adequate facilities for intensive care.
3. In the ‘idiopathic age group’, and in the absence of radiological evidence of intestinal obstruction or perforation, initial treatment is attempted using either pneumatic or hydrostatic reduction, the latter by means of a barium enema. Such facilities are usually only available in specialist centres. If this is unsuccessful, operation is required.
4. Outside the usual age range there is more likely to be a leading point such as a Meckel’s diverticulum, polyp, duplication cyst or tumour causing the intussusception, and operation should be advised at an early stage.
5. If the infant is in good condition and regional facilities for non-operative reduction are not available, prepare for operation.


Prepare
1. Set up a well-placed, adequately running, intravenous infusion.
2. Most infants will have reduced intravascular volume and will need preoperative rehydration. Many will require replacement of 10% or more of blood volume with plasma, plasma expanders or whole blood.
3. Once anaesthetized, the peripheral vascular resistance falls and the child may deteriorate suddenly.
Action
1. Withdraw the colon distal to the mass and gently attempt to push out the intussusceptum by squeezing the intussuscipiens in an antiperistaltic direction towards the caecum.

2. Patience and gentleness will succeed in the majority of cases.
3. Reduction becomes increasingly difficult as it proceeds towards the starting point (apex), the last few centimetres being the most difficult. Proceed very slowly if the serosa of the intussuscipiens begins to split.
4. Continue assessment during reduction. If the reduced intussusceptum is obviously gangrenous or perforates, abandon the reduction and proceed to a limited right hemicolectomy.
5. If the reduction is successful, examine the distal ileum to ensure there is no ileo-ileal element to the intussusception. The anti-mesenteric border of the ileum 5–10 cm from the ileocaecal valve is the usual starting point of the intussusception and it is to be expected that there will be a thickened patch in the bowel wall 2–3 cm long at that site. This is not an indication for intestinal resection. This patch of oedematous bowel is an enlarged Peyer’s patch and is not to be confused with a polyp or tumour.
6. If the bowel is viable, some surgeons perform an appendicectomy (especially if the Lanz incision is used), by either the inversion or the routine method. If there is doubt about the viability of the caecum, leave the appendix in situ. The intestine has remarkable powers of healing in this age group.
7. If the bowel is non-viable, resect the affected length. A standard right hemicolectomy is rarely necessary. Excise only the gangrenous areas and perform an end-to-end ileocolic anastomosis as previously described.
8. Check for a Meckel’s diverticulum. If present, excise it using a simple intestinal resection and anastomosis.
9. Ensure that there is no polyp, duplication cyst or tumour acting as a ‘lead-point’.
Aftercare
1. Observe closely for hypovolaemic or bacteraemic shock following gangrenous intussusception.
2. Hyperpyrexia is not uncommon in the first 24–48 hours. Measures to reduce body temperature may be required.
3. Approximately 10% of non-operatively reduced intussusceptions will recur. The parents usually recognize the cry immediately.
ADHESION OBSTRUCTION
Appraise
1. Adhesion obstruction as a consequence of previous surgery occurs in about 5% of children who have undergone laparotomy.
2. The majority of such episodes occur within 12 months of the previous operation but the risk is lifelong.
3. Typically, symptoms begin with abdominal pain which becomes more severe and is associated with vomiting. In the presence of strangulation, the pain becomes relentless.
4. Young children frequently have obstruction by peritoneal bands and intestinal strangulation is an early feature.
5. In children with intestinal obstruction, there may be visible bowel loops and peristalsis on inspecting the abdomen. Obstructive bowel sounds are heard on auscultation. Tenderness occurs when the bowel is severely compromised.
6. Abdominal X-ray usually shows multiple dilated loops of bowel with no gas in the rectum. The presence of visible jejunal loops is almost diagnostic in this setting.
7. The treatment of adhesion obstruction in infants and children is surgical. There is very limited, if any, role for non-operative treatment.
APPENDICITIS
Appraise
1. Appendicitis is the commonest surgical cause of abdominal pain in children. The estimated lifetime risk of appendicitis is approximately 8%. The commonest age of presentation is between 8 and 14 years.
2. The diagnosis may be difficult to make. Classical features are worsening abdominal pain migrating from umbilicus to right iliac fossa, nausea, vomiting and malaise. Examination findings include fever, tachycardia, localized peritonism in the right iliac fossa and generalized peritonism in advanced cases.
3. The diagnosis is clinical. Measurements of neutrophil count, white cell count and C-reactive protein are neither sensitive nor specific. Imaging modalities including ultrasound and CT scanning are being used increasingly to assist in diagnosis.
4. If the diagnosis is uncertain and the child is stable then serial observation is employed to detect changes in clinical status over time. If the child improves then the diagnosis is excluded. If clinical features progress then the diagnosis is confirmed.
Prepare
1. Assess degree of dehydration and resuscitate if necessary with 20 ml/kg of normal saline as a bolus.
2. If the child is vomiting insert a nasogastric tube and discontinue all oral intake. Replace any nasogastric losses ml per ml with normal saline with 10 mmol potassium chloride per 500 ml.
3. If advanced appendicitis is suspected based on abdominal examination and general clinical features, administer broad-spectrum antibiotics.
4. Consider the need for appendicectomy. Localized perforated appendicitis may be preferentially and successfully treated with broad-spectrum intravenous antibiotics, intestinal rest and analgesia.
Anaesthesia
1. Induce general anaesthesia with the child supine.
2. After the induction of general anaesthesia examine the abdomen to determine the presence of a firm, fixed mass arising from the right side of the pelvis. If present, abandon the procedure, wake the child up and treat with broad-spectrum intravenous antibiotics until fever and abdominal pain subside.
Access
Either open appendicectomy: make a transverse incision 4–5 cm long in the right iliac fossa centred on McBurney’s point which lies one third of the distance along a line drawn from the anterior superior iliac spine to the umbilicus
Or laparoscopic appendicectomy: use a 5-mm supra-umbilical port in a younger child or a 10–12-mm port in an older child. Further port positioning depends on the size of the child and location of the appendix. Open appendicectomy is described further.
2. Divide the subcutaneous tissues and Scarpa’s fascia using cutting diathermy.
3. Identify and clear the external oblique aponeurosis for the length of the wound.
4. Incise the aponeurosis parallel to the fibres and split the fibres.
5. Split the internal oblique and transverse muscles in the direction of their fibres using blunt dissection and spread them using retractors.
6. Divide the transversalis fascia and grasp the underlying peritoneum. Open it with a scalpel. Suction any free fluid and send any pus for culture. Enlarge the peritoneal opening with scissors.
7. Insert your finger into the peritoneal cavity and identify the appendix and caecum by palpation and vision.
8. Deliver the caecum into the wound using a rocking motion. You may need to divide lateral adhesions under direct vision. If this proves difficult extend the wound.
9. Having delivered the caecum, deliver the entire appendix.
Action: open appendicectomy
1. Divide the meso-appendix using clips and ties down to the base of the appendix.
2. Crush the appendix 5 mm above its base using a straight crushing clamp and then re-apply the clamp a few millimetres distally. Tie the crushed area with a 3/0 polyglactin tie then cut along the proximal edge of the clamp with a scalpel, thereby excising the appendix.
3. Invert the stump of the appendix and secure it with a purse string or Z-suture of 3/0 polyglactin through the serosal layer of the caecum only.
4. Return the caecum to the abdomen and suction the paracolic gutters and pelvis.
5. Close the wound in layers using absorbable sutures. Close the peritoneum using a continuous suture. Approximate the transverse and internal oblique muscles with a couple of interrupted sutures. Close the external oblique and then Scarpa’s fascia, both with a continuous suture.
Aftercare
1. In the case of simple inflamed appendix provide intravenous antibiotic cover for 24 hours and introduce oral fluids once the child has recovered from anaesthesia.
2. In more advanced cases, treat with broad-spectrum intravenous antibiotics for 3–5 days, changing to oral only once the child is making clinical progress and is taking oral diet. Use intra-operative microbiology swab results to guide antibiotic use. Use a nasogastric tube to decompress the intestine until the ileus has resolved, at which point diet can be introduced.
Complications
1. Intra-abdominal collection/abscess may present with prolonged postoperative fever with or without prolonged ileus and abdominal pain. The diagnosis is confirmed with ultrasound. Treatment is initially with prolonged intravenous broad-spectrum antibiotics but percutaneous image-guided abscess drainage may be required.
2. Adhesion small-bowel obstruction is a risk following any intra-abdominal procedure, including appendicectomy.