[level-membership-for-surgery-category]29
Orthopaedics and trauma
amputations
INTRODUCTION


Appraise
1. The main indications for amputation are:
 Vascular disease—arterial or venous
 Diabetes (diabetes and vascular disease together account for about 85% of amputations)


 Infection (now only responsible for 1.5% of amputations)
 Neurological causes such as nerve injury and its secondary effects

2. Major upper limb amputations are rarely required (only 3% of the total).
GENERAL PRINCIPLES
Appraise
1. If you are in any doubt about the necessity for amputation, obtain a second opinion from a senior colleague.
KEY POINTS
Anticipate


2. Operate using general anaesthesia whenever possible.
3. The level of amputation and type of prosthesis are influenced by:


4. Energy conservation is an important consideration when planning lower-limb amputation and the chosen level is crucial. Energy expenditure following bilateral below-knee amputation is still less than that of a unilateral above-knee amputation. Plan to preserve every possible dynamic structure, including the knee joint and the epiphysis in children.
5. Appraise the blood supply of the limb clinically by looking for skin colour changes, shiny atrophic appearance and lack of hair growth. Feel for skin temperature changes. Be willing to order transcutaneous Doppler recordings and measurement of the ankle-brachial index, thermography, radioactive xenon clearance and transcutaneous PO2 measurements.
6. Assess the bone by taking plain radiographs in two planes, tomograms or a radioisotope bone scan. In the presence of bone or soft-tissue malignancy, ensure that the diagnosis has been confirmed with a biopsy. Computed tomography (CT) and magnetic resonance imaging (MRI) are essential in fully staging the lesion and assessing the necessity for amputation. Limb-sparing surgery has recently become more feasible, provided the correct indications are followed under guidance from expert tumour surgeons.
Prepare
1. As the surgeon performing the operation it is your personal responsibility to obtain consent and explain possible complications. Fully inform the patient of the proposed operation. Obtain consent to amputate, if necessary, more proximally than you intend.
2. Give prophylactic antibiotics: penicillin (or erythromycin) plus one other broad-spectrum antibiotic. Swab and culture any wounds preoperatively.
3. Clean the limb and seal off the infected or necrotic areas.
4. Arrange for the disposal of the limb after amputation to the pathology department or straight to the incinerator.
Action
General techniques
1. Use a tourniquet except in peripheral vascular disease. Exsanguinate the limb by elevation for 2–4 minutes rather than using an Esmarch bandage.
2. Prepare the skin and apply the drapes.
KEY POINTS
Skin flaps
 Mark the proposed skin flaps preoperatively.
 They should be approximately as long as the base is wide at the level of bone section.
 Leave them too long rather than too short.
 If amputation follows traumatic injury, preserve all viable skin to create an adequate stump.
 In the presence of vascular disease do not undermine the edges of the flaps.

3. Wherever possible, include underlying muscles in the flap (myoplastic flap) since this greatly improves the skin blood supply and covers and protects the stump. Muscles provide power, stabilization and proprioception to the stump. In emergency cases remove all dead muscle (this avoids gas gangrene) and leave viable muscle (red, bleeding and contracting). In elective cases cut the muscle with a raked incision angled towards the level of bone section.
4. Double-ligate major vessels with strong silk or linen thread. Ligate other vessels with absorbable material such as polyglycolic acid (Dexon).
5. Gently pull down nerves, divide them cleanly and allow them to retract into soft tissue envelopes. Ligate major nerves with a fine suture prior to and just above the site of division. This stops bleeding from accompanying vessels and decreases neuroma formation.
6. Prepare to cut the bone at the appropriate level. Remember that the stump must be long enough to gain secure attachment to the prosthesis and to act as a useful lever but short enough to accommodate the prosthesis and its hinge or joint mechanism. Divide the periosteum and cut the bone with a Gigli or power saw. During bone section, cover the soft tissues with a moist pack and irrigate afterwards to remove bone dust and particles from the soft tissues. Round-off sharp bone edges with a rasp.
7. Check that the flaps will approximate easily.
8. Release the tourniquet and secure haemostasis.
10. Suture the flaps together without tension, starting with the muscle. Handle the skin carefully and close it with staples if available, or interrupted nylon sutures.
11. In the presence of infection or if you have any doubt about the viability of the flaps, approximate the muscles loosely over gauze soaked in saline or proflavine to prevent them from contracting. Do not close the skin. Plan delayed primary closure at 5–7 days.
Aftercare
1. Apply a well-padded compressible but not crushing dressing, using either cotton wool or latex foam. Hold this in place with crepe bandage taking care to avoid fixed flexion or other deformity of neighbouring joints.
2. Except in cases with infection or doubtful flap viability, apply a light shell, maximum four layers, of plaster of Paris over the dressing. This makes the patient more comfortable and able to be more mobile in bed. In specialist centres a prosthetist can apply a rigid dressing to which a temporary pylon can be attached, allowing early ambulation.
3. Leave the dressing undisturbed if possible for 10 days.


4. Order regular physiotherapy to prevent joint contractures.
5. Encourage mobilization and use of the stump as soon as the patient is comfortable.
6. When the wound has healed and sutures have been removed, apply regular stump bandaging to maintain the shape of the stump.
7. As soon as possible refer the patient to the local limb-fitting centre if you had not already done so before operation.
Special situations
Amputations in children
Children’s amputations present their own special problems:
 Growing bones at the site of amputation will overgrow by apposition, not related to growth at the proximal growth plate. You may need to revise the bone to prevent skin problems.
 If possible, always preserve epiphyseal growth plates.


 Amputations of accessory digits in children:
Certain cultures discriminate against children with accessory toes of fingers while other cultures applaud them. Sensitivity is needed and the wishes of the child and parents must be respected.
Accessory digits, and if necessary the associated metacarpals or metacarpals, should be amputated according to the principles described below.
 Amputations of lower limbs with congenital tibial and fibular dysplasia in children:
 Congential tibial and fibular dysplasia is frequently bilateral and presents with shortened lower limbs and a child who is crawling on the ground.
 The whole tibia may be missing, in which case the child is weight bearing through the distal femur.


 Discuss the possibility of making a prosthesis immediately and during subsequent growth.
 Discuss amputation with the parents.
 Use the principles of lower limb amputation discussed below.


Decision making for amputations in major trauma
1. Objective criteria help predict amputation following lower extremity trauma. The Mangled Extremity Score (MESS) is one such system. It uses four significant criteria of skeletal/soft-tissue injury, limb ischaemia, shock and patient age.
2. Such systems help you to discriminate between salvageable limbs and those better managed by primary amputation.
Complications
Haematoma


1. Haematoma in the stump predisposes to infection and greatly delays prosthetic fitting.
2. Drain collections of blood by aspiration or a small incision. Perform this in the operating theatre under sterile conditions, not on the ward. Local anaesthesia is usually sufficient.
3. If there is clearly uncontrolled haemorrhage, apply firm compression and elevate the limb while you make arrangements to explore the stump under a general anaesthetic.
Infection
1. Amputation stumps are more at risk of infection than most other surgical wounds. The stump tissues are often poorly vascularized, there are often infected lesions in the distal extremity, and patients are often frail and elderly, with poor resistance to infection.
2. Give prophylactic antibiotics to all lower-limb amputees. Choose antibiotics that are active against Clostridia, Escherichia coli and staphylococci.
3. Handle all soft tissues with care and avoid leaving dead muscle and long sections of denuded cortical bone in the stump.
4. Treat wound infections promptly with antibiotics. Incise and drain any collection of pus.
5. If a chronic sinus fails to dry up with a course of antibiotics lasting up to 6 weeks, explore the stump under general anaesthesia. You will usually find a focus of infection such as a small bony sequestrum or a lump of infected suture material.
Flap necrosis
1. Prevent this complication by carefully assessing skin viability prior to amputation and by handling all skin edges and flaps with the utmost care. Use a myoplastic flap wherever possible as this always has a better blood supply.
2. Treat small areas of wound necrosis conservatively. The wound often granulates beneath the patch of blackened, sloughing skin, which eventually separates spontaneously.
3. Major flap necrosis requires either a wedge resection, down to and including bone, or re-amputation to a higher level.
Joint contractures


1. Treat or prevent mild contractures by early active and passive exercises, place the joints in a corrective posture, fit a prosthesis that retains the position, and encourage mobilization. For example, regularly lying the patient prone discourages hip contractures.
2. Severe contractures may require serial plasters or surgical release; otherwise, applying a prosthesis is likely to be impossible and useless.
Neuroma
1. All cut ends of nerves form neuromata but they are painful only if trapped in scar tissue or exposed to repeated trauma. Ensure that transected nerves lie deep within the normal tissues of the limb, proximal to the end of the stump.
2. Treat painful neuromata by resecting the neuroma together with a length of the affected nerve, well away from the area of scar tissue.
Phantom limb sensation
1. Always warn the patient before amputation about the likelihood of still feeling that the missing part of the limb is present. Do not introduce the concept of phantom pain, however.
2. After amputation, reassure the patient that this feeling will gradually fade away. Meanwhile warn against attempting to use a limb that is not present.
Phantom pain
1. This complication is most common with proximal rather than distal amputations, in patients who had severe pain before amputation and in those who have been in contact with other patients with phantom pain.
2. The cause is unknown and the pain is untreatable even by nerve section or cordotomy. Be continually optimistic and supportive, and remember that this distressing symptom occasionally leads to suicide. Involve the whole team in giving the patient support and encouragement.
Failure to use a prosthesis
1. Patients most likely to adapt to a prosthesis are those who have the physical ability, mental capability and the determination to do so. The most adaptable are those who were able to stand and walk, with or without aids, shortly before operation.
2. In both the upper and lower limbs, the higher the amputation the less likely it is that a prosthesis will be used. If the energy expenditure in a wheelchair is less than on a prosthesis, it requires a determined patient to get out of the wheelchair.


HINDQUARTER AMPUTATION
Appraise
1. This radical operation is usually performed for malignant disease of bone or soft tissue of the pelvis or upper thigh. It is beyond the scope of anyone except a skilled and especially experienced expert.
2. It is included to demonstrate the principles if you are an assistant. The detailed steps were described by Gordon-Taylor and Monro.1
3. The incision is shown in Figure 29.1. The external iliac, deep epigastric and internal iliac branch vessels are divided, as are the femoral, obturator and sciatic nerves. The pelvis is sectioned at the symphysis pubis and upwards from the greater sciatic notch to the iliac rim. The anterior portion of the pelvis is freed and removed with the hindquarter, and the wound is closed.

Fig. 29.1 Incision for hindquarter amputation.
ABOVE-KNEE AMPUTATION
Appraise
Decide on the level of the amputation, bearing in mind the following considerations:


Action
1. Place the patient supine with a sandbag beneath the buttock.
2. Use a tourniquet if there is room for it without interfering with the operative area.

3. Mark out equal anterior and posterior flaps, their bases sited at the proposed level of bone section.
4. Deepen the incision to the deep fascia, allowing the skin to retract slightly. From this level divide the anterior muscles with a raking cut aimed at the level of bone section.
5. Identify the femoral vessels beneath the sartorius muscle and doubly ligate them. Pull down the femoral nerve, ligate it with a fine suture and then cut it cleanly, allowing it to retract.
6. Divide the periosteum around the whole femur at the level of proposed section. Cut through the bone with a Gigli or amputation saw, protecting the soft tissues as previously described.
7. Now retract the distal femoral fragment and locate the profunda femoris vessels in the tissues behind the femur. Ligate them, then identify the sciatic nerve. Pull it down gently, ligate it and then divide it cleanly, allowing it to retract.
8. Complete the division of the posterior muscles using a raking cut to match the anterior flap.
Closure
1. Round off the end of the bone with a rasp.
2. Now turn your attention to the flaps, which should be roughly equal in size and thickness. They are composed of muscle and skin and are called myoplastic flaps. Perform a myodesis after drilling a small hole in the posterior cortex of the femoral stump. Draw and fix the quadriceps muscle over the end of the bone with absorbable sutures. Suture the remaining muscles to the quadriceps, attempting to retain roughly equal tension in all the muscle groups.
4. Close the skin with interrupted nylon sutures plus adhesive such as Steri-Strip tapes.
5. Apply a well-padded compression dressing and hold it in place by taking two or three turns of crepe bandage round the waist. Be careful, however, to avoid pulling the stump into a position of flexion with the dressing.
Aftercare
1. Remove the drain at 48 hours.
2. Encourage maximum mobility as soon as the patient is comfortable. Ensure regular physiotherapy is given, including prone lying to prevent a flexion contracture at the hip.
3. Inspect the wound at 10 days and remove the sutures when healed.
4. Apply a firm stump bandage daily thereafter to mould the stump into a roughly conical shape.
5. Arrange for the fitting of a temporary pylon by the third or fourth week and plan for definitive limb-fitting between the sixth and twelfth week.
BELOW-KNEE AMPUTATION
Appraise
1. Carefully assess the viability of the soft tissues of the lower leg when considering amputation at this level, looking for evidence of peripheral vascular disease, diabetic gangrene or trauma.


2. Do not consider this amputation in the non-ambulant patient but otherwise always try to preserve the knee.
3. The optimal level for tibial section is a third of its length. Do not make it longer than this or the resulting flaps will not contain sufficient muscle to maintain its viability. The minimum length is 6 cm. If there is a fixed flexion deformity of the knee then the required tibial lengths are as indicated in Table 29.1.
Table 29.1
Required tibial length for below-knee amputation in cases of fixed flexion deformity of the knee
| Fixed flexion deformity | Tibial length |
| 35° | 6–10 cm |
| 15° | 10–15 cm |
| 5° | > 20 cm |
Access
1. Seal off any infected, gangrenous areas by enclosing them in a polyethylene bag.
2. Employ general or epidural anaesthesia.
3. Apply a tourniquet to the thigh unless the amputation is for peripheral vascular disease.
4. Place the patient supine on the operating table with a padded, inverted bowl underneath the proximal tibia.
5. Mark the skin flaps (Fig. 29.2).
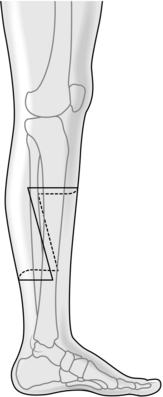
Fig. 29.2 Incision for below-knee amputation.
Action
1. Start the anterior incision at the base of proposed bone section, cutting transversely round each side of the leg to a point two-thirds of the way down each side. Then take the incisions distally on each side, passing slightly anteriorly to a point well below the length that is likely to be required.
2. Join the two incisions posteriorly.
3. Deepen the longitudinal incisions down to deep fascia. Anteriorly incise straight down to bone and then on to the interosseous membrane. Ligate the anterior tibial vessels at this point.
4. Elevate the periosteum of the tibia for 1 cm proximal to the level of section. Divide the tibia using a Gigli or amputation saw. Bevel the anterior half of the tibial stump with the saw and a rasp. Divide the fibula 1 cm proximally and bevel the bone laterally.
5. Use a bone hook to distract the distal part of the tibia. Divide the deep posterior muscles of the calf at the same level as the tibia. At this stage identify and ligate the posterior tibial and peroneal vessels. Cleanly divide the posterior tibial nerve, allowing it to retract.
6. Use a raking cut through the soleus and gastrocnemius muscles down to the end of the posterior flap. Remove the limb.
Closure
1. Complete the smoothing and bevelling of the tibia and fibula using bone nibblers and a rasp.
2. Bevel the gastrocnemius and soleus medially and laterally, and trim the excess skin to fashion a rounded, slightly bulbous stump.
3. Release the tourniquet and secure haemostasis.
4. Insert a suction drain brought out medially through the wound.
5. Bring the posterior flap forwards over the bone and suture it anteriorly to the deep fascia of the anterolateral group of muscles, using a strong absorbable suture.
6. Close the skin, preferably with closely placed staples, or with interrupted nylon sutures and adhesive strips such as Steri-Strip tapes. Do not leave any ‘dog-ears’ laterally.
7. Apply a dressing of gauze and sterile plaster wool, then apply gentle compression of the stump with a crepe bandage. Apply a further layer of plaster wool and then a light plaster cast to mid-thigh level. Mould the plaster over the femoral condyles to prevent it from slipping down. Do not use plaster if there is any infection.
Aftercare
2. Remove the drain at 48 hours by gently pulling it out of the top of the plaster cast.
3. Mobilize the patient early but retain the plaster cast undisturbed for at least 10 days.
4. Remove the sutures at 14 days.
5. Apply a daily stump bandage.
6. Arrange for daily hip and knee physiotherapy.
7. As soon as the wound has fully healed arrange for the fitting of a temporary pylon, either patellar-tendon-bearing or ischial-bearing, depending on the quality of the stump. Now arrange for definitive limb-fitting.
SYME’S AMPUTATION
Appraise
1. This was described by James Syme (1799–1870), Professor of Surgery in Edinburgh, in 1842, as an alternative to below-knee amputation. Transmetatarsal and tarsometatarsal amputation is occasionally required for severe trauma. For elective amputation, Syme’s amputation is functionally superior.


2. Ensure that there is adequate circulation in the foot. The posterior tibial pulse must be palpable. The skin of the heel must be of good quality.
3. Carry out a Syme’s or through ankle amputation, if possible, in preference to a below-knee amputation where there has been an associated amputation of the ipsilateral arm. It is possible to weight bear directly on the Syme’s stump, for instance in the night, obviating the need to attach the BK prosthesis, which is difficult to achieve with one arm.
Action
1. Place the patient supine with the foot extending beyond the end of the table.
2. Apply a tourniquet to the thigh.
3. With the foot and ankle in a neutral position, mark the skin flaps (Fig. 29.3). The plantar flap runs from the tip of the lateral malleolus across the sole (curving slightly forward) to a point just below the medial malleolus. The dorsal flap joins the ends of the plantar incision at an angle of 45° from the line of the tibia.
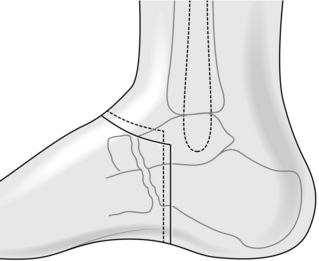
Fig. 29.3 Incision for Syme’s amputation.
4. Deepen the incision in the plantar flap down to the bone. On the dorsum, divide the extensor retinaculum and pull down the extensor tendons, dividing them as high as possible.
5. Open the ankle joint, plantar-flex the foot and divide the medial and lateral collateral ligaments from within. Take care to avoid the posterior tibial nerve and artery on the medial side.
6. Dislocate the talus downwards and open the posterior capsule of the ankle, exposing the posterosuperior surface of the os calcis and the anterior surface of the tendo achilles.
7. With a periosteal elevator, reflect periosteum and soft tissue from the medial and lateral sides of the os calcis down to the inferior surface of the bone. Continue this dissection so as to free the inferior surface.
8. Detach the long plantar ligament from the tuberosity of the os calcis and continue until you reach the plantar incision. The proximal end of the bone is now free except for the insertion of the tendo achilles. Carefully divide this from above downwards, keeping close to the bone. Avoid buttonholing the skin flap behind the tendon.
Closure
1. Turn the heel flap backwards and upwards and free the malleoli and distal centimetre of tibia. Remove the malleoli and a thin slice of tibia with a saw.

3. Release the tourniquet and secure haemostasis.
5. Suture the heel flap to the margin of the dorsal incision in two layers with subcutaneous synthetic absorbable material such as polyglycolic acid (Dexon) and interrupted nylon to skin. Begin skin closure in the middle and continue to each end.
6. Ensure that the heel flap remains centred over the cut end of the tibia. The flap may be secured with adhesive such as Steri-Strip tapes.
7. If the heel flap is very unstable, transfix it percutaneously with a Kirschner wire or Steinmann pin passed up into the tibia.
8. Apply a well-padded pressure dressing and retain this either with adhesive strapping to the upper calf or a lightweight above-knee plaster cast.
Aftercare
2. Remove the drain at 48 hours but do not disturb the dressing.
3. If you have not transfixed the heel flap, inspect the wound at 5 days to check the position of the flap. Otherwise, inspect the wound at 14 days, when the sutures and the percutaneous pin may be removed.
4. Carefully apply a stump bandage thereafter and arrange the fitting of a prosthesis as soon as the swelling has subsided, usually at 2–4 weeks.
RAY AMPUTATIONS OF THE FOREFOOT
Appraise
1. Indications for ray amputation are:
 Gigantism. This may affect the 2nd or 3rd rays and the corresponding toes. The feet are too large to fit shoes and cosmetically inappropriate. In this case, a wedge of the forefoot containing the abnormal digits needs to be excised
 Congenital extra rays, with or without the corresponding digits, producing a wide foot

Action
 Mark out a dorsal and ventral wedge to include the affected rays

 Close the wedge, approximating the remaining adjacent MTs with strong Vicryl

3. Congenital additional rays. If the ray is buried between normal MTs expose it through a dorsal longitudinal incision and excise it. Approximate the adjacent MTs.


AMPUTATION OF THE TOES
Appraise
1. Avoid amputating single toes if possible. Neighbouring toes tend to develop secondary deformity and take more weight.
2. Remove all the toes (nicknamed the ‘Pobble’ operation, from a poem by the English humourist Edward Lear, 1812–1888) if there are multiple painful, fixed deformities or if several toes are gangrenous.
3. Ray resection of toes may be required for gangrene or diabetes.
4. If you need to amputate the great toe, try to preserve the attachments of the short flexor and extensor tendons on the proximal phalanx.
Action
1. Use a tourniquet after exsanguination.
2. Mark out a racquet incision for amputation of individual toes. For amputation of all the toes use a transverse incision, passing across the root of the toes on the plantar aspect, that is overlying the proximal phalanx, and across the MTPJ on the dorsum. The eventual scar should lie dorsally.
3. Take the flaps straight down to bone and dissect off the proximal phalanx.
4. Preserve the base of the proximal phalanx if possible, dividing the bone just distal to the insertion of the capsule. This creates a small wound cavity, which heals quickly, and the amputation does not damage the transverse MT ligaments. Alternatively, perform a careful disarticulation.
6. Close the skin with interrupted nylon sutures.
7. Apply a bulky compression dressing, passing a few turns of crepe bandage round the ankle to hold the dressing in position.
Aftercare
2. Remove the sutures at 10 days and mobilize the patient.
3. Where individual toes have been amputated, ask the chiropodist to supply a toe spacer.
4. Where all the toes have been amputated, order a special insole that incorporates a combined MT and cavus support, together with a cork toe-block faced with sponge rubber.
THE UPPER LIMB
1. Many of the indications for amputation in the hand have changed in recent times as a result of improvements in surgical method, prosthetics and plastic surgery. These techniques require special expertise.
2. Some of the operations are suitable for semi-elective use, provided you adhere to the principles of soft-tissue and wound management.
3. Here we shall consider only some of the common and simpler procedures.
AMPUTATION OF FINGERS
Action
1. Use an exsanguinating tourniquet.
2. Place the arm on a side table.
3. Mark the incision, which should be placed so that the scar will lie on the dorsal aspect and the stump will be covered by volar skin.
4. Do not suture together the ends of the extensor and flexor tendons over the end of the bone.
5. Identify the digital nerves and isolate them from the vessels before dividing them cleanly, 1 cm proximal to the stump.
6. Round off the end of the bone and remove the articular cartilage and prominent condyles when performing a disarticulation.
7. Reduce the bulk of the fibrofatty subcutaneous tissue to allow the skin edges to be brought together without difficulty.
8. Release the tourniquet and secure haemostasis before closure.
9. Avoid tight skin closure, otherwise painful and ischaemic torsion may develop as a result of postoperative swelling. Some soft tissue retraction occurs during the first 2 months but do not, on this account, leave excessive slackness of the stump; this causes an unsightly, unsupported soft-tissue mass.
10. Apply a compression dressing of gauze and narrow crepe bandage.
AMPUTATION THROUGH THE DISTAL PHALANX
DISARTICULATION THROUGH THE DISTAL INTERPHALANGEAL JOINT
1. Incise the skin in the midlateral line on either side of the neck of the middle phalanx. Join these two incisions across the dorsum at the level of the joint and across the volar pulp 1 cm distal to the flexor crease (Fig. 29.4).
2. Dissect back the fibrofatty tissue to reveal the digital vessels and nerves, the extensor expansion and the flexor tendon in its sheath.
3. Divide the extensor and flexor tendons at the level of the neck of the middle phalanx and allow them to retract.
4. Ligate the digital vessels and divide the nerves proximally.
5. Divide the capsule and collateral ligaments to complete the amputation.
6. Shape the head of the middle phalanx using bone nibblers and close the wound as described above.
AMPUTATION THROUGH THE MIDDLE PHALANX
Proceed as above but retain the attachment of the flexor digitorum superficialis to bone.
DISARTICULATION THROUGH THE METACARPOPHALANGEAL JOINT
Assess
1. As a rule, employ this operation only for the middle and ring fingers. It is particularly suitable for the hand of a man doing manual labour, since a powerful grip can be retained.
2. The two disadvantages are the obvious deformity and a gap between the fingers through which small objects in the hand may fall.
3. Disarticulation of the index or little fingers at this level leaves the metarcarpal head projecting and unprotected. Oblique amputation through the metacarpal shaft is preferable.
Action
1. Mark the skin incisions, which should lie over the proximal part of the proximal phalanx on each side, leaving sufficient skin to permit full abduction of the other fingers without tension in the cleft.
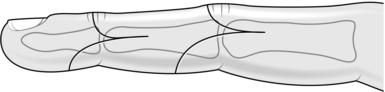
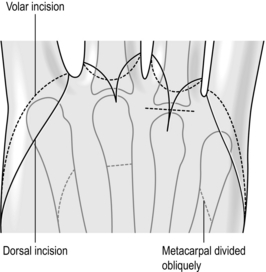
2. Join the incisions anteriorly just distal to the flexor crease and posteriorly over the metacarpal head with an extension along the line of the metacarpal (Fig. 29.5).
AMPUTATION THROUGH THE SHAFT OF THE METACARPAL
Action
1. Use the same skin incision as for a disarticulation in the middle and ring fingers.
2. For the index and little finger use an incision along the midlateral aspect of the radial, or ulnar, border of the hand from the junction of the proximal and middle thirds of the metacarpal to the metacarpophalangeal joint (Fig. 29.5). Fashion a larger palmar flap and a smaller dorsal flap and joint the incisions in the cleft at the level of the web.
3. Amputate the middle and ring fingers by dividing the metacarpal cleanly through the neck, taking care not to splinter the bone.
4. Amputate the index and little fingers by exposing the middle third of the metacarpal, stripping the muscular attachments and dividing the bone obliquely with a power saw. Smooth the edges of the bone and allow the muscles to fall back over the stump. Divide the digital nerves to the radial border of the index or the ulnar border of the little finger in the proximal part of the wound.
MAJOR UPPER-LIMB AMPUTATIONS


BELOW-ELBOW AMPUTATION
1. Mark out equal dorsal and volar skin flaps with their bases at the junction of the middle and lower third of the ulna, approximately 17 cm distal to the olecranon process.
2. Ensure that the arm is supinated on the table without any torsional strain below the elbow. If you do not avoid this, the cut flaps will be drawn into an oblique position by the elasticity of the skin.
3. Reflect the flaps deep to the deep fascia. Cut the muscles and tendons with a slightly raked incision aimed at the level of the bone section.
4. Incise the periosteum circumferentially at the level of section and divide the bones with a Gigli or a power saw.
5. Identify and ligate the main vessels. Gently pull down the nerves and divide them cleanly as high as possible.
6. Release the tourniquet and secure haemostasis.
8. Close the deep fascia over the bone ends using interrupted synthetic absorbable material such as Dexon. Close the skin with interrupted fine nylon sutures plus Steri-Strip tapes.
ABOVE-ELBOW AMPUTATION
1. Mark out equal anterior and posterior flaps with their bases 20 cm from the tip of the acromion process of the scapula.
2. Retain as much length of the upper humerus as is possible in the presence of an ipsilateral amputation of the lower limb. This will facilitate the use of a crutch in the axilla.
3. Reflect the flaps deep to the deep fascia.
4. Divide the muscles with a raking incision down to bone.
5. Divide the bone with a Gigli or power saw.
6. Ligate the main vessels. Pull down the nerves and shorten them by about 2.5 cm so that they retract into the depths of the wound.
7. Release the tourniquet if present and secure haemostasis.
9. Close the deep fascia over the bone using synthetic absorbable material such as Dexon. Close the skin and apply a compression dressing.
FOREQUARTER AMPUTATION
Appraise
1. This is beyond the scope of all but the highly skilled, especially experienced surgeons. It is included merely to demonstrate the extent of the excision, usually for extensive tumour, if you are an assistant. There are two methods available: the posterior approach described by Littlewood (Fig. 29.6) and the anterior approach of Berger (1887), which is preferred.
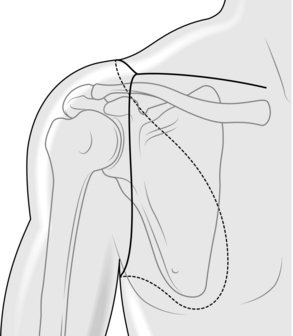
Fig. 29.6 Incision for forequarter amputation.
2. The clavicle is divided, the vessels including the subclavian artery and axillary vein are divided, as are the trunks of the brachial plexus. The attaching muscles are divided, including pectoralis major and minor, trapezius, latissimus dorsi, levator scapula rhomboids and serratus anterior.
3. The forequarter, including the scapula, is removed and the wound closed.
2. Angel, J.C., Weaver, P.C. Amputations. In Bentley G., Greer R.B., III., eds.: Rob and Smith’s Operative Surgery, 4th ed., London: Butterworths, 1979. [Orthopaedics Part 1].
3. Anonymous. Symposium on Amputations. Ann R Coll Surg Engl. 1991; 73:133–176.
4. Gerhardt, J.J., King, P.S., Zettl, J.H. Amputations. Immediate and Early Prosthetic Management. Bern: Hans Huber; 1982.
5. Helfet, D.L., Howey, T., Sanders, R., et al. Preliminary results of the Mangled Extremity Severity Score. Clinical Orthopaedics. 1990; 256:80–86.
6. Thompson, R.G. Complications of lower extremity amputation. Orthop Clin North Am. 1972; 3:323.
7. Tooms, R.E. Amputations. In: Crenshaw A.H., ed. Campbell’s Operative Orthopedics. St Louis: Mosby; 1987:597–646.
[/level-membership-for-surgery-category][not-level-membership-for-surgery-category]29
Orthopaedics and trauma
amputations
INTRODUCTION
Appraise
1. The main indications for amputation are:
Vascular disease—arterial or venous
Diabetes (diabetes and vascular disease together account for about 85% of amputations)
Infection (now only responsible for 1.5% of amputations)
Neurological causes such as nerve injury and its secondary effects
2. Major upper limb amputations are rarely required (only 3% of the total).
GENERAL PRINCIPLES
Appraise
1. If you are in any doubt about the necessity for amputation, obtain a second opinion from a senior colleague.
KEY POINTS
Anticipate
2. Operate using general anaesthesia whenever possible.
3. The level of amputation and type of prosthesis are influenced by:
4. Energy conservation is an important consideration when planning lower-limb amputation and the chosen level is crucial. Energy expenditure following bilateral below-knee amputation is still less than that of a unilateral above-knee amputation. Plan to preserve every possible dynamic structure, including the knee joint and the epiphysis in children.
5. Appraise the blood supply of the limb clinically by looking for skin colour changes, shiny atrophic appearance and lack of hair growth. Feel for skin temperature changes. Be willing to order transcutaneous Doppler recordings and measurement of the ankle-brachial index, thermography, radioactive xenon clearance and transcutaneous PO2 measurements.
6. Assess the bone by taking plain radiographs in two planes, tomograms or a radioisotope bone scan. In the presence of bone or soft-tissue malignancy, ensure that the diagnosis has been confirmed with a biopsy. Computed tomography (CT) and magnetic resonance imaging (MRI) are essential in fully staging the lesion and assessing the necessity for amputation. Limb-sparing surgery has recently become more feasible, provided the correct indications are followed under guidance from expert tumour surgeons.
Prepare
1. As the surgeon performing the operation it is your personal responsibility to obtain consent and explain possible complications. Fully inform the patient of the proposed operation. Obtain consent to amputate, if necessary, more proximally than you intend.
2. Give prophylactic antibiotics: penicillin (or erythromycin) plus one other broad-spectrum antibiotic. Swab and culture any wounds preoperatively.
3. Clean the limb and seal off the infected or necrotic areas.
4. Arrange for the disposal of the limb after amputation to the pathology department or straight to the incinerator.
Action
General techniques
1. Use a tourniquet except in peripheral vascular disease. Exsanguinate the limb by elevation for 2–4 minutes rather than using an Esmarch bandage.
2. Prepare the skin and apply the drapes.
KEY POINTS
Skin flaps
Mark the proposed skin flaps preoperatively.
They should be approximately as long as the base is wide at the level of bone section.
Leave them too long rather than too short.
If amputation follows traumatic injury, preserve all viable skin to create an adequate stump.
In the presence of vascular disease do not undermine the edges of the flaps.
3. Wherever possible, include underlying muscles in the flap (myoplastic flap) since this greatly improves the skin blood supply and covers and protects the stump. Muscles provide power, stabilization and proprioception to the stump. In emergency cases remove all dead muscle (this avoids gas gangrene) and leave viable muscle (red, bleeding and contracting). In elective cases cut the muscle with a raked incision angled towards the level of bone section.
4. Double-ligate major vessels with strong silk or linen thread. Ligate other vessels with absorbable material such as polyglycolic acid (Dexon).
5. Gently pull down nerves, divide them cleanly and allow them to retract into soft tissue envelopes. Ligate major nerves with a fine suture prior to and just above the site of division. This stops bleeding from accompanying vessels and decreases neuroma formation.
6. Prepare to cut the bone at the appropriate level. Remember that the stump must be long enough to gain secure attachment to the prosthesis and to act as a useful lever but short enough to accommodate the prosthesis and its hinge or joint mechanism. Divide the periosteum and cut the bone with a Gigli or power saw. During bone section, cover the soft tissues with a moist pack and irrigate afterwards to remove bone dust and particles from the soft tissues. Round-off sharp bone edges with a rasp.
7. Check that the flaps will approximate easily.
8. Release the tourniquet and secure haemostasis.
10. Suture the flaps together without tension, starting with the muscle. Handle the skin carefully and close it with staples if available, or interrupted nylon sutures.
11. In the presence of infection or if you have any doubt about the viability of the flaps, approximate the muscles loosely over gauze soaked in saline or proflavine to prevent them from contracting. Do not close the skin. Plan delayed primary closure at 5–7 days.
Aftercare
1. Apply a well-padded compressible but not crushing dressing, using either cotton wool or latex foam. Hold this in place with crepe bandage taking care to avoid fixed flexion or other deformity of neighbouring joints.
2. Except in cases with infection or doubtful flap viability, apply a light shell, maximum four layers, of plaster of Paris over the dressing. This makes the patient more comfortable and able to be more mobile in bed. In specialist centres a prosthetist can apply a rigid dressing to which a temporary pylon can be attached, allowing early ambulation.
3. Leave the dressing undisturbed if possible for 10 days.
4. Order regular physiotherapy to prevent joint contractures.
5. Encourage mobilization and use of the stump as soon as the patient is comfortable.
6. When the wound has healed and sutures have been removed, apply regular stump bandaging to maintain the shape of the stump.
7. As soon as possible refer the patient to the local limb-fitting centre if you had not already done so before operation.
Special situations
Amputations in children
Children’s amputations present their own special problems:
Growing bones at the site of amputation will overgrow by apposition, not related to growth at the proximal growth plate. You may need to revise the bone to prevent skin problems.
If possible, always preserve epiphyseal growth plates.
Amputations of accessory digits in children:
Certain cultures discriminate against children with accessory toes of fingers while other cultures applaud them. Sensitivity is needed and the wishes of the child and parents must be respected.
Accessory digits, and if necessary the associated metacarpals or metacarpals, should be amputated according to the principles described below.
Amputations of lower limbs with congenital tibial and fibular dysplasia in children:
Congential tibial and fibular dysplasia is frequently bilateral and presents with shortened lower limbs and a child who is crawling on the ground.
The whole tibia may be missing, in which case the child is weight bearing through the distal femur.
Discuss the possibility of making a prosthesis immediately and during subsequent growth.
Discuss amputation with the parents.
Use the principles of lower limb amputation discussed below.
Decision making for amputations in major trauma
1. Objective criteria help predict amputation following lower extremity trauma. The Mangled Extremity Score (MESS) is one such system. It uses four significant criteria of skeletal/soft-tissue injury, limb ischaemia, shock and patient age.
2. Such systems help you to discriminate between salvageable limbs and those better managed by primary amputation.
Complications
Haematoma
1. Haematoma in the stump predisposes to infection and greatly delays prosthetic fitting.
2. Drain collections of blood by aspiration or a small incision. Perform this in the operating theatre under sterile conditions, not on the ward. Local anaesthesia is usually sufficient.
3. If there is clearly uncontrolled haemorrhage, apply firm compression and elevate the limb while you make arrangements to explore the stump under a general anaesthetic.
Infection
1. Amputation stumps are more at risk of infection than most other surgical wounds. The stump tissues are often poorly vascularized, there are often infected lesions in the distal extremity, and patients are often frail and elderly, with poor resistance to infection.
2. Give prophylactic antibiotics to all lower-limb amputees. Choose antibiotics that are active against Clostridia, Escherichia coli and staphylococci.
3. Handle all soft tissues with care and avoid leaving dead muscle and long sections of denuded cortical bone in the stump.
4. Treat wound infections promptly with antibiotics. Incise and drain any collection of pus.
5. If a chronic sinus fails to dry up with a course of antibiotics lasting up to 6 weeks, explore the stump under general anaesthesia. You will usually find a focus of infection such as a small bony sequestrum or a lump of infected suture material.
Flap necrosis
1. Prevent this complication by carefully assessing skin viability prior to amputation and by handling all skin edges and flaps with the utmost care. Use a myoplastic flap wherever possible as this always has a better blood supply.
2. Treat small areas of wound necrosis conservatively. The wound often granulates beneath the patch of blackened, sloughing skin, which eventually separates spontaneously.
3. Major flap necrosis requires either a wedge resection, down to and including bone, or re-amputation to a higher level.
Joint contractures
1. Treat or prevent mild contractures by early active and passive exercises, place the joints in a corrective posture, fit a prosthesis that retains the position, and encourage mobilization. For example, regularly lying the patient prone discourages hip contractures.
2. Severe contractures may require serial plasters or surgical release; otherwise, applying a prosthesis is likely to be impossible and useless.
