Oral and maxillofacial surgery
GENERAL PRINCIPLES OF ORAL SURGERY


Anaesthesia


1. Most minor procedures such as tooth extraction, biopsy, removal of salivary calculi and suturing of lacerations can be carried out using local analgesia. Local anaesthetics are available in 2-ml glass cartridges, the most common of which contain 2% lidocaine with adrenaline (epinephrine). Use 3% prilocaine with felypressin for patients sensitive to adrenaline (epinephrine). These cartridges fit into a syringe with a disposable needle.
2. In the upper jaw, deposit 1.5 ml of solution over the apex or apices of the offending tooth on the buccal side and about 0.5 ml on the palatal side. In the lower jaw, a similar technique may suffice for the anterior teeth. For the posterior teeth, an inferior alveolar and lingual nerve block is required at the lingula of the mandible, along with a long buccal nerve block at the anterior edge of the ramus of the mandible. Regional nerve block can also be used in the maxilla but, before attempting this, refer to appropriate literature.


3. General anaesthesia is often preferable in the treatment of children, patients who have fluctuant abscesses and if there is a history of allergy to local anaesthetic.
4. Hold the jaws apart with a prop or gag and stabilize the head in a rubber ring or horseshoe. Do not dislocate the jaw or tear the lips, which tend to be dry following preoperative fluid restriction.
5. Lightly coat the lips with petroleum jelly to keep them moist.
Haemostasis
1. Remove excess clot. Suture tightly across the socket and repair any lacerations. Apply pressure with a damp gauze pad for 10 minutes, timed by the clock.
2. If bleeding continues, infiltrate local anaesthetic with adrenaline around the area and lightly press a resorbable haemostatic material, such as oxidized cellulose, into the socket.
3. Sit the patient up at least 45° and if necessary give a sedative.
4. Control secondary haemorrhage with pressure, treat infection with systemic antibiotics. A 5-day course of metronidazole and amoxicillin will cover most oral infections. Prescribe 6% hydrogen peroxide mouthwashes.
5. Treat medical causes for prolonged bleeding appropriately, such as haemophilia, thrombocytopenia or hepatic cirrhosis. In patients with haemophilia it is essential to liaise with their haematologist to ensure appropriate factor replacement over the course of the treatment. When dealing with patients on warfarin or antiplatelet medications (e.g. clopidogrel, aspirin) give 5% tranexamic acid as a mouthwash. Flush the socket with the liquid then insert some oxidized cellulose and suture the socket. Prescribe the mouthwash four times a day for 5 days.
6. If the prothrombin time is within the normal therapeutic range, you need not stop the warfarin in order to remove only a few teeth.


Suturing
1. Use a half-circle 22–24-mm needle with a reverse cutting edge.
2. Use 3/0 sutures. Silk is easy to use but must be removed. Nylon is uncomfortable and also needs to be removed. Polyglactin 910 remains intact in the mouth for 3–4 weeks and produces minimal reaction but the knots and ends are irritating.
3. Use a needle-holder with a ratchet to avoid dropping the needle into the pharynx.
4. Insert the needle into the mucosa 3–5 mm from the edge, taking greater care on the more friable lingual edge.
5. The mucosal edges can rarely be approximated over a socket without excessive removal of bone. If you wish to apply even tension, insert mattress sutures.
6. Tie knots with the needle-holder rather than fingers: this is easier if you keep the end of the suture material short.
Aftercare
1. Warn the patient that, until healing is complete, there may be constant discomfort because of the need to eat, swallow and speak.
2. If necessary, prescribe moderate analgesics such as ibuprofen or paracetamol. Aspirin mixture, used as a gargle, relieves a sore throat caused by an endotracheal tube and packing and ensures more comfortable swallowing. Ice packs applied to the skin for the first 4–6 hours reduce the swelling and subsequent discomfort.
3. Advise the patient that there may be difficulty in opening the mouth wide and chewing may be painful so that a soft diet may be beneficial.
4. Patients who have had their fractured jaws fixed together require special care in the early postoperative hours to avoid inhaling vomit. Swallowed blood may cause vomiting. To avoid this ensure that the stomach is empty preoperatively and administer an anti-emetic. Keep a suction machine and wire-cutters by the bedside and show the nurses which wires to cut in an emergency.
5. When carrying out an operation on bone, many surgeons prescribe prophylactic antibiotics.
TOOTH EXTRACTION
Appraise
1. Is the extraction urgent or will antibiotics give relief until a specialist is available?
2. Tooth removal is indicated when there is a large cavity in a painful tooth, a painful loose tooth resulting from periodontal infection, an alveolar abscess or a loose tooth following trauma that could be inhaled.
Prepare
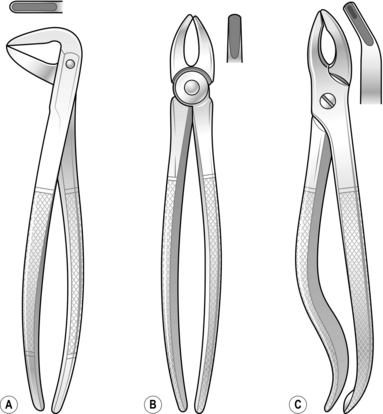
1. Extraction forceps: there are three basic pairs (Fig. 41.1), although many more specialized forceps are available.
2. Elevators (levers) enable you to remove broken roots or to loosen teeth before using forceps.
3. Prepare yourself by obtaining a radiograph before tooth removal to display unfavourable curved root patterns, buried roots, impacted teeth and latent pathology.
4. As a rule, have the patient seated, although the supine position is sometimes appropriate. Use local or general anaesthesia.
Action
1. Stand in front of the patient for most extractions. If you are right-handed, it is most convenient to stand behind the patient’s right shoulder to remove lower right teeth.
2. Position the forceps blades on the buccal and lingual aspects of the tooth and push them under the gum as far as they will go along the root.
3. Grip the tooth and move it to expand the socket.
4. Deliver the tooth in the direction of the weakest wall – generally the buccal.


5. Squeeze the socket with your fingers to reduce the dead space and position a damp gauze pad for the patient to bite on until the clot has formed.
6. Instruct the patient to avoid touching the clot for 24 hours and then bathe the wound frequently with warm saline mouth washes until it heals.
7. Leave small broken roots but attempt to remove large superficial roots using fine forceps or elevators.
8. If possible, refer patients with unerupted or impacted teeth to a specialist. Extraction may necessitate removing sufficient bone to allow elevation of the tooth. Use a small chisel or drill to remove the bone.
Aftercare
1. Inspect the socket if infection and pain develop a few days following extraction.
2. If the blood clot has disappeared, the empty socket fills with debris and pus.
3. Syringe out the socket and insert an antiseptic, which usually cures the osteitis. Although the socket closes slowly, a protective epithelial layer soon covers it.
JAW INFECTIONS
DENTAL ABSCESS
1. Once pus has escaped from bone, its direction of spread is influenced by gravity and muscle attachments.
2. Antibiotics given before there is significant fluctuation may suppress it.
Action
1. If there is no swelling, remove the tooth. Antibiotics are rarely required.
2. Treat a non-fluctuant swelling with antibiotics. The bacteria may be anaerobic.
3. Remove the source of infection if you can provide adequate anaesthesia.
4. When the tooth is partly erupted, clean the underside of the gum flap with an antiseptic solution or 6% hydrogen peroxide.
5. A sharp upper wisdom tooth may traumatize the cheek or the gum over a lower tooth. Removal of the upper is usually simple and gives relief of pain until the more complex lower can be extracted.
6. When fluctuation is present in the mouth, remove the offending tooth if accessible and incise the swelling in the buccal sulcus or palate to release pus that has not emptied into the socket.
7. Pus around the muscles of mastication produces trismus and prevents easy access to posterior teeth. This usually presents as a submandibular abscess. Under general anaesthesia, incise the skin of the neck at the most dependent point of the swelling and parallel to the lower border of the mandible. Extend the wound by blunt dissection then open up the loculi. Pass a pair of sinus forceps to the full depth of the cavity. Open the jaws of the forceps and remove them to enlarge the opening. Repeat this manoeuvre in a plane at right-angles to the original. In large cavities, the septae can be broken down with a finger.
8. Insert a drain for 24–48 hours. If the abscess is extensive, pass the drain from the skin through the abscess cavity and lingual mucosa into the mouth lateral to the submandibular duct. Draw it out of the mouth and fix it to the other end of the drain.
9. Remove the diseased tooth if possible during the anaesthetic period.
CELLULITIS
1. Cellulitis involving the sublingual and submandibular spaces and the cervical fascial plane is named Ludwig’s angina after the German surgeon who described it. It is usually caused by streptococcal infection, making breathing and swallowing difficult.
2. Inspect an X-ray of the neck and mediastinum, looking for gas bubbles.
Action
1. Administer parenteral penicillin and metronidazole and a steroid such as dexamethasone every 8 hours for 24 hours, which will produce rapid improvement in early cases.
2. If the infection is established, you may need to make multiple superficial incisions of the skin of the neck to relieve pressure on the glottis. Deeper incisions and blunt dissection may cause additional, dangerous oedema.
3. Perform tracheostomy (see Chapter 40) if dyspnoea threatens. If the source of infection is accessible, remove it.
OSTEOMYELITIS/OSTEONECROSIS OF THE JAW
1. This rarely occurs in well-nourished populations, except those patients who have undergone previous radiotherapy to the jaws or have been on parenteral or long-term bisphosphonates.
2. The mandible is more frequently involved than the maxilla.
3. Most patients respond to long-term treatment with antibiotic therapy or in the case of osteoradionecrosis, hyperbaric oxygen can be used if available. If infection persists operation may be required.
Action
1. In the acute phase, expose the lateral cortex of the mandible through a submandibular incision. Remove the cortex with a dental drill. If a large drill is not available, make multiple perforations and prise off segments with a chisel. Remove loose sequestra. Insert drains and close the wound.
2. In the chronic stage, expose the outer cortex of the mandible and dissect out the inferior alveolar neurovascular bundle. Remove the area of involved bone in a block and plan to graft the defect at a later date. Gentamicin beads or foam may be helpful.
3. Osteonecrosis following radiotherapy is difficult to treat and may require a microvascularized graft from a distant donor site. Referral to a specialist unit is necessary.
FACIAL SINUS
1. A sinus on the face, such as the chin, cheek or nasolabial fold, may be caused by a chronic low-grade dental infection. Multiple or recurring sinuses suggest the possibility of actinomycosis.
2. Clinical and radiographic examination usually shows a tooth is involved.
Action
1. If the sinus is recent, remove the tooth or refer to a dental surgeon for root canal treatment.
2. Excise the sinus with an ellipse of skin if it is retracted. Encourage a small sinus to heal by cauterizing the track with a crystal of silver nitrate.
3. If you suspect actinomyces infection, give an antibiotic such as penicillin for 6 weeks.
TEMPORO-MANDIBULAR JOINT DISLOCATION
1. The temporo-mandibular joint (TMJ) has an upper and lower joint space divided by a disc of fibrocartilage. The cartilage moves with the condyle to ensure smooth passage as it passes down the articular eminence to increase mouth opening.
2. There are many problems associated with this joint, ranging from acute myofascial pain syndrome to generalized systemic disorders, e.g. gout or rheumatoid arthritis, which are best treated by appropriate specialists.
3. Dislocation is an alarming and stressful condition for the patient. Oral sedation followed by manipulation is frequently cited as the method to reduce the condition but often results in failure and great stress to the patient.
Action
1. A simple and reliable method is to inject 1–2 ml of 2% lidocaine solution into the TMJ space which lies just anterior to the tragus. A hollow in the tissues can be palpated when the joint is dislocated.
2. In addition, infiltrate a further 2 ml of 2% lidocaine into the sulcus high above the 2nd and 3rd upper molars on the affected side. This procedure blocks the proprioceptive feedback and reduces spasm in the lateral and upper part of medial pterygoid muscles which hold the disc and joint in the dislocated position.
3. Wait for 10 minutes and then place each thumb onto the posterior buccal aspect of the last mandibular molar area.
4. Press downwards and backwards to unlock the condylar head over the articular eminence. If the local anaesthetic is correctly placed, the procedure is not usually painful and will reduce most dislocations.
5. In the last resort, reduce the jaw under general anaesthesia.
6. If the TMJ repeatedly dislocates, as may occur in stroke patients, then selective botulinum toxin injections or surgical reduction of the articular eminence can be tried. Refer the patient to a specialist.
FACIAL FRACTURES
Appraise
1. Facial injuries involve the nose, maxilla, zygoma and mandible. Fractures of the nose are dealt with in Chapter 40.
2. Respiration. Posterior and inferior displacement of the maxilla and blockage of the nose with blood clot cause respiratory distress. Bilateral fractures of the body of the mandible may result in lack of support for the tongue, which then falls back against the pharynx if the patient lies on his back.
3. Bleeding from facial injuries may appear copious, but is rarely life-threatening. If there are signs of shock, check other injured sites such as ruptured internal organs and fractured limbs. Fixation of fractures reduces haemorrhage.


Emergency action
1. Respiratory obstruction from posterior displacement of the maxilla will be relieved by pulling the maxilla forwards with a finger hooked around the back of the palate.
2. Relieve obstruction following bilateral mandibular fractures by placing the patient in the recovery position. This allows the tongue to fall forward under gravity and prevents blood and debris from being inhaled. If necessary, insert a tongue stitch to pull the bulk of the tongue forwards.
3. Remove foreign bodies, such as broken teeth or dentures, from the mouth and pharynx. Plastic dentures are radiolucent and may not be apparent on a chest X-ray.
4. Unconscious patients with severe facial injuries may require an elective tracheostomy if oral or nasal intubation proves difficult.
5. Control persistent bleeding from the nose with posterior nasal packs.
Assess
1. Mandibular fractures are often bilateral. A mandibular body fracture is often accompanied by a contralateral condylar fracture. Unilateral condyle neck fractures may not require treatment if the occlusion can be maintained. Bilateral condyle neck fractures combined with a fractured maxilla may require complex treatment.
2. Most fractures through the tooth-bearing areas are compound.
3. Carefully look for deformity or loss of facial symmetry.
4. Assess the number and position of teeth, and note any wear facets, in order to determine if the relationships have been altered.
5. Note the proximity of a fracture line to apex of tooth, as a devitalized tooth may become infected and delay healing.
6. Identify and record the presence and site of skin lacerations.
7. Test for sensory loss to assess the possibility of nerve damage, including loss of smell, indicating possible olfactory nerve damage.
8. Look for possible complications of fractures, such as diplopia and trismus.
9. Carefully check for cerebrospinal fluid leakage from the nose or ear.
Appraise
1. If the teeth meet correctly, the mandibular fractures are probably reduced.
2. Maxillary fractures need to be splinted to the skull or zygomatic arches if they are intact.
3. Intermaxillary fixation of maxillary fractures needs to maintained for 3 weeks and 4–6 weeks for the mandible.
4. Remove teeth if they are in the line of the fracture and loose.
5. Give appropriate antibiotics.
6. Treat the patient under general anaesthesia unless the displacement is minimal.
7. If a general anaesthetic is administered, remember to remove the throat pack before finally tightening the intermaxillary fixation.
8. Consider the need for anti-emetics and nasogastric tube gastric aspiration.
MANDIBLE
Appraise


Action
 If appropriate, expose the fracture through the mouth or a skin laceration.
 Remove an unerupted posterior tooth if it is in the fracture line.

 Apply temporary intermaxillary fixation to hold fragments accurately.


2. Eyelet wiring. This may be possible when there are sufficient occluding teeth. Stretch soft, stainless steel wire of 0.5 mm diameter by 10%. Fold 15 cm of wire in half and bend round the shaft of a dental burr to form a loop in the middle. Pass the two ends between adjacent teeth so that the eyelet is on the buccal side. Separate the ends and pass them back around each tooth. Thread one end through the eyelet and twist off with the other. The wire should be between the gum margin and the most bulbous part of the tooth (Fig. 41.3). When sufficient wires have been placed in both jaws and on all fragments, place the teeth in occlusion. Pass a tie wire through an eyelet in the lower jaw and one in the upper jaw and twist them together. Ensure the ends of the twisted wires are tucked between a pair of teeth to protect the lips and cheeks (Fig. 41.4). By convention, all wires are twisted in a clockwise direction. Take care when using wires to avoid a needle-stick injury.
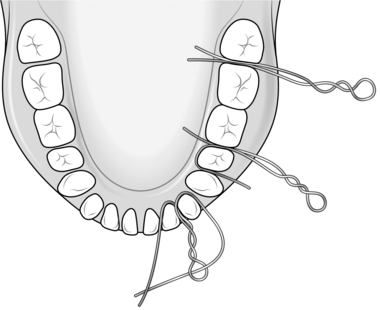
Fig. 41.3 Steps in the placement of eyelet wires.
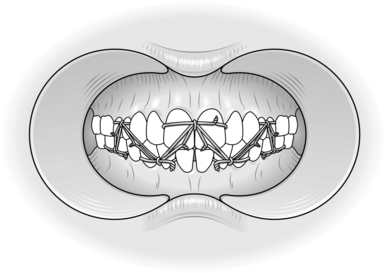
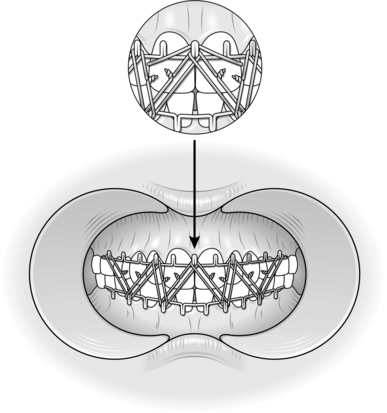
3. Arch bars. These are an alternative to eyelets, especially when there are missing teeth. Commercially prepared bars are available with loops or cleats attached. Cut a sufficient length of bar and apply it to all the teeth in one jaw. The loops point towards the roots of the teeth. Fix the bar to the jaws with wire twisted round each tooth and the bar. Carry out a similar procedure in the other jaw. Place the teeth in occlusion and twist the wire around the opposing loops of the arch bars (Fig. 41.5).
4. Gunning splints. Use these for edentulous patients. Obtain the help of a maxillofacial technician. The splints are made from impressions of the patient’s mouth or from the patient’s dentures if available. The splints or dentures are wired to the jaws after reducing the fractures. The wires are passed round the splint and the mandible. In the upper jaw the wires are looped round the denture and through the alveolar ridge. A large hole in the palate of the splint makes this easier. The wires are placed using an awl with a hole near the trocar point in which the wire can be held (Fig. 41.6). Take care not to let the wire enter the fracture or damage the submandibular ducts.
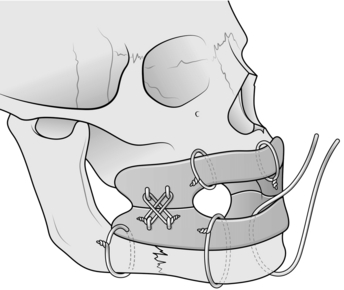
Fig. 41.6 Gunning splints fixed to jaws.
5. Barrel bandage. This is normally used only as a temporary measure before the patient can receive the correct treatment. The bandage should be non-stretch material. Apply it to hold the lower jaw against the upper and not to pull the chin backwards (Fig. 41.7). Ensure there is adequate space for easy observation of the pupils and lips.
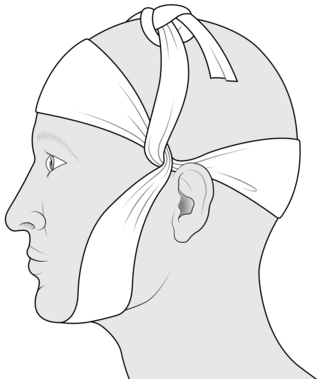
Fig. 41.7 Barrel bandage.
MAXILLA
1. A fractured maxilla is displaced posteriorly and inferiorly.
2. Disimpaction involves moving the maxilla in the opposite directions after freeing it with disimpaction forceps.
3. After disimpaction, fix the teeth in occlusion with a few wires round upper and lower teeth.
4. By applying pressure under the mandible, reduce the fracture between the maxilla and skull.
Fixation
1. Plating. Do not embark on this unless you have had special training in the use of plates and are familiar with the anatomy of the maxilla and nose. Plates can be used to fix a fractured maxilla, reducing the need for intermaxillary fixation. They are placed across the fracture lines using a suitably shaped plate. The bone over the zygomatic buttress is thick and will hold a relatively long screw as will the piriform rim of the nose but the anterior wall of the maxilla is thin and the thread of the screw may strip the bone. Avoid placing a screw into the maxillary antrum or a tooth root. Metal plates can interfere with CT (computed tomography) scans. Titanium causes less interference and can be used round the orbit, on the frontal bone and nose.
2. Halo frame. This is easy to use, versatile and firm but you should not attempt to use it unless you have had special training. The same warnings apply to the use of pins and screws.
3. Internal fixation may be within your capabilities. Using an awl or lumbar puncture needle, pass a loop of wire round the zygomatic arch and into the mouth in the molar region. Pass one end through an eyelet or round a cleat on splints or arch bars in the upper or lower jaws and twist it with the other end (Fig. 41.8).
Aftercare
1. Administer prophylactic antibiotics where there are compound fractures around the mouth. If you suspect cerebrospinal fluid leakage, amoxicillin or equivalent is mandatory.
2. If you have used a general anaesthetic remove the anaesthetist’s throat pack.
3. Patients with intermaxillary fixation need close supervision postoperatively in case they inhale vomit. Keep a suction machine and wire-cutters by the bedside and instruct the nurses how to use them.
4. Give anti-emetics at the end of the general anaesthetic.
5. Elastic bands are safer than wires for intermaxillary fixation but need replacement.
6. Give a fluid or semifluid diet. Six small meals are easier to take than three large ones.
7. Keep the mouth clean with mouthwashes in a syringe and a small toothbrush.
ZYGOMATIC COMPLEX (MALAR)
Access
1. Use Gillies temporal approach. Make a 2.5-cm incision in the hairline between the main branches of superficial temporal vessels. Cut at 45° to zygomatic arch inclining the incision posteriorly.
2. When you reach glistening temporalis fascia, incise it carefully to avoid damaging the temporalis muscle.
3. Slide a Howarth’s periosteal elevator or similar shaped instrument under the fascia until it is beneath the zygomatic arch. You should not feel any resistance until you reach the arch.
Action
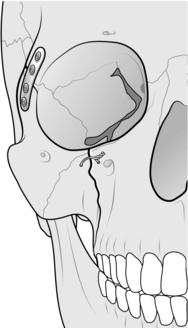
1. Exchange the Howarth for a Bristow elevator or one of the modifications (e.g. Rowe zygomatic elevator) and lift the displaced bone with an anterior and lateral motion. A slight lateral rotation may also help. Do not lever against the middle cranial fossa. The bone usually jams into place with a click (Fig. 41.9).
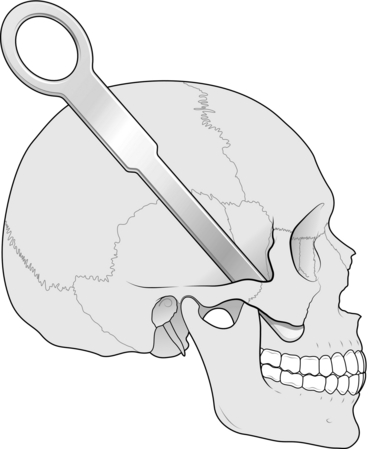
Fig. 41.9 Elevator under zygomatic arch.
3. Mark the affected cheek and instruct nurses not to lay the patient on that side. Pressure on the bone at this stage may easily displace it.
DIFFICULTY
1. The reduced fracture may be unstable. Do not attempt to insert plates or wires unless you are specially trained. If you attempt wiring, look for and protect the infraorbital nerve as it comes out of the foramen. The fracture often runs through it. Protect the eye when drilling the holes (Fig. 41.10).
2. Support can be provided by placing a pack into the antrum, but do not attempt to insert a pack into the antrum through a Caldwell-Luc approach unless you have had special training.
3. If there are trapped orbital contents and the patient displays marked diplopia with unequal pupil levels, you should make every effort to obtain specialist help and advice.
Banks, P., Brown, A. Fractures of the Facial Skeleton. Oxford: Wright; 2000.
Burkitt, H.G., Quick, C.R.G. Essential Surgery, 3rd ed. Edinburgh: Churchill Livingstone; 2002.
Ferraro, J.W. Fundamentals of Maxillofacial Surgery. New York: Springer; 1997.
Hawkesford, J., Banks, J.G. Maxillofacial and Dental Emergencies. Oxford: Oxford University Press; 1994.
Hutchison, I., Lawlor, M. Major maxillofacial injuries. Br Med J. 1990; 301:595–599.
Kaban, L.B., Pogrel, M.A., Perrott, D.H. Complications in Oral and Maxillofacial Surgery. Philadelphia: Saunders; 1996.
Langdon, J.D., Patel, M. Maxillofacial Surgery. London: Chapman & Hall Medical; 1998.
McGowan, D.A. An Atlas of Minor Oral Surgery: Principles and Practice. London: Martin Dunitz; 1999.
Miloro, M. Peterson’s Principles of Oral and Maxillofacial Surgery, 2nd ed. New York: Marcel Decker; 2004.
Moore, U.J. Principles of Oral and Maxillofacial Surgery, 5th ed. Oxford: Blackwell Science; 2000.
Moore, J.R., Gilbe, G.V. Principles of Oral Surgery, 4th ed. Manchester: Manchester University Press; 1991.
Pedlar, J., Frame, J.W. Oral and Maxillofacial Surgery. Edinburgh: Churchill Livingstone; 2001.
Robinson, P.D., Pitt Ford, T.R., McDonald, F. Local Anaesthesia in Dentistry. Oxford: Wright; 2000.
Ward-Booth, P., Hausaman, J., Schendel, S.A. Maxillofacial Surgery. Edinburgh: Churchill Livingstone; 1999.
Wray, D., Stenhouse, D., Lee, D., et al. Textbook of General and Oral Surgery. Edinburgh: Churchill Livingstone; 2003.