[level-membership-for-plastic-reconstructive-surgery-category]
Chapter 2 Optimizing Success in Aesthetic Breast Surgery
General Concepts
In many respects, quality breast surgery is as much a product of intelligent preoperative preparation and planning as it is sound technical skill. In fact, much of the most useful information that hopefully will come from this book will be contained in this chapter. As I have built my breast practice over the years, a pattern for success has emerged that has improved my personal results in both aesthetic and reconstructive breast surgery. This approach has made these results more consistent and helped tremendously in holding complications to a minimum. This approach can be divided into preoperative and intraoperative considerations.
Preoperative Considerations
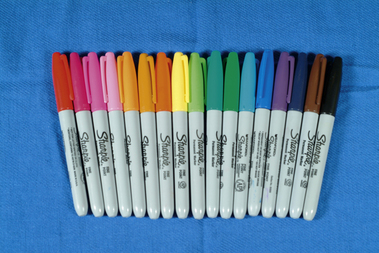
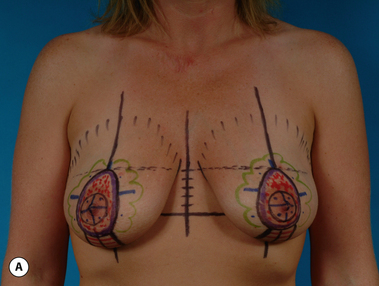
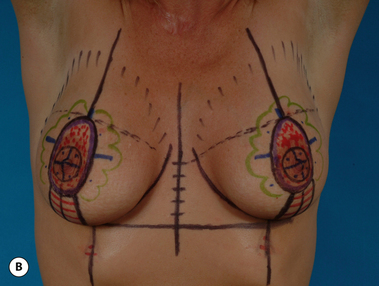
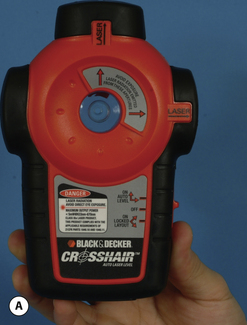
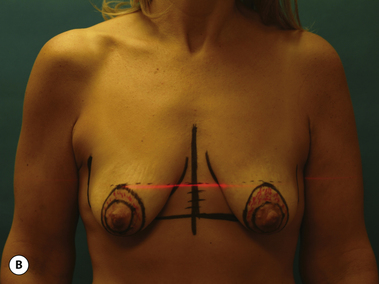
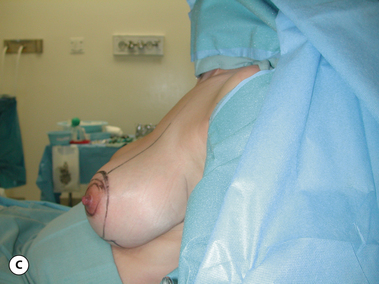
The second major goal of the preoperative visit is technical and relates to patient marking. As opposed to the often harried environment which is present in the hospital or surgical center, marking in the office allows the surgeon to apply all his or her energies to the task at hand in a quiet, controlled environment without interruption by anesthesia staff or nurses. All marking supplies will be readily available and experienced nursing staff assistance is assured. Marking done in conjunction with the administrative functions described previously assures that all issues will be addressed and greatly minimizes the potential for either significant or insignificant errors. Standard ‘permanent ink’ skin markers are used to identify pertinent landmarks as the patient stands upright in a relaxed position. Various multicolored packs of markers are available, with my personal preference being the ‘Sharpie’ brand, which offers up to 24 different colors (Figure 2.1). Bedsides the standard black and red, various other colors can be used to signify the particular surgical steps to be undertaken. For instance, areas of skin to be resected can be designated one color and areas where undermining is to be performed can be outlined in another. Any color scheme is appropriate and when this scheme is applied uniformly from patient to patient, the accuracy of the preoperative plan becomes enhanced. Essentially, the entire operative sequence is performed in the surgeon’s mind’s eye during the marking procedure with the marks documenting the surgical steps. In my opinion, the more detailed the marking pattern, the better the likelihood the proposed surgical procedure will be successful (Figure 2.2 A,B). One additional device which is quite useful is a standard laser leveler, which is available at most hardware stores. By dimming the lights and using the red laser light to reveal the true horizontal plane across the chest, accurate placement of important breast landmarks such as the top of the areola can be assured. Using this device can be very helpful, particularly in patients with preoperative asymmetries, where landmarks can be sometimes difficult to identify correctly and symmetrically (Figure 2.3 A,B).
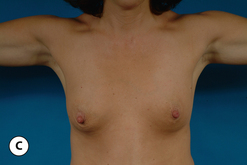
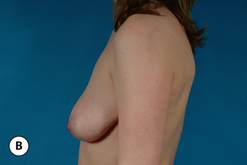
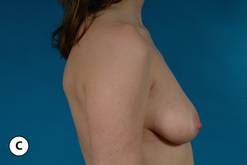
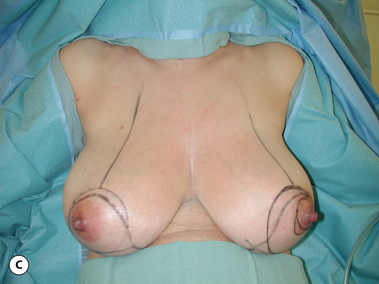
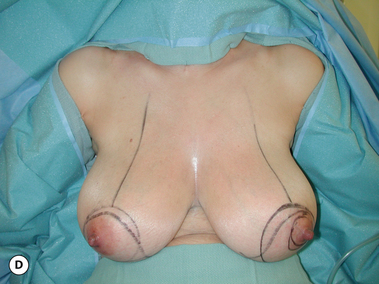
At this point, it is very important to note the patient’s natural shoulder position. Many patients will have an asymmetry in their shoulder level, which affects the position of the breast when the shoulder is artificially raised or lowered (Figure 2.4). This asymmetry must be replicated during surgery when the patient is placed upright on the operative table to allow accurate intraoperative assessment of important landmarks such as the location of the nipple and areola or the level of the inframammary fold. Another important yet subtle maneuver to perform is the ‘arm abduction test’. Here, the patient slowly raises her arms up from the sides to a position extending straight out from the torso at 90 degrees. As this is done, the effect of this position on the shape and position of the breast is noted. In some patients, no significant change in breast shape occurs and it is perfectly acceptable to position the arms at 90 degrees on armboards at the time of surgery. However, in some patients, the breast begins to become distorted in some fashion at about 45 degrees and worsens with continued arm abduction (Figure 2.5 A–C) (DVD clips 1.02, 1.03). In these patients, it is important to position the arms on armboards during surgery at no more than 45 degrees in order to assure the most accurate intraoperative assessment of breast shape that can be obtained (Figure 2.6 A,B). This may necessitate working above the arm in some cases but is well worth the effort to afford the most control over the final result.
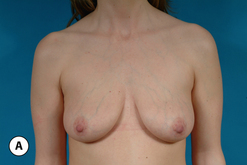
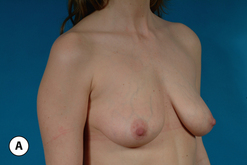
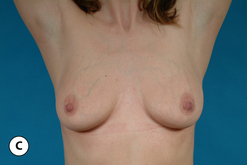
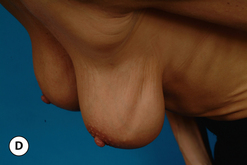
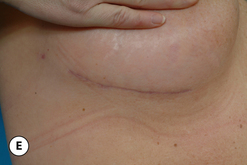
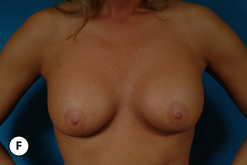
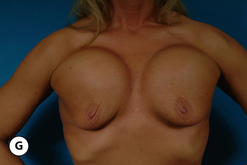
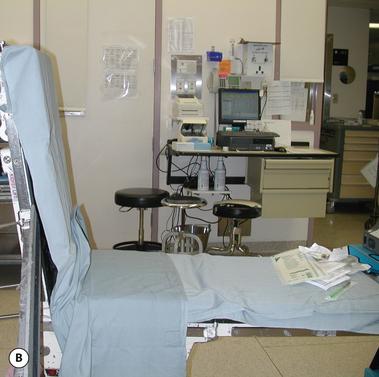
Once the marks have been made, it is very important to obtain photographs which clearly document the preoperative plan. One of the greatest teaching tools a plastic surgeon can provide to ensure steady improvement as his or her practice matures is a photograph of the preoperative marks. Not only can these images provide useful medicolegal documentation, but also they can serve as effective visual reminders to support the operative note once the result has matured over a prolonged period of time. When examining the patient after full healing has occurred, often many months to a year may have elapsed. These photographs can be used to correlate decisions made at the time of surgery with their long-term result. Such information is vital to the development of an aesthetic breast surgeon. Photographic standards must also be developed and adhered to for both pre- and postoperative images. Standard views include an AP and lateral image taken from each side with the hands and arms resting comfortably against the sides. The photograph must include the tops of the shoulders and extend down to midway between the inferior pole of the breast and the umbilicus. Centering the patient in front of a crisp colored background completes an artistic image. While various shades of gray or brown are effective, it is my personal preference to use a bright blue as a background color. This tends to provide a pleasing contrast to the patients skin color, which enhances the visual effect of the photograph (Figure 2.7 A–C). Additional views particular to the individual procedure can also be included. These additional views commonly include 3/4 views, both arms overhead, bending forward slightly to visualize implant wrinkling, breast elevation to expose scars and hands pressing in against the sides to show the effect of pectoralis major muscle contraction on breast and implant shape (Figure 2.8 A–G).

Lighting is a critical variable in the generation of high-quality images. A good basic photographic studio is relatively easy to set up and should include a backdrop with an even contrasting color (blue is recommended) and at least two photographic lights with diffusing umbrellas. The lighting system must be adjustable and synched to the camera for best results. Any camera store or photographic supply business can equip a basic studio, which can be up and running immediately.
Intraoperative Considerations
Preparing for surgery begins before the patient even enters the operating room (OR). Here, an experienced surgical staff or a dedicated nurse working closely with the surgeon can greatly facilitate the preparation of the room. Perhaps the most important piece of equipment required to successfully complete the case is the operating table. The table must sit up to 90 degrees to allow the patient to be placed upright intraoperatively. This maneuver allows the breast to be evaluated with the patient in the sitting position, a process which facilitates successful intraoperative decision making. Many operating tables do not have this capability or only sit up partially to 45 degrees or less. These tables are of limited utility and ideally would be replaced with a table that sits up a full 90 degrees to allow the best results to be obtained (Figure 2.9 A,B).

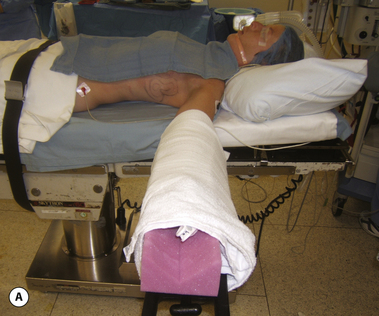
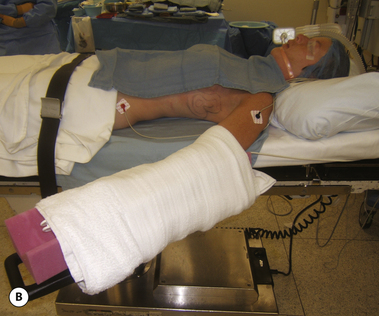
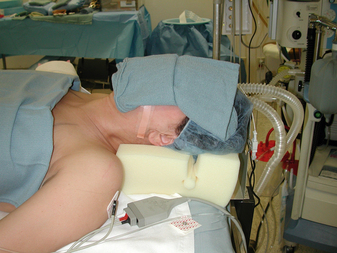
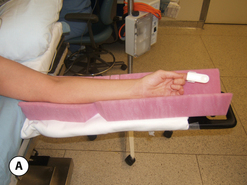
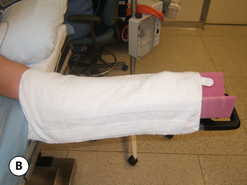
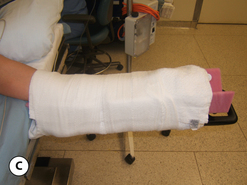
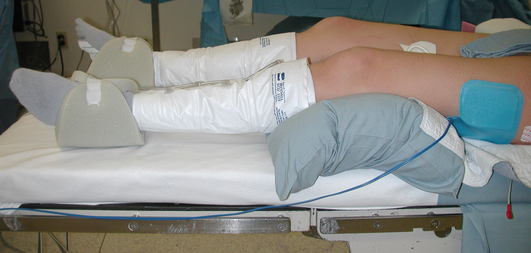
Once in the room and after the successful induction of anesthesia, the patient is positioned so the head is directly at the top of the table and is well supported by a foam headrest (Figure 2.10). This assures that the tops of the shoulders can be incorporated into the surgical prep without risk of contamination by pillows, towels or other types of head wraps commonly placed by the anesthesia staff. The arms must then be secured to allow the patient to be placed upright safely during surgery. Armboards are placed at shoulder level and foam pads are placed under the arms. The arm is then secured to the board and the foam pads with a soft gauze towel followed by a gentle circumferential wrap of gauze which runs from the axilla to the hand. This even application of pressure gently secures the arm to the armboard without risk of nerve compression during what can be long operative procedures (Figure 2.11 A–C). It is imperative that a single constricting band not be used to secure the arm to the armboard as this can lead to a troublesome pressure point and possible nerve compression. The armboard is then adjusted to an angle which will not distort the breast once the patient is placed upright. To relieve pressure on the back while upright, a pillow is placed under the knees and foam pads positioned under the heels to prevent pressure necrosis (Figure 2.12). It can also be very helpful to position the patiently preliminarily into a mild beach chair position before the surgical prep. By elevating the back of the OR table 20 to 30 degrees and flexing at the hips slightly, a head start on the upright position which will be used during the operative procedure can be obtained. This will make placing the patient upright during the procedure easier and may reduce anxiety on the part of the OR staff who may be unfamiliar with the upright position. Also, any tethering points which may have been created during patient positioning can be appropriately and easily identified and corrected (Figure 2.13). It has been our practice to utilize a heated air-warming device for all cases, no matter how long or short the planned procedure is, and this warming blanket is applied to the lower body as a final maneuver in preparation for applying the surgical prep (DVD clip 1.04).
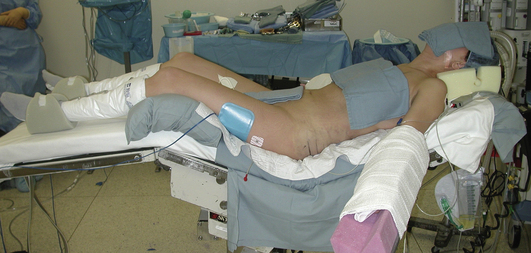
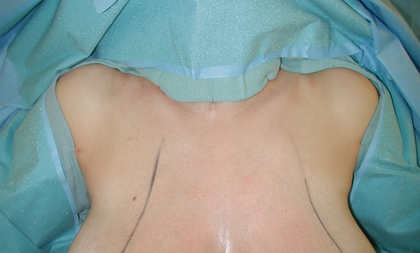
During the surgical prep, it is mandatory that the tops of the shoulders be included and then appropriately draped to allow assessment of the shoulder position when upright (Figure 2.14). Here, it may be necessary to adjust the shoulder position to recreate any preoperative asymmetries which were noted during the preoperative evaluation. Finally, it must be stressed to the nursing staff that the previously applied marks not be completely washed off for obvious reasons.
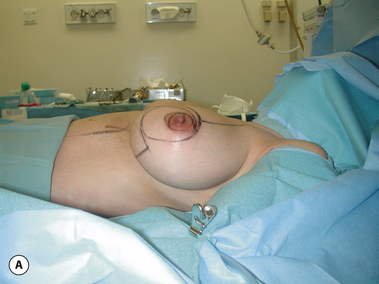
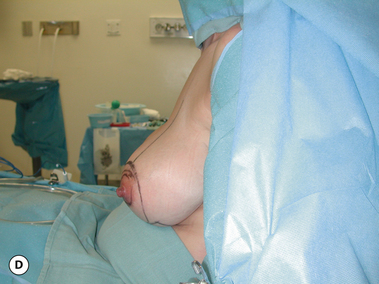
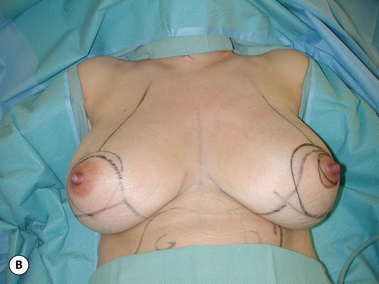
When the decision is made to sit the patient up, it is very important to bring the back of the bed up to at least 80 degrees. It is in these last few degrees that the breast can be seen to settle significantly under the influence of gravity. Only then and with proper attention to shoulder level and the angle of the armboard can the most accurate assessment of the breast be made (Figures 2.15 A–D and 2.16 A–D).


[/level-membership-for-plastic-reconstructive-surgery-category][not-level-membership-for-plastic-reconstructive-surgery-category]
Chapter 2 Optimizing Success in Aesthetic Breast Surgery
General Concepts
In many respects, quality breast surgery is as much a product of intelligent preoperative preparation and planning as it is sound technical skill. In fact, much of the most useful information that hopefully will come from this book will be contained in this chapter. As I have built my breast practice over the years, a pattern for success has emerged that has improved my personal results in both aesthetic and reconstructive breast surgery. This approach has made these results more consistent and helped tremendously in holding complications to a minimum. This approach can be divided into preoperative and intraoperative considerations.
Preoperative Considerations
The second major goal of the preoperative visit is technical and relates to patient marking. As opposed to the often harried environment which is present in the hospital or surgical center, marking in the office allows the surgeon to apply all his or her energies to the task at hand in a quiet, controlled environment without interruption by anesthesia staff or nurses. All marking supplies will be readily available and experienced nursing staff assistance is assured. Marking done in conjunction with the administrative functions described previously assures that all issues will be addressed and greatly minimizes the potential for either significant or insignificant errors. Standard ‘permanent ink’ skin markers are used to identify pertinent landmarks as the patient stands upright in a relaxed position. Various multicolored packs of markers are available, with my personal preference being the ‘Sharpie’ brand, which offers up to 24 different colors (Figure 2.1). Bedsides the standard black and red, various other colors can be used to signify the particular surgical steps to be undertaken. For instance, areas of skin to be resected can be designated one color and areas where undermining is to be performed can be outlined in another. Any color scheme is appropriate and when this scheme is applied uniformly from patient to patient, the accuracy of the preoperative plan becomes enhanced. Essentially, the entire operative sequence is performed in the surgeon’s mind’s eye during the marking procedure with the marks documenting the surgical steps. In my opinion, the more detailed the marking pattern, the better the likelihood the proposed surgical procedure will be successful (Figure 2.2 A,B). One additional device which is quite useful is a standard laser leveler, which is available at most hardware stores. By dimming the lights and using the red laser light to reveal the true horizontal plane across the chest, accurate placement of important breast landmarks such as the top of the areola can be assured. Using this device can be very helpful, particularly in patients with preoperative asymmetries, where landmarks can be sometimes difficult to identify correctly and symmetrically (Figure 2.3 A,B).
At this point, it is very important to note the patient’s natural shoulder position. Many patients will have an asymmetry in their shoulder level, which affects the position of the breast when the shoulder is artificially raised or lowered (Figure 2.4
[/not-level-membership-for-plastic-reconstructive-surgery-category]
