[level-membership-for-plastic-reconstructive-surgery-category]
Chapter 5 Mastopexy
One of the primary goals of any aesthetic procedure is to restore aged or otherwise injured structures to a rejuvenated and youthful appearance. In fact, it is the youthful ideal that serves as a template for nearly every aesthetic procedure commonly performed in plastic surgery today. To that end then with regards to the breast, in order better to understand the surgical principles involved in mastopexy, it is helpful to review the attributes of the youthful breast that help identify it as an object of beauty and femininity. Then, understanding how these attributes are altered in the ptotic patient allows an organized and complete surgical plan for the operative correction of ptosis to be developed.
Breast Ptosis – Definitions
Positional Breast Ptosis
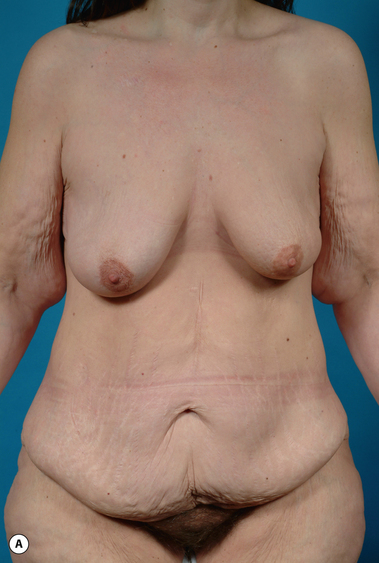
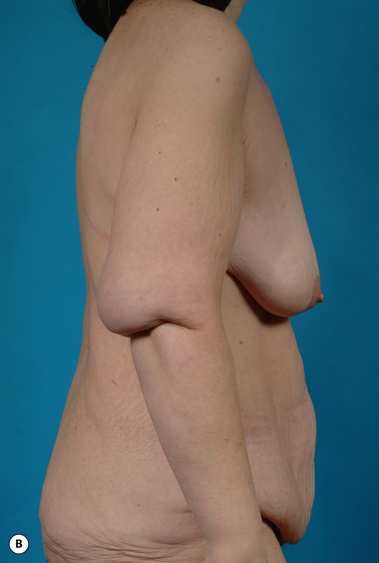
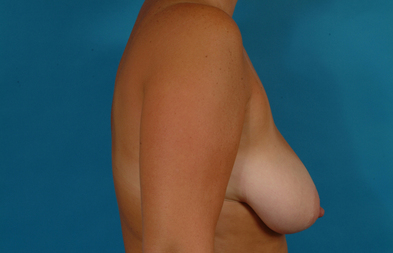
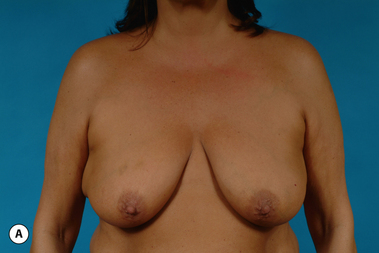
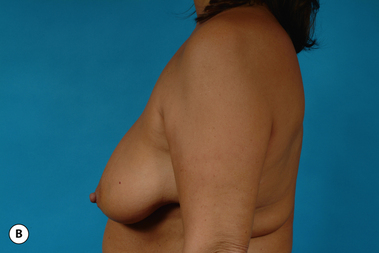
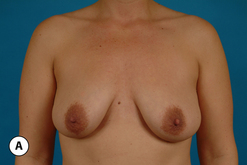
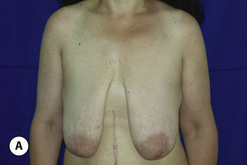
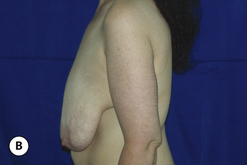
Many patients who present for ptosis surgery in fact have developed descent of the entire breast complex on the chest wall such that the normal aesthetic ideals are altered. These patients present with a low inframammary fold and an often underfilled and lax breast skin envelope that overhangs the fold and rests on the lower rib cage, masking the contour of the upper abdomen (Figure 5.1). This anatomic relationship is referred to as positional breast ptosis and it represents an under-recognized component of the overall presentation of the ptosis patient. It is most commonly seen in the massive weight loss patient where, after weight loss, the overall soft tissue expansion of the skin envelope of the breast caused by the obesity results in physical descent of the entire breast complex including the inframammary fold inferiorly on the chest wall. In some patients, the breast can actually be seen to fall as low as halfway down the length of the torso (Figure 5.2). Positional breast ptosis is very difficult to correct surgically and can actually be made worse very easily if the attachments of the inframammary fold are disrupted in any way. For this reason, recognizing positional ptosis is critical in allowing appropriate management of the breast to optimize the final result.
Volume Ptosis
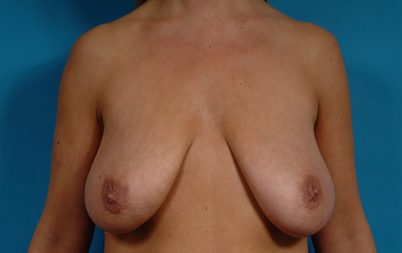
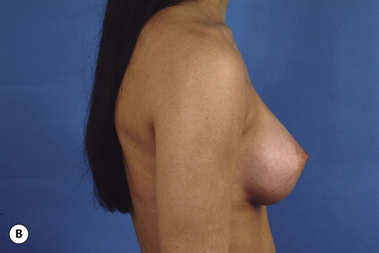
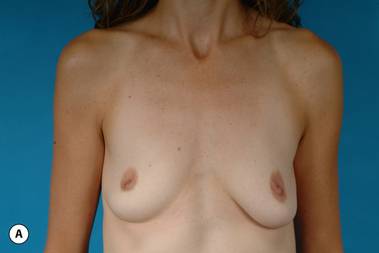
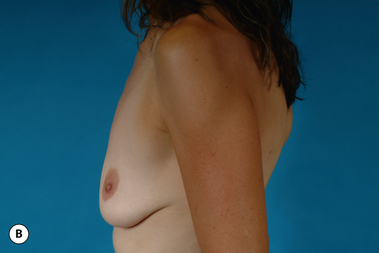
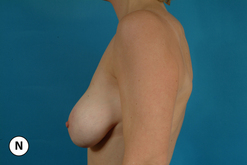
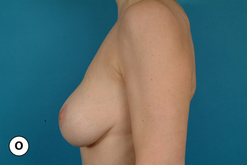
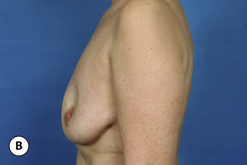
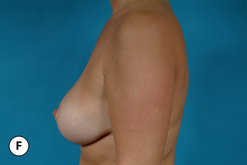
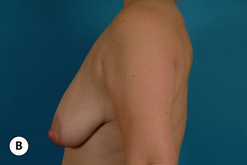
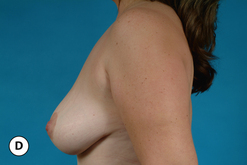
Assuming that the inframammary fold and overall position of the breast is properly located, it is then very common for the existing breast volume to become ptotic. In the aesthetic youthful breast, the support structures in the breast as well as the skin are strong, uninjured and are able to contain the developing breast volume without inordinately stretching. As a result, the volume of the breast is symmetrically distributed over the chest wall. When the patient stands upright, a mild descent in the volume distribution occurs that creates a pleasing, full and rounded lower pole along with an upper pole contour that has a smooth takeoff from its attachments to the upper chest and results in a straight line contour extending down to the point of maximal projection, where, ideally, the NAC is located (Figure 5.3). Alteration in these relationships contributes significantly to the appearance of the ptotic patient. Over time, and under the influence of other factors such as pregnancy, weight fluctuations or simply aging, the support structure of the breast can change. As the internal ligamentous support of the breast stretches, particularly with the changes in breast volume that occur with pregnancy and subsequent breast-feeding, stress is placed on the skin. Gradually, the skin gives way and the inherent elastic character becomes diminished. The result is tissue stretching with descent of the majority of the volume of the breast into the inferior portion of the skin envelope. This volume ptosis can result in a concavity in the contour of the upper pole of the breast and a breast that appears elongated (Figure 5.4). Occasionally, ptosis of the volume of the breast disproportionately involves only the skin envelope of the lower pole and as the breast gradually descends, a new point of maximal projection is created by the newly configured breast contour. In these patients, the existing NAC actually assumes a position in the upper pole of the breast above the point of maximal projection and the distance from the nipple down to the inframammary fold becomes disproportionately lengthened. This form of volume ptosis is known as pseudoptosis (Figure 5.5).
Breast Skin Ptosis
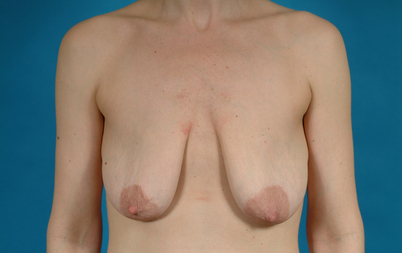
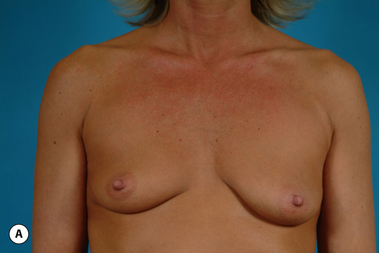
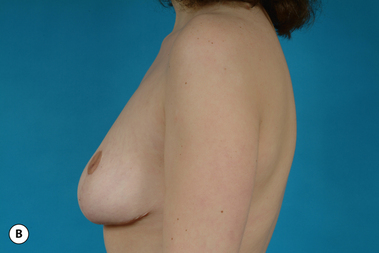
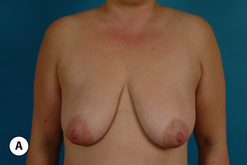
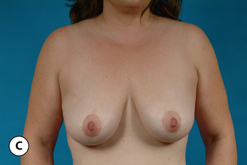
With aging, weight loss or after pregnancy, the breast fat and parenchyma can variably involute, resulting in a decrease in breast volume. Typically, however, the skin surface area does not appreciably change and the breast becomes underfilled and redundant with the result being ptosis of the breast skin envelope. In these patients, the breast often demonstrates a wide and flattened contour that drapes over the inframammary fold, creating a very unaesthetic appearance to the breast. Also, it is very common in these types of patients for the NAC to be positioned very low on the breast mound (Figure 5.6).
NAC Ptosis
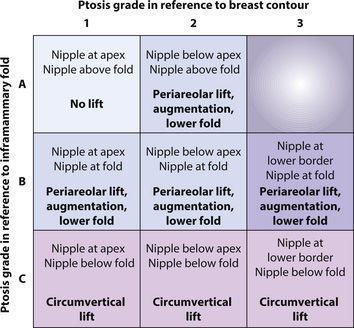
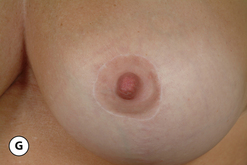
Finally, the position of the NAC can further accentuate these changes. In the aesthetic breast, the nipple is located just at the point of maximal projection of the breast mound. For some, even just a hint of an upturn in the nipple location adds a visual element of softness to the breast that some find aesthetic (Figure 5.7). However, any shift in the position of the nipple below the point of maximal projection is most decidedly unaesthetic and detracts from what might otherwise be an acceptable breast contour in selected patients. For this reason, any nipple position that is noted to be below the point of maximal projection is termed NAC ptosis. Traditionally, this type of ptosis has been graded as:
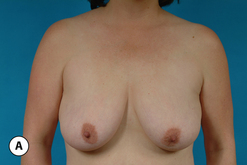
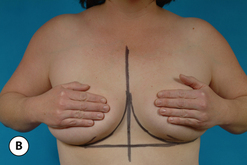
It must be recognized, however, that this classification system is incomplete and misses a very important relationship that directly affects the surgical management of the position of the NAC. In many patients, the nipple is located directly at the point of maximal projection; however, because the skin envelope is ptotic as well, the overall position of the NAC is low and therefore requires lifting to optimally restore an aesthetic relationship between the breast mound and the position of the NAC (Figure 5.9). The structure that defines this position is the inframammary fold and where the NAC lies in relation to the fold must also be described. This is performed by noting where the nipple lies in relation to the inframammary fold when looking at the patient from the front. By drawing a line that connects the inframammary fold on each side across the midline, the position of the nipple in relation to this line can be assessed by simply standing back and observing the relationship with the aid of a straight edge. The following classification is utilized:
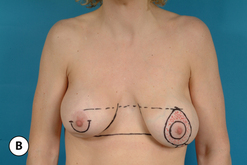
By combining the two classifications, a useful indicator of nipple position can be developed that can guide surgical management of NAC ptosis. For example, a patient with a nipple that is at or slightly above the point of maximal projection and lies above the inframammary fold (1A) does not require lifting of the NAC. Such a relationship is seen with pseudoptosis, where operative correction would be aimed at lifting the volume of the breast to position it properly under the NAC (Figure 5.10). However, a patient with a nipple at the point of maximal projection that lies below the inframammary fold (1C) will require not only lifting of the NAC but also reduction of the redundant skin envelope to restore an aesthetic relationship between the NAC position and the breast mound (Figure 5.11). For patients who have a nipple at the point of maximal projection that lies directly at the inframammary fold (1B), several surgical options may be appropriate including mild lowering of the fold, augmentation particularly with shaped cohesive gel breast implants, periareolar mastopexy or some combination of these techniques (Figures 5.12, 5.13).
Evaluation of the Ptotic Patient
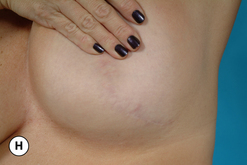
When designing a surgical strategy for the correction of ptosis, it must be recognized that each of the four elements of ptosis can be variably present and these elements will combine to determine the overall appearance of the breast. Therefore, the goal of the preoperative evaluation is to determine the presence and extent of each of these elements to allow for an appropriate surgical strategy for correction to be devised. This must be done in conjunction with an overall evaluation of the patient’s health, with particular attention placed on conditions that can affect the size and shape of the breast. Any history of previous breast problems must be obtained and the presence of breast scars from previous biopsies is noted as this can alter the surgical approach with regard to skin incisions or pedicle choice. Inquiry is made into any family history of breast cancer that might be present and the date of the last mammogram and the result is documented. A reproductive history is obtained, including the number of pregnancies, deliveries and any plans for future children. Particular note is made with regard to breast-feeding. How many children were breast-fed and how long this process continued can provide insight into the forces applied to the breast that may have significantly influenced the patient’s present condition. If further pregnancies are planned, it is best to inform the patient that this may have an adverse effect on the ultimate result, necessitating a revision in the future.
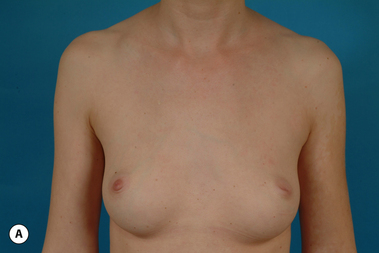
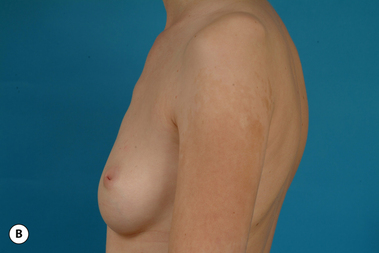
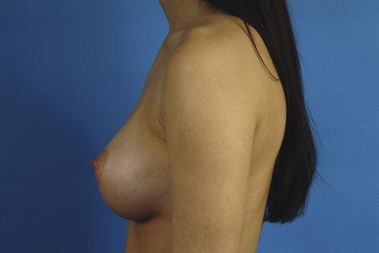
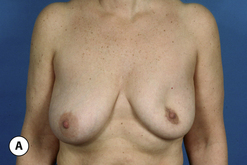
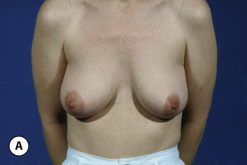
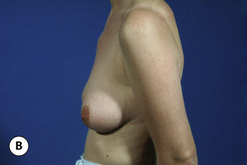
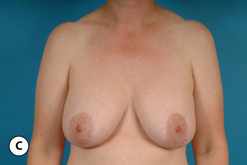
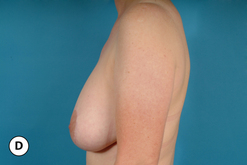
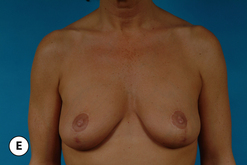
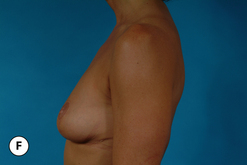
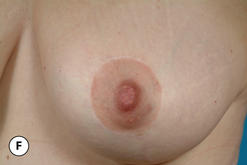
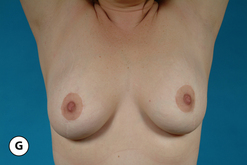
When discussing breast size after mastopexy, it is helpful to stress to the patient that the size of the breast very frequently appears smaller after the procedure (Figure 5.14). The simple act of removing skin to tighten the skin envelope can create the illusion of a smaller breast despite the fact that no parenchyma was removed. This is due to the fact that a breast with variable ptosis of the skin envelope and volume looks bigger than it actually is. Once the volume is lifted and the redundant skin envelope is reduced, the true volume of the breast becomes evident. As a result, for some patients the newly shaped and proportioned breast can appear smaller than expected. It is important to discuss this ahead of time with the patient, particularly when the use of an implant is being considered, to avoid the potential for postoperative patient dissatisfaction.
Beyond the questions about whether or not to use an implant, other common patient requests include lifting the entire breast higher on the chest wall, increasing the fullness in the upper pole, lifting the position of the NAC, reducing the diameter of an enlarged and out of proportion areola and creating a firmer consistency to the breast. Each of these goals can be achieved using the techniques described in this chapter, either alone or in combination.
Surgical Techniques in Mastopexy
Lifting the NAC
Asymmetrical areolar shape
One of the recognized techniques for lifting the areola involves an incision around the upper half of the areola that is then combined with an excision of a wedge of skin above the areola. This technique, called a crescent mastopexy, is intended to provide a distracting force that lifts the top of the areola but limits the scar to the upper border of the areola where it joins with the breast skin. While limiting the scar is an attractive goal, in actuality, the net effect of the asymmetrical force that is applied to the areola is to stretch it along the vertical axis with the result being an oval-shaped and widened areolar diameter. The resulting distorted areolar size and shape compromises the appearance of the areola and creates a less than optimal aesthetic result (Figure 5.15). From this experience is derived one of the technical concepts that governs successful periareolar surgery, namely that, to achieve a round and properly positioned areola, the periareolar incision must be carried around the entire peripheral margin of the intended areolar diameter in order to redistribute evenly and adequately the forces around the subsequent closure. In this fashion, a controlled and consistently round areolar shape can be created.
Widened areolar diameter
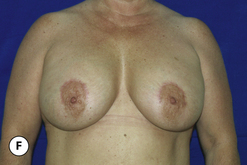
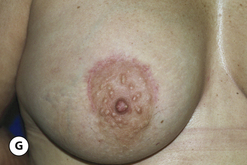
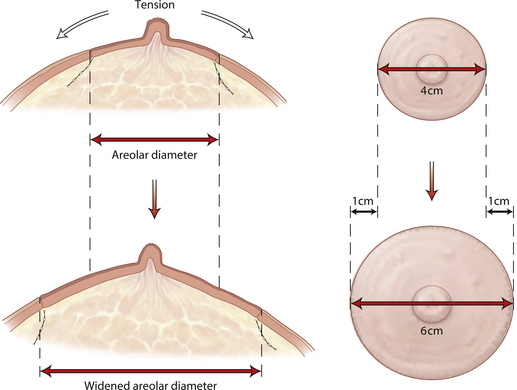
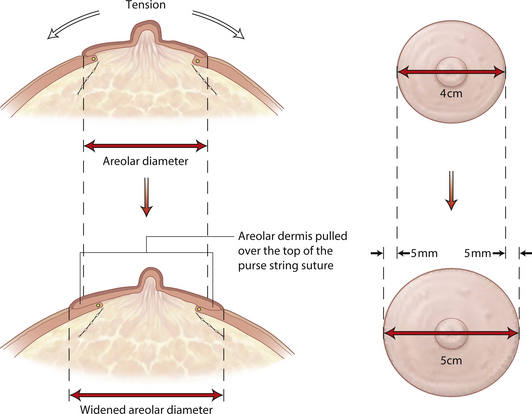
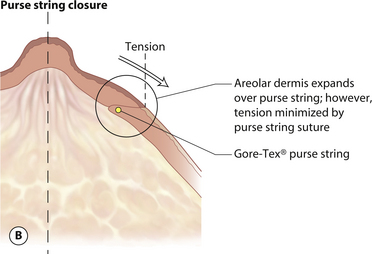
Another and perhaps more widely recognized complication of periareolar surgery is widening of the areolar diameter postoperatively. The skin of the areola has an exaggerated elasticity compared to the surrounding breast skin and possesses a tremendous ability to stretch when placed under tension. As result, when there is tension placed on the wound closure around the areola after a periareolar procedure, the areola can spread over time, creating a larger areolar diameter than was initially created at the time of surgery. At times, this postoperative spreading can be dramatic and the distorted proportion that the wide areola creates can significantly detract from the overall aesthetic appearance of the breast (Figures 5.16, 5.17). Clearly, the etiology of postoperative spreading of the areola is related to tension on the areolar closure. From this experience is derived the second of the technical concepts that governs periareolar surgery, namely that the tension on the wound closure must be minimized as much as possible. Minimizing tension can be accomplished using a number of different technical modifications, including adding a vertical segment to a periareolar skin pattern whenever possible to reduce the dimensions of the outer periareolar skin incision, limiting the amount of skin removed in the horizontal dimension and using smaller implants in cases of augmentation mastopexy. But perhaps the most effective technique involves stabilizing the dimensions of the periareolar opening with the use of a periareolar purse string suture. By evenly cinching down the outer skin incision to the desired dimension, tension on the areola can be greatly minimized, leading to a reduced incidence of postoperative areolar spreading.
Suture material
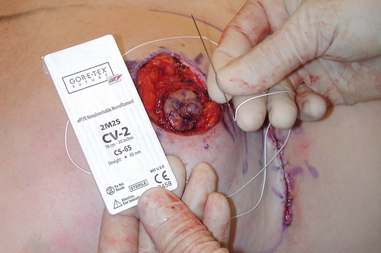
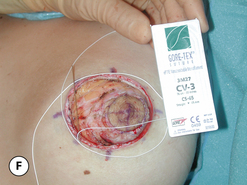
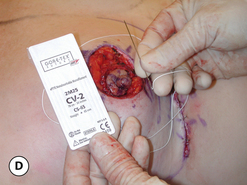
The optimal suture material is a permanent monofilament, which slides much more easily through the dermis than a braided suture which tends to catch and become resistant to movement as it is passed through a dermal length of more than 3 or 4 cm. When the suture material passes easily through the dermis, it facilitates an even cinching down of the periareolar opening without any asymmetrically positioned crimping or bunching of the skin edges. The use of a permanent suture also provides long-term support to the periareolar closure. When absorbable materials are used, reabsorption of the suture can occur before scar stabilization of the tissues has occurred. By using a permanent suture, the chances for postoperative areolar spreading are minimized. Although materials such as nylon and prolene can be used for smaller diameter openings, the ideal suture for this purpose is Gore-Tex (Gore Tex Corporation, Flagstaff, Arizona). This material, which comes from the disciplines of vascular and cardiovascular surgery, where it has been used in conjunction with vascular grafts for years, is a very strong, smooth and permanent material that slides through tissues with ease. The optimal suture size to use is CV-3, which has a soft and manageable pliability and great strength, all with the size of about a 2–0 prolene suture. By cutting off the curved needles on either end and threading the suture onto a straight needle, long passes with the needle through the dermal layer of the outer periareolar incision can be made, which speeds suture placement. Alternatively, a slightly larger but stronger CV-2 suture may be used. This particular suture comes already swedged onto a straight needle, which obviates the need to thread the suture separately (Figure 5.18). Once the suture is placed, it then becomes very easy to cinch the periareolar defect down to the desired dimension as the Gore-Tex easily slides through the soft tissues without catching or bunching. Using this suture material provides for a precise and controlled management of the periareolar opening over and above that which is possible with any other suture material.
Suture placement
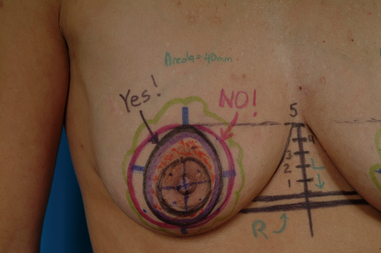
When performing a periareolar lift, there are several technical maneuvers that can improve the chances for success and can minimize the potential for areolar spreading, wound dehiscence and irregular, widened or prominent scars. Initially, the limits of the outer periareolar incision are outlined. Vertically, the top of the pattern is located at the point where the top of the areola will be positioned. Inferiorly, the pattern skirts the lower border of the areola. Medially and laterally, the pattern again skirts the areola to avoid unnecessary removal of skin in the horizontal plane that can create a tight closure. This pattern variably assumes the shape of an elongated oval. The width of the planned areolar incision varies from 40 to 44 mm. Using a wider areolar incision can predispose to areolar spreading with an excessive areolar diameter developing postoperatively (Figure 5.19). The initial incisions are made just into the dermis and the intervening skin between the outer periareolar incision and the inner areolar incision is de-epithelialized. To place the purse string suture effectively and securely, it is helpful to create a small dermal shelf around the periphery of the periareolar defect. This is as opposed to cutting through the dermis directly at the margin of the periareolar incision. By dividing the dermis approximately 5–6 mm away from the de-epithelialized skin edge, a dermal cuff is created that provides a firm scaffold to hold the Gore-Tex suture. By then passing the straight needle directly within the substance of the dermal shelf and minimizing any gaps that are present as the various passes with the straight needle are made, the tension on the purse string suture is evenly distributed in the strong and stable architectural framework of the dermis. This helps prevent the suture from rupturing through the dermal cuff and pulling out. Also, because the tension is evenly distributed, the surrounding breast skin is evenly pulled down to the areolar diameter, which prevents uneven gathering of the pleats which inevitably form when the purse string is cinched down. Avoiding intermittent skip areas in the dermal shelf when placing the suture also prevents the development of stress points in the suture strand once it is pulled down that could potentially lead to the suture breaking. It is important to note that the width of the dermal cuff should not be any wider than 5–6 mm. If a dermal shelf wider than this is used, then the periareolar opening that results after the purse string suture is cinched down can become quite small and can crowd the areola as it is pulled through the opening, possibly resulting in swelling, NAC ischemia and areolar necrosis.
After development and undermining of the dermal shelf, the purse string suture is placed. Ultimately, the suture will be cinched down and secured with 8–10 square knots as the very smooth surface of the Gore-Tex material has a tendency to cause the knot to slip unless a sufficient number of ‘throws’ are used to secure the knot. This creates a knot complex that is quite bulky and, if it is not buried securely under a healthy layer of tissue, postoperative exposure of the knot can occur. Therefore, to begin suture placement, the needle is passed from deep under the dermal edge to superficial and then once the purse string has been placed, it ends by passing the needle from superficial to deep. This positions the knot securely under the dermal shelf and away from the skin closure. Once the knot is tied down, it is then very easy simply to tuck the knot under the dermal shelf so that it will be reliably buried under healthy tissue and will completely prevent subsequent erosion with exposure of the knot. It is my preference always to place the knot at the most medial aspect of the areola in the event that, for whatever reason, it becomes necessary to remove the Gore-Tex suture. For the right breast this would mean starting the purse string at the 3 o’clock position and for the left breast the 9 o’clock position. Then, if the Gore-Tex needs to be removed, it is very easy to simply spread with scissors to separate the incision at the location of the knot, gently pull the intact suture strand away from the skin edge and cut it to pull the suture out. If the location of the knot is not known, this process can be somewhat difficult as, when the suture is cut midstrand and an attempt is made to remove the suture, the knot catches in the scar around the areola, which prevents easy removal.
Once the purse string suture has been placed, the outer periareolar incision is cinched down to the desired diameter. The Gore-Tex suture is secured with 8–10 ‘throws’ and the knot complex is buried under the dermal ledge. It should be noted that, if redundancy with pleating of the periareolar skin becomes evident, this pleating tends to become particularly prominent along the superomedial margin of the periareolar opening and the inferolateral margin tends to form more of a one-to-one length relationship with the areolar skin. By redistributing these pleats more evenly around the periphery of the closure, the likelihood that scar contracture will effectively minimize or even eliminate these pleats is enhanced. It is advisable to cinch the opening down to a smaller size than what ultimately is desired for two reasons. First, despite the positive effects of the purse string suture on maintaining the areolar diameter, a modest amount of areolar stretching almost always occurs postoperatively. By adding an element of overcorrection to the operative strategy, the effects of this postoperative spreading on the quality of the final result can be minimized. Second, if the shape of the areola is not round, a small additional amount of very superficial de-epithelialization can be performed as needed to make the periareolar defect round and this maneuver can enlarge the areolar diameter slightly. Care must be taken during this maneuver not to inadvertently cut the Gore-Tex suture. If the suture is cut, it is a simple matter to simply reinsert a new purse string suture; however, the stress dynamics of the new suture are invariably different from the first and the opening must frequently be modified with additional de-epithelialization to create a round areola. Once the purse string is in place and the defect has the proper shape, the areola is inset with 4–0 absorbable monofilament dermal sutures placed in a buried inverted, interrupted, fashion followed by a running subcuticular suture to complete the procedure (Figure 5.20).


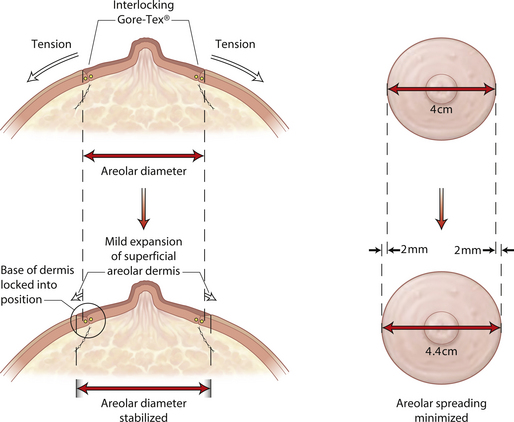
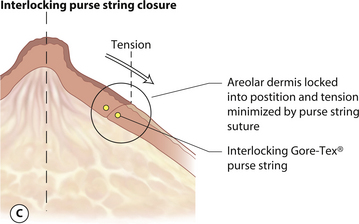
Interlocking Gore-Tex suture technique
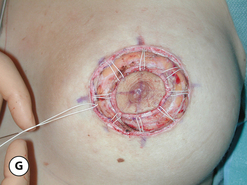
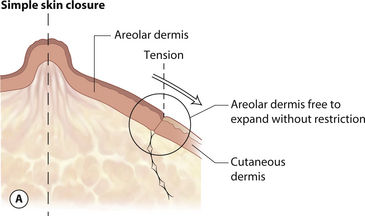
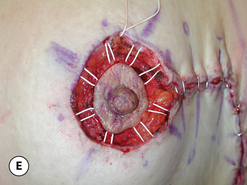
Even with the described technical modifications, it is not at all unusual for some degree of postoperative spreading of the areola to occur. This can also be associated with distortion and asymmetry in the shape of the areola. The reason for this relates back to the marked ability of the areola to stretch under tension. Despite the placement of the supporting Gore-Tex purse string suture located deep within the dermis of the periareolar breast skin, it is possible for the areolar dermis to be pulled over the top of this supporting suture framework if the tension on the surrounding skin is great enough. When this happens, the more superficial elastic dermis of the areola is pulled over the top the stable purse string support and a widened areola results (Figures 5.21, 5.22). In order better to secure the areola into the fixed periareolar opening, the interlocking Gore-Tex suture technique was developed. In this technique, all of the modifications described earlier are utilized, including the creation of a dermal shelf, undermining of the skin edges to ease the periareolar closure and use of the Gore-Tex suture on a straight needle to manage the periareolar defect. What differs is the manner in which the suture is placed. Before suture placement, eight evenly spaced orientation marks are placed on the outer diameter of the periareolar opening as well as the areola itself. By starting at the most medial point, the Gore-Tex is passed from deep to superficial through the dermal shelf. The suture is then directed over to the corresponding point on the areola and a small bite of areolar dermis is incorporated in the stitch. The suture is directed back over to the dermal shelf and the needle is passed directly in the dermis until the next orientation mark is reached. Here, the needle goes back over to the corresponding point on the areolar dermis, again to incorporate a small bite of tissue. This process repeats until the suture has passed all the way around the defect, where the needle ends by passing from superficial to deep under the dermal shelf. The appearance of the pattern created by placing the suture in this fashion is one of a wagon wheel. Ideally, all the bites of dermis through the areola are equal and the spacing between the ‘spokes’ is even. By then pulling on the free suture ends, the Gore-Tex strand can be seen to slide smoothly through the fairly complex weave created by the pattern and the purse string is clinched down until the two unequal diameters are brought together. While a small amount of widening of the contracted areola contributes to the closure of the gap between the two diameters, it is mainly the outer periareolar incision that is cinched down to close the wound. Because of the friction encountered by the Gore-Tex as it is passed through the extensive dermal framework of the periareolar dermal shelf and the areola, it holds without even the need to place a knot. Typically, the diameter of the periareolar opening is made smaller than intended and by using gentle manipulation, the size of the overcorrected areolar defect can be slowly massaged open to whatever diameter is desired. As before, 8–10 throws are placed to keep the knot from slipping and the knot complex is buried under the dermal shelf. The shape of the areola is then checked with the patient in the upright position and if it is not round, additional superficial de-epithelialization is performed at the appropriate margins of the breast skin flaps to create a round shape and the incision is then closed with a running subcuticular 4–0 absorbable monofilament to complete the closure. By interlocking the dermis of the areola into the periareolar closure using the same purse string suture as described, the tendency for the areolar dermis to be pulled over the purse string is held in check. As a result, a more stable distribution of forces is created that tends to resist areolar spreading postoperatively (Figures 5.23–5.25).
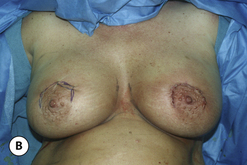
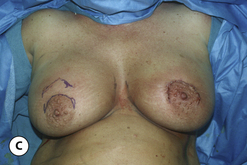
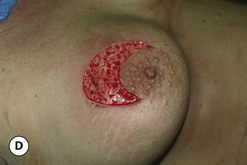
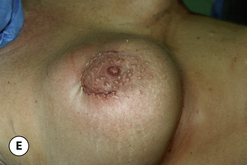
While this technique has been used successfully in primary periareolar cases, where the results have been particularly dramatic is in secondary revisions where patients have presented with widened areolar diameters after an initial periareolar procedure. Despite the presence of, at times, dramatically enlarged areolar diameters, a small, circular and stable areolar size and shape have been restored using this technique.
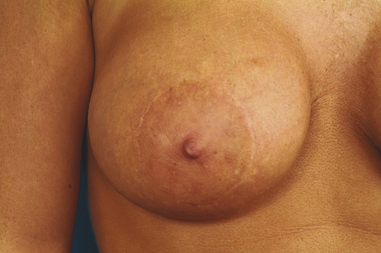
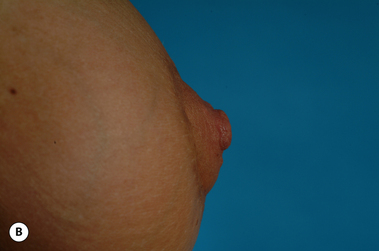
Areolar herniation
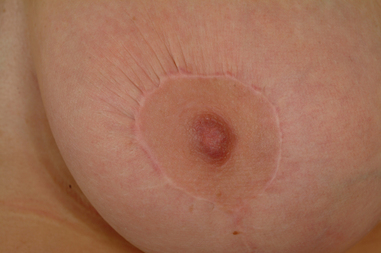
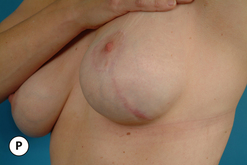
The skin of the areola has a greater elasticity than the surrounding breast skin. Also, the fascial support structure of the breast is greatly attenuated to absent in the area under the areola. As a result, pressure from the underlying breast volume can stretch the skin of the areola to a greater degree than the skin of the breast (Figure 5.26). This difference in skin elasticity leads to the third technical concept of periareolar surgery, namely that when performing skin envelope reducing procedures that increase the pressure being placed on the breast parenchyma, the differing elasticities between the breast skin and areola can result in an exaggerated bulging or ‘herniation’ of the areola. This tendency for the areola to herniate can be overcome by making the initial areolar incision small enough to create a trampoline effect on the areola when it is inset into the periareolar defect. By slightly increasing the pressure on the areola, the tendency to bulge or herniate is reduced. Because the periareolar diameter is stabilized by the purse string suture, the effect of the tension created by insetting the areola into the periareolar defect is confined to the areola alone and is more or less separate from the surrounding breast skin. In this fashion, the tension on the more elastic areola can be adjusted separate from the tension on the surrounding breast skin such that there is no elasticity differential between the two. The result is that pressure from below cannot be differentially expressed through the areola and the tendency to herniate is reduced. Occasionally, areolar herniation is noted early in the postoperative recovery period when none was noted at the time of surgery. This is because temporary swelling in the breast has caused the more elastic areola to stretch in relation to the surrounding breast skin. When the swelling subsides, the areolar herniation will recede. Also, if areolar herniation is persistent after the swelling resolves, it does tend to improve over time as the entire skin envelope of the breast as well as the areolar skin accommodates to its new size and shape. When areolar herniation is noted at the time of surgery, simply reducing the diameter of the areola and re-insetting it into the periareolar defect will usually correct the problem. It must be remembered, however, that, in each circumstance, management of areolar herniation depends upon a strong and stable purse string support of the periareolar closure.

Using these technical modifications, it is possible to reliably control the shape, diameter and position of the areola in periareolar surgery. Of course, it is important to realize that, even with these modifications, the positive effect of the purse string suture technique can be overcome. There is a limit to the size of the periareolar opening beyond which the quality of the overall result becomes compromised. When the diameter of the outer periareolar incision exceeds 10 cm, depending on the elasticity of the tissues, complications such as persistent pleating around the areolar closure, widened areolar scars, postoperative areolar spreading with shape distortion and purse string suture failure become increasingly more likely. Also, breakage of the purse string closure can result in sudden spreading of the areolar diameter. If scar stabilization of the periareolar closure is strong enough, the tendency for subsequent areolar spreading can be minimized. In most instances, however, the described technical modifications can enhance the reliability and dependability of periareolar surgery in mastopexy.
Managing the Skin Envelope
The skin envelope becomes problematic in mastopexy patients for two reasons.
Periareolar
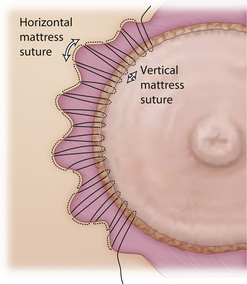
All of the technical steps described previously apply to periareolar mastopexy. However, one additional technical point merits emphasis when dealing with larger periareolar openings. As the dimensions of the periareolar opening begin to exceed 10 cm in diameter, the pleating that forms as the outer periareolar incision is cinched down to the diameter of the inner areola can be significant, making subsequent placement of the subcuticular suture difficult. To help evenly distribute the discrepancy between the circumferences of the two incisions, a modified subcuticular closure technique is used. Here, instead of taking evenly spaced ‘bites’ of dermis on either side of the incision as would be done with a wound where the two incision lengths are even, the length of dermis incorporated in a single pass of the needle through the dermal shelf of the outer periareolar incision is greater than in the inner areolar incision. One fairly straightforward way to accomplish this is by placing a horizontal mattress bite in the outer incision and a vertical mattress bite in the inner incision. By gradually working this inequality in the amount of tissue incorporated in each pass of the needle around the entire perimeter of the defect, even large differences in areolar diameter can be effectively taken up (Figure 5.27). As the powerful forces of wound contracture subsequently come into play, these pleats then settle significantly over time. In modest size defects, all that is left after full healing occurs is often just a minor skin irregularity noted at the margin of the periareolar skin with the incision. However, for larger defects, the pleating in the skin edge, even after full healing has occurred, can create a noticeable and persistent wrinkle, particularly in the superomedial margin of the incision (Figure 5.28). For these reasons, periareolar management of the redundant skin envelope in mastopexy can be effectively used up to a variable but identifiable limit. When problems regarding the shape of the breast, the shape or size of the areola or the quality of the periareolar scar begin to become noticeable, alternative techniques must be used to obtain the optimal result.
Circumvertical
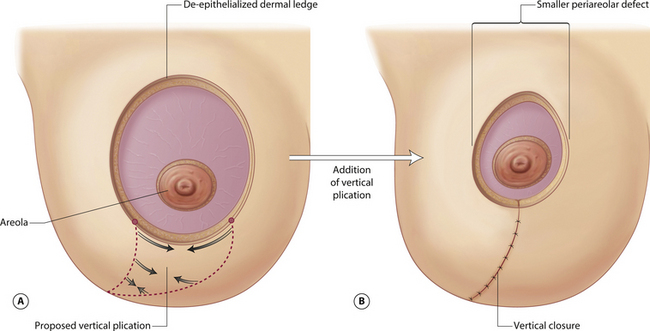
The circumvertical skin pattern is the most powerful and versatile skin reduction technique available for use not only in mastopexy, but in augmentation mastopexy and breast reduction as well. The technique can be thought of as simply adding a vertical component to a periareolar skin pattern. For smaller skin redundancies, the vertical component is truly vertical and simply extends straight down to the inframammary fold. For larger cases, the lower portion of the vertical plication turns laterally along the inframammary fold as the redundant skin is taken up. In every instance, however, the pattern is considered to be circumvertical. The tremendous advantage afforded by adding the vertical component is twofold. First, by removing a segment of skin from the underside of the breast that communicates with the periareolar incision, the dimensions of the periareolar defect are reduced, which creates a much more manageable periareolar opening (Figure 5.29). Therefore, in patients who were perhaps at risk for compromised periareolar aesthetics due to the large size of the periareolar incision, the postoperative finding of a widened or distorted areola with an unattractive periareolar scar is significantly reduced. Second, the plicating maneuver of removing skin from the inferior pole of the breast is a powerful shaping technique. Tightening the skin in this fashion not only reduces the skin envelope but also slightly lifts the NAC and increases the projection of the breast, while at the same time narrowing the breast base diameter. Also, any tendency for the periareolar component to flatten the breast contour is generally more than offset by the addition of a vertical segment to the pattern. The only drawback to the addition of a vertical segment relates to the presence of the additional scar that runs down the front of the breast from the inferior portion of the areola down to the inframammary fold. However, this unavoidable disadvantage must be viewed in the context of what is achieved by adding the vertical component. Typically, the vertical scar heals in an imperceptible fashion and is the most inconspicuous of all the standard scar locations used in breast surgery today. Therefore, when assessing the positive effects adding a vertical component can have on the shape of the breast and the overall quality of the aesthetic result, the vertical scar is nearly always a reasonable tradeoff in achieving the optimal result. For this reason, if the addition of a vertical component is deemed to improve the aesthetic result even slightly, it is highly advisable to add it to the overall pattern. For the vast majority of patients, optimizing shape at the expense of the additional vertical scar is well accepted as a necessary strategy to provide the optimal result (Figure 5.30).


Inverted T
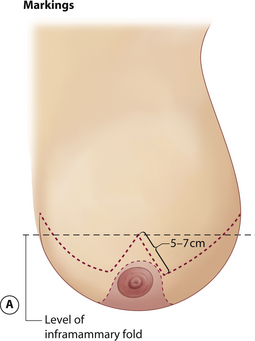
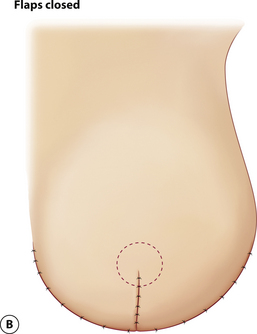
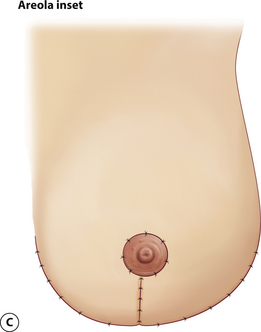
Historically, the most commonly used technique for managing the redundant skin envelope in mastopexy was the Wise pattern inverted T approach. As a result, it is this technique against which all other ‘short scar’ techniques are measured in terms of results and complications. Here, the apex of the inverted T is located by transposing the inframammary fold anteriorly onto the breast by placing the fingers of the left hand under the breast and palpating with the right hand where the tips of the fingers could be felt. An angled inverted V pattern is then drawn from this point downward, skirting the medial and lateral margins of the areola with the lengths of these two limbs being 5–7 cm long. A medial and lateral extension is then drawn as needed to meet a similar line drawn directly in the inframammary fold. The strategy of this marking pattern is to keep the inframammary component of the incision as short as possible to appropriately take up any redundancy in the skin pattern and yet not leave behind a ‘dog ear’ at either the medial or lateral end of the incision. After the breast is re-shaped, the areola is then inset into a matching defect created by removing a circular segment of skin at the apex of the vertical incision (Figure 5.31). The advantage afforded by this technique relates to the ease with which the skin envelope can be reduced as even large skin redundancies can be managed without difficulty. Because of the manner in which the pattern is designed, there is a more or less 1:1 relationship in the lengths of the corresponding skin incisions, which eases closure and prevents any of the pleating or skin redundancy that can be noted with periareolar or circumvertical techniques. Because of the familiarity many surgeons have with the inverted T technique along with the directness of the skin closure, this pattern remains a popular choice for mastopexy.
Breast Reshaping
Conceptually, previous attempts at mastopexy have focused on taking up the redundant skin envelope and lifting the position of the NAC. Shape was created as a by-product of the skin envelope management strategy with the result being directly related to the inherent elasticity of the patient’s tissues. For instance, when the inverted T pattern is used in mastopexy, the shape of the breast is built into the surgical strategy by the way the skin is managed. The vertical portion narrows the breast slightly while the horizontal component shortens and lifts the breast. In essence, the shape of the breast is determined by the pattern of the skin resection and how the remaining skin wraps around the breast parenchyma. However, it has long been recognized that relying on the skin to support the breast shape is a strategy that can ultimately fail for many patients due to the fact that, as the skin stretches, the breast parenchyma becomes ptotic once again and the upper pole develops a concavity (Figure 5.32). For this reason, many surgeons have advocated an ‘overcorrection’ in the shape of the breast at the time of the initial procedure in an attempt to compensate for these potential postoperative changes. Such compensation is variably successful and maintenance of long-term breast shape after mastopexy remains as one of the primary, and perhaps one of the most elusive, goals of any mastopexy procedure. For this reason, several different shaping strategies have been developed in an attempt to shape the breast more directly and improve the results of mastopexy. Although numerous specific techniques have been described, they can be summarized into one of several different approaches including suture fixation of the breast parenchyma, suture fixation of various internal pedicle flaps or dermal flaps, or the use of an artificial mesh to wrap around and support the breast.
Suture fixation of breast parenchyma
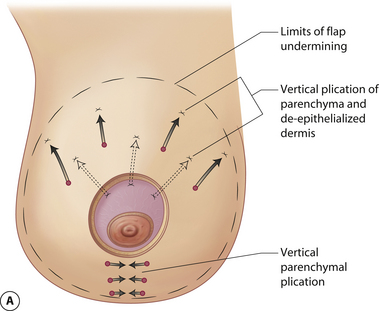
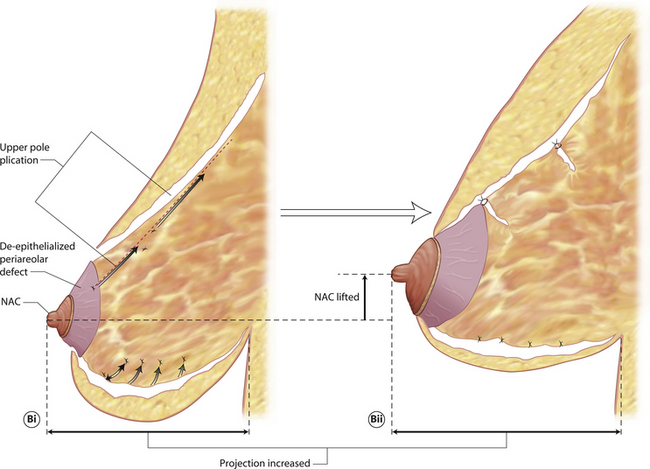
In breast ptosis, the internal connective tissue scaffold of the breast is generally very lax. Therefore, even when the skin envelope is tightened, there is little internal support of the breast parenchyma. As a result, when the breast skin inevitably relaxes postoperatively, there is no restraining force to help maintain breast shape and the breast sags. In an attempt to reconstruct the stretched-out supporting framework of the breast such that it complements the tightened skin envelope and therefore helps create a more aesthetic and long-lasting breast shape, various types of parenchymal plication strategies have been developed. All of these strategies have as their goal a tightened and firmer breast mound that will withstand the test of time as the soft tissues relax postoperatively. When using this technique, any skin pattern can be used to address the redundant skin envelope. Once the initial skin incisions are made, the skin envelope is elevated away from the underlying breast parenchyma at a level that would normally be considered mastectomy flap thickness. This will be more easily done when using an inverted T or circumvertical pattern; however, it is possible to use a periareolar pattern as well, although exposure will be somewhat limited using this approach. It is important to elevate the skin flaps all the way to the periphery of the breast to release the tethered skin completely away from the breast parenchyma. If this is not done, distortions created by the plication of the breast parenchyma may become visible through the skin envelope postoperatively. Once the flaps have been developed, the breast parenchyma can be suture plicated to restore a more youthful, full and firmer appearance. Plication begins in the upper half of the breast first by imbricating the superior pole parenchyma upon itself. This serves to lift the position of the NAC and corrects any concavity present preoperatively in the upper pole of the breast. Once this contour is reset, a vertical plication line is run from the bottom of the areola down to the inframammary fold (IMF). This serves to narrow the width of the breast and increases the projection of the breast mound (Figure 5.33). Together, these two plication strategies will serve to reduce the effective surface area of the breast mound. As a result, the existing breast volume is redistributed in a more confined space, which results in a firmer and more uplifted appearance to the breast. It may be advisable to use 3–0 non-absorbable monofilament (Prolene) suture for this plication to avoid any possibility that early hydrolysis of an absorbable suture could lead to loss of parenchymal support before scar tissue has sufficiently developed to hold the shape. Once the breast is reshaped, the skin envelope is tailored to wrap around the newly formed breast in a way which complements the reduced breast surface area. When using this parenchymal plication strategy, it is important to note that the end result must be overcorrected as a certain amount of postoperative settling will occur. Also, because the effective surface area of the breast is being reduced, the breast will likely appear smaller to the patient, even though no tissue other than skin is removed. Given the wide area of dissection, it is advisable to use a drain postoperatively to prevent a seroma from leading to complications such as infection, scarring and shape distortion. This parenchymal plication technique is a very straightforward method of breast reshaping and additional plication can be added as needed to accomplish specific corrections. No matter how the plication is performed, the concept is the same, namely separate the skin envelope from the gland, reshape the gland and then wrap the reduced skin envelope around the gland using any one of the several skin patterns described previously (Figure 5.34).


Suture fixation of internal flaps
Pedicle flaps
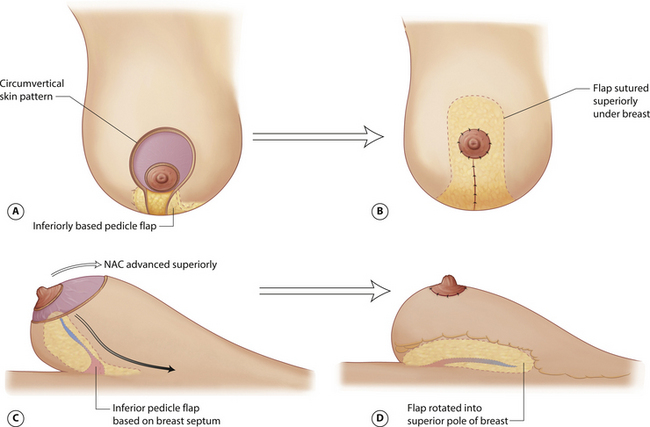
Perhaps the most well-known type of internal flap is the inferiorly based parenchymal flap used in conjunction with the vertical mammaplasty procedure. In this technique, the blood supply to the NAC is based on a superior pedicle and the skin envelope is managed using a circumvertical approach. Inferiorly, a parenchymal flap is designed extending up from the inframammary fold to the inferior border of the areola. The width of the flap will vary depending on the size of the breast but it generally ranges anywhere from 6 to 8 cm. As the medial and lateral skin flaps are dissected free from around the lower pole of the breast, the inferior pedicle flap is developed. Inferiorly, the flap is dissected free from its dermal attachments along the inframammary fold. Medially and laterally, the flap is divided by extending the dissection deeply within the breast parenchyma through to the septum. The deep superior border of the flap is then the septum itself with the contained blood vessels that define the blood supply to the flap. The flap is then sutured superiorly under the breast, which is then folded around the pedicle flap as the vertical incision is closed and the NAC is inset. The flap easily reaches the superior pole of the breast and thus provides direct fill to this area, completely correcting any preoperative concavity which may be present. Also, by securing this flap superiorly, any tendency for the inframammary fold to drop is minimized as this flap slings the fold up and holds it in position. Initially, as with many procedures performed on the breast, the appearance of the upper pole of the breast will be excessively full; however, with time, the fullness settles into a persistent and long-lasting contour correction (Figures 5.35, 5.36).
A modification of the inferior parenchymal flap technique for upper pole reshaping has been described that involves suturing the flap under a small strip of muscle elevated from the lower leading edge of the pectoralis major muscle. It is theorized that fixating the flap in this fashion more securely holds the flap in position and provides more reliable recontouring of the upper pole of the breast. Concerns over this technique have focused on placing breast tissue under muscle and thus compromising the ability of this tissue to be properly screened via mammography. While the oncologic issues are debatable, my personal feelings regarding the technique have more to do with possible constriction of the blood supply to the flap with potential ischemia and fat necrosis being the result of a tight muscle sling, either initially at the time of flap elevation, or subsequently as the muscle swells during the early phase of healing. This coupled with the fact that the flap can be reliably sutured up into position by simply directly affixing it superficially to the fascia of the pectoralis major muscle has led me to choose the direct approach in those patients who are candidates for use of the flap as opposed to the use of the muscle sling. Certainly, further research into this area will clarify the utility of the muscular sling in utilizing this flap.
Breast resuspension
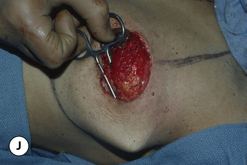
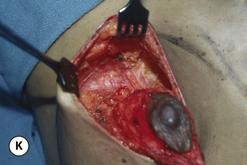
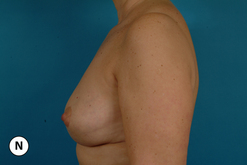
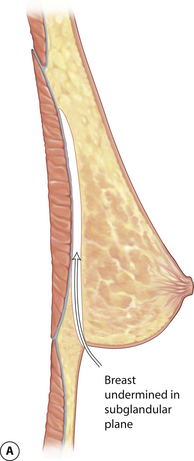
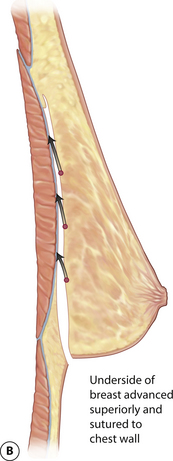
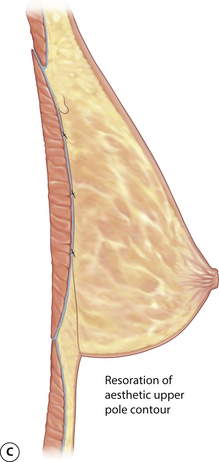
One variation to the flap reshaping strategy involves the use of the entire underside of the breast to resuspend the breast superiorly. In this technique, the breast is approached from an inferior direction, using either an inframammary fold incision or the lower portion of a vertical incision. A subglandular pocket is created that extends up to and slightly beyond the superior pole of the breast. Once the breast is released from its attachments to the pectoralis major muscle, it is lifted superiorly and reattached by suturing the deep surface of the breast to the pectoralis major fascia in a location that is higher up on the chest wall. This serves to shift the entire breast position superiorly and thus functions as an operative correction for positional breast ptosis. Also, upper pole concavity can be addressed by using the superior translocation to effectively ‘autoaugment’ the upper pole of the breast. Although an element of overcorrection must be employed with this technique to take into account recurrent stretching of the tissues, this resuspension strategy can be used in conjunction with skin envelope retailoring to provide for a very simple and yet effective mastopexy technique (Figure 5.37).
Dermal flaps
In an attempt to suture fixate the breast parenchyma into position, it is possible to use the redundant skin envelope left over after skin retailoring to act as an internal brassiere to help hold the breast parenchyma up into position. In periareolar approaches, the redundant dermis around the areola is de-epithelialized and undermined up to the NAC. The circular dermal flap can then be sutured to the surrounding breast parenchyma such that the redundant parenchyma is reinforced into a more compact and supported shape (Figure 5.38). Also, when using an inverted T skin pattern, rather than discarding the redundant wings of the lateral skin flaps, they can be de-epithelialized, released from the inframammary fold and wrapped around the inferior pedicle to help mold and shape the breast into a more projecting and aesthetic mound. Although only small flaps may be available after retailoring of the skin envelope, even partial coverage of the breast parenchyma can aid in molding the breast.


Mesh
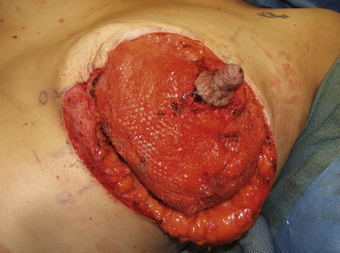
Although not a commonly used technique, various types of synthetic and mixed absorbable/non-absorbable meshes have been used to provide sturdy and long-lasting support to the shape of the breast. In that regard, the technical strategy is the same as when dermal flaps are used and as well when the breast is plicated. By applying a molding force to the redundant and ptotic breast parenchyma that has been separated away from the surrounding breast flaps, the redundancy is taken up and the shape of the breast is improved (Figure 5.39). The advantage provided by mesh as opposed to dermal flaps is that there is no limitation to the surface area of the mesh that can be applied to the breast, which allows the entire gland to be supported. Also, with the non-absorbable mesh materials, permanent support of the breast will be accomplished. The major concern related to the use of mesh in the breast relates to oncologic issues. Despite evidence to the contrary, possible interference with mammographic evaluation of the breast prevents many surgeons from adopting this approach. Also, the placement of a widely dispersed foreign body in an organ that has a well-recognized and significant malignant potential also causes concern. Despite these concerns, this technique is a very important conceptual concept when applied to breast shape. Once it is realized that the breast shape can be controlled by the application of an external force, all that remains is to determine the optimal external force, whether that be suture plication, dermal flaps or soft tissue rearrangement. Research into the possible development of mesh materials that are ‘physiologically inert’ may well allow this technique to become a valuable adjunct in shaping the breast in the future.
Operative Strategies
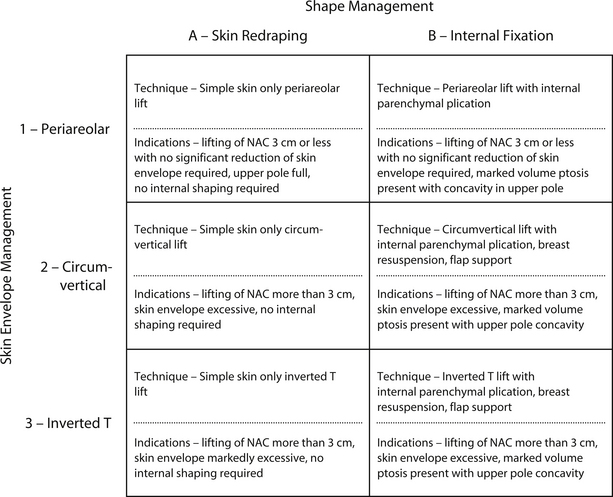
Any procedure designed to correct breast ptosis must generally satisfy three requirements. First, the nipple and areola must be lifted to a higher position without compromising the blood supply. Second, the redundant skin envelope must be reduced. And third, the shape of the breast must be controlled. To assist in organizing a surgical plan, it is helpful to categorize the procedures utilized to perform mastopexy in terms of a matrix with management of the skin envelope identified along the vertical axis and techniques to manage shape listed along the horizontal axis (Figure 5.40). Such an organizational plan summarizes how each of the technical maneuvers described in this chapter can be utilized, either alone or perhaps more effectively in combination, to provide for an effective operative strategy to meet the needs of a specific patient.
Periareolar Mastopexy (1A mastopexy procedure)
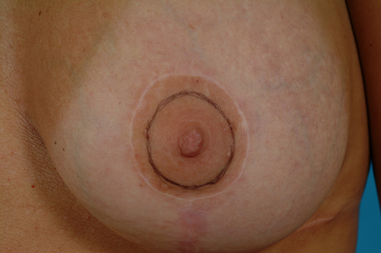
The markings for the periareolar lift are as described previously. It is advantageous to use the interlocking Gore-Tex technique for closure of the periareolar defect as this will provide a degree of stability and reliability to the result above that provided for by a simple periareolar purse string approach. However, no matter what approach is used, it is advisable to overcorrect the areolar diameter slightly when applying the purse string suture as it is inevitable that a small amount of spreading will occur postoperatively. Overall, however, this procedure is very attractive as an operative correction for breast ptosis because of the simplicity of the technique and the requirement for only a periareolar scar (Figure 5.41).

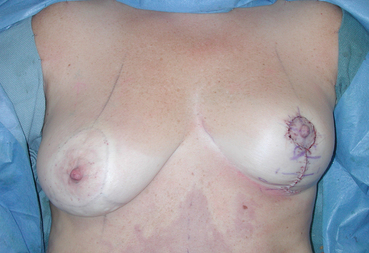
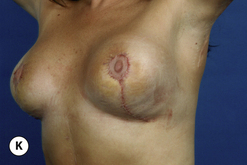
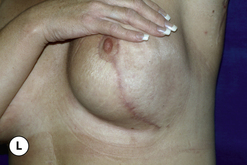
In my experience, it is only the occasional mastopexy patient who is a candidate for a periareolar lift alone. However, in reconstruction patients, the technique can be very useful as a means to lift a mildly ptotic NAC on the side opposite a unilateral breast reconstruction. By slightly lifting the NAC on the uninvolved breast, the reconstructed NAC on the cancer side can be properly positioned at the apex of the reconstructed breast mound, a maneuver that can improve significantly the overall aesthetic appearance of the result. To this end, periareolar mastopexy alone can be a very useful technique to accomplish this task in reconstructive patients.
Periareolar Mastopexy with Internal Shaping (1B mastopexy procedure)
When a patient with minimal ptosis does present with a less than ideal breast shape, internal parenchymal plication can be used in conjunction with a periareolar skin pattern to lift and reshape the breast. Again, this technique is ideally limited to patients who require less than 3 cm of lift and do not have an excess of lower pole breast skin. After the periareolar incision is made, the skin flaps are dissected away from the breast in all directions down to the chest wall. Once the breast mound has been separated from the surrounding skin flaps, the parenchyma is plicated as described by suturing the superior pole to itself horizontally and adding a vertical plication line down the center of the lower pole. The effect of these shaping sutures is to reduce the internal surface area of the breast mound, therefore there is a limit to the extent that the breast skin can re-drape around the new breast without creating a redundancy that results in a distorted appearance. Occasionally, the inferior periareolar skin pattern can be extended slightly inferiorly to take up some of this redundancy in the lower pole, but only to a limited extent. If the lower pole still has a flattened or distorted contour, a vertical segment must be added to the pattern to create the optimal result. Once the breast is properly reshaped and the skin envelope is re-draped around the breast, either with an isolated periareolar incision or with a circumvertical pattern, the interlocking Gore-Tex suture is applied to finish the procedure. This sequence of maneuvers presents a demanding technical challenge for the surgeon and is only applicable to a minority of patients who present with breast ptosis. However, when used with the periareolar approach, the advantage is an improved shape with preferably only a periareolar scar (Figure 5.42).

Circumvertical Mastopexy
In patients who present with reasonable upper pole fullness and therefore do not need aggressive reshaping of the breast, but yet have a redundant and ptotic skin envelope along with ptosis of the NAC, what is required is a contoured resection of the redundant skin along with lifting of the NAC. In these patients, a simple circumvertical skin resection can be a technically straightforward and predictable option for performing a mastopexy. Here, the top of the periareolar pattern is determined by lifting the top of the areola up to the desired location on the breast and marking this point in line with the breast meridian. As a check measurement, this point should be anywhere from 4 to 6 cm above the inframammary fold line, which is drawn connecting the IMF from each breast across the midline such that it can be seen with the breasts in repose. If there is an asymmetry in the level of the IMF, the measurement is taken using the higher of the two folds. An oval-shaped pattern is then drawn around the existing areola, skirting the medial, lateral and inferior borders, which then identifies the periareolar component of the skin pattern. By pinching together the skin of the inferior pole of the breast, a rough estimate of the location and the shape of the vertical component of the skin pattern can be estimated. This identifies the proposed limits of the skin resection. At surgery, prior to any incisions being made, the planned incisions can be temporarily stapled together and the patient placed upright to assess the result of this initial plication. At this point, appropriate alterations can be made to raise or lower the top of the periareolar pattern, alter the takeout of skin around the areola, or be more or less aggressive with the vertical component. This estimation is a completely artistic determination that is made by removing or adding staples as needed. Once the desired shape has been created, the skin edges that have been plicated with staples are marked and the staples removed. The dimensions of the skin pattern are easily visualized at this point and the incisions are deepened through the dermis and the redundant skin is either removed or simply de-epithelialized. If desired, a small amount of parenchyma can be removed under this vertical segment as needed to reduce slightly the size of one or both breasts depending on the presence of any preoperative asymmetry in breast size. Plication of the parenchyma in the inferior pole of the breast can also be performed as needed and the vertical incision is closed. An interlocking Gore-Tex suture completes the periareolar closure. This technique is easily performed and provides consistent, reliable results for a wide variety of patients. Should recurrent ptosis occur, it is a simple matter to re-tighten the skin envelope along the existing scar lines, which allows effective revision without the need for any additional scars (Figure 5.43).

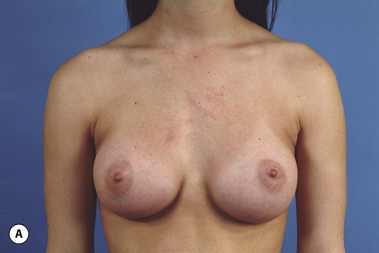
One particular group of patients who are excellent candidates for this approach includes those patients who present with recurrent ptosis of the breast after previous augmentation mastopexy. In these cases, as a result of pregnancy, weight gain or simply aging, the internal support structure of the breast as well as the skin envelope stretches over time with the end result being a mismatch in the position of the implant versus the position of the breast. In essence, the implant tends to remain located in the upper pole of the breast while the breast parenchyma and skin fall inferiorly. In severe cases, two separate breast contours can be created, leading to what is called a ‘snoopy dog’ deformity. When the implant is not malpositioned superiorly and it is the ptotic breast that is responsible for the shape distortion, simple skin only circumvertical mastopexy can be a technically straightforward and reliable technique to reposition the breast parenchyma such that it once again lies on top of the implant. Because the shape of the breast is largely being created by the underlying implant, using the skin envelope to lift the ptotic parenchyma can provide just enough of a correction to restore an aesthetic shape to the breast and lift the inferiorly malpositioned NAC. In these patients, there is also less likelihood of recurrent soft tissue ptosis due to the fact that the soft tissue framework has already become ptotic once. There is a variable limit to the extent that the skin, fat, parenchyma and internal fascial support can stretch and that limit is approached during the ptosis recurrence. Therefore, despite the fact that skin only procedures carry a variable risk for recurrent ptosis, in augmentation mastopexy patients who present with recurrent ptosis and who have reasonable skin elasticity, a skin only procedure can provide a long-term solution (Figure 5.44).

Resuspension Circumvertical Mastopexy
For patients who present with a redundant skin envelope and a ptotic gland with concavity in the upper pole of the breast, something more than a simple skin resection must be performed to provide the best result. One option for these types of patients is to use the proposed vertical portion of the circumvertical skin pattern as an access portal to the breast and then develop a subglandular pocket. Using the resuspension technique described previously can then allow the entire gland to be translocated superiorly, which provides a mild improvement in the positional ptosis and, if done aggressively enough, can correct the upper pole concavity. It is necessary once again to overcorrect the upper pole contour to provide a long-lasting result as tissue relaxation will lead to partial relapse of the upper pole shape. Once the breast is reshaped, the circumvertical pattern including the interlocking Gore-Tex technique is applied as before to complete the procedure. This procedure is easily performed and is simply an extension of the circumvertical approach described previously. As such, the extent to which the breast is disassembled is minimized, which keeps potential complications to a minimum. Should revision become necessary, as with the circumvertical approach alone, it is easily performed and can provide excellent results with no additional scars. For these reasons, the circumvertical mastopexy with breast resuspension has proven to be an attractive option for many patients seeking mastopexy (Figures 5.45, 5.46).


SPAIR Mastopexy
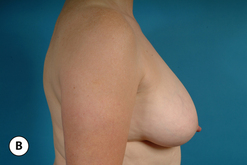
Due to the fact that breast reduction and mastopexy are closely related procedures, there is a commonality to the numerous surgical approaches that can be applied to each. In fact, in some instances, the exact same pattern used for breast reduction can also be used for mastopexy with the caveat being that no parenchyma is removed. Such is the case with the short scar, periareolar, inferior pedicle, reduction (SPAIR) mammaplasty procedure. By applying the concepts used to perform breast reduction, a very reliable and widely applicable method for mastopexy can also be developed. What results is the most complex and invasive of all the techniques described in this chapter. However, it is also the most complete in terms of correcting the preoperative deformity that patients with severe breast ptosis can present with. Conceptually, the procedure carries the blood supply to the NAC on an inferior pedicle. Breast flaps are created such that parenchymal shaping maneuvers can be used to autoaugment the upper pole of the breast and completely correct any shape deficiencies that are invariably present. Finally, the redundant skin envelope is managed using a circumvertical skin pattern strategy along with an interlocking Gore-Tex technique to finish the periareolar closure.
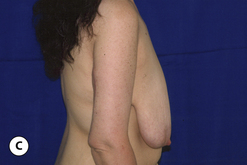
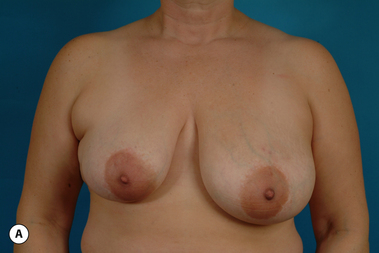
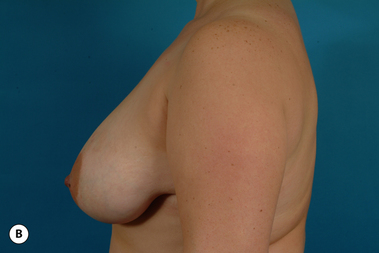
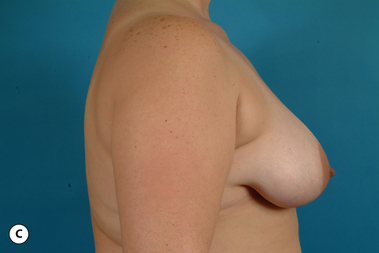
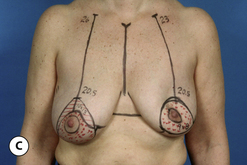
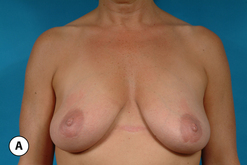
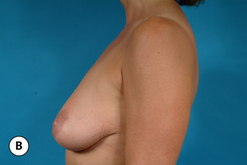
Patient marking
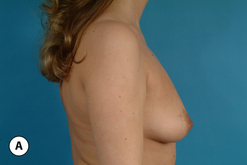
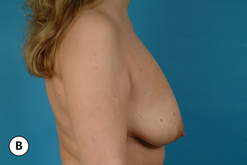
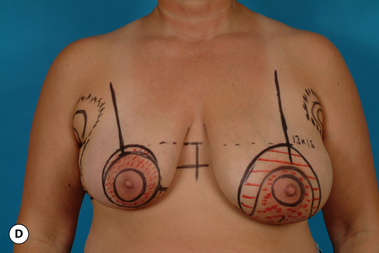
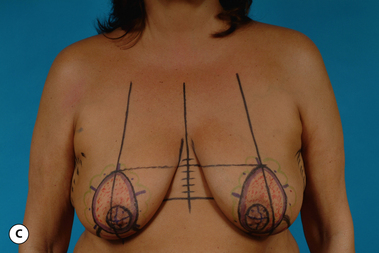
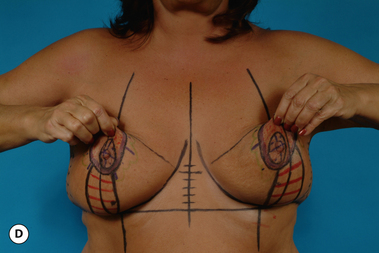
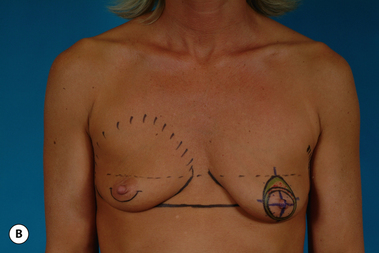
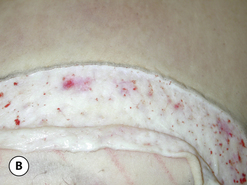
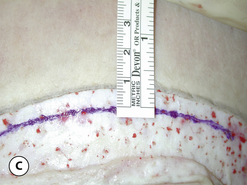
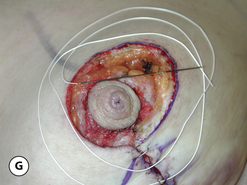
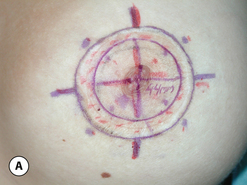
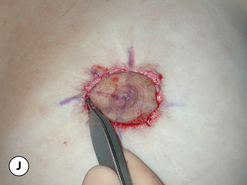
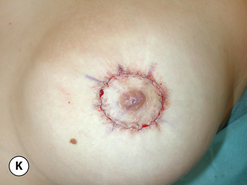
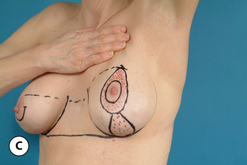
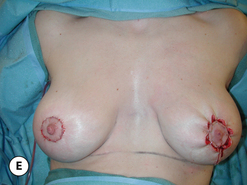
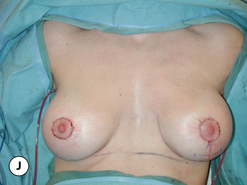
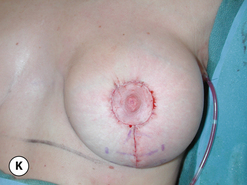
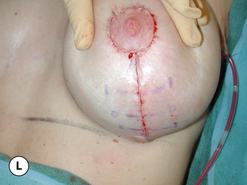
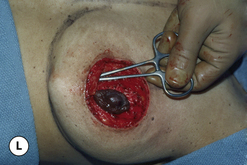
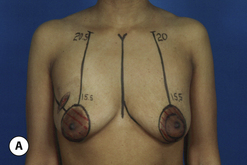
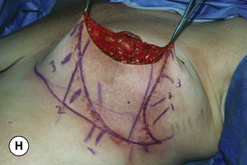
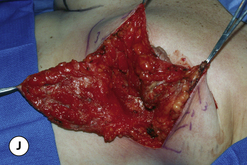
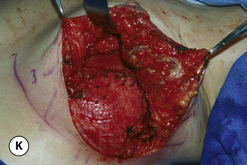
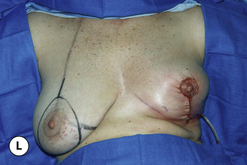
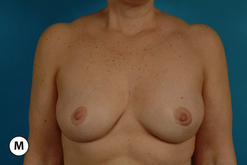
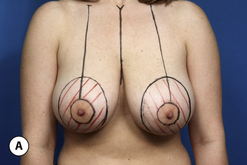
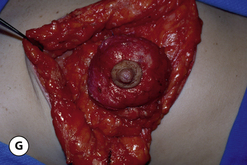
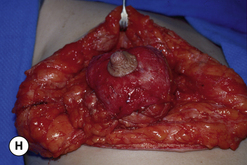
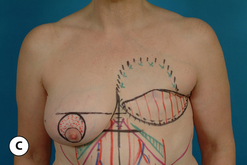
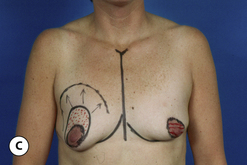
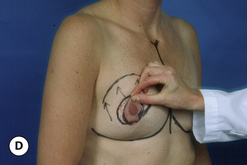
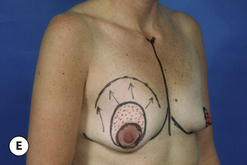
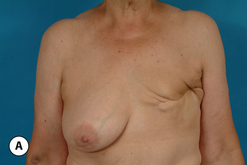
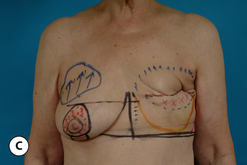
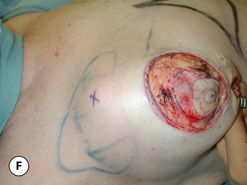
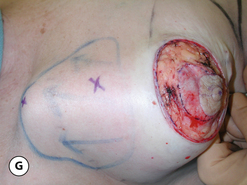
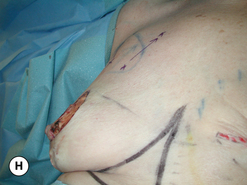
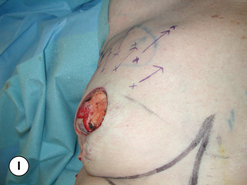
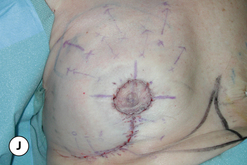
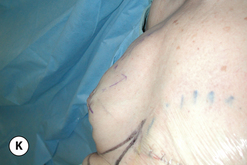
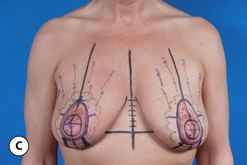
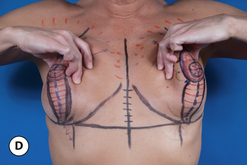
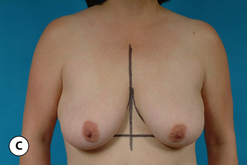
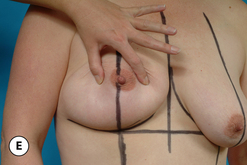
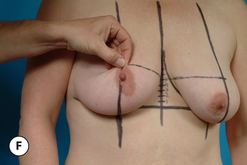
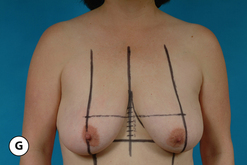
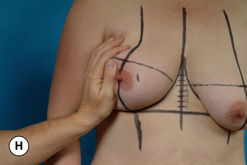
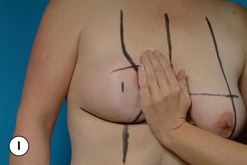
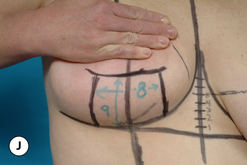
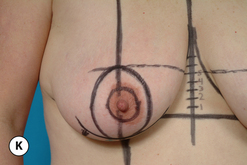
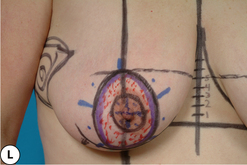
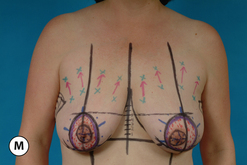
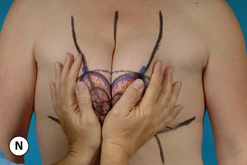
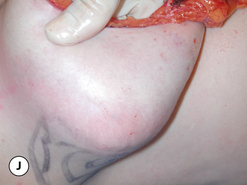
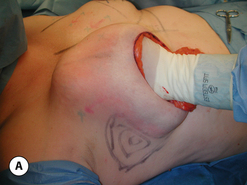
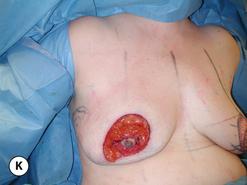
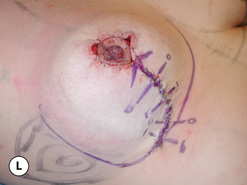
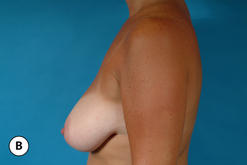
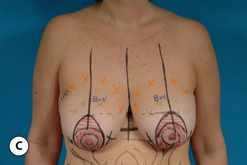
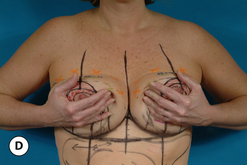
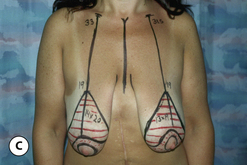
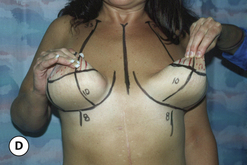
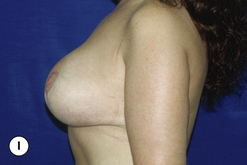
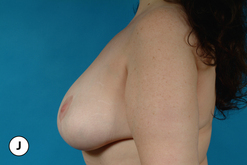
The patient is marked in the upright position with the arms resting comfortably at the sides. The inframammary fold is marked on each side by drawing the location of the fold directly in the crease that forms as the breast is gently lifted away from the chest wall (Figure 5.47 A–C). It is important to place this mark directly in the fold as the location of the fold will not change postoperatively, therefore, there is no need to artificially raise or lower the incision location in an attempt to compensate for the bottoming out phenomenon. Because the support structure of the inframammary fold is not violated in the SPAIR mastopexy, bottoming out in the classic sense does not occur. The position of the breast on the chest wall is noted and a meridian line is visualized such that it divides the breast into two equal halves. This line is drawn from the clavicle down to and beyond the inframammary fold (Figure 5.47 D,E). The top of the proposed incision in the areola is then lifted superiorly to a point where the apex of the breast is destined to be positioned. The exact location of this point is identified by estimating, based on the visual appearance of the breast as the areola is lifted, where the point of maximal projection of the breast will eventually be located. The areola is positioned here and the top of the periareolar pattern is drawn where it intersects the breast meridian line (Figure 5.47 F). The same location is identified on the opposite breast and a line running parallel to the inframammary fold line is drawn across the chest (Figure 5.47 G). The position of the top of the periareolar pattern can be checked by measuring the distance between the IMF line and the line denoting the top of the periareolar pattern. This distance can measure up to 6 cm in some patients. It should be emphasized, however, that the measured distance is meant to be only a confirmatory finding to support the estimation made by the surgeon as to the proper location for the top of the periareolar pattern. In smaller breasts, the remainder of the periareolar incision is diagrammed so as to skirt the medial, inferior and lateral borders of the existing areola. The resulting shape assumed by the proposed periareolar incision becomes that of an elongated oval. In larger breasts, a displacement maneuver is used to simulate what the desired contour will be. By gently transposing the breast medially and laterally with just enough pressure to create the desired shape and noting where the breast meridian would be located at a level even with the nipple, the proper amount of skin can be preserved to eventually wrap around the inferior pedicle in a contoured fashion (Figure 5.47 H,I). Finally, to complete the periareolar pattern, an 8 cm pedicle is diagrammed inferiorly centered on the breast meridian. On either side of this pedicle, a distance is measured up from the inframammary fold 8–10 cm and these two points are smoothly joined in a manner that parallels the shape of the inframammary fold (Figure 5.47 J). The 8 cm measurement is used in smaller breasts and the 10 cm measurement is used in more ptotic patients with a large skin envelope excess. Once these four cardinal points have been determined, they are smoothly joined together in what becomes an elongated oval (Figure 5.47 K). The landmarks for the interlocking Gore-Tex suture are applied and marks are checked for symmetry to complete the marking process (Figure 5.47 L,M). A useful maneuver to ensure symmetric application of the marks is to compress the breasts against each other in the midline to be sure that the marks are evenly and symmetrically applied and that the same amount of skin is left behind (Figure 5.47 N). This can be very helpful in patients who present with any degree of asymmetry. Although the amount of skin resected from each side may differ, leaving behind the same amount of skin on each side offers the best environment for obtaining symmetry. A useful adage to remember in this regard is, ‘it’s not what you take, it’s what you leave behind that is important’.

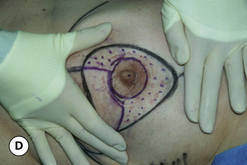
Flap development
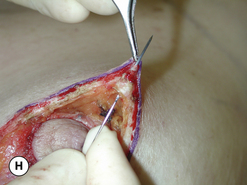
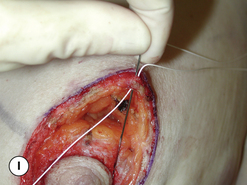
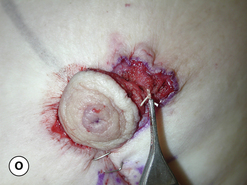
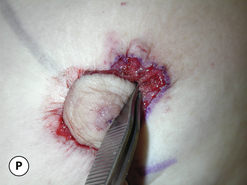
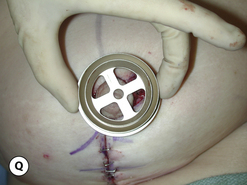
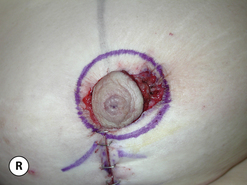
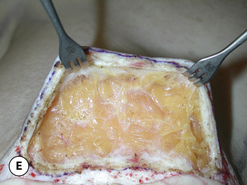
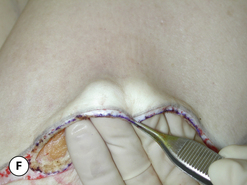
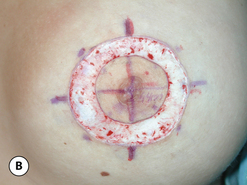
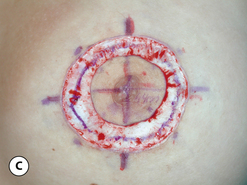
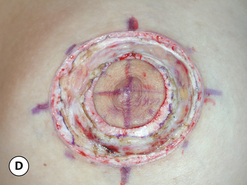
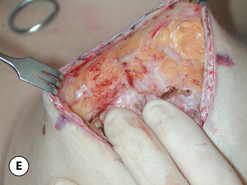
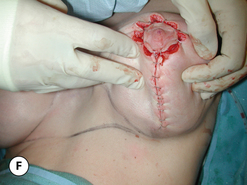
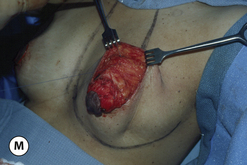
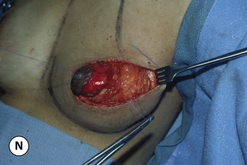
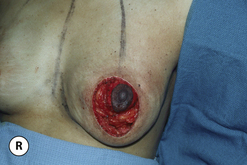
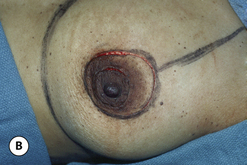
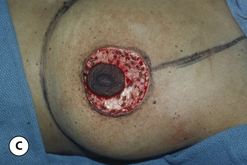
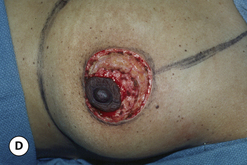
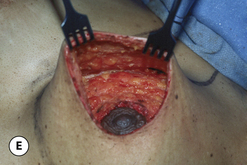
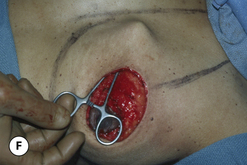
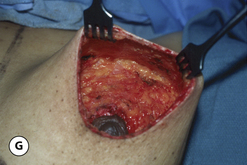
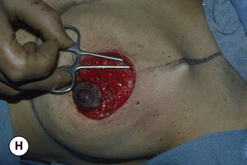
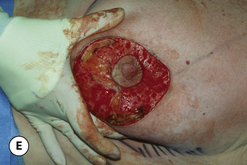
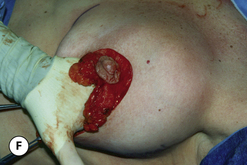
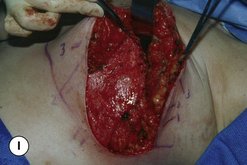
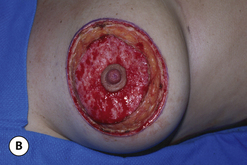
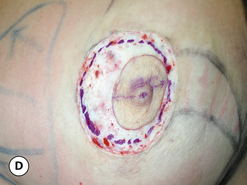
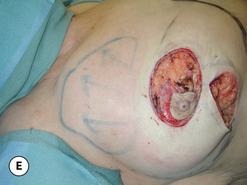
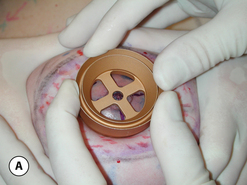
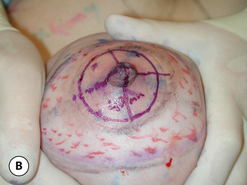
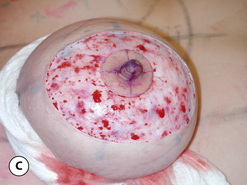
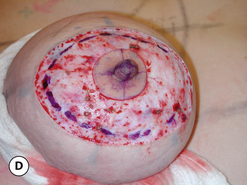
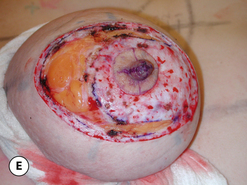
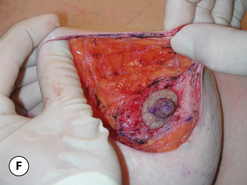
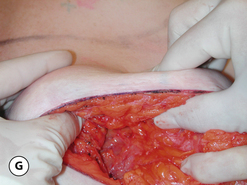
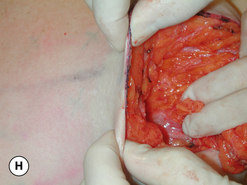
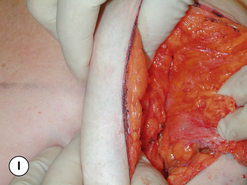
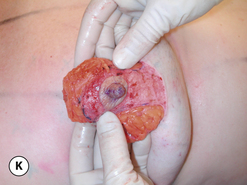
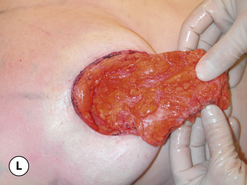
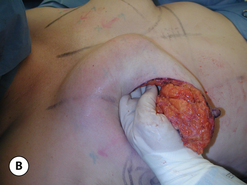
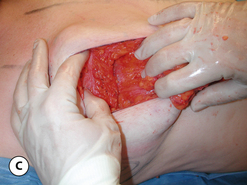
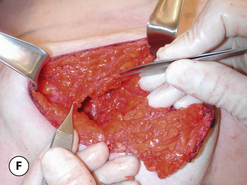
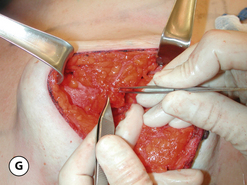
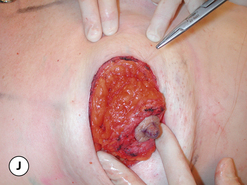
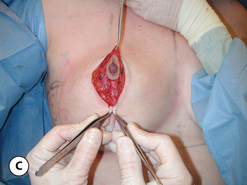
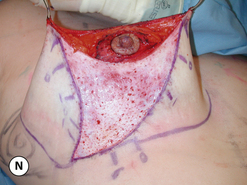
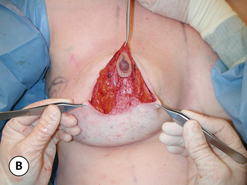
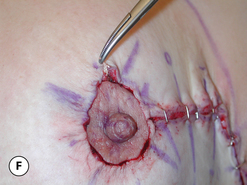
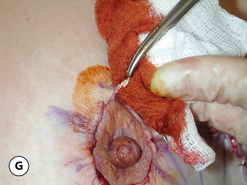
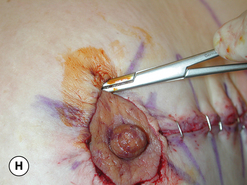
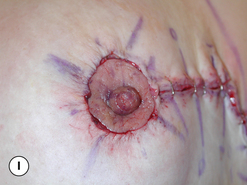
At surgery, the proposed areolar incision is made with the assistance of a multidiameter areolar marker. With the areola under stretch, an areolar diameter of 40–44 mm is diagrammed and incised (Figure 5.48 A,B). The outer periareolar incision is made and the intervening skin de-epithelialized (Figure 5.48 C). The dermis is divided around the periphery of the periareolar defect leaving a 5 mm dermal cuff that will ultimately hold the periareolar Gore-Tex purse string suture. The dermis in the inferior 25% of the periareolar pattern is left intact to preserve the dermal contribution of the blood supply to the NAC (Figure 5.48 D,E). The medial, superior and lateral breast flaps are then developed in preparation for breast reshaping. Initially, dissection of the superior and medial flaps proceeds directly under the dermal shelf and then progressively curves downward toward the chest wall, creating a flap that will be 4–6 cm in thickness. The end result is a flap that is quite thin initially but then becomes substantially thicker at the base of the breast (Figure 5.48 F–I). In contrast, however, the lateral flap is dissected at the level of the investing breast fascia down to the chest wall (Figure 5.48 J). If the lateral flap is left too thick, experience has shown that a pronounced lateral fullness to the breast will often result. An effort is made to make a smooth transition between the base of the thicker superior flap and the thinner lateral flap to avoid the possibility of a visible contour step off in the superolateral aspect of the breast. Once the flaps have been developed, the inferior pedicle with the attached NAC can be identified as it lies in the center of the breast mound. Every effort is made to avoid undermining the pedicle and to keep as wide a base of attachment as possible to ensure maximal neurovascular supply to the pedicle (Figure 5.48 K,L).
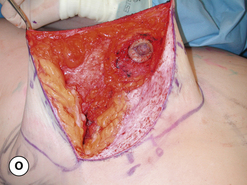
Breast reshaping
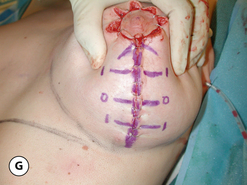
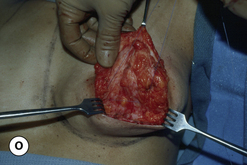
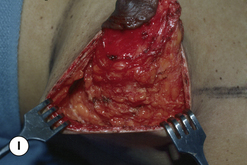
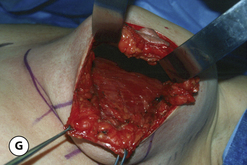
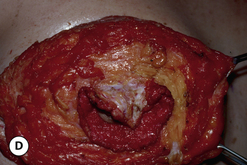
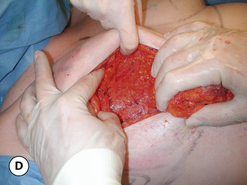
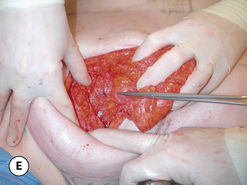
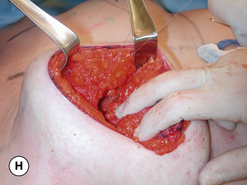
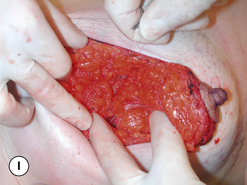
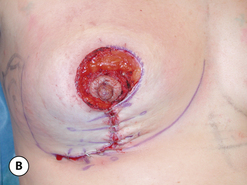
Once the flaps have been developed, the superior flap is undermined up to a level that approaches the clavicle (Figure 5.49 A) and the medial flap is undermined over to but not beyond the internal mammary perforators (Figure 5.49 B). Superiorly, the leading deep edge of the flap is advanced up and under itself, where it is sutured to the pectoralis major fascia in three locations using an absorbable 3–0 monofilament suture (Figure 5.49 C–E). Ideally, these sutures are placed correspondingly at the 10, 12 and 2 o’clock positions to evenly advance the flap superiorly. Absorbable sutures can be used in this procedure as a result of the fact that the flaps are actually undermined and directly repositioned. Scar will eventually form, which then functions to hold the repositioned tissues into place. In this fashion, an autoaugmentation of the upper pole of the breast is performed using the soft tissue thickness of the superior flap as the basis for supplying tissue to fill in the upper breast contour. The deep leading edge of the medial flap is then imbricated to itself again with the 3–0 absorbable monofilament suture (Figure 5.49 F–H). This serves to gather the medial flap tissues together, which creates a more rounded and improved medial breast contour. The inferior pedicle that was created by default after dissection of the flaps is now translocated superiorly such that it meets the superior flap, at which point the deep margin of the pedicle is secured to the pectoralis major fascia with two to three sutures (Figure 5.49 I). If there is a sharp tissue edge around the apex of the pedicle, this edge is trimmed to provide a rounded smooth contour. Finally, if the surrounding flaps have enough bulk, the pedicle can be directly sutured to the medial and superior flaps to assist further in holding the pedicle in position to improve the shape of the breast (Figure 5.49 J,K).
Vertical plication
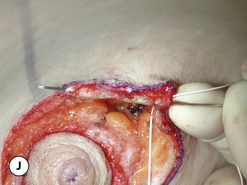
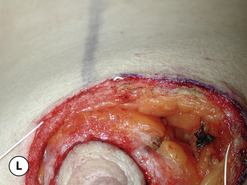
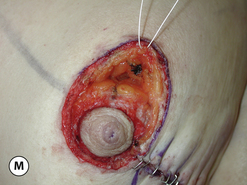
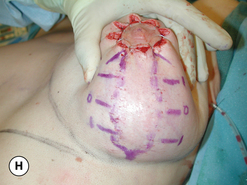
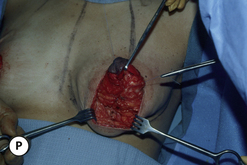
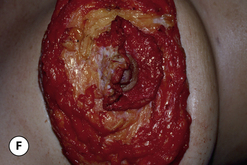
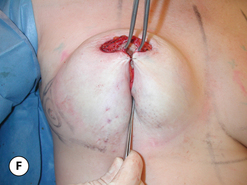
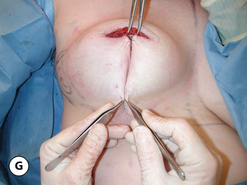
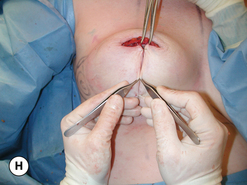
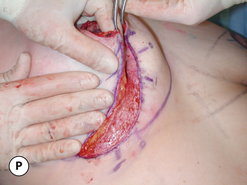
From a technical standpoint, the plication of the redundant skin in the lower pole of the breast is a very straightforward maneuver and yet, at the same time, it is this maneuver that requires the most artistry on the part of the surgeon. The procedure is begun by placing the patient upright at least 45 degrees to allow gravity to affect the breast in a way that allows the surgeon to accurately assess the effect of the vertical plication. By placing traction on the most superior aspect of the inferior pedicle, the skin envelope will buckle medial and lateral to the pedicle (Figure 5.50 A). These two buckle points are grasped with a forceps and the edges are brought together and temporarily secured with what is called the ‘key’ staple (Figure 5.50 B–D). This is the fixation point that sets the remainder of the pattern as all other judgments regarding the extent of plication are based on the key staple as a starting point. The de-epithelialized dermal shelf on either side of the key staple is grasped with a hemostat and, by providing upward traction, the lower pole skin envelope is placed under tension (Figure 5.50 E). In this position, when inward pressure is applied against the center of the lower pole of the breast, the edges can be seen to imbricate in a vertical to slightly oblique orientation that identifies the plication line needed to optimally create the desired breast shape (Figure 5.50 F). It is then a simple matter to apply staples sequentially to secure the plication line in the desired location (Figure 5.50 G,H). As the plication line nears the inframammary fold, it is angled laterally to prevent the vertical incision from extending down onto the upper abdomen (Figure 5.50 I). Once the vertical segment is fully plicated, the dimensions of the periareolar defect will be markedly reduced and the areola can be inset into the defect to allow final assessment of the breast shape (Figure 5.50 J,K). At this point, further tightening of the plication line can be performed as needed to create the best shape possible. Conversely, some staples can be loosened slightly to correct excessive lower pole flattening. Essentially, whatever maneuver is required to create the best shape possible is what is required at this point. This aspect of the shaping strategy represents one of the major advantages of the technique, namely, that the shape immediately on the table is designed to be the shape that is ultimately created after full healing has occurred. In patients with poor skin tone, it may be advisable to over-tighten the plication line slightly in anticipation of some postoperative skin envelope relaxation. Once the vertical segment has been set, the margins of the plication line are marked and the staples are removed (Figure 5.50 L,M). The vertical segment is de-epithelialized and the lateral flap is fully released to allow it to cross over on top of the de-epithelialized pedicle to meet the medial incision line (Figure 5.50 M–P). This maneuver creates a more contoured lower pole and obviates any potential for flattening along the incision line that can occur when the lower pole tissues are simply imbricated without any tissue release. The vertical incision is then closed in layers to prepare for placement of the purse string suture.


Control of the periareolar defect
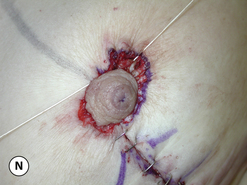
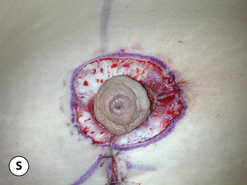
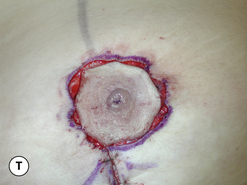
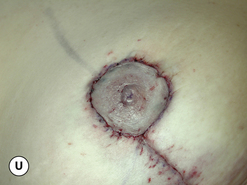
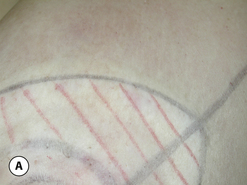
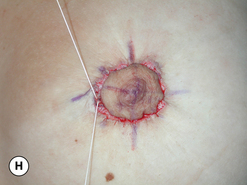
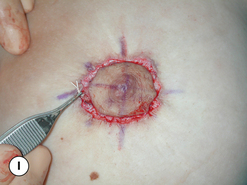
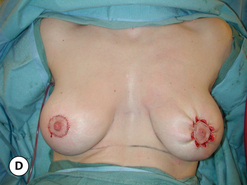
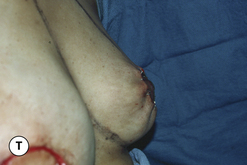
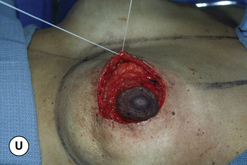
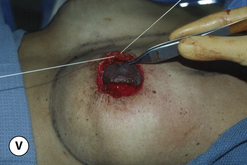
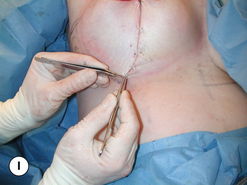
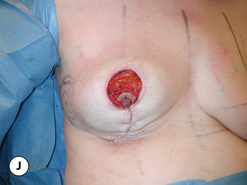
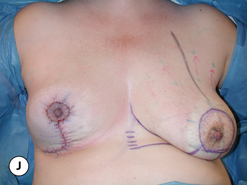
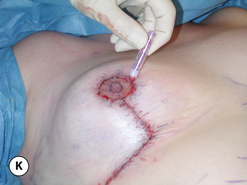
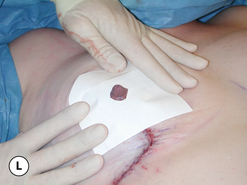
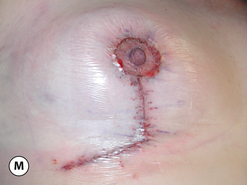
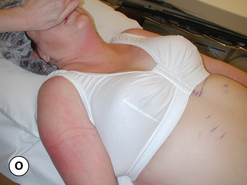
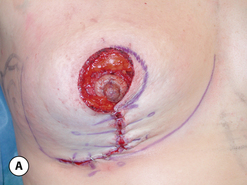
The patient is once again placed upright and the shape of the periareolar defect is assessed. If it is not round, additional skin and underlying parenchyma is removed to create a round opening, being sure to maintain a dermal shelf in the course of revising the defect (Figure 5.51 A,B). The markings for an interlocking Gore-Tex purse string suture are applied and the suture is placed as described previously (Figure 5.51 C–H). Final inset is performed in a layered fashion (Figure 5.51 I,J) and an occlusive dressing consisting of tissue glue (Dermabond-Ethicon Corporation) and Opsite is applied (Figure 5.51 K–N). A support garment is placed to provide support to the newly repositioned breasts (Figure 5.51 O).

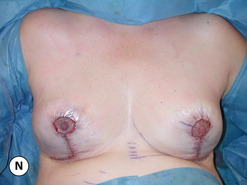
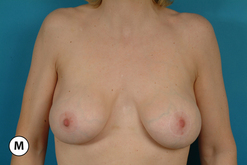
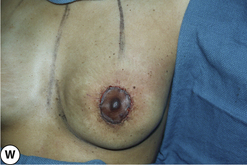
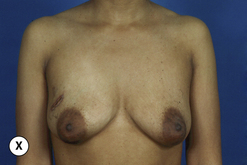
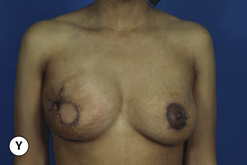
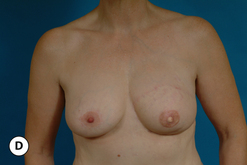
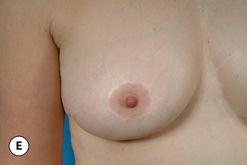
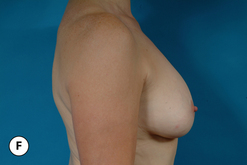
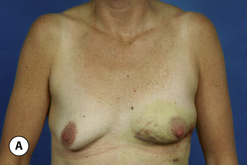
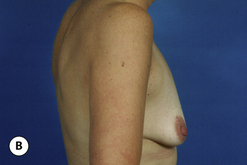
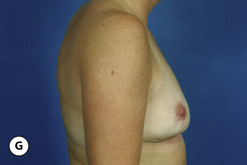
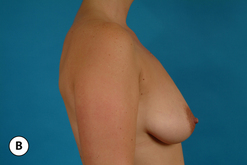
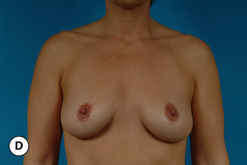
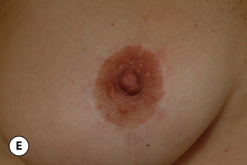
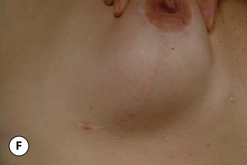
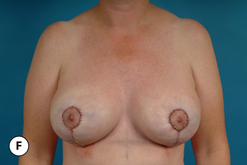
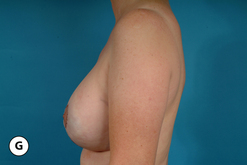
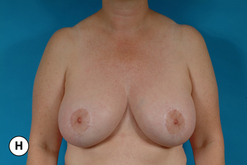
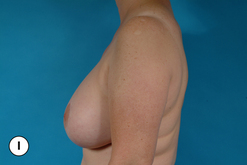
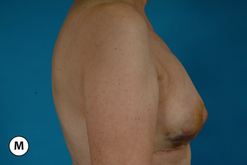
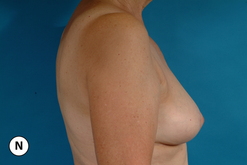
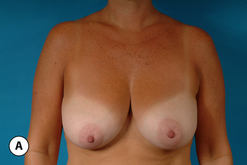
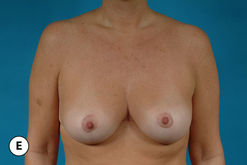
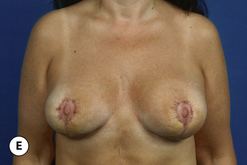
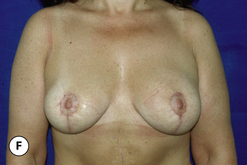
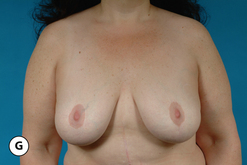
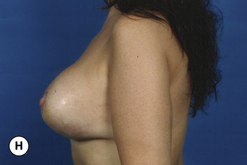
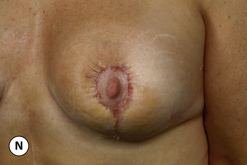
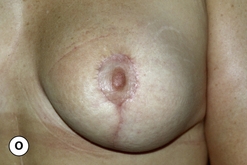
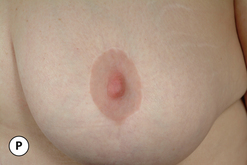
Using this operative strategy, each of the elements that describe the ptotic patient is addressed. The positional ptosis and concavity in the upper pole are directly corrected by strategically developing the flaps and the pedicle, advancing them superiorly and suture fixating them into position. The redundant skin envelope is reduced using the circumvertical skin pattern along with the interlocking Gore-Tex suture technique to manage the periareolar opening. The SPAIR mastopexy technique is reserved for patients who present with more severe cases of breast ptosis where the degree of breast descent on the chest wall is pronounced or the amount of internal reshaping required to provide the optimal result is considered extensive. While it is the most complex and involved of all the mastopexy procedures described in this chapter, it is also a very consistent and reliable technique for management of the ptotic breast (Figures 5.52–5.54).

Postoperative Care
With all of the described procedures, the postoperative care is generally the same. While a support garment will not create breast shape by itself, it can help support the newly positioned breast flaps and pedicle until early scar formation begins to secure the tissue into position. Also, the mild compression afforded by the garment can help reduce swelling and result in greater patient comfort postoperatively. In cases where the vascular supply to the NAC is at all in doubt, a support garment is not applied until after the viability of the NAC has been assured. Opsite dressings and suture ends are clipped and removed at approximately 7 days postoperatively and scar treatment with a vitamin E based ointment (Amology) is initiated and continued for 6 weeks. Return to work is allowed as early as 1 week, depending on the occupation, and return to athletic activities at 4–6 weeks. Follow up is arranged at 1 week, 6 weeks, 6 months and 1 year, after which full healing is deemed to be complete.
[/level-membership-for-plastic-reconstructive-surgery-category][not-level-membership-for-plastic-reconstructive-surgery-category]
Chapter 5 Mastopexy
One of the primary goals of any aesthetic procedure is to restore aged or otherwise injured structures to a rejuvenated and youthful appearance. In fact, it is the youthful ideal that serves as a template for nearly every aesthetic procedure commonly performed in plastic surgery today. To that end then with regards to the breast, in order better to understand the surgical principles involved in mastopexy, it is helpful to review the attributes of the youthful breast that help identify it as an object of beauty and femininity. Then, understanding how these attributes are altered in the ptotic patient allows an organized and complete surgical plan for the operative correction of ptosis to be developed.
Breast Ptosis – Definitions
Positional Breast Ptosis
Many patients who present for ptosis surgery in fact have developed descent of the entire breast complex on the chest wall such that the normal aesthetic ideals are altered. These patients present with a low inframammary fold and an often underfilled and lax breast skin envelope that overhangs the fold and rests on the lower rib cage, masking the contour of the upper abdomen (Figure 5.1). This anatomic relationship is referred to as positional breast ptosis and it represents an under-recognized component of the overall presentation of the ptosis patient. It is most commonly seen in the massive weight loss patient where, after weight loss, the overall soft tissue expansion of the skin envelope of the breast caused by the obesity results in physical descent of the entire breast complex including the inframammary fold inferiorly on the chest wall. In some patients, the breast can actually be seen to fall as low as halfway down the length of the torso (Figure 5.2). Positional breast ptosis is very difficult to correct surgically and can actually be made worse very easily if the attachments of the inframammary fold are disrupted in any way. For this reason, recognizing positional ptosis is critical in allowing appropriate management of the breast to optimize the final result.
Volume Ptosis
Assuming that the inframammary fold and overall position of the breast is properly located, it is then very common for the existing breast volume to become ptotic. In the aesthetic youthful breast, the support structures in the breast as well as the skin are strong, uninjured and are able to contain the developing breast volume without inordinately stretching. As a result, the volume of the breast is symmetrically distributed over the chest wall. When the patient stands upright, a mild descent in the volume distribution occurs that creates a pleasing, full and rounded lower pole along with an upper pole contour that has a smooth takeoff from its attachments to the upper chest and results in a straight line contour extending down to the point of maximal projection, where, ideally, the NAC is located (Figure 5.3). Alteration in these relationships contributes significantly to the appearance of the ptotic patient. Over time, and under the influence of other factors such as pregnancy, weight fluctuations or simply aging, the support structure of the breast can change. As the internal ligamentous support of the breast stretches, particularly with the changes in breast volume that occur with pregnancy and subsequent breast-feeding, stress is placed on the skin. Gradually, the skin gives way and the inherent elastic character becomes diminished. The result is tissue stretching with descent of the majority of the volume of the breast into the inferior portion of the skin envelope. This volume ptosis can result in a concavity in the contour of the upper pole of the breast and a breast that appears elongated (Figure 5.4). Occasionally, ptosis of the volume of the breast disproportionately involves only the skin envelope of the lower pole and as the breast gradually descends, a new point of maximal projection is created by the newly configured breast contour. In these patients, the existing NAC actually assumes a position in the upper pole of the breast above the point of maximal projection and the distance from the nipple down to the inframammary fold becomes disproportionately lengthened. This form of volume ptosis is known as pseudoptosis (Figure 5.5).
Breast Skin Ptosis
With aging, weight loss or after pregnancy, the breast fat and parenchyma can variably involute, resulting in a decrease in breast volume. Typically, however, the skin surface area does not appreciably change and the breast becomes underfilled and redundant with the result being ptosis of the breast skin envelope. In these patients, the breast often demonstrates a wide and flattened contour that drapes over the inframammary fold, creating a very unaesthetic appearance to the breast. Also, it is very common in these types of patients for the NAC to be positioned very low on the breast mound (Figure 5.6).
NAC Ptosis
Finally, the position of the NAC can further accentuate these changes. In the aesthetic breast, the nipple is located just at the point of maximal projection of the breast mound. For some, even just a hint of an upturn in the nipple location adds a visual element of softness to the breast that some find aesthetic (Figure 5.7). However, any shift in the position of the nipple below the point of maximal projection is most decidedly unaesthetic and detracts from what might otherwise be an acceptable breast contour in selected patients. For this reason, any nipple position that is noted to be below the point of maximal projection is termed NAC ptosis. Traditionally, this type of ptosis has been graded as:
It must be recognized, however, that this classification system is incomplete and misses a very important relationship that directly affects the surgical management of the position of the NAC. In many patients, the nipple is located directly at the point of maximal projection; however, because the skin envelope is ptotic as well, the overall position of the NAC is low and therefore requires lifting to optimally restore an aesthetic relationship between the breast mound and the position of the NAC (Figure 5.9). The structure that defines this position is the inframammary fold and where the NAC lies in relation to the fold must also be described. This is performed by noting where the nipple lies in relation to the inframammary fold when looking at the patient from the front. By drawing a line that connects the inframammary fold on each side across the midline, the position of the nipple in relation to this line can be assessed by simply standing back and observing the relationship with the aid of a straight edge. The following classification is utilized:
By combining the two classifications, a useful indicator of nipple position can be developed that can guide surgical management of NAC ptosis. For example, a patient with a nipple that is at or slightly above the point of maximal projection and lies above the inframammary fold (1A) does not require lifting of the NAC. Such a relationship is seen with pseudoptosis, where operative correction would be aimed at lifting the volume of the breast to position it properly under the NAC (Figure 5.10). However, a patient with a nipple at the point of maximal projection that lies below the inframammary fold (1C) will require not only lifting of the NAC but also reduction of the redundant skin envelope to restore an aesthetic relationship between the NAC position and the breast mound (Figure 5.11). For patients who have a nipple at the point of maximal projection that lies directly at the inframammary fold (1B), several surgical options may be appropriate including mild lowering of the fold, augmentation particularly with shaped cohesive gel breast implants, periareolar mastopexy or some combination of these techniques (Figures 5.12, 5.13).
Evaluation of the Ptotic Patient
When designing a surgical strategy for the correction of ptosis, it must be recognized that each of the four elements of ptosis can be variably present and these elements will combine to determine the overall appearance of the breast. Therefore, the goal of the preoperative evaluation is to determine the presence and extent of each of these elements to allow for an appropriate surgical strategy for correction to be devised. This must be done in conjunction with an overall evaluation of the patient’s health, with particular attention placed on conditions that can affect the size and shape of the breast. Any history of previous breast problems must be obtained and the presence of breast scars from previous biopsies is noted as this can alter the surgical approach with regard to skin incisions or pedicle choice. Inquiry is made into any family history of breast cancer that might be present and the date of the last mammogram and the result is documented. A reproductive history is obtained, including the number of pregnancies, deliveries and any plans for future children. Particular note is made with regard to breast-feeding. How many children were breast-fed and how long this process continued can provide insight into the forces applied to the breast that may have significantly influenced the patient’s present condition. If further pregnancies are planned, it is best to inform the patient that this may have an adverse effect on the ultimate result, necessitating a revision in the future.
When discussing breast size after mastopexy, it is helpful to stress to the patient that the size of the breast very frequently appears smaller after the procedure (Figure 5.14). The simple act of removing skin to tighten the skin envelope can create the illusion of a smaller breast despite the fact that no parenchyma was removed. This is due to the fact that a breast with variable ptosis of the skin envelope and volume looks bigger than it actually is. Once the volume is lifted and the redundant skin envelope is reduced, the true volume of the breast becomes evident. As a result, for some patients the newly shaped and proportioned breast can appear smaller than expected. It is important to discuss this ahead of time with the patient, particularly when the use of an implant is being considered, to avoid the potential for postoperative patient dissatisfaction.
Beyond the questions about whether or not to use an implant, other common patient requests include lifting the entire breast higher on the chest wall, increasing the fullness in the upper pole, lifting the position of the NAC, reducing the diameter of an enlarged and out of proportion areola and creating a firmer consistency to the breast. Each of these goals can be achieved using the techniques described in this chapter, either alone or in combination.
Surgical Techniques in Mastopexy
Lifting the NAC
Asymmetrical areolar shape
One of the recognized techniques for lifting the areola involves an incision around the upper half of the areola that is then combined with an excision of a wedge of skin above the areola. This technique, called a crescent mastopexy, is intended to provide a distracting force that lifts the top of the areola but limits the scar to the upper border of the areola where it joins with the breast skin. While limiting the scar is an attractive goal, in actuality, the net effect of the asymmetrical force that is applied to the areola is to stretch it along the vertical axis with the result being an oval-shaped and widened areolar diameter. The resulting distorted areolar size and shape compromises the appearance of the areola and creates a less than optimal aesthetic result (Figure 5.15). From this experience is derived one of the technical concepts that governs successful periareolar surgery, namely that, to achieve a round and properly positioned areola, the periareolar incision must be carried around the entire peripheral margin of the intended areolar diameter in order to redistribute evenly and adequately the forces around the subsequent closure. In this fashion, a controlled and consistently round areolar shape can be created.
Widened areolar diameter
Another and perhaps more widely recognized complication of periareolar surgery is widening of the areolar diameter postoperatively. The skin of the areola has an exaggerated elasticity compared to the surrounding breast skin and possesses a tremendous ability to stretch when placed under tension. As result, when there is tension placed on the wound closure around the areola after a periareolar procedure, the areola can spread over time, creating a larger areolar diameter than was initially created at the time of surgery. At times, this postoperative spreading can be dramatic and the distorted proportion that the wide areola creates can significantly detract from the overall aesthetic appearance of the breast (Figures 5.16, 5.17). Clearly, the etiology of postoperative spreading of the areola is related to tension on the areolar closure. From this experience is derived the second of the technical concepts that governs periareolar surgery, namely that the tension on the wound closure must be minimized as much as possible. Minimizing tension can be accomplished using a number of different technical modifications, including adding a vertical segment to a periareolar skin pattern whenever possible to reduce the dimensions of the outer periareolar skin incision, limiting the amount of skin removed in the horizontal dimension and using smaller implants in cases of augmentation mastopexy. But perhaps the most effective technique involves stabilizing the dimensions of the periareolar opening with the use of a periareolar purse string suture. By evenly cinching down the outer skin incision to the desired dimension, tension on the areola can be greatly minimized, leading to a reduced incidence of postoperative areolar spreading.
Suture material
The optimal suture material is a permanent monofilament, which slides much more easily through the dermis than a braided suture which tends to catch and become resistant to movement as it is passed through a dermal length of more than 3 or 4 cm. When the suture material passes easily through the dermis, it facilitates an even cinching down of the periareolar opening without any asymmetrically positioned crimping or bunching of the skin edges. The use of a permanent suture also provides long-term support to the periareolar closure. When absorbable materials are used, reabsorption of the suture can occur before scar stabilization of the tissues has occurred. By using a permanent suture, the chances for postoperative areolar spreading are minimized. Although materials such as nylon and prolene can be used for smaller diameter openings, the ideal suture for this purpose is Gore-Tex (Gore Tex Corporation, Flagstaff, Arizona). This material, which comes from the disciplines of vascular and cardiovascular surgery, where it has been used in conjunction with vascular grafts for years, is a very strong, smooth and permanent material that slides through tissues with ease. The optimal suture size to use is CV-3, which has a soft and manageable pliability and great strength, all with the size of about a 2–0 prolene suture. By cutting off the curved needles on either end and threading the suture onto a straight needle, long passes with the needle through the dermal layer of the outer periareolar incision can be made, which speeds suture placement. Alternatively, a slightly larger but stronger CV-2 suture may be used. This particular suture comes already swedged onto a straight needle, which obviates the need to thread the suture separately (Figure 5.18). Once the suture is placed, it then becomes very easy to cinch the periareolar defect down to the desired dimension as the Gore-Tex easily slides through the soft tissues without catching or bunching. Using this suture material provides for a precise and controlled management of the periareolar opening over and above that which is possible with any other suture material.
Suture placement
When performing a periareolar lift, there are several technical maneuvers that can improve the chances for success and can minimize the potential for areolar spreading, wound dehiscence and irregular, widened or prominent scars. Initially, the limits of the outer periareolar incision are outlined. Vertically, the top of the pattern is located at the point where the top of the areola will be positioned. Inferiorly, the pattern skirts the lower border of the areola. Medially and laterally, the pattern again skirts the areola to avoid unnecessary removal of skin in the horizontal plane that can create a tight closure. This pattern variably assumes the shape of an elongated oval. The width of the planned areolar incision varies from 40 to 44 mm. Using a wider areolar incision can predispose to areolar spreading with an excessive areolar diameter developing postoperatively (Figure 5.19). The initial incisions are made just into the dermis and the intervening skin between the outer periareolar incision and the inner areolar incision is de-epithelialized. To place the purse string suture effectively and securely, it is helpful to create a small dermal shelf around the periphery of the periareolar defect. This is as opposed to cutting through the dermis directly at the margin of the periareolar incision. By dividing the dermis approximately 5–6 mm away from the de-epithelialized skin edge, a dermal cuff is created that provides a firm scaffold to hold the Gore-Tex suture. By then passing the straight needle directly within the substance of the dermal shelf and minimizing any gaps that are present as the various passes with the straight needle are made, the tension on the purse string suture is evenly distributed in the strong and stable architectural framework of the dermis. This helps prevent the suture from rupturing through the dermal cuff and pulling out. Also, because the tension is evenly distributed, the surrounding breast skin is evenly pulled down to the areolar diameter, which prevents uneven gathering of the pleats which inevitably form when the purse string is cinched down. Avoiding intermittent skip areas in the dermal shelf when placing the suture also prevents the development of stress points in the suture strand once it is pulled down that could potentially lead to the suture breaking. It is important to note that the width of the dermal cuff should not be any wider than 5–6 mm. If a dermal shelf wider than this is used, then the periareolar opening that results after the purse string suture is cinched down can become quite small and can crowd the areola as it is pulled through the opening, possibly resulting in swelling, NAC ischemia and areolar necrosis.
After development and undermining of the dermal shelf, the purse string suture is placed. Ultimately, the suture will be cinched down and secured with 8–10 square knots as the very smooth surface of the Gore-Tex material has a tendency to cause the knot to slip unless a sufficient number of ‘throws’ are used to secure the knot. This creates a knot complex that is quite bulky and, if it is not buried securely under a healthy layer of tissue, postoperative exposure of the knot can occur. Therefore, to begin suture placement, the needle is passed from deep under the dermal edge to superficial and then once the purse string has been placed, it ends by passing the needle from superficial to deep. This positions the knot securely under the dermal shelf and away from the skin closure. Once the knot is tied down, it is then very easy simply to tuck the knot under the dermal shelf so that it will be reliably buried under healthy tissue and will completely prevent subsequent erosion with exposure of the knot. It is my preference always to place the knot at the most medial aspect of the areola in the event that, for whatever reason, it becomes necessary to remove the Gore-Tex suture. For the right breast this would mean starting the purse string at the 3 o’clock position and for the left breast the 9 o’clock position. Then, if the Gore-Tex needs to be removed, it is very easy to simply spread with scissors to separate the incision at the location of the knot, gently pull the intact suture strand away from the skin edge and cut it to pull the suture out. If the location of the knot is not known, this process can be somewhat difficult as, when the suture is cut midstrand and an attempt is made to remove the suture, the knot catches in the scar around the areola, which prevents easy removal.
Once the purse string suture has been placed, the outer periareolar incision is cinched down to the desired diameter. The Gore-Tex suture is secured with 8–10 ‘throws’ and the knot complex is buried under the dermal ledge. It should be noted that, if redundancy with pleating of the periareolar skin becomes evident, this pleating tends to become particularly prominent along the superomedial margin of the periareolar opening and the inferolateral margin tends to form more of a one-to-one length relationship with the areolar skin. By redistributing these pleats more evenly around the periphery of the closure, the likelihood that scar contracture will effectively minimize or even eliminate these pleats is enhanced. It is advisable to cinch the opening down to a smaller size than what ultimately is desired for two reasons. First, despite the positive effects of the purse string suture on maintaining the areolar diameter, a modest amount of areolar stretching almost always occurs postoperatively. By adding an element of overcorrection to the operative strategy, the effects of this postoperative spreading on the quality of the final result can be minimized. Second, if the shape of the areola is not round, a small additional amount of very superficial de-epithelialization can be performed as needed to make the periareolar defect round and this maneuver can enlarge the areolar diameter slightly. Care must be taken during this maneuver not to inadvertently cut the Gore-Tex suture. If the suture is cut, it is a simple matter to simply reinsert a new purse string suture; however, the stress dynamics of the new suture are invariably different from the first and the opening must frequently be modified with additional de-epithelialization to create a round areola. Once the purse string is in place and the defect has the proper shape, the areola is inset with 4–0 absorbable monofilament dermal sutures placed in a buried inverted, interrupted, fashion followed by a running subcuticular suture to complete the procedure (Figure 5.20).
Interlocking Gore-Tex suture technique
Even with the described technical modifications, it is not at all unusual for some degree of postoperative spreading of the areola to occur. This can also be associated with distortion and asymmetry in the shape of the areola. The reason for this relates back to the marked ability of the areola to stretch under tension. Despite the placement of the supporting Gore-Tex purse string suture located deep within the dermis of the periareolar breast skin, it is possible for the areolar dermis to be pulled over the top of this supporting suture framework if the tension on the surrounding skin is great enough. When this happens, the more superficial elastic dermis of the areola is pulled over the top the stable purse string support and a widened areola results (Figures 5.21, 5.22). In order better to secure the areola into the fixed periareolar opening, the interlocking Gore-Tex suture technique was developed. In this technique, all of the modifications described earlier are utilized, including the creation of a dermal shelf, undermining of the skin edges to ease the periareolar closure and use of the Gore-Tex suture on a straight needle to manage the periareolar defect. What differs is the manner in which the suture is placed. Before suture placement, eight evenly spaced orientation marks are placed on the outer diameter of the periareolar opening as well as the areola itself. By starting at the most medial point, the Gore-Tex is passed from deep to superficial through the dermal shelf. The suture is then directed over to the corresponding point on the areola and a small bite of areolar dermis is incorporated in the stitch. The suture is directed back over to the dermal shelf and the needle is passed directly in the dermis until the next orientation mark is reached. Here, the needle goes back over to the corresponding point on the areolar dermis, again to incorporate a small bite of tissue. This process repeats until the suture has passed all the way around the defect, where the needle ends by passing from superficial to deep under the dermal shelf. The appearance of the pattern created by placing the suture in this fashion is one of a wagon wheel. Ideally, all the bites of dermis through the areola are equal and the spacing between the ‘spokes’ is even. By then pulling on the free suture ends, the Gore-Tex strand can be seen to slide smoothly through the fairly complex weave created by the pattern and the purse string is clinched down until the two unequal diameters are brought together. While a small amount of widening of the contracted areola contributes to the closure of the gap between the two diameters, it is mainly the outer periareolar incision that is cinched down to close the wound. Because of the friction encountered by the Gore-Tex as it is passed through the extensive dermal framework of the periareolar dermal shelf and the areola, it holds without even the need to place a knot. Typically, the diameter of the periareolar opening is made smaller than intended and by using gentle manipulation, the size of the overcorrected areolar defect can be slowly massaged open to whatever diameter is desired. As before, 8–10 throws are placed to keep the knot from slipping and the knot complex is buried under the dermal shelf. The shape of the areola is then checked with the patient in the upright position and if it is not round, additional superficial de-epithelialization is performed at the appropriate margins of the breast skin flaps to create a round shape and the incision is then closed with a running subcuticular 4–0 absorbable monofilament to complete the closure. By interlocking the dermis of the areola into the periareolar closure using the same purse string suture as described, the tendency for the areolar dermis to be pulled over the purse string is held in check. As a result, a more stable distribution of forces is created that tends to resist areolar spreading postoperatively (Figures 5.23–5.25).
