Neurosurgery
THE ETHOS OF NEUROSURGERY
1. Damage to the brain will result in disability at remote sites which is not always proportional to the extent of brain damage: a massive lesion in a non-eloquent area such as the right frontal lobe can cause virtually no disability whereas a lesion no larger than a few millimetres in the internal capsule or brainstem can cause hemiplegia. Modern neurosurgical approaches make ingenious use of corridors through the skull base or non-eloquent areas of the brain: it is always preferable to remove more skull and retract the brain less.
2. Although the brain is 2% of the body weight, it receives 15% of cardiac output. It depends on this massive blood supply to support its extremely high metabolism and tolerates any disruption poorly. It can also bleed catastrophically and the usual haemostatic measures of applying firm pressure and ligating vessels cannot be used due to the risk of causing neurological injury.
3. Emergency neurosurgery generally involves removing pressure from some point of the neuroaxis to prevent extension of injury. This can ameliorate secondary injury, and if the primary injury can be survived this allows some chance of recovery:


TRAUMA
1. The head is vulnerable to injury due to its position and its weight. Under normal conditions it is supported by powerful muscles in the neck, but in high-speed deceleration its weight results in massive forces acting on it about the moment of the top of the chest. Most assaults include blows to the head.
2. Patients with a severe head injury frequently have neck injuries and this must be assumed and the cervical spine protected unless the patient is fully conscious and the neck can be cleared of injury by clinical examination according to ATLS protocol.
3. Patients with severe head injury frequently require immediate surgery to save their life; however, adequate resuscitation is of greater importance: operating on a hypoxic hypotensive patient with an unprotected fractured cervical spine is far more likely to result in the patient’s death than delaying whilst they are resuscitated: an intubated, oxygenated patient with a sustainable blood pressure and a protected cervical spine is in a far better condition to tolerate a trauma craniotomy. Specific management must be preceded by adequate resuscitation.
INTRACRANIAL PRESSURE
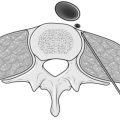
Intracranial pressure (ICP) is defined as the pressure of CSF in the frontal horn of the lateral ventricle. The relationship between ICP and the volume of an expanding mass lesion within the brain is given by the Monro-Kellie doctrine (Fig. 35.1). This divides the intracranial contents into compartments: brain, CSF, venous blood, and arterial blood. There may be an extra compartment in the form of a mass lesion such as haematoma. The doctrine states that since the intracranial volume is fixed, an increase in one compartment must be compensated by a decrease in another or ICP will rise. In effect this means that normal ICP can be maintained with an expanding haematoma by displacing CSF and venous blood (the total volume is approximately 100 ml). Thereafter, ICP will rise steeply, clinically manifest by a sudden and often catastrophic deterioration in the patient’s conscious level. This explains the lucid interval seen in extradural haematoma (see below). Subsequent decrease in the volume of the arterial blood compartment will produce ischaemia, with further injury and swelling. As a haematoma expands, the brain is displaced towards the foramen magnum, and pressure builds up in the conical posterior fossa causing the brainstem to herneate through the foramen magnum, compressing the respiratory and cardiac centres in the medulla – this is ‘coning’. Ischaemia and herniation are the mechanisms of death from raised ICP.

Fig. 35.1 Monro-Kellie doctrine.
INITIAL MANAGEMENT OF THE OBTUNDED HEAD INJURED PATIENT
The intracranial pressure must be reduced immediately:
1. Secure the airway with endotracheal intubation and hyperventilate to a PaCO2 of 4–4.5 KPa, or double the minute ventilation if ABGs are not immediately available. This causes a reduction in PaCO2 resulting in reduced cerebral blood flow. Although this is ultimately bad for the brain, it results in an immediate drop in intracerebral pressure and can save the patient’s life.
2. Sit the patient up to between 30 and 45 degrees. This can still be accomplished with a fractured cervical spine. Make sure that nothing is compressing the neck veins: if blood cannot leave the head venous congestion will needlessly raise ICP. Cervical collars should be removed as soon as the patient has been transferred to a trolley. Bolsters either side of the head, with tape across forehead and chin, anchored either side of the trolley, will hold the neck still and prevent unnecessary compromise of the neck veins. Collars should only ever be used for transferring patients.
3. Administer Mannitol: accurate dose calculations are time consuming and based on a (usually wildly inaccurate) estimate of the patient’s weight. Give 200 ml of 20% over 20 minutes (or 400 ml of 10%, etc.). This dose is easy to remember when the patient’s pupil has just fixed. Insert a urinary catheter since a massive diuresis will occur within 15 minutes.
4. As soon as the patient is stable obtain cross sectional imaging, if available. There is no place for skull X-rays when CT scanning is available.
ANAESTHETIC CONSIDERATIONS
A typical anaesthetic for elective craniotomy may be given with the following:
1. I.V. induction of anaesthesia with Propofol with or without a strong opiate (fentanyl/alfentanil/remifentanil).
2. A muscle relaxant is given and the trachea is intubated with a reinforced/armoured endotracheal tube.
3. The response to laryngoscopy may be obtunded using adjuvant drugs.
4. Anaesthesia is maintained with either ≈ 1 MAC of volatile agent ± analgesia or total intravenous anaesthesia (TIVA). A non-depolarizing muscle relaxant is used.
5. Normotension and normocarbia are usually maintained, but certain surgical procedures may require relative hypotension.
6. At the end of the operation, if the patient is to be woken up, the muscle relaxant is reversed and the volatile agent/TIVA is turned off. Once the patient is able to breathe they are allowed to wake up. Analgesia is given as required. Some patients are electively intubated and ventilated after surgery to protect the brain using anaesthesia or maintain strict blood pressure control.
Specific considerations for anaesthetic drugs
 Induction agents: propofol can cause hypotension (given slowly to minimize effect). Thiopentone may be useful to reduce CMRO2 (cerebral metabolic rate of oxygen) and seizure activity.

 TIVA: remifentanil is usually given as an infusion.

 Paralysis: non-depolarizing drugs are preferred (e.g. atracurium, vecuronium, rocuronium).
SCALP LACERATIONS
Appraise
1. An unsutured small scalp laceration can bleed profusely, so arrest bleeding from the scalp as soon as is practicable after injury, using a temporary single layer of through-and-through sutures.
2. If the patient has been struck on the head with a heavy object, X-ray the skull to ensure that the laceration does not cover a depressed skull fracture.
Action
1. Shave adequately and closely round the laceration before exploring it.
2. The scalp is vascular, heals well and seldom gets infected, so do not excise the contused edges of the laceration too enthusiastically which will produce a scalp defect requiring apposition of the edges under tension.
3. If the galea has been breached, always close the scalp laceration in two layers, one for the galea and a second through-and-through skin layer, as previously described.
4. If possible, transfer a patient with severe scalp loss to a special unit where plastic and neurosurgical facilities are available.
DEPRESSED SKULL FRACTURE
Appraise
1. The purpose of elevating a depressed skull fracture is to reduce the risk of infection, so elevate only compound depressed skull fractures.
2. Leave alone depressed fractures with intact overlying scalp. Occasionally, the dislocation of the skull contour may be so great that elevation is required for cosmetic reasons, but these more severe injuries are invariably compound, so that the customary indication for operation is also present.
Access
1. Excise the overlying scalp laceration if it is badly contused. Extend the incision to give access to the whole depressed area. Scrape the scalp off the underlying bone and hold the incision wide open with self-retaining retractors.
2. Clear the pericranium away with a periosteal elevator to reveal the whole depressed area.
3. The inner table will have been driven in over a much wider area than the visible area of depressed outer table. Make a single burr hole just outside the edge of the visibly depressed region in order to expose dura not involved in the depression.
Action
1. Insert a periosteal elevator into the burr hole, slide it gently between the bone and the dura and ease out the depressed fragments so that the dura beneath them is fully exposed. Remove dirt, debris and any small flakes of bone from the wound and send them for bacteriological culture.
2. If the dura is intact, do not open it. If it is lacerated, carefully extend the laceration to inspect the brain beneath. If the brain surface is torn, probe gently in the tear for any in-driven debris and bone and remove them.
3. Remove pulped and clearly necrotic brain tissue by a combination of gentle suction and irrigation with 0.9% saline at body temperature.
4. Coagulate bleeding points in the brain with low-intensity diathermy coagulation, and diffuse oozing by applying patches of surgical cellulose compressed into place beneath lintine strips.
5. If the depressed bone fragments have been driven through the dura, their removal may tear large cerebral vessels as the fragments are extracted. A large cerebral vessel, not visible on the brain surface, may be picked up and held in the tip of a fine sucker under fairly strong suction while it is coagulated with diathermy or occluded with a metal clip.


6. If a sinus is torn, do not try to close it with sutures. Reduce the pressure in the sinus by tilting the patient feet-down, then cover the sinus with several layers of surgical cellulose and hold them firmly in place under lintine strips for 5–10 minutes. When you release the pressure and remove the lintine, the bleeding should not recur. Do not now disturb the surgical cellulose.

Closure
1. Before closing, irrigate the whole wound with hydrogen peroxide solution and 20 ml of 0.9% saline containing 20 000 units of penicillin and 50 mg of streptomycin.
2. Close the dura with interrupted 3/0 silk sutures. Cover any gaps in the dura with two layers of surgical cellulose.
3. Unless the wound has been neglected and is obviously infected, replace the removed bone fragments on the dura to fill in the skull defect. Scrub them thoroughly in aqueous Savlon before replacing them.
EXTRADURAL HAEMATOMA
EMERGENCY BURR HOLE/CRANIECTOMY FOR EXTRADURAL HAEMATOMA
Appraise
1. This operation can be performed by any competent surgeon whether or not you have any prior experience in neurosurgery. If you have never done this before, stay in telephone contact with a neurosurgeon who can talk you through the operation. In our unit, all junior medical staff (including physicians) are strongly encouraged to learn this simple and life-saving skill.
2. It can be performed concurrently with surgery for other imminently life-threatening injuries such as laparotomy or thoracotomy.
3. If available, always obtain CT scans and have these available in theatre. Remember that the sides are reversed when looking at a CT scan so check the side with another doctor.
4. If CT scans and immediate transfer to a neurosurgeon and a CT scanner are unavailable and the patient has a severe head injury with an underlying skull fracture and a fixed pupil, the diagnosis is not in significant doubt.
5. Operate on the side of the fixed pupil.
6. If both pupils are fixed, operate on the side of the pupil that fixed first. The patient is on the verge of death and you can do no harm.
Prepare
1. Unless the cervical spine has been cleared, position the patient on the operating table with the head and neck in alignment with the rest of the spine. Secure the patient to the table with the strongest tape available. Use extra arm supports on the side that is going to be tilted down. Side-tilt the whole table to 30 degrees. Use a head ring, or even better, a horseshoe table attachment to keep the head clear of the table to permit access. If the spine has been cleared place the patient supine, with the head on a ring or a horseshoe and turned to the side. This can be aided by placing a bolster under the ipsilateral shoulder.
2. Ask the anaesthetist to give an intravenous dose of broad-spectrum antibiotics.
3. Shave the side of the head you are going to operate on generously.
Access
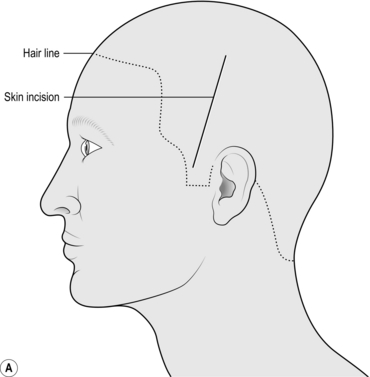
1. Mark a linear incision starting 1 cm anterior to the pinna and 2 cm above the zygoma running superiorly towards the vertex for 10 cm. Prep and drape the scalp in the way that you would prep any wound for surgery (Fig. 35.2a).
2. Using a scalpel, cut sharply down to bone for the entire length of the incision. The wound edges will probably bleed briskly but this can be controlled by an assistant pressing on the wound edges.
3. Insert a periosteal elevator or similar sharp scraping instrument and quickly scrape all layers of the scalp and muscle back from the bone.
4. Insert a self-retaining retractor with the blades under the periosteum and muscle. This will stop bleeding from the wound edges.
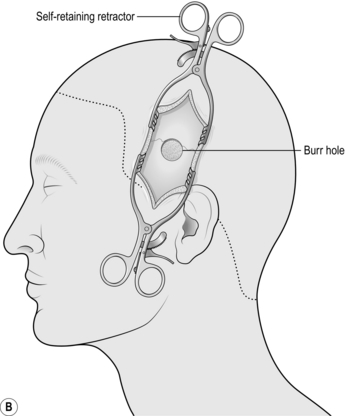
5. Using a drill with the largest round burr available (if no burr is available any attachment that can cut bone will suffice), fashion a hole in the centre of the wound. Use both hands and work quickly but carefully. Try to avoid plunging into the skull; however, this is not a problem with an extradural haematoma since there is a blood clot between the skull and the brain. In the temporal region, the skull is rarely more than 5 mm thick but may be half this (Fig. 35.2b).
Action
1. Once you are through you will see the surface of a dark solid blood clot. Use bone rongeurs to enlarge the craniectomy. Bite away the thin temporal bone to the margins of your incision.
2. Insert an atraumatic sucker (glass or plastic) into the hole and work on the surface of the clot, carefully removing as much of it as access permits. It is usually fairly tough but continue sucking at the clot, angling the operating lights (or using a head light) obliquely into the hole to afford greater access until you cannot reach any more under direct vision, or until you see a tough white membrane (the dura). Do not press onto the dura and do not insert the sucker blindly under the edges of the burr hole. Gentle irrigation with saline into the hole will often yield more of the clot.
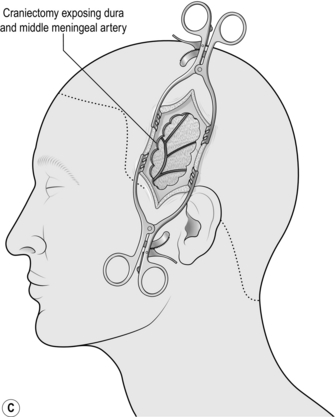
3. If fresh blood is welling up from the inferior limit of the craniectomy, bite off more of the thin squamous temporal bone inferiorly. This exposes the intracranial course of the middle meningeal artery and you may find the bleeding point and be able to stop it (Fig. 35.2c).
CRANIOTOMY FOR EXTRADURAL HAEMATOMA
Access
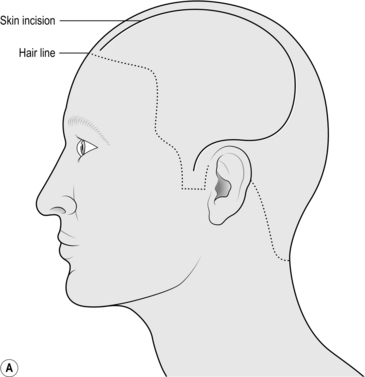
1. Mark the incision starting at the zygoma 1 cm anterior to the pinna, running up and curving posteriorly over the pinna. Go as far posteriorly as you can before curving upwards and then anteriorly as far as the hairline (or 8 cm from the bridge of the nose), 1 cm lateral to the midline without crossing it (Fig. 35.3a).
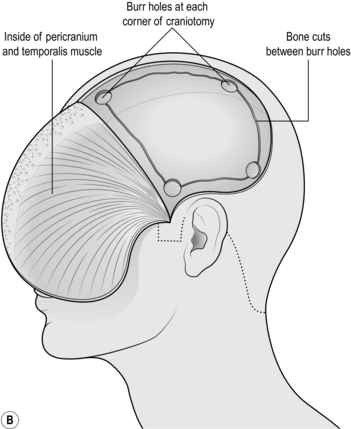
2. Prep and drape. Infiltrate the wound with local anaesthetic with 1 in 200 000 adrenaline (epinephrine).
3. Start at the anterior extent of the incision near the midline cutting sharply down to bone, opening the incision in 5-cm increments. If you have scalp clips (such as Raney or Leroy) available then use them. Otherwise catch the galea (the deepest white layer of the scalp) with artery clips at intervals of 1 cm. Use straight clips on the flap side, curved clips on the scalp side. Gather them together in groups of four with elastic bands. They can be retracted once the wound is open.
4. Once you are anterior to the pinna, you will encounter the superficial temporal artery. Do not worry about cutting it but stop the brisk haemorrhage quickly. Bipolar rarely works so grasp the artery with forceps and use monopolar on the coagulation setting.
5. Begin retracting the flap forwards with an assistant keeping it under constant tension. Start working from the posterior limit and use a sharp periosteal elevator to retract all layers of the scalp as one. Once you encounter the temporalis muscle, switch to monopolar diathermy on the cutting setting, with a medium to high current. Hold the tip on the bone and strip the muscle fibres from their attachment. You will have to incise the temporalis along the line of the scalp incision: this is best done with cutting diathermy, dividing a few fibres then deepening a self-retaining retractor until you reach bone. This way blood loss from this extremely vascular muscle will be minimized (Fig. 35.3b).
6. Push it as far forward as you can and wrap the flap in a wet swab, retracting it with towel clips or heavy sutures placed through the temporalis connected to elastic bands.
7. Drill several burr holes using either the automatic perforator or a high-speed drill with a round burr or acorn attachment. The automatic perforators have a gear that cuts out automatically once the skull has been breeched, leaving a thin rim of bone that can be removed using forceps: always run it at full speed and do not stop, since they are notoriously difficult to restart if they cut out half way through. The high-speed burr requires a little more skill but is easily mastered: again, run it at full speed and using firm but controlled pressure, drill through the skull holding it perpendicular to the bone. It will run smoothly through the outer table and diploe and start kicking back or juddering as it breeches the inner table.
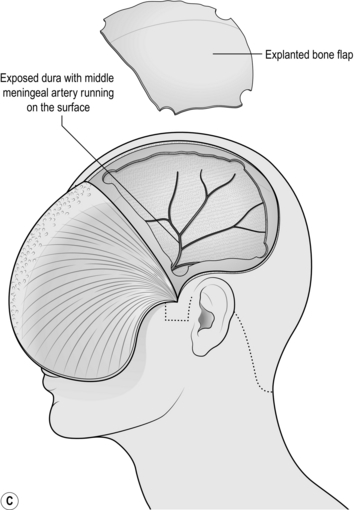
8. Use the craniotome attachment to join up the burr holes. The craniotome is a side-cutting drill that incorporates a base plate that is used to strip the dura from the inside of the skull as the bone is cut in a line. Make the largest craniotomy that your bone exposure will permit (Fig. 35.3c).
KEY POINTS
 An experienced surgeon may use a single burr hole to reduce operation time and improve the cosmetic result, but the default should be to make a minimum of three. The first two should be placed one above the other in the slight depression behind the frontal process of the zygomatic bone. This will give you access to the anterior and middle cranial fossae, spanning the sphenoid ridge which is a frequent sticking point for the drill. Place the third burr hole at the posterior edge of the bone exposure.
 If you have any difficulty identifying landmarks for the burr holes, simply make one at each corner of the bone exposure (Figure 35.3b,c).
 If there is a skull fracture, do not drill a burr hole directly into the fracture line.
Action
1. As soon as a burr hole that has solid clot at the bottom has been made, use the suction to quickly aspirate as much of the clot as can be reached under direct vision. Do not spend long doing this (a few seconds should suffice) since you are about to perform a craniotomy.
2. As soon as the bone is removed, an extradural haematoma will immediately be visible.
3. Evacuate the haematoma using gentle suction and copious saline wash. Once the entire clot has been removed and the dura can be seen, identify the bleeding point. It will be either from the middle meningeal artery (MMA) or from a fracture. The MMA can be easily identified on the surface of the dura running superiorly and posteriorly. It can usually be controlled with bipolar but if there is any doubt about haemostasis, lift the dura with toothed forceps and encircle the artery with a suture.
4. If blood is welling up from the inferior edge of the craniotomy, it is likely to be coming from the MMA at, or just distal to, the foramen spinosum (where the MMA enters the skull). As you follow the artery under the temporal lobe, use bone rongeurs to remove the thin squamous temporal bone down to the floor of the middle fossa, then retract the dura up gently. This will give you good access to the intracranial course of the MMA. If there is still solid clot here, remove it with suction since it will be impossible to find the bleeding point until the clot has been removed. If bleed is coming from the foramen spinosum itself, plug the foramen with a suitable tamponade: anything from a small piece of temporalis muscle to bone wax covered in surgical cellulose will do. The MMA is a terminal branch of the external carotid so bleeding will be brisk. Hold the tamponade firmly in place for at least 5 minutes and leave it in situ.
5. If blood is coming from a fracture line, pack the fracture line with bone wax. Work the bone wax between your fingers to soften it as much as possible before using it. It is almost impossible to apply it using anything except your finger.
Check
1. A gentle ooze from under the bone edge can stopped by packing the extradural space with surgical cellulose and placing hitch stitches: place the stitch (we use 3/0 Vicryl) through only the outer layer of the dura (this prevents the risk of lacerating the brain) as flush with the bone edge as possible, and suture it to periosteum. You may need to place these at 1 cm intervals around the edge of the entire craniotomy to achieve haemostasis.
2. If there is any suspicion that there is an associated subdural haematoma, open the dura in the centre of the craniotomy: lift the dura with a small sharp hook and incise it with a new blade. Once you are through, extend the incision to about 1 cm in length. If there is no haematoma, then close the dura with a running suture.
Closure
1. Replace the bone flap using either a purpose-built plating system or a heavy suture through drill holes in the bone flap and the skull. Take care that the bone flap is not dropped on the floor at this stage.
2. Re-oppose the edges of the temporalis and insert a wound drain bringing it out behind the hairline (take care that it does not pierce the pinna). If the dura has not been opened, this can be on gentle suction, otherwise leave it on gravity.
3. Close the scalp using an interrupted inverted, absorbable suture through the galea. Remove the scalp or artery clips in sections rather than all at once. The scalp may bleed profusely at this stage and the best way of stopping it is to close the galea tightly. Make sure that you place one or two sutures in the centre of the wound first so you do not end up with a mismatch.
Postoperative
1. If the brain was slack at closure, the patient should have an ICP of 0–5 mmHg and should wake up. This allows for early neurological assessment.
2. If the patient cannot be woken up immediately, or fails to wake, insert an ICP monitor if available. Alternatively, arrange for an early postoperative scan.
3. If the ICP is greater than 10 mmHg, rescan them immediately: they may have a re-collection or a contralateral haematoma, both requiring immediate evacuation (the pressure from a haematoma on one side can tamponade an injury on the contralateral side which starts bleeding as soon as the tamponade is released).
Complications
KEY POINTS
Hudson brace and Gigli saw


CRANIOTOMY FOR ACUTE SUBDURAL HAEMATOMA
Appraise
1. Acute subdural haematoma (ASDH) is associated with bleeding from an injury to the surface of the brain and is almost always associated with a severe head injury with underlying damage to the brain. Due to an injury mechanism called contra coup where an impact on one side of the head causes the brain to impact diametrically opposite, the haematoma may well be on the opposite side of the head to the injury.
2. ASDH may also be associated with traumatic intracranial haemorrhage or haemorrhagic contusions.
3. The patient will usually be unconscious from the start. There is rarely a lucid interval (as there is in extradural haematoma). Motor vehicle accidents, assaults and falling down stairs are common injury mechanisms. Alcohol is seldom far from the cause.
Action
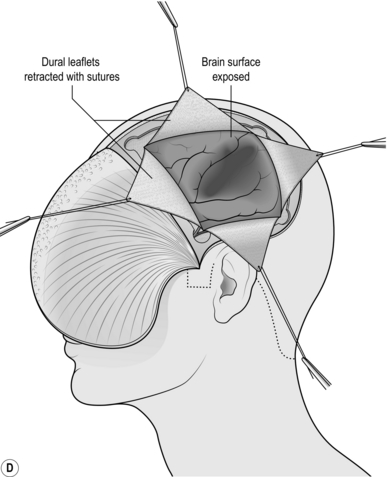
1. As soon as the bone flap has been removed, the dura will be exposed. If there is a large subdural haematoma it will be discoloured and tense. Use a sharp hook to tent it in the centre and carefully incise it with a new blade.
2. You can open the dura in a cruciate (Fig. 35.3d) or peripheral manner, leaving an adequate anterior pedicle.
3. Gently irrigate the clot from the cortical surface using saline warmed to body temperature.
4. Remove as much clot as is required to achieve decompression.
5. Do not chase clot under the edges of the bone flap as this runs the risk of bleeding that you cannot control.
6. Once the cortex has been exposed, look for obvious bleeding points. Although you need to coagulate vessels that are bleeding profusely, you may be able to control less profuse bleeding with surgical cellulose and gentle pressure which will preserve the vessel. This is particularly important in eloquent areas such as the left superior temporal gyrus (receptive speech) or the precentral gyrus (motor cortex).
7. Occasionally, haemorrhagic contusions will present to brain surface and spontaneously express haemorrhagic brain when the dura is opened and the clot removed. If this happens, remove the expressed material but do not explore the cavity since it will be extremely friable and you are likely to cause further bleeding.
KEY POINTS
 Occasionally, devastating injuries can result in massive and uncontrollable brain swelling as soon as the dura is opened. The brain will herniate out of the craniotomy with astonishing speed and unless immediate action is taken, you will not be able to close the wound. If this starts to happen, you cannot close the wound fast enough.


 Amputation of the herniated brain is likely to result in cardiac arrest.

Closure
1. If the brain is slack, close the dura using a running suture. If you have opened it in a cruciate fashion, first place a suture in the centre to aid opposition of the flaps.
2. If the dura will not close easily, do not put interrupted sutures across the deficit since these can damage the brain if swelling occurs later. Leave the dural flaps lying on the brain surface and cover the entire craniotomy with a dural substitute: pericranium (from the outside of the bone flap), fascia lata, or a commercially available dural graft. We often use a sheet of surgical cellulose. This is of paramount importance if the bone flap is left out or subsequently removed.
3. If there are obvious contusions (the brain is discoloured – anything from the red tinge of traumatic subarachnoid haemorrhage to black–blue haemorrhagic contusion), if the brain is clearly swollen, or if brain swelling is anticipated, do not replace the bone flap but store it in a subcutaneous pouch in the abdominal wall rather than perform a craniectomy later.
4. Replace the bone flap and close the wound as you would for an extradural haematoma (see above).
5. ASDH is high-velocity injury and more likely to require prolonged periods in intensive care. Always insert an ICP monitor.
Complications
1. As for Extradural haematoma.
2. If the ICP rises due to brain swelling and you have replaced the bone flap, you may need to remove it (it can be stored in a subcutaneous pouch in the abdominal wall). Although ideally performed in the operating theatre, if the patient is too unstable to be moved or if the patient has just fixed their pupils, this can easily be performed on the ITU with minimal surgical equipment.
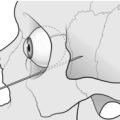
BURR HOLE FOR TAPPING CEREBRAL ABSCESS
Access
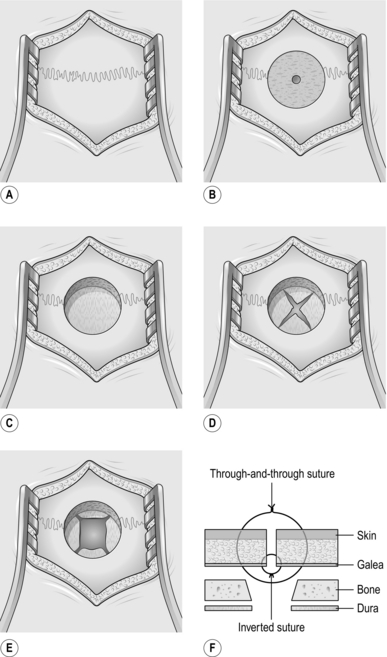
1. Make a burr hole (Figure 35.4) according to the clinical situation, either through a vertical incision in the temporal region just above the top of the pinna in line with the external auditory meatus or through a horizontal incision in the forehead just above the line of the affected frontal sinus.
2. Frontal sinuses vary considerably in size and configuration, so have a preoperative anteroposterior skull X-ray available so you can place your burr hole avoiding entering the sinus.
Action
1. Diathermy the tense brain surface, avoiding any vessels, and incise the coagulated cortex.
2. Hold the widest available brain cannula between thumb and index finger and gently run it towards the expected position of the abscess. This is either just behind the frontal sinus or just above the tegmen tympani.
3. The wall of the abscess is rubbery and offers a definite resistance to the cannula tip. Push the cannula through into the centre of the abscess.
4. Remove the stylette and gently suck out the pus, using moderate suction until no pus comes out freely. Inject 5 ml of 0.9% saline containing dissolved 200 000 units of penicillin and 50 mg of streptomycin, into the empty cavity. Also inject 1 ml of sterile barium sulphate to outline the cavity.
EXTERNAL VENTRICULAR DRAIN (VENTRICULOSTOMY)
Appraise
1. A patient exhibits progressively worsening morning headache and vomiting, blurred vision, papilloedema and impaired up-gaze. The absence of papilloedema does not exclude raised ICP. Papilloedema may take hours or even days to develop.
2. If a CT scan is available it will show enlarged lateral and III ventricles. You may well see the cause of the problem, such as intraventricular tumour or haemorrhage.
3. If a parent tells you their child has a dysfunctioning CSF shunt, they are right until disproved by an experienced neurosurgeon, usually after surgical exploration of the shunt.
Prepare
1. Place the patient supine on the operating table. It is advisable to shave the head to facilitate identification of anatomical landmarks.
2. Make sure the head is perfectly straight as this helps with orientation.
3. Mark the midline, the mid-pupillary line and the coronal suture (this is easily palpable 10 cm back from the nasion).
4. Mark a 3-cm incision running parallel to the midline in the mid-pupillary line, centred on the coronal suture.
Access
1. Open the scalp: cut sharply down to bone, scrape all layers back and insert a self-retaining retractor.
2. Fashion a burr hole using any means described above.
3. Coagulate the dura in the centre of the burr hole and make a cruciate incision in the centre. Do not worry about damaging the underlying brain – indeed, if the pia is breached with the dura this merely speeds up the operation.
4. Coagulate the dural edges so that the hole easily admits the catheter and also supports it.
5. Coagulate the underlying cortical surface (this is the pia) and make a cruciate incision to a depth of 2 mm, avoiding any visible vessels. If there is any bleeding, use bipolar forceps to coagulate the edge of the incision (the pia).
Action
1. Hold the catheter like a dart in the right hand with the stylette in situ, orientated so that you can see the depth markers (most catheters have a black marker every 5 cm).
2. Aim for the intersection of the midline and the external auditory meatus. This is often easier said than done and in practice many surgeons simply aim perpendicular to the cortical surface: if the ventricles are large enough to obtund the patient you will not miss using this method.
3. Advance it slowly and gently. As it enters the ventricle you will feel a slight pop and be rewarded by CSF gushing out of the catheter. Advance it to the 5-cm mark and withdraw the stylette. Allow CSF to flow until normal pressure is restored. Keeping the end of the drain 10 cm above the burr hole will prevent over-drainage.
4. Holding the catheter in non-toothed forceps, connect the catheter to the tunneller and tunnel it laterally through the temporalis muscle as far as you can. Infection travels up the outside of the catheter at approximately 1 cm per day so you must tunnel at least 7 cm for the drain to last a week.
5. Secure it at the exit wound. Most catheters are supplied with a silicone collar that fits snugly around the catheter and can be sutured to the skin. We then secure a loop of the catheter to the scalp. Pay particular attention to securing it well. Regardless of how it is accidentally pulled out, you will be putting it back in, which subjects the patient to further risks and demoralizes you, especially if you struggled to insert the first one.
6. If you have not hit CSF by 5 cm then your trajectory is wrong. Withdraw the catheter, wash it with saline and try again. You are usually aiming too lateral and too posterior so aim more medial and anterior. Never advance it further then 5 cm: you will probably hit a CSF space eventually but will cause untold neurological damage in the process. There are many vital neurological structures less than a centimetre away from the intended insertion point.
7. If you have not hit CSF after three attempts, call for senior help. If you are the senior help, check placement of the burr hole, check the orientation of the patient’s head, check the scans. If you have still not hit the ventricle, consider operating on the contralateral side or closing the wound and obtaining a CT scan (with the patient asleep): the ventricles may have reduced in size or may have moved due to rapidly enlarging haematoma. If available, a stereotactic scan should also be performed (see below).
Closure
1. Taking care not to suture in the EVD catheter, place interrupted inverted absorbable sutures (we use 2/0 Vicryl) through the galea. Close the skin with clips unless an MRI is planned, in which case use a continuous suture.
2. Set it to drain connected to a manometer set at 10 cm CSF, with zero at the level of the external auditory meatus. This equates to a normal ICP. CSF will only drain when the ICP exceeds this and over-drainage will be prevented. If such a system is not available, aim to drain 15–20 ml/hour to match normal production of CSF.
Complications
1. Failure to hit the ventricle (vide supra).
2. Intracranial haemorrhage (1% risk).
3. Blockage: get a CT scan to confirm that the catheter is within the ventricle then flush the catheter with not more than 5 ml 0.9% saline. This may be repeated as required, especially if there is an intraventricular blood clot.
4. Displacement of the catheter: if the catheter has been partially pulled out, do not push it back in. Take the patient to theatre and insert a fresh catheter in a sterile environment.
5. Over-drainage: can result in the brain collapsing (especially in the elderly) and development of an acute subdural haematoma.
6. Infection: the investigation of pyrexia in any patient with an EVD must include CSF sampling from the drain. If organisms are seen on gram stain or if the cell count is suspicious (white cells > 20 with a high proportion of polymorphs, allowing for 1 white cell for every 1000 red cells), start antibiosis with good CSF penetrance. Consider changing the EVD catheter and intrathecal antibiotics (Gentamicin or Vancomycin are most commonly used: seek expert advice for preparation and dosing).
7. Accidental use of EVD catheter for I.V. medications or radiological contrast (anecdotes abound with horrific consequences): label it and make sure the nursing staff know what it is.
KEY POINTS
 Patients with obstructive hydrocephalus may clinically deteriorate very rapidly. Deep coma with fixed dilated pupils must be treated immediately and unless the patient responds rapidly to Mannitol (see above), there is no time to transfer the patient to a neurosurgical unit in another hospital. Occasionally, hydrocephalus can cause cardiorespiratory arrest and in this situation the ventricles must be drained immediately as part of the resuscitation.