[level-membership-for-neurology-category]chapter 3
Neurological Examination of the Limbs
Learning how to perform a neurological examination requires repeated practice. Practice without an understanding of how to examine the various aspects of the nervous system and how to interpret the findings is akin to practising golf without having had lessons – useless. This chapter describes how to examine the limbs and interpret the findings. As it is very difficult to learn examination technique from a textbook, a video of the technique is included on the accompanying DVD.
The principal purpose of the examination is to determine whether the patient has lower motor neuron (LMN) signs or, more specifically, signs that indicate involvement of the peripheral nervous system (anterior horn cells, nerve roots, brachial or lumbosacral plexus, peripheral nerve, neuromuscular junction or muscle) or upper motor neuron (UMN) signs that indicate involvement of the central nervous system (brain, cerebellum and spinal cord). These were briefly discussed in Chapter 2, ‘The neurological history’, and, because they are absolutely crucial, they will be discussed in more detail in this chapter (see Table 3.1).
TABLE 3.1
The neurological findings in upper versus lower motor neuron lesions
| Upper motor neuron lesion | Lower motor neuron lesion | |
| Wasting | Usually no wasting but there may be mild wasting with long standing problems | No wasting in the very early stages but usually associated with significant wasting |
| Power | Weakness of extensor muscles in the arms∗ and flexor muscles in the legs∗∗ | The pattern of weakness reflects that part of the LMN that is affected |
| Tone | Increased +/– clonus | Decreased |
| Reflexes | Increased | Decreased or absent |
| Plantars | Up-going (extensor) | Down-going |
| Sensory findings | Sensory level | Focal sensory loss reflecting involvement of a nerve root, plexus or peripheral nerve |
∗Shoulder abduction, elbow extension, wrist and finger extension in the arms.
∗∗Hip flexion, knee flexion and foot dorsiflexion in the legs. The tone may not be increased and the reflexes can be absent in acute spinal cord lesions referred to as spinal shock. Clonus is a series of involuntary repetitive movements of the ankle, up and down, induced by suddenly pushing the foot upwards while the leg is extended [1]. The test is less painful if it is performed with the knee slightly flexed.
THE MOTOR EXAMINATION
The examination of the motor system involves:
• inspecting for wasting and fasciculations in the muscles
Many examiners will perform a screening test of the upper limbs by observing patients elevating their arms and holding them horizontally straight out in front, initially with their eyes open and then subsequently closed (see Figure 3.1). The palms can be turned either down or up – it does not matter – although occasionally having
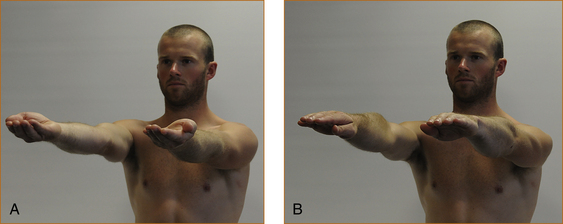
FIGURE 3.1 Screening test of the upper limbs with hands outstretched: A with palms up; B with palms down

• The pathology is always at the level of the LMN signs and at or above the uppermost limit of the UMN signs.
• In most instances the neurological examination does not establish the aetiology or cause of the problem. It simply localises the part of the nervous system that is affected by the pathological process.
• If the history has been obtained using the method described in Chapter 2, ‘The neurological history’, the nature and distribution of the symptoms should provide an idea as to whether there will be upper or lower motor neuron signs.
the palms turned upwards seems a more sensitive technique.1
 If the signs are different, the diagnosis suspected from the history should be reviewed and the whole process should be repeated to confirm both the history and findings. This is far more rewarding than ordering a multitude of purposeless investigations.
• drift downwards if there is weakness
• drift upwards and often outwards if there is a proprioceptive or parietal lobe problem
• oscillate up and down with a cerebellar disturbance if the patient is asked to elevate the limbs briskly, which can be missed if the movement is too slow.
Inspection for wasting and fasciculations
The muscles of the upper arm, forearm, hand, thigh, anterior tibial compartment and calves are examined for wasting and/or fasciculations. Fasciculations are visible spontaneous contractions or twitching of muscle fibres that are innervated by a single motor unit [1]. It may be necessary to spend several minutes carefully examining the muscles in order to detect fasciculations. It is easy to be certain that wasting is present when it is very severe, but with milder degrees of wasting one is less certain that there is a lesion involving the peripheral (LMN) nervous system. Some patients are very thin, and inexperienced clinicians may incorrectly suspect wasting when examining the small muscles of the hands, particularly in older patients. If the wasting affects one arm or one leg a comparison can be made with the contralateral limb. The muscles, if wasted, will initially lose their rounded appearance and appear flattened.
The reliable signs of muscle wasting are (Figure 3.2):
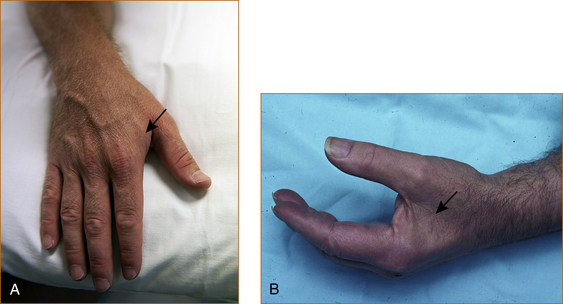
• loss of the visible bulge that occurs when the thumb is adducted towards the index finger – the first dorsal interosseous muscle
• prominence of the anterior border of the tibia – tibialis anterior muscle
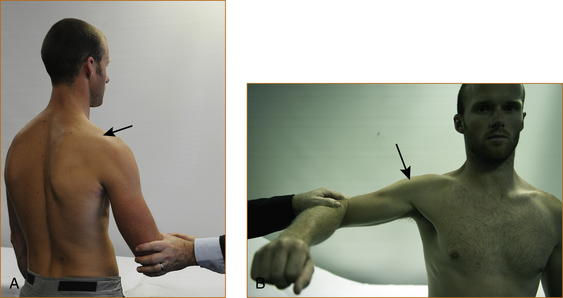
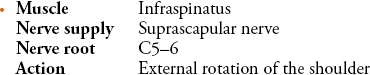
• prominence of the spine of the scapula – supraspinatus and infraspinatus muscles
• scalloped appearance just above the patella as if a bite has been taken out of the muscle – quadriceps.
Looking for changes in tone
There are two different ways to test for tone, depending on whether the problem is affecting the motor system or the extrapyramidal system (the latter is discussed in Chapter 13, ‘Abnormal movements and difficulty walking due to central nervous system problems’).
 Tone is tested using quick movements when the motor system is being assessed.
TESTING FOR INCREASED TONE RELATED TO AN UPPER MOTOR NEURON PROBLEM
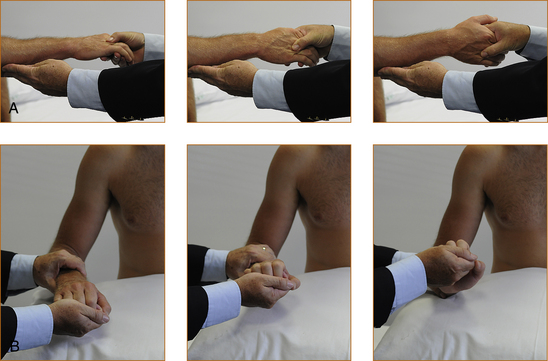
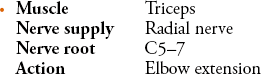
• Arms. Tone is tested with the forearm semi-pronated and the elbow flexed at 90° (refer to Figure 3.3A). The examiner holds the elbow with one hand and then places the other hand in the hand of the patient as if they were shaking hands. The test is performed with a quick supination of the forearm. If there is increased tone there will be a discernible catch. Very occasionally, when the tone is markedly increased, repetitive contractions may occur, and this is referred to as clonus.
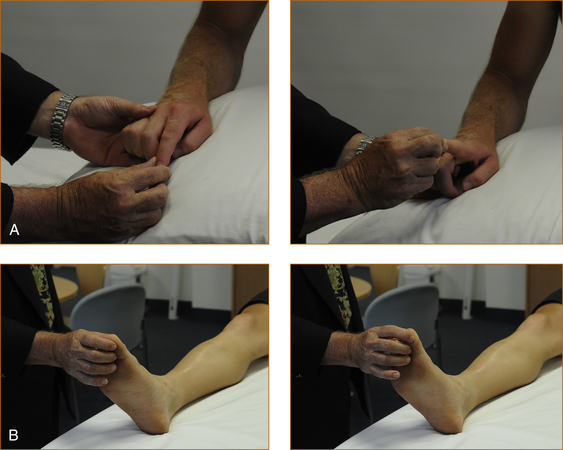
• Legs. Tone is tested with the leg lying flat on the bed and slightly externally rotated and with the knee flexed very slightly. The examiner places their hands behind the leg just above the knee and attempts to quickly elevate the leg. If there is increased tone, the heel will lift up off the bed. The leg may lift off the bed in patients who are very anxious and who find it difficult to relax – slight external rotation of the leg prior to the quick movement helps in this situation and eliminates the false impression of increased tone in anxious patients. The other test for increased tone in the legs is ankle clonus, where the leg is slightly flexed at the knee with the ankle plantar-flexed. The examiner places their left hand behind the knee and grasps the foot with their right hand and forcibly dorsiflexes the foot. Repetitive contractions while the examiner holds the foot in dorsiflexion is a sign of increased tone, referred to as ankle clonus.
TESTING FOR INCREASED TONE RELATED TO AN EXTRAPYRAMIDAL PROBLEM
To test the upper limbs (Figure 3.3B), the forearm and hand are pronated and the examiner holds the middle of the forearm with one hand and holds the hand of the patient in a monkey grip. The patient’s hand is compressed into the wrist as the wrist is slowly flexed and extended. This technique will elicit the classical cog-wheel rigidity seen with extrapyramidal problems.
Testing muscle strength
The following technique is recommended when examining muscle strength. The muscle/muscle group, nerve related to that muscle/muscle group, the nerve root(s) and the action of the muscle [2] are listed in each section below. Experienced neurologists have memorised the neuroanatomy; inexperienced clinicians can record the pattern of weakness and consult a textbook of neuroanatomy, the illustrations in Chapter 1, ‘Clinically oriented neuroanatomy’, or this chapter.
UPPER LIMBS
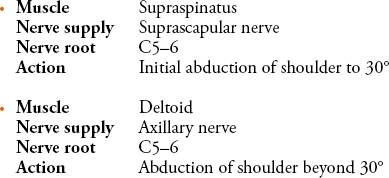
To test the supraspinatus (Figure 3.4) the elbow should be abducted from the side of the body to approximately 30°, the examiner places a hand over the elbow and pushes the elbow towards the trunk while the patient tries to resist.
To test the deltoid muscle (Figure 3.4) the elbow should be abducted from the side to 90°, the examiner places a hand over the upper arm just above the elbow and pushes downwards while the patient attempts to resist.
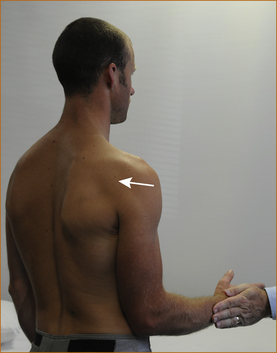
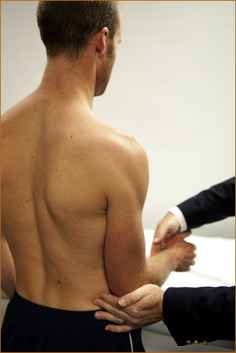
The elbow is kept by the side, the forearm is flexed at 90° and the hand is semi-pronated (Figure 3.5). The examiner places a hand over the middle of the back of the forearm and attempts to internally rotate the forearm towards the body as the patient resists.
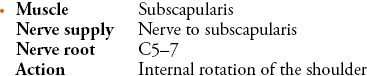
The elbow is kept by the side, the forearm is flexed at 90° and the hand is semi-pronated (Figure 3.6). The examiner places a hand on the middle of the forearm and attempts to prevent internal rotation of the forearm.

There is a rare entity of winging of the scapular that is the result of damage to the nerve to the serratus anterior (see Chapter 11, ‘Common neck, arm and upper back problems’). The patient is instructed to stand in front of a wall, with the elbows slightly flexed and the palms on the wall (Figure 3.7). They are then instructed to push as hard as they can and the scapular should not lift off the chest wall. If it does the muscle is weak, resulting in ‘winging of the scapula’.
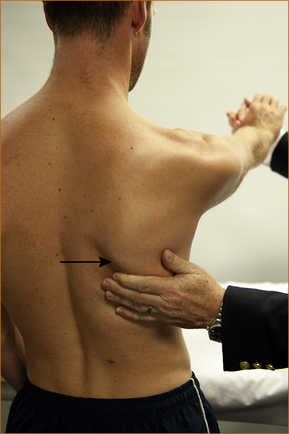
FIGURE 3.7 Testing of the serratus anterior
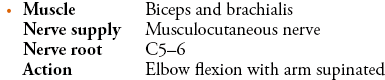
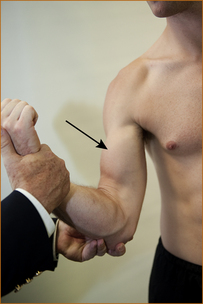
The elbow is bent at 90° with the palm pointing towards the ceiling (Figure 3.8). The examiner grasps the elbow with the left hand and the wrist with the right hand and attempts to prevent further flexion of the elbow.

The elbow is flexed at 90° with the forearm semi-pronated (Figure 3.9). The examiner places the left hand under the elbow and the right hand on the wrist and attempts to prevent further flexion of the elbow.
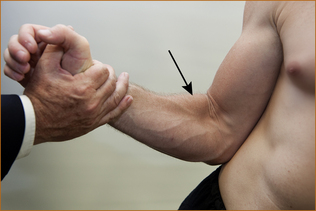
FIGURE 3.9 Testing elbow flexion with the forearm semi-pronated
It is very important that the elbow is only slightly flexed (as little as 20–30° from the fully extended position) when testing extension (Figure 3.10). If the elbow is fully flexed, this will result in an apparent weakness of the triceps when it is strong and, if it is fully extended, subtle degrees of weakness may be missed. The examiner places the left hand over the anterior aspect of the elbow and the right hand over the dorsal aspect of the wrist and attempts to prevent the patient from straightening their elbow.


The patient is instructed to extend their wrist and the examiner places the back of their hand on the back of the patient’s hand and attempts to flex the wrist while the patient resists (Figure 3.11). Similarly, the patient is asked to extend their fingers and the examiner places the back of their fingers across the patient’s fingers. The 5th digit of the examiner’s hand lies over the patient’s metacarpophalangeal joints while the second digit of the patient’s hand is beneath the metacarpophalangeal joints of the examiner.
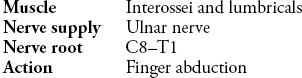
The patient is instructed to spread the fingers apart and the examiner attempts to push them together by pressing on the base of the fingers close to the metacarpophalangeal joints (Figure 3.12). Using this technique the patient should be able to resist very firm pressure whereas, if the examiner pushes against the tips of the fingers, even patients with normal strength cannot resist.
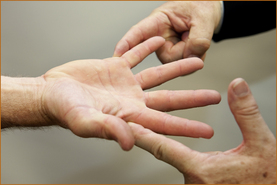
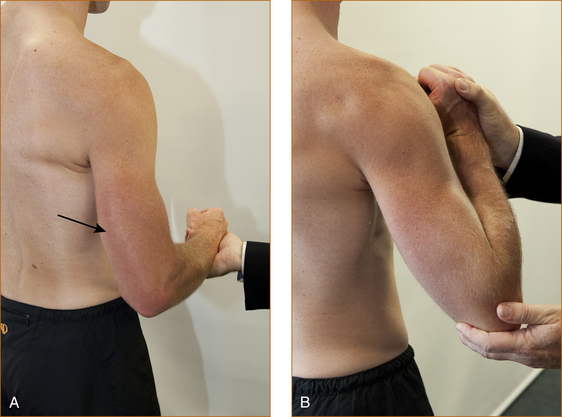
The patient’s palm is supinated and the patient is instructed to point the thumb up towards the ceiling (Figure 3.13) while the examiner pushes down on either the base or the proximal phalanx of the thumb.

The patient is instructed to bend the tip of the thumb while the examiner uses the tip of their thumb to try and straighten the patient’s thumb (Figure 3.14). Normal patients should be able to resist very firm pressure.

FIGURE 3.14 Testing of the flexor pollicis longus

The examiner places the left hand over the palm and palmar surfaces of the patient’s 2nd and 3rd fingers to prevent flexion at the metacarpophalangeal and proximal interphalangeal joints (Figure 3.15). The patient is instructed to bend the tips of the 2nd and 3rd digits while the examiner tries to straighten them using the tips of the 2nd and 3rd digits of the right hand. Normal patients can resist very firm pressure.
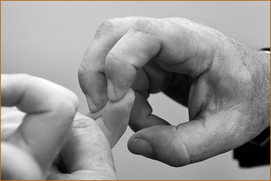
FIGURE 3.15 Testing flexion of the 2nd and 3rd digits

The examiner places the left hand over the palm and palmar surfaces of the patient’s 4th and 5th fingers to prevent flexion at the metacarpophalangeal and proximal interphalangeal joints (Figure 3.16). The patient is instructed to bend the tips of the 4th and 5th digits while the examiner tries to straighten them using the tips of the 2nd and 3rd digits of the right hand. Normal patients can resist very firm pressure.
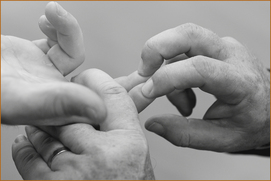
FIGURE 3.16 Testing flexion of the 4th and 5th digits
Table 3.2 summarises the muscles/muscle groups, nerves and nerve roots of the upper limbs.
TABLE 3.2
Muscles, muscle groups, nerve supply and nerve root innervation in the upper limbs
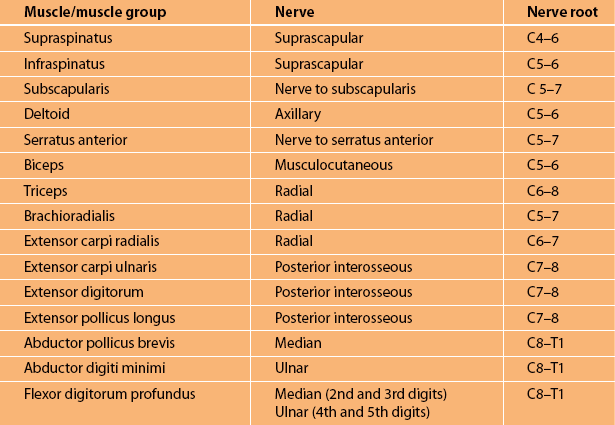
Note: The nerve roots reflect the main nerve root supply to that muscle. Not all muscles are listed. More detailed information is available in textbooks [2], [3]. The method of testing these individual muscles is discussed in the text and demonstrated on the DVD.
LOWER LIMBS
Muscles around the hip and knee:
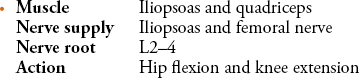
The patient is instructed to lift their leg straight up off the bed to approximately 30–40° and keep it elevated (Figure 3.17). The examiner then places their hand over the thigh just above the knee and pushes down as hard as they can while instructing the patient to resist. Patients of all ages, except perhaps the very elderly and frail, can prevent the examiner from pushing the leg downwards.
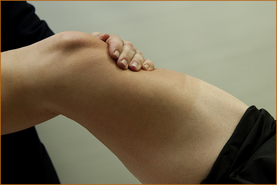
FIGURE 3.17 Testing of hip flexion
The patient’s leg is elevated with the knee is slightly bent (Figure 3.18). The examiner places the left arm behind the knee and the right hand on the shin, and the patient is instructed to straighten the leg and not allow it to be bent.
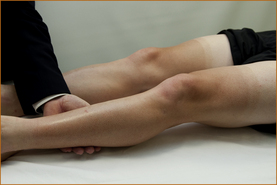
FIGURE 3.18 Testing of knee extension
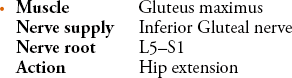
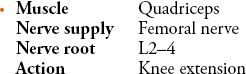
The patient is instructed to keep the leg and the heel on the surface of the bed (Figure 3.19). The examiner places a hand under the leg, just below the calf, and attempts to lift the leg up off the bed instructing the patient to keep the heel on the bed to prevent the leg from being elevated.
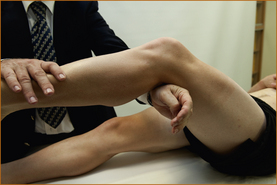
FIGURE 3.19 Testing of hip extension

The patient is instructed to bend the knee to approximately 90° with the heel just off the bed (Figure 3.20). The examiner places the left hand on the kneecap and the right hand just below the calf. The patient is instructed to bend the knee and not allow it to be straightened.
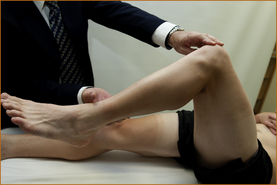
FIGURE 3.20 Testing of flexion of the knee

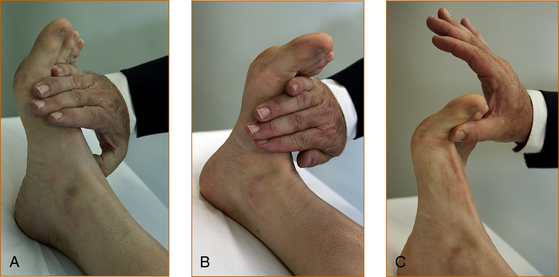
The patient is instructed to bring the foot up towards the nose (Figure 3.21B). The examiner places a hand over the dorsal aspect of the foot and pushes downwards while the patient attempts to prevent the foot from being pushed downwards. Subtle degrees of weakness may be missed using this test. A more sensitive technique is for the patient to have the ankle in a neutral position, neither plantar flexed or dorsiflexed (Figure 3.21A). The examiner places a hand over the dorsal aspect of the foot and asks the patient to lift the foot up towards the nose while the examiner pushes down firmly on the foot. An even more sensitive technique is to have the patient bend the big toe up towards their nose while the examiner pushes on the toe at the level of the metatarsophalangeal joint (Figure 3.21C). Remember, however, as the sensitivity of testing is increased the specificity decreases, and a mild degree of weakness may be interpreted as abnormal when in fact it is a normal finding for a patient of that age.

The examiner places the palm of the hand over the ball of the foot and the patient is instructed to push down as hard as they can while the examiner attempts to push the foot upwards (Figure 3.22).
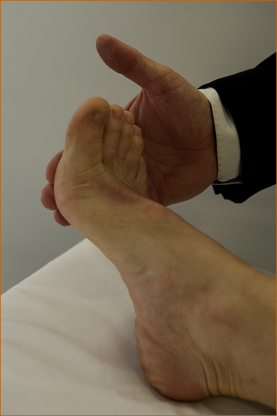
FIGURE 3.22 Testing of plantar flexion of the foot

The examiner places the palm of a hand on the medial aspect of the foot and instructs the patient to turn the foot inwards and not to allow it to be turned outwards while the examiner attempts to turn the foot out laterally and observes the tibialis anterior and tibialis posterior tendons in front and behind the medial malleolus, respectively. These tendons can be palpated if they are not visible (Figure 3.23).
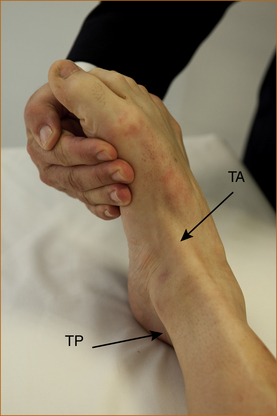
FIGURE 3.23 Testing of inversion of the ankle

The examiner places the palm of a hand on the lateral aspect of the foot and instructs the patient to turn the foot outwards and not to allow it to be turned inwards while the examiner attempts to push the foot in medially (Figure 3.24).
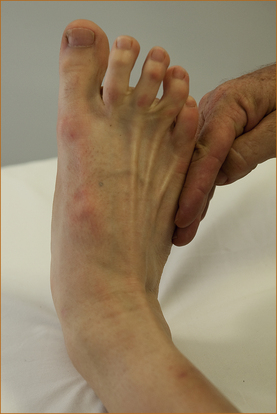
FIGURE 3.24 Testing of eversion of the ankle
It is very important to test inversion and eversion of the ankle in a patient who has a foot drop, and this is discussed further in Chapter 11, ‘Common neck, arm and upper back problems’. In essence, testing these two muscles helps to differentiate between a deep branch common peroneal nerve lesion, a peripheral neuropathy and an L5 radiculopathy.
Table 3.3 summarises the muscles/muscle groups, nerves and nerve roots of the lower limbs.
TABLE 3.3
Muscle groups, nerve supply and nerve root innervation in the lower limbs
| Muscle group | Nerve | Nerve root |
| Hip flexion | Femoral | L2–4 |
| Hip extension | Superior and inferior gluteal | L5–S1 |
| Knee extension | Femoral | L2–4 |
| Knee flexion | Sciatic | L5–S 1 |
| Dorsiflexion of foot | Deep branch of common peroneal | L4–5, S1 |
| Plantar flexion | Posterior tibial | L5–S1 |
| Eversion of foot | Superficial peroneal | L5–S1 |
| Inversion of foot | Posterior tibial and deep branch of common peroneal | L4–5 |
Note: The nerve roots reflect the main nerve root supply to that muscle. Not all muscles are listed. More detailed information is available in textbooks [2], [3]. The method of testing these individual muscles is discussed in the text above.
Looking for changes in reflexes
• If the patient is anxious the reflexes can give the appearance of being abnormally brisk.
• Reduced or absent ankle reflexes are almost the norm in the elderly patient.
• Sometimes in teenagers it can be difficult to elicit the upper limb reflexes.
• If the limb is not in the correct position and the joint is not relaxed, this can give the impression of reduced reflexes.
As with all aspects of the neurological examination, one needs to interpret the findings in the context of the history and other neurological signs.
The upper limb reflexes are best tested with the patient sitting, if possible, with a pillow on their lap and the arms resting comfortably on that pillow. The lower limb reflexes are best tested with the patient lying flat (Figure 3.25).
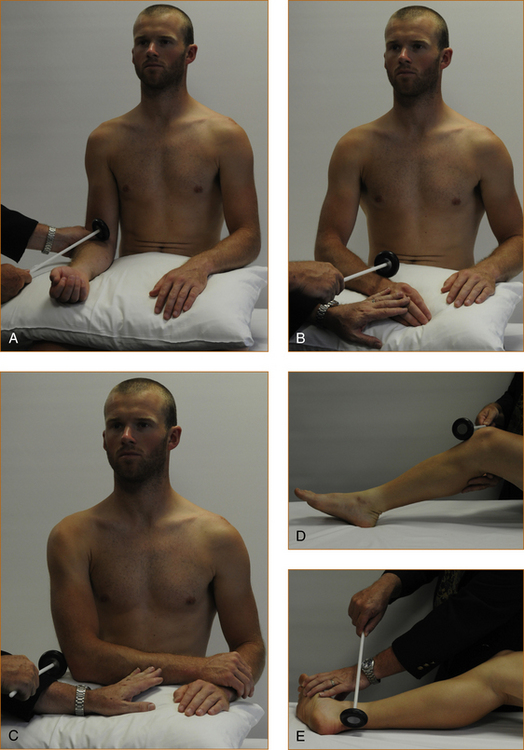
FIGURE 3.25 How to test the reflexes in the upper and lower limbs.
A Biceps: The thumb or fingers of one hand are placed over the biceps tendon and the examiner’s own fingers are struck with the tendon hammer.
B Brachioradialis: The brachioradialis tendon can be struck directly or else the examiner can place a finger or two over the tendon and strike
C Triceps: This is best tested with the patient’s arm folded across their body and the triceps tendon struck directly.
D Knee reflex: The knee should be at approximately 45° and the patella tendon struck directly.
E Ankle reflex: Externally rotate the leg and have the ankle slightly plantar flexed and strike the Achilles tendon directly.
Table 3.4 summarises the limb reflexes and nerve root supply.
TABLE 3.4
The limb reflexes and the nerve root supply
| Reflex | Nerve root supply |
| Biceps | C5(6) |
| Brachioradialis | C(5)6 |
| Triceps | C(5,6)7 |
| Knee jerk | L2,3,4 |
| Ankle reflex | S1 |
THE SENSORY EXAMINATION
The primary sensory modalities tested in the clinical setting include:
Vibration and proprioception
A 128-Hz tuning fork is used to test vibration sense. The tuning fork should be vibrating strongly and placed over the patient’s big toe or index finger (Figure 3.26). The intensity of the vibration is gradually reduced by running the examiner’s fingers slowly up the tuning fork until it stops vibrating or until the patient states they can no longer feel any vibration. This gradual reduction in the intensity of vibration increases the sensitivity of the testing, but it is important to remember that elderly patients often have reduced or absent vibration sense in the feet and ankles. In younger patients vibration can be detected in the toes almost to the point where the tuning fork stops vibrating. In the hands, patients of all ages can appreciate vibration over the dorsal aspect of the distal phalanx of the finger, although once again older patients may have a very slight reduction in vibration sense.
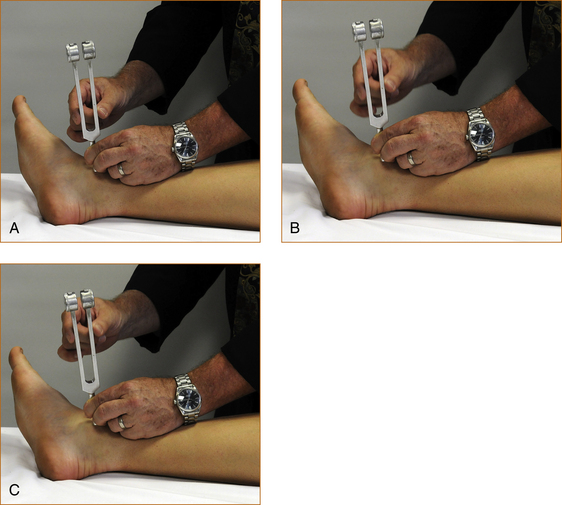
FIGURE 3.26 How to test vibration
A, B, C: The examiner’s finger is moved slowly up the tuning fork, gradually reducing the intensity until the patient states they can no longer feel vibration.
Proprioception is tested by moving the index finger or big toe up or down while holding the digit on its side, initially showing the patient which way is up and which way is down and then asking the patient to close the eyes and say which way the toe or finger is being moved (Figure 3.27). It is recommended that the digit be moved two or three times in the same direction because some patients guess, and guesses may coincide with the direction of movement if the digit is alternately moved up and then down. The amplitude of movement will again depend on the age of the patient, with older patients normally losing appreciation of small degrees of movement. Very slight movement in the range of 1 or 2 mm can be detected in the index finger although the range may be slightly greater for older patients. The range of movement that can be detected in the big toe is 3 or 4 mm.
If the impairment of proprioception is very severe (and this is rare), there may be impairment at the ankle and wrist or even the knee and elbow. This assessment of the severity of proprioceptive and vibration loss adds nothing to localising the pathology. Once there is impairment of these modalities in a limb, one is dealing with either a peripheral neuropathy (abnormalities in these modalities rarely occur with single nerve or nerve root lesions) or a central nervous system problem on the ipsilateral side of the spinal cord or the contralateral side of the brain.
Pain, temperature and light touch
• Temperature sensation is tested using a cold object such as the tuning fork. Patients with cold feet may not be able to appreciate that the object is cold, and this can produce an ‘apparent alteration’ of temperature sensation confined to the feet up to where the limb becomes warm when in fact sensation is normal. The feet should be felt first to see if they are cold or warm. If the feet are very cold, temperature sensation should be tested using a warm object. Pain sensation will be normal in this area of ‘apparently altered’ temperature sensation.
• Pain sensation is tested using a sharp object. Hypodermic needles are too sharp, often cause bleeding and should not be used. Pain sensation is probably the most difficult modality to test. It is subjective and very dependent on how hard the sharp object is pressed into the skin. Repeated rapid stimuli (2–3) in the one spot, initially with a blunt object such as the tip of the finger and then with a sharp object, help to reduce this variability. This technique is demonstrated on the accompanying DVD.
• Testing light touch does not help differentiate whether the pathology is affecting a particular pathway, as both the spinothalamic tract and the pathways carrying vibration and proprioception transmit light touch sensation. Testing light touch can be very helpful when the other sensory signs are confusing. A useful technique is to gently stroke with the fingers of one hand the skin in an area of normal sensation on the same limb while using the fingers of the other hand to stroke the skin in the area of suspected abnormal sensation, moving slowly from the area of abnormal sensation until the patient says the feeling is the same. It may be necessary to do this repeatedly to confirm the findings.
If when testing pain, temperature or light touch an altered sensation is confirmed, the examination continues to test that same modality in all four directions away from the original area of abnormal sensation until the full extent of sensory loss is established. The pattern of sensory loss is then compared with the figures in Chapter 1, ‘Clinically oriented neuroanatomy’, to determine what part of the nervous system is affected.
 When an area of abnormal sensation is found, it is imperative to extend the examination in all four directions from where the initial sensory loss is detected until the exact extent of the sensory loss is determined.
SENSORY LOSS DUE TO A CENTRAL NERVOUS SYSTEM LESION
When the history suggests that the problem may involve the central nervous system or spinothalamic tract, the most appropriate way to test pain, temperature and light touch sensation is to commence testing over the tips of the fingers or toes. If an abnormality is found, the stimulus is moved quickly up the arm or leg until normal sensation is found. The anterior and posterior aspect of the limb should be tested, ensuring that testing crosses the skin supplied by multiple individual nerves and multiple individual nerve roots. The sensory loss should be higher up on the back than on the front of the trunk because the area of skin supplied by the thoracic nerve roots is higher on the back than on the chest or abdomen (see Figures 1.11 and 1.12). A horizontal band of sensory abnormality around the trunk is indicative of a non-organic problem. If the sensory loss extends all the way up the leg and trunk, sensation is then tested on the inside of the upper arm (T2), down the medial aspect of the forearm (C8), across the fingers from the little finger (C8), 3rd digit (C7) to the thumb (C6) and up the lateral aspect of the forearm (C6) and upper arm (C5) onto the neck (C2–4) and if necessary to the face (trigeminal nerve) and the occipital region of the head (C2–3).
Lesions in different parts of the central nervous system will produce different patterns of loss of pain, temperature and touch sensations.
• Lesions involving the spinothalamic tract of the central nervous system will produce abnormal pain and/or temperature sensation affecting:
 If there is no abnormality in the fingers and toes in patients with UMN signs (i.e. a central nervous system problem) then, apart from the very rare suspended sensory loss seen with central cervical spinal cord problems (see below), there will not be abnormal sensation more proximally in the limb.
• the whole of the contralateral leg if the lesion is in or above the thoracic spinal cord
• the contralateral arm and leg if the lesion is in or above the upper cervical spinal cord or brain stem below the level of the pons where the 5th nerve nucleus is situated.
• If the pathology is above the 5th nerve nucleus there will be abnormal pain and temperature sensation affecting the contralateral face, arm and leg.
• If the pathology is at the level of the pons or medulla in the brain stem, this can result in ipsilateral impairment of pain and temperature sensation on the face with contralateral impairment in the arm and leg.
• Alterations of pain and temperature affecting the whole of one side of the body indicate that the lesion is above the pons but cannot determine the exact site of the pathology, and it is the associated symptoms and signs that will localise the pathology more accurately.
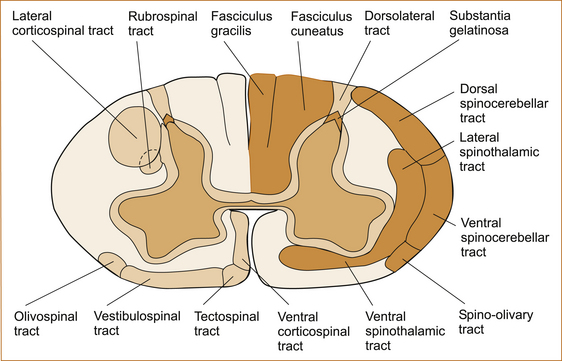
• Syringomyelia (a cyst within the central region of the spinal cord) in the cervical spinal cord can result in a suspended sensory loss affecting the trunk and upper limbs and, if the lesion extends into the lower brainstem, also involve the trigeminal nerve causing sensory loss on the face commencing in front of the ear and extending forward in an onion-skin pattern. This is because the syrinx affects the nerve fibres conveying pain and temperature sensation in the centre of the spinal cord, and these nerve fibres enter the spinal cord via the dorsal root ganglion, cross the midline and push the nerve fibres from the lower part of the body out laterally so that a syrinx in the centre of the cord will affect the spinothalamic tract fibres from the upper part of the body closest to the syrinx first (see Figure 3.28).
EXAMINING CEREBELLAR FUNCTION
Test for coordination. The patient alternately touches their nose with their index finger and then the examiner’s finger held at arm’s length from the patient. It is important to ensure that the patient is not anchoring their upper arm against their torso, as this can mask ataxia in the upper limb. To test the lower limbs the patient elevates their leg high up off the bed and then places the heel as accurately as possible on the opposite kneecap. This initial movement is the most important to observe, although many examiners will then test the heel sliding down the shin. This latter technique at times can obscure a subtle ataxia because the heel can be anchored against the shin. These two tests are referred to as finger-to-nose and heel-to-shin testing.
Finally, patients with cerebellar disturbance may have nystagmus when the external ocular movements are tested. This is discussed in Chapter 4, ‘The cranial nerves and understanding the brainstem’.
CLINICAL CASES
The following are cases illustrating how the pathways affected and the pattern of involvement can be used to localise the lesion.
[/level-membership-for-neurology-category][not-level-membership-for-neurology-category]chapter 3
Neurological Examination of the Limbs
Learning how to perform a neurological examination requires repeated practice. Practice without an understanding of how to examine the various aspects of the nervous system and how to interpret the findings is akin to practising golf without having had lessons – useless. This chapter describes how to examine the limbs and interpret the findings. As it is very difficult to learn examination technique from a textbook, a video of the technique is included on the accompanying DVD.
The principal purpose of the examination is to determine whether the patient has lower motor neuron (LMN) signs or, more specifically, signs that indicate involvement of the peripheral nervous system (anterior horn cells, nerve roots, brachial or lumbosacral plexus, peripheral nerve, neuromuscular junction or muscle) or upper motor neuron (UMN) signs that indicate involvement of the central nervous system (brain, cerebellum and spinal cord). These were briefly discussed in Chapter 2, ‘The neurological history’, and, because they are absolutely crucial, they will be discussed in more detail in this chapter (see Table 3.1).
TABLE 3.1
The neurological findings in upper versus lower motor neuron lesions
| Upper motor neuron lesion | Lower motor neuron lesion | |
| Wasting | Usually no wasting but there may be mild wasting with long standing problems | No wasting in the very early stages but usually associated with significant wasting |
| Power | Weakness of extensor muscles in the arms∗ and flexor muscles in the legs∗∗ | The pattern of weakness reflects that part of the LMN that is affected |
| Tone | Increased +/– clonus | Decreased |
| Reflexes | Increased | Decreased or absent |
| Plantars | Up-going (extensor) | Down-going |
| Sensory findings | Sensory level | Focal sensory loss reflecting involvement of a nerve root, plexus or peripheral nerve |
∗Shoulder abduction, elbow extension, wrist and finger extension in the arms.
∗∗Hip flexion, knee flexion and foot dorsiflexion in the legs. The tone may not be increased and the reflexes can be absent in acute spinal cord lesions referred to as spinal shock. Clonus is a series of involuntary repetitive movements of the ankle, up and down, induced by suddenly pushing the foot upwards while the leg is extended [1]. The test is less painful if it is performed with the knee slightly flexed.
THE MOTOR EXAMINATION
The examination of the motor system involves:
• inspecting for wasting and fasciculations in the muscles
Many examiners will perform a screening test of the upper limbs by observing patients elevating their arms and holding them horizontally straight out in front, initially with their eyes open and then subsequently closed (see Figure 3.1). The palms can be turned either down or up – it does not matter – although occasionally having
FIGURE 3.1 Screening test of the upper limbs with hands outstretched: A with palms up; B with palms down
• The pathology is always at the level of the LMN signs and at or above the uppermost limit of the UMN signs.
• In most instances the neurological examination does not establish the aetiology or cause of the problem. It simply localises the part of the nervous system that is affected by the pathological process.
• If the history has been obtained using the method described in Chapter 2, ‘The neurological history’, the nature and distribution of the symptoms should provide an idea as to whether there will be upper or lower motor neuron signs.
the palms turned upwards seems a more sensitive technique.1
• drift downwards if there is weakness
• drift upwards and often outwards if there is a proprioceptive or parietal lobe problem
• oscillate up and down with a cerebellar disturbance if the patient is asked to elevate the limbs briskly, which can be missed if the movement is too slow.
Inspection for wasting and fasciculations
The muscles of the upper arm, forearm, hand, thigh, anterior tibial compartment and calves are examined for wasting and/or fasciculations. Fasciculations are visible spontaneous contractions or twitching of muscle fibres that are innervated by a single motor unit [1]. It may be necessary to spend several minutes carefully examining the muscles in order to detect fasciculations. It is easy to be certain that wasting is present when it is very severe, but with milder degrees of wasting one is less certain that there is a lesion involving the peripheral (LMN) nervous system. Some patients are very thin, and inexperienced clinicians may incorrectly suspect wasting when examining the small muscles of the hands, particularly in older patients. If the wasting affects one arm or one leg a comparison can be made with the contralateral limb. The muscles, if wasted, will initially lose their rounded appearance and appear flattened.
The reliable signs of muscle wasting are (Figure 3.2):
• loss of the visible bulge that occurs when the thumb is adducted towards the index finger – the first dorsal interosseous muscle
• prominence of the anterior border of the tibia – tibialis anterior muscle
• prominence of the spine of the scapula – supraspinatus and infraspinatus muscles
• scalloped appearance just above the patella as if a bite has been taken out of the muscle – quadriceps.
Looking for changes in tone
There are two different ways to test for tone, depending on whether the problem is affecting the motor system or the extrapyramidal system (the latter is discussed in Chapter 13, ‘Abnormal movements and difficulty walking due to central nervous system problems’).
TESTING FOR INCREASED TONE RELATED TO AN UPPER MOTOR NEURON PROBLEM
• Arms. Tone is tested with the forearm semi-pronated and the elbow flexed at 90° (refer to Figure 3.3A). The examiner holds the elbow with one hand and then places the other hand in the hand of the patient as if they were shaking hands. The test is performed with a quick supination of the forearm. If there is increased tone there will be a discernible catch. Very occasionally, when the tone is markedly increased, repetitive contractions may occur, and this is referred to as clonus.
• Legs. Tone is tested with the leg lying flat on the bed and slightly externally rotated and with the knee flexed very slightly. The examiner places their hands behind the leg just above the knee and attempts to quickly elevate the leg. If there is increased tone, the heel will lift up off the bed. The leg may lift off the bed in patients who are very anxious and who find it difficult to relax – slight external rotation of the leg prior to the quick movement helps in this situation and eliminates the false impression of increased tone in anxious patients. The other test for increased tone in the legs is ankle clonus, where the leg is slightly flexed at the knee with the ankle plantar-flexed. The examiner places their left hand behind the knee and grasps the foot with their right hand and forcibly dorsiflexes the foot. Repetitive contractions while the examiner holds the foot in dorsiflexion is a sign of increased tone, referred to as ankle clonus.
TESTING FOR INCREASED TONE RELATED TO AN EXTRAPYRAMIDAL PROBLEM
To test the upper limbs (Figure 3.3B), the forearm and hand are pronated and the examiner holds the middle of the forearm with one hand and holds the hand of the patient in a monkey grip. The patient’s hand is compressed into the wrist as the wrist is slowly flexed and extended. This technique will elicit the classical cog-wheel rigidity seen with extrapyramidal problems.
Testing muscle strength
The following technique is recommended when examining muscle strength. The muscle/muscle group, nerve related to that muscle/muscle group, the nerve root(s) and the action of the muscle [2] are listed in each section below. Experienced neurologists have memorised the neuroanatomy; inexperienced clinicians can record the pattern of weakness and consult a textbook of neuroanatomy, the illustrations in Chapter 1, ‘Clinically oriented neuroanatomy’, or this chapter.
UPPER LIMBS
To test the supraspinatus (Figure 3.4) the elbow should be abducted from the side of the body to approximately 30°, the examiner places a hand over the elbow and pushes the elbow towards the trunk while the patient tries to resist.
To test the deltoid muscle (Figure 3.4) the elbow should be abducted from the side to 90°, the examiner places a hand over the upper arm just above the elbow and pushes downwards while the patient attempts to resist.
The elbow is kept by the side, the forearm is flexed at 90° and the hand is semi-pronated (Figure 3.5). The examiner places a hand over the middle of the back of the forearm and attempts to internally rotate the forearm towards the body as the patient resists.
The elbow is kept by the side, the forearm is flexed at 90° and the hand is semi-pronated (Figure 3.6). The examiner places a hand on the middle of the forearm and attempts to prevent internal rotation of the forearm.
There is a rare entity of winging of the scapular that is the result of damage to the nerve to the serratus anterior (see Chapter 11, ‘Common neck, arm and upper back problems’). The patient is instructed to stand in front of a wall, with the elbows slightly flexed and the palms on the wall (Figure 3.7). They are then instructed to push as hard as they can and the scapular should not lift off the chest wall. If it does the muscle is weak, resulting in ‘winging of the scapula’.
FIGURE 3.7 Testing of the serratus anterior
The elbow is bent at 90° with the palm pointing towards the ceiling (Figure 3.8). The examiner grasps the elbow with the left hand and the wrist with the right hand and attempts to prevent further flexion of the elbow.
The elbow is flexed at 90° with the forearm semi-pronated (Figure 3.9). The examiner places the left hand under the elbow and the right hand on the wrist and attempts to prevent further flexion of the elbow.
FIGURE 3.9 Testing elbow flexion with the forearm semi-pronated
It is very important that the elbow is only slightly flexed (as little as 20–30° from the fully extended position) when testing extension (Figure 3.10). If the elbow is fully flexed, this will result in an apparent weakness of the triceps when it is strong and, if it is fully extended, subtle degrees of weakness may be missed. The examiner places the left hand over the anterior aspect of the elbow and the right hand over the dorsal aspect of the wrist and attempts to prevent the patient from straightening their elbow.
[/not-level-membership-for-neurology-category]
