CHAPTER 40 Nasal tip grafting with an “anatomic tip graft” and sizers
History
Surgeons today have several different methods for achieving a contoured, well-projected tip, including suture techniques, columellar struts and tip grafting. A variety of nasal tip grafting techniques have been proposed,1–8 many of which are outstanding. Some of those nasal tip graft designs, however, may not readily produce consistent and aesthetically pleasing results in the hands of less experienced surgeons. This is because many graft designs do not represent the actual, normal surface anatomy of the nasal tip cartilages. Consequently, the surgeon finds himself or herself in the position of having to adjust the size, location, and angulation of the graft until the external appearance is aesthetically pleasing. That would be all right if, in fact, it were easy to do so. But without an artistic sense or a great deal of experience, these minor adjustments to the tip graft can become a guessing game.
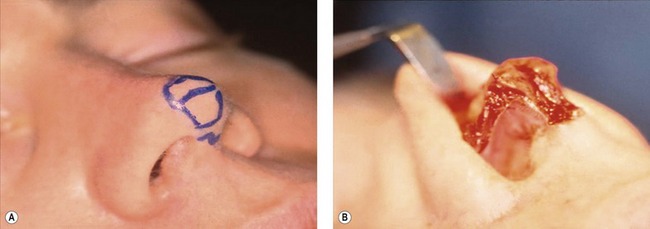
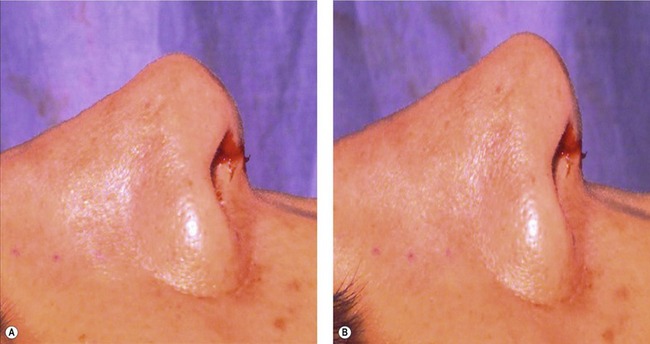
The indications for tip grafting are fairly specific: (1) if there is actually tip (lobular) deficiency such as occurs commonly in Asian-American noses (Fig. 40.1); and (2) if the tip architecture cannot be restored with suture techniques (particularly in secondary rhinoplasties). Tip deficiency is best appreciated on the basal view where the infratip lobule, the area comprising the tip, should normally be approximately one-third of the total height of the basal aspect of the nose. However, if underprojection is associated with a normal sized infratip lobule, a columellar strut is indicated.
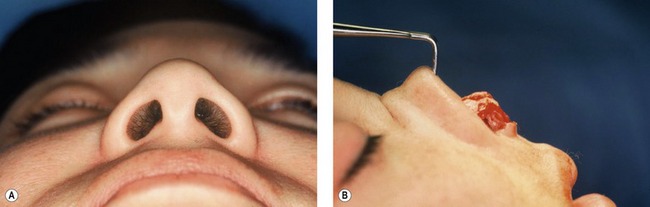
Fig. 40.1 Tip grafting is indicated when there is tip deficiency such as occurs frequently in Asian-American noses, and when the tip cannot be reconfigured with suture techniques into a normal shape. A deficient infratip lobule is best appreciated on basal view (A) and can easily be seen intraoperatively in the open approach (B).
Physical evaluation
• Patients for nasal tip augmentation are evaluated both on physical examination and with imaging programs. By morphing the nasal tip one can determine preoperatively if tip grafting is a helpful adjunct.
• The basal view helps determine if tip grafting is a better option than columellar strut for achieving tip projection.
• The infratip lobule should occupy approximately  of the vertical height of the base view. A small infratip lobule suggests that tip grafting is the best approach.
• If the infratip lobule is normal, but the columella is short as seen on base view a columellar strut may be a better choice than tip grafting.
• The nasal tip, itself, is examined to see if it is small and ill-defined in which case suture techniques probably will not suffice and tip grafting will be necessary to give the proper tip shape and definition.
• The quality of the skin is evaluated to see if tip grafting is best via the open or closed approach. Poor circulation or nasal scars suggests the closed approach.
• The septum is examined to see if cartilage has been previously removed. If so, the ear is examined to see if concha cavum is available for a graft.
Anatomy
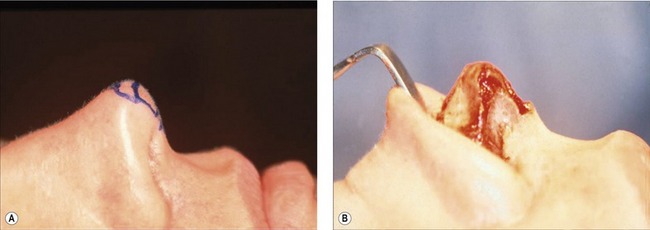
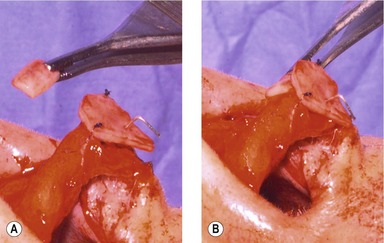
The nasal tip of the patient in Figs 40.2A and 40.3A exhibits normal anatomy. The skin is thin and, consequently, one can see the lateral edges of the middle crura and the shape of the domes. On side view, a slight angulation between the area formed by the domes and the area formed by the middle crura can be seen. This angulation is what provides the lobule with its slight roundness. It is also the reason why tip grafts cannot be absolutely flat but must have a slight bend.
On opening the nose (Figs 40.2B, 40.3B) one can actually see the crura diverge from one another. The domes, upon careful inspection possess an axis and (standing at the head of the bed) diverge at about 70–90 degrees (the angle of domal separation). There is normally a separation between the cephalic ends of the domes (the high point of pronasale of the nose) of about 3 mm. The cephalic end of the domes is where the supratip break begins. The high point of the domes is usually 6–8 mm above the dorsum of the septum. The upper part of the anatomic tip graft design represents the area between the domes, and the lower part of the graft represents the area between the middle crura (Fig. 40.4). Both areas combined represent the external surface anatomy of the infratip lobule. Therefore, this specifically designed tip graft is referred to as the anatomic tip graft.9
Technical steps
Tip graft sizers
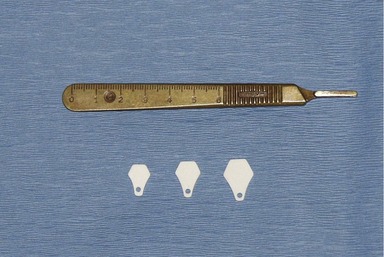
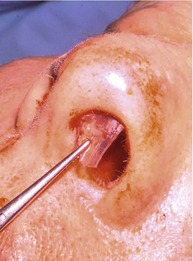
In years past it was necessary to carve one’s own tip graft based upon the anatomy of the patient. Too often, surgeons have carved a graft that was too small and then had no more cartilage to carve another whole tip graft. Too often they fractured the graft in the process of repeatedly putting it in the pocket. The sizer allows the surgeon to test the effect of tip grafting without having to use actual cartilage. Today, it is possible to use sizers10 that have the design of an “anatomic tip graft”.
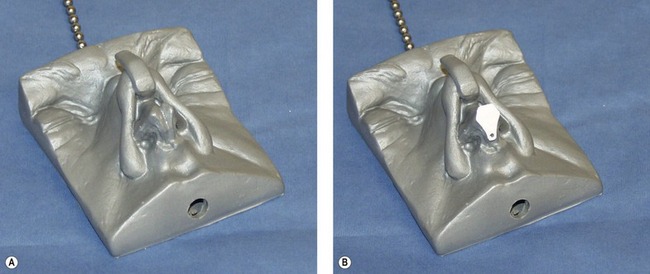
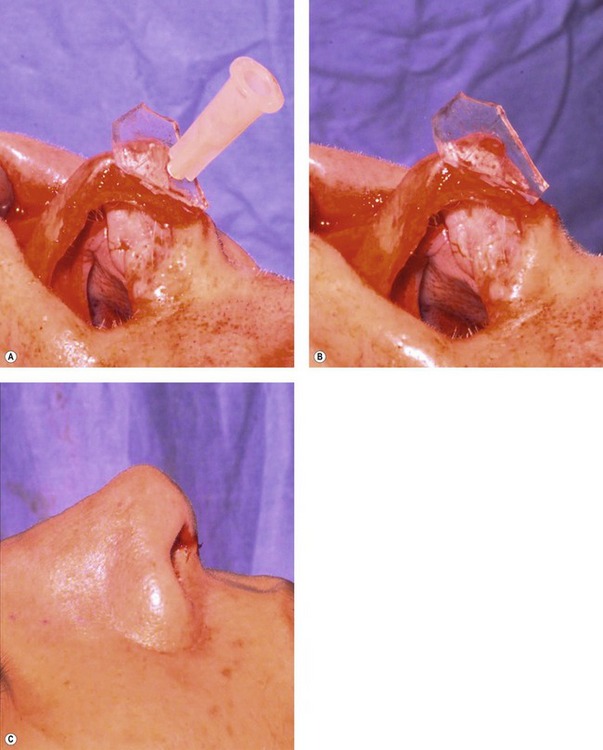
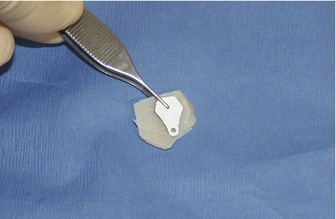
The sizers (commercially available) are made of silicone and have the properties of septal cartilage. They are flexible and of approximately the same thickness. They come in three sizes, although in almost all adults the medium size works best. A model (Fig. 40.6A – also commercially available) is a useful guide when sculpting the cartilaginous tip with excision and/or suture techniques. When the sizer is placed on the model (Fig. 40.6B) it exactly covers the infratip lobule (the area between the middle crura and the area between the domes). The sizer is pinned to the tip graft with a No. 27 needle (Fig. 40.7), the hub is cut off with a bone cutter or snippers and the skin flap returned so as to be able to evaluate the quality and quantity of tip projection that the sizer provides. If the angle at which the sizer is sitting (columella/lobule angle) seems inappropriate, or it is not giving enough tip projection, the sizer is repositioned, repined, the flap is returned and the external result evaluated again.
Carving the graft
A graft made from the septum is preferable, but ear cartilage works almost as well. Rib cartilage is used only if necessary. Fortunately, sizers make it possible to cut a tip graft from cartilage in cookie cutter fashion. Carving the graft is done on a silicone block (Fig. 40.8) by skewering the sizer to the cartilage and to a silicone block. If septal cartilage is used, the carved graft is scored at the junction of the upper area (representing the domes) and lower area (representing the middle crura). Scoring a septal cartilage graft can prevent a tombstone effect. At first, very light scoring should be done. Inserting a graft into the nose multiple times in an attempt to check its position and size often weakens it and causes it to bend. Also, the tautness of the nasal skin over the graft makes it bend. Therefore, it is prudent to be conservative with the first scoring maneuver. If, however, the graft is over-scored, its stiffness can be resorted by applying a horizontal mattress suture on the convex side of the scored graft. Because septal cartilage is very stiff it is necessary, particularly in the thin-skinned individual, to bevel the edges of the graft at 45 degrees. This will minimize sharp edges. If ear cartilage is used, scoring is often not necessary, provided that the graft is placed in the nose convex side up. The best part of ear cartilage for this purpose is concha cavum. It is thick, strong, and has a gentle curvature that precludes the need for scoring.
Applying the graft in the open approach
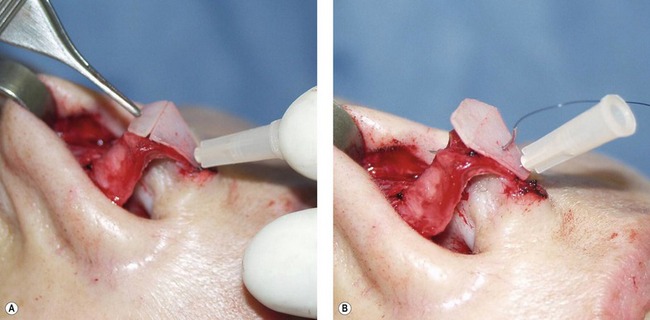
The graft is placed on the dome such that it rests above the existing dome by the amount of projection that is desired (Fig. 40.9). The lower half of the graft is usually able to rest against the surface of the middle crura. In fact, the width of the graft almost always turns out to be the total distance spanning the middle crura. If not, the sides of the graft are shaved down so as to just cover the area of the middle crura. If the columella (total distance spanning the middle crura is too large (as commonly occurs in cleft lift noses) its width can be reduced with a mattress suture. The graft is then pierced with a No. 27 needle that penetrates the tip cartilages. The hub of the needle is cut off with a bone cutter or snippers. The skin flap is redraped to evaluate the external appearance of the nasal tip and be certain that the proper amount of projection has been achieved. The graft is secured in place using 5-0 polydioxanone (PDS) sutures. A needle can be used to go directly through the center of the graft. However, grafts tend to tip either to the left or right. Therefore, it is best to place the first two sutures (5-0 PDS) on either side of the widest part of the graft. The third and usually final suture is placed at the posterior (narrowest) part of the graft with the knot buried.
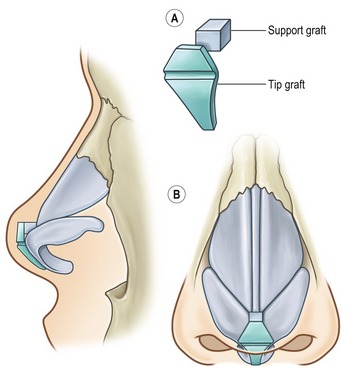
The support graft
A tip graft by itself seldom suffices because: (1) more tip augmentation is needed; (2) there is a dead space behind (deep) to the tip graft; and (3) the tip graft tends to become dislodged if not secured somehow. Rather than making multiple tip grafts, wasting good cartilage, and taking the time to carve them, it is much easier to simply construct a block of cartilage of the appropriate size and shape that will fill the dead space and in so doing lock the tip graft in place, push it up against the skin surface to create more definition and achieve more tip projection. Any sort of cartilage will work for this purpose, even cartilage that would not be suitable for anything else. Cartilage from the vomerine groove that is typically deformed will work, as will pieces of cartilage from the ear that are otherwise unusable. Usually 1–3 layers of cartilage (approximately 1 mm thick each) are skewered with a needle and pierced into a silicone block. Two or three simple sutures of 5-0 PDS are then used to make a sandwich of these grafts. Only one solid support graft is desired. Placing multiple grafts deep to the tip graft is fraught with the danger of their dispersing later and losing both projection and orientation of the anatomic tip graft. The support graft is secured to the posterior aspect of the tip graft with a single suture (5-0 PDS) such that the knot is not on the superficial surface of the graft. The skin flap is then returned so that the columella–labial angle can be judged to see it is more aesthetic to change that angle one way or another (Fig. 40.11A).
Results
The patient in Fig. 40.12 exhibited tip deficiency as well as a slightly broad tip. She also exhibited a slight dorsal hump caudally but a radix deficiency as well. She underwent a primary open rhinoplasty involving a number of maneuvers, including a radix graft, and slight dorsal trim. With respect to the tip, sutures (transdomal, lateral crural mattress and interdomal sutures) were used first to maximize contour and projection. Then, an anatomic tip graft and a support graft were carved and applied. Postoperative results at 13 months showed improved tip projection and tip definition.
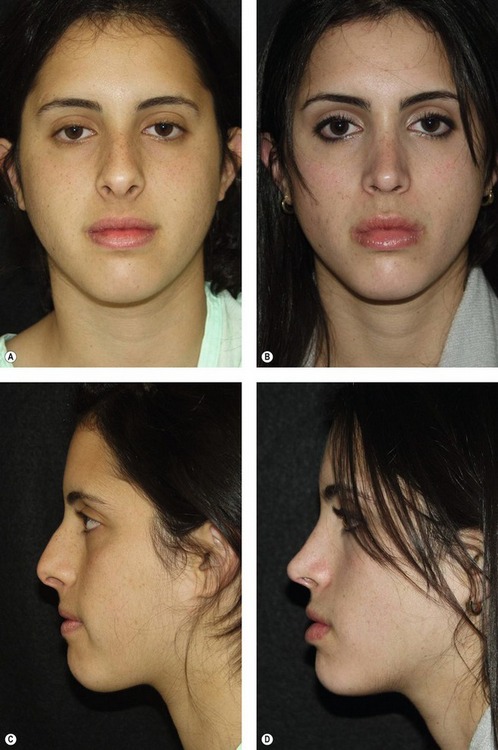
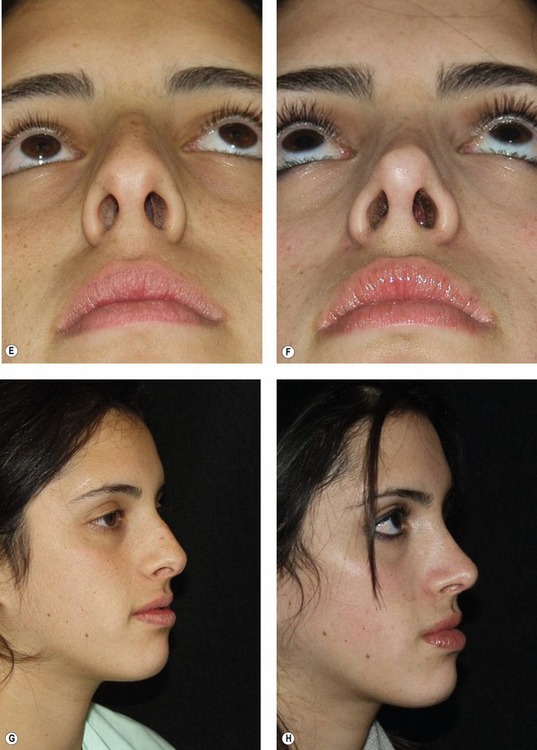
Fig. 40.12 This patient in exhibited tip deficiency as well as a slightly broad tip (front – A; side C; basal – E; oblique – G). She also exhibited a slight dorsal hump caudally but a radix deficiency as well. She underwent a primary open rhinoplasty involving humpectomy, spreader flaps and osteotomies. With respect to the tip, sutures (transdomal, lateral crural mattress and interdomal sutures) were used first to maximize contour and projection. Then, an anatomic tip graft and a support graft were carved and applied. Postoperative results at  years showed improved tip projection and tip definition (front – B; side – D; basal – F; oblique – H.
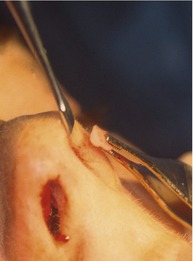
Applying grafts in the closed approach
Before applying grafts in the closed approach it is helpful to use the sizers. The sizer is inserted after the tip is maximally contoured using sculpting and/or suture techniques. The sizer is placed into the tip from a rim (infracrural) incision (Fig. 40.13). Although one rim incision is theoretically all one needs, a symmetrical pocket is easier to make by dissecting it from bilateral rim incisions. Also, it is better to make the pocket too large than too small. Trying to force the sizer into a small, tight pocket can be done but suggests that when the graft is cut to size it can be damaged. A pocket that is too large can always be rectified by subsequently inserting the appropriately sized support graft (1–3 layers of grafts sutured together) to fill it.
With the graft in place just beneath the skin, one makes a few aesthetic judgments. These include whether the graft needs to be repositioned slightly and whether more scoring is needed. Next a support graft may be needed in order to push the graft up against the skin, produce more definition, fill the dead space and/or provide more tip augmentation. To make these judgments, a Ragnell retractor is inserted deep to the graft; it is then retracted (Fig. 40.14). Doing this makes it possible to see the edges of the graft more clearly and to see if the external appearance is satisfactory with the graft in this location. The Ragnell retractor also allows insertion of the support graft deep to the tip graft without graft dislodgment. A 5-0 plain catgut suture may be necessary to close the rim incision.
Complications
• One of the intraoperative complications includes accidentally overscoring the septal cartilage tip graft in an attempt to give it a gentle bend that every tip graft requires. If this occurs, the problem is almost always corrected by placing a horizontal 5-0 PDS suture on the convex side of the excessive curved tip graft cartilage.
• Another occasional postoperative complication is malposition of the tip graft. If this occurs in the closed approach it is because the dead space behind the tip graft was not adequately filled with the appropriate sized support graft whose job it is to lock the tip graft in place. The extent of residual dead space deep to the tip graft is best ascertained by inserting a small clamp behind the tip graft and wiggling it from side to side.
• A potential complication in the open approach is graft malposition. Standing directly in front of the patient to evaluate the orientation of the tip graft helps avoid that problem. Symmetry of the tip graft is also appreciated from the head of the bed.
• Another occasional postoperative problem is a sharp edge to the tip graft. This can be avoided by beveling the edges of the tip graft at 45 degrees and/or draping a thin piece of dermis or fascia over the tip graft. This latter maneuver is particularly helpful in very thin-skinned individuals.
Pearls & pitfalls
Pearls
• Cartilage carving is most easily done on a silicone block. Secure grafts to the block with No. 27 or No. 30 needles before cutting.
• A tip graft made of septal cartilage needs to be beveled (45 degrees) at its edges in order to avoid sharp edges showing through the nasal tip skin.
• Using a No. 27 needle to stabilize the tip graft up against the nasal tip cartilages (in the open approach), cutting off the needle hub and reflecting the skin flap avoids unnecessary trial and error suturing.
• If a septal cartilage tip graft becomes floppy as a result of overzealous scoring, its rigidity can be regained by placing a horizontal mattress suture (5-0 PDS) on the convex side.
• Only one solitary graft should be used as a support graft because multiple grafts deep to the actual tip graft tend to disperse.
Pitfalls
• Septal cartilage that is used for a tip graft will exhibit a tombstone effect if it is not scored.
• If the edges of a septal cartilage tip graft are not beveled in a thin-skinned individual, sharp edges will result.
• If the patient already has a normal size infratip lobule and yet needs more tip projection, a tip graft will increase the projection but make the infratip lobule abnormally large. In this kind of a patient a columellar strut is indicated to give more tip projection.
• If more than one graft is simply stuffed deep to the tip graft without suturing them together to make one solid “support graft” they will very likely disperse, resulting in a loss of some tip projection.
• Grafts tend to tip either to the left or right. Therefore, it is best to place the first two sutures (5-0 PDS) on either side of the widest part of the graft. The third and usually final suture is placed at the narrowest (posterior) part of the graft with the knot buried.
Evaluation of procedure
• The “anatomic nasal tip graft” has the surface morphology of the normal nasal tip which includes the area between the domes and the area between the middle crura.
• Tip graft sizers are available that mimic the normal nasal tip surface. They have the same flexible consistency as normal cartilage and therefore can be placed in the nasal to judge the effect before committing to carve cartilage.
• Cutting around a sizer that is placed on cartilage avoids sculpting errors.
• A support graft (1–3 layers thick) supports the tip graft at the appropriate columella–lobule angle, fills dead space behind the tip graft and allows for greater tip projection.
• Only one actual tip graft is required. Further projection, definition, and stabilization are obtained by the support grafts.
• Overdissecting the pocket for the graft in the closed approach does not create a problem, because the dead space can always be filled by the appropriately sized support graft.
• Concha cavum from the ear is an ideal choice of donor material for tip grafting, because it has a gentle curvature mimicking the normal angulation between the middle crura and domes.
Summary of steps
1. Tip grafting is recommended for the underprojected tip due to infratip lobule deficiency and for the deformed tip that cannot be corrected by sutures.
2. A specific design of the tip graft is recommended here, one that mimics the normal anatomy of the tip, i.e. the infratip lobule. It represents the area between the domes, the area between the middle crura and the normal angulation (as seen on side view) that commonly occurs between those two areas.
3. Mock surgery is done preoperatively with the computer. The tip is morphed with an imaging program to see what the nasal tip looks like when it has been enlarged on the screen.
4. Sizers are used to see its effect on the patient before cutting the cartilage and possibly ruining it.
5. Sizers are used to cut the cartilage in template fashion so as to avoid inadvertently carving a graft too small and then not having enough cartilage to carve another graft.
6. If septum is available it is carved with the aid of the sizer. The edges should be feathered and the graft should be horizontally scored at its widest point to allow flexibility of the cartilage over the existing domes.
7. If ear cartilage is used, concha cavum is best. After carving it to the appropriate shape and size with the aid of the sizer, it is placed concave side down on the tip.
8. Additional cartilage deep to the tip graft (referred to as the “support graft”) is usually needed in order to secure the tip graft, provide additional tip augmentation, and accentuate tip definition by pushing the tip graft toward the skin surface.
9. For a closed rhinoplasty the support graft is made by suturing together 2–3 pieces of septal or ear cartilage. By suturing 2–3 pieces of cartilage to make a single block, one avoids them being dispersed if placed individually.
10. If the nasal skin is thin, a single layer of temporalis fascia or dermis should be placed over the entire graft so that the sharp edges will not be seen postoperatively.
1. Collawn SS, Fix RJ, Moore JR, Vasconez LO. Nasal cartilage grafts: more than a decade of experience. Plast Reconstr Surg. 1997;100:1547.
2. Daniel RK. Rhinoplasty: the first 100. In: Daniel RK, ed. Rhinoplasty. Boston: Little, Brown; 1993:343.
3. Guyuron B, DeLuca L, Lash R. Supratip deformity: a closer look. Plast Reconstr Surg. 2000;105:1140–1151.
4. Pastorek NJ, Bustillo A, Murphy MR, Becker DG. The extended columellar strut tip graft. Arch Facial Plast Surg. 2005;7:176–184.
5. Peck GC, Jr., Peck GC. Nasal augmentation: inadequate tip projection and saddle-nose deformity. In: Gruber RP, Peck GC. Rhinoplasty: state of the art. St. Louis: Mosby; 1993:113–122.
6. Rohrich RJ. An 18-year experience with the umbrella graft in rhinoplasty (Discussion). Plast Reconstr Surg. 1998;102:2166.
7. Sheen JH, Sheen AP. Aesthetic rhinoplasty. St. Louis: Mosby; 1987.
8. Toriumi D. New concepts in nasal tip contouring. Arch Facial Plast Surg. 2006;8:156–185.
9. Gruber RP, Grover S. The anatomic tip graft for nasal augmentation. Plast Surg. 1999;103:1744.
10. Gruber RP. Nasal tip graft sizing and securing. Op Tech Plast Reconstr Surg. 2000;7:229.