CHAPTER 373 Microsurgery of Basilar Apex Aneurysms
Basilar Apex Aneurysm Surgery: Clinical Experience
Dr. Charles Drake shared his insight into basilar apex aneurysm surgery throughout his career in multiple publications and lectures.1–14 In an update on his experience in 1990, he described 545 patients who had been treated, with good outcomes achieved in 475 patients (87%).13 During the past 40 years, other experienced surgeons have also contributed to this challenging area of neurosurgery.14–25 This list includes well-trained young individuals with intense dedication to neurovascular surgery and sufficient experience who also can achieve successful results when treating basilar apex aneurysms.15
In a review of their experience with 303 basilar apex aneurysms, Samson and colleagues16 demonstrated a statistical correlation between poor outcome and various factors: poor admission grade (Hunt-Hess grades IV and V), patient age older than 65 years, computed topography (CT) demonstration of thick basal cistern clot, aneurysm diameter larger than 20 mm, and symptoms attributable to brainstem compression. In a review of all series published between 1980 and 1989, Wascher and Spetzler17 found, for a total of 957 patients, that the rate of good outcome was 82.4% and that the mortality rate was 5.1%. These series included results for a heterogeneous group of aneurysm sizes, patient ages, and clinical presentations. In a report focusing on the management outcomes of 179 unruptured posterior circulation aneurysms, of which 99 were bifurcation aneurysms, Rice and colleagues18 found a 4.2% combined morbidity and mortality rate. This variability in morbidity and mortality based on clinical factors and aneurysmal morphology must be considered when comparing clip ligation with endovascular options for specific patients. Lozier and associates reported their retrospective review of the perioperative and long-term clinical outcomes in a cohort of prospectively enrolled patients.19 They identified 98 consecutively treated basilar apex aneurysms. Eighty-four of the 98 aneurysms were directly clipped. Fifty patients presented with subarachnoid hemorrhage (SAH), and 19 aneurysms were giant. The surgical morbidity rates were 19% for the entire group and 8.8% for the unruptured and nongiant subgroup. The most common complication was perforator injury. Sixty-seven percent of patients were independent at discharge and 79% at the 3-month follow-up. Ninety-three percent of the subgroup of patients with nongiant and unruptured aneurysms were independent at discharge and 100% at the 3-month follow-up. In a multivariate analysis, unruptured giant aneurysm status was found to confer a tremendous risk for poor outcome in this series.19 An important issue to consider when assessing the efficacy of a treatment modality for aneurysms is the rate of complete aneurysm occlusion that can be achieved. In a series reported by Samson and colleagues,16 postoperative angiography was performed in 246 patients. Residual aneurysm was identified in 6% (i.e., complete aneurysm occlusion in 94%). This rate of complete aneurysm occlusion is superior to the current results achieved with endovascular treatment.26–30
Microsurgical Anatomy of the Interpeduncular Cistern
The technical challenges of clipping basilar apex aneurysms are related to the complex anatomy in and around the interpeduncular cistern and the depth of dissection through narrow corridors that is required to safely secure these lesions. The subarachnoid space within the interpeduncular cistern is enclosed by the clivus and posterior clinoid process anteriorly, the medial aspects of the temporal lobes and tentorial edges laterally, the cerebral peduncles posteriorly, and the mamillary bodies and posterior perforated substance superiorly. The terminal basilar artery has a normal diameter of 2.7 to 4.3 mm and lies 15 to 17 mm posterior to the posterior aspect of the internal carotid arteries (ICAs).25,31,32 This proximity to the ICA provided a basis for seeking a transsylvian approach to basilar apex aneurysms. A point proximal to the bifurcation of the basilar artery gives rise to bilateral superior cerebellar arteries (SCAs), which may be duplicated. The dentate nuclei are irrigated by these vessels.20
Visualization and preservation of the thalamoperforating arteries is an essential technical nuance of basilar apex aneurysm surgery. These critical perforators arise from the posterior aspect of the basilar trunk, the proximal P1 segments, and the posterior communicating arteries. The cranial nerve most intimately associated with this region is the oculomotor nerve that traverses the space between the PCA and the SCA within the interpeduncular cistern. The membrane of Liliequist21 forms an anterior “curtain” for the interpeduncular cistern. This membrane is a thick layer of arachnoid that anchors from the mamillary bodies superiorly and extends anteriorly and inferiorly before folding posteriorly to form the roof of the prepontine cistern. The basilar apex can be located above, below, or at the level of the dorsum sellae.
Surgical Strategies
The two pure approaches for basilar apex aneurysms are the subtemporal approach and the transsylvian approach. In our practice, we employ both approaches but are increasingly relying on a new modification or hybrid approach.22 We emphasize the importance of tailoring the operation to the patient’s particular anatomy. Considering the key assets and liabilities of each approach allows a more rational design of operative strategies for each patient. The pure transsylvian approach has several assets:
The transsylvian exposure also has liabilities:
The subtemporal approach offers the surgeon many assets:
The subtemporal exposure also has liabilities:
Pure Transsylvian Approach
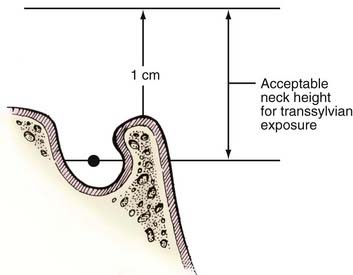
The transsylvian exposure provides excellent visualization for aneurysms with necks at the level between the middle depth of the sella turcica and a line 1 cm superior to the posterior clinoid process (Fig. 373-1). Aneurysms with necks lying inferior to the midsellar level are better approached through the subtemporal corridor or a “half-and-half” conversion with tentorial division.23,25 Extremely high aneurysms are difficult to approach but are probably best tackled through a transsylvian approach above the carotid bifurcation. The orbitozygomatic osteotomy is helpful when tackling high aneurysms because the surgeon’s line of sight can angle more superiorly. Several maneuvers, including drilling the posterior clinoid for low-lying lesions, have been described to tackle anatomic problems encountered during transsylvian exposure.3,33 A transcavernous approach has also been described.34
Operative Technique
Yasargil20 pioneered the transsylvian approach for basilar apex aneurysms. The advantages of this approach include its familiarity to neurosurgeons, the proximity of the basilar artery to the carotid artery, and the wide exposure of the interpeduncular cistern that can be achieved by opening the membrane of Liliequist. We typically approach midline basilar apex aneurysms from the right side. A left-sided approach is valid when the patient has a right hemiparesis or left third nerve palsy. Some anatomic variants also warrant a left-sided approach. For example, an aneurysm that tilts to the left side makes it difficult to dissect the left PCA off the aneurysm from the right. Occasionally, the entire basilar artery is displaced to the left, making a right-sided transsylvian approach difficult.
Positioning
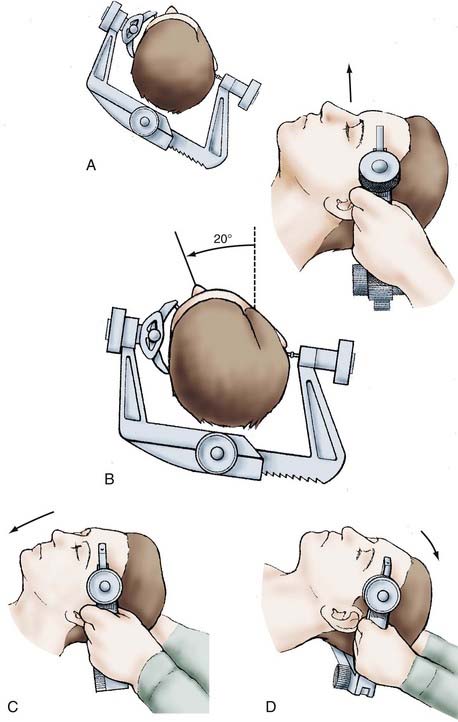
Precise positioning is critical to optimize exposure of the basilar apex. Excellent positioning can be achieved with four steps after the Mayfield-Kees skull fixation device is placed with two pins on the contralateral side of the frontal bone and with a single pin placed superior to the mastoid process (Fig. 373-2). First, the head is elevated above the long access of the body to maximize venous drainage. Second, the head is rotated away from the operative side by 20 degrees. Third, flexion of the neck brings the chin toward the contralateral shoulder and ensures the plane of the floor of the anterior cranial fossa is perpendicular to the long axis of the body. Fourth, the head is extended until the maxillary eminence is well above the orbital rim.
Scalp Incision
The incision is begun at the zygoma and carried superiorly in a straight line for about 10 cm above the superior temporal line and then curved gently forward toward the midline (Fig. 373-3). Care is taken to ensure that the incision is within 1 cm of the tragus to avoid damage to the frontalis branch of the facial nerve. We preserve at least one branch of the superficial temporal artery. In addition to maximizing scalp healing potential, preservation of the vessel may prove useful if a revascularization procedure is needed. We retract the scalp flap with fishhooks and perform an interfascial dissection of the temporalis muscle. Using a knife, we incise the temporalis fascia from the area of the zygoma to just 1 cm below the muscle attachment to the temporal bone and then to the area of the keyhole. The knife is used to prevent shrinkage of the temporalis fascia and to facilitate complete closure. We use cautery to cut the muscle through the opening made with the knife and then peel the muscle off the temporal squama and retract it over the scalp flap with fishhooks (Fig. 373-4).
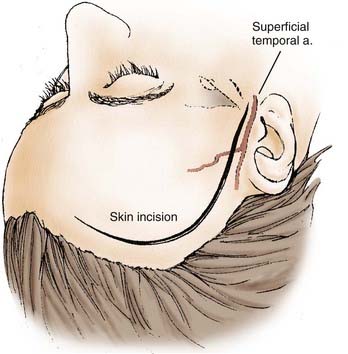
FIGURE 373-3 Scalp incision for a pterional approach.
(From Apuzzo MLF, ed. Brain Surgery: Complications, Avoidance and Management. New York: Churchill Livingstone; 1993.)
Craniotomy
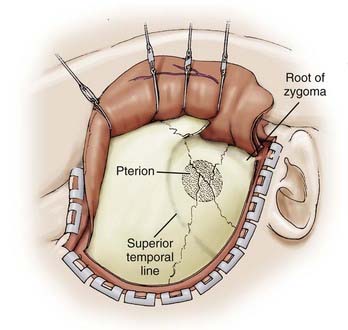
We perform a three- or four-hole craniotomy (Fig. 373-5). The fourth hole is reserved for older patients with presumed adherent dura. The first bur hole is placed just above the zygomatic arch. The second bur hole is superior to the first bur hole and just inferior to the superior temporal line. The third bur hole is placed at the anatomic key hole. The optional fourth bur hole is placed medial and anterior to the second bur hole. A power-driven craniotome is used to incise the bone. After elevating the bone flap, we drill enough bone to expose the temporal tip and the floor of the middle fossa all the way back to the zygomatic root. This degree of temporal exposure can be critical if conversion to a half-and-half or subtemporal approach is needed. We then perform an aggressive resection of the sphenoid ridge with rongeurs and a cutting bur on an air-driven drill (Fig. 373-6). Preferably, the bony exposure is carried to the lateral aspect of the superior orbital fissure. We remove the inner table of the frontal bone for a distance of 2 cm from the bur hole at the anatomic key hole. After adequate bony exposure, we obtain hemostasis with bone wax, oxidized cellulose, and tack-up sutures. This avoids run-down later in the case.
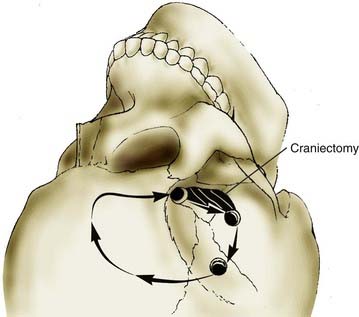
FIGURE 373-5 Pterional craniotomy. A critical aspect of the craniotomy is a generous anterior temporal craniectomy.
(From Apuzzo MLF, ed. Brain Surgery: Complications, Avoidance and Management. New York: Churchill Livingstone; 1993.)
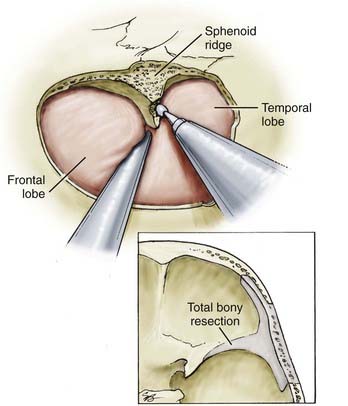
FIGURE 373-6 Aggressive resection of the sphenoid ridge.
(From Apuzzo MLF, ed. Brain Surgery: Complications, Avoidance and Management. New York: Churchill Livingstone; 1993.)
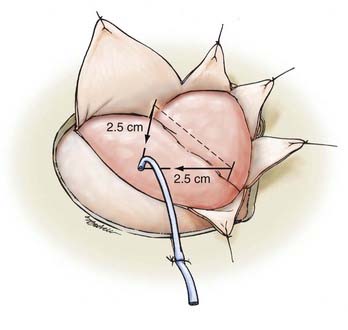
We then incise the dura in a semilunar fashion, with the medial limb extending to the frontal bone 1 cm below the medial edge of the craniotomy. The lateral limb crosses the sylvian fissure and extends anteriorly to a point 1 cm below the sylvian fissure at the edge of the craniectomy. At this point, for ruptured aneurysms, we place a ventriculostomy catheter using anatomic points defined by Paine and coworkers35 if the brain appears to be tight. The point of entry is the vertex of an isosceles right triangle whose hypotenuse overlies the sylvian fissure and whose sides are 2.5 cm long (Fig. 373-7). A ventricular catheter is used to puncture the frontal lobe at this point. We suture the catheter posterior to the dura and allow continuous drainage during the microsurgical dissection.
Subarachnoid Exposure
We then turn our attention to the arachnoid, which tethers the gyrus rectus to the optic nerve. Dissecting the arachnoid further frees the frontal lobe and opens the prechiasmatic cistern. At this point, the temporal lobe is usually found to be displaced posteriorly, which can result in uncal tissue herniating medially over the incisura and obstructing the view of the interpeduncular cistern. Although retraction of this tissue is an option, we have occasionally performed a subpial uncal resection with good results. Post and colleagues36 reported their initial experience using uncal resection (10 × 10 × 15 mm volume) to optimize transsylvian access to the basilar apex without sacrifice of the pretemporal veins. Their initial clinical experience included eight patients—four of whom were treated for basilar apex aneurysms. They found that no patient developed venous infarction or new postoperative seizure. Cadaver analysis revealed that there was similar exposure to the upper basilar complex; however, the additional exposure from uncal resection did increase visualization of the ipsilateral PCAs and SCAs compared with the pretemporal approach. These investigators did report that the angle of view is limited to a more superior-lateral perspective when compared with the pretemporal approach. Therefore, the transuncal approach may be less suited for very large or giant basilar apex aneurysms when proximal control of the basilar trunk is obscured by the dome of the aneurysm.36 For this approach, we routinely use frontal and temporal lobe retractors. When a significant amount of posterior temporal lobe retraction is needed with or without conversion to a half-and-half or extended lateral approach, it is wise to coagulate and cut the veins that drain the temporal lobe into the sphenoparietal sinus. Rupture of one of these veins later could obstruct the view during a critical part of the procedure.
Orbitozygomatic Approach
A helpful supplement to the transsylvian approach is the orbitozygomatic osteotomy.37,38 The initial incision is similar to the standard pterional craniotomy.26 The inferior limb of the incision is completed after the scalp is dissected from the temporalis fascia, preserving the superficial temporal artery. The scalp is mobilized anteriorly, and the temporalis fascia is exposed. The fascia is incised and elevated to avoid injury to the frontalis branch of the facial nerve. The dissection continues anteriorly to expose the orbital rim, malar eminence, and zygomatic arch. The temporalis muscle is raised separately, which exposes the pterion and the zygomatic root. The scalp flap and temporalis muscles are reflected anteriorly and inferiorly, respectively. Bur holes are placed in the temporal bone over the zygoma and pterion. A pterional craniotomy is performed. The periorbita is dissected with a No. 1 Penfield dissector. A reciprocating saw is used to perform the orbital and zygomatic osteotomies.27 The first osteotomy is an oblique cut across the zygomatic root. The second and third cuts divide the zygoma just superior to the level of the malar eminence. The third cut extends from the inferior orbital fissure. Care is taken with thin retractors to protect the periorbita. The dura is elevated from the anterior wall of the temporal fossa and the orbital roof. The fourth cut divides the superior orbital rim and roof and is begun 1 to 2 mm lateral to the supraorbital canal. The last two cuts connect the superior and inferior orbital fissures. This is performed after the inferior orbital fissure is identified by direct vision or palpation of the infratemporal fossa with a No. 4 Penfield dissector. Reciprocating saw blade is engaged in the upper end of the fissure, and a short cut is made to the edge of the previously made notch in the temporal fossa. The final cut extends from the lateral margin of the superior orbital fissure to join the fifth cut. Removal of additional bone at the skull base decreases retraction and increases the angle of view superiorly toward the basilar apex.26 After the bony removal is accomplished, the dura is opened, the sylvian fissure is widely split, and the microsurgical dissection proceeds similarly to the traditional transsylvian approach.
The relationship between the aneurysm origin and the posterior clinoid process can help guide decisions regarding the surgical approach.28 High- or low-lying aneurysm necks are defined as occurring higher or lower than 5 mm, respectively.29 Some neurosurgeons prefer an orbitozygomatic craniotomy to approach normal or high-lying aneurysms.28 In those that are low lying, resection of three bony obstacles (the anterior clinoid process, the posterior clinoid process, and the dorsum sellae) can be advantageous.30
Youssef and colleagues31 reported on a cadaver study to quantify the effects of anterior and posterior clinoidectomy as they relate to the carotid-oculomotor window when exposing the basilar apex. This was after a frontotemporal-orbitozygomatic craniotomy. They found that the anterior clinoidectomy and ICA mobilization increased the carotid-oculomotor space 44% anteriorly and 28% posteriorly. The posterior clinoidectomy increased the exposed length of the basilar artery 69%. They concluded that superficial wide-field exposure, expansion of the carotid-oculomotor window, and increased exposure of the basilar apex improve visualization, facilitate clip application, and allow for proximal control.31 Chanda and Nanda’s32 cadaver study involved a stepwise dissection starting with a frontal temporal craniotomy, then an orbitozygomatic craniotomy, followed by drilling the posterior clinoid process. These investigators found that, on average, a 13.4-mm segment of the basilar artery was gained.
Pretemporal Transzygomatic Transcavernous Approach
Krisht and Kadri39 described the use of the pretemporal transzygomatic transcavernous approach to treat higher complexity basilar apex aneurysms surgically. They defined basilar apex aneurysms as highly complex if they were larger than 2 cm, very dysmorphic, or wide based; had a low bifurcation; were posterior or posteroinferior projecting; possessed dolichoectatic changes of the basilar apex compromising the surgical view; or were associated with additional aneurysms affecting the surgical view.39 The technique begins with an extended pterional craniotomy with temporal extension. This allows for an inferior reflection of the temporalis muscle. After the craniotomy, the temporal squama is drilled flush with the middle fossa floor. The sphenoid wing is drilled from its lateral to its medial extent until the anterior clinoid process is reached. The meningo-orbital artery is exposed, coagulated, and cut. During this step, the posterior third of the lateral and superior orbital wall is removed while preserving the periorbita. The anterior clinoid process is exposed and removed.
The meningo-orbital artery is the site where the dissection plane between the dura propria of the temporal lobe and the lateral wall of the cavernous sinus can begin.39 The third cranial nerve is identified lateral to the anterior clinoid process and followed to the level of its exit through the dura at the level of the oculomotor trigone. The fourth nerve is also identified in its epidural course as it crosses over the oculomotor nerve. Adequate exposure of the course of the oculomotor nerve is better achieved if this plane is dissected along its posterolateral extension over the V1 and V2 segments of cranial nerve V, to the level of the ganglion. The space between V1 and V2 is a common area of bleeding controlled with Surgicel (Ethicon, Inc., Somerville, NJ) or Tisseel VH fibrin sealant (Baxter AG, Vienna, Austria).
The anterior clinoid process removal involves detaching its three bony connections39: the sphenoid bone over the superior orbital fissure, the roof of the optic canal, and the optic strut, usually performed with a 2- to 3-mm diamond drill bit.
The dura is cut in a curved T-shaped fashion, with the vertical arm of the T following the sphenoid wing indentation.39 The incision extends all the way to the entrance of the third nerve and into the oculomotor trigone. This allows for visualization of the third nerve both intradurally and extradurally and allows for increased mobilization of the nerve for exposure of the interpeduncular fossa and region of the posterior clinoid process. Also, releasing the nerve from the dural attachment makes it more tolerant of the mobilization.39 The subarachnoid dissection is similar to that presented for the transsylvian approach.
Krisht and associates34 reported their results using this technique for the treatment of 50 basilar apex aneurysms, which by their definition were complex. Half of the patients presented with SAH. Thirty-six patients were female and 14 were male, with a mean age of 52.2 years (32 to 76 years old). Ninety-eight percent (49 of 50) were successfully clipped without procedure-related mortality. Two deaths occurred—one from delayed bowel ischemia and a second from the effects of vasospasm. The investigators reported three ischemia-related events, of which two were procedural related. All patients experienced partial or complete cranial nerve III palsy, with full recovery in all but 1 patient. At discharge, the Glasgow Outcome Scale scores were 4 and 5 in 88% of patients; at the 6-month follow-up, the Rankin Outcome Scale scores were 0 to 2 in 92% of patients.34
Subtemporal Approach
Most basilar apex aneurysms that were treated by Drake were treated with a subtemporal approach.8 As outlined previously, several situations make this approach preferable to the transsylvian route. A right-sided approach usually is preferable to prevent damaging the dominant temporal lobe. Several circumstances make a left-sided approach more reasonable. A left cranial nerve III palsy or right hemiparesis favors a left-sided approach to avoid injury to the right cranial nerve III and cerebral peduncle. Occasionally, a tilt of the basilar apex can elevate one P1 segment significantly above the other. If the left PCA is significantly higher than the right PCA, a right-sided approach could risk trapping the left PCA in the blades.
CSF drainage is paramount to the success of this approach. When the subtemporal approach is used, we place a lumbar drain routinely in the operating room before positioning the patient. CSF drainage is particularly important after SAH. When positioning the Mayfield fixation device, the surgeon should always consider the possibility of needing to convert to a transsylvian approach; the ability to do this without redraping is obviously advantageous. After the Mayfield head frame has been positioned with one pin over the forehead and two pins over the occiput, we place the patient on the side and allow the dependent arm to rest in a sling. We use gel pads to protect the axilla. The chest area, hips, and legs are appropriately padded and taped to the operating table (Fig. 373-8). After the patient is well positioned, we elevate the head slightly and then tilt the vertex 10 to 20 degrees below horizontal to allow the temporal lobe to fall away from the middle fossa floor, minimizing retraction and maximizing the working space.
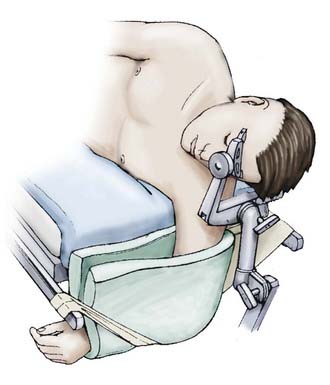
FIGURE 373-8 Positioning for a subtemporal approach.
(From Apuzzo MLF, ed. Brain Surgery: Complications, Avoidance and Management. New York: Churchill Livingstone; 1993.)
For unruptured aneurysms, we use a straight incision, which extends 10 cm up from a point 1 cm anterior to the tragus (Fig. 373-9). The craniotomy is then based over the zygomatic root and has a diameter of about 3.5 cm. For patients with recent SAH, we favor a larger craniotomy. We use an upside-down horseshoe incision and then perform a craniotomy in addition to an anterior craniectomy (Fig. 373-10). The wider exposure allows inferior temporal gyrus resection if it is needed for further exposure. Resection of bone down to the floor of the middle fossa minimizes the need for brain retraction. After the craniotomy, the dura is opened in a cruciate fashion such that the inferior limb can be secured inferiorly to minimize extradural bleeding and maximize exposure (Fig. 373-11). Hyperventilation, diuresis, and lumbar drainage often result in sufficient brain relaxation to maneuver subtemporally. In patients with a recent hemorrhage, these maneuvers may not be sufficient. In this situation, we have frequently resected the inferior temporal gyrus with the fusiform and parahippocampal gyri. We have not noticed any increased morbidity associated with this method, and the resulting exposure is usually excellent. When resorting to this resection, we have found it helpful to leave the medial pia-arachnoid tissue to serve as an anchor for the retractor. When the uncus is elevated, cranial nerve III elevates with the uncus. To further enhance exposure, we place a tentorial stitch as advocated by Drake.8 This stitch is placed posterior to the dural insertion of cranial nerve IV. For an extremely low-lying aneurysm, splitting the tentorium may be necessary. Bleeding can be minimized by aggressively coagulating the tentorium over the incision site and by placing small pieces of cotton in the dural leaflets with a nerve hook.
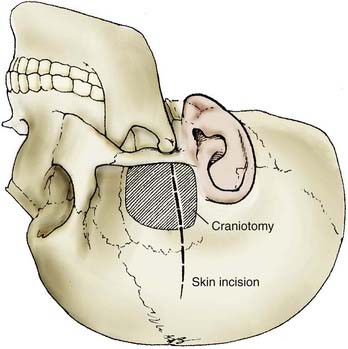
FIGURE 373-9 Skin incision and craniotomy for a subtemporal approach for an unruptured aneurysm.
(From Apuzzo MLF, ed. Brain Surgery: Complications, Avoidance and Management. New York: Churchill Livingstone; 1993.)
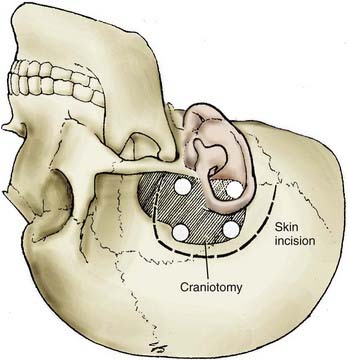
FIGURE 373-10 Skin incision and craniotomy for a subtemporal approach for a ruptured aneurysm.
(From Apuzzo MLF, ed. Brain Surgery: Complications, Avoidance and Management. New York: Churchill Livingstone; 1993.)
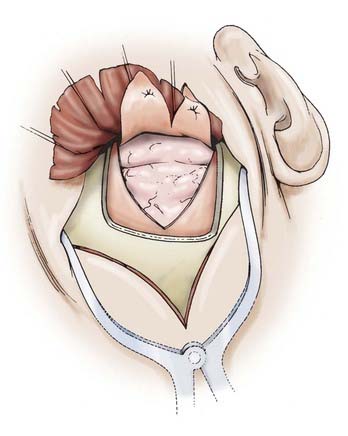
FIGURE 373-11 Dura tacked up for a subtemporal exposure.
(From Apuzzo MLF, ed. Brain Surgery: Complications, Avoidance and Management. New York: Churchill Livingstone; 1993.)
After the anterior aspect of the basilar artery and both P1 origins have been identified and dissected free of arachnoid adhesions and blood, attention is turned to the posterior aspect of the aneurysm complex. Perforators emanating from the posterior wall of the basilar artery are often adherent to the neck and must be dissected free. This dissection is best started at the ipsilateral P1 and carried to the contralateral P1. The goal of this dissection is to create room for safe application of an aneurysm clip. Clip length should match the neck length as closely as possible because excessively long clips risk occluding medial perforators emanating from the contralateral P1. Short-bladed fenestrated clips are almost always used, with the P1 included in the fenestration. Conventional clips are appropriate for apex aneurysms projecting straight anteriorly or posteriorly. Although anteriorly projecting aneurysms may obscure the contralateral P1, the contralateral P1 occasionally can be visualized during the final phase of clip closure. Control of the microscope with the mouthpiece allows subtle maneuvering that can enhance visualization on both sides of the aneurysm during clip closure. The advantages of the subtemporal approach include the ease of visualization of posterior perforators and the ease of proximal control.22 The disadvantages of the approach include difficult access to the contralateral P1, which may be important for trapping or for inspection of the P1 perforators; the narrow field of view; and difficulty using the technique when the brain is swollen after SAH.22
Pterional Approach through the Extended Lateral Corridor
The main limitation of the subtemporal approach is the limited ability to see the contralateral P1 and its medial perforators. In contrast, the transsylvian approach is limited by poor visualization of the posterior perforators of the basilar artery. In an effort to combine the advantages of the subtemporal and transsylvian approaches while minimizing the limitations of each, we have developed a modified approach, the pterional approach through the extended lateral corridor (PAVEL).22,40 This extended lateral exposure has eliminated most of the risks and liabilities of the pure transsylvian and subtemporal approaches, and we employ it for the treatment of most upper basilar aneurysms that are treated surgically. The essential elements of PAVEL include the following:
For this approach, the patient is positioned as for a pterional craniotomy. The head is rotated no more than 30 degrees away from the operative side to minimize the temporal lobe encroaching on the incisura. A frontotemporal scalp incision is extended down to the zygoma. The scalp is incised to the subgaleal plane but not through the temporalis fascia. As the scalp is reflected anteriorly in the subgaleal plane, we use an interfacial technique to identify the fat pad containing the frontalis branch of the facial nerve. This tissue is dissected away from the temporalis fascia to minimize retraction on the nerve. The temporalis muscle is divided along the zygoma, the anterior temporal squama, and the superior temporal line and reflected posteriorly, as described by Heros and Lee.41 These maneuvers minimize obstruction of the view along the skull base and usually obviate the need for a skull base approach such as the orbitozygomatic resection.
Cerebrospinal Fluid Drainage, Hyperventilation, and Diuresis
As with the traditional approaches, CSF drainage, hyperventilation, and diuresis are critical for maximizing the view of the basilar apex without excessive brain retraction. CSF drainage can be accomplished by lumbar drainage or intraoperative ventricular puncture. We use the previously described Paine’s point to accurately tap the ventricle.35
Timing of Treatment
The peak incidence of repeat hemorrhage after SAH occurs in the first 48 hours.42 The peak incidence of vasospasm occurs 7 to 10 days after SAH.43 Early surgery after SAH avoids the morbidity and mortality associated with repeat hemorrhage and allows aggressive medical and interventional management of vasospasm.43 However, certain patients with basilar apex aneurysms may be harmed by early surgery. It has been our practice to delay surgery in the high-grade patient (i.e., Hunt-Hess grades IV and V) for a few days unless acceptable occlusion with endovascular therapy is feasible. We have frequently considered endovascular treatment for patients with high clinical grades. Of the various approaches, we have found that the subtemporal approach is particularly not well tolerated soon after hemorrhage in the high-grade patient. We have occasionally used aminocaproic acid in patients for whom we delay surgery, particularly if the subarachnoid portion of the bleeding is modest.
Temporary Occlusion
Proximal occlusion and trapping have important roles in basilar apex aneurysm surgery. The application of cerebral protectants such as barbiturates or propofol to achieve burst suppression, coupled with mild hypothermia (32° to 34°C) has increased the safety of temporary occlusion.44,45 Temporary occlusion allows the surgeon to soften the sac sufficiently to visualize the posterior perforators and safely place a clip and to mobilize the sac out of the interpeduncular cistern for posteriorly projecting aneurysms. Proximal occlusion is often sufficient, and complete trapping is needed, as in the case of thrombotic giants. In this situation, an anterior approach is advantageous because the contralateral P1 can be well visualized. The amount of time available for temporary occlusion is not entirely clear and may vary and depend on complex parameters, which are not yet easily decipherable. In a study considering 121 patients, patient age older than 61 years and poor neurological grade (i.e., Hunt-Hess grades III and IV) were associated with decreased tolerance for temporary occlusion compared with younger patients and those with lower-grade disease. In this study, patients occluded for less than 14 minutes did not develop infarcts, whereas those occluded for more than 31 minutes routinely developed infarcts. Although not statistically significant, there was a trend toward more infarction for occlusions proximal to perforator segments of the M1 and basilar artery and for increasing episodes of temporary occlusion.
Complication Avoidance
Leaving neck remnants can result in delayed aneurysm growth and hemorrhage.46–49 Whenever feasible, a second, small “baby clip” should be used to occlude neck remnants or “dog ears.” When these remnants cannot be tackled safely, the patient should be followed with serial angiography. If the remnant can be occluded by endovascular approaches, this should be considered.37 Clear distinction should be made between neck remnants and dome remnants, which represent a more dangerous and unstable situation. Such situations should be managed promptly with reoperation,38,46,50 if deemed feasible, or with endovascular coiling.
Intraoperative rupture is perhaps the most notorious intraoperative complication in aneurysm surgery.51 This complication is particularly dangerous for basilar apex aneurysms. When rupture occurs, the patient should be placed in burst suppression if this has not already been done. Gentle tamponade with a small piece of cotton is often effective. If tamponade fails within several minutes, temporary occlusion should be seriously considered. Prophylactic temporary occlusion in our opinion also reduces the incidence of intraoperative rupture.45 The use of adenosine has been reported52 for inducing temporary asystole when treating an intracranial aneurysm, and we have employed this occasionally with good results.
Each of the described approaches has its own unique complications. The subtemporal approach can be associated with temporal lobe swelling and herniation postoperatively. Serious consideration should be given to partial anterior temporal lobectomy when the temporal lobe appears “boggy.” We think the subtemporal approach should be avoided in the acute setting in a patient with a high-grade aneurysm. The vein of Labbé should be respected with this approach. We have found that placing moist Gelfoam and cottonoids on the vein and its connection with the transverse or sigmoid sinus before retraction helps avoid injury. The transsylvian approach can be associated with kinking of the Ml and its branches, with resulting postoperative infarction.27 In treating giant aneurysms, we avoid overly aggressive evacuation of the sac because collapse of the large sac may injure perforators owing to an “accordion” phenomenon.
Endovascular Management of Basilar Apex Aneurysms
Aneurysm coiling for some aneurysms has improved the natural history of SAH during short-term follow-up.53,54 The data regarding the use of detachable coils in the management of basilar apex aneurysms has significantly increased. Lessons have been learned regarding the safety, efficacy, limitations, and durability of coiling in this area. Although safety data are encouraging, concern remains regarding recurrence and higher rates of rehemorrhage after coiling when compared with clipping. Endovascular treatment is mainly a function of the morphology of the basilar apex aneurysm. The three most important factors are aneurysm neck size, aneurysm size, and relationship to the PCA.29 In a study by Raymond and colleagues of 31 patients treated with detachable coils, 29% of wide-necked aneurysms had a significant rate of recurrence.55 Of patients with aneurysm necks less than 4 mm, 77% had complete aneurysm occlusion.55 In a nonselected study population with basilar apex aneurysms, Klein and colleagues56 produced PCA occlusion in five patients (24%). This study highlights the fact that PCA anatomy can prevent complete aneurysm occlusion in a significant number of patients.
The multicenter Cerebral Aneurysm Rerupture After Treatment (CARAT)57 study reported the outcomes of patients with ruptured intracranial aneurysms treated with coil embolization or surgical clipping for basilar apex aneurysms. The degree of aneurysm occlusion after treatment was evaluated as a predictor of nonprocedural rehemorrhage. Of 1001 patients, there were 19 postprocedural rehemorrhages, with 58% of these leading to death. Degree of aneurysm occlusion after treatment was strongly associated with risk for rehemorrhage. The rehemorrhage rate after complete occlusion was 1.1%; it was 2.9% for 91% to 99% occlusion, 5% for 70% to 90% occlusion, and 17.6% for less than 70% occlusion. The authors reported that the risk for rehemorrhage tended to be greater after coil embolization than after surgical clipping, 3.4% and 1.3%, respectively. Overall, the degree of occlusion after initial treatment is a strong predictor of the risk for rehemorrhage in patients presenting with SAH, justifying attempts to completely occlude aneurysms. To achieve complete aneurysm occlusion safely in a high percentage of patients, coiling should be limited to small aneurysms with neck sizes less than 4 mm and PCAs that do not originate from the dome.55,56,58
Conclusion
Achieving successful outcomes for patients with simple and complex aneurysms of the basilar apex requires thoughtful diagnostic work-up, careful preparation and development of a strategic plan, and a detailed microsurgical understanding of normal neuroanatomy and the patient’s specific anatomic variables. It is critical that multidisciplinary teams evaluate these patients.59 These aneurysms should not be treated at centers that are not identified as cerebrovascular centers, with all that entails. The time has passed when the focus was on the rhetoric of determining whether clipping or coiling was the superior option. Our understanding of these lesions and complications of therapy has taken us to a point at which cases can be analyzed critically and decisions highly individualized. Critical variables include patient age and therefore years of exposure to recurrence, clinical grade, neck width, size of the aneurysm, associated thrombosis, and anatomic variance.
Batjer H, Samson D. Intraoperative aneurysmal rupture: incidence, outcome, and suggestions for surgical management. Neurosurgery. 1986;18:701-707.
Batjer HH, Frankfurt AI, Purdy PD, et al. Use of etomidate, temporary arterial occlusion, and intraoperative angiography in surgical treatment of large and giant cerebral aneurysms. J Neurosurg. 1988;68:234-240.
Batjer HH, Samson DS. Causes of morbidity and mortality from surgery of aneurysms of the distal basilar artery. Neurosurgery. 1989;25:904-915.
Bendok BR, Ali MJ, Malisch TW, et al. Coiling of cerebral aneurysm remnants after clipping. Neurosurgery. 2002;51:693-697.
Bendok BR, Getch CC, Malisch TW, Batjer HH. Treatment of aneurysmal subarachnoid hemorrhage. Semin Neurol. 1998;18:521-531.
Bendok BR, Getch CC, Parkinson R, et al. Extended lateral transsylvian approach for basilar bifurcation aneurysms. Neurosurgery. 2004;55:174-178.
Ciacci J, Bendok B, Getch C, Batjer HH. Pterional approach to distal basilar aneurysms via the extended lateral corridor: PAVEL. Tech Neurosurg. 2000;6:221-227.
Drake CG. Bleeding aneurysms of the basilar artery: direct surgical management in four cases. J Neurosurg. 1961;18:230-238.
Drake CG. Ligation of the vertebral (unilateral or bilateral) or basilar artery in the treatment of large intracranial aneurysms. J Neurosurg. 1975;43:255-274.
Drake CG. The treatment of aneurysms of the posterior circulation. Clin Neurosurg. 1979;26:96-144.
Drake CG, Barr HW, Coles JC, Gergely NF. The use of extracorporeal circulation and profound hypothermia in the treatment of ruptured intracranial aneurysm. J Neurosurg. 1964;21:575-581.
Drake CG, Peerless SJ. Giant fusiform intracranial aneurysms: review of 120 patients treated surgically from 1965 to 1992. J Neurosurg. 1997;87:141-162.
Gross BA, Hage ZA, Daou M, et al. Surgical and endovascular treatments for intracranial aneurysms. Curr Treat Options Cardiovasc Med. 2008;10:241-252.
Heros RC, Lee SH. The combined pterional/anterior temporal approach for aneurysms of the upper basilar complex: technical report. Neurosurgery. 1993;33:244-250.
Hsu FP, Clatterbuck RE, Spetzler RF. Orbitozygomatic approach to basilar apex aneurysms. Neurosurgery. 2005;56:172-177.
Johnston SC, Dowd CF, Higashida RT, et al. Predictors of rehemorrhage after treatment of ruptured intracranial aneurysms: the cerebral aneurysm rerupture after treatment (carat) study. Stroke. 2008;39:120-125.
Krisht AF, Kadri PA. Surgical clipping of complex basilar apex aneurysms: a strategy for successful outcome using the pretemporal transzygomatic transcavernous approach. Neurosurgery. 2005;56:261-273.
Krisht AF, Krayenbuhl N, Sercl D, et al. Results of microsurgical clipping of 50 high complexity basilar apex aneurysms. Neurosurgery. 2007;60:242-250.
Lawton MT. Basilar apex aneurysms: surgical results and perspectives from an initial experience. Neurosurgery. 2002;50:1-8.
Paine JT, Batjer HH, Samson D. Intraoperative ventricular puncture. Neurosurgery. 1988;22:1107-1109.
Raymond J, Roy D, Bojanowski M, et al. Endovascular treatment of acutely ruptured and unruptured aneurysms of the basilar bifurcation. J Neurosurg. 1997;86:211-219.
Rice BJ, Peerless SJ, Drake CG. Surgical treatment of unruptured aneurysms of the posterior circulation. J Neurosurg. 1990;73:165-173.
Samson D, Batjer HH, Bowman G, et al. A clinical study of the parameters and effects of temporary arterial occlusion in the management of intracranial aneurysms. Neurosurgery. 1994;34:22-28.
Samson D, Batjer HH, Kopitnik TAJr. Current results of the surgical management of aneurysms of the basilar apex. Neurosurgery. 1999;44:697-702.
Vinuela F, Duckwiler G, Mawad M. Guglielmi detachable coil embolization of acute intracranial aneurysm: perioperative anatomical and clinical outcome in 403 patients. J Neurosurg. 1997;86:475-482.
1 Drake CG. Bleeding aneurysms of the basilar artery. Direct surgical management in four cases. J Neurosurg. 1961;18:230.
2 Drake CG. Surgical treatment of ruptured aneurysms of the basilar artery. Experience with 14 cases. J Neurosurg. 1965;23:457.
3 Drake CG. Further experience with surgical treatment of aneurysm of the basilar artery. J Neurosurg. 1968;29:372.
4 Drake CG. Ruptured intracranial aneurysms. Proc R Soc Med. 1971;64:477.
5 Drake CG. Ligation of the vertebral (unilateral or bilateral) or basilar artery in the treatment of large intracranial aneurysms. J Neurosurg. 1975;43:255.
6 Drake CG. Intracranial aneurysms. Acta Neurol Latinoam. 1977;23:43.
7 Drake CG. Advances in the neurosurgical treatment of aneurysms, arteriovenous malformations, and hematomas of the vertebral circulation. Adv Neurol. 1977;16:211.
8 Drake CG. The treatment of aneurysms of the posterior circulation. Clin Neurosurg. 1979;26:96.
9 Drake CG. Progress in cerebrovascular disease. Management of cerebral aneurysm. Stroke. 1981;12:273.
10 Drake CG, Allcock JM. Postoperative angiography and the “slipped” clip. J Neurosurg. 1973;39:683.
11 Drake CG, Barr HW, Coles JC, et al. The use of extracorporeal circulation and profound hypothermia in the treatment of ruptured intracranial aneurysm. J Neurosurg. 1964;21:575.
12 Drake CG, Peerless SJ. Giant fusiform intracranial aneurysms: review of 120 patients treated surgically from 1965 to 1992. J Neurosurg. 1997;87:141.
13 Peerless SJ, Drake CG. Management of aneurysms of the posterior circulation. In: Youmans J, editor. Neurological Surgery. A Comprehensive Reference Guide to the Diagnosis and Management of Neurosurgical Problems. 3rd ed. Philadelphia: WB Saunders; 1990:1764-1806.
14 Peerless SJ, Hernesniemi JA, Gutman FB, et al. Early surgery for ruptured vertebrobasilar aneurysms. J Neurosurg. 1994;80:643.
15 Lawton MT. Basilar apex aneurysms: surgical results and perspectives from an initial experience. Neurosurgery. 2002;50:1.
16 Samson D, Batjer HH, Kopitnik TAJr. Current results of the surgical management of aneurysms of the basilar apex. Neurosurgery. 1999;44:697.
17 Wascher T, Spetzler RF. Saccular aneurysms of the basilar bifurcation. In: Carter LP, Spetzler RF, Hamilton MG, editors. Neurovascular Surgery. New York: McGraw-Hill; 1995:729-752.
18 Rice BJ, Peerless SJ, Drake CG. Surgical treatment of unruptured aneurysms of the posterior circulation. J Neurosurg. 1990;73:165.
19 Lozier AP, Kim GH, Sciacca RR, et al. Microsurgical treatment of basilar apex aneurysms: perioperative and long-term clinical outcome. Neurosurgery. 2004;54:286.
20 Yasargil M, editor. Microneurosurgery. Stuttgart: George Thieme Verlag, 1984.
21 Froelich SC, Abdel Aziz KM, Cohen PD, et al. Microsurgical and endoscopic anatomy of Liliequist’s membrane: a complex and variable structure of the basal cisterns. Neurosurgery. 2008;63:ONS1.
22 Bendok BR, Getch CC, Parkinson R, et al. Extended lateral transsylvian approach for basilar bifurcation aneurysms. Neurosurgery. 2004;55:174.
23 Awad IA, Barrow DL. Giant Intracranial Aneurysms. Rolling Meadows: AANS; 1995.
24 Goto H, Watanabe K. A combined trans-sylvian and subtemporal approach for basilar bifurcation aneurysms. Clin Neurol Neurosurg. 1997;99(suppl 1):124.
25 Kopitnik TA, Batjer HH, Samson DS. Combined transsylvian-subtemporal exposure of cerebral aneurysms involving the basilar apex. Microsurgery. 1994;15:534.
26 Hsu FP, Clatterbuck RE, Spetzler RF. Orbitozygomatic approach to basilar apex aneurysms. Neurosurgery. 2005;56:172.
27 Zabramski JM, Kiris T, Sankhla SK, et al. Orbitozygomatic craniotomy. Technical note. J Neurosurg. 1998;89:336.
28 Gonzalez LF, Amin-Hanjani S, Bambakidis NC, et al. Skull base approaches to the basilar artery. Neurosurg Focus. 2005;19:E3.
29 Ferreira MAT, Tedeschi H, Wen HT, de Oliveira E. Posterior circulation aneurysms: guideline to management. Oper Tech Neurosurg. 2000;3:169.
30 Lawton MT, Spetzler RF. Surgical strategies for giant intracranial aneurysms. Neurosurg Clin N Am. 1998;9:725.
31 Youssef AS, Abdel Aziz KM, Kim EY, et al. The carotid-oculomotor window in exposure of upper basilar artery aneurysms: a cadaveric morphometric study. Neurosurgery. 2004;54:1181.
32 Chanda A, Nanda A. Anatomical study of the orbitozygomatic transsellar-transcavernous-transclinoidal approach to the basilar artery bifurcation. J Neurosurg. 2002;97:151.
33 Drake CG. The surgical treatment of aneurysms of the basilar artery. J Neurosurg. 1968;29:436.
34 Krisht AF, Krayenbuhl N, Sercl D, et al. Results of microsurgical clipping of 50 high complexity basilar apex aneurysms. Neurosurgery. 2007;60:242.
35 Paine JT, Batjer HH, Samson D. Intraoperative ventricular puncture. Neurosurgery. 1988;22:1107.
36 Post N, Russell SM, Jafar JJ. Role of uncal resection in optimizing transsylvian access to the basilar apex: cadaveric investigation and preliminary clinical experience in eight patients. Neurosurgery. 2005;56:274.
37 Bendok BR, Ali MJ, Malisch TW, et al. Coiling of cerebral aneurysm remnants after clipping. Neurosurgery. 2002;51:693.
38 Batjer HH, Samson DS. Reoperation for aneurysms and vascular malformations. Clin Neurosurg. 1992;39:140.
39 Krisht AF, Kadri PA. Surgical clipping of complex basilar apex aneurysms: a strategy for successful outcome using the pretemporal transzygomatic transcavernous approach. Neurosurgery. 2005;56:261.
40 Ciacci J, Bendok B, Getch C, et al. Pterional approach to distal basilar aneurysms via the extended lateral corridor: PAVEL. Tech Neurosurg. 2000;6:221.
41 Heros RC, Lee SH. The combined pterional/anterior temporal approach for aneurysms of the upper basilar complex: technical report. Neurosurgery. 1993;33:244.
42 Kassell NF, Torner JC. Aneurysmal rebleeding: a preliminary report from the Cooperative Aneurysm Study. Neurosurgery. 1983;13:479.
43 Bendok BR, Getch CC, Malisch TW, et al. Treatment of aneurysmal subarachnoid hemorrhage. Semin Neurol. 1998;18:521.
44 Batjer HH, Frankfurt AI, Purdy PD, et al. Use of etomidate, temporary arterial occlusion, and intraoperative angiography in surgical treatment of large and giant cerebral aneurysms. J Neurosurg. 1988;68:234.
45 Samson D, Batjer HH, Bowman G, et al. A clinical study of the parameters and effects of temporary arterial occlusion in the management of intracranial aneurysms. Neurosurgery. 1994;34:22.
46 Drake CG, Friedman AH, Peerless SJ. Failed aneurysm surgery. Reoperation in 115 cases. J Neurosurg. 1984;61:848.
47 Ebina K, Suzuki M, Andoh A, et al. Recurrence of cerebral aneurysm after initial neck clipping. Neurosurgery. 1982;11:764.
48 Feuerberg I, Lindquist C, Lindqvist M, et al. Natural history of postoperative aneurysm rests. J Neurosurg. 1987;66:30.
49 Lin T, Fox AJ, Drake CG. Regrowth of aneurysm sacs from residual neck following aneurysm clipping. J Neurosurg. 1989;70:556.
50 Giannotta SL, Litofsky NS. Reoperative management of intracranial aneurysms. J Neurosurg. 1995;83:387.
51 Batjer H, Samson D. Intraoperative aneurysmal rupture: incidence, outcome, and suggestions for surgical management. Neurosurgery. 1986;18:701.
52 Groff MW, Adams DC, Kahn RA, et al. Adenosine-induced transient asystole for management of a basilar artery aneurysm. Case report. J Neurosurg. 1999;91:687.
53 Graves VB, Strother CM, Duff TA, et al. Early treatment of ruptured aneurysms with Guglielmi detachable coils: effect on subsequent bleeding. Neurosurgery. 1995;37:640.
54 Vinuela F, Duckwiler G, Mawad M. Guglielmi detachable coil embolization of acute intracranial aneurysm: perioperative anatomical and clinical outcome in 403 patients. J Neurosurg. 1997;86:475.
55 Raymond J, Roy D, Bojanowski M, et al. Endovascular treatment of acutely ruptured and unruptured aneurysms of the basilar bifurcation. J Neurosurg. 1997;86:211.
56 Klein GE, Szolar DH, Leber KA, et al. Basilar tip aneurysm: endovascular treatment with Guglielmi detachable coils—midterm results. Radiology. 1997;205:191.
57 Johnston SC, Dowd CF, Higashida RT, et al. Predictors of rehemorrhage after treatment of ruptured intracranial aneurysms: the Cerebral Aneurysm Rerupture After Treatment (CARAT) study. Stroke. 2008;39:120.
58 Malisch TW, Guglielmi G, Vinuela F, et al. Intracranial aneurysms treated with the Guglielmi detachable coil: midterm clinical results in a consecutive series of 100 patients. J Neurosurg. 1997;87:176.
59 Gross BA, Hage ZA, Daou M, et al. Surgical and endovascular treatments for intracranial aneurysms. Curr Treat Options Cardiovasc Med. 2008;10:241.