[level-membership-for-plastic-reconstructive-surgery-category]
CHAPTER 50 Medial pedicle vertical mammaplasty
History
The inverted T inferior pedicle approach to breast reduction solved many problems.1 It was reliable and reproducible. It became the standard method in teaching programs and all residents finished their training being comfortable with its design and execution. Some surgeons in South America2,3 and Europe4–6 began describing procedures for breast reduction without an inframammary scar. The “vertical” approach to breast reduction became more popular but there were problems. Many surgeons felt that the inverted T procedure did not need “fixing”.
The superomedial vertical breast reduction7 solved some of the problems but it still seemed only applicable to moderate sized breast reductions. But the principles of separating the design of the pedicle, the parenchymal resection and the skin resection pattern however are applicable to all breast reductions. The controversy still persists as to which pedicle is best, what is the best approach to the tissue resection and which is the best skin resection design. The best procedure in the final analysis is that which each surgeon finds they can achieve the best result.
The vertical design involves a vertical wedge resection of breast tissue (and skin) whereas most inverted T patterns remove tissue (and skin) in a horizontal pattern. This vertical wedge excision allows the base to be narrowed and improves projection. The method described below uses the Wise pattern8 (not just the keyhole) as a good pattern of breast tissue that should remain behind after resection. All other breast tissue and fat should be removed either with direct excision or liposuction. Both the parenchyma and the skin should be closed without tension. This method also relies on excising the heavy inferior breast tissue so that bottoming out is less likely to occur.
Physical evaluation
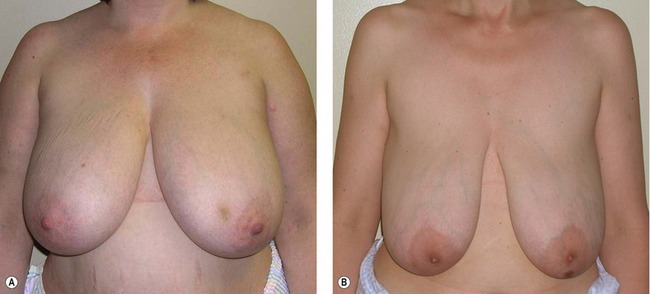
1. Assess the upper breast border. (Fig. 50.1A,B). This border will not change with the surgery. The distance from the clavicle to the upper breast border will determine whether the patient is “high-breasted” or “low-breasted”.
2. Assess the level of the inframammary fold. The fold level is quite variable from patient to patient. The fold can be raised to some degree with this procedure but an aggressive attempt to raise the fold will also increase the revision rate.
3. Assess the lateral breast border. If the breast is quite wide the parenchyma laterally will need to be excised and the breast coned in order to narrow the breast base.
4. Assess the amount of upper pole fullness. Some patients have unrealistic expectations about what surgeons can achieve – and sometimes the surgeons do as well. The amount of upper pole fullness can be rarely increased without the use of exogenous tissue such as an implant or fat injections.
5. Design the new nipple position relative to the upper breast border. The ideal nipple position should be determined preoperatively with the patient standing. For a “C” cup brassiere the new nipple should be about 10 cm below the upper breast border.
6. Use the Wise pattern for determination of final breast shape. The Wise pattern comes from a brassiere pattern and is not just about the keyhole design. The whole pattern is ideal for determining what should be left behind to get a good final shape. All tissue beyond the Wise pattern should be removed.
7. Close the breast pillars without undue tension. The tissue beyond the Wise pattern should be excised. The breast tissue should be excised directly and any fat beyond the breast tissue can be either directly excised or removed by liposuction. The pillars should be closed without tension. Neither the breast tissue nor the skin should be closed under tension or complications will increase and the shape will relapse.
Anatomy
The deep vessels come from the internal mammary system and perforate the pectoralis muscle usually just above the fifth rib (about 4–6 cm above the inframammary fold) and just medial to breast meridian. There are branches from this system which extend laterally in the septum described by Elisabeth Wuringer.9 The arteries are accompanied by venae comitantes. The deep system supplies an inferior and central pedicle.
The superficial system has been documented by Ian Taylor10 and the arteries and veins have been pushed into the superficial fatty layer as the breast enlarges. The arteries and veins travel separately and the veins are quite superficial and can be easily seen through the skin. They drain superiorly and medially which means that superior and medial pedicles are well supplied.
There are several nerves that supply sensation to the nipple and areola. The lateral branch of the fourth intercostal nerve is the main nerve but there are also medial nerves and some from the superior thoracoacromial system. The lateral branch of the fourth intercostal nerve has one branch that runs above the breast tissue toward the areola and a deep branch which runs along the pectoralis muscle and then runs vertically toward the areola at the breast meridian. This deep and superficial system is similar to the vascular supply. Maintaining a full thickness superomedial pedicle will preserve the deep branch of the nerve although the superficial lateral branch will be sacrificed.11 Superior and medial nerve branches will also be preserved. About 85% of patients with the superomedial pedicle will recover normal to near-normal sensation.
Technical steps
Marking
1. New nipple position (Fig. 50.2A,B). The key to marking is the upper breast border and evaluating the breast footprint on the chest wall. The upper breast border is the junction between the breast and the upper chest wall. It lies just below the pre-axillary fullness and the indentation below the pre-axillary fullness can be marked and carried medially. The breast meridian is then marked. It is not drawn through the existing nipple but drawn where the ideal nipple position should be. The new nipple position should then be placed on the new breast meridian about 8–10 cm below the upper breast border. This often corresponds with the level of the inframammary fold.
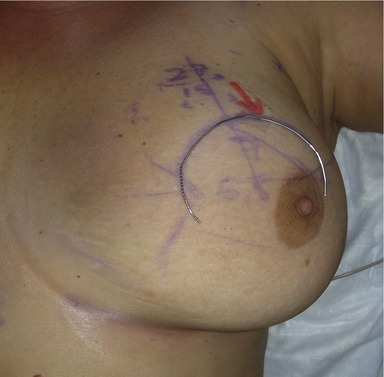
2. Areolar opening (Fig. 50.3). The top of the areola is then marked 2 cm above the new nipple position. The new areolar opening is drawn so that it will be a circle when it is closed. A good pattern is to use a large paper clip as a template. A large paper clip is 16 cm in length. This matches a 5 cm diameter areola. There is no need to make the opening in a “mosque” shape.
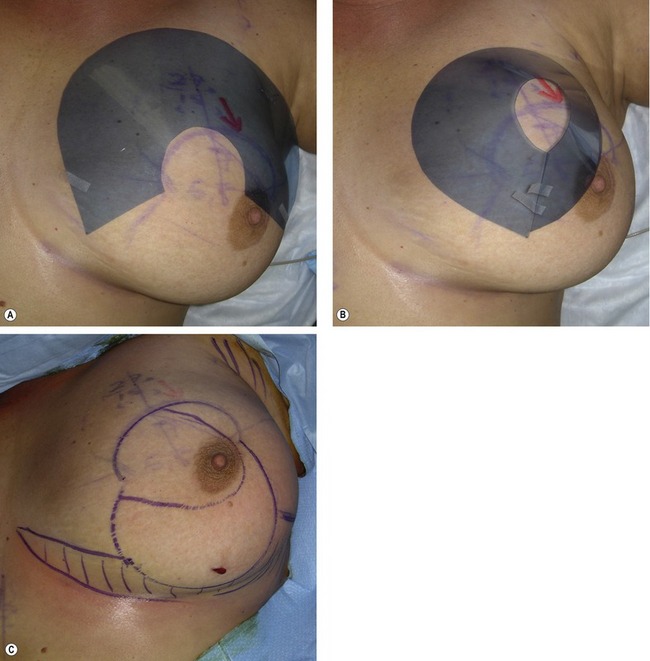
3. Skin resection pattern (Fig. 50.4A–C). The vertical limbs of a Wise pattern or keyhole opening are the same for a vertical design. Instead of extending the vertical limbs laterally and medially in an anchor pattern, the two vertical lines are joined together about 2–4 cm above the inframammary fold. The skin can then be pinched to make sure that enough skin is being left behind. It is important to make the lower portion of the skin resection pattern curved in a “U“ shape rather than in a “V“ otherwise there will be too much skin excess.
4. Pedicle design. A medial or superomedial pedicle can be designed. The easiest design to inset is one where the base of the pedicle is designed so that one half is in the areolar opening and one half is on the vertical limb.

Operative technique
1. Infiltration. The incisions are not infiltrated because the veins can be damaged. Infiltration with xylocaine and adrenalin is used for the areas (inferior breast, preaxillary fullness and lateral chest wall) that will be treated with liposuction. If a patient is overweight a tumescent type of infiltration will be used. The breast itself is not infiltrated.
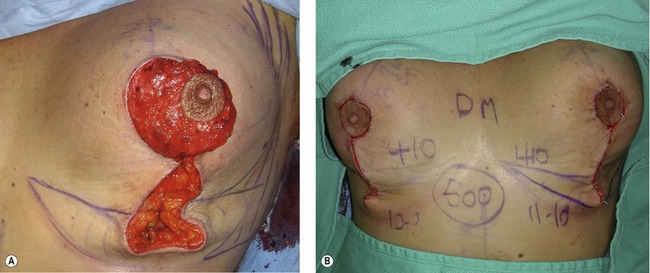
2. Creation of the pedicle (Fig. 50.5A). The pedicle is de-epithelialized leaving a cuff of dermis around the areola. The pedicle is created as a full thickness pedicle. The blood supply starts deep medially as it comes around the sternum from the internal mammary system. Because it then proceeds superficially as it approaches the areola the pedicle can be dermal or dermoglandular. A full thickness pedicle, however, will have better sensation and better breast feeding potential.
3. Parenchymal resection (Fig. 50.5B). The parenchyma is then resected en bloc by removing the tissue around the pedicle. The excision is carried straight down laterally to create the lateral pillar leaving it about 1–2 cm thick. The lateral excision is then beveled outward to remove breast tissue deep to the lateral flap. It is difficult to remove enough breast tissue with this technique and under-resection is a frequent complaint. The parenchyma is then beveled out inferiorly and medially as well as laterally. The best way to remove tissue is to visualize leaving a Wise pattern of tissue behind and to remove all the parenchyma – but not the skin – below the Wise pattern. This parenchyma can be directly excised and then tailored out by liposuction. It is best to leave tissue over the pectoralis muscle to avoid bleeding and to preserve the sensory nerves that pass just above the pectoralis fascia.
4. Closure of the pillars (Fig. 50.6A). It is easiest to begin by closing the base of the areolar opening with an absorbable suture such as 3-0 Monocryl. The pedicle can then be inset into place and the inferior border of the medial pedicle then becomes the medial pillar. The whole base of the pedicle rotates into position and this gives an elegant curve to the lower pole of the breast. The pillars correspond to the vertical limbs of the Wise pattern and they are best left at about 7 cm in a normal breast reduction. The pillars start usually about half way up the skin opening – not at either the inferior aspect of the skin opening or at the inframammary fold. Again, visualizing the Wise pattern for what is left behind will help visualize the ideal pillar design. The pillars are brought together without tension using about three sutures not much more than a centimeter or so deep to the skin surface. Large deep sutures are unnecessary – the pillars only need to be held together for a few weeks until they are healed together. There is no need to suture the breast tissue or the pillars up onto pectoralis fascia.
5. Closure of the deep dermis. The dermis is then closed with deep interrupted 3-0 Monocryl sutures. Only enough sutures are needed to achieve dermal to dermal apposition. Too many sutures will interfere with blood supply. Closure of the dermis allows the surgeon to visualize the Wise pattern and to better be able to determine where to perform liposuction. There is no need to suture dermis up onto the breast tissue. Suturing the lower end of the skin to the chest wall will only delay resolution. It will tuck in quite quickly as the weeks pass after surgery.
6. Liposuction tailoring. Most of the parenchyma is directly excised. Any breast tissue which has a fibrous element (especially laterally and some inferiorly) will need to be directly excised. Liposuction is not used for volume reduction but for tailoring beyond the areas of direct excision. This is usually in the inferior breast to allow the inframammary fold to curve up medially and laterally as well as the lateral chest wall and pre-axillary area. Puckers are often the result of residual subcutaneous tissue and not excess skin. It is important to remove all the tissue below the Wise pattern but it is also important to leave some fat on the undersurface of the remaining skin to prevent scar contracture.
7. Skin closure (Fig. 50.6B). The areola is closed with some interrupted sutures in the deep dermis and then a subcuticular suture. If the areola is not a complete circle some excess skin can be removed to create a circle prior to closure. The vertical skin is closed with a subcuticular suture that is not pulled tightly. Multiple deep bites will damage blood supply. Pleating or gathering the vertical incision is not only unnecessary, but it can cause delayed healing by constricting blood supply and it delays resolution of the final result. This vertical length will stretch back out if it is gathered.

Fig. 50.5 A, The pedicle is designed as a medially based pedicle. It is created as a full thickness pedicle straight down to the chest wall and it is very easy to inset without kinking or compression. B, The resected specimen has more tissue removed laterally, inferiorly and medially than the skin resection. The remaining skin will adapt to the new breast shape rather than acting as a brassiere.
Postoperative care
The final result of any procedure cannot be properly assessed until a full year has passed. The result at one year after a medial pedicle vertical breast reduction varies little after the first year (Fig. 50.7).
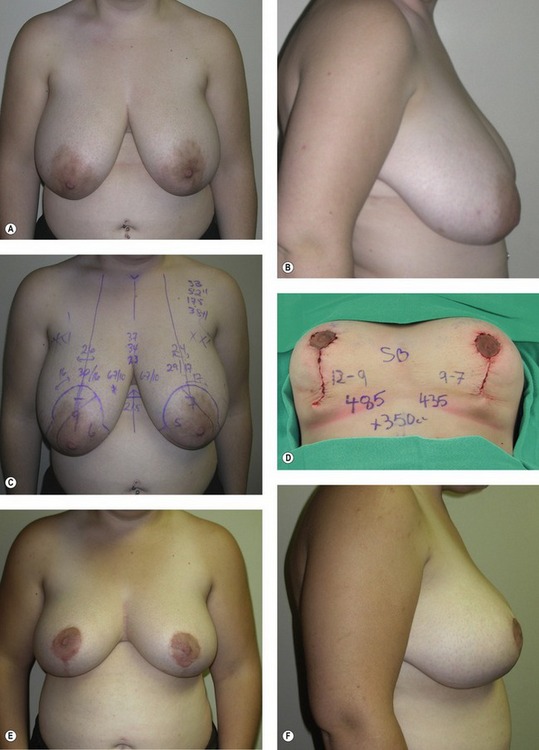
Fig. 50.7 A–F, This 20-year-old patient wore a 38 H brassiere and weighed 175 lb at 5 ft 2 in tall. She had a medial pedicle vertical breast reduction with 485 g removed from the right breast and 435 g from the left breast. Another 350 mL was removed by liposuction. The postoperative photos are shown at 2 years after surgery. She reported a complete return of nipple sensation.
Complications
The most common complication is a small pucker at the inferior end of the incision. This pucker is present at the end of the surgery but it disappears usually within the first few weeks after surgery. It will occasionally need to be corrected under local anesthesia in the office in about 5% of cases. Some surgeons will convert during surgery and add a small “T“ but this actually may not improve the revision rate.12
Pearls & pitfalls
Pearls
• It is important to note whether the patient is “high-breasted” or “low-breasted”.
• New nipple position is best determined in relation to the upper breast border.
• The parenchymal excision is a vertical rather than a horizontal wedge.
• The Wise pattern is a good design for the parenchymal (and not the skin) resection.
• Liposuction is used for tailoring beyond the Wise pattern.
Pitfalls
• Skin and pillar closure do not need to be tight.
• The skin excision should not be carried down to the IMF or the scar will end up on the chest wall.
• Tissue cannot be pushed up into the upper pole.
• Bottoming out is due to inadequate inferior resection.
• The pucker should not be sutured to the chest wall.
• It is often not necessary to add a “T“ to the skin excision.
Summary of steps
1. New nipple position and areola opening: The key to marking is the upper breast border and evaluating the breast footprint on the chest wall. The top of the areola is then marked 2 cm above the new nipple position.
2. Skin resection pattern: The vertical limbs of a Wise pattern or keyhole opening are the same for a vertical design.
3. Pedicle design: A medial or superomedial pedicle can be designed.
4. Infiltration: Infiltration with xylocaine and adrenalin is used for the areas (inferior breast, preaxillary fullness and lateral chest wall) that will be treated with liposuction. The breast itself is not infiltrated.
5. Creation of the pedicle: The pedicle is de-epithelialized leaving a cuff of dermis around the areola. The pedicle is created as a full thickness pedicle.
6. Parenchymal resection: The parenchyma is then resected en bloc by removing the tissue around the pedicle.
7. Closure of the pillars: It is easiest to begin by closing the base of the areolar opening with an absorbable suture such as 3-0 Monocryl. The pedicle can then be inset into place and the inferior border of the medial pedicle then becomes the medial pillar.
8. Closure of the deep dermis: The dermis is then closed with deep interrupted 3-0 Monocryl sutures. Only enough sutures are needed to achieve dermal to dermal apposition.
9. Liposuction tailoring: Most of the parenchyma is directly excised. Any breast tissue which has a fibrous element (especially laterally and some inferiorly) will need to be directly excised. Liposuction is not used for volume reduction but for tailoring beyond the areas of direct excision.
10. Skin closure: The areola is closed with some interrupted sutures in the deep dermis and then a subcuticular suture.
1. Courtiss EH, Goldwyn RM. Reduction mammaplasty by the inferior pedicle technique. An alternative to free nipple and areola grafting for severe macromastia or extreme ptosis. Plast Reconstr Surg. 1977;59:500.
2. Arie G. Una nueva tecnica de mastoplastia. Rev Iber Latino Am Cir Plast. 1957;3:28.
3. Peixoto G. Reduction mammaplasty: A personal technique. Plast Reconstr Surg. 1980;65:217.
4. Lassus C. A technique for breast reduction. Int Surg. 1970;53:69.
5. Marchac D, de Olarte G. Reduction mammaplasty and correction of ptosis with a short inframammary scar. Plast Reconstr Surg. 1982;69:45–55.
6. Lejour M, Abboud M, Declety A, Kertesz P. Reduction des cicatrices de plastie mammaire: De l’ancre courte a la verticale. Ann Chir Plast Esthet. 1990;35:369.
7. Hall-Findlay EJ. A simplified vertical reduction mammaplasty: Shortening the learning curve. Plast Reconstr Surg. 1999;104:748.
8. Wise RJ. A preliminary report on a method of planning the mammaplasty. Plast Reconstr Surg. 1956;17:367.
9. Wuringer E, Mader N, Posch E, Holle J. Nerve and vessel supplying ligamentous suspension of the mammary gland. Plast Reconstr Surg. 1998;101:1486.
10. Palmer JH, Taylor GI. The vascular territories of the anterior chest wall. Br J Plast Surg. 1986;39:287–299.
11. Schlenz I, Kuzbari R, Gruber H, Holle J. The sensitivity of the nipple-areola complex: An anatomic study. Plast Reconstr Surg. 2000;105:905–909.
12. Berthe J-V, Massaut J, Greuse M, Coessens B, De Mey A. The vertical mammaplasty: A reappraisal of the technique and its complications. Plast Reconstr Surg. 2003;111:2192–2199.
[/level-membership-for-plastic-reconstructive-surgery-category][not-level-membership-for-plastic-reconstructive-surgery-category]
CHAPTER 50 Medial pedicle vertical mammaplasty
History
The inverted T inferior pedicle approach to breast reduction solved many problems.1 It was reliable and reproducible. It became the standard method in teaching programs and all residents finished their training being comfortable with its design and execution. Some surgeons in South America2,3 and Europe4–6 began describing procedures for breast reduction without an inframammary scar. The “vertical” approach to breast reduction became more popular but there were problems. Many surgeons felt that the inverted T procedure did not need “fixing”.
The superomedial vertical breast reduction7 solved some of the problems but it still seemed only applicable to moderate sized breast reductions. But the principles of separating the design of the pedicle, the parenchymal resection and the skin resection pattern however are applicable to all breast reductions. The controversy still persists as to which pedicle is best, what is the best approach to the tissue resection and which is the best skin resection design. The best procedure in the final analysis is that which each surgeon finds they can achieve the best result.
The vertical design involves a vertical wedge resection of breast tissue (and skin) whereas most inverted T patterns remove tissue (and skin) in a horizontal pattern. This vertical wedge excision allows the base to be narrowed and improves projection. The method described below uses the Wise pattern8 (not just the keyhole) as a good pattern of breast tissue that should remain behind after resection. All other breast tissue and fat should be removed either with direct excision or liposuction. Both the parenchyma and the skin should be closed without tension. This method also relies on excising the heavy inferior breast tissue so that bottoming out is less likely to occur.
Physical evaluation
1. Assess the upper breast border. (Fig. 50.1A,B). This border will not change with the surgery. The distance from the clavicle to the upper breast border will determine whether the patient is “high-breasted” or “low-breasted”.
2. Assess the level of the inframammary fold. The fold level is quite variable from patient to patient. The fold can be raised to some degree with this procedure but an aggressive attempt to raise the fold will also increase the revision rate.
3. Assess the lateral breast border. If the breast is quite wide the parenchyma laterally will need to be excised and the breast coned in order to narrow the breast base.
4. Assess the amount of upper pole fullness. Some patients have unrealistic expectations about what surgeons can achieve – and sometimes the surgeons do as well. The amount of upper pole fullness can be rarely increased without the use of exogenous tissue such as an implant or fat injections.
5. Design the new nipple position relative to the upper breast border. The ideal nipple position should be determined preoperatively with the patient standing. For a “C” cup brassiere the new nipple should be about 10 cm below the upper breast border.
6. Use the Wise pattern for determination of final breast shape. The Wise pattern comes from a brassiere pattern and is not just about the keyhole design. The whole pattern is ideal for determining what should be left behind to get a good final shape. All tissue beyond the Wise pattern should be removed.
7. Close the breast pillars without undue tension. The tissue beyond the Wise pattern should be excised. The breast tissue should be excised directly and any fat beyond the breast tissue can be either directly excised or removed by liposuction. The pillars should be closed without tension. Neither the breast tissue nor the skin should be closed under tension or complications will increase and the shape will relapse.
Anatomy
The deep vessels come from the internal mammary system and perforate the pectoralis muscle usually just above the fifth rib (about 4–6 cm above the inframammary fold) and just medial to breast meridian. There are branches from this system which extend laterally in the septum described by Elisabeth Wuringer.9 The arteries are accompanied by venae comitantes. The deep system supplies an inferior and central pedicle.
The superficial system has been documented by Ian Taylor10 and the arteries and veins have been pushed into the superficial fatty layer as the breast enlarges. The arteries and veins travel separately and the veins are quite superficial and can be easily seen through the skin. They drain superiorly and medially which means that superior and medial pedicles are well supplied.
There are several nerves that supply sensation to the nipple and areola. The lateral branch of the fourth intercostal nerve is the main nerve but there are also medial nerves and some from the superior thoracoacromial system. The lateral branch of the fourth intercostal nerve has one branch that runs above the breast tissue toward the areola and a deep branch which runs along the pectoralis muscle and then runs vertically toward the areola at the breast meridian. This deep and superficial system is similar to the vascular supply. Maintaining a full thickness superomedial pedicle will preserve the deep branch of the nerve although the superficial lateral branch will be sacrificed.11 Superior and medial nerve branches will also be preserved. About 85% of patients with the superomedial pedicle will recover normal to near-normal sensation.
Technical steps
Marking
1. New nipple position (Fig. 50.2A,B). The key to marking is the upper breast border and evaluating the breast footprint on the chest wall. The upper breast border is the junction between the breast and the upper chest wall. It lies just below the pre-axillary fullness and the indentation below the pre-axillary fullness can be marked and carried medially. The breast meridian is then marked. It is not drawn through the existing nipple but drawn where the ideal nipple position should be. The new nipple position should then be placed on the new breast meridian about 8–10 cm below the upper breast border. This often corresponds with the level of the inframammary fold.
2. Areolar opening (Fig. 50.3). The top of the areola is then marked 2 cm above the new nipple position. The new areolar opening is drawn so that it will be a circle when it is closed. A good pattern is to use a large paper clip as a template. A large paper clip is 16 cm in length. This matches a 5 cm diameter areola. There is no need to make the opening in a “mosque” shape.
3. Skin resection pattern (Fig. 50.4A–C
[/not-level-membership-for-plastic-reconstructive-surgery-category]
