[level-membership-for-plastic-reconstructive-surgery-category]
CHAPTER 48 Mastopexy with and without augmentation
Physical evaluation
• Measure breast width and upper pole pinch thickness.
• Assess for nipple ptosis by noting nipple position relative to inframammary fold.
• Assess for glandular ptosis by measuring centimeters of breast hanging below the inframammary fold.
• Assess for presence of unpigmented skin below the areola with the patient upright on frontal view.
• Assess overall breast skin quality, skin stretch, masses, and previous scars.
• Assess for any chest wall abnormalities such as pectus excavatum, pectus carinatum, thoracic hypoplasia, etc.
• Assess for any evidence of a tuberous breast deformity including constriction of the breast in the horizontal or vertical dimensions and herniation of the areola.
• Take note of asymmetries preoperatively including inframammary folds, breast volume, nipple position, ptosis, and chest wall.
Technical steps
Mastopexy without augmentation and mastopexy with augmentation are really two different procedures and we will address them separately, although some principles do overlap. Both procedures aim to raise the breast gland and the nipple in relation to the chest wall. Mastopexy with augmentation is more complicated since there are more variables related to implant selection and position. In addition, mastopexy with augmentation is more likely to disrupt the blood supply to the nipple due to more extensive undermining and it is more likely to require revision.
Preoperative assessment
Marking
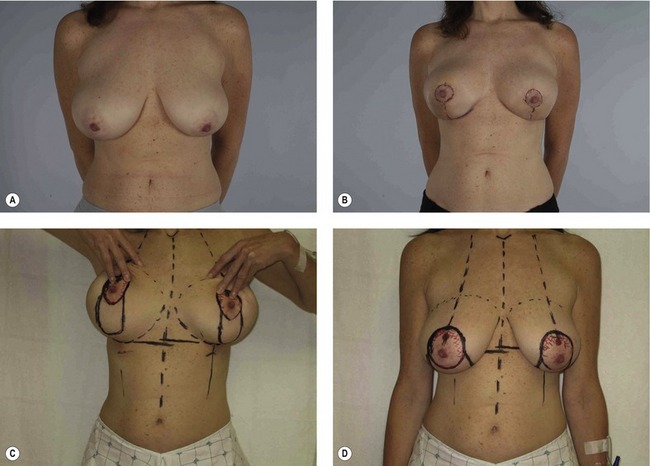
The patient is marked while standing, often on the day prior to surgery. Midline, bilateral breast meridians, and inframammary folds are marked (Fig. 48.1). Nipple height is usually set at or just above the level of the inframammary fold in mastopexy patients, but up to 4 cm higher than the fold in mastopexy with augmentation patients in order to center the nipple and breast over the implant. Based around the selected nipple position, a circumareolar pattern is drawn either free hand or using the circular portion of a Wise pattern ring. The superior aspect of the circumareolar marking should be 2 cm above the new nipple position. The lateral, medial, and inferior markings should skirt the areola creating an oval that includes the existing areola.
Mastopexy procedure
The areola is incised at a diameter of 38 to 50 mm, but most often at a diameter of 42 mm. The circumvertical incisions are made along the preoperative markings. The intervening skin is de-epithelialized. Skin along the lower half of the breast is then widely undermined leaving approximately 5 mm of fat on the skin flaps to preserve blood supply, similar to mastectomy skin flaps. Skin is undermined laterally, medially, and inferiorly down to the inframammary fold. Dissection is continued deep to the breast gland over the pectoralis major muscle along the lower half of the breast in order to deliver the lower pole of the breast through the vertical incision (Fig. 48.2).
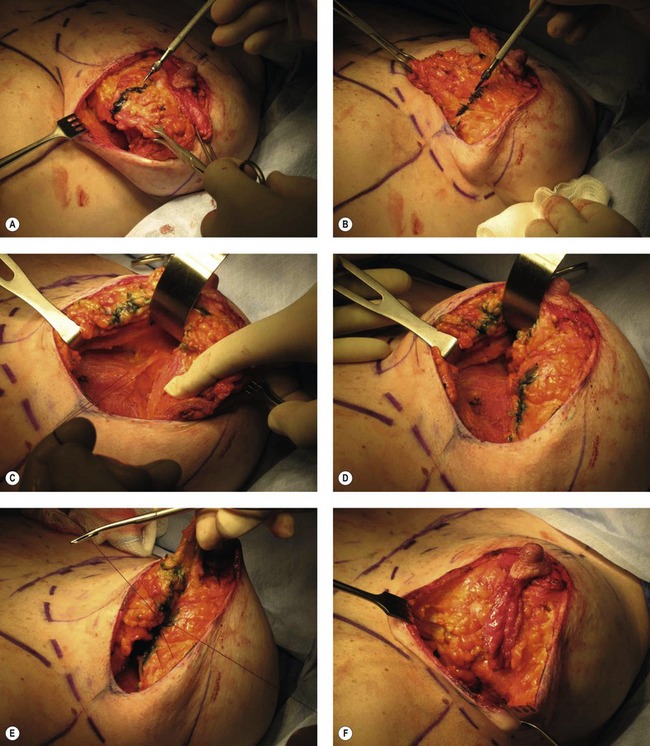
Fig. 48.2 Technique of circumvertical mastopexy on the same patient as Fig. 48.1, left breast. A, The lower pole breast skin has been undermined and breast gland has been delivered. The lower pole breast gland is displaced laterally and marked in line with the breast meridian marking on the chest wall below the inframammary fold. B, The breast gland is then displaced medially and marked similarly in line with the stable breast meridian marking on the chest wall. This defines a wedge of lower pole breast gland which is then freed from the surrounding tissue except laterally where it remains connected to the remainder of the breast gland. C, A subglandular pocket is created to accept the wedge of breast gland and a suture is placed through the pectoralis major fascia. D, The wedge of breast tissue is rotated medially and superiorly into the pocket and secured with the suture. E, Lateral and medial pillars were created by separating the wedge from the adjacent tissues. The pillars are approximated to each other with suture. F, The resulting breast shape is narrowed, lifted, and more projecting.
The patient is placed in the sitting position to assess for symmetry, nipple position, shape, volume, and skin excess. Additional tailor tacking of the skin is performed to reduce the skin envelope if necessary. We almost always add a horizontal excision of skin along the inframammary fold at this time in order to avoid a dog ear from the vertical incision and to reduce the nipple to fold distance. We typically aim for a nipple to fold distance of at least 6–8 cm (Fig. 48.3).
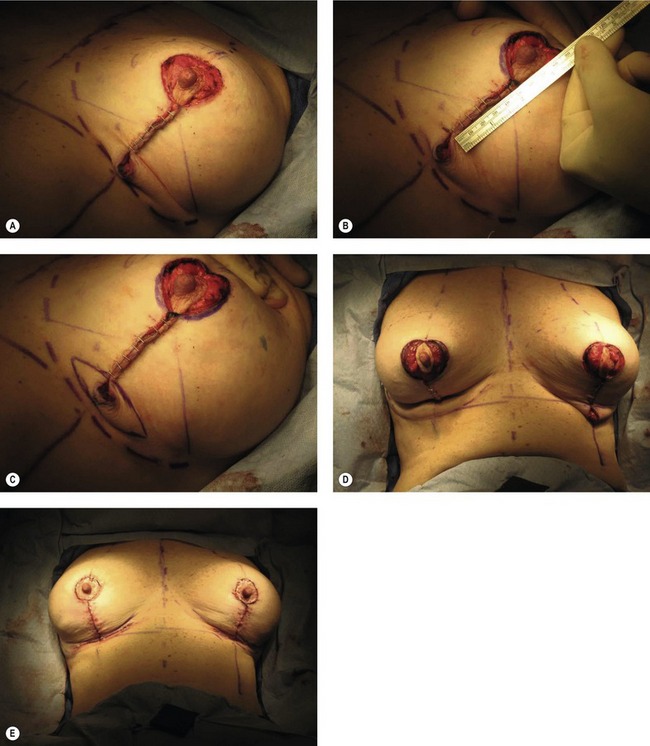
Fig. 48.3 A, Vertical closure is tailor-tacked. B, Distance of 6 cm is marked inferiorly from the areola/skin margin to decide on redundant skin along the inframammary fold. C, The ellipse of skin to be excised along the inframammary fold to remove the dog ear and decrease the nipple to fold distance. D, The patient is placed in the sitting position to confirm the planned skin resection along the inframammary fold. Areola aperture is also measured and compared to the contralateral side at this point. E, Patient in sitting position after excision of inframammary fold skin bilaterally and closure. Notice that there is absolutely no breast ptosis.
The circumareolar skin edges are undermined by approximately 1 cm in a superficial plane just deep to the dermis in order to avoid compromising blood supply to the nipple. The circumareolar incision is closed to the areola with an interlocking purse string suture of Gortex CV-3 or CV-4 (as described by Hammond) followed by interrupted and running dermal 3-0 Monocryl. The vertical and horizontal incisions are closed with interrupted and running 3-0 Monocryl. Incisions are dressed with either Dermabond or Tegaderm.
Mastopexy with augmentation procedure
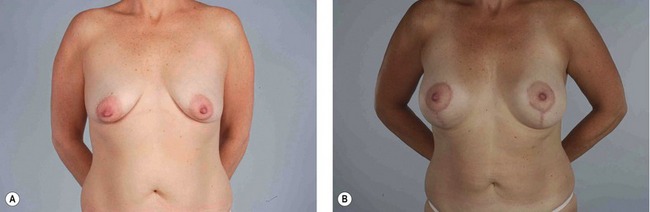
Similar to the procedure described above for the mastopexy only patients, the circumareolar aperture is measured and compared to the contralateral side. Adjustments in the skin envelope are made as needed. Typically, only a small amount of vertical skin needs to be excised and this is usually done in the shape of a “V” with the tip of the “V” pointing at the inframammary fold and the open ends of the “V” joining the circumareolar incision. Minimal undermining of the lower pole of the breast is performed in mastopexy with augmentation patients in order to prevent compromise of nipple blood supply. Undermining in these patients typically extends only 1 cm from the skin edges at a subdermal level. Skin and areolar closure are performed similar to the mastopexy only patients. A representative patient before and after surgery is shown in Fig. 48.4.
Postoperative care
Patients are placed in a soft sports bra with a front zipper immediately after surgery. The sports bra is continued for comfort as tolerated for 1–2 weeks. In those cases where anatomic implants are used, a strap is placed superior to the implants to prevent rotation for 1–2 weeks. In cases where the inframammary fold is significantly elevated or where concern for implant bottoming out exists, an underwire bra is used instead of the sports bra starting on postoperative day one. Patients are allowed to shower the night of their surgery. Patients are instructed to avoid heavy exercise or lifting for 2 weeks after surgery.
Complications
Pearls & pitfalls
Pearls
• The goal of a mastopexy procedure is to improve breast ptosis by lifting the breast including the gland and the nipple.
• Ptosis can be categorized by assessing the extent of breast gland below the inframammary fold while also assessing the nipple position on the gland.
• Patients who desire upper pole fullness and/or volume beyond their current size should consider augmentation in addition to mastopexy.
Pitfalls
• Mastopexy with augmentation patients may have high revision rates to correct latrogenic asymmetries or residual ptosis.
• The procedures we have described are not ideal for severely ptotic breasts such as in massive weight loss patients. These patients may benefit from a more traditional Wise pattern mastopexy with augmentation from autologous tissue in one stage or augmentation with an implant at second stage.
Summary of steps
1. Preoperative assessment. In particular, note asymmetries, ptosis, visible skin below areola. Also, develop a clear understanding of the patient’s goals. Specifically, discuss volume and breast shape goals to help decide whether or not to use an implant.
2. Preoperative marking. This is a critical component of the surgery. New nipple height is set at the level of the inframammary fold. Remember that nipple height should be set higher for patients receiving implants in order to center the nipple over the new breast mound.
Mastopexy procedure steps
3. The areola is marked and incised. Circumvertical incisions are also made at this time. Intervening skin is de-epithelialized.
4. The skin over the lower half of breast is completely undermined at the subcutaneous level leaving approximately 5 mm of fat on the skin.
5. The lower half of the breast gland is delivered through the vertical incision. The lower pole of the breast gland is displaced medially and laterally and then marked with methylene blue where it lines up with the meridian of the breast during displacement. This results in two radial marks on the lower pole of the breast that define a wedge.
6. The wedge is separated from the surrounding tissue except laterally where it remains attached to the lateral part of the breast gland to maintain its blood supply.
7. A subglandular pocket is dissected centrally under the breast over the pectoralis muscle to accept the wedge. The wedge of breast gland is rotated superiorly into this pocket and secured to the pectoralis muscle fascia with 2-0 PDS suture.
8. The medial and lateral pillars of breast gland are sewn together with 2-0 PDS suture to narrow the breast and increase projection.
9. Overlying skin is tailor tacked with staples along the vertical incision.
10. The diameter of the nipple areola complex aperture should be measured and compared to the contralateral side. Each diameter should measure approximately 6 cm. Adjustments can be made by removing skin along the vertical incision.
11. The patient is placed in the sitting position to assess for symmetry, nipple position, shape, volume, and skin excess. Additional tailor tacking is then performed to reduce skin envelope. A horizontal skin excision along the inframammary fold is performed to eliminate the dog ear from the vertical incision if needed.
12. Circumareolar skin edges are undermined by approximately 1 cm at a superficial plane just deep to the dermis. This superficial plane avoids compromising blood supply to the nipple areola complex.
13. The circumareolar closure is performed with an interlocking purse string suture with CV-3 or CV-4 Gortex followed by running dermal 3-0 Monocryl. Vertical and horizontal incisions are closed with running and interrupted 3-0 Monocryl in the dermis.
Mastopexy with augmentation procedure steps
3. The areola is marked and incised. Circumareolar incisions are made conservatively in order to avoid over resection of skin. Intervening skin is de-epithelialized. Vertical incisions are not made at this time unless the surgeon is certain that skin resection will be required in the vertical dimension.
4. An incision is made through the breast gland in order to create the implant pocket. This incision is typically made along the lower border of the areola. Once again, in cases where a vertical skin excision is certain, a vertical incision through the breast gland can be used instead of a periareolar incision to create the implant pocket.
5. If subpectoral placement of an implant is preferred, the gland is elevated off of the muscle inferior to the level of the nipple. Then the pectoralis major muscle is elevated off of the chest wall and released along the inferior origin. This creates a dual-plane pocket. If a subglandular pocket is preferred, such a pocket is created.
6. An implant is placed into the dual-plane subpectoral pocket or subglandular pocket. A sizer may be useful in cases of significant asymmetry.
7. The breast gland is closed over the implant with interrupted 2-0 PDS suture.
Benelli L. A new periareolar mammaplasty: the “round block” technique. Aesthet Plast Surg. 1990;14(2):93–100.
Goes JC. Periareolar mammaplasty: double skin technique with application of polyglactine or mixed mesh. Plast Reconstr Surg. 1996;97(5):959–968.
Gonzalez-Ulloa M. Correction of hypotrophy of the breast by means of exogenous material. Plast Reconstr Surg. 1960;25:15–26.
Goulian D. Dermal mastopexy. Clin Plast Surg. 1976;3(2):171–175.
Graf R, Biggs TM. In search of better shape in mastopexy and reduction mammoplasty. Plast Reconstr Surg. 2002;110(1):309–317.
Hammond DC, Khuthaila DK, Kim J. The interlocking Gore-Tex suture for control of areolar diameter and shape. Plast Reconstr Surg. 2007;119(3):804–809.
Lassus C. A 30-year experience with vertical mammaplasty. Plast Reconstr Surg. 1996;97(2):373–380.
Lejour M. Vertical mammaplasty and liposuction of the breast. Plast Reconstr Surg. 1994;94(1):100–114.
Marchac D, de Olarte G. Reduction mammaplasty and correction of ptosis with a short inframammary scar. Plast Reconstr Surg. 1982;69(1):45–55.
Regnault P. Breast ptosis. Definition and treatment. Clin Plast Surg. 1976;3(2):193–203.
Spear SL, Boehmler JH, Clemens MW. Augmentation/mastopexy: a 3-year review of a single surgeon’s practice. Plast Reconstr Surg, 2006:136S–147S.
Spear SL, Kassan M, Little JW. Guidelines in concentric mastopexy. Plast Reconstr Surg. 1990;85(6):961–966.
Whidden PG. The tailor-tack mastopexy. Plast Reconstr Surg. 1978;62(3):347–354.
Wise RJ. A preliminary report on a method of planning the mammaplasty. Plast Reconstr Surg. 1956;17(5):367–375.
[/level-membership-for-plastic-reconstructive-surgery-category][not-level-membership-for-plastic-reconstructive-surgery-category]
CHAPTER 48 Mastopexy with and without augmentation
Physical evaluation
• Measure breast width and upper pole pinch thickness.
• Assess for nipple ptosis by noting nipple position relative to inframammary fold.
• Assess for glandular ptosis by measuring centimeters of breast hanging below the inframammary fold.
• Assess for presence of unpigmented skin below the areola with the patient upright on frontal view.
• Assess overall breast skin quality, skin stretch, masses, and previous scars.
• Assess for any chest wall abnormalities such as pectus excavatum, pectus carinatum, thoracic hypoplasia, etc.
• Assess for any evidence of a tuberous breast deformity including constriction of the breast in the horizontal or vertical dimensions and herniation of the areola.
• Take note of asymmetries preoperatively including inframammary folds, breast volume, nipple position, ptosis, and chest wall.
Technical steps
Mastopexy without augmentation and mastopexy with augmentation are really two different procedures and we will address them separately, although some principles do overlap. Both procedures aim to raise the breast gland and the nipple in relation to the chest wall. Mastopexy with augmentation is more complicated since there are more variables related to implant selection and position. In addition, mastopexy with augmentation is more likely to disrupt the blood supply to the nipple due to more extensive undermining and it is more likely to require revision.
Preoperative assessment
Marking
The patient is marked while standing, often on the day prior to surgery. Midline, bilateral breast meridians, and inframammary folds are marked (Fig. 48.1). Nipple height is usually set at or just above the level of the inframammary fold in mastopexy patients, but up to 4 cm higher than the fold in mastopexy with augmentation patients in order to center the nipple and breast over the implant. Based around the selected nipple position, a circumareolar pattern is drawn either free hand or using the circular portion of a Wise pattern ring. The superior aspect of the circumareolar marking should be 2 cm above the new nipple position. The lateral, medial, and inferior markings should skirt the areola creating an oval that includes the existing areola.
