[level-membership-for-orthopaedics-category]CHAPTER 8
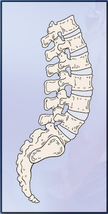
LUMBAR SPINE
SELECTED MOVEMENTS

McKenzie1 recommended repeating the active movements, especially flexion and extension, 10 times to see whether the movement increases or decreases the symptoms.
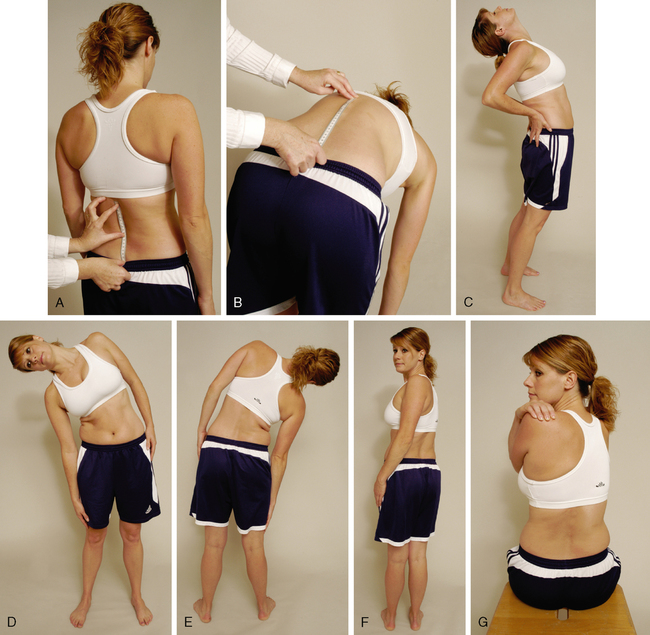
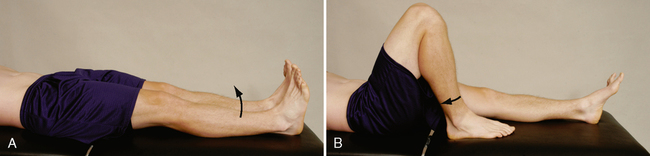
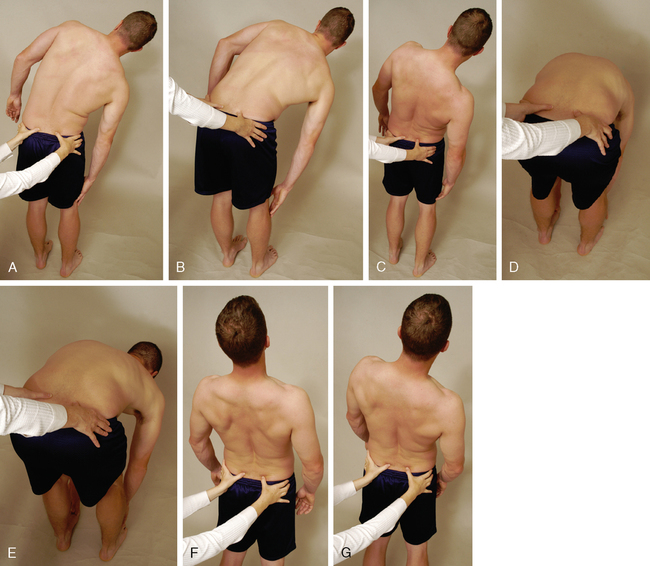
• On forward flexion, the lumbar spine should move from its normal lordotic curvature to at least a straight or slightly flexed curve. If this change does not occur, some hypomobility probably is present in the lumbar spine either from tight structures or muscle spasm.
• In a patient with no back pain, when returning to the upright posture from forward flexion, the person first rotates the hips and pelvis to about 45° of flexion; during the last 45° of extension, the low back resumes its lordosis.
• In a patient with back pain, most movement usually occurs in the hips, accompanied by knee flexion; in some cases, the patient also uses hand support, working up the thighs.
• The examiner must differentiate the movement that occurs in the lumbar spine from that occurring in the hips or thoracic spine. Some patients can touch their toes by flexing the hips, even if no movement occurs in the spine. The degree of injury also has an effect. For example, the more severely a disc is injured (e.g., if sequestration has occurred rather than a protrusion), the greater is the limitation of movement.
• Often, an “instability jog” may be seen during one or more movements, especially flexion, returning to neutral from flexion, or side flexion. An instability jog is a sudden movement shift or rippling of the muscles during active movement, which indicates an unstable segment.
• Similarly, muscle twitching during movement or complaints of something “slipping out” during lumbar spine movement may indicate instability.
• If the patient bends one or both knees on forward flexion, the examiner should watch for nerve root symptoms or tight hamstrings, especially if spinal flexion is decreased when the knees are straight.
INDICATIONS OF A POSITIVE TEST
Extension (backward bending) normally is limited to 20° to 35° in the lumbar spine.
• Bourdillon and Day2 recommend having the patient do this movement in the prone-lying position to hyperextend the spine. They called the resulting position the “sphinx position.” The patient hyperextends the spine by resting on the elbows with the hands holding the chin and allows the abdominal wall to relax. The position is held for 10 to 20 seconds to see whether symptoms occur or worsen if already present.
• Although the patient usually is in the standing position, rotation may be performed while the patient is sitting to eliminate or decrease pelvic and hip movement. If the patient stands, the examiner must take care to watch for this accessory movement and try to eliminate it by stabilizing the pelvis.
• If a movement (e.g., side flexion) toward the painful side increases the symptoms, the lesion is probably intra-articular, because the muscles and ligaments on that side are relaxed.
• If a disc protrusion is present and lateral to the nerve root, side flexion to the painful side increases the pain and radicular symptoms on that side.
• If a movement (e.g., side flexion) away from the painful side alters the symptoms, the lesion may be articular or muscular in origin, or it may be a disc protrusion medial to the nerve root.
• In the spine, the movement of side flexion is a coupled movement with rotation. Because of the position of the lumbar facet joints, side flexion and rotation occur together, although the amount and direction of movement may not be the same.
• Patients often deviate into forward flexion instead of remaining in true side flexion. To prevent this, the patient can be cued to run the hand down the back of the thigh instead of the side of the thigh.
TRENDELENBURG’S TEST (MODIFIED) 
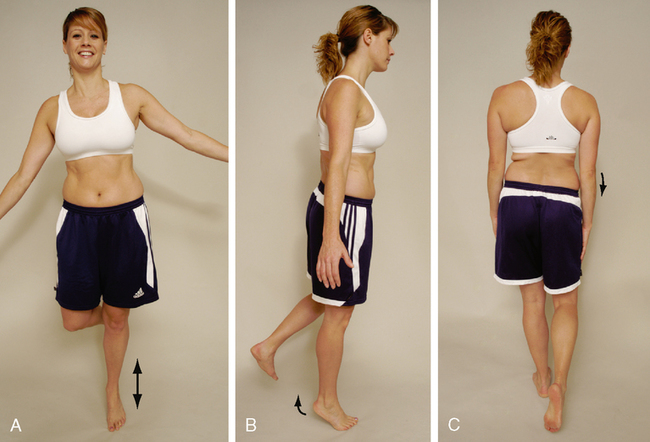
• This is, in effect, a modified Trendelenburg’s test. A weak gluteus medius muscle or a coxa vara (abnormal shaft-neck angle of the femur) on the stance leg side may produce a positive sign on the nonstance side.
• The examiner should look for patient compensations when completing the test. The most common compensation is trunk side flexion toward the stance leg. The patient side flexes to move his or her center of gravity over the stance leg, thus decreasing the demand on the gluteus medius. Therefore, the test may appear normal because the ilium responds normally, but if the side flexion is corrected, the positive response occurs.

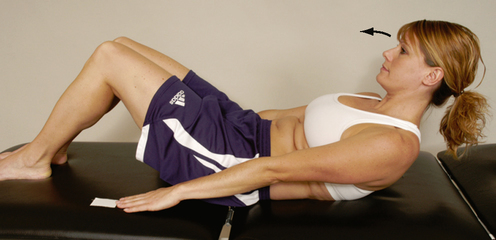
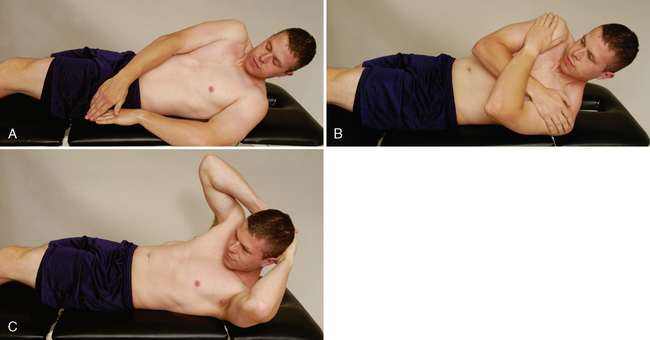
The patient starts the test in the patient position noted above. The examiner then sequentially asks the patient to move to the end position of each level of testing. The patient is instructed to hold the end position for as long as possible. Testing begins with the Trace Grade and progresses sequentially to the Normal Grade (see Table 8-1).
Table 8-1
Isometric Abdominal Test Grading
| Grade | MMT Score | Patient Position |
| Normal | 5 | With the hands clasped behind the neck, able to raise the upper body until the scapulae clear the table (20- to 30-second hold) |
| Good | 4 | With the arms crossed over the chest, able to raise the upper body until the scapulae clear the table (15- to 20-second hold) |
| Fair | 3 | With the arms straight, able to raise the upper body until the scapulae clear the table (10- to 15-second hold) |
| Poor | 2 | With the arms extended toward the knees, able to raise the upper body until the top of the scapulae lift from the table (1- to 10-second hold) |
| Trace | 1 | Unable to raise more than the head off the table |
INDICATIONS OF A POSITIVE TEST
The number of seconds the patient holds the contraction before cheating (e.g., holding the breath, altered mechanics) or the onset of fatigue is recorded as the manual muscle test (MMT) score. The grading for this isometric abdominal test is described in Table 8-1.
RELIABILITY/SPECIFICITY/SENSITIVITY5

DYNAMIC ABDOMINAL ENDURANCE TEST5,8 

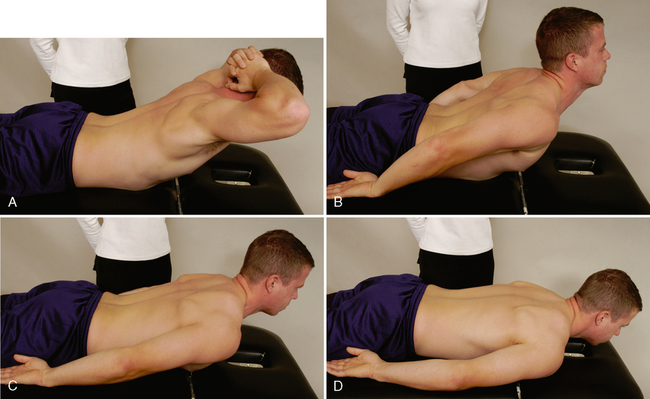
The patient attempts to extend the spine as far as possible by lifting up the head and trunk. Depending on how the patient does the test (the aim is to get the highest score possible) and how long the position is held (see Table 8-2), the examiner records the MMT score. The patient holds the end position as long as possible.
Table 8-2
Isometric Extensor Test Grading
| Grade | MMT Score | Patient Position |
| Normal | 5 | With the hands clasped behind the head, extends the lumbar spine, lifting the head, chest, and ribs from the bed/floor (20- to 30-second hold) |
| Good | 4 | With the hands at the side, extends the lumbar spine, lifting the head, chest, and ribs from the bed/floor (15- to 20-second hold) |
| Fair | 3 | With the hands at the side, extends the lumbar spine, lifting the sternum off the bed/floor (10- to 15-second hold) |
| Poor | 2 | With the hands at the side, extends the lumbar spine, lifting the head off the bed/floor (1- to 10-second hold) |
| Trace | 1 | Only slight contraction of the muscle with no movement |
INTERNAL/EXTERNAL ABDOMINAL OBLIQUE TEST6,11 
The patient is asked to lift the head and the shoulder on one side and reach over and touch the fingernails of the other hand or to flex and rotate the trunk. Depending on how the patient does the test (the aim is to get the highest score possible) and how long the position is held (see Table 8-3), the examiner records the MMT score. The patient holds the end position as long as possible. The patient’s feet should not be supported, and the patient should breathe normally.
Table 8-3
Internal/External Abdominal Oblique Test Grading
| Grade | MMT Score | Patient Position |
| Normal | 5 | Flexes and rotates the lumbar spine fully with the hands behind the head (20- to 30-second hold) |
| Good | 4 | Flexes and rotates the lumbar spine fully with the hands across the chest (15- to 20-second hold) |
| Fair | 3 | Flexes and rotates the lumbar spine fully with the arms reaching forward (10- to 15-second hold) |
| Poor | 2 | Unable to flex and rotate fully |
| Trace | 1 | Only slight contraction of the muscle with no movement |
| None | 0 | No contraction of the muscle |
INDICATIONS OF A POSITIVE TEST
The number of seconds the contraction is held before cheating (e.g., holding the breath, altered mechanics) or the onset of fatigue is recorded as the score. The test is graded as described in Table 8-3.
DOUBLE STRAIGHT LEG LOWERING TEST6,11–13 
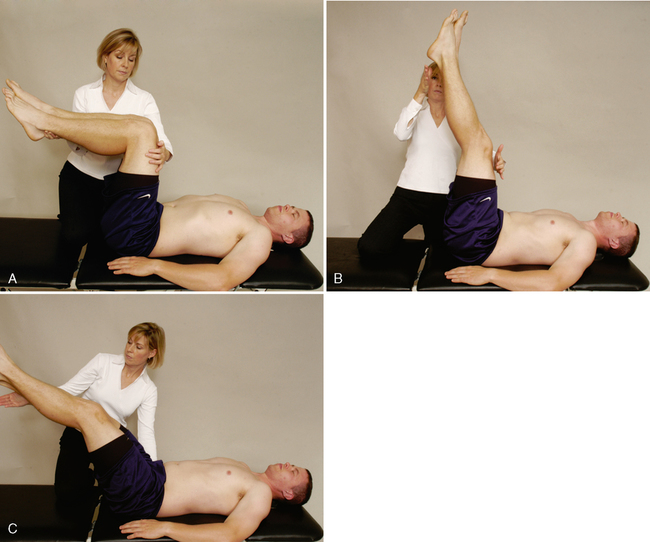
INDICATIONS OF A POSITIVE TEST
As soon as the examiner feels the ASIS start to rotate forward during the leg lowering, the test is stopped and the examiner holds the patient’s legs in that position while measuring the angle (plinth to thigh angle). The test must be done slowly, and the patient must not hold the breath. The test is graded as described in Table 8-4.
Table 8-4
Double Straight Leg Lowering Test Grading
| Grade | MMT Score | Patient Position |
| Normal | 5 | Able to reach 0° to 15° from the table before the pelvis tilts |
| Good | 4 | Able to reach 16° to 45° from the table before the pelvis tilts |
| Fair | 3 | Able to reach 46° to 75° from the table before the pelvis tilts |
| Poor | 2 | Able to reach 75° to 90° from the table before the pelvis tilts |
| Trace | 1 | Unable to hold the pelvis in neutral at all |
• This test should be performed only if the patient receives a grade of “normal” in the dynamic abdominal endurance test or the abdominal isometric test.
• This is an abdominal eccentric test that can put a great deal of stress on the spine; therefore, the examiner must make sure the patient is able to hold a neutral pelvis before doing the exercise. If the patient cannot hold neutral spine or if the patient is symptomatic with the test, the test should not be completed. This test also causes greater abdominal activation than curl-ups.
DYNAMIC HORIZONTAL SIDE SUPPORT (SIDE BRIDGE OR SIDE PLANK) TEST14,15 
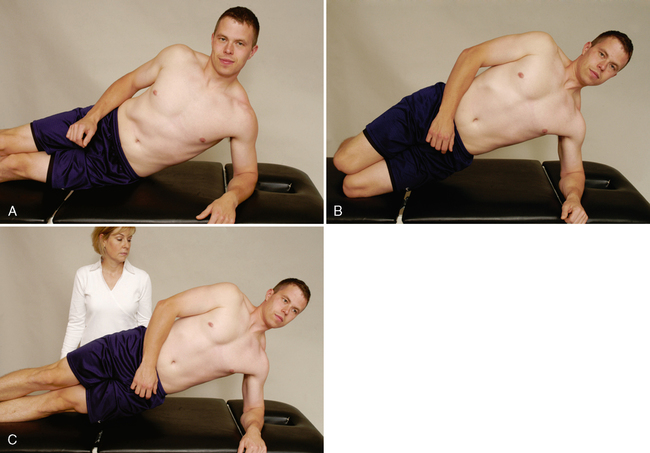
INDICATIONS OF A POSITIVE TEST
The patient should not roll forward or backward when doing the test. The examiner times how long the patient can hold the position without cheating. The test is graded as described in Table 8-5.
Table 8-5
Dynamic Horizontal Side Support (Side Bridge) Test Grading
| Grade | MMT Score | Patient Position |
| Normal | 5 | Able to lift the pelvis off the examining table and hold the spine straight (10- to 20-second hold) |
| Good | 4 | Able to lift the pelvis off the examining table but has difficulty holding the spine straight (5- to 10-second hold) |
| Fair | 3 | Able to lift the pelvis off the examining table but cannot hold the spine straight (<5-second hold) |
| Poor | 2 | Unable to lift the pelvis off examining table |
• The test may also be done dynamically, to test endurance, by having the patient repeat the side bridging as many times as possible on each side.
• McGill et al.15 reported that the side bridge should be able to be held 65% of the extensor time for men and 39% for women, and 99% of the flexor time for men and 79% for women.
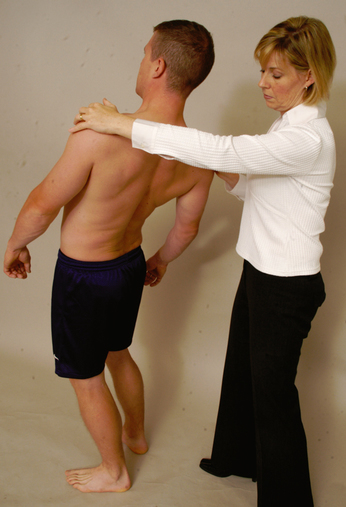
PERIPHERAL JOINT SCANNING EXAMINATION

The examiner’s position varies, depending on the joint to be scanned.
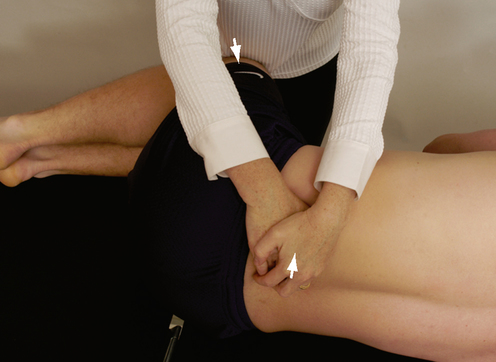
• As the patient flexes the hip, the examiner may palpate the ilium, sacrum, and lumbar spine to determine when movement begins at the sacroiliac joint on that side and at the lumbar spine during the hip movement. The two sides should be compared.
• If any positive signs occur, the examiner should do a detailed examination of the hip joints.


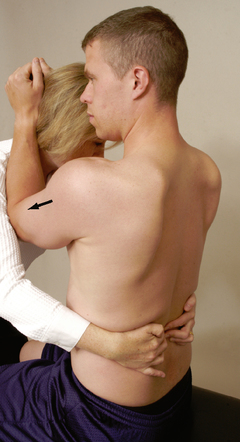
L2 myotome (hip flexion). The examiner flexes the patient’s hip to 80° to 90° and then applies a resisted force into hip extension. The other side then is tested for comparison. To prevent excessive stress on the lumbar spine, the examiner must make sure the patient does not increase the lumbar lordosis while doing the test. The more the hip is flexed, the less is the stress on the lumbar spine. Only one leg is tested at a time.
L3 myotome (knee extension). The examiner flexes the patient’s knee to 25° to 35° (over a pillow or the examiner’s knee) and then applies a resisted flexion force at the midshaft of the tibia, making sure the heel is not resting on the examining table. The other side is tested for comparison.
L4 myotome (ankle dorsiflexion). The examiner asks the patient to place the feet at 90° relative to the leg (plantigrade position). The examiner applies a resisted force to the dorsum of each foot and compares the two sides. In this case, the two sides may be tested at the same time.
L5 myotome (toe extension). The patient is asked to hold both big toes in a neutral position. The examiner applies resistance to the nails of both toes and compares the two sides. It is imperative that the resistance be isometric; therefore, the amount of force in this case is less than that applied, for example, during knee extension. The two sides may be tested at the same time.
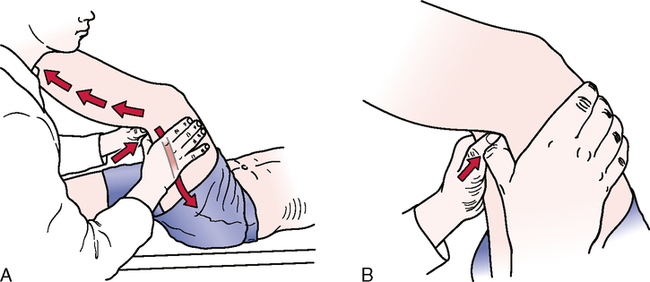
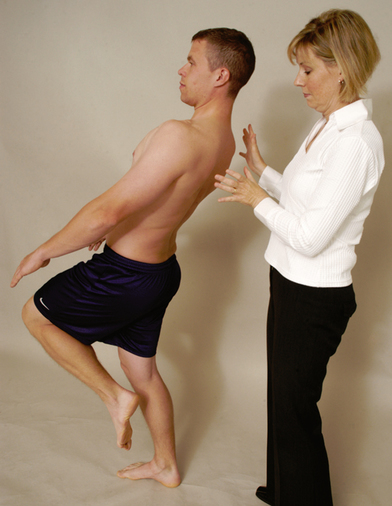
S1 myotome (ankle plantar flexion). The patient is asked to place the feet at 90° relative to the leg (plantigrade position). The examiner then applies resistance to the sole of the foot. Because of the strength of the plantar flexor muscles, this myotome is best tested with the patient standing. The patient slowly moves up and down on the toes of each foot (for at least 5 seconds) in turn (see modified Trendelenburg’s test), and the examiner compares the differences between the two sides.
S1 myotome (ankle eversion). The patient is supine lying. The examiner applies a force to move the patient’s foot into inversion while the patient isometrically resists.
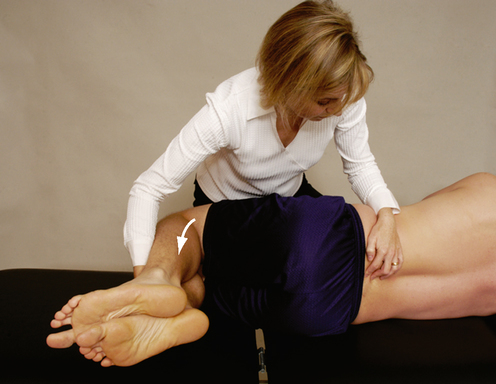
S1 myotome (hip extension). The patient is prone lying, and the knee is flexed to 90°. The examiner then lifts the patient’s thigh slightly off the examining table while stabilizing the leg. A downward force is applied to the posterior thigh with one hand while the other hand ensures that the patient’s thigh is not resting on the table.
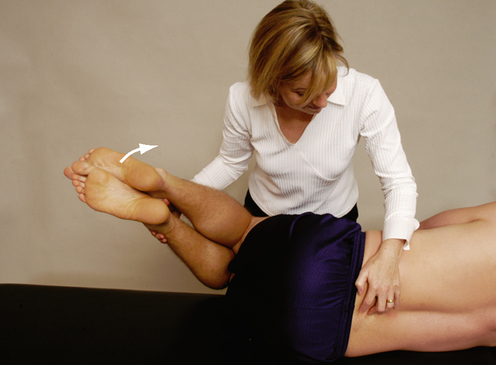
S1-S2 myotomes (knee flexion). The patient is prone with the knee flexed to 80° to 90°. The examiner applies an extension isometric force just above the ankle. Although the two knee flexors can be tested at the same time, this is not advisable because of the stress it places on the lumbar spine.
• For the S1 myotome, only one of the tests needs to be done.
• When appropriate, the examiner should test the two sides simultaneously for comparison. Simultaneous bilateral comparison is not possible for movements involving the hip and knee joints because of the weight of the limbs and the stress on the low back; therefore, in these cases the two sides must be done individually.
• The examiner should not apply pressure over the joints, because this may cause symptoms unrelated to the myotomes.
• The ankle movements should be tested with the knee flexed approximately 30°, especially if the patient complains of sciatic pain, because full dorsiflexion is considered a provocative maneuver for stretching neurological tissue. Likewise, the extended knee increases the stretch on the sciatic nerve and may result in false signs, such as weakness that results from pain rather than from pressure on the nerve root.
• Hamstring cramping may occur during testing of knee flexion. It does not indicate a positive test result, but the examiner should be aware that cramping may occur.
• If the patient is in extreme pain, all tests in the supine position should be completed before the patient is tested in the prone position. This reduces the amount of movement the patient must do, decreasing the patient’s discomfort. Ideally, all tests in the standing position should be performed first, followed by tests in the sitting, supine, side-lying, and prone positions.
SPECIAL TESTS FOR NEUROLOGICAL DYSFUNCTION
Relevant Special Tests
Epidemiology and Demographics
About 30% of patients with back pain have a radiculopathy associated with their low back pain. Between 1% and 10% of the general public will have a lumbar radiculopathy, and men and women are affected equally. Symptoms occur most often in men in their 40s and women in their 50s.17–20
Relevant Signs and Symptoms
• Radiculopathy can cause pain, numbness, tingling, and weakness in a nerve root distribution pattern. The pain may be described as sharp, shooting, or burning.
• The pain may begin in the low back or may start in the buttocks or posterior thigh.
• Most radiculopathies involve the lower lumbar nerve roots (L4-S1), sending symptoms below the level of the knee. Irritation of nerves from the upper lumbar nerve roots (L1-3) sends symptoms into the hip and anterior thigh above the level of the knee.
• The referral pattern varies, depending on the specific nerve root involved, but radicular pain results in numbness and tingling in the lower extremities in a dermatomal pattern. Sensory symptoms are more common with radiculopathy, but muscle weakness may be present, especially in more severe cases.
• Muscle weakness and reflex changes also occur in a specific myotomal pattern. A myotome is a motor function associated with a specific nerve root
Clinical Note
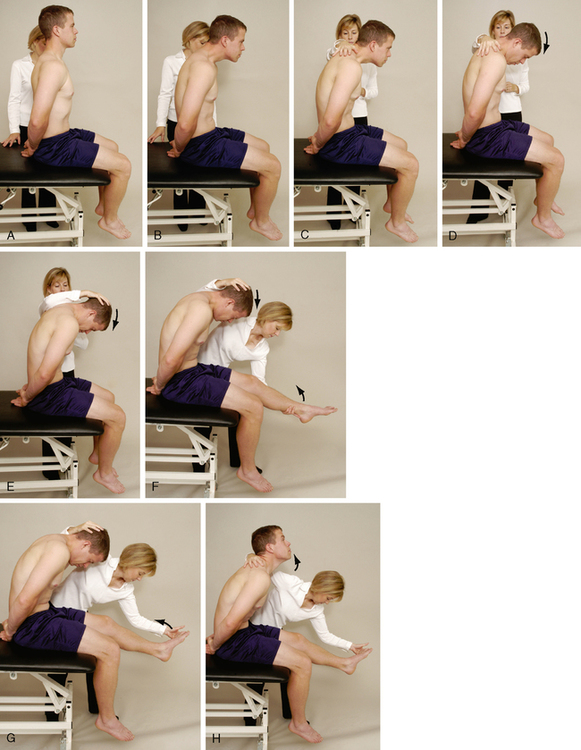
• These tests are potentially provocative assessment techniques; therefore, the examiner should increase tension on the system gradually and carefully. Continuous communication with the patient is required to ensure that symptoms are not exacerbated.

• The unaffected leg is always tested first.
• Butler26 recommended doing bilateral knee extension in the slump position, on the grounds that any asymmetry in the amount of knee extension is easier to note this way.
• The effect of releasing neck flexion on the patient’s symptoms should be noted. In hypermobile patients, more hip flexion (more than 90°), as well as hip adduction and medial rotation, may be required to elicit a positive response. If symptoms are produced in any phase of the sequence, it is important to stop the provocative maneuvers to prevent undue discomfort for the patient.
• Some people do knee extension last, because it often is easier to measure knee ROM to determine whether it has improved with treatment.
• Butler26 has suggested modifications to the slump test to stress individual nerves (Table 8-6)
Table 8-6
| Slump Test (ST 1) | Slump Test (ST2) | Side Lying Slump Test (ST3) | Long Sitting Slump Test (ST4) | |
| Cervical spine | Flexion | Flexion | Flexion | Flexion, rotation |
| Thoracic and lumbar spine | Flexion (slump) | Flexion (slump) | Flexion (slump) | Flexion (slump) |
| Hip | Flexion (90° +) | Flexion (90° +), abduction | Flexion (20°) | Flexion (90° +) |
| Knee | Extension | Extension | Flexion | Extension |
| Ankle | Dorsiflexion | Dorsiflexion | Plantar flexion | Dorsiflexion |
| Foot | — | — | — | — |
| Toes | — | — | — | — |
| Nerve bias | Spinal cord, cervical and lumbar nerve roots, sciatic nerve | Obturator nerve | Femoral nerve | Spinal cord, cervical and lumbar nerve roots, sciatic nerve |
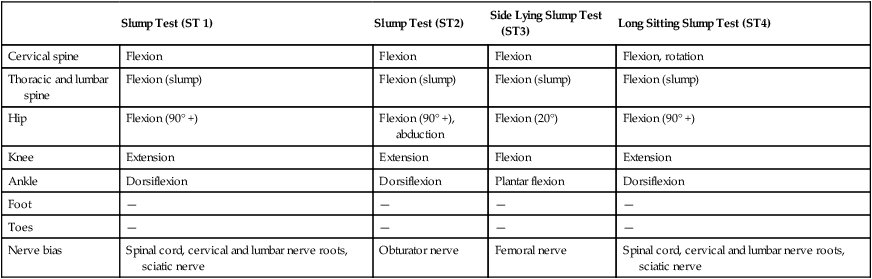
Data from Butler DA: Mobilisation of the nervous system, Melbourne, 1991, Churchill Livingstone.
RELIABILITY/SPECIFICITY/SENSITIVITY
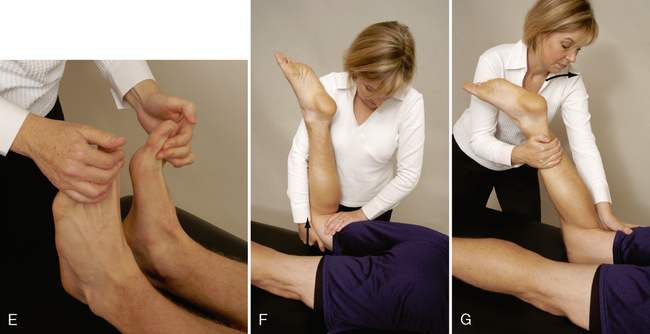
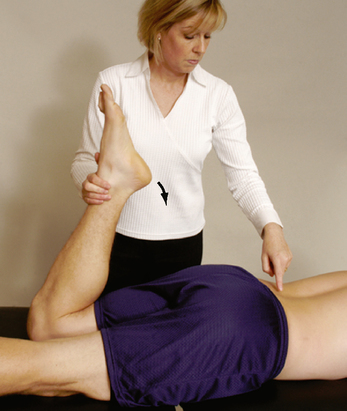
STRAIGHT LEG RAISE TEST (LASÈGUE’S TEST)26–42 
INDICATIONS OF A POSITIVE TEST
• The uninvolved side should be tested first.
• Both the neck flexion and foot dorsiflexion are considered provocative or sensitizing tests for neurological tissue.
• Straight leg raise testing is one of the most common neurological tests of the lower limb.
• This test is a passive test, and each leg is tested individually; the normal leg is tested first.
• Modifications of the straight leg raise test can be used to stress different peripheral nerves to a greater degree; these are referred to as straight leg raise tests with a particular nerve bias (Table 8-7).
Table 8-7
Straight Leg Raise (SLR) Test and Modifications
| SLR (Basic) | SLR2 | SLR3 | SLR4 | Cross (Well Leg) SLR5 | |
| Hip | Flexion and adduction | Flexion | Flexion | Flexion and medial rotation | Flexion |
| Knee | Extension | Extension | Extension | Extension | Extension |
| Ankle | Dorsiflexion | Dorsiflexion | Dorsiflexion | Plantar flexion | Dorsiflexion |
| Foot | — | Eversion | Inversion | Inversion | — |
| Toes | — | Extension | — | — | — |
| Nerve bias | Sciatic nerve and tibial nerve | Tibial nerve | Sural nerve | Common peroneal nerve | Nerve root (disc prolapse) |
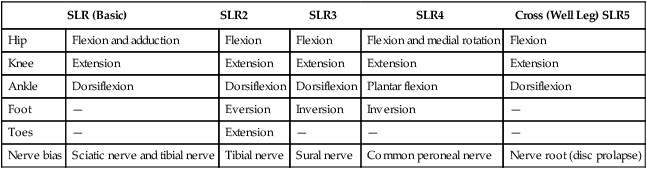
Data from Butler DA: Mobilisation of the nervous system, Melbourne, 1991, Churchill Livingstone.
• The neck flexion movement has also been called Hyndman’s sign, Brudzinski’s sign, and Lidner’s sign.
• A contralateral positive test result is called the crossover sign or well leg test of Fajersztjan. A positive crossover sign usually indicates a large disc protrusion and a poor prognosis for conservative treatment.
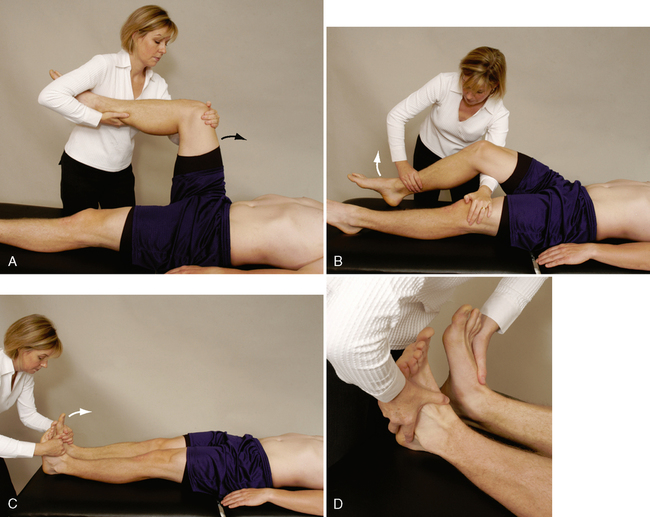
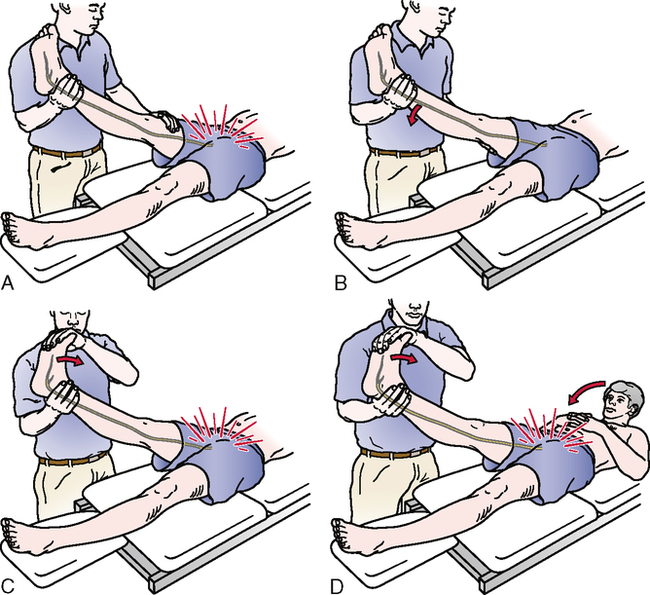
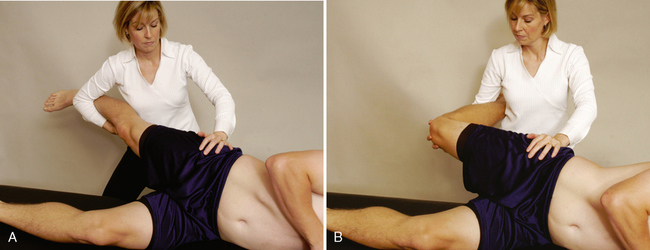
PRONE KNEE BENDING TEST26,43,44 
• If the examiner is unable to flex the patient’s knee past 90° because of a pathological condition in the knee, the test may be performed by passive extension of the hip while the knee is flexed as much as possible.
• If the rectus femoris is tight, the examiner should remember that taking the heel to the buttock may cause anterior torsion to the ilium, which could lead to sacroiliac or lumbar pain.
• The test may be modified to stress different peripheral nerves (Table 8-8).
Table 8-8
Prone Knee Bending (PBK) Test and Modifications
| Basic Prone Knee Bending (PKB1) | Prone Knee Bending (PKB2) | Prone Knee Extension (PKE) | |
| Cervical spine | Rotation to test side | Rotation to test side | — |
| Thoracic and lumbar spine | Neutral | Neutral | Neutral |
| Hip | Neutral | Extension, adduction | Extension, abduction, lateral rotation |
| Knee | Flexion | Flexion | Extension |
| Ankle | — | — | Dorsiflexion |
| Foot | — | — | Eversion |
| Toes | — | — | — |
| Nerve bias | Femoral nerve, L2-L4 nerve root | Lateral femoral cutaneous nerve | Saphenous nerve |
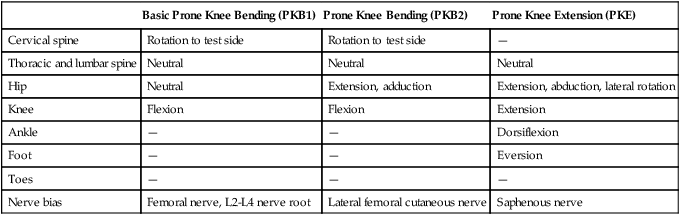
Data from Butler DA: Mobilisation of the nervous system, Melbourne, 1991, Churchill Livingstone.
FEMORAL NERVE TRACTION TEST45,46 
INDICATIONS OF A POSITIVE TEST
Neurological pain radiates down the anterior thigh if the test result is positive.
• This is also a traction test for the nerve roots at the midlumbar area (L2-L4).
• As with the straight leg raise test, there is also a contralateral positive test. That is, when the test is performed, the symptoms occur in the opposite limb. This is called the crossed femoral stretching test.
• Pain in the groin and hip that radiates along the anterior medial thigh indicates an L3 nerve root problem; pain extending to the midtibia indicates an L4 nerve root problem.
• This test is similar to Ober’s test for a tight iliotibial band, so the examiner must be able to differentiate between the two conditions. If the iliotibial band is tight, the test leg does not adduct but remains elevated away from the table, because the tight tendon riding over the greater trochanter keeps the leg abducted.
• Femoral nerve injury presents with a different history, and the referred pain (anteriorly) tends to be stronger.
BOWSTRING TEST (CRAM TEST OR POPLITEAL PRESSURE SIGN)47–51 
• The test also may be done with the patient in the sitting position and the examiner passively extending the knee to produce pain. The examiner then slightly flexes the knee so that the pain and symptoms disappear. The examiner holds this slightly flexed position by clasping the patient’s leg between the examiner’s knees. The examiner then presses the fingers of both hands into the popliteal space. In this case, the test is called the sciatic tension test or Deyerle’s sign.
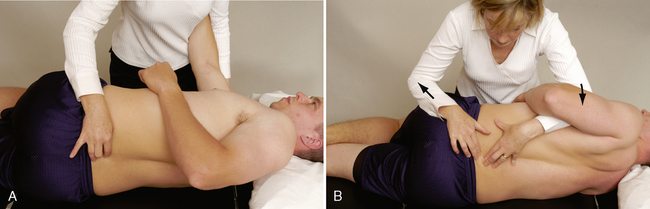
SPECIAL TESTS FOR LUMBAR INSTABILITY52–59
Relevant Special Tests
Relevant Signs and Symptoms
• Patients with lumbar instability usually report a history of recurrent/episodic locking, catching, or giving way of the low back during active motion. They may use terms such as “clicking,” “clunking,” or “slipping” or may report a feeling of instability.
• Patients may report a sharp pain with motion or a painful arc of motion.
• Patients usually feel decreased pain with activity (the muscles of the spine act to stabilize the instability) and increased pain with static positions (the muscles relax, and the spine shifts).
• Patients may report aching in the lumbar spine for several days after an episode of instability and usually report increased back pain after prolonged positioning and/or pain at end range of lumbar motion or on the return to neutral.
• The intensity of the pain may seem excessive relative to the provoking force or activity. Symptom onset occurs after what seems to be a simple activity with minimal provocation, and the symptoms often resolve rapidly.
• There is no consistent pattern of dysfunction or symptom onset.
• The pain is located in the lumbar region and may radiate into one or both buttocks or posterior thighs if the adjacent nerve root is irritated.
• Patients often report no relief or only temporary relief from previous interventions.
Mechanism of Injury
Lumbar instability may be caused by a severe sprain, fracture, spondylolisthesis, or previous lumbar surgery. Degenerative mechanisms include degenerative joint disease (DJD [osteoarthritis]) and degenerative disc disease (DDD [spondylosis]). Panjabi et al.59 theorized that joint stability was achieved by the coordinated actions of three systems: the passive, active, and motor control neurological systems. Disruption or injury to any of these three systems could affect the other systems by forcing them to work harder to provide stability to the joint. In the case of trauma, ligaments that provide passive support to the spinal vertebrae could be sprained, resulting in joint laxity and instability. Motion and activity encourage activation of the active systems, thus joint stability is maintained; however, over time, the muscles also have a tendency to weakness or tightness, upsetting the normal neutral pelvis alignment. Static positions or positions of relative rest allow the lumbar musculature to turn off. When the muscles are not activated, lumbar dynamic stability can be lost. As the spinal segment loses stability, the instability aggravates pain-producing structures.

• The “H” and “I” monikers relate to the movements that occur.
• This test is primarily for structural instability, but an instability jog may be evident during one of the movements if loss of control occurs. In this case, the end range is commonly normal, but loss of control occurs somewhere in the available ROM.
TEST OF ANTERIOR LUMBAR SPINE INSTABILITY61 
• A problem with this test is that the examiner must make sure the posterior ligaments of the spine are relatively loose or relaxed before beginning. This can be controlled by altering the amount of hip flexion. With greater hip flexion, the posterior ligaments tighten more from the bottom (sacrum) up.

SPECIFIC LUMBAR SPINE TORSION TEST60,61 
• This test position is a common position used to manipulate the spine; therefore, the examiner should take care not to overstress the rotation during assessment. In some cases, the examiner may hear a “click” or “pop” when doing this test; these are the same sounds that are heard with a manipulation.
SPECIAL TESTS FOR JOINT DYSFUNCTION62–64
Relevant Special Tests
Relevant Signs and Symptoms
• Younger adult patients may report a unilateral low back pain that radiates into the ipsilateral gluteal region.
• Patients may report that they began experiencing lumbar pain after bending forward. When they straightened up, they felt a sharp pain that has limited their motion since that time.
• Symptoms usually are increased with positions that require lumbar extension coupled with ipsilateral side bend and/or rotation.
• Symptoms often are alleviated by lumbar flexion.
• Symptoms generally are mechanical in nature. Specific activities worsen the symptoms, and specific activities alleviate the pain.
• Older adults with joint arthritis or stenosis usually report an insidious onset of low back pain and stiffness.
• Patients with either central or lateral stenosis have a low tolerance for trunk extension postures or activities. In patients with central stenosis, pain into the low back and gluteal region can occur bilaterally.
• Patients with lateral stenosis may report pain or sensory changes in one or both lower extremities. Pain may be located below the buttocks or below the knees. Functionally, walking usually is limited by low back pain or gluteal pain or both.
Mechanism of Injury

INDICATIONS OF A POSITIVE TEST
The test result is positive if the patient’s symptoms are reproduced.
• The position causes maximum narrowing of the intervertebral foramen and stress on the facet joint to the side on which rotation and side flexion occur.
• Cipriano67 described a similar test as Kemp’s test.
• A treatment table may be placed directly in front of the patient. For the initial start position, the patient places the front of the hips in direct contact with the table. The table stabilizes the hips and allows motion to occur more locally at the lumbar spine.

JOINT PLAY MOVEMENTS

• The results of this test depend on the examiner’s skill; interrater reliability studies have shown only average reliability.
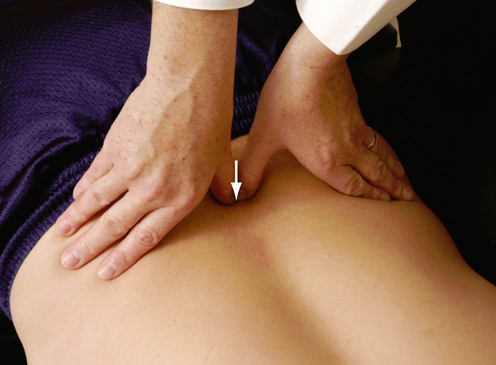
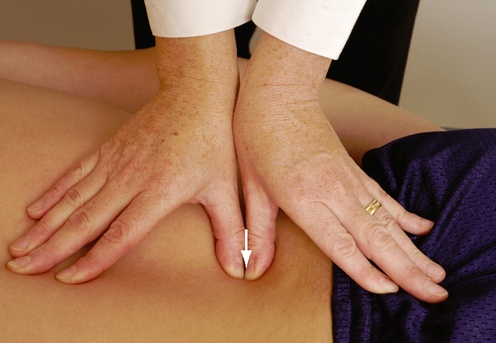
• An alternative means of palpation is to place just one finger in the interspinous space (between two spinous processes).
• Motion is assessed by palpating when the supraspinous ligament becomes taut.
• The patient’s lower extremities can be heavy and difficult to hold and maneuver. Placing the patient’s knees in the crease of the examiner’s hip and using the examiner’s legs to help lift and maneuver the legs make the technique easier to accomplish.

• The results of the test depend on the examiner’s skill; interrater reliability studies have shown only average reliability.
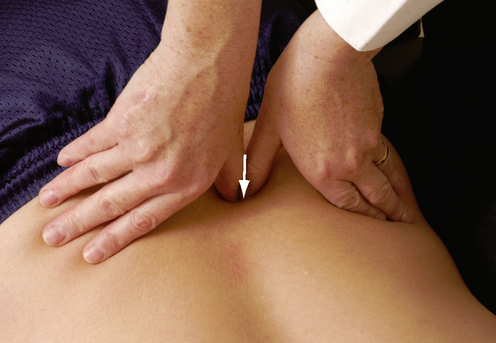
• An alternative means of palpation is to place one finger in the interspinous space (between two spinous processes) and feeling the spinous processes come together.
• Motion is assessed by palpating when the supraspinous ligament becomes lax or the spinous processes reach their maximum approximation.
• The patient’s lower extremities can be heavy and difficult to hold and maneuver. Placing the patient’s knees in the crease of the examiner’s hip and using the examiner’s legs to help lift and maneuver the legs make the technique easier to accomplish.

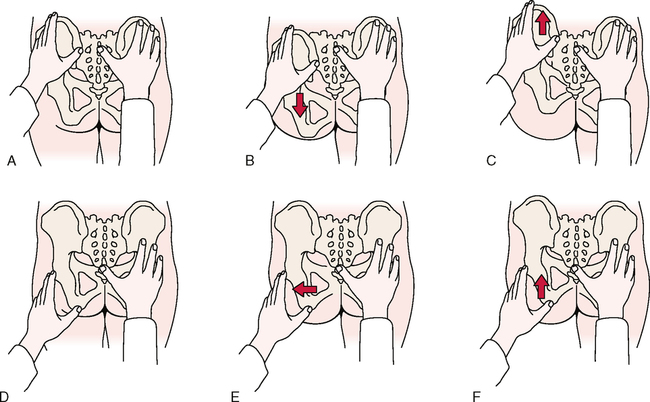
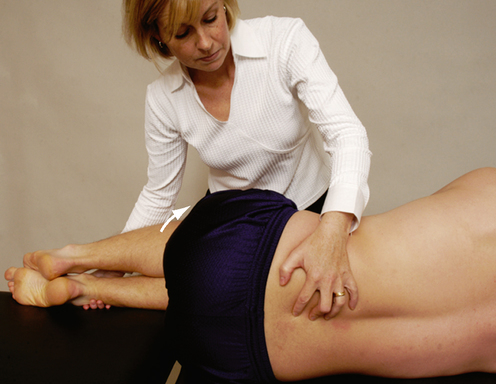
POSTERIOR-ANTERIOR CENTRAL VERTEBRAL PRESSURE (PACVP) 
The patient is prone. Pillows or cushions may be used to put the lumbar spine in a neutral position.
• If the examiner plans to test end feel over several occasions, the same examining table should be used to improve reliability. Likewise, the patient should be positioned the same way each time.
• The greatest movement occurs with the spine in neutral. The interrater reliability of these techniques is often low.
POSTERIOR-ANTERIOR UNILATERAL VERTEBRAL PRESSURE (PAUVP) 
The patient is prone. Pillows or cushions may be used to put the lumbar spine in a neutral position.
• The lumbar musculature often is guarded and tight (i.e., in spasm) in patients with a pathological low back condition; therefore, tenderness and stiffness from muscle tightness may influence the stiffness of joints and therefore affect the examiner’s test results.
• These techniques are specific to each vertebra and are applied to each vertebra in turn, or at least to the ones the examination has indicated may be affected by a pathological condition.

[/level-membership-for-orthopaedics-category][not-level-membership-for-orthopaedics-category]CHAPTER 8
LUMBAR SPINE
SELECTED MOVEMENTS
McKenzie1 recommended repeating the active movements, especially flexion and extension, 10 times to see whether the movement increases or decreases the symptoms.
• On forward flexion, the lumbar spine should move from its normal lordotic curvature to at least a straight or slightly flexed curve. If this change does not occur, some hypomobility probably is present in the lumbar spine either from tight structures or muscle spasm.
• In a patient with no back pain, when returning to the upright posture from forward flexion, the person first rotates the hips and pelvis to about 45° of flexion; during the last 45° of extension, the low back resumes its lordosis.
• In a patient with back pain, most movement usually occurs in the hips, accompanied by knee flexion; in some cases, the patient also uses hand support, working up the thighs.
• The examiner must differentiate the movement that occurs in the lumbar spine from that occurring in the hips or thoracic spine. Some patients can touch their toes by flexing the hips, even if no movement occurs in the spine. The degree of injury also has an effect. For example, the more severely a disc is injured (e.g., if sequestration has occurred rather than a protrusion), the greater is the limitation of movement.
• Often, an “instability jog” may be seen during one or more movements, especially flexion, returning to neutral from flexion, or side flexion. An instability jog is a sudden movement shift or rippling of the muscles during active movement, which indicates an unstable segment.
• Similarly, muscle twitching during movement or complaints of something “slipping out” during lumbar spine movement may indicate instability.
• If the patient bends one or both knees on forward flexion, the examiner should watch for nerve root symptoms or tight hamstrings, especially if spinal flexion is decreased when the knees are straight.
INDICATIONS OF A POSITIVE TEST
Extension (backward bending) normally is limited to 20° to 35° in the lumbar spine.
• Bourdillon and Day2 recommend having the patient do this movement in the prone-lying position to hyperextend the spine. They called the resulting position the “sphinx position.” The patient hyperextends the spine by resting on the elbows with the hands holding the chin and allows the abdominal wall to relax. The position is held for 10 to 20 seconds to see whether symptoms occur or worsen if already present.
• Although the patient usually is in the standing position, rotation may be performed while the patient is sitting to eliminate or decrease pelvic and hip movement. If the patient stands, the examiner must take care to watch for this accessory movement and try to eliminate it by stabilizing the pelvis.
• If a movement (e.g., side flexion) toward the painful side increases the symptoms, the lesion is probably intra-articular, because the muscles and ligaments on that side are relaxed.
• If a disc protrusion is present and lateral to the nerve root, side flexion to the painful side increases the pain and radicular symptoms on that side.
• If a movement (e.g., side flexion) away from the painful side alters the symptoms, the lesion may be articular or muscular in origin, or it may be a disc protrusion medial to the nerve root.
• In the spine, the movement of side flexion is a coupled movement with rotation. Because of the position of the lumbar facet joints, side flexion and rotation occur together, although the amount and direction of movement may not be the same.
• Patients often deviate into forward flexion instead of remaining in true side flexion. To prevent this, the patient can be cued to run the hand down the back of the thigh instead of the side of the thigh.
TRENDELENBURG’S TEST (MODIFIED)
• This is, in effect, a modified Trendelenburg’s test. A weak gluteus medius muscle or a coxa vara (abnormal shaft-neck angle of the femur) on the stance leg side may produce a positive sign on the nonstance side.
• The examiner should look for patient compensations when completing the test. The most common compensation is trunk side flexion toward the stance leg. The patient side flexes to move his or her center of gravity over the stance leg, thus decreasing the demand on the gluteus medius. Therefore, the test may appear normal because the ilium responds normally, but if the side flexion is corrected, the positive response occurs.
The patient starts the test in the patient position noted above. The examiner then sequentially asks the patient to move to the end position of each level of testing. The patient is instructed to hold the end position for as long as possible. Testing begins with the Trace Grade and progresses sequentially to the Normal Grade (see Table 8-1).
Table 8-1
Isometric Abdominal Test Grading
| Grade | MMT Score | Patient Position |
| Normal | 5 | With the hands clasped behind the neck, able to raise the upper body until the scapulae clear the table (20- to 30-second hold) |
| Good | 4 | With the arms crossed over the chest, able to raise the upper body until the scapulae clear the table (15- to 20-second hold) |
| Fair | 3 | With the arms straight, able to raise the upper body until the scapulae clear the table (10- to 15-second hold) |
| Poor | 2 | With the arms extended toward the knees, able to raise the upper body until the top of the scapulae lift from the table (1- to 10-second hold) |
| Trace | 1 | Unable to raise more than the head off the table |
INDICATIONS OF A POSITIVE TEST
The number of seconds the patient holds the contraction before cheating (e.g., holding the breath, altered mechanics) or the onset of fatigue is recorded as the manual muscle test (MMT) score. The grading for this isometric abdominal test is described in Table 8-1.
RELIABILITY/SPECIFICITY/SENSITIVITY5
DYNAMIC ABDOMINAL ENDURANCE TEST5,8
The patient attempts to extend the spine as far as possible by lifting up the head and trunk. Depending on how the patient does the test (the aim is to get the highest score possible) and how long the position is held (see Table 8-2), the examiner records the MMT score. The patient holds the end position as long as possible.
Table 8-2
Isometric Extensor Test Grading
| Grade | MMT Score | Patient Position |
| Normal | 5 | With the hands clasped behind the head, extends the lumbar spine, lifting the head, chest, and ribs from the bed/floor (20- to 30-second hold) |
| Good | 4 | With the hands at the side, extends the lumbar spine, lifting the head, chest, and ribs from the bed/floor (15- to 20-second hold) |
| Fair | 3 | With the hands at the side, extends the lumbar spine, lifting the sternum off the bed/floor (10- to 15-second hold) |
| Poor | 2 | With the hands at the side, extends the lumbar spine, lifting the head off the bed/floor (1- to 10-second hold) |
| Trace | 1 | Only slight contraction of the muscle with no movement |
INTERNAL/EXTERNAL ABDOMINAL OBLIQUE TEST6,11
The patient is asked to lift the head and the shoulder on one side and reach over and touch the fingernails of the other hand or to flex and rotate the trunk. Depending on how the patient does the test (the aim is to get the highest score possible) and how long the position is held (see Table 8-3), the examiner records the MMT score. The patient holds the end position as long as possible. The patient’s feet should not be supported, and the patient should breathe normally.
Table 8-3
Internal/External Abdominal Oblique Test Grading
| Grade | MMT Score | Patient Position |
| Normal | 5 | Flexes and rotates the lumbar spine fully with the hands behind the head (20- to 30-second hold) |
| Good | 4 | Flexes and rotates the lumbar spine fully with the hands across the chest (15- to 20-second hold) |
| Fair | 3 | Flexes and rotates the lumbar spine fully with the arms reaching forward (10- to 15-second hold) |
| Poor | 2 | Unable to flex and rotate fully |
| Trace | 1 | Only slight contraction of the muscle with no movement |
| None | 0 | No contraction of the muscle |
INDICATIONS OF A POSITIVE TEST
The number of seconds the contraction is held before cheating (e.g., holding the breath, altered mechanics) or the onset of fatigue is recorded as the score. The test is graded as described in Table 8-3.
DOUBLE STRAIGHT LEG LOWERING TEST6,11–13
INDICATIONS OF A POSITIVE TEST
As soon as the examiner feels the ASIS start to rotate forward during the leg lowering, the test is stopped and the examiner holds the patient’s legs in that position while measuring the angle (plinth to thigh angle). The test must be done slowly, and the patient must not hold the breath. The test is graded as described in Table 8-4.
Table 8-4
Double Straight Leg Lowering Test Grading
| Grade | MMT Score | Patient Position |
| Normal | 5 | Able to reach 0° to 15° from the table before the pelvis tilts |
| Good | 4 | Able to reach 16° to 45° from the table before the pelvis tilts |
| Fair | 3 | Able to reach 46° to 75° from the table before the pelvis tilts |
| Poor | 2 | Able to reach 75° to 90° from the table before the pelvis tilts |
| Trace | 1 | Unable to hold the pelvis in neutral at all |
• This test should be performed only if the patient receives a grade of “normal” in the dynamic abdominal endurance test or the abdominal isometric test.
• This is an abdominal eccentric test that can put a great deal of stress on the spine; therefore, the examiner must make sure the patient is able to hold a neutral pelvis before doing the exercise. If the patient cannot hold neutral spine or if the patient is symptomatic with the test, the test should not be completed. This test also causes greater abdominal activation than curl-ups.
DYNAMIC HORIZONTAL SIDE SUPPORT (SIDE BRIDGE OR SIDE PLANK) TEST14,15
INDICATIONS OF A POSITIVE TEST
The patient should not roll forward or backward when doing the test. The examiner times how long the patient can hold the position without cheating. The test is graded as described in Table 8-5.
Table 8-5
Dynamic Horizontal Side Support (Side Bridge) Test Grading
| Grade | MMT Score | Patient Position |
| Normal | 5 | Able to lift the pelvis off the examining table and hold the spine straight (10- to 20-second hold) |
| Good | 4 | Able to lift the pelvis off the examining table but has difficulty holding the spine straight (5- to 10-second hold) |
| Fair | 3 | Able to lift the pelvis off the examining table but cannot hold the spine straight (<5-second hold) |
| Poor | 2 | Unable to lift the pelvis off examining table |
• The test may also be done dynamically, to test endurance, by having the patient repeat the side bridging as many times as possible on each side.
• McGill et al.15 reported that the side bridge should be able to be held 65% of the extensor time for men and 39% for women, and 99% of the flexor time for men and 79% for women.
PERIPHERAL JOINT SCANNING EXAMINATION
The examiner’s position varies, depending on the joint to be scanned.
