Chapter 17 Laryngoscopic Orotracheal and Nasotracheal Intubation
Our very breath, pre-language of the lingus,
Unspoken and unseen, lies all around us;
It tunnels through a darkened path to bring us
Before the guarded gates that would confound us:
Dentition, palate, epiglottic folds
Are navigated as the case is started
And followed through to cartilage that holds
The two true cords, those gleaming pillars, parted;
Here human hands, left trembling with creation,
Are re-creating life as it began,
Beginning with the step of intubation,
I A Short History of Endotracheal Intubation
Cannulation of the trachea, or aspera arteria, as it was called by Robert Hooke,1 was initially described as a technique for positive-pressure ventilation (PPV):
The use of tracheal cannulation for the administration of anesthetics and provision of a patent airway was first reported in 1858 by John Snow in On Chloroform and Other Anaesthetics,2 in which he described a tracheostomy and cannulation for the administration of chloroform in a spontaneously breathing rabbit. The first human use of tracheostomy for anesthesia and protection against aspiration was reported by Trendelenburg in 1869, and it also was accompanied by spontaneous ventilation.3 In the next 10 years, numerous investigators developed nonsurgical techniques and apparatus for cannulation of the trachea for surgical (ear, nose, throat) or medical (diphtheria) indications. Matas was among the first to advocate the use of PPV through a tracheal cannula to avoid the catastrophic consequences of pneumothorax for a spontaneously ventilating patient during thoracotomy.5
Endotracheal anesthesia came into its own during and immediately after World War I because of the volume of facial and mandibular injuries treated in England, especially at the hospital in Sidcup. In 1936, I.W. Magill wrote one of many descriptive treatises on intubation in anesthesia5:
II Laryngoscopic Orotracheal Intubation
A Preparation and Positioning
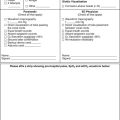
Box 17-1 lists the basic materials required for conventional orotracheal intubation. The materials are grouped according to the temporal sequence of events. All items are required for routine intubation, dealing with common difficulties, or preventing complications. Redundancy is the key in preparing for a critical event, such as endotracheal intubation. All essential equipment (e.g., laryngoscope handles, ETTs) should have readily available back-up counterparts in case of unexpected failure. An assortment of laryngoscope blades, both straight (Miller) and curved (Macintosh), should be available.
Box 17-1 Basic Equipment for Endotracheal Intubation
The proper sequence of events before laryngoscopy should be followed:
1. Adequate access to the head of the bed or table is essential. Removal of side rails and headboard (if outside the operating room) ensures freedom of movement; confirming that the bed or table is locked in position prevents unnecessary and stress-inducing pursuit of the patient around the room. The height of the surface should be adjusted to the level of the laryngoscopist’s chest. An experienced aide should be in constant attendance to provide items such as suction lines, airways, tubes, and drugs to the primary laryngoscopist, as well as to apply optimal external laryngeal manipulation (OELM), as needed.
2. The patient must be properly positioned before laryngoscopy. Patients who are uncooperative, agitated, or otherwise mobile may require rapid and efficient positioning after sedation. Pads or rolls should be prepared in advance and be readily at hand.
The earliest attempts at laryngoscopy used the classic positioning of full extension. Described by Jackson in 1913, this position required full extension of the head and neck on a flat surface.6 After 20 years, he amended his view to one that supported the contemporary sniffing position of flexion at the neck and extension at the head.7 This was accomplished by supporting the head on a pillow that was at least 10 cm thick. Numerous investigators have examined radiographs of subjects to determine the optimal positioning for orotracheal access. Various theoretical models of positioning for intubation have been proposed. For the past 60 years, the three-axis theory has proposed that the oral, pharyngeal, and laryngeal axes should be brought into approximate alignment to best facilitate orotracheal visualization and intubation (Fig. 17-1). Proposed by Bannister and MacBeth in 1944, this model presumes that laryngoscopy is done in the midline (two-dimensional model) and that laryngeal axis alignment is necessary for proper intubation.8 This idea has been challenged by the work of Adnet and colleagues in imaging studies and clinical comparisons.9–11
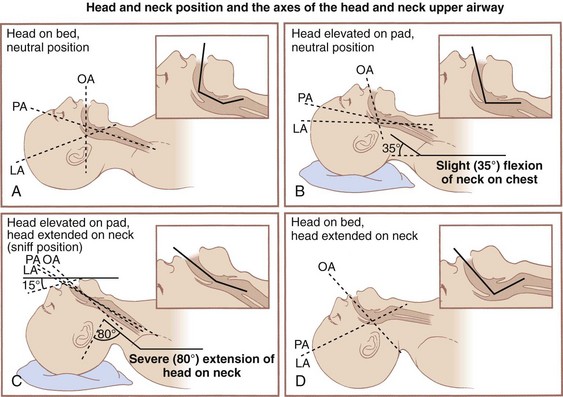
Adnet’s conclusion, however, has been questioned at length.12 Greenland and colleagues reexamined the issue, finding “the sniffing position the most favorable for direct laryngoscopy” as determined by magnetic resonance imaging (MRI).13 This perspective has been corroborated by evidence indicating 9 cm as the optimal pillow height.14 Others have advocated for an extension-extension position, in which the head and neck are extended by lowering the head of the table 30 degrees, proposing that direct laryngoscopy requires less axial force in this position than in the sniffing position.15 Whether the lower cervical spine is flexed, extended, or neutral, the extension of the atlanto-occipital joint remains the critical factor for optimal positioning. The reasonable option in view of conflicting evidence (and patients’ variability) is to position the patient with the occiput on a pad (traditional sniffing position) and be prepared to remove the pad (convert to simple extension) if the initial laryngoscopy becomes inadequate (Fig. 17-2).
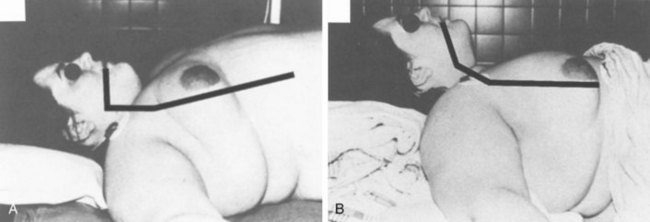
Obese patients often require more extensive padding (planking) starting at the midpoint of the back to the head to assume an optimal position for laryngoscopy. Occasionally, it is necessary to place towels and blankets under the scapula, shoulders, nape of the neck, and head to flex the neck on the chest (see Figs. 17-1B and 17-2) and extend the head on the neck (see Figs. 17-1C and 17-2). In this instance, the purpose of the scapula, shoulder, and neck support is to give the head room so that it may be extended on the neck. When in doubt, the final assessment of the position should be from a lateral view of the patient, because only a lateral view enables precise assessment of the chest, neck, face, and head axes (see Figs. 17-1C and 17-2).
B Preoxygenation
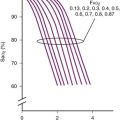
Depending on the minute ventilation of the patient (spontaneous or assisted), the time to complete effective preoxygenation varies from 1 to 5 minutes; although in an awake and cooperative patient, this may be mostly accomplished with three or four full, vital capacity (VC) breaths.16,17 Work has documented the increased efficacy of eight full breaths in about 60 seconds, with times to desaturation approaching those of the more traditional 3- to 5-minute preoxygenation.18 A higher minute ventilation level leads to more rapid and complete preoxygenation. Measures of the adequacy of preoxygenation include real-time gas analysis of expired O2 concentration (goal = 95%) and analysis of expired N2 (goal < 5%). Essential to either of these measurements is the presence of a capnograph waveform with a plateau reflecting the expected alveolar carbon dioxide (CO2) concentration. This documents the presence of an effective seal of the circuit-bag system to the patient’s airway and the effective delivery of 100% O2. The use of an air-mask-bag unit (AMBU) without an expiratory valve may not provide optimal preoxygenation.19
The effectiveness of preoxygenation in preventing hypoxia during laryngoscopy is significantly reduced in the morbidly obese patient. Even with the most careful preoxygenation, the duration of apnea before the onset of hypoxia is one half of the duration seen in patients with normal body weight. This situation is attributed to the considerable reduction in FRC and VC in the obese patient and to the additional reduction attributable to the cephalad diaphragmatic shift related to supine positioning.20 This places morbidly obese patients at significantly increased risk for injury if any difficulty with ventilation or intubation is encountered.
Pharyngeal insufflation of O2 can significantly prolong the safe duration of apnea. In a typical adult, approximately 250 mL/min of O2 is transferred from the lungs into the bloodstream, while only 200 mL/min of CO2 enters the lungs from the bloodstream (respiratory quotient = 0.8). This alveolar gas deficit causes alveolar pressures to become slightly subatmospheric. If the airway is patent, there is a net flow of gas from the pharynx into the alveoli (apneic oxygenation). If, after adequate preoxygenation, the pharynx is filled with O2, the onset of hypoxia is delayed because O2, rather than air, is drawn into the lungs by this mechanism. Pharyngeal insufflation may be conveniently achieved by passing a catheter into the pharynx through a nasopharyngeal airway and attaching an O2 source at 2 to 3 L/min. Alternatively, some laryngoscopes have a side port suitable for attachment of O2 tubing. When preoxygenation is followed by pharyngeal insufflation as previously described, in normal but apneic patients, the O2 saturation from pulse oximetry [SpO2] remains equal to 98% for 10 or more minutes (although at the end of 10 minutes the arterial carbon dioxide tension [PaCO2] may be expected to be about 80 mm Hg).21
C Laryngoscopy
Two basic types of laryngoscope blades are the curved blade (Macintosh) and the straight blade with a curved tip (Miller).22,23 They are designed for right hand–dominant use; the laryngoscope is held in the left hand while the right hand manipulates the ETT. Historically, either hand (or both) could be initially used, shifting the laryngoscope to the left hand while the right hand manipulated the tube. Both blade styles include a flange on the left side of the blade for lateral retraction of the tongue and contain a light-emitting area (bulb or fiberoptic tip). Each blade has a channel with an open right side for visualization of the larynx and for insertion of the ETT (Figs. 17-3 to 17-10). Despite numerous modifications and variations, they are all lighted, handheld retractors for oropharyngeal soft tissues.
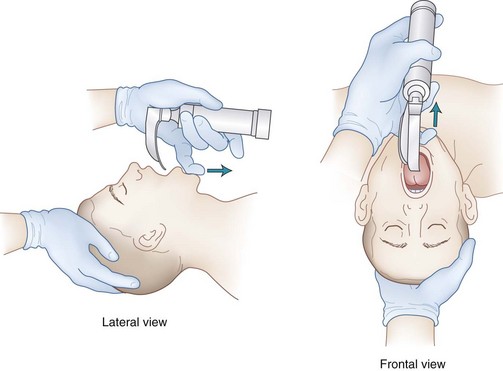
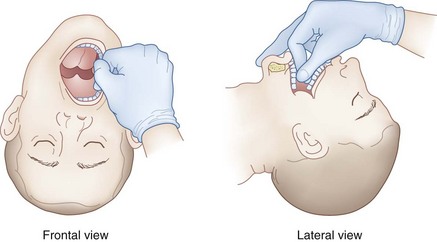


Two methods are used to open the mouth and facilitate the introduction of the blade. First, extension of the head on the neck (by pressure from the right hand at the vertex) causes the lips to part and the mouth to open (see Fig. 17-4). Alternatively, the thumb of the right hand can press down on the right lower molar teeth, and the index finger of the right hand can simultaneously press up on the right upper molar teeth (scissors maneuver) (see Fig. 17-5).
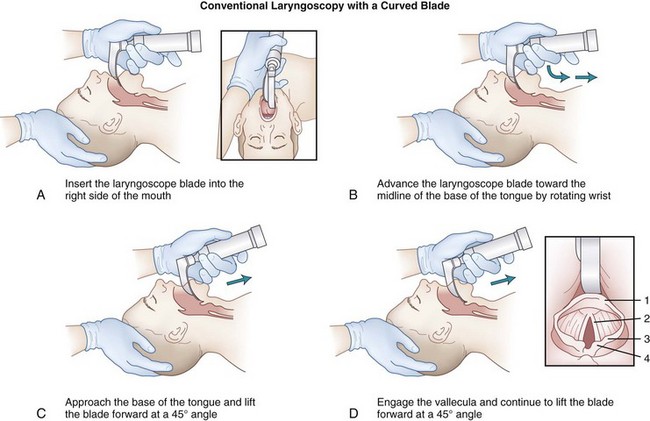
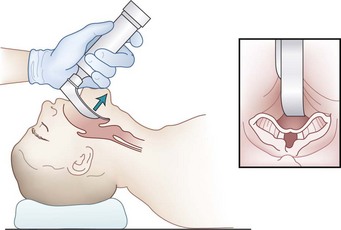
The laryngoscope blade is inserted into the right side of the mouth (see Fig. 17-3A). During the insertion of the laryngoscope, the patient’s lower lip should be pulled away from the lower incisors (with the right hand or by an assistant) to prevent injury to the lower lip by entrapment of the lower lip between the laryngoscope blade and the lower incisor teeth. The blade is simultaneously advanced forward toward the base of the tongue and the tip directed centrally toward the midline so that the tongue is completely displaced to the left side of the mouth by the flange of the laryngoscope blade (see Fig. 17-3B). After the blade has been applied to the base of the tongue, the laryngoscope is lifted to expose the epiglottis (see Fig. 17-3C). During this process, the left wrist should remain straight, with all lifting done by the left shoulder and arm. If the laryngoscopist follows a natural inclination to radial-flex the wrist further, thereby using the laryngoscope like a lever whose fulcrum is the upper incisor or gum, injury is likely to result. With the patient properly positioned, the direction of force necessary to lift the mandible and tongue and expose the glottis is along an approximately 45-degree straight line above the long axis of the patient. The best aid for inexperienced laryngoscopists learning laryngoscopy may be a 10-pin bowler’s wrist brace, which immobilizes the wrist.
After the epiglottis is visualized, the next step depends on the type of laryngoscope blade being used. If the blade is curved (Macintosh), the tip should be placed in the vallecula (space between the base of the tongue and the pharyngeal surface of the epiglottis) (see Fig. 17-3D). Subsequent forward and upward movement of the blade tenses the hyoepiglottic ligament, causing the epiglottis to move upward like a trapdoor, first exposing the arytenoid cartilages and then allowing more and more of the glottic opening and vocal cords to come into view (see Fig. 17-3D).
The ability to identify the epiglottis and then lift anteriorly to reveal progressively more of the glottic aperture has led to a convenient system for grading the laryngoscopic view of any patient.24,25 A grade I laryngoscopic view consists of visualization of the vocal cords in their entirety. A grade II laryngoscopic view is visualization of the posterior portion of the laryngeal aperture (arytenoid cartilages) but not any portion of the vocal cords. A grade III laryngoscopic view is visualization of the epiglottis but not the posterior portion of the laryngeal aperture, and a grade IV laryngoscopic view is visualization of the soft palate but not the epiglottis. This grading system is necessarily subjective and skill dependent, but it does correlate somewhat with difficult intubation.
If the blade is straight (Jackson, Wisconsin, or Miller blades), the tip should extend just behind (posterior to) or beneath the laryngeal surface of the epiglottis (see Fig. 17-6). As with a curved laryngoscope blade, subsequent forward and upward movement of the straight blade (exerted along the axis of the handle, not by pulling back on the handle) exposes the glottic opening (see Fig. 17-6).
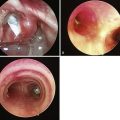
Four major common problems are encountered in performing laryngoscopy. First, with either laryngoscope blade, inserting the blade too deeply into the pharynx may elevate the entire larynx so that the opening of the esophagus is visualized rather than the glottic aperture (see Fig. 17-7). Insertion of a curved blade too far into the vallecula and continued rotation of the handle to the vertical may push the epiglottis down over the glottic opening, resulting in limited exposure of the larynx (see Fig. 17-8). The tracheal and esophageal openings are usually easily distinguished. The esophagus is located just to the right of the midline and more posteriorly, and the esophageal opening is round and puckered, with no structures around it. The glottis is located in the midline, has a triangular shape, and contains the prominent knobs of the arytenoids posteriorly and the pale white true vocal cords bilaterally.
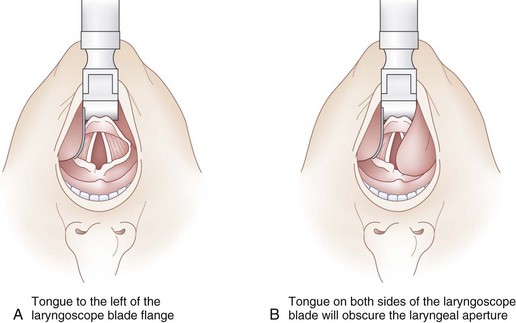
Second, it is important to keep the tongue completely to the left side of the mouth with the flange of the laryngoscope blade. Many difficult or failed intubations result from the tongue protruding over the flange of the blade toward the right side of the mouth, obstructing a clear path through which the vocal cords must be visualized and the ETT passed (see Fig. 17-9B). Vision is obscured further when the ETT occupies part of the view. With a partially obstructed (tunnel) view the endoscopist can partially visualize but not instrument the larynx. All of the tongue must be to the left of the blade (Fig. 17-9A).
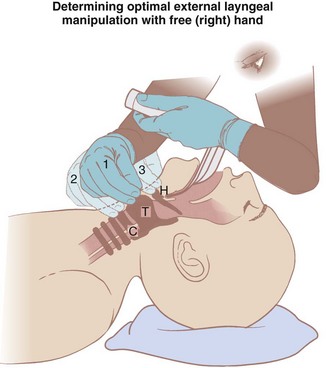
The use of OELM can significantly improve the laryngoscopic view. For example, routine use of OELM may reduce the incidence of a grade III view from 9% to between 1.3% and 5.4%.26 Although backward, upward, and rightward pressure (BURP) placed on the thyroid cartilage is typically the most useful OELM, it is best for the laryngoscopist to determine what form of external manipulation is optimal. This can best be accomplished using his or her right hand when it becomes free after the patient’s head is properly positioned (extended) and mouth fully opened (see Fig. 17-10).
D Endotracheal Tube
Insertion of the ETT is frequently easy after the vocal cords are exposed and the tongue is out of the way (see Fig. 17-9A). However, endotracheal intubation is often problematic even if the vocal cords are visualized. Adult tracheas readily accept ETTs with 7- to 10-mm internal diameters (IDs) (see Chapter 36 for pediatric sizes). If it is thought that fiberoptic bronchoscopy (FOB) will be necessary subsequently for diagnosis or therapy, an 8-mm or larger ETT should be used. If it is thought that the space between the upper and lower teeth will be small, allowing the cuff of the tube to come in contact with the teeth, the distal part of the tube and cuff should be lubricated to facilitate orotracheal intubation and protect the cuff from tearing. In the case of limited mouth opening, air should be evacuated from the cuff to allow as low a profile as possible. The tip of the ETT should be introduced into the far right corner of the mouth and passed along an axis that intersects the line of the laryngoscope blade at the glottis. In this manner, the tube does not block the view of the vocal cords down the channel of the blade. The common error of trying to use the laryngoscope blade as a midline guide, through which the tube is passed, violates this principle, obscures vision, and is a significant source of difficulty for the inexperienced laryngoscopist. The tube tip is passed through the cords, stopping 2 cm after the tube cuff completely passes through the vocal cords. Alternatively, when the external tube markings at the level of 22 to 24 cm reach the lower incisors, the tip of the tube is at the midtrachea.7 The laryngoscopist must not take his or her eyes off the laryngeal aperture until the cuff disappears just beyond the vocal cords. The most common cause of inadvertent esophageal intubation is failure to clearly see the tube pass through the cords (and inspect it in situ after placement). The arytenoid cartilages frequently displace the tube tip posteriorly into the esophagus unless care is taken to pass the tip anteriorly and squarely into the tracheal lumen.
E Verification of Correct Placement
The next, most important task is to determine definitively that the tube has been inserted into the trachea rather than the esophagus (Box 17-2). This issue is extensively discussed in Chapter 16, and only a brief summary of the signs of endotracheal intubation is given here. Helpful but not absolute signs of endotracheal intubation consist of breath sounds in the axillary chest wall, lack of breath sounds over the stomach, lack of gastric distention, chest rise with inspiration, large exhaled tidal volumes (VT), the sound of air exiting from the ETT when the chest is compressed, and appropriate compliance of a reservoir bag during hand ventilation. A progressive decrease in SpO2 may indicate failure to intubate the trachea, but it is a very late sign of esophageal intubation (especially on 100% O2), and it may also indicate bronchospasm, endobronchial intubation, aspiration, kinking of the tube, machine or equipment malfunction, or merely the normal response delay inherent in pulse oximetry.
Box 17-2 Signs of Endotracheal Intubation
Less Reliable Signs
More reliable signs of endotracheal intubation are the presence of a normal CO2 waveform (capnogram) and rapid expansion of a large rubber tracheal indicator bulb (see Chapter 16). Cardiac arrest (when no CO2 is excreted), severe bronchospasm, or kinking or plugging of the ET may prevent the appearance of CO2 in the exhaled gas (false-negative finding), and CO2 may appear if the tip of the tube is proximal to but near the larynx (false-positive finding). The self-inflating bulb has high sensitivity and specificity in normal patients, but it has a significant false-negative rate in obese patients.27
The next task is to ascertain that the tip of the ETT is above the carina. This is done by observing equal expansion of both hemithoraces and by stethoscopic examination for breath sounds throughout both peripheral lung fields. However, hearing uniform breath sounds throughout all lung fields does not guarantee correct tube position. If there is any question about a possible main stem bronchus intubation, the physician should retract the tube about 1 cm at a time and reexamine the breath sounds (stopping before complete withdrawal above the vocal cords). In one study, an insertion depth of 20 to 21 cm in adult women and 22 to 23 cm in adult men resulted in no incidence of main stem bronchial intubation.28 Simultaneous palpation of pulsed pressures in the cuff in the suprasternal notch and the pilot balloon of the cuff is another simple way of determining the location of the tube in the trachea. FOB is another, but complex, way of determining the location of the tube in the trachea. Outside the operating room, it is always advisable to confirm ETT position by chest radiography. Ideally, the tip of the tube should be 2 to 4 cm above the carina at the clavicular (midtracheal) level.
III Laryngoscopic Nasotracheal Intubation
Nasotracheal intubation usually is a more difficult procedure than orotracheal intubation. However, nasal tubes are thought to be better tolerated than oral tubes, and nasal tubes have been considered the tube of choice for medium-term mechanical ventilation. The issue of nasotracheal tubes contributing to the development of sinusitis and pneumonia has been investigated, and existing evidence has not demonstrated an association.29 Nonetheless, the use of nasotracheal intubation for longer-term ventilation has been declining in favor of orotracheal intubation or early tracheostomy. The use of nasotracheal tubes is currently confined to surgical procedures requiring free access to the oropharynx (e.g., dental procedures, mandibular fixation) and to some pediatric procedures in which stability and security of the tube are of overwhelming concern (usually because of proximity to the surgical field).
A Preparation
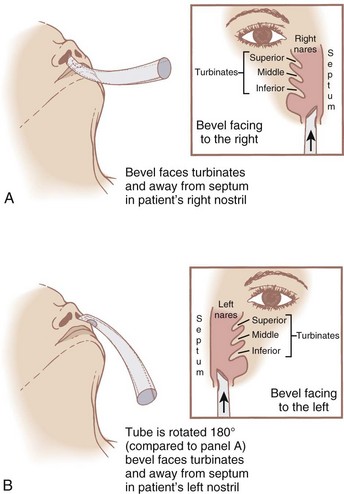
Before insertion of the single-lumen nasotracheal tube, the nasal mucosa should be sprayed with a vasoconstrictor drug. Vasoconstriction of blood vessels in the nasal mucosa minimizes bleeding related to the unavoidable trauma, and it increases the diameter of the nasal passages by constricting (shrinking) the nasal mucosa. Softening the tip of the nasotracheal tube by soaking it in a warm saline solution may decrease the incidence of mucosal damage and bleeding. The naris selected should be the one that the patient thinks is the most patent (because of the significant incidence of septal deviation in patients). However, if both nares offer equal resistance, the right naris should be chosen because the bevel of the nasotracheal tube, when introduced through the right naris, more easily passes the vocal cords (Fig. 17-11).
C Endotracheal Intubation
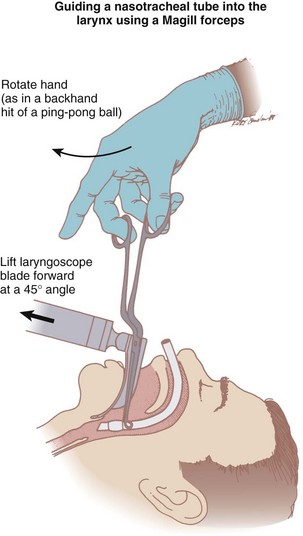
The advantage of the design of these forceps is that when the grasping ends are parallel to the long axis of the ETT, the handle is outside the right side of the mouth and at a right angle to the long axis of the tube. Because the handle is outside the right side of the mouth, it is away from the line of sight. As the forceps are grasped parallel to the long axis of the tube, a backhand motion of the right hand passes the ETT toward the glottic opening (Fig. 17-12). The intubator can have the larynx exposed by the laryngoscope held in the left hand, the tube in full view, a means (using the forceps) of manipulating the alignment of the ETT, and a means of advancing the tube. However, it is often desirable to have an assistant advance the proximal end of the ETT so that the intubator is free to guide the tube into the larynx without having to pull it with the Magill forceps. The tip of the tube should be grasped to guide it into the trachea; grasping the cuff area is likely to lead to cuff trauma and possible damage. The addition of a small amount of air into the ETT cuff should center the tube within the glottis, and as the ETT is advanced, the cuff deflates.
In some patients, as the ETT enters the trachea, the tube’s anterior curvature may direct it against the anterior tracheal wall and interfere with passage past this point. To resolve this difficulty, the head must be lifted (flexed) slowly as the ETT is advanced. A nasotracheal tube should be advanced until the cuff is 2 cm below the vocal cords or until the external markings are 24 to 25 cm for women and 26 to 27 cm for men (3 cm more than for oral ETTs) at the nares. The tube’s correct placement must be verified as in any intubation (see “Verification of Correct Placement”), but this is particularly critical with nasotracheal intubations because the relation to external tube markings and the location of the tip are not as firmly established as for orotracheal intubations. If nasal bleeding occurs, it is probably wise to leave the ETT in place to provide tamponade. If the bleeding is severe, the ETT can be retracted and the cuff inflated to provide better tamponade.
V Clinical Pearls
• Redundancy is the key to adequate preparation. All essential equipment (laryngoscopy handles and ETTs) should have back-up counterparts readily available in case of unexpected failure.
• Proper positioning is essential to successful intubation. Atlanto-occipital extension is the most critical component of positioning. The sniffing position (with the occiput elevated 9 cm) may provide a more favorable laryngoscopic view.
• Preoxygenation delays the onset of hypoxemia by denitrogenating the lungs and filling the functional residual capacity (FRC) with O2. The benefit of preoxygenation is limited in morbidly obese patients due to a decrease in FRC and an exaggerated cephalad diaphragmatic shift related to supine positioning.
• Although numerous techniques for tracheal cannulation exist, direct laryngoscopy is by far the most common technique.
• The tip of the laryngoscopic blade is inserted into the right side of the mouth and advanced toward the midline base of the tongue, displacing the tongue to the left side of the mouth. Lifting of the laryngoscopist’s arm at a 45-degree angle from the long axis of the patient without moving the wrist exposes the epiglottis while minimizing risk of injury to the airway. The tip of a curved blade is inserted into the vallecula, thereby tensing the hypoepiglottic ligament, lifting the epiglottis, and exposing the arytenoids and glottic opening. The tip of a straight blade is extended beneath the laryngeal surface of the epiglottis, and subsequent upward and forward movement of the blade exposes the glottic opening.
• The use of a curved blade is thought to be less stimulating and less traumatic to the teeth and epiglottis than a straight blade, and it may provide more room for passage of the ETT through the oropharynx. A straight blade may provide a better view in a patient with a long epiglottis or anterior larynx.
• The use of optimal external laryngeal manipulation (OELM) can significantly improve the laryngoscopic view.
• It is essential to confirm endotracheal intubation by auscultation of breath sounds, chest wall excursion, lack of gastric sounds or distention, large exhaled VT value, and a normal capnogram finding.
• The most common cause of inadvertent esophageal intubation is failure to clearly visualize the ETT pass through the vocal cords.
• Depths of 20 to 21 cm for women and 22 to 23 cm for men can safeguard against endobronchial intubation during orotracheal intubation.
• The ETT must be tightly secured to prevent inadvertent extubation or tube movement within the airway.
• Because nasotracheal intubation is thought to be better tolerated and has not been shown to be associated with an increased incidence of sinusitis, it is preferred over orotracheal intubation for medium-term mechanical ventilation. The nasal mucosa should be pretreated with a vasoconstrictor drug to facilitate nasotracheal intubation and to minimize the risk of trauma. Gentle head flexion may assist in the passage of a nasotracheal tube as it contacts the anterior tracheal wall.
All references can be found online at expertconsult.com.
6 Jackson C. Bronchoscopy, oesophagoscopy, and gastroscopy, ed 3. Philadelphia: WB Saunders; 1934.
8 Bannister FB, MacBeth RG. Direct laryngoscopy and tracheal intubation. Lancet. 1944;2:651.
9 Adnet F, Baillard C, Borron SW, et al. Randomized study comparing the “sniffing position” with simple head extension for laryngoscopic view in elective surgery patients. Anesthesiology. 2001;95:836–841.
13 Greenland KB, Edwards MJ, Hutton NJ, et al. Changes in airway configuration with different head and neck positions using magnetic resonance imaging of normal airways: A new concept with possible clinical applications. Br J Anaesth. 2010;105:683–690.
17 Gold MI, Duarte I, Muravchick S. Arterial oxygenation in conscious patients after 5 minutes and after 30 seconds of oxygen breathing. Anesth Analg. 1981;60:313–315.
20 Jense HG, Dubin SA, Silverstein PI, O’Leary-Escolas U. Effect of obesity on safe duration of apnea in anesthetized humans. Anesth Analg. 1991;72:89–93.
21 Teller LE, Alexander CM, Frumin MJ, Gross JB. Pharyngeal insufflation of oxygen prevents arterial desaturation during apnea. Anesthesiology. 1988;69:980–982.
23 Miller RA. A new laryngoscope. Anesthesiology. 1941;2:317–320.
24 Cormack RS, Lehane J. Difficult tracheal intubation in obstetrics. Anaesthesia. 1984;39:1105–1111.
25 Wilson ME, Spiegelhalter D, Robertson JA, Lesser P. Predicting difficult intubation. Br J Anaesth. 1988;61:211–216.
1 Hooke R. The technique of insertion of intratracheal insufflation tubes. Philos Trans R Soc. 1667;2:539.
2 Snow J. On chloroform and other anaesthetics. London: John Chruchill; 1858.
3 Trendelenburg F. Beitrage zur den Operationen an den Luftwegen. 2. Tamponnade der Trachea. Arch Klin Chir. 1871;12:121.
4 Matas R. I. On the management of acute traumatic pneumothorax. Ann Surg. 1899;29:409–434.
5 Magill IW. Endotracheal anesthesia. Am J Surg. 1936;24:450–455.
6 Jackson C. Bronchoscopy, oesophagoscopy, and gastroscopy, ed 3. Philadelphia: WB Saunders; 1934.
7 Jackson C. An account of an experiment made by M. Hook of preserving animals alive by blowing through their lungs with bellows. Surg Gynaccol Obstet. 1913;17:507.
8 Bannister FB, MacBeth RG. Direct laryngoscopy and tracheal intubation. Lancet. 1944;2:651.
9 Adnet F, Baillard C, Borron SW, et al. Randomized study comparing the “sniffing position” with simple head extension for laryngoscopic view in elective surgery patients. Anesthesiology. 2001;95:836–841.
10 Adnet F, Borron SW, Dumas JL, et al. Study of the “sniffing position” by magnetic resonance imaging. Anesthesiology. 2001;94:83–86.
11 Adnet F, Borron SW, Lapostolle F, Lapandry C. The three axis alignment theory and the “sniffing position”: perpetuation of an anatomic myth? Anesthesiology. 1999;91:1964–1965.
12 Benumof JL. Comparison of intubating positions: The end point for position should be measured. Anesthesiology. 2002;97:750. author reply 754
13 Greenland KB, Edwards MJ, Hutton NJ, et al. Changes in airway configuration with different head and neck positions using magnetic resonance imaging of normal airways: A new concept with possible clinical applications. Br J Anaesth. 2010;105:683–690.
14 Park SH, Park HP, Jeon YT, et al. A comparison of direct laryngoscopic views depending on pillow height. J Anesth. 2010;24:526–530.
15 Lee L, Weightman WM. Laryngoscopy force in the sniffing position compared to the extension-extension position. Anaesthesia. 2008;63:375–378.
16 Gambee AM, Hertzka RE, Fisher DM. Preoxygenation techniques: comparison of three minutes and four breaths. Anesth Analg. 1987;66:468–470.
17 Gold MI, Duarte I, Muravchick S. Arterial oxygenation in conscious patients after 5 minutes and after 30 seconds of oxygen breathing. Anesth Analg. 1981;60:313–315.
18 Baraka AS, Taha SK, Aouad MT, et al. Preoxygenation: comparison of maximal breathing and tidal volume breathing techniques. Anesthesiology. 1999;91:612–616.
19 Nimmagadda U, Salem MR, Joseph NJ, et al. Efficacy of preoxygenation with tidal volume breathing. Comparison of breathing systems. Anesthesiology. 2000;93:693–698.
20 Jense HG, Dubin SA, Silverstein PI, O’Leary-Escolas U. Effect of obesity on safe duration of apnea in anesthetized humans. Anesth Analg. 1991;72:89–93.
21 Teller LE, Alexander CM, Frumin MJ, Gross JB. Pharyngeal insufflation of oxygen prevents arterial desaturation during apnea. Anesthesiology. 1988;69:980–982.
22 Macintosh RR. An aid to oral intubation. Br Med J. 1949;1:28.
23 Miller RA. A new laryngoscope. Anesthesiology. 1941;2:317–320.
24 Cormack RS, Lehane J. Difficult tracheal intubation in obstetrics. Anaesthesia. 1984;39:1105–1111.
25 Wilson ME, Spiegelhalter D, Robertson JA, Lesser P. Predicting difficult intubation. Br J Anaesth. 1988;61:211–216.
26 Knill RL. Difficult laryngoscopy made easy with a “BURP.”. Can J Anaesth. 1993;40:279–282.
27 Lang DJ, Wafai Y, Salem MR, et al. Efficacy of the self-inflating bulb in confirming tracheal intubation in the morbidly obese. Anesthesiology. 1996;85:246–253.
28 Sitzwohl C, Langheinrich A, Schober A, et al. Endobronchial intubation detected by insertion depth of endotracheal tube, bilateral auscultation, or observation of chest movements: randomised trial. BMJ. 2010;341:c5943.
29 Holzapfel L, Chevret S, Madinier G, et al. Influence of long-term oro- or nasotracheal intubation on nosocomial maxillary sinusitis and pneumonia: Results of a prospective, randomized, clinical trial. Crit Care Med. 1993;21:1132–1138.