Intrathecal Catheter Implantation

Published on 06/02/2015 by admin

Filed under Anesthesiology

Last modified 22/04/2025

Print this page

rate 1 star rate 2 star rate 3 star rate 4 star rate 5 star
Your rating: none, Average: 5 (1 votes)

This article have been viewed 5235 times

50 Intrathecal Catheter Implantation

Perspective

After thousands of years of empiric use of opioids for treating pain, in the early 1970s a class of highly specific opioid receptors was identified. Soon thereafter, opioid receptors were localized in the brain and spinal cord. Investigators developed a model of chronic catheterization of the spinal subarachnoid space in experimental animals, and evidence that direct application of morphine at the spinal cord level produces selective spinal analgesia soon followed. Based on this limited experimental evidence, intrathecal morphine was administered to patients with severe pain associated with advanced cancer, and it produced profound and long-lasting pain reduction.

Since these first bold clinical experiments, we have witnessed a rapid transition from the laboratory to clinical practice. Intrathecal morphine and other opioids are now widely used as adjuncts in the treatment of acute and chronic pain, and a number of agents show promise as analgesic agents with spinal selectivity. Continuous delivery of analgesic agents at the spinal level can be carried out using percutaneous epidural or intrathecal catheters, but vulnerability to infection and the cost of external systems typically limits them to short-term use, in most cases less than 6 weeks. Reliable implanted drug delivery systems that make long-term delivery of medications to the intrathecal space feasible are available. These systems consist of a drug reservoir/pump implanted in the subcutaneous tissue of the abdominal wall that is refilled periodically through an access port. The pump may be a fixed-rate, constant-flow device or a variable-rate pump that can be programmed using a wireless radiofrequency transmitter, similar to the programming possible with implanted cardiac pacemakers.

Patient selection for spinal pain therapy is empiric and remains the subject of some debate. In general, intrathecal drug delivery is reserved for patients with severe pain that does not respond to conservative treatment. Most patients with cancer-related pain have ongoing pain despite appropriate oral opioid therapy, or they may have developed intolerable side effects related to these medications. Randomized controlled trials comparing maximal medical therapy with intrathecal drug delivery for cancer-related pain have demonstrated improved pain control and reduced opioid-related side effects with intrathecal pain therapy. Intrathecal drug delivery has also been widely used for noncancer pain, particularly for the treatment of chronic low-back pain. Use of this therapy for noncancer pain, however, has not been subject to controlled trials and remains controversial.

Once a patient is selected for intrathecal therapy, a trial is carried out. Most physicians now conduct trials by placing a temporary percutaneous intrathecal catheter and infusing the analgesic agent over several days to judge the effectiveness of this therapy before a permanent system is implanted. Some carry out the trial of intrathecal therapy using a single dose or a continuous epidural infusion. The most common analgesic agent used for spinal delivery is morphine, which remains the only opioid approved for intrathecal use by the U.S. Food and Drug Administration.

Placement

Position

Before the procedure, discuss with the patient the location of the pocket for the intrathecal pump. Most devices are large, and the only region suitable for placement is the left or right lower quadrant of the abdomen. Once the site is determined, the proposed skin incision is marked with a permanent marker while the patient is in the sitting position. The position of the pocket on the abdominal wall is deceptively difficult to determine once the patient is lying on his or her side. If the location is not marked, the pocket is often placed too far laterally in the abdominal wall.

Implantation of an intrathecal drug delivery system is a minor surgical procedure that is carried out in the operating room using aseptic precautions, including skin preparation, sterile draping, and full surgical attire (Fig. 50-1A). The procedure can be conducted under regional anesthesia or general anesthesia using dedicated anesthesia personnel. Performing the initial spinal catheter placement under general anesthesia is controversial, and concerns about neural injury are similar to those when performing any neuraxial technique under general anesthesia.

image image image image image image

Figure 50-1. Intrathecal drug delivery system implantation. A, View of a typical operating room arrangement during intrathecal implantation. The patient is placed in the lateral position with the fluoroscopic C-arm in place for a cross-table anteroposterior view of the lumbar spine. B, Initial spinal needle placement at the L3-L4 interspace using a paramedian approach. Free flow of cerebrospinal fluid (CSF) indicates an intrathecal location. C, Intrathecal catheter placement through the spinal needle under fluoroscopic guidance. Anteroposterior (D) and lateral (E) radiographs of the intrathecal catheter tip in good position, with the tip adjacent to the L2-L3 intervertebral disk. F, After confirming the final position of the catheter tip, the proximal portion of the catheter is fastened to the surgical field and the spinal needle is withdrawn about 1 cm to lie in the subcutaneous tissue. Leaving the needle in place protects the catheter during subsequent dissection. G, A cephalocaudad incision is made through the skin and subcutaneous tissues; the incision extends above and below the needle entry point. H, Using blunt dissection, the skin and subcutaneous tissues are further divided until the lumbar paravertebral fascia is exposed. I, A pursestring suture is placed around the base of the needle in the paravertebral fascia; this suture reduces the likelihood that CSF will track back along the catheter and result in a subcutaneous CSF collection. J, The needle and catheter stylet are removed together while the catheter is held firmly in position. K, The catheter is secured to the paravertebral fascia using an anchoring device provided by the manufacturer. L, A transverse incision is created in the abdominal wall midway between the umbilicus and the anterior axillary line, and a pocket of sufficient size to accommodate the pump is created using blunt dissection. The blunt dissection can be accomplished using the fingertips or surgical scissors and a repeated spreading (rather than cutting) motion. M, A tunneling device provided by the manufacturer is used to position the catheter in the subcutaneous tissue between the paravertebral incision and the abdominal pump pocket. N, Once good hemostasis has been achieved, the pump is placed in the pocket. The abdominal and paravertebral incisions are then closed in two layers: a layer of interrupted, absorbable sutures in the subcutaneous tissue overlying the pump and a separate layer within the skin.

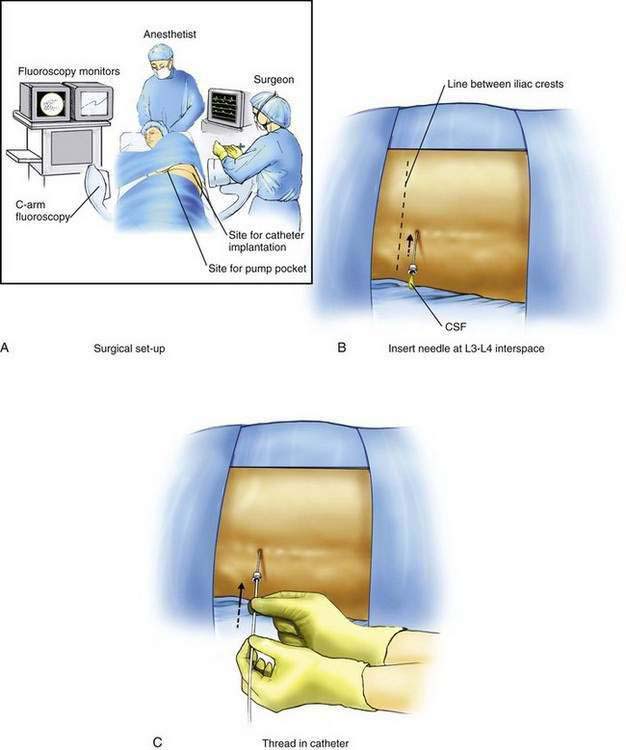
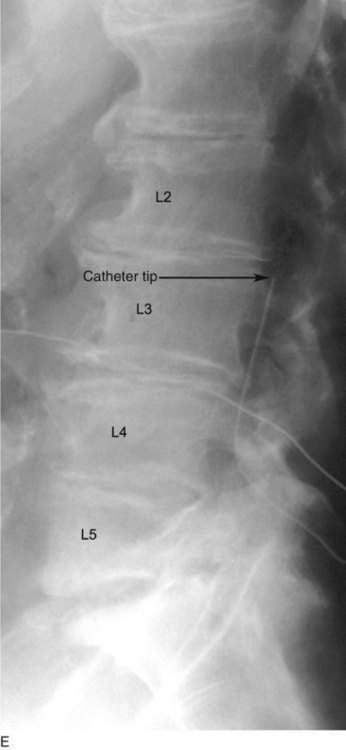
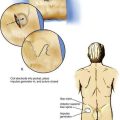
The patient is positioned on a radiolucent table in the lateral decubitus position with the patient’s side for the pump pocket nondependent (see Fig. 50-1A). The arms are extended at the shoulders and secured so that they are well away from the surgical field. The skin is prepared and sterile drapes are applied. The fluoroscopic C-arm is positioned across the lumbar region to provide a cross-table anteroposterior view of the lumbar spine. Care must be taken to ensure that the radiographic view is not rotated by observing that the spinous processes are in the midline, halfway between the vertebral pedicles (see Fig. 50-1E).

Procedure for Intrathecal Catheter Placement

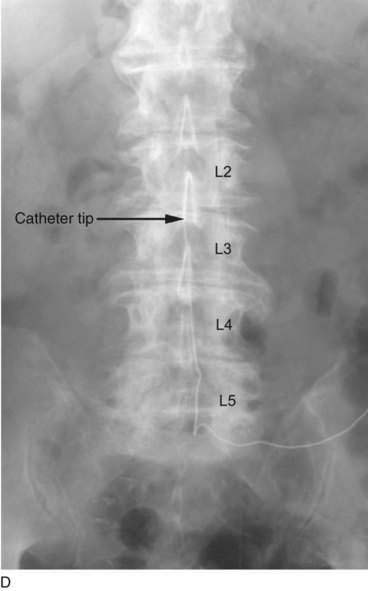
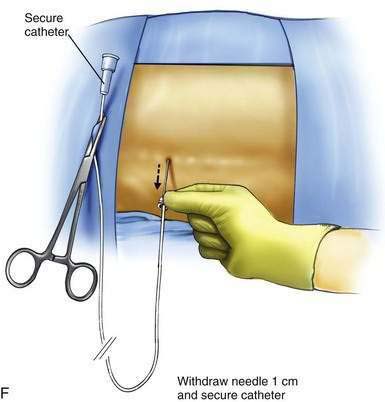
The L3-L4 interspace is identified using fluoroscopy The spinal needle supplied by the intrathecal device manufacturer must be used to ensure that the catheter can advance through the needle without damage. The needle is advanced using a paramedian approach starting 1 to 1.5 cm lateral to the spinous processes. The needle is directed to enter the spinal space in the midline; the stylet is removed to ensure adequate flow of CSF (Fig. 50-1B). The spinal catheter is then advanced through the needle until the tip is well into the spinal space but below L2 in the lumbar cistern (Fig. 50-1C). The position of the catheter tip is verified using fluoroscopy in the anteroposterior and lateral planes (Fig. 50-1D and E). The needle is then withdrawn slightly (about 1 to 2 cm) but left in place around the catheter in the subcutaneous tissues to protect the catheter during the subsequent incision and dissection (Fig. 50-1F). The catheter is secured to the surgical field using a small clamp to ensure that it does not fall from the sterile field (see Fig. 50-1F).

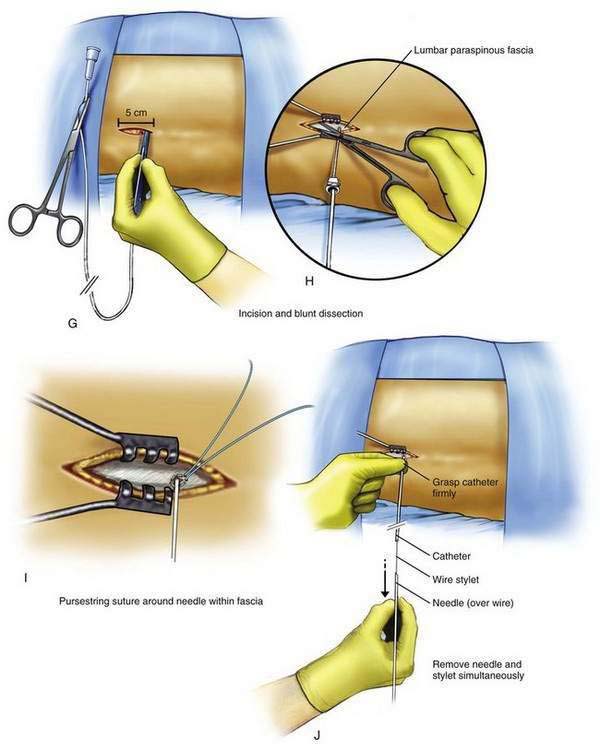
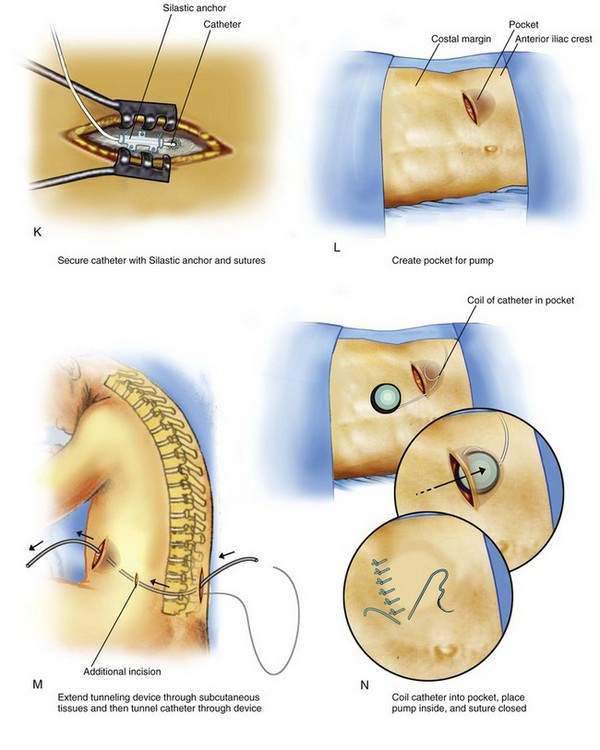
A 5- to 8-cm incision parallel to the axis of the spine is extended from just cephalad to just caudad to the needle, extending directly through the needle’s entry point on the skin (Fig. 50-1G). The subcutaneous tissues are divided using blunt dissection until the lumbar paraspinous fascia is visible surrounding the needle shaft (Fig. 50-1H). A pursestring suture is created in the fascia surrounding the needle shaft site (Fig. 50-1I). This suture is used to tighten the fascia around the catheter and prevent backflow of CSF, which may lead to a chronic subcutaneous CSF collection. The needle and stylet are then removed simultaneously, using care not to dislodge the spinal catheter (Fig. 50-1J). Free flow of CSF from the catheter should be evident; if there is no CSF flowing from the catheter, a blunt needle can be inserted in the end of the catheter and gentle aspiration used to ensure that the catheter remains in the thecal sac. If CSF cannot be aspirated from the catheter, the catheter is removed and replaced. The catheter is then secured to the paraspinous fascia using a specific anchoring device supplied by the manufacturer (Fig. 50-1K).

Attention is now turned to creating the pocket in the patient’s abdominal wall. A 10- to 12-cm transverse incision is made along the previously marked line, and a subcutaneous pocket is created using blunt dissection (Fig. 50-1L). The pocket should always be created caudad to the incision; if the pocket is placed cephalad to the incision, the weight of the pump on the suture line is likely to cause wound dehiscence. In many patients, the blunt dissection can be accomplished using gentle but firm pressure with the fingers. It is simpler and less traumatic to use a small surgical scissors to perform the blunt dissection, using repeated opening motions rather than closing or cutting motions that are likely to cut vascular structures and provoke marked bleeding. An alternative to blunt dissection is the use of a monopolar electrocautery device in the “cut” mode, an effective means to carry out the necessary dissection without excessive tissue trauma or blood loss. After the pocket has been created, the pump is placed in the pocket to ensure that the pocket is large enough. The pump should fit completely within the pocket without any part of the device extending into the incision. With the device in place, the wound margins should fall into close apposition. There should be no tension on the sutures during closure of the incision, or the wound is more likely to undergo dehiscence.

After the pocket has been created, a tunneling device is extended within the subcutaneous tissues between the paraspinous incision and the pocket (Fig. 50-1M). The catheter is then advanced through the tunnel, leaving a small tension-relief loop of catheter in the subcutaneous area of the paraspinous dissection (commonly used tunneling devices place a hollow plastic sleeve through which the catheter can be advanced from the patient’s back to the pump pocket). The catheter is then trimmed to a length that allows a small loop of catheter to remain deep to the pump and attached to it. The pump is placed in the pocket with a loop of catheter deep to the device (Fig. 50-1N). This loop and the small loop of catheter in the paraspinous region allow patient movement without placing tension on the distal catheter, causing it to be pulled from the thecal sac. Two or more sutures are then placed through the suture loops or mesh enclosure surrounding the pump and are used to secure the pump to the abdominal fascia. These simple retaining sutures prevent the pump from rotating or flipping within the pocket. The skin incisions are then closed in two layers: a series of interrupted subcutaneous sutures to close the fascia securely overlying the pump and the catheter, followed by skin closure using suture or staples.

Procedure for Permanent Epidural Catheter Placement

Patient positioning and use of fluoroscopy when placing a permanent epidural catheter are similar to those described for intrathecal catheter placement. The interspace of entry varies with the dermatomes to be covered, particularly if local anesthetic solution is to be used. A typical loss-of-resistance technique is used to identify the epidural space, and a Silastic catheter is threaded into the epidural space. A paraspinous incision is created and the catheter is secured to the paraspinous fascia as described previously for intrathecal catheter placement.

Two permanent epidural systems are available: (1) a totally implanted system using a subcutaneous port that is accessed by a needle placed into the port through the skin, and (2) a percutaneous catheter that is tunneled subcutaneously but exits the skin to be connected directly to an external infusion device.

To place a permanent epidural system with a subcutaneous port, a 6- to 8-cm transverse incision is made overlying the costal margin halfway between the xiphoid process and the anterior axillary line. A pocket is created overlying the rib cage using blunt dissection (Fig. 50-2A). The catheter is then tunneled from the paraspinous region to the pocket, as described previously for intrathecal catheter placement, and secured to the port. The port must then be sutured securely to the fascia over the rib cage. Care must be taken to ensure that the port is secured firmly in a region that overlies the rib cage; if the port migrates inferiorly to lie over the abdomen, it becomes difficult to access. The rigid support of the rib cage holds the port firmly from behind, allowing easier access to the port. The skin incisions are then closed in two layers: a series of interrupted subcutaneous sutures to close securely the fascia overlying the catheter, followed by skin closure using sutures or staples.

image

Figure 50-2. Permanent epidural catheter placement. Placement of the epidural catheter is accomplished using a loss-of-resistance technique, and fluoroscopy is used to direct the catheter to the dermatome of the pain to be treated. Creation of a paravertebral incision and securing the catheter to the lumbar paravertebral fascia are carried out as described for intrathecal catheter placement. A, Placement of a subcutaneous port. The epidural catheter is placed and tunneled to a pocket over the costal margin, leaving a small tension-relief loop of catheter in the subcutaneous paraspinous pocket. The port is connected to the epidural catheter and sutured to the fascia overlying the inferior rib cage. The port must lie firmly in place over the ribs rather than the abdominal wall; without the support of the firm rib cage behind the port, it would be difficult to access. B, Placement of a percutaneous tunneled catheter. This type of catheter typically is supplied in two pieces: a distal, epidural portion and a proximal catheter length with a subcutaneous antibiotic-impregnated cuff and external access port. After placement of the epidural catheter and dissection through a paravertebral incision, the proximal catheter is tunneled from the costal margin to the paravertebral incision and the catheter is pulled into the subcutaneous tissues until the antibiotic-impregnated cuff lies 1 to 2 cm from the chest wall incision in the subcutaneous tissue. The catheter segments are then trimmed, joined together using a connector supplied by the manufacturer, and secured to the paravertebral fascia, leaving a small tension-relief loop of catheter in the subcutaneous paraspinous pocket. The skin entry site on the chest wall is secured around the exiting catheter using interrupted sutures.

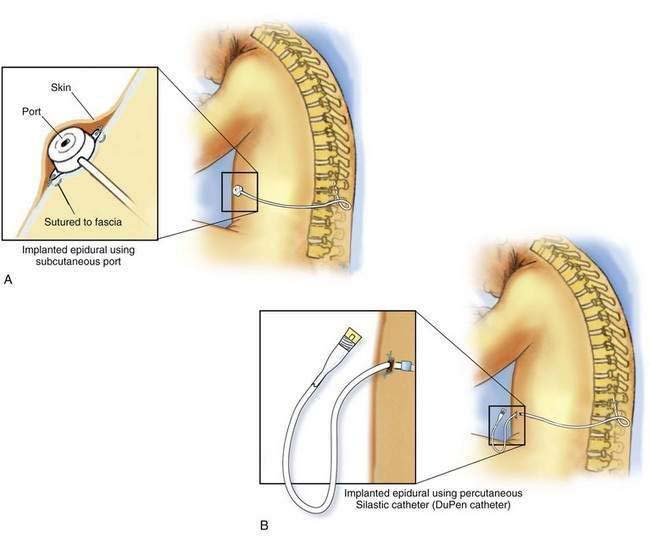
To place a permanent epidural system without a subcutaneous port, a tunneling device is extended from the paraspinous incision to the right upper abdominal quadrant just inferior to the costal margin. A small incision (about 0.5 cm) is made to allow the tunneling device to exit the skin. Percutaneous epidural catheters are supplied in two parts: the proximal portion of the catheter that is placed in the epidural space and the distal portion of the catheter that enters the abdominal wall and connects with the proximal portion of the catheter. The distal portion of the catheter is now secured to the tunneling device and pulled through the incision in the abdominal wall subcutaneously to emerge from the paraspinous incision (Fig. 50-2B). Many catheters are supplied with an antibiotic-impregnated cuff that is designed to arrest entry of bacteria along the track of the catheter. This cuff should be placed about 1 cm from the catheter’s exit site along the subcutaneous catheter track. The proximal and distal portions of the catheter are then trimmed, leaving enough catheter length to ensure that there is no traction on the catheter with movement. The two ends of the catheter are connected using a stainless steel union supplied by the manufacturer and sutured securely. The paraspinous skin incision is then closed in two layers: a series of interrupted subcutaneous sutures to securely close the fascia overlying the catheter, followed by skin closure using suture or staples. The skin incision at the epidural catheter’s exit site in the right upper quadrant is closed around the base of the catheter using one or two simple interrupted sutures.

Potential Problems

Bleeding and infection are risks inherent to all open surgical procedures. Bleeding in the pump pocket can lead to a hematoma surrounding the pump and may require surgical drainage. Bleeding along the subcutaneous tunneling track often causes significant bruising in the region but rarely requires treatment. As with other neuraxial techniques, bleeding in the epidural space can lead to significant neural compression. Signs of infection in the pump pocket typically appear between 10 and 14 days after implantation but may occur at any time. Some practitioners have reported successful treatment of superficial infections of the incision overlying the pocket with oral antibiotics aimed at the offending organism and close observation alone. However, infections within the pocket or along the catheter’s subcutaneous course almost always require removal of all implanted hardware and treatment with parenteral antibiotics to eradicate infection. Catheter and deep tissue infections can extend to involve the neuraxis and result in epidural abscess formation, meningitis, or both. Permanent epidural catheters without subcutaneous ports have a higher infection rate than those with ports during the first weeks after placement, but both systems have a similar high rate of infection when left in place for more than 6 to 8 weeks.

Spinal cord injury during initial catheter placement has been reported. Most practitioners recommend placing the catheter only in awake patients so that the patients can report paresthesias during needle placement. However, this is a topic of some debate, and placing the intrathecal catheter under general anesthesia using radiographic guidance below the level of the conus medullaris (at about L2) is considered appropriate by some physicians. The catheter can be placed incorrectly in the subdural compartment or the epidural space. In both cases, free flow of CSF does not occur, indicating improper location of the catheter tip.

Wound dehiscence and pump migration are infrequent problems. Ensuring that the size of the pocket is sufficient to prevent tension on the suture line at the time of wound closure is essential to minimize the risk of dehiscence. Pump migration usually occurs because retaining sutures were omitted at the time of pump placement. Placing two or more sutures through the suture loops or mesh on the pump and securely fastening them to the abdominal fascia minimizes the risk of pump migration. Subcutaneous collection of fluid surrounding the pump (seroma formation) can be problematic and typically follows pump replacement. Percutaneous drainage of the sterile fluid collection is often successful in resolving the problem. A subcutaneous collection of CSF, particularly in the paraspinous region, can also develop, even many months after pump placement. This complication can be managed with observation alone unless the fluid collection is large or painful; in these instances, neurosurgical exposure of the spinal catheter as it enters the dura and placement of a pursestring suture around the catheter to eliminate the CSF leak may be needed.

Share this: