Chapter 9 Interventional Techniques
 Additional videos for this topic are available online at www.expertconsult.com. Examples of diagnostic elbow ultrasound reports are available online at www.expertconsult.com (see eBox 9-1 and 9-2).
eBox 9-1
Sample Interventional Ultrasound Report
Examination: Ultrasound-Guided Injection of Right Biceps Brachii Long Head Tendon Sheath
Findings: Limited ultrasound over the anterior right shoulder demonstrates minimal joint fluid distending the biceps brachii long head tendon sheath. No evidence for hyperemia or synovial hypertrophy to suggest tenosynovitis. No evidence for biceps brachii long head tendon tear. No tendon subluxation or dislocation with dynamic imaging. No abnormal subacromial-subdeltoid bursal thickening.
After obtaining both written and verbal informed consent discussing potential risks (bleeding, infection, soft tissue injury) and benefits, using sterile technique and local anesthetic injection (provide type and amount), a 20-gauge spinal needle with stylet was inserted into the long head of the biceps brachii tendon sheath. Intrasheath location of needle tip was confirmed with a small amount of anesthetic injection. This was followed by corticosteroid injection (provide type and amount).
The patient tolerated the procedure well without complications. The patient’s pain level changed from 8/10 before procedure to 2/10.
eBox 9-2
Sample Interventional Ultrasound Report
Examination: Ultrasound-Guided Right Iliopsoas Peritendon Injection
History: Pain, evaluate for tendon tear
Findings: Limited ultrasound over the anterior right hip showed no hip joint effusion and unremarkable anterior hip labrum. The rectus femoris was normal. No evidence for iliopsoas bursal distention. Dynamic imaging showed no evidence for snapping iliopsoas tendon.
After obtaining both written and verbal informed consent discussing potential risks (bleeding, infection, soft tissue injury) and benefits, using sterile technique and local anesthetic injection (provide type and amount), a 20-gauge spinal needle with stylet was directed between the iliopsoas tendon and ilium superior to the femoral head. Needle tip location between the iliopsoas tendon and ilium was confirmed with a small amount of anesthetic injection. This was followed by corticosteroid injection (provide type and amount).
The patient tolerated the procedure well without complications. The patient’s pain level changed from 8/10 before procedure to 2/10.
Ultrasound-guided percutaneous procedures have several advantages, including real-time assessment and guidance, in which continuous visualization of a needle is possible throughout the procedure.1,2 With ultrasound guidance, a needle can be precisely placed in a target while avoiding important structures, such as nerves and blood vessels. This allows very high accuracy and low complication rate, especially compared with blind needle placement. Compared with other imaging-guided techniques like computed tomography (CT), ultrasound is especially effective when a target is superficial. In addition, procedure time is typically reduced compared with CT, and ultrasound is not limited to standard imaging planes. Other intrinsic advantages of ultrasound are not specifically related to intervention but include availability, portability, lack of ionizing radiation, and relatively low cost.
This chapter first reviews technical considerations when performing an ultrasound-guided procedure. This is followed by topics related to joint, bursal, tendon sheath, tendon, and miscellaneous procedures. Because the procedure that is completed using ultrasound guidance can vary widely (diagnostic or therapeutic injection versus aspiration), the ultrasound guidance aspect is emphasized here, rather than the efficacy of the specific procedure.3,4 Regardless of the procedure, if one can identify the target and the needle with ultrasound, and understand what structures lie in the projected needle path, ultrasound can offer an accurate and safe method for needle guidance for essentially any procedure. Knowledge of anatomy and of normal and abnormal sonographic findings is essential to accurately identify a target. Of note, the photographs in this chapter that show needle and transducer placement are for illustrative purposes only, in that sterile technique and needles were not used.
Technical Considerations
Needle Guidance Overview
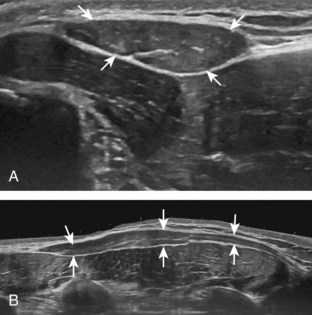
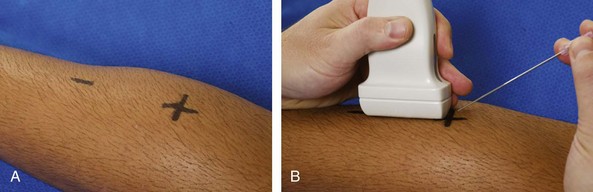
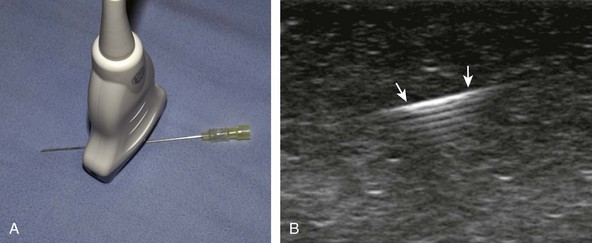
There are several techniques that may be employed when using the direct approach, including needle guide or freehand techniques. The one option that is not routinely used for musculoskeletal procedures employs a needle guide that is physically attached to the ultrasound transducer. Because most musculoskeletal procedures are relatively superficial, and given the extra steps required when using a needle guide, a freehand approach is favored. When using the freehand direct approach, there are two methods to direct a needle relative to the transducer and sound beam: in plane and out of plane. With the in-plane approach, the needle is directed under the long axis of the transducer and sound beam in plane, and the entire needle, including its tip, is visible at all times during the procedure (Fig. 9-1) (Video 9-1) . This enables real-time correction of angle and depth while the needle is advanced. The in-plane approach is the preferred method in most situations because continual visualization of the entire needle, including the needle tip and target, minimizes complications and maximizes accuracy.
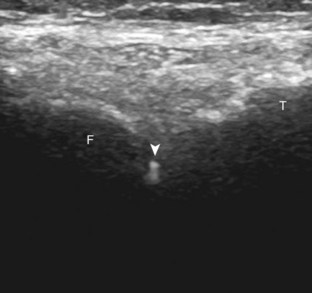
With the out-of-plane approach, the needle is passed perpendicular to the transducer so that the needle passes through the plane of the sound beam (Fig. 9-2) (Video 9-2) . The disadvantage with this approach is that only a short segment of the needle is seen where the needle passes through the sound beam plane. When using the out-of-plane approach, the needle entrance site is centered over the target, and the needle enters from the side of the transducer (see Fig. 9-12). When inserting the needle, there is some trial and error required as the needle passes through the sound beam, is retracted, and then repeatedly redirected, typically deeper, to eventually get to the target. Another disadvantage is that one cannot determine what segment of the needle is represented on the ultrasound image, the shaft or tip of the needle, because they look exactly the same as a single bright echo with reverberation artifact. Although the in-plane approach is preferred in most situations, the out-of-plane approach is favored in situations in which the target is very superficial, such as guiding a needle into small joints of the hand and foot. Regardless of the in-plane or out-of-plane approach, once the needle is seen in the target, it is critical that the transducer is turned 90 degrees to confirm accurate location of the needle tip. It is wise to become comfortable with both in-plane and out-of-plane direct methods of needle guidance.

Approach, Transducer and Needle Selection, and Ergonomics
The first step in planning an ultrasound-guided procedure (after performing a limited diagnostic ultrasound) is proper positioning of the patient. I prefer to always have the patient supine when performing any procedure, to avoid the potential for a vasovagal reaction. Next, the generalized needle approach and transducer plane are planned before marking and cleansing the skin. When performing an extremity procedure, there is often a choice between having the needle enter along the flat surface of the extremity or the curved surface. There are several benefits of having the needle enter along the curved surface, including more room to work in the space next to the extremity rather than directly over the flat surface of an extremity. Another advantage is that the puncture site can be an increased distance from the transducer (Fig. 9-3). This is helpful in that the needle can be more perpendicular to the sound beam (and therefore more conspicuous), and in addition the needle is not directly touching the transducer, which comes into play depending on the level of aseptic technique (see later discussion).
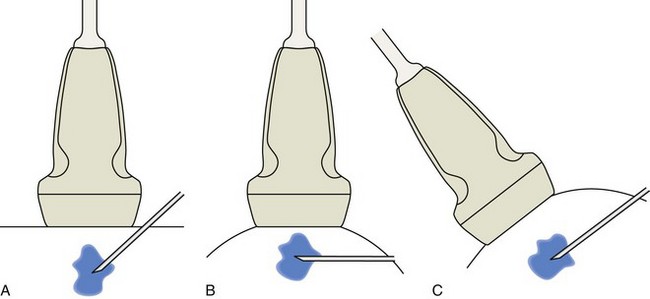
FIGURE 9-3 Needle entry site: flat versus curved surface.
(Adapted from illustrations by Carolyn Nowak, Ann Arbor, Mich; http://www.carolyncnowak.com/MedTech.html.)
Transducer choice should also be considered at this time. In procedures of the extremities involving the elbow, wrist, hand, knee, ankle, and foot, a linear transducer greater than 10 MHz is typically used because the target is usually superficial. A high-frequency transducer provides the highest resolution, and the sound beam projecting in a linear fashion parallel to the transducer face creates an echogenic appearance of the needle (see Fig. 1-1A). A small-footprint transducer is often helpful at the distal extremities; often, a larger footprint transducer does not make contact with the full surface of the skin because of the multiple curvatures of the distal extremities and decreased thickness of soft tissues compared with more proximal joints. An offset to a small-footprint probe (often referred to as a hockey-stick design) is not required but is helpful when performing procedures of small parts because the hand holding the transducer is then away from the puncture site, improving visualization at the puncture site (see Fig. 1-1C). When performing procedures of the shoulder and hip, a curvilinear transducer is often selected (see Fig. 1-1B). The benefits of this type of transducer include a larger field of view of deeper structures and a lower frequency, improving sound beam penetration. In addition, the sound beam is emitted in a more radial fashion, which helps to improve conspicuity of a needle that is steeply angled to reach a deep target.
Prepping the Site
The first step in the procedure after finding the target, determining the approach, and choosing the transducer is marking the skin. This is completed before cleansing the skin and before sterile conditions. With a direct method of needle guidance, the transducer is placed over the target and the puncture site is determined. A mark is placed at the puncture site (such as an X), and a line is placed at the other end of the transducer to indicate the imaging plane (Fig. 9-4). The use of a surgical marker will help to ensure that the marks are not washed off during cleansing of the skin. If using the indirect method, an opened paperclip passed between the transducer face and the skin can be used to accurately mark the skin directly over a target (Video 9-3) .5
.5
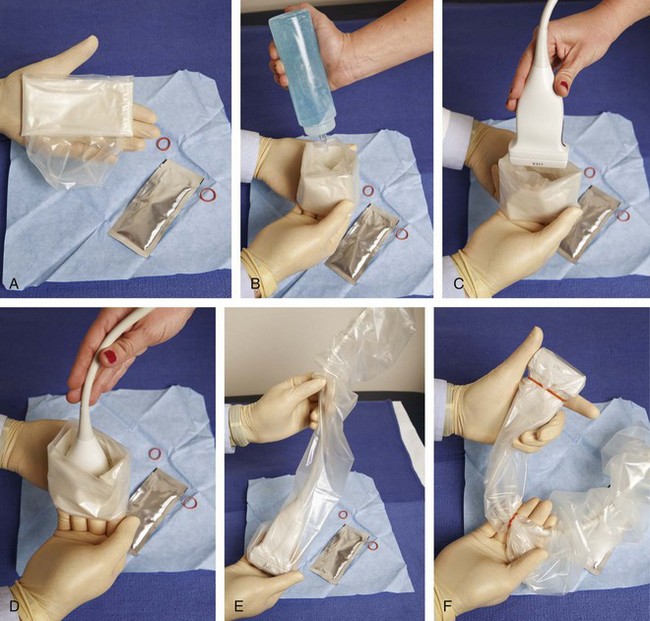
With regard to sterile technique, the use of a probe cover and preparing a sterile field at the puncture site will minimize the risk of infection. Although sterile preparation of the site can take variable forms, the following represents the procedure used by this author. The operator wears sterile gloves and prepares the site with chlorhexidine solution. Sterile drapes or towels are placed around the puncture site covering the areas not washed with chlorhexidine solution. The puncture site is anesthetized with local anesthetic using a 25-gauge needle. A sterile probe cover kit is opened and placed on the sterile tray (Fig. 9-5A). The sterile operator opens the probe cover, and an assistant places nonsterile gel in the inside of the probe cover, followed by the transducer (see Fig. 9-5B to D). The operator then extends the probe cover along the transducer cable (see Fig. 9-5E) and secures the cover with sterile rubber bands (included with the probe cover) (see Fig. 9-5F). Sterile gel that is also included in the sterile probe cover kit is opened and deposited on one of the sterile drapes near the puncture site. The transducer in the cover is then dipped into the sterile gel and placed between the X and the line to reconfirm the target. The probe is removed from the site, and the procedure needle enters the skin (about 1 cm) at the puncture site. The transducer is returned to the procedure site to visualize the needle. Of note, the transducer is removed from the procedure site until the needle penetrates the skin to avoid inadvertent puncture of the transducer or transducer cover. With a sterile field placed around the procedure site, the operator can easily set the transducer down on the field while exchanging syringes, minimizing contamination.
Needle Visualization
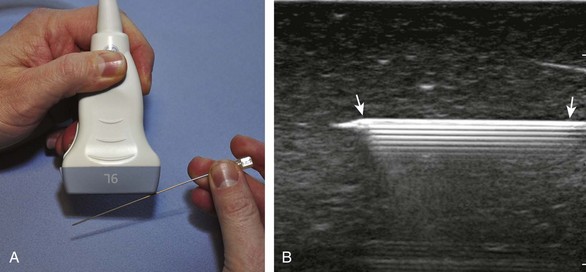
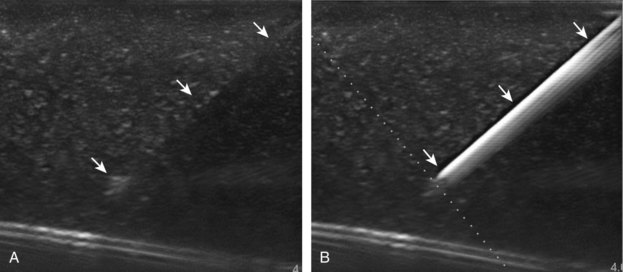
There are several options to improve conspicuity of the needle with ultrasound. A larger needle with a stylet may help, but a larger needle is not chosen for this reason. Some manufacturers have a coated or etched needle so that the needle becomes more echogenic (Fig. 9-6).6 This is helpful when performing a procedure that is deep where the needle angle is steep in order to get to the target. A very helpful option is to “jiggle” the needle while moving the transducer over the projected needle path (Video 9-4) . With this maneuver, the needle is moved minimally forward and backward along the needle path, similar to needle movement with an intention tremor, which causes movement of the adjacent soft tissue and can help locate the needle. Of note, the needle in this maneuver is not advanced or moved side to side. Another option is to rotate the needle because the bevel of the needle may produce a more echogenic appearance. The most important technique to improve visualization of the needle is to have the needle as close to perpendicular to the sound beam as possible. Similar to anisotropy of tendons, a needle that is oblique to the sound beam will be less echogenic (Fig. 9-7A), whereas a needle that is perpendicular will be very echogenic with a strong reverberation artifact (see Fig. 9-1B) (Video 9-5)
 . A perpendicular alignment between the sound beam and needle can be accomplished by having the puncture site farther removed from the transducer, which is possible when performing a procedure along the curvature of an extremity (see Fig. 9-3B). Another option is to move the transducer or deform the soft tissues with a heel-toe maneuver (see Fig. 9-3C). Many ultrasound machines have the ability to steer the ultrasound beam so that the insonation angle between the needle and the beam is ideally perpendicular to eliminate needle anisotropy (see Fig. 9-7B).
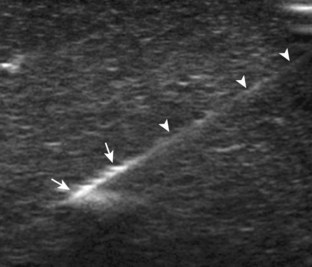
FIGURE 9-6 Echogenic needle tip.
Ultrasound image shows needle (arrowheads) with increased echogenicity at needle tip (arrows).
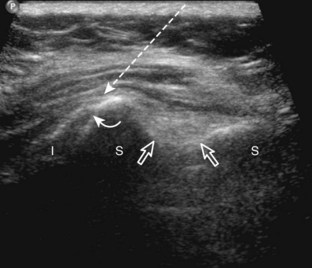
When attempting to align the needle along the long axis of the sound beam, as in the in-plane approach, it is not uncommon to identify only a short segment of the needle. This finding indicates that the transducer alignment and needle are not parallel but instead are crossing each other (Fig. 9-8). The longer the visible segment, the more the needle and sound beam are parallel. To correct this, the transducer should be turned clockwise or counterclockwise. If the segment of needle is increasing in length, the rotation is in the correct direction because the needle and sound beam become more parallel (Video 9-6) . On the contrary, if the segment of needle becomes shorter, the transducer is being turned in the wrong direction because less of the needle is in the sound beam path.
Joint Procedures
Percutaneous joint procedures can include aspiration (for infection or crystal analysis), injection (both diagnostic and therapeutic using anesthetic agents or corticosteroids, or for the purpose of injecting contrast before magnetic resonance imaging [MRI] or CT), or less commonly synovial biopsy. Accuracy of such procedures is improved compared with blind attempt if the needle tip is directly visualized with ultrasound within the target.4 One key concept is that nearly every synovial joint in the extremity has one recess that preferentially distends with joint fluid and is visible at imaging.7 These recesses directly communicate with their respective joint articulations so that a joint procedure targets these sites rather than the joint articulations, which would potentially harm fibrocartilage and hyaline cartilage. These distinct joint recesses are assessed for joint fluid or synovial hypertrophy and are targeted for the joint procedure.
 . Biopsies of synovial hypertrophy tend to be reserved to evaluate for atypical infection or synovial proliferative disorders (such as pigmented villonodular synovitis); such biopsies in the setting of a systemic inflammatory arthritis often reveal nonspecific inflammation.
Shoulder
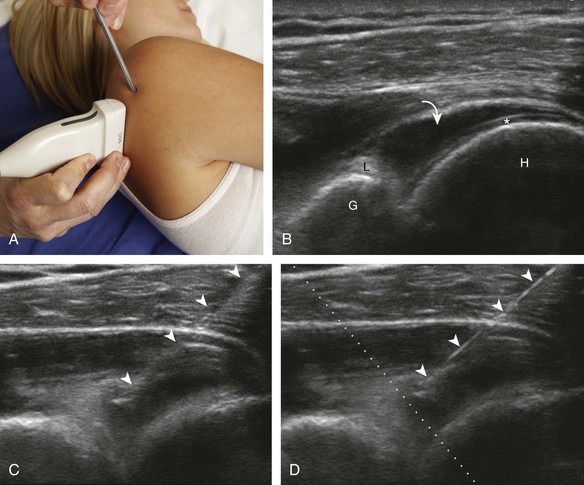
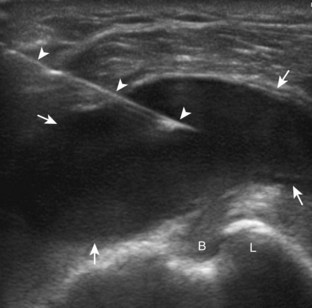
Regarding the shoulder joint, joint effusions accumulate within the biceps brachii tendon sheath because this space openly communicates with the glenohumeral joint (in the absence of biceps brachii long head tenosynovitis). Other glenohumeral joint recesses include the axillary recess, the subscapularis recess, and the posterior glenohumeral joint recess (assessed in external rotation).8 To access the glenohumeral joint, a posterior approach targeting the posterior glenohumeral recess is preferred (Fig. 9-9).3,9 The transducer is placed long axis to the infraspinatus tendon, and the needle is advanced in plane from lateral to medial (or medial to lateral) until the needle tip is located at the surface of the humeral head hyaline cartilage (see Video 9-7). The joint recess is wider more medial adjacent to the hyperechoic fibrocartilage labrum, especially with external rotation of the shoulder. The biceps brachii tendon sheath is not typically targeted for glenohumeral joint access because open communication between the biceps sheath and joint may not always be present in the setting of biceps tenosynovitis.
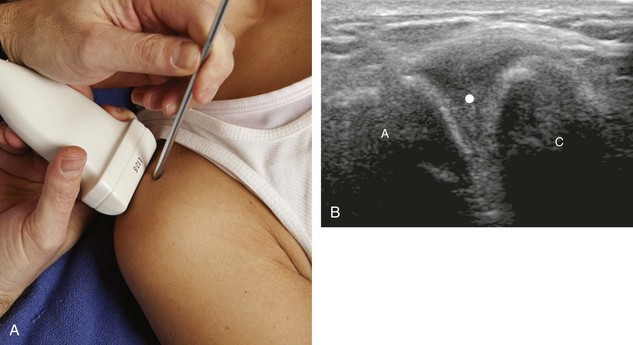
The acromioclavicular joint can be accessed in several different ways. If the joint is distended superiorly, an in-plane needle approach can be used with the transducer in the coronal plane on the body and with the needle entering from lateral to medial (Fig. 9-10) (Video 9-8) . Another method is an in-plane approach with the transducer in the sagittal plane and the needle entering from anterior to posterior (Fig. 9-11), although this technique may be difficult if the joint is narrowed. Lastly, an out-of-plane approach may be used with the transducer in the coronal plane on the body (Fig. 9-12). Similarly, the sternoclavicular joint can be approached in plane from lateral to medial or out of plane (Fig. 9-13).


Elbow
For the elbow joint, the most sensitive location to identify a joint effusion by ultrasound is the posterior olecranon recess (in the olecranon fossa) with the elbow flexed, where a joint effusion or synovial process displaces the adjacent hyperechoic fat pad posterior and superior.10 Needle placement is transverse to the extremity, in plane with the transducer, with the needle advanced from lateral to medial (Fig. 9-14) (Video 9-9) . Positioning of the elbow in slight extension prior to needle placement may redistribute the joint fluid more superficially, aiding in aspiration.

Wrist and Hand
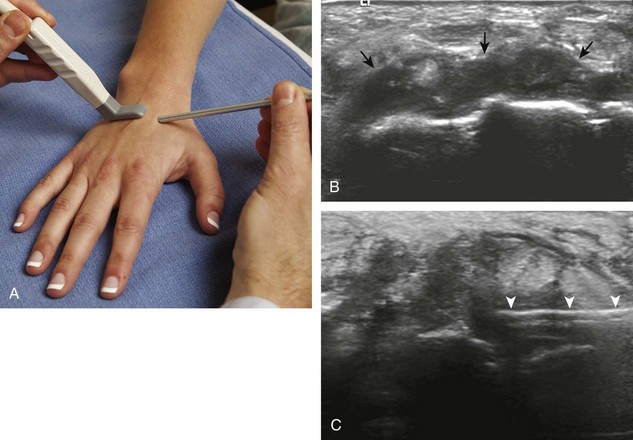
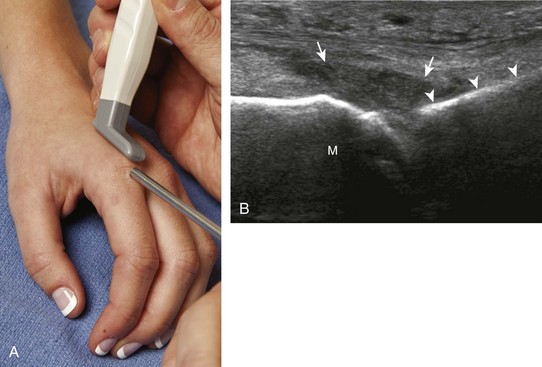
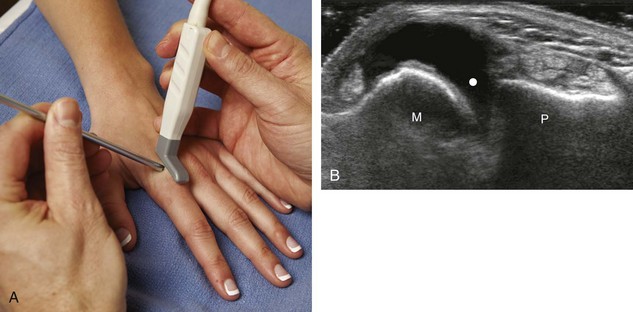
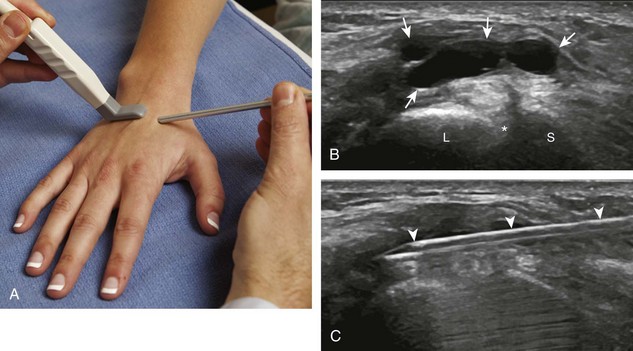
With regard to the wrist and hand, the dorsal recesses are the typical accessible targets. There are three wrist joints: distal radioulnar, radiocarpal, and midcarpal. For all three of these joint recesses, I prefer the in-plane approach with the transducer in the axial plane on the body and the needle entering from ulnar or radial along the curvature of the extremity (Fig. 9-15) (Video 9-10) . Aspiration of the small joints of the hand can be more difficult, although the dorsal recesses are usually targeted. To access the dorsal recesses, either an in-plane (Fig. 9-16) or out-of-plane approach (Fig. 9-17) is effective, with the needle entering into the actual joint space with the latter.11 It is important to avoid the overlying tendon in the sagittal plane and the neurovascular structures at the medial and lateral aspects, so a parasagittal approach is ideal.
Hip and Pelvis
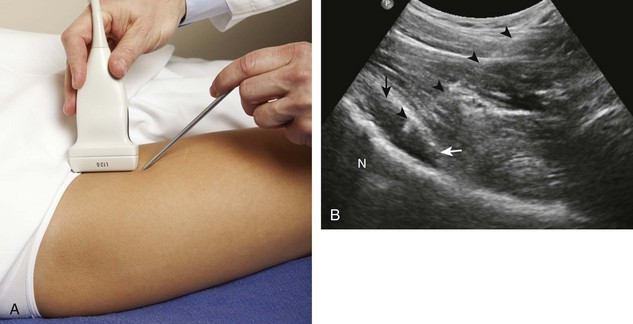
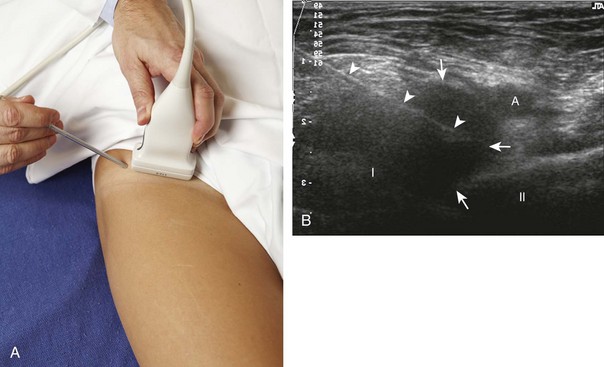
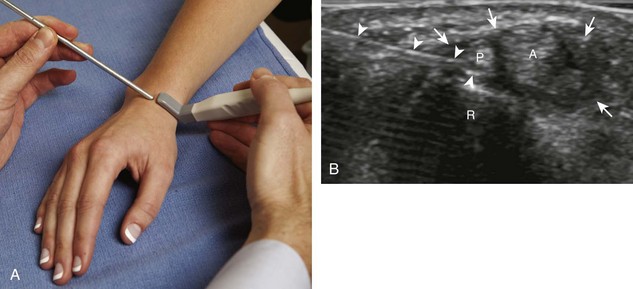
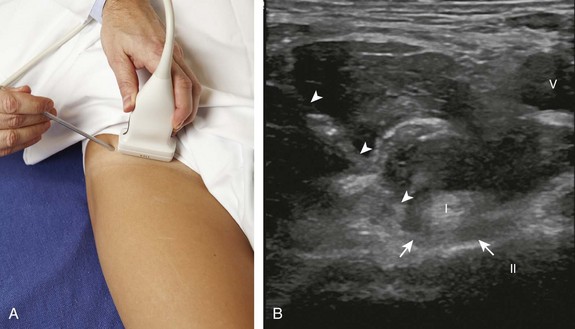
For the hip joint, the anterior recess overlying the femoral neck is the site for aspiration or injection.12 I prefer an in-plane approach with the needle entering from inferior to superior along the plane of the femoral neck (sagittal oblique) (Fig. 9-18) (Video 9-11) , although an in-plane approach with the needle entering from lateral to medial is an additional technique.7,13 Because of the depth of the target in many adults, the needle is often quite oblique to the sound beam, which makes the needle less conspicuous. The use of a curvilinear transducer is often helpful. As described earlier, for injecting a collapsed joint recess, it is often helpful to first test inject with local anesthetic to ensure accurate needle position before final injection.14
For aspiration or injection of the pubic symphysis, the transducer is placed in the transverse plane, and the needle can enter lateral to medial with an in-plane approach (Fig. 9-19), or an out-of-plane approach may be used.
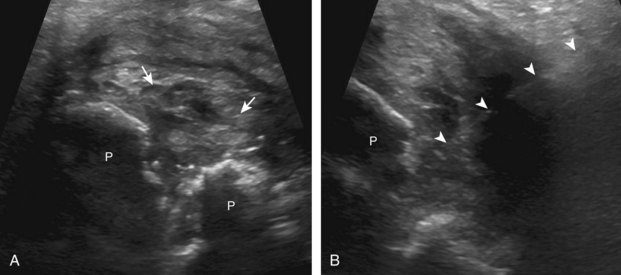
Ultrasound-guided needle placement into the sacroiliac joint typically is in plane with the transducer in the axial plane on the body, with the needle entering from medial to lateral.15,16 It is critical not to mistake the adjacent sacral neural foramina, which are just medial to the sacroiliac joints, as the sacroiliac joints (Fig. 9-20). Last, at the superior aspect of the sacroiliac joints where the space between the ilium and sacrum is widened, this is not the true synovial joint articulation, which is located more inferiorly where the joint space is relatively narrow.
Knee
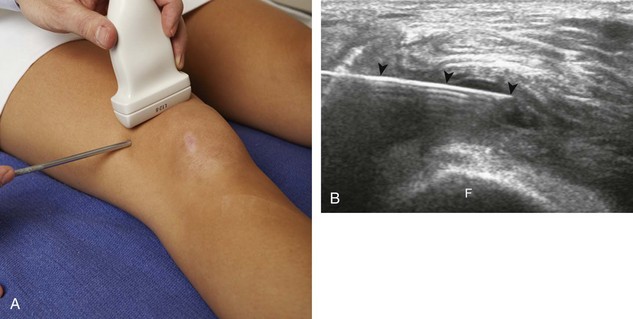
Distention of the knee joint occurs around the patella, most commonly just superolateral to the patella. Fluid collects in the suprapatellar recess under the quadriceps with the knee in slight flexion, or medial or lateral to the patella under the retinaculum when the knee is extended.17 Given this variability, it is important to screen all areas around the patella for joint recess distention. To access the knee joint, I prefer an in-plane approach with the transducer transverse on the body and the needle entering from lateral to medial along the curvature of the extremity, usually targeting the superolateral aspect of the joint recess (Fig. 9-21) (Video 9-12)  .18 To access the proximal tibiofibular joint, the transducer is placed in the transverse plane on the body over the anterior aspect of the joint, and an out-of-plane approach is used (Fig. 9-22) (Video 9-13)
 .19
.19
Ankle and Foot
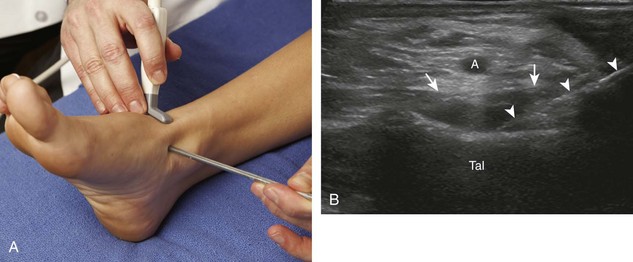
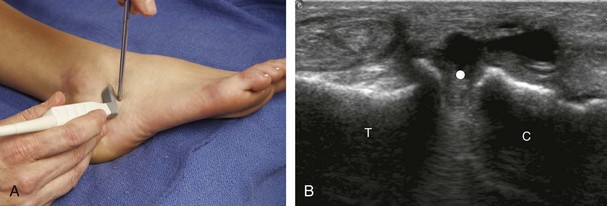
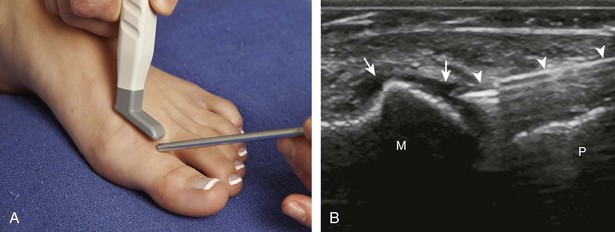
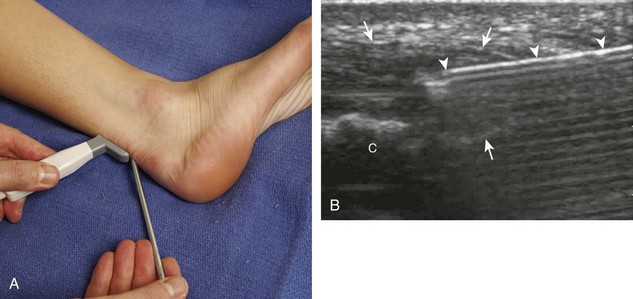
For the ankle joint, the anterior recess is accessed for aspiration or injection. There are two different approaches to consider. The first is an in-plane approach with the transducer in the sagittal plane on the body and the needle entering from inferior to superior, usually between the tibialis anterior and extensor hallucis longus tendons (Fig. 9-23).20 The other approach is an in-plane approach with the transducer transverse on the body and the needle entering from medial to lateral beneath the tibialis anterior tendon and dorsalis pedis artery (Fig. 9-24) (Video 9-14) . For the subtalar joint, there are several approaches that can be considered, including anterolateral (Fig. 9-25), posterolateral, and posteromedial.21 For the metatarsophalangeal and interphalangeal joints, an in-plane (Fig. 9-26) (Video 9-15)
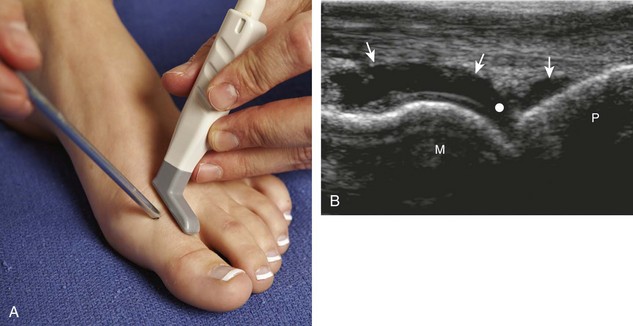
 or out-of-plane (Fig. 9-27) approach can access the dorsal recesses or joint articulations, similar to what was described for the hand.

Bursal Procedures
Bursal injection or aspiration using ultrasound guidance can be more accurate than a blind attempt when the needle tip is accurately identified within the bursa.3 Regardless, needle placement within a collapsed bursa is more difficult than within one that is distended with fluid. Before attempting injection into a collapsed bursa, it is important to test-inject with a small amount of local anesthetic to ensure accurate needle placement in the bursa, which will appear as bursal distention with the injection moving away from the needle tip and low resistance to injection. Knowledge of the various bursae around the body allows differentiation between true bursal distention and a nonspecific soft tissue fluid collection. When guiding a needle into a bursa, the bursal wall is often difficult to penetrate, and frequently the needle tents the wall, which may simulate an intrabursal location of the needle tip (see Baker Cyst). True intrabursal location is evident when the needle does not retract on its own and can be easily and freely moved within the bursa. When one anticipates complete aspiration of a bursa, an introducer rather than a standard needle should be considered. With an introducer, the inner stylet is removed after the needle is in the bursa, and the needle end is relatively blunt, which minimizes trauma and potential bleeding as the opposing wall of the bursa collapses down onto the needle tip.
Subacromial-Subdeltoid Bursa
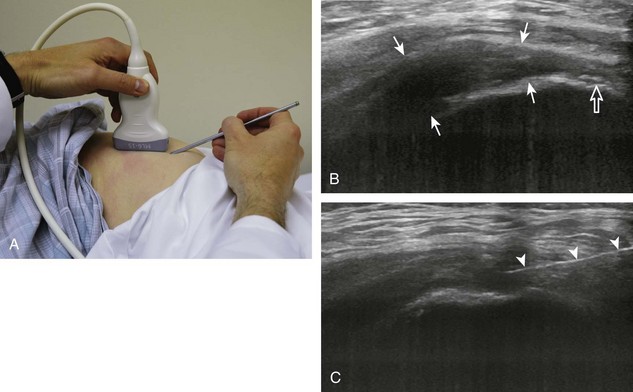
One of the more common bursal injections involves the subacromial-subdeltoid bursa. I prefer the in-plane approach with the transducer in the coronal (Fig. 9-28) or axial plane (Fig. 9-29) on the body and the needle entering from lateral to medial, targeting the area of the bursa that is distended (Videos 9-16 and 9-17) . If the bursa is not distended, the needle is directed superficial to the supraspinatus tendon; a test injection with anesthetic agent is completed to confirm bursal location of the needle before corticosteroid injection (Video 9-18)
 . If the puncture site is several centimeters away from the end of the transducer, then the needle will be more perpendicular to the transducer sound beam, making the needle more conspicuous. The subacromial-subdeltoid bursa extends from under the acromion, over the rotator cuff, and along the cortex of the proximal humerus, where any site of bursal distention can be a target for aspiration or injection (see Fig. 9-28C and Video 9-19)
 .
.
Iliopsoas Bursa
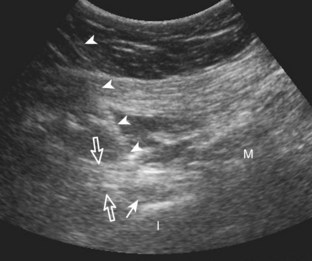
Another bursa that may be targeted is the iliopsoas bursa.22 As described in Chapter 6, the iliopsoas bursa is uncommonly distended, and if distended, it usually relates to a hip joint process because of the potential communication between the two synovial spaces. Ultrasound-guided aspiration or injection is typically completed when a distended iliopsoas bursa is identified. For needle placement into the iliopsoas bursa, the transducer is placed parallel to the inguinal ligament just at or superior to the level of the femoral head, and an in-plane approach from lateral to medial is used (Fig. 9-30).
Greater Trochanteric Bursae
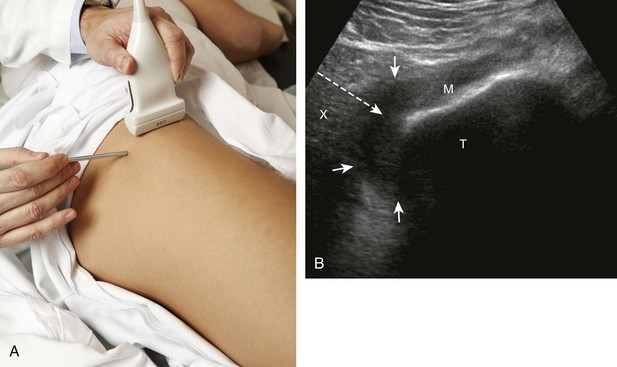
There are several bursae around the greater trochanter, the largest being the trochanteric (or subgluteus maximus) bursa, located between the posterior facet of the greater trochanter and the gluteus maximus, although a distended trochanteric bursa can extend anterior over the gluteus medius tendon.23 Similar to the iliopsoas bursa, the trochanteric bursa is uncommonly distended and rarely inflamed as an isolated cause of symptoms, but rather is associated with adjacent gluteus tendon abnormalities in the setting of greater trochanteric pain syndrome. To aspirate or inject a distended trochanteric bursa using ultrasound guidance, the patient is rolled decubitus, the transducer is placed in the transverse plane on the body, and the needle is directed in plane with the transducer from posterior to anterior (Fig. 9-31).
Baker Cyst
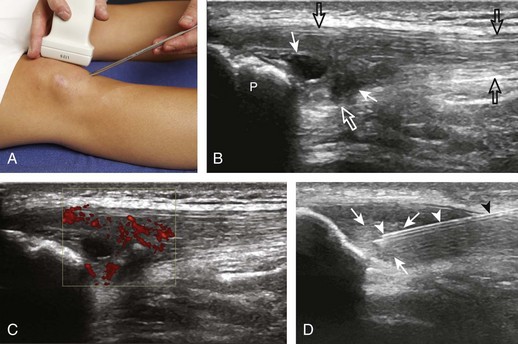
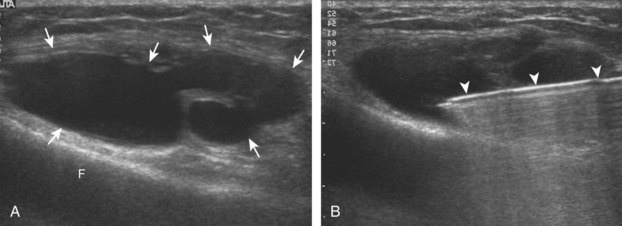
Another common bursal aspiration is the semimembranosus-medial gastrocnemius bursa, when distended termed a popliteal or Baker cyst. Injection or aspiration can be completed with the needle in plane with the transducer and the needle either entering from inferior to superior (Fig. 9-32) (Videos 9-20 and 9-21) or from medial or lateral (Fig. 9-33). Because about 50% of Baker cysts communicate to the knee joint in patients older than 50 years, the knee joint should be aspirated first if distended before aspiration and injection of a Baker cyst.24 Failure to do so can result in immediate re-accumulation of joint fluid within the Baker cyst (see Fig. 9-33C).


Other Bursae
Among the various other bursae throughout the body, those that are very superficial, including the olecranon (Fig. 9-34) and prepatellar bursae (Fig. 9-35), are often aspirated blindly, with ultrasound guidance used only when blind aspiration attempt has failed or bursal injection is required. Virtually any bursae, such as the retrocalcaneal bursa, medial collateral ligament, pes anserinus, and bicipitoradial bursae, to name a few, can be targeted with ultrasound guidance.
Tendon Sheath Procedures
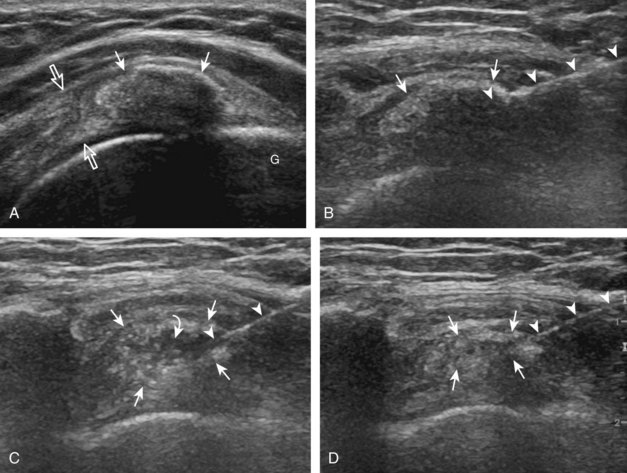
There are two approaches to guiding a needle into a tendon sheath: short axis and long axis relative to the tendon. I prefer the short axis for several reasons. First, when approaching a tendon sheath in short axis to the tendon, the needle tip can be placed superficial to the tendon, next to the tendon, or deep to the tendon (Fig. 9-36). In long axis, the needle can only be placed superficial to the tendon. The flexibility in using the short axis method enables one to target fluid distention of the tendon sheath that may only be located deep to the tendon. In addition, when injecting corticosteroids, I prefer to inject deep to the tendon rather than superficially, adjacent to the subcutaneous fat, which increases the risk for fat atrophy. The other reason that short axis is ideal is that the needle is typically introduced from lateral to medial over the curvature of the extremity, which allows more room to work as well as a puncture site away from the transducer, decreasing the obliquity of the needle relative to the sound beam and increasing needle conspicuity. When injecting corticosteroids, the needle should be flushed with local anesthetic or saline before withdrawing it to avoid corticosteroid deposition in the subcutaneous tissues, which may cause depigmentation and atrophy.

Biceps Brachii Long Head
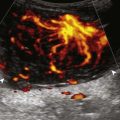
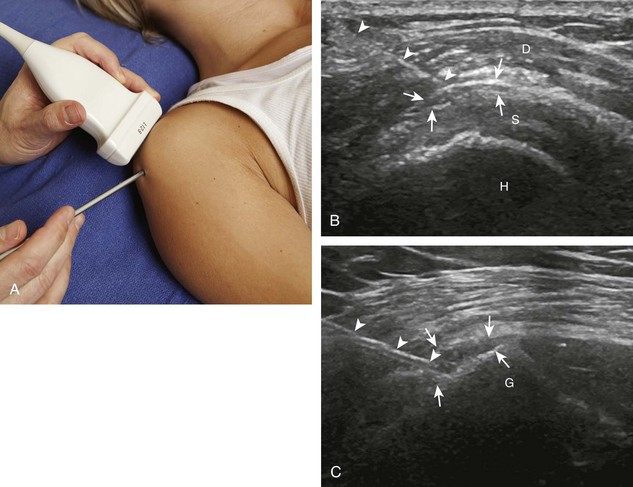
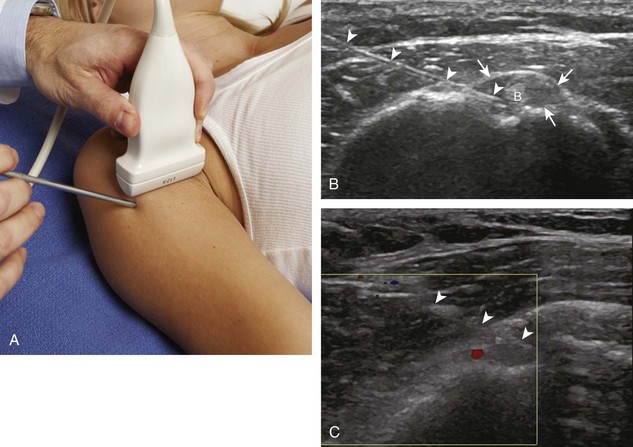
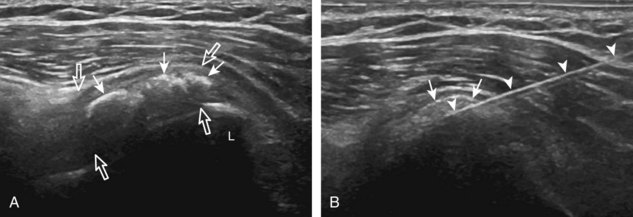
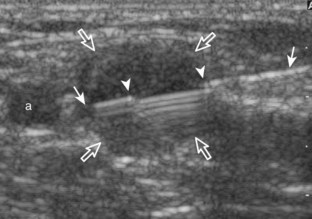
The biceps brachii long head tendon sheath is a common injection that is more accurate using ultrasound guidance compared with blind attempt.25 I prefer an in-plane approach, with the transducer short axis to the tendon and the needle entering from lateral to medial (Fig. 9-37) (Video 9-22) . It is important to assess the projected needle path with color Doppler because the anterior circumflex humeral artery and its branches are routinely seen and may be in the needle path (see Fig. 9-37C).
De Quervain Tenosynovitis
Another upper extremity tendon injection site is the first extensor wrist compartment for de Quervain tenosynovitis (Fig. 9-38). I prefer an in-plane approach, with the transducer in short axis to the tendons and the needle entering from ulnar to radial at the dorsal wrist (Video 9-23) .26 The needle is advanced between the extensor pollicis brevis tendon and the adjacent radius for injection. Because subcompartmentalization of the first extensor compartment is frequent, the needle can be advanced deep to the extensor pollicis brevis into the abductor pollicis longus tendon sheath if diffuse filling around each tendon is not noted at the initial injection.27,28 This is another advantage of the short axis approach for this procedure. Positioning the needle deep to the extensor pollicis brevis also avoids contact with the superficial branch of the radial nerve overlying the tendons and minimizes fat atrophy or depigmentation if corticosteroids leak into the adjacent tissues. As a rule, the needle is typically flushed with local anesthetic after injecting corticosteroids before removing the needle to avoid deposition of corticosteroids along the exiting needle track.
Iliopsoas
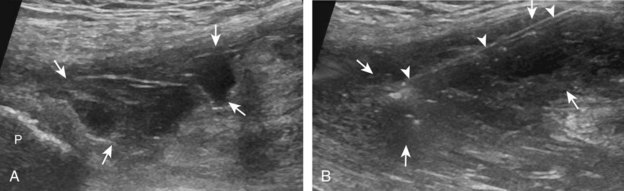
Another common peritendon injection involves the iliopsoas.29 For this procedure, an in-plane approach is used with the transducer in the oblique axial plane (parallel to the inguinal ligament and just superior to the femoral head) and the needle entering from lateral to medial (Fig. 9-39) (Video 9-24) . The needle tip is positioned between the tendon and the adjacent ilium, and a test injection with local anesthetic confirms that the needle is not within muscle or tendon before corticosteroid injection. This injection should be completed superior to the femoral head to avoid inadvertent injection into the hip joint. Typically, the injection accumulates between the iliopsoas tendon and the adjacent ilium, lifting the iliopsoas anteriorly (Videos 9-25 and 9-26)
 . Less commonly, the injection may freely flow medial to the iliopsoas tendon with low resistance, which indicates filling of the iliopsoas bursa. Ultrasound-guided injections may also target the iliopsoas as it passes over the femoral component of a total replacement when symptomatic from impingement.30
Piriformis
Ultrasound can guide injection of the piriformis, where it has been reported that the use of ultrasound guidance improves accuracy over fluoroscopic guidance.31 For this technique, the piriformis is first identified in long axis with the transducer in the oblique-axial plane on the body just inferior to the sacroiliac joint and greater sciatic notch. A curvilinear transducer of frequency lower than 10 MHz helps to ensure depth penetration and a large field of view. Passive internal and external hip rotation during imaging is also helpful in that movement of the piriformis during this maneuver makes it more conspicuous. A needle can then be guided as a peritendon injection, or intramuscular if desired, using an in-plane approach in long axis to the piriformis from either a lateral or medial approach (Fig. 9-40). If the segment of piriformis over the ilium is targeted, then the ilium can be used as a backstop for safety measures if the needle visualization is difficult. Other peritendon injections around the hip include the gluteus medius tendon at the greater trochanter and the proximal hamstring tendons.32,33
Tendon Procedures
Calcific Tendinosis Lavage and Aspiration
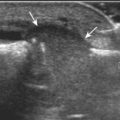
Treatment of calcific tendinosis can be carried out with a single puncture of a 20-gauge needle with a stylet using an in-plane approach (Figs. 9-41 and 9-42) (see Video 9-26).34 The use of a stylet helps to ensure that the needle does not get plugged with calcification while entering the calcific deposit. If the calcification is associated with shadowing, one cannot visualize the needle after it enters into the calcification, so care should be taken not to advance the needle through the other side of the calcification. When the needle is in place within the center of the calcification, the stylet is removed, and a syringe with several millimeters of anesthetic agent is connected to the needle. The procedure begins with lavage of the calcification by injecting minimal anesthetic agent. Typically, the calcification is quite thick, and there will be much resistance to injection. As the plunger is released, the backpressure from inside the calcific deposit will bring the calcifications into the needle. The maneuver of minimal injection with aspiration from spontaneous backpressure is repeated. When there is minimal shadowing, one will see swirling of the calcification and decreasing echogenicity as the calcium is diluted and aspirated (Videos 9-27 and 9-28) . During the aspiration, echogenic calcifications are often seen moving within the needle (Video 9-29)
 . When the syringe becomes slightly opaque from calcification, a new syringe is connected, and the process is repeated. This continues with a third syringe. Positioning of the syringe dependent relative to the targeted tendon calcification will allow the more dependent calcifications to collect in the syringe instead of being reinjected. In the situation in which the original calcification is amorphous without shadowing, the procedure is complete when the calcification decreases in amount or echogenicity and the syringes contain calcification. When the calcification is echogenic with shadowing (usually when more chronic), progressive dilution of the calcification is not visible because of the shadowing, so one relies on visualization of the calcification within the syringes to indicate completion (Video 9-30)
 . In this latter situation, there may be little or no change when comparing the calcification before and after the procedure; however, a dramatic interval change with resorption of calcification can still be seen (Fig. 9-43).

At the completion of the lavage and aspiration of rotator cuff calcific tendinosis, the needle is withdrawn into the adjacent subacromial-subdeltoid bursa for corticosteroid and anesthetic injection (Video 9-31) . This latter procedure is essential because patients can develop a calcific bursitis after the procedure. Studies have shown that lavage and aspiration result in immediate improvement of symptoms, although transient increase in symptoms may occur about 15 weeks after the procedure.35 Improved symptoms correlate with reduction in size of the calcification.36 Although patients treated with lavage and aspiration had better outcomes 1 year after the procedure than those who were not treated, outcomes at 5 and 10 years were similar.37 Lavage and aspiration of calcium may be completed in any accessible tendon and also can be considered with calcific bursitis.
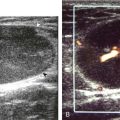
Tendon Fenestration (Tenotomy or Dry Needling)
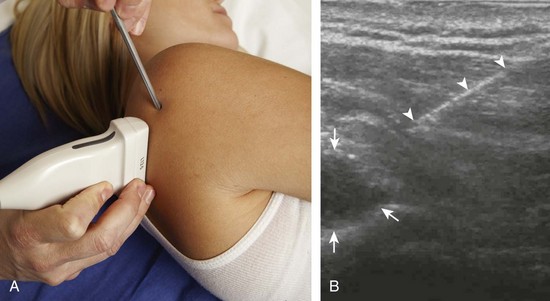
When a tendon shows tendinosis or partial tear, a needle can be guided into the affected tendon segment using ultrasound guidance. Common sites for this procedure include the common extensor tendon of the elbow (Fig. 9-44) (Video 9-32) ,38–40 the gluteus minimus and medius tendons (Fig. 9-45) (Video 9-33)
 , the patellar tendon (Fig. 9-46) (Video 9-34)
 ,41 and the Achilles tendon (Fig. 9-47) (Video 9-35)
 , although other tendons have been treated with success.42 By repeatedly passing the needle into the abnormal tendon, healing can be stimulated by disruption of the degenerative area and by causing local bleeding, which releases growth factors.42 The procedure is completed with a 20- or 22-gauge needle using an in-plane technique relative to the transducer and sound beam and the needle entering along the long axis of the tendon. The needle is placed through the skin, and a small amount of anesthetic agent is placed at the surface of the abnormal tendon (if needed). The needle is then repeatedly inserted into the abnormal segment; the needle is withdrawn just out of the tendon, redirected and advanced to an adjacent area, and repeated. The procedure continues until the entire segment of abnormal tendon is treated and softens, confirmed in both short axis and long axis dimensions. This typically involves passing the needle 20 to 30 times, but this varies depending on the size of the tendon abnormality. If the tendon abnormality is adjacent to bone at the enthesis, the needle is also directed to the bone surface. If there is hyperemia on color or power Doppler imaging in the abnormal tendon segment before the fenestration, one will see increased echogenicity from bleeding. As a precaution, a patient is immobilized, with direction from the patient’s clinician if the tendon is weight bearing. Patients are also instructed not to take nonsteroidal anti-inflammatory drugs for 2 weeks before and after the procedure so that released growth factors related to bleeding will not be inhibited.

Platelet-Rich Plasma and Whole Blood Injection
Although the complexity and controversy of platelet-rich plasma injection are beyond the scope of this chapter, several topics related to ultrasound-guided injection deserve comment. The use of ultrasound guidance can ensure that the platelet-rich plasma or whole blood injection is accurate while minimizing complications as for any other percutaneous ultrasound-guided procedure (Fig. 9-48) (Video 9-36) . Similar to other procedures, an in-plane approach relative to the transducer is favored, although an out-of-plane approach can be considered with superficial targets. Typically, platelet-rich plasma or whole blood injection into a tendon occurs in conjunction with and immediately following tendon fenestration (Video 9-37)
 .
.
Miscellaneous Procedures
Cyst Aspiration
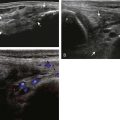
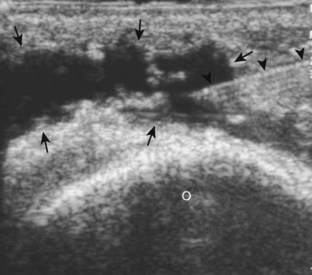
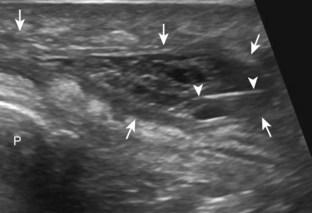
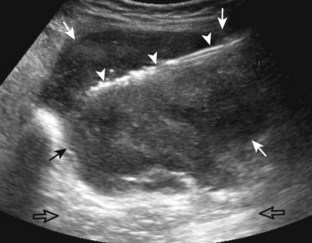
Two general categories of cysts that may be aspirated using ultrasound guidance are ganglion cysts and cysts associated with fibrocartilage tears (meniscus and labrum).43 In both settings, the fluid in the cyst is often viscous, and the cyst is often multilocular, which can limit the success of the aspiration (Fig. 9-49). Typically, a large-gauge (16-gauge) needle is used, and cyst lavage may improve aspiration (Fig. 9-50) (Video 9-38) . Ganglion cysts may recur after aspiration and injection because a connection or neck to a joint or tendon sheath is usually present. Ganglion cyst aspiration may also be followed by corticosteroid injection.44 Cysts associated with fibrocartilage often recur as well because the origin of the cyst is in fact the tear of the meniscus or labrum (shoulder or hip) (Fig. 9-51) (Video 9-39)
 .
.
Peripheral Nerve Block
Injections adjacent to a peripheral nerve are carried out in an in-plane approach with the transducer in short axis to the peripheral nerve. The characteristic appearance of a peripheral nerve is best appreciated in short axis, and adjacent vascular are also easily seen (see earlier chapters). For injection of the carpal tunnel, the needle is in plane with the transducer and sound beam, with the transducer in short axis to the median nerve, and the needle enters from ulnar to radial over the volar aspect of the wrist.45 With regard to the tarsal tunnel, the needle is in plane with the transducer in short axis to the tibial nerve, and the needle enters from posterior to anterior next to the Achilles tendon and over the flexor hallucis longus tendon.
Biopsy
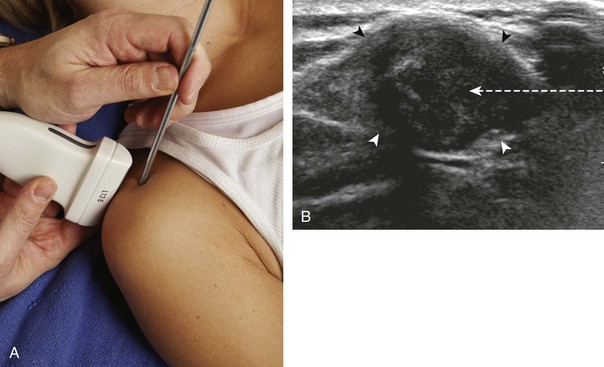
Although a full discussion of ultrasound-guided biopsy is beyond the scope of this textbook, a few fundamentals will be mentioned.46 The first is that a biopsy of a suspected mass or malignancy should occur at a hospital or institution where the tumor will be treated. This allows an open communication between the physician performing the procedure and the surgical oncologist. Because the surgery resects the tumor along the biopsy needle path, this planning is critical. Using ultrasound guidance, several biopsy specimens are taken from various areas of the soft tissue tumor to ensure thorough sampling (Fig. 9-52).47,48 Guiding the biopsy needle with an in-plane approach and using real-time observation of the biopsy ensure accurate sampling (Videos 9-40 and 9-41) . In addition, seeding of adjacent compartments, such as neurovascular structures and an adjacent joint, should be avoided (Fig. 9-53).
1 Joines MM, Motamedi K, Seeger LL, et al. Musculoskeletal interventional ultrasound. Semin Musculoskelet Radiol. 2007;11:192–198.
2 Adler RS, Sofka CM. Percutaneous ultrasound-guided injections in the musculoskeletal system. Ultrasound Q. 2003;19:3–12.
3 Daley EL, Bajaj S, Bisson LJ, et al. Improving injection accuracy of the elbow, knee, and shoulder: does injection site and imaging make a difference? A systematic review. Am J Sports Med. 2011;39:656–662.
4 Gilliland CA, Salazar LD, Borchers JR. Ultrasound versus anatomic guidance for intra-articular and periarticular injection: a systematic review. Phys Sportsmed. 2011;39:121–131.
5 Creel SA, Girish G, Jamadar DA, et al. Sonographic surface localization of subcutaneous foreign bodies and masses. J Clin Ultrasound. 2009;37:158–160.
6 Jandzinski DI, Carson N, Davis D, et al. Treated needles: do they facilitate sonographically guided biopsies? J Ultrasound Med. 2003;22:1233–1237.
7 Fessell DP, Jacobson JA, Craig J, et al. Using sonography to reveal and aspirate joint effusions. AJR Am J Roentgenol. 2000;174:1353–1362.
8 Zubler V, Mamisch-Saupe N, Pfirrmann CW, et al. Detection and quantification of glenohumeral joint effusion: reliability of ultrasound. Eur Radiol. 2011;21:1858–1864.
9 Gokalp G, Dusak A, Yazici Z. Efficacy of ultrasonography-guided shoulder MR arthrography using a posterior approach. Skeletal Radiol. 2010;39:575–579.
10 De Maeseneer M, Jacobson JA, Jaovisidha S, et al. Elbow effusions: distribution of joint fluid with flexion and extension and imaging implications. Invest Radiol. 1998;33:117–125.
11 Lohman M, Vasenius J, Nieminen O. Ultrasound guidance for puncture and injection in the radiocarpal joint. Acta Radiol. 2007;48:744–747.
12 Kantarci F, Ozbayrak M, Gulsen F, et al. Ultrasound-guided injection for MR arthrography of the hip: comparison of two different techniques. Skeletal Radiol. 2011. Oct 14 [Epub ahead of print]
13 Rowbotham EL, Grainger AJ. Ultrasound-guided intervention around the hip joint. AJR Am J Roentgenol. 2011;197:W122–127.
14 Smith J, Hurdle MF, Weingarten TN. Accuracy of sonographically guided intra-articular injections in the native adult hip. J Ultrasound Med. 2009;28:329–335.
15 Klauser A, De Zordo T, Feuchtner G, et al. Feasibility of ultrasound-guided sacroiliac joint injection considering sonoanatomic landmarks at two different levels in cadavers and patients. Arthritis Rheum. 2008;59:1618–1624.
16 Pekkafahli MZ, Kiralp MZ, Basekim CC, et al. Sacroiliac joint injections performed with sonographic guidance. J Ultrasound Med. 2003;22:553–559.
17 Fenn S, Datir A, Saifuddin A. Synovial recesses of the knee: MR imaging review of anatomical and pathological features. Skeletal Radiol. 2009;38:317–328.
18 Park Y, Lee SC, Nam HS, et al. Comparison of sonographically guided intra-articular injections at 3 different sites of the knee. J Ultrasound Med. 2011;30:1669–1676.
19 Smith J, Finnoff JT, Levy BA, et al. Sonographically guided proximal tibiofibular joint injection: technique and accuracy. J Ultrasound Med. 2010;29:783–789.
20 Wisniewski SJ, Smith J, Patterson DG, et al. Ultrasound-guided versus nonguided tibiotalar joint and sinus tarsi injections: a cadaveric study. PM R. 2010;2:277–281.
21 Smith J, Finnoff JT, Henning PT, et al. Accuracy of sonographically guided posterior subtalar joint injections: comparison of 3 techniques. J Ultrasound Med. 2009;28:1549–1557.
22 Blankenbaker DG, De Smet AA, Keene JS. Sonography of the iliopsoas tendon and injection of the iliopsoas bursa for diagnosis and management of the painful snapping hip. Skeletal Radiol. 2006;35:565–571.
23 Pfirrmann CW, Chung CB, Theumann NH, et al. Greater trochanter of the hip: attachment of the abductor mechanism and a complex of three bursae—MR imaging and MR bursography in cadavers and MR imaging in asymptomatic volunteers. Radiology. 2001;221:469–477.
24 Ward EE, Jacobson JA, Fessell DP, et al. Sonographic detection of Baker’s cysts: comparison with MR imaging. AJR Am J Roentgenol. 2011;176:373–380.
25 Hashiuchi T, Sakurai G, Morimoto M, et al. Accuracy of the biceps tendon sheath injection: ultrasound-guided or unguided injection? A randomized controlled trial. J Shoulder Elbow Surg. 2011;20:1069–1073.
26 Jeyapalan K, Choudhary S. Ultrasound-guided injection of triamcinolone and bupivacaine in the management of De Quervain’s disease. Skeletal Radiol. 2009;38:1099–1103.
27 Choi SJ, Ahn JH, Lee YJ, et al. De Quervain disease: US identification of anatomic variations in the first extensor compartment with an emphasis on subcompartmentalization. Radiology. 2011;260:480–486.
28 Rousset P, Vuillemin-Bodaghi V, Laredo JD, et al. Anatomic variations in the first extensor compartment of the wrist: accuracy of US. Radiology. 2010;257:427–433.
29 Adler RS, Buly R, Ambrose R, et al. Diagnostic and therapeutic use of sonography-guided iliopsoas peritendinous injections. AJR Am J Roentgenol. 2005;185:940–943.
30 Wank R, Miller TT, Shapiro JF. Sonographically guided injection of anesthetic for iliopsoas tendinopathy after total hip arthroplasty. J Clin Ultrasound. 2004;32:354–357.
31 Finnoff JT, Hurdle MF, Smith J. Accuracy of ultrasound-guided versus fluoroscopically guided contrast-controlled piriformis injections: a cadaveric study. J Ultrasound Med. 2008;27:1157–1163.
32 Labrosse JM, Cardinal E, Leduc BE, et al. Effectiveness of ultrasound-guided corticosteroid injection for the treatment of gluteus medius tendinopathy. AJR Am J Roentgenol. 2010;194:202–206.
33 Zissen MH, Wallace G, Stevens KJ, et al. High hamstring tendinopathy: MRI and ultrasound imaging and therapeutic efficacy of percutaneous corticosteroid injection. AJR Am J Roentgenol. 2010;195:993–998.
34 Lee KS, Rosas HG. Musculoskeletal ultrasound: how to treat calcific tendinitis of the rotator cuff by ultrasound-guided single-needle lavage technique. AJR Am J Roentgenol. 2010;195:638.
35 del Cura JL, Torre I, Zabala R, et al. Sonographically guided percutaneous needle lavage in calcific tendinitis of the shoulder: short- and long-term results. AJR Am J Roentgenol. 2007;189:W128–134.
36 Yoo JC, Koh KH, Park WH, et al. The outcome of ultrasound-guided needle decompression and steroid injection in calcific tendinitis. J Shoulder Elbow Surg. 2010;19:596–600.
37 Serafini G, Sconfienza LM, Lacelli F, et al. Rotator cuff calcific tendonitis: short-term and 10-year outcomes after two-needle US guided percutaneous treatment—nonrandomized controlled trial. Radiology. 2009;252:157–164.
38 McCarthy CL, Wilson DJ, Coltman TP. Anterolateral ankle impingement: findings and diagnostic accuracy with ultrasound imaging. Skeletal Radiol. 2008;37:209–216.
39 McShane JM, Nazarian LN, Harwood MI. Sonographically guided percutaneous needle tenotomy for treatment of common extensor tendinosis in the elbow. J Ultrasound Med. 2006;25:1281–1289.
40 McShane JM, Shah VN, Nazarian LN. Sonographically guided percutaneous needle tenotomy for treatment of common extensor tendinosis in the elbow: is a corticosteroid necessary? J Ultrasound Med. 2008;27:1137–1144.
41 Housner JA, Jacobson JA, Morag Y, et al. Should ultrasound-guided needle fenestration be considered as a treatment option for recalcitrant patellar tendinopathy? A retrospective study of 47 cases. Clin J Sport Med. 2010;20:488–490.
42 Housner JA, Jacobson JA, Misko R. Sonographically guided percutaneous needle tenotomy for the treatment of chronic tendinosis. J Ultrasound Med. 2009;28:1187–1192.
43 Chiou HJ, Chou YH, Wu JJ, et al. Alternative and effective treatment of shoulder ganglion cyst: ultrasonographically guided aspiration. J Ultrasound Med. 1999;18:531–535.
44 Breidahl WH, Adler RS. Ultrasound-guided injection of ganglia with corticosteroids. Skeletal Radiol. 1996;25:635–638.
45 Smith J, Wisniewski SJ, Finnoff JT, et al. Sonographically guided carpal tunnel injections: the ulnar approach. J Ultrasound Med. 2008;27:1485–1490.
46 Gogna A, Peh WC, Munk PL. Image-guided musculoskeletal biopsy. Radiol Clin North Am. 2008;46:455–473. v
47 Peer S, Freuis T, Loizides A, et al. Ultrasound guided core needle biopsy of soft tissue tumors: a fool proof technique? Med Ultrason. 2011;13:187–194.
48 Vasilevska V, Gligorievski A, Zafiroski G, et al. Radiologic-pathologic correlation of 100 consecutive biopsied soft tissue musculoskeletal lesions after multimodality imaging. Cancer Imaging. 2011;11:S42.