[level-membership-for-orthopaedics-category]
Hip and Pelvis
David B. Weiss, Seth R. Yarboro, James A. Browne
Regional Anatomy and Surgical Intervals
Regional Anatomy
Osteology
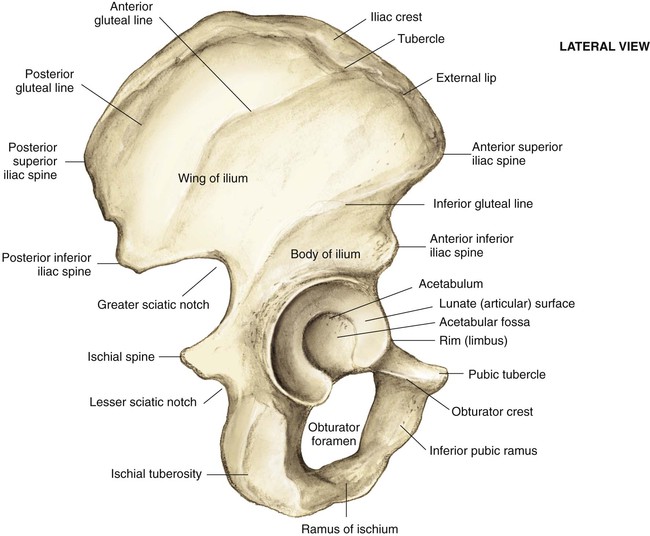
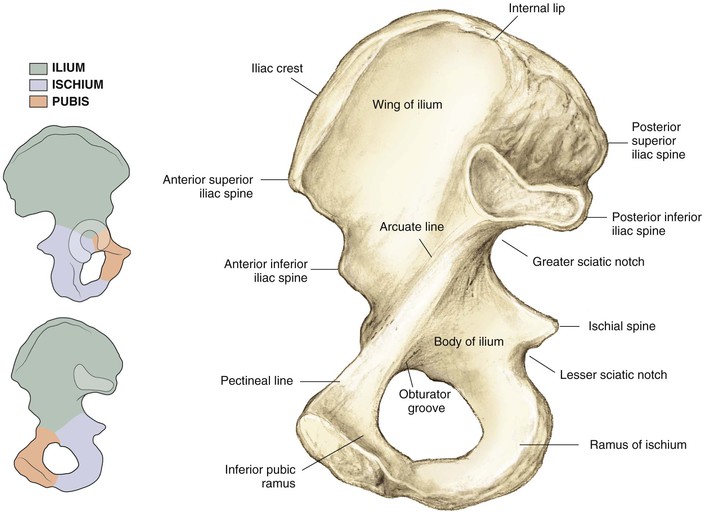
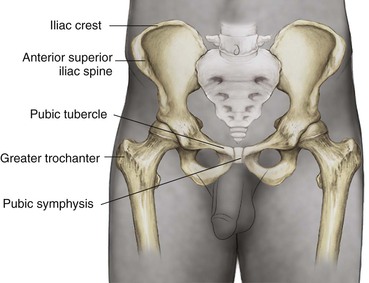
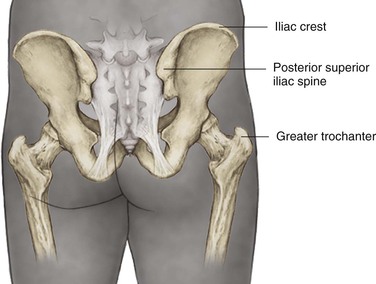
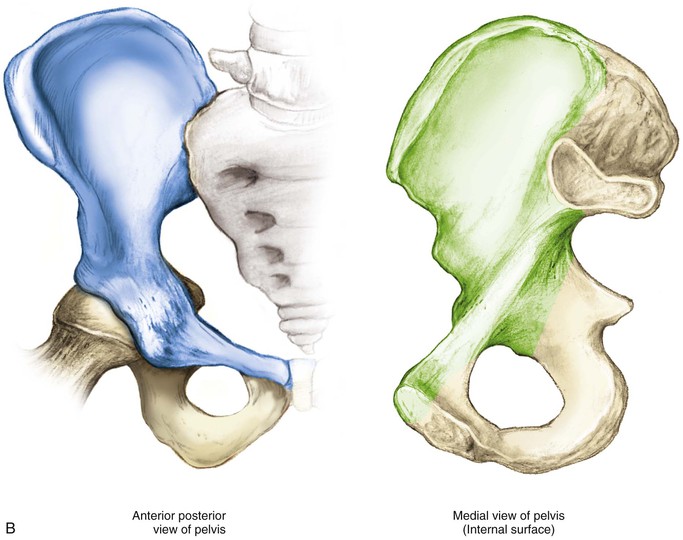
Pelvis (Figs. 6-1 and 6-2)
Iliac crest (palpable throughout its entire length)
• Landmark for several skin incisions
• Iliac tubercle (outer surface of iliac crest about 5 cm posterior to the anterior superior iliac spine [ASIS])
• Site for external fixator pin
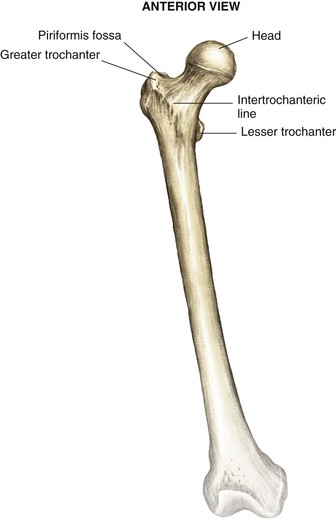
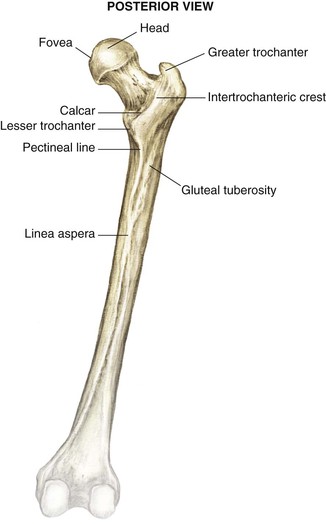
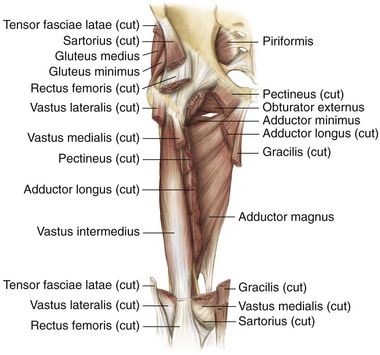
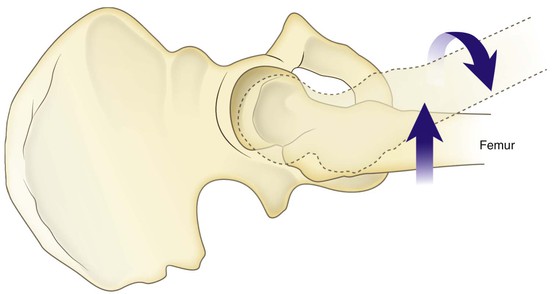
Proximal Femur (Figs. 6-3 and 6-4)
• Greater trochanter (abductor attachment for increased moment arm and mechanical advantage)
• Attachment point for abductor muscles
• Intertrochanteric line (ridge connecting the greater and lesser trochanter)
• Lesser trochanter (insertions of the iliacus and the psoas muscles)
• Posterior to the midaxis of the femoral neck, in line with the medullary canal
• The starting point for some femoral nails
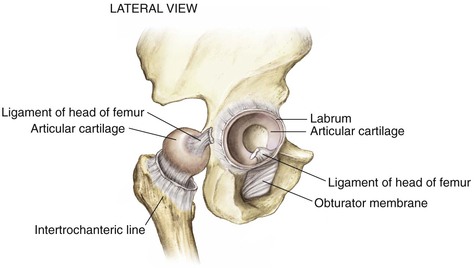
• Fovea (ligament of the femoral head attachment)
• Fractures below this area are out of the weight-bearing surface
Arthrology
Hip Joint (Figs. 6-5 to 6-7)
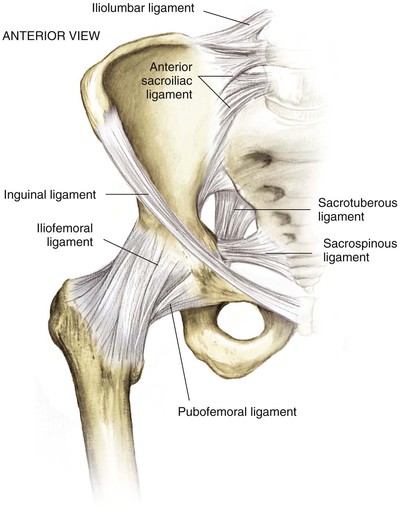
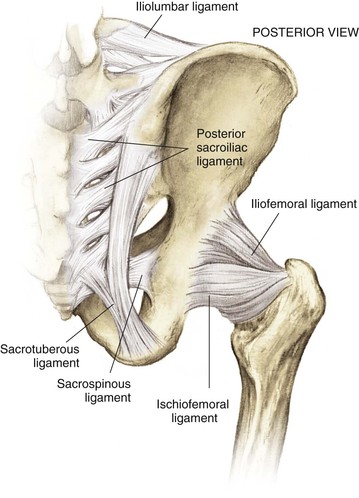
Sacroiliac Joint
Small translations of the joint
Largely stabilized by ligaments
• Pelvis and sacroiliac ligament joint stabilizers
• Sacrospinous (connects the lateral part of the sacrum and the coccyx to the spine of the ischium)
• Iliolumbar ligaments (transverse process of the lower lumbar vertebrae to the ilium)

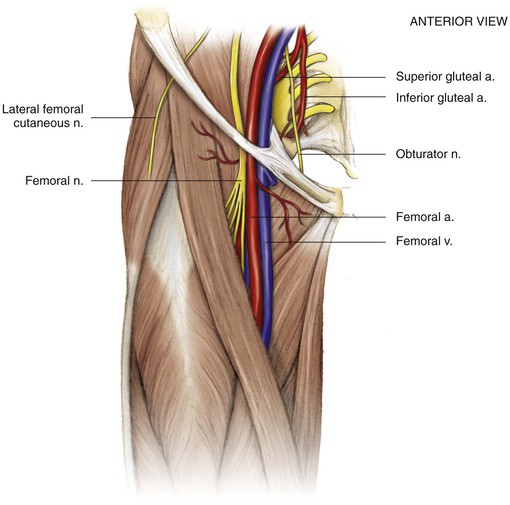
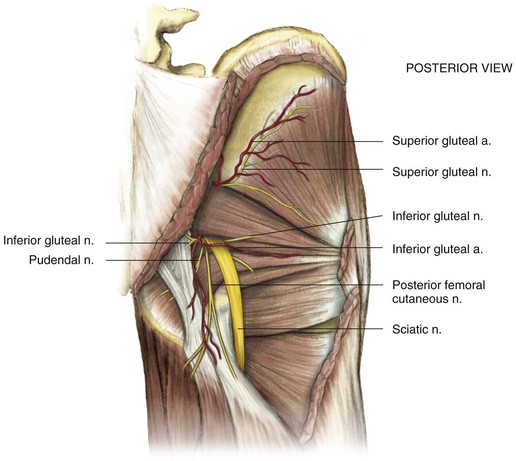
Nerves
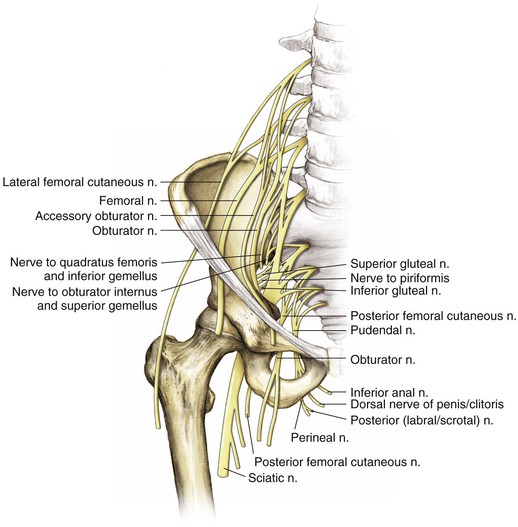
Extension of Nerves from the Lumbosacral Plexus (Fig. 6-14)
• Sciatic nerve (L4 and L5 and S1, S2, and S3)
• Has tibial and peroneal divisions that are indistinguishable around the hip but later divide
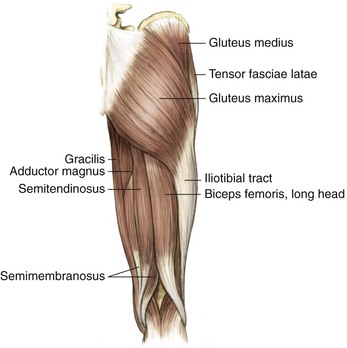
• Superior gluteal nerve (innervates the gluteus medius, gluteus minimus, and tensor fasciae latae muscles)
• A risk of injury exists with extensive superior and medial dissection above the GSN
• Inferior gluteal nerve (innervates the gluteus maximus)
• Exits the GSN inferior to the sciatic nerve and enters the gluteus maximus
• Is at risk with extensive medial dissection around the posterior column near the GSN
• Lateral femoral cutaneous nerve
• Exits the pelvis just medial to the ASIS (with wide variation up to 3 cm to either side)
• Provides pure sensory innervation to anterolateral thigh
• Femoral nerve (largest branch L2, L3, and L4)
• Exits the pelvis over the anterior wall of the hip and lateral to the femoral artery and vein
• Is at risk with anterior retractor placement during anterior and posterior approaches to the hip and during middle window dissection and retraction for ilioinguinal approaches
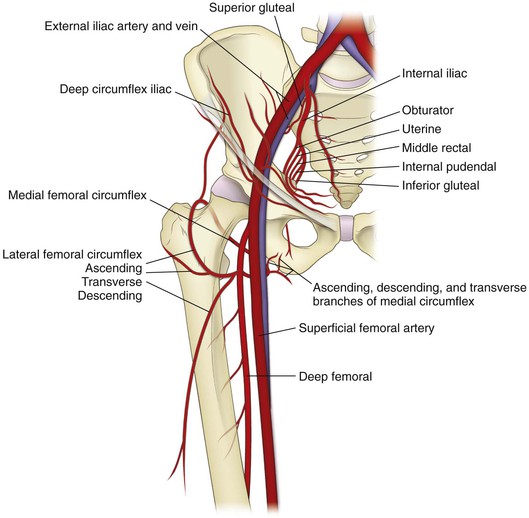
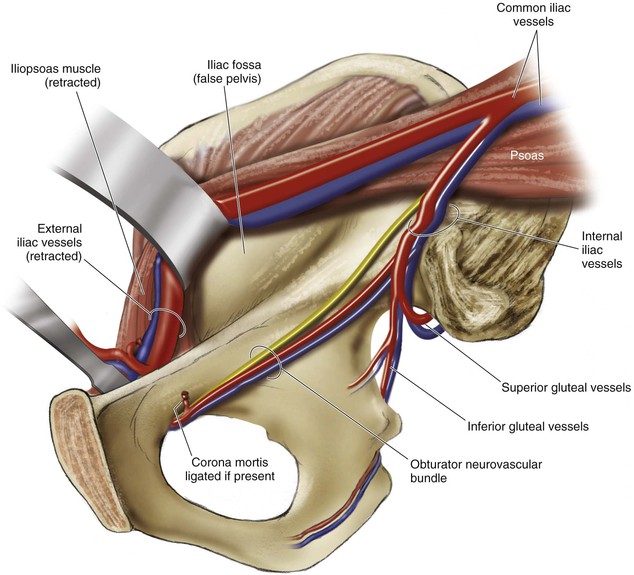
Vascularity (Fig. 6-15)
Internal Iliac Artery
Primarily supplies the pelvic floor musculature
• Exits the greater sciatic notch and supplies the gluteus medius and minimus
• Can be damaged during posterior approaches to the hip/acetabulum
• Travels along the true pelvis and quadrilateral plate
• Corona mortis must be ligated during ilioinguinal or Stoppa approaches to the pelvis
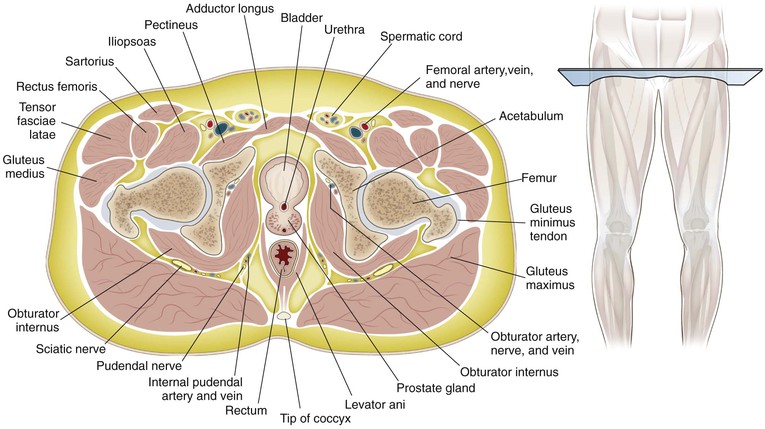
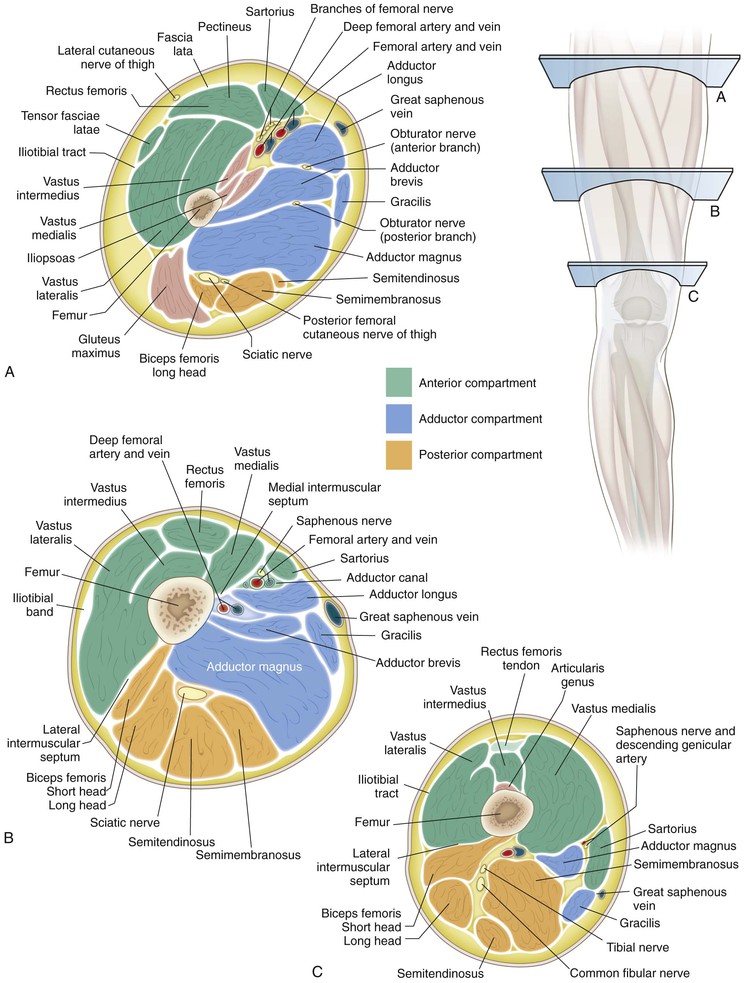
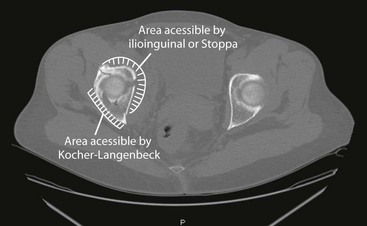
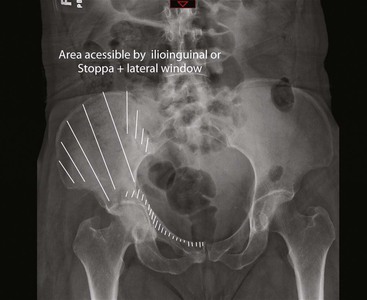
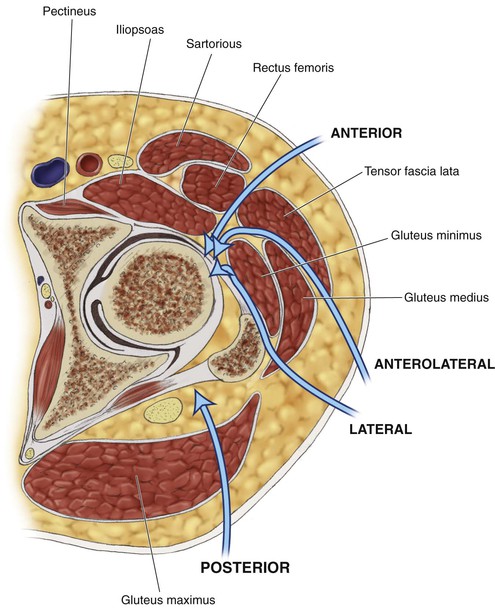
Cross-Sectional Anatomy (Figs. 6-16 to 6-19)
Hazards (Figs. 6-20 and 6-21)
Femoral Triangle
Bordered by the inguinal ligament, sartorius, and the adductor longus, the structures from lateral to medial consist of the femoral nerve, artery, vein, and lymphatics (see Fig. 6-20)
Bladder
Landmarks (Figs. 6-22 to 6-25)
Surgical Approaches to the Pelvis
Posterior Approach to the Sacroiliac Joint
Indications

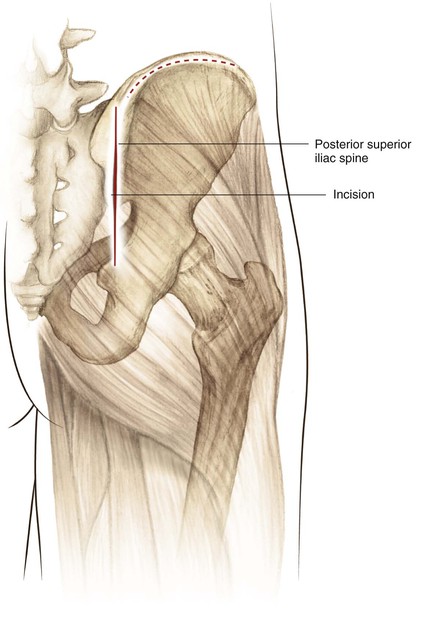
Incision (Fig. 6-27)
The incision is 8 to 12 cm centered 2 to 3 cm below and slightly lateral to the PSIS (Fig. 6-28)
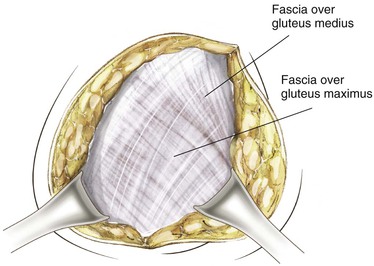
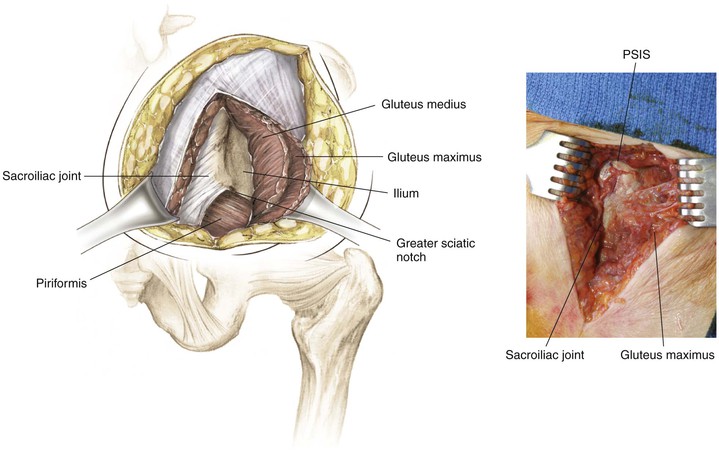
• Incise the fascia of the maximus over the crest of the ilium
• This maneuver uncovers the gluteus medius and the piriformis emerging from the greater sciatic notch (the superior gluteal nerve and artery are emerging as well; Fig. 6-29)
Anterior Approach to the Pubic Symphysis (Video 6-1)
Indication
Positioning
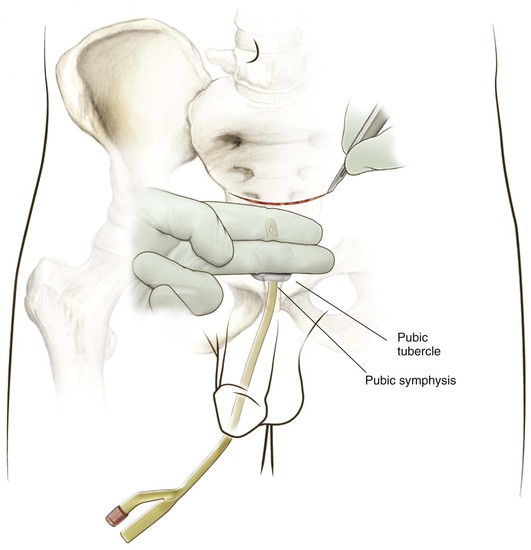
Superficial Dissection
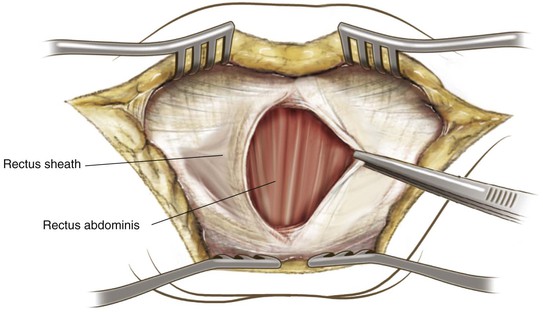
Deep Dissection Midline
Retract the rectus abdominis laterally and superiorly
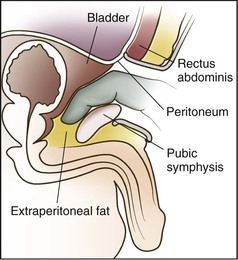
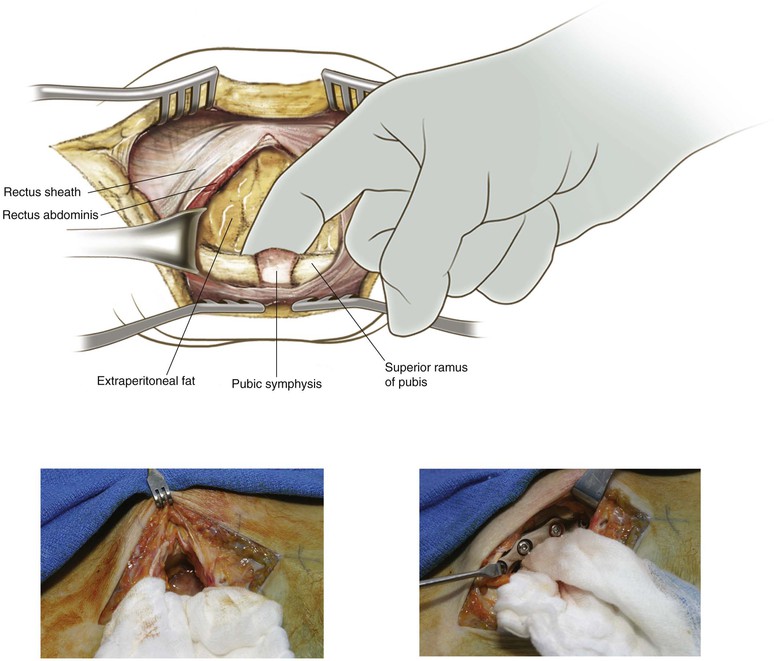
A layer of extraperitoneal fat may be present between the rectus abdominis and the bladder
Dissection of the posterior aspect of the superior rami and pubic symphysis can be accomplished digitally (preperitoneal space of Retzius; Figs. 6-33 and 6-34)
Ilioinguinal Approach to the Pelvis (Video 6-2)
Background

Surgical Dissection
Lateral Window
Divide the skin and subcutaneous tissue in line with the incision down to the iliac crest
Perforators through the iliac wing may require bone wax for hemostasis
Pack this area with moist lap pads and continue to the middle and medial window dissection
Middle and Medial Window
The lateral femoral cutaneous nerve will be near the medial edge of the ASIS, but its course is somewhat variable up to 3 cm; identify the superficial inguinal ring at the medial aspect of the dissection (Fig. 6-36)
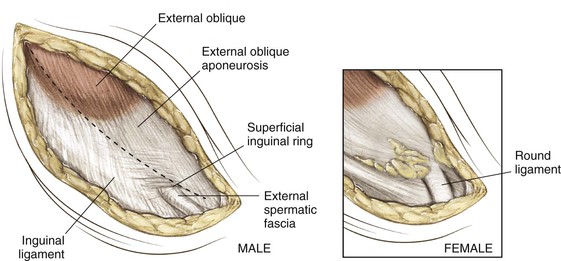
Divide the external oblique fascia, taking 1 to 2 mm of the inguinal ligament with it to allow better closure; medially avoid injuring the spermatic cord/round ligament with blunt dissection around these structures (Fig. 6-37)
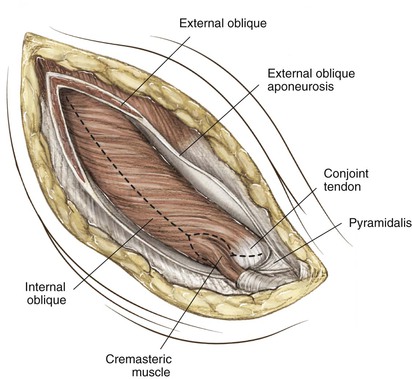
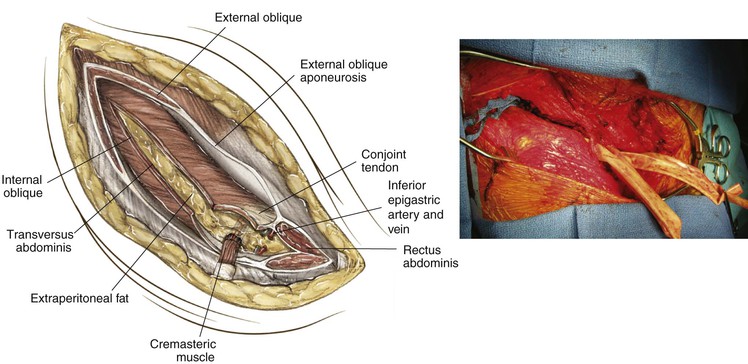
Incise the internal abdominal oblique fascia carefully because the femoral vessels and nerve are just beneath it; medially incise the rectus sheath 1 cm proximal to its insertion to allow repair and elevate (Fig. 6-38); finger dissection behind the pubis will develop the space of Retzius between the bladder and pubis; the inferior epigastric artery and vein cross just medial to the inguinal ring and should be ligated
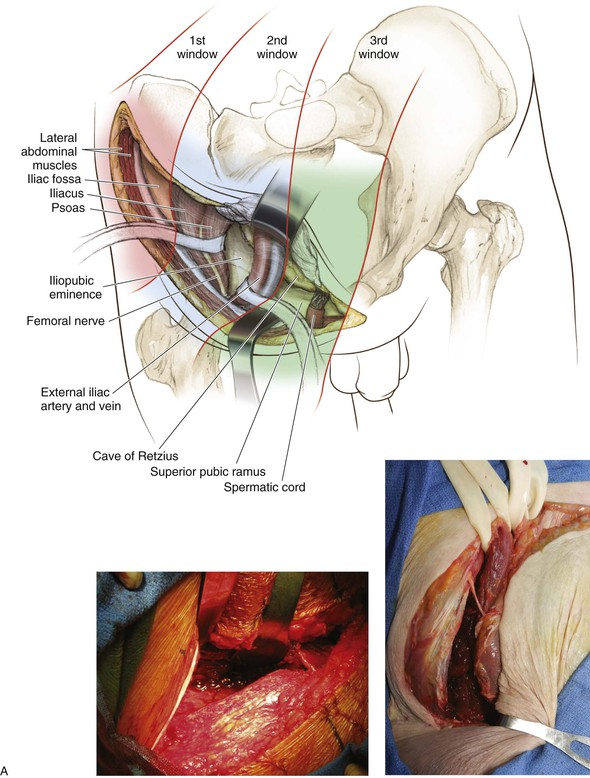
Use a lap pad to elevate the extraperitoneal fat from the femoral vessels; bluntly dissect the femoral sheath medially and the femoral nerve and iliopsoas tendon laterally and protect these groups with slings (Fig. 6-39); avoid excessive retraction on the femoral vessels to avoid damage to intertwined lymphatics
Closure
Surgical Dissection
Lateral Window
Medial Window
Start with the pubic symphysis approach (see p. 285)
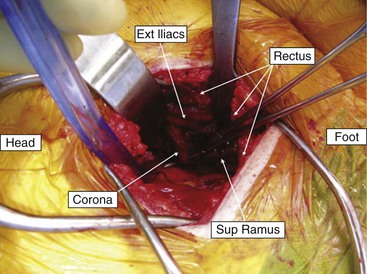
At approximately the midpoint of the rami, carefully dissect the tissue below the femoral vessels either bluntly or with scissors to identify the presence of corona mortis; divide and ligate if seen (vascular clips are helpful here; Fig. 6-40)
Continue elevating laterally to the quadrilateral plate and then continue posterior to the SI joint as needed; the iliopectineal fascia will need to be divided to expose the true pelvis and the inferior portion of the quadrilateral plate (Fig. 6-41)
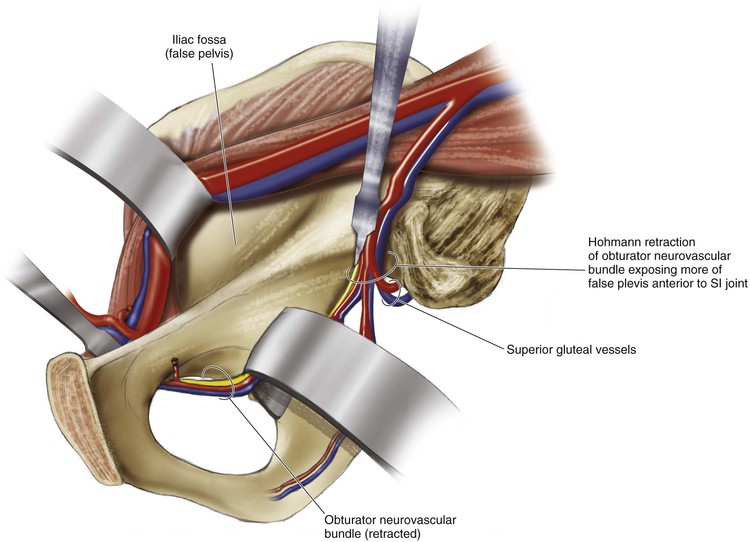
This maneuver will expose the medial surface of the acetabulum and the pelvic brim down into the true pelvis (Fig. 6-42)
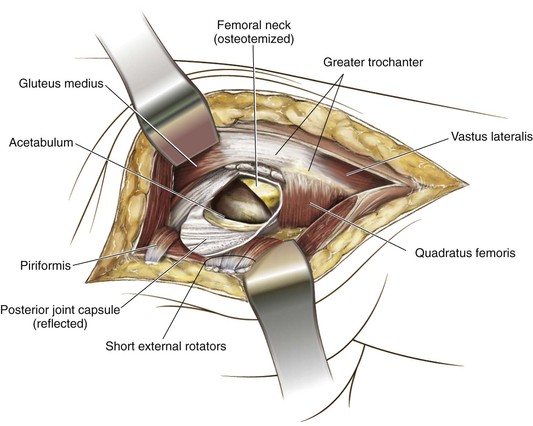
Posterior Approach to the Acetabulum (Kocher-Langenbeck)
Indications
Posterior wall fracture, posterior column fracture, associated posterior column/wall fractures, and tranverse acetabular fracture with posterior displacement (Fig. 6-43A)

Dangers
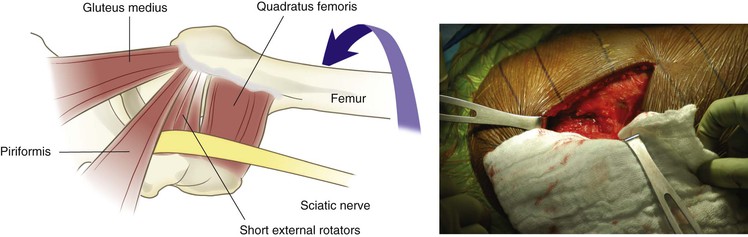
Sciatic Nerve
Blood Supply to the Femoral Head (Lateral Ascending Branch of the Medial Femoral Circumflex)
Avoiding release of the quadratus femoris will further protect the vascular supply
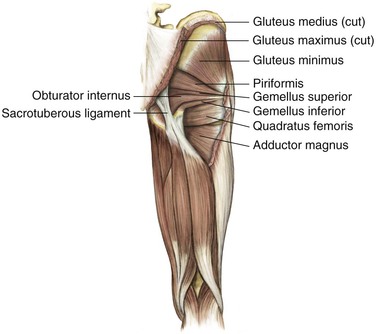
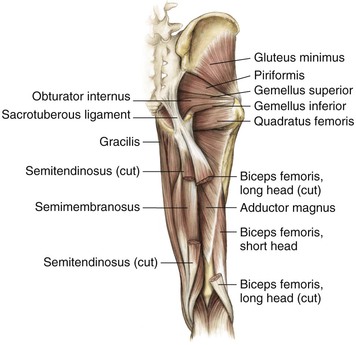
The inferior gluteal artery (a branch from the anterior division of the internal iliac artery) may be damaged from the traumatic injury if surgery is being performed for a fracture, but the vessel leaves the pelvis through the greater sciatic notch inferior to the piriformis and travels along the inferior undersurface of the piriformis
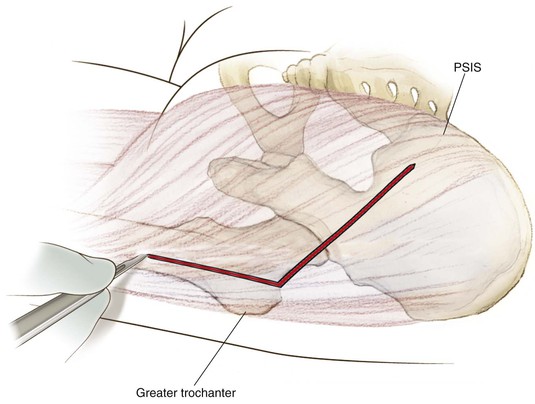
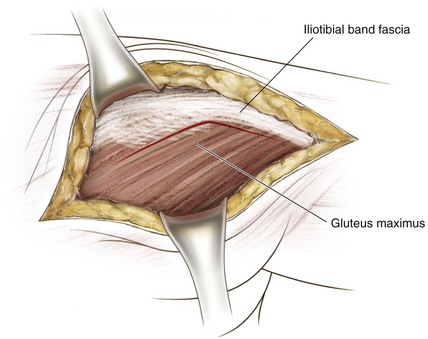
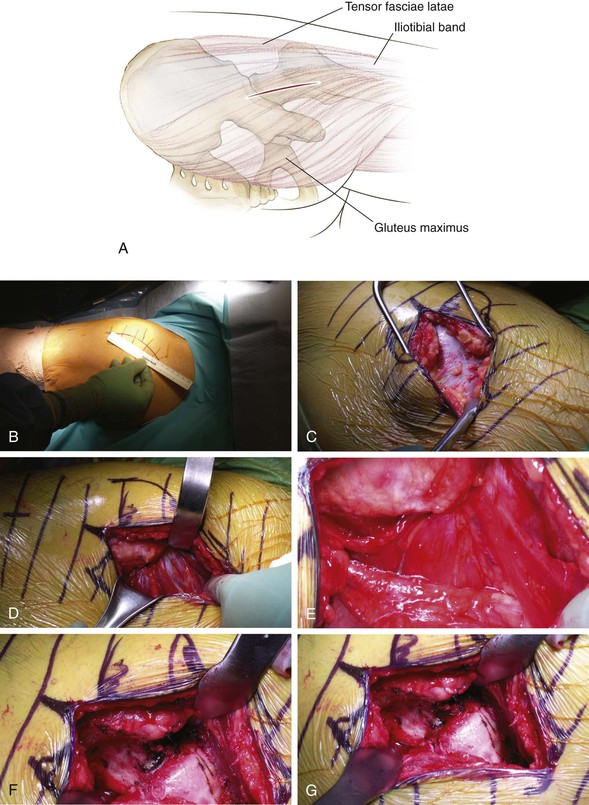
Superficial Dissection
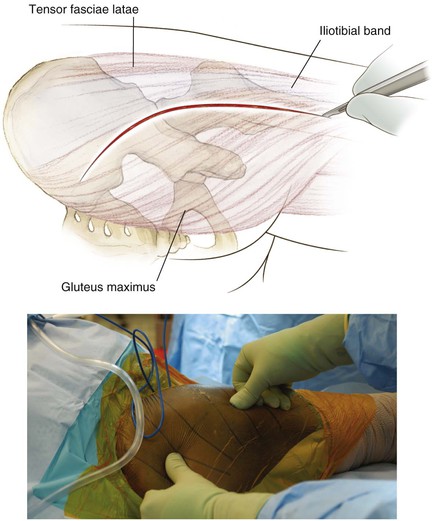
Carry the incision through the subcutaneous tissue down to the fascia of the gluteus maximus proximally and to the IT band distally (Fig. 6-45)
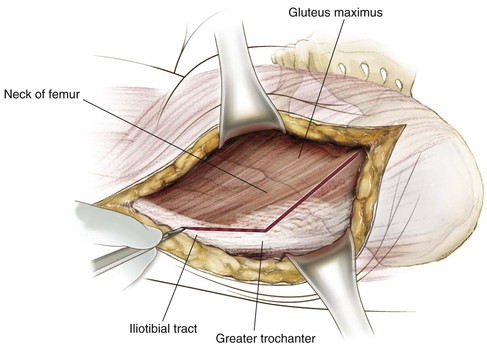
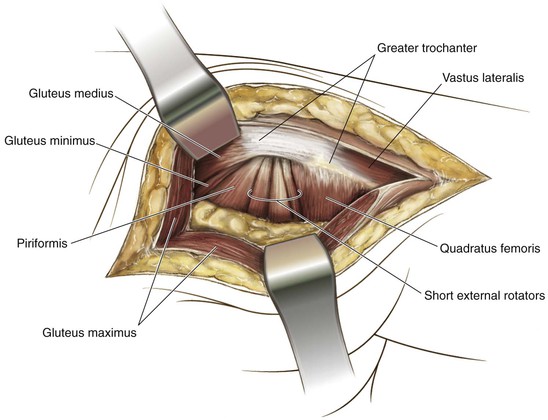
Divide the trochanteric bursa and bluntly develop the interval between the piriformis and gluteus medius; a Charnley retractor may be used for retraction (with the fixed blade on the gluteus medius and the mobile blade on the posterior gluteus maximus [Fig. 6-46])
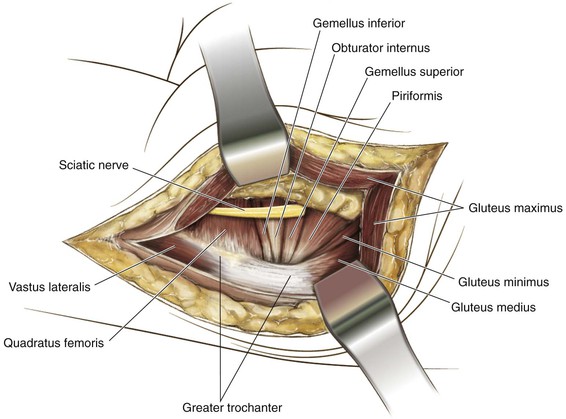
Deep Dissection
Place tension on the external rotators by internally rotating the hip
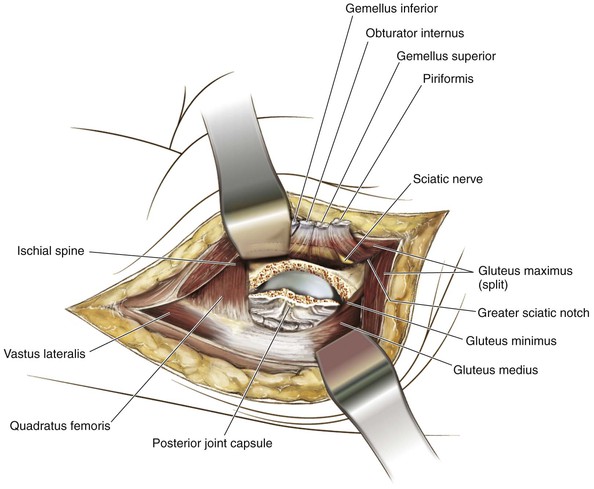
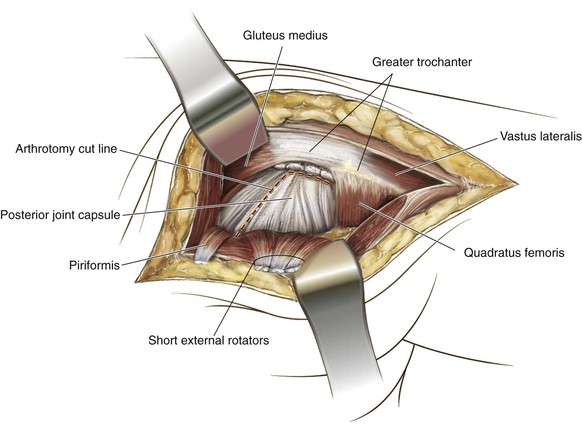
The external rotators (the piriformis, gemelli, and obturator internus) are detached 1 cm off the bone in their tendinous portions (protecting the capsular and femoral head blood supply; Fig. 6-47); they should be tagged to facilitate retraction, as well as protection of sciatic nerve; of note, the piriformis and obturator internus typically have good tendinous tissue to suture, whereas the gemelli are less predictable
Extensile Measures
Surgical Approaches to the Hip
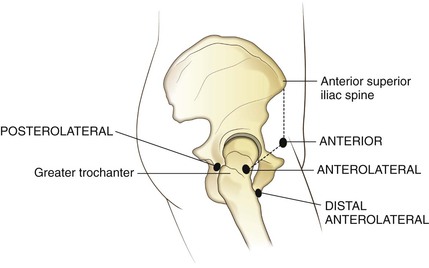
Overview of the Five Basic Approaches to the Hip (Figs. 6-48 to 6-50)
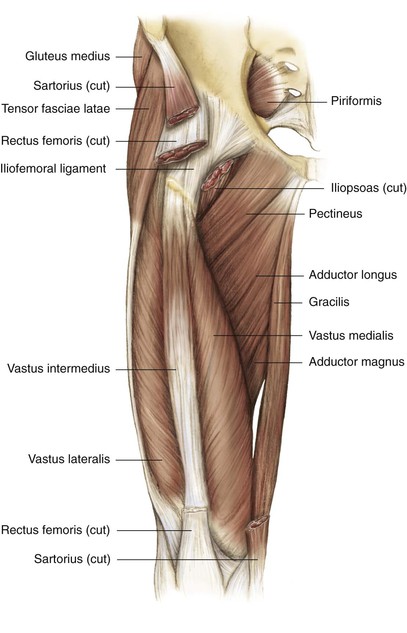
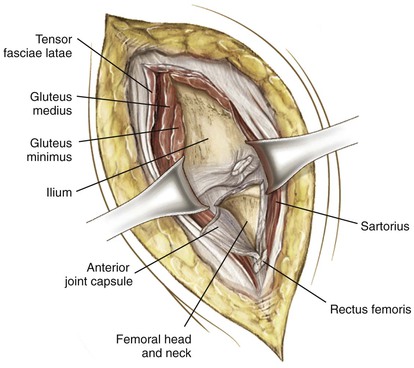
Anterior Approach (Smith-Petersen)
Sartorius (femoral nerve) and tensor fasciae latae (superior gluteal nerve) interval superficially
This approach has gained popularity for use in minimally invasive total hip replacement surgery
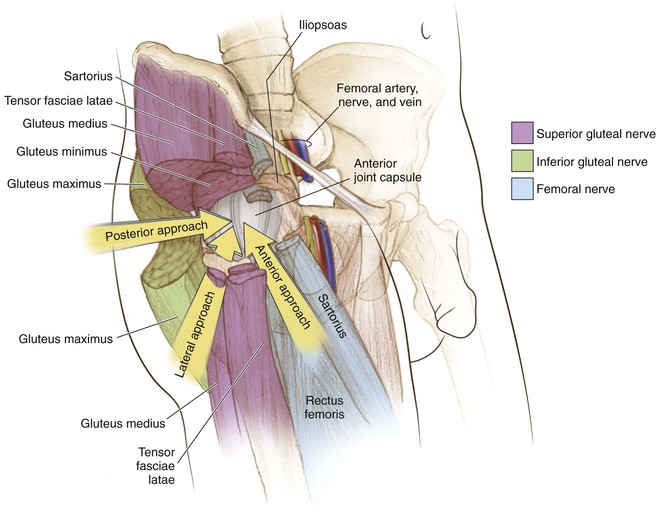
Lateral or Transgluteal (Hardinge) Approach
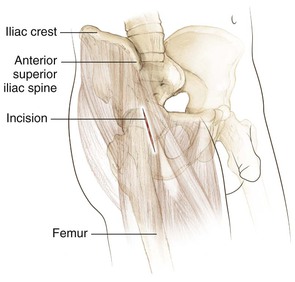
Anterior (Smith-Petersen) Approach to the Hip (Video 6-3)
Indications
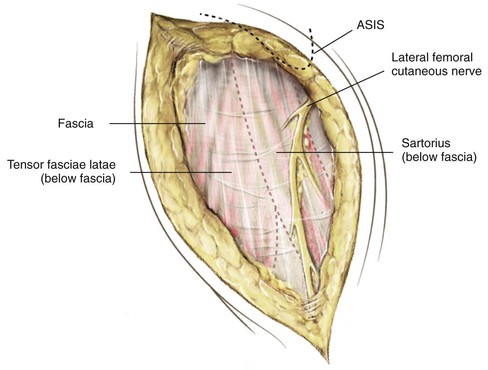
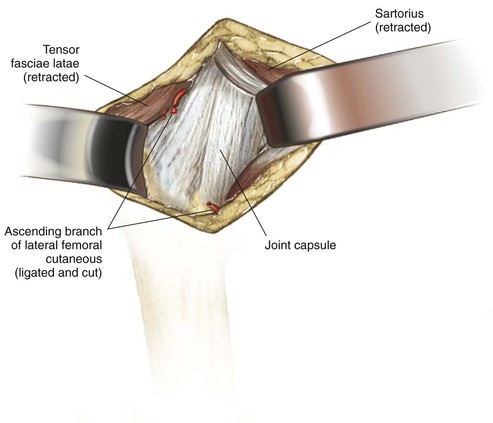
Deep Dissection
Incise the fascia in this intermuscular plane between the sartorius and the TFL
Retract the sartorius medially and upward while the tensor is retracted laterally
The tensor can be detached from the iliac crest if necessary
The ascending branch of the lateral femoral circumflex lies in this interval and should be ligated in a controlled fashion (Fig. 6-53)
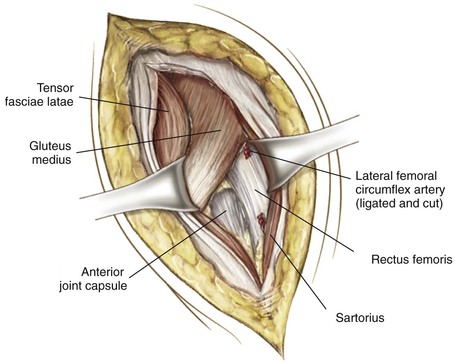
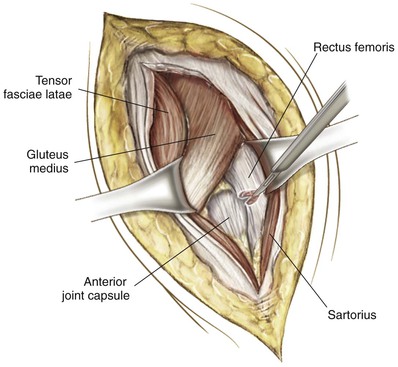
The rectus femoris and gluteus medius muscles are now exposed in the field
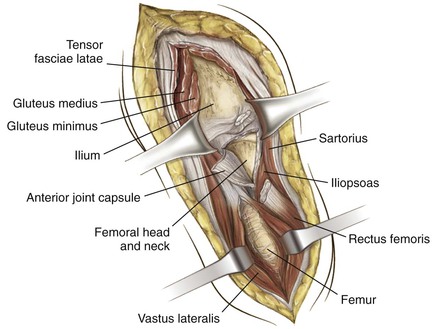
Detach the rectus femoris from its origin (ASIS and the anterior lip of the acetabulum and capsule; Figs. 6-54 and 6-55)
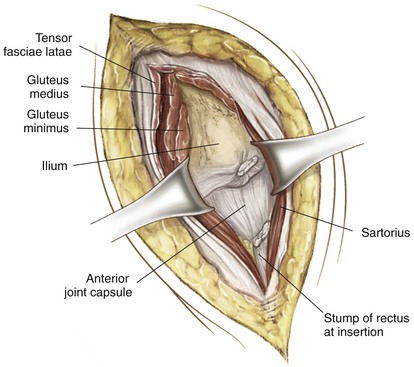
The hip capsule is now exposed and can be tensed by externally rotating and extending the hip
The capsule can be incised according to the necessity of the procedure being performed (Fig. 6-56)
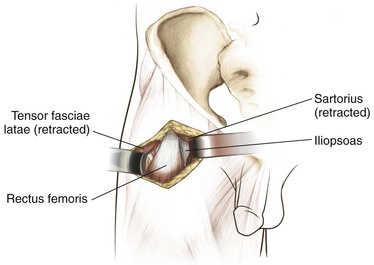
Direct Anterior Mis Total Hip Replacement Considerations (Fig. 6-58)
Superficial dissection can be taken down to the sartorius tensor fascia interval (see Fig. 6-58)
The tensor fascia can be incised, and blunt dissection used to develop the interval (Fig. 6-59)
Ligation of the ascending branch of the lateral femoral circumflex should be carried out (Fig. 6-60)
This maneuver exposes the joint capsule, which can be incised for exposure of the joint (Fig. 6-61)
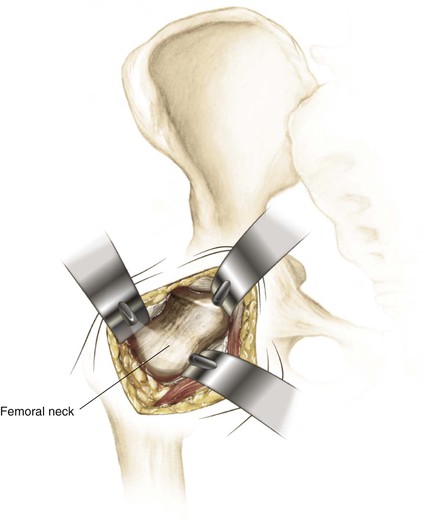
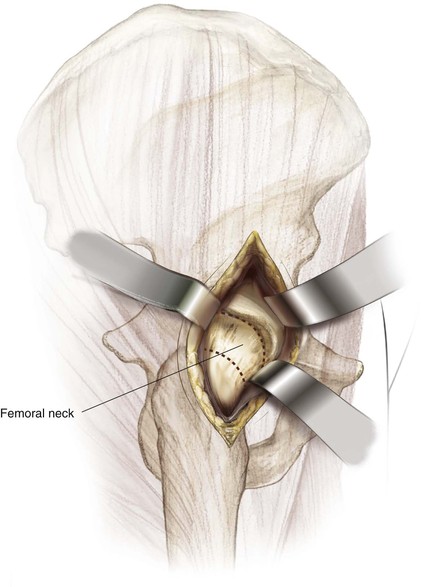
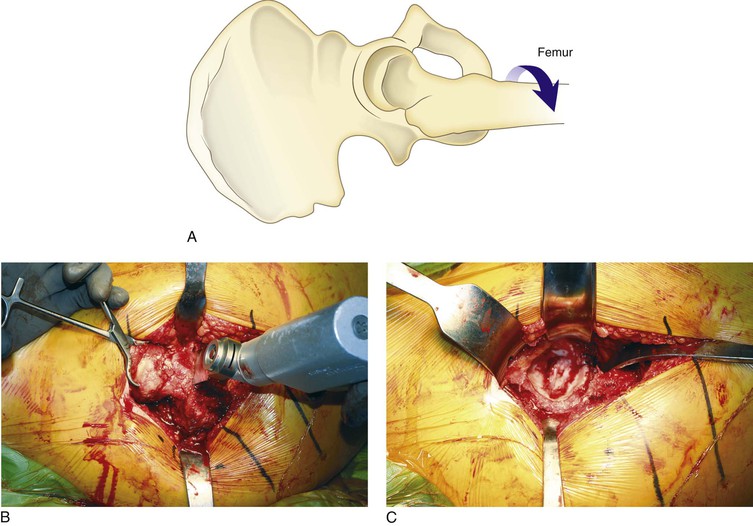
Retractors are placed in an intracapsular position and a two-step osteotomy of the femoral neck is completed (Fig. 6-62)
Posterior Approach to the Hip (Video 6-4)
Indications

Deep Dissection
With a lap pad, bluntly sweep any underlying fat from the posterior aspect of the hip posteriorly (Figs. 6-66 and 6-67)
Identify the piriformis tendon insertion into the piriformis fossa
Internally rotate the lower extremity at the hip to aid in exposure of the external rotator tendons
Dissect the piriformis tendon from the fossa and from the obturator externus and inferior and superior gemelli tendons (tag these structures with sutures for closure repair; see Fig. 6-68)
The quadratus femoris is taken down, leaving a cuff of tissue on the femur for repair
The joint capsule is incised, and the arthrotomy is performed according to the procedure. The hip is then atraumatically dislocated in a posterior direction (Fig. 6-69).
Closure
Extensile Measures
Posterior wall and column fractures
Revision total hip arthroplasty with acetabular cage replacement
• Femoral component revision in a total hip replacement
• Acetabular exposure for revision in a total hip replacement
Distal to expose the femur as a lateral approach with elevation of the vastus musculature
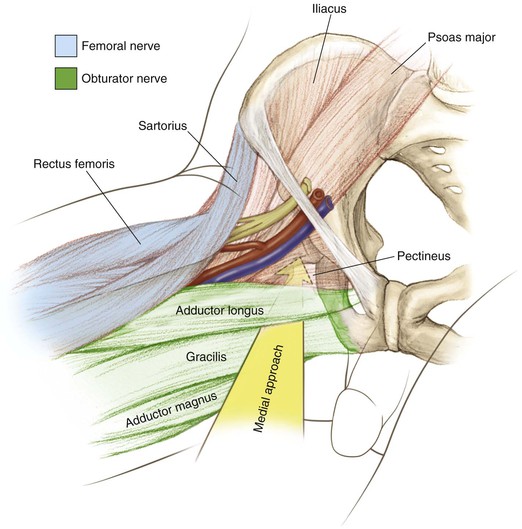
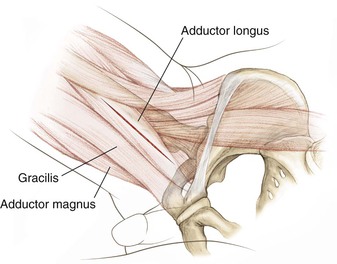
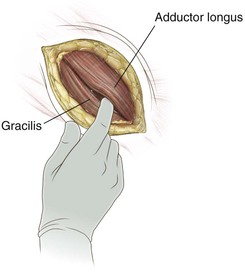
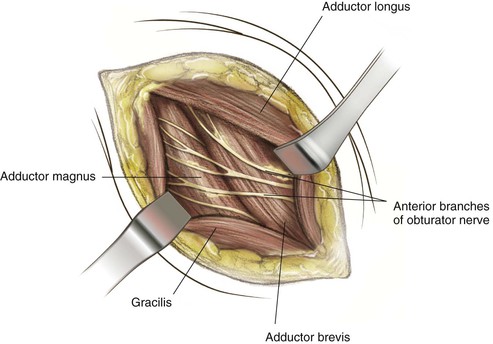
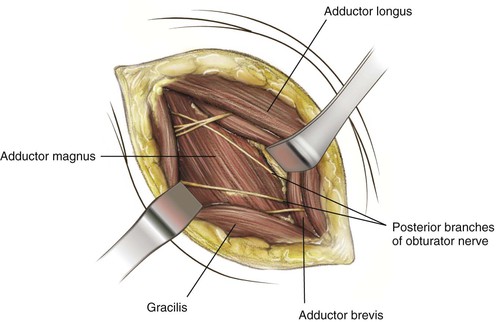
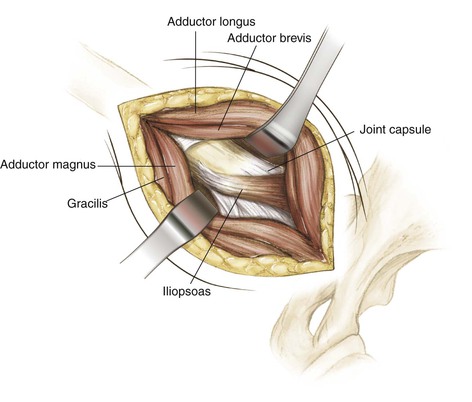
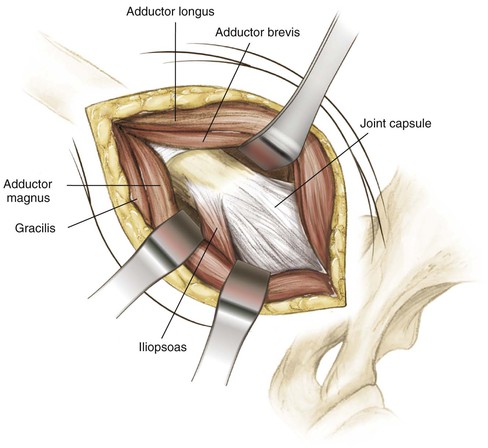
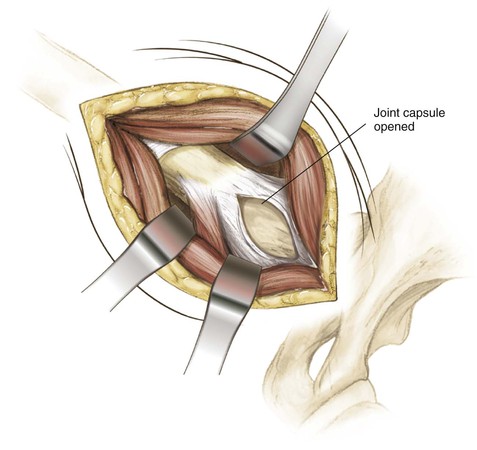
Medial Approach to the Hip (Video 6-5)
Indications
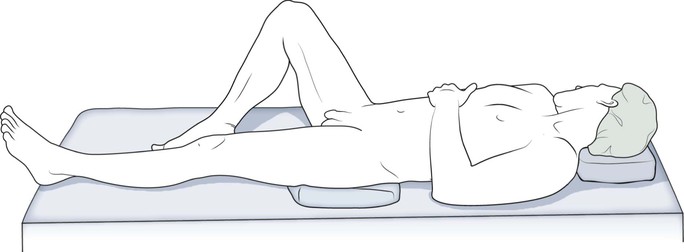
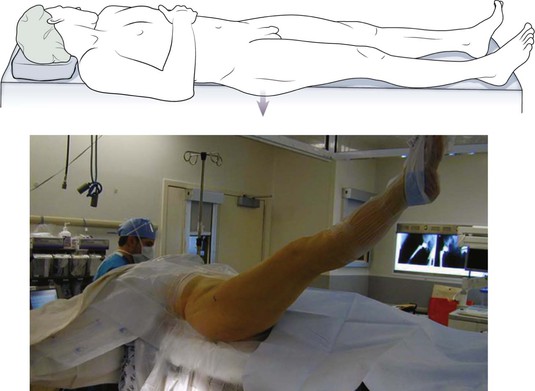
Positioning
Lateral Approach to the Hip (Video 6-6)
Indications
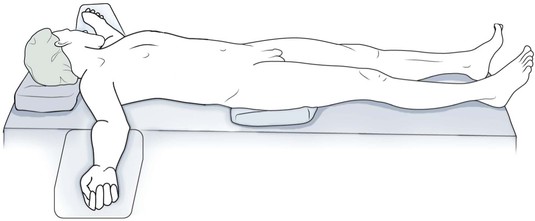
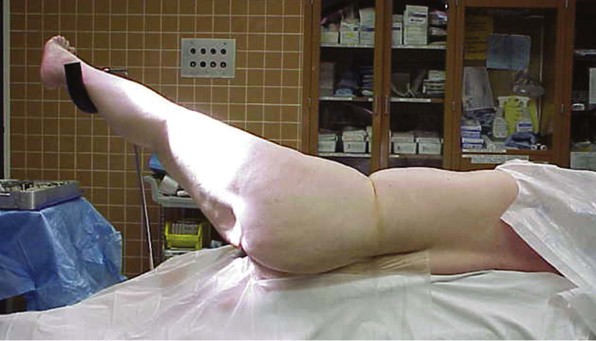
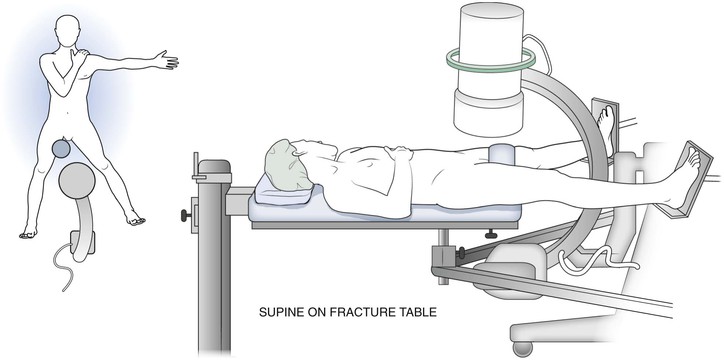
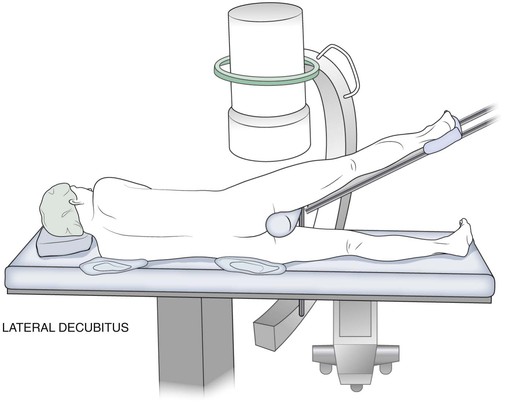
Positioning (Fig. 6-79; See Also Fig. 6-63)
The patient can be placed either supine on the operative table with the operative side buttocks just over the edge (see Fig. 6-79) or in the lateral decubitus position (see Fig. 6-63) with the operative side up
In the supine position, a bump also may be used under the operative side in the buttocks region
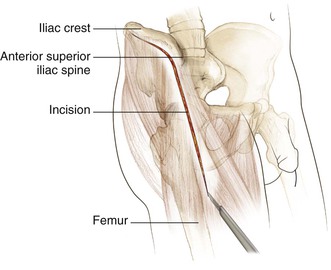
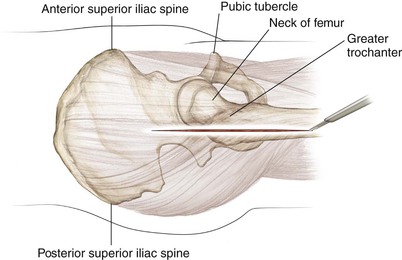
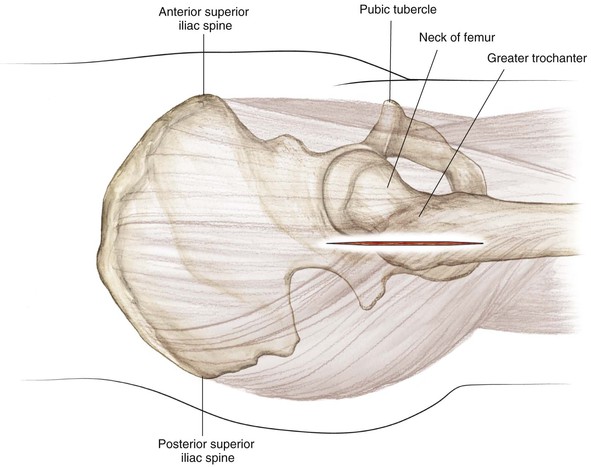
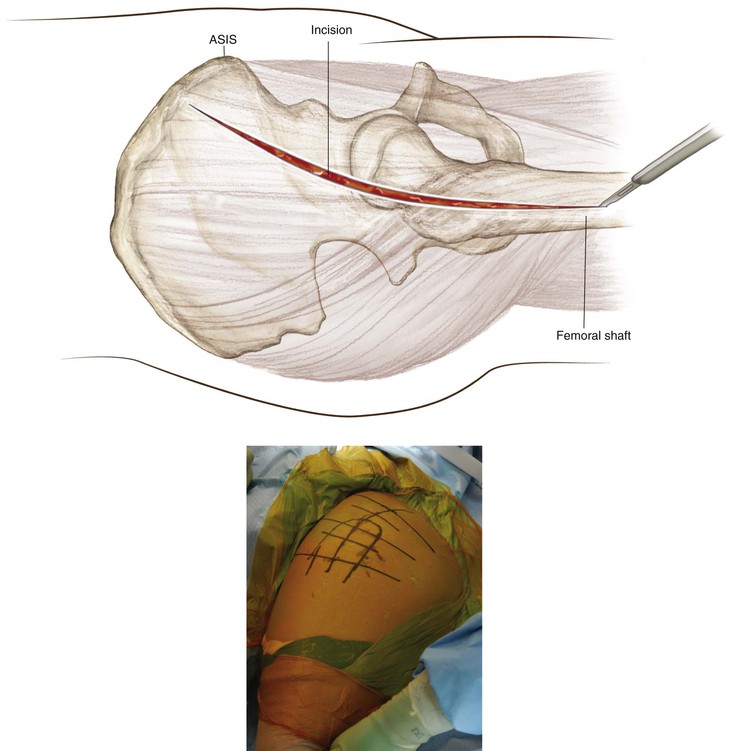
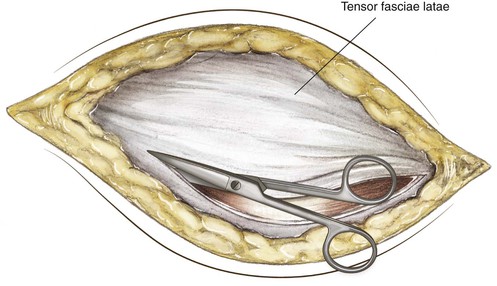
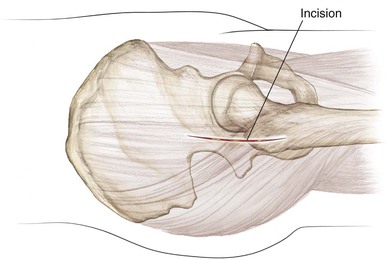
Incision (Fig. 6-80)
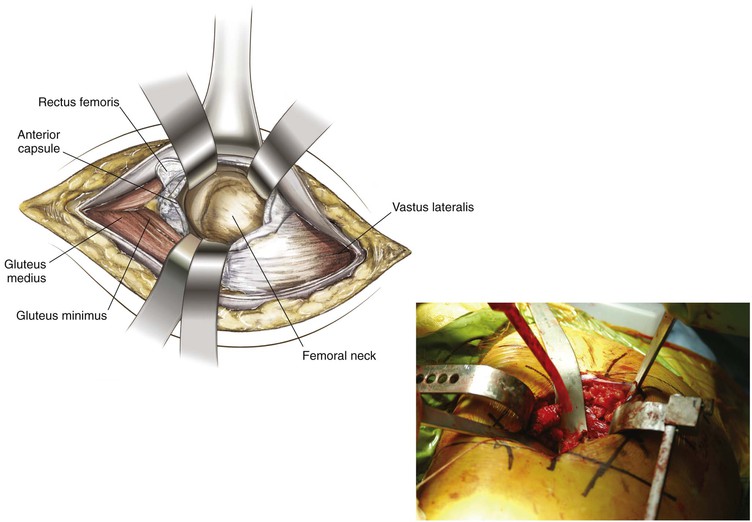
Deep Dissection
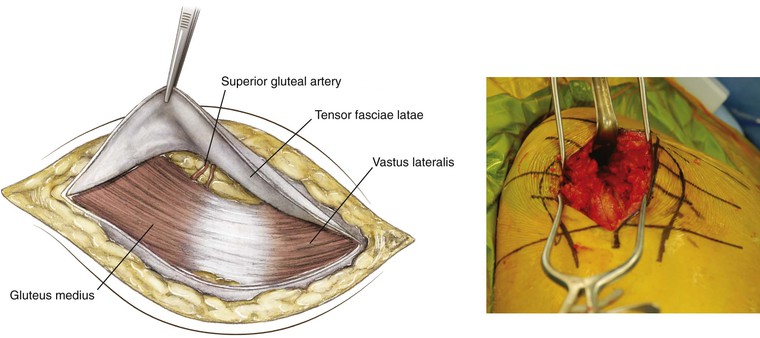
The gluteus medius and vastus lateralis are exposed
A self-retaining retraction system can be used after the superficial dissection is completed (Fig. 6-81)
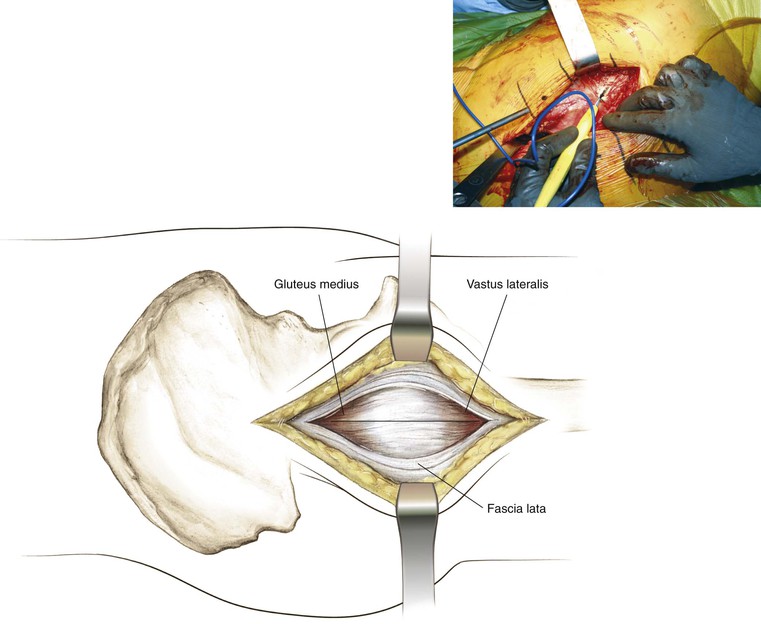
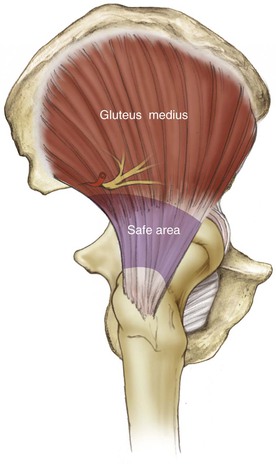
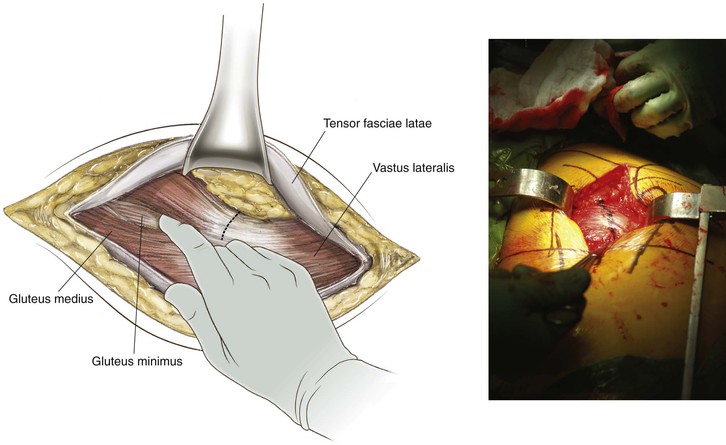
Split the medius no more than 5 cm above the tip of the greater trochanter and carry this dissection 2 to 3 cm into the vastus lateralis muscle (see Figs. 6-82 and 6-83)
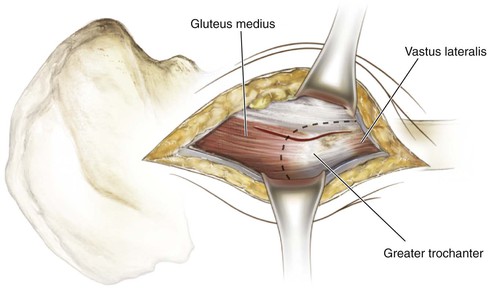
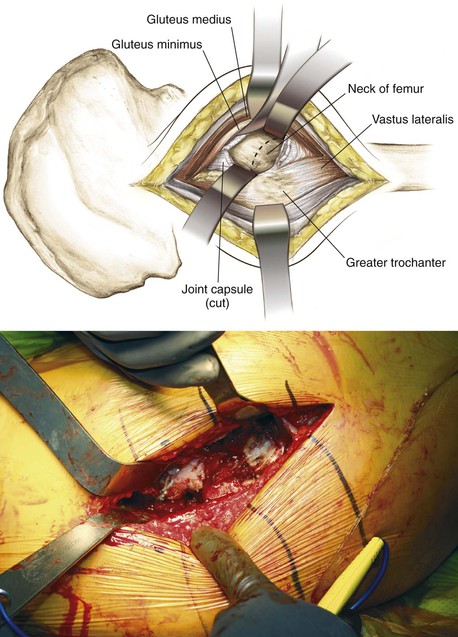
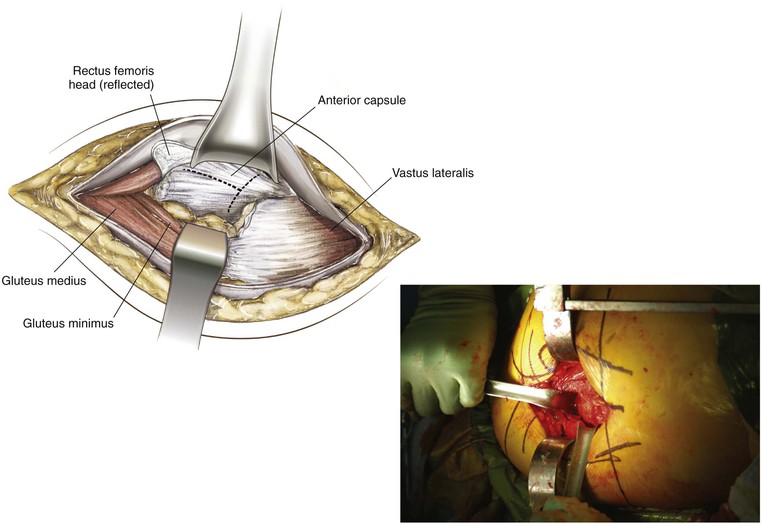
Place a blunt retractor to dissect this flap from the anterior capsule to expose it
The capsulotomy can be performed with release from the femoral attachment and a “T” into the acetabular rim; blunt retractors can be placed around the neck of the femur to expose the joint better (Figs. 6-84 and 6-85)
Closure
Mis Total Hip Replacement Considerations (Fig. 6-86)
Anterolateral Approach to the Hip (Video 6-7)
Indications
Dangers
Deep Dissection
The anterior third of the medius is isolated to split the fibers (Fig. 6-91)
The medius and minimus can be taken together or layer by layer
If the anterior flap is taken together, the capsule can be left and uncovered by blunt dissection (Fig. 6-92)
With external rotation, adduction maneuver, and aid of a bone hook, the femoral head can be dislocated (Fig. 6-93)
Anterior, posterior, and superior retractors are placed to expose the acetabulum (Fig. 6-94)
Mis Total Hip Replacement Considerations (Fig. 6-95)
Trochanteric Approaches to the Hip (Figs. 6-96 and 6-97)
Indications
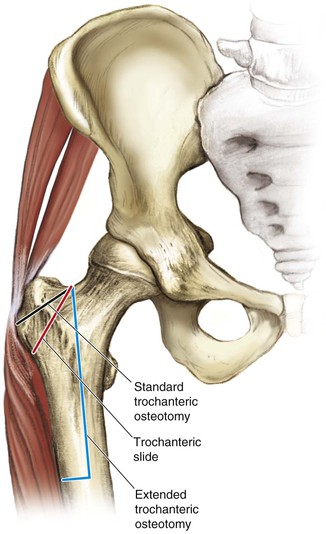
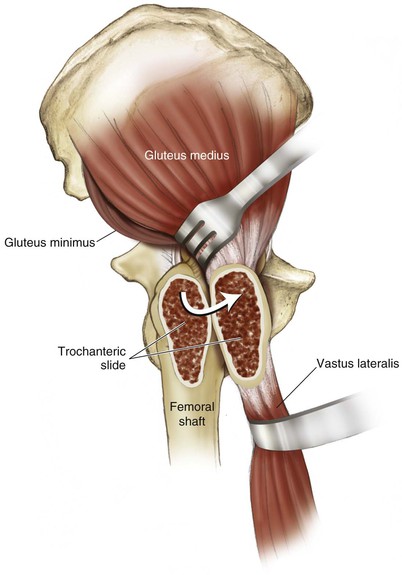
Deep Dissection
Closure
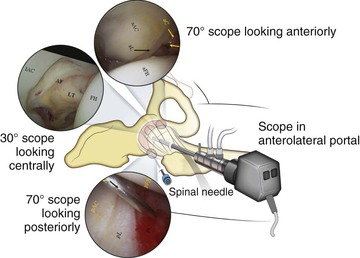
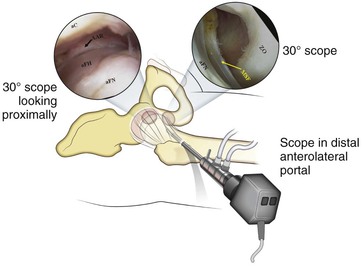
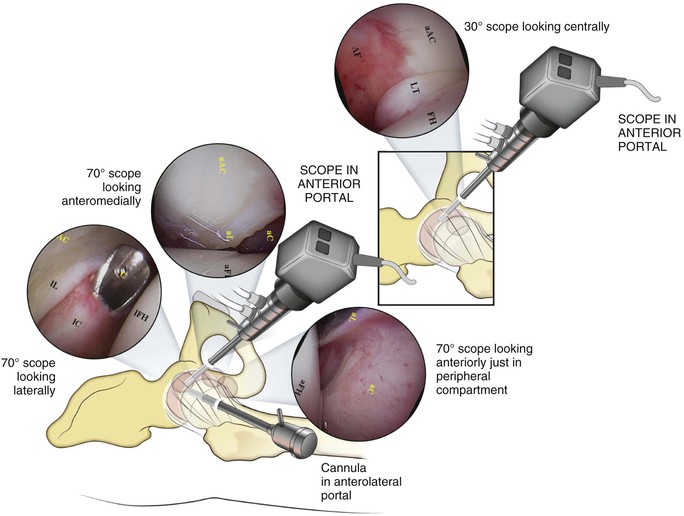
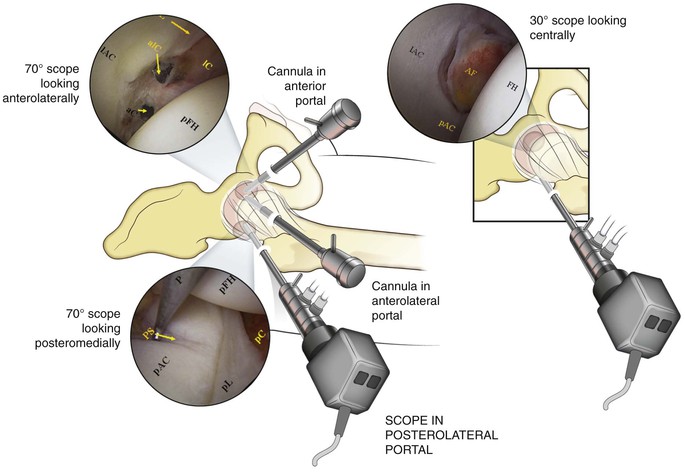
Hip Arthroscopy
Indications
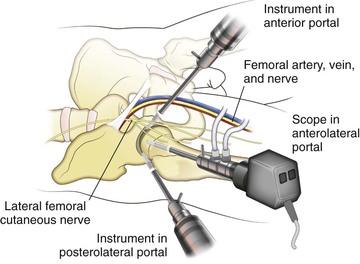
Visualization
(Figs. 6-102 to 6-105)
[/level-membership-for-orthopaedics-category][not-level-membership-for-orthopaedics-category]
Hip and Pelvis
David B. Weiss, Seth R. Yarboro, James A. Browne
Regional Anatomy and Surgical Intervals
Regional Anatomy
Osteology
Pelvis (Figs. 6-1 and 6-2)
Iliac crest (palpable throughout its entire length)
• Landmark for several skin incisions
• Iliac tubercle (outer surface of iliac crest about 5 cm posterior to the anterior superior iliac spine [ASIS])
• Site for external fixator pin
Proximal Femur (Figs. 6-3 and 6-4)
• Greater trochanter (abductor attachment for increased moment arm and mechanical advantage)
• Attachment point for abductor muscles
• Intertrochanteric line (ridge connecting the greater and lesser trochanter)
• Lesser trochanter (insertions of the iliacus and the psoas muscles)
• Posterior to the midaxis of the femoral neck, in line with the medullary canal
• The starting point for some femoral nails
• Fovea (ligament of the femoral head attachment)
• Fractures below this area are out of the weight-bearing surface
Arthrology
Hip Joint (Figs. 6-5 to 6-7)
Sacroiliac Joint
Small translations of the joint
Largely stabilized by ligaments
• Pelvis and sacroiliac ligament joint stabilizers
• Sacrospinous (connects the lateral part of the sacrum and the coccyx to the spine of the ischium)
• Iliolumbar ligaments (transverse process of the lower lumbar vertebrae to the ilium)
Nerves
Extension of Nerves from the Lumbosacral Plexus (Fig. 6-14)
• Sciatic nerve (L4 and L5 and S1, S2, and S3)
• Has tibial and peroneal divisions that are indistinguishable around the hip but later divide
• Superior gluteal nerve (innervates the gluteus medius, gluteus minimus, and tensor fasciae latae muscles)
• A risk of injury exists with extensive superior and medial dissection above the GSN
• Inferior gluteal nerve (innervates the gluteus maximus)
• Exits the GSN inferior to the sciatic nerve and enters the gluteus maximus
• Is at risk with extensive medial dissection around the posterior column near the GSN
• Lateral femoral cutaneous nerve
• Exits the pelvis just medial to the ASIS (with wide variation up to 3 cm to either side)
• Provides pure sensory innervation to anterolateral thigh
• Femoral nerve (largest branch L2, L3, and L4)
• Exits the pelvis over the anterior wall of the hip and lateral to the femoral artery and vein
• Is at risk with anterior retractor placement during anterior and posterior approaches to the hip and during middle window dissection and retraction for ilioinguinal approaches
Vascularity (Fig. 6-15)
Internal Iliac Artery
Primarily supplies the pelvic floor musculature
• Exits the greater sciatic notch and supplies the gluteus medius and minimus
• Can be damaged during posterior approaches to the hip/acetabulum
• Travels along the true pelvis and quadrilateral plate
• Corona mortis must be ligated during ilioinguinal or Stoppa approaches to the pelvis
Cross-Sectional Anatomy (Figs. 6-16 to 6-19)
Hazards (Figs. 6-20 and 6-21)
Femoral Triangle
Bordered by the inguinal ligament, sartorius, and the adductor longus, the structures from lateral to medial consist of the femoral nerve, artery, vein, and lymphatics (see Fig. 6-20)
Bladder
Landmarks (Figs. 6-22 to 6-25)
Surgical Approaches to the Pelvis
Posterior Approach to the Sacroiliac Joint
Indications
Incision (Fig. 6-27)
The incision is 8 to 12 cm centered 2 to 3 cm below and slightly lateral to the PSIS (Fig. 6-28)
• Incise the fascia of the maximus over the crest of the ilium
• This maneuver uncovers the gluteus medius and the piriformis emerging from the greater sciatic notch (the superior gluteal nerve and artery are emerging as well; Fig. 6-29)
Anterior Approach to the Pubic Symphysis (Video 6-1)
Indication
Positioning
Superficial Dissection
Deep Dissection Midline
Retract the rectus abdominis laterally and superiorly
A layer of extraperitoneal fat may be present between the rectus abdominis and the bladder
Dissection of the posterior aspect of the superior rami and pubic symphysis can be accomplished digitally (preperitoneal space of Retzius; Figs. 6-33 and 6-34)
Ilioinguinal Approach to the Pelvis (Video 6-2)
Background
Surgical Dissection
[/not-level-membership-for-orthopaedics-category]
