Head and neck
Exploration of the lower pole of the parotid
Operations on the parotid duct orifice in the mouth
Removal of stone from the submandibular duct
Excision biopsy of a basal cell carcinoma of the face
Local excision or biopsy of an intraoral lesion
Excision of suprahyoid (submental) cyst
Excision of thyroglossal cyst, sinus and fistula
Operations for branchial cyst, sinus and fistula
Excision biopsy of cervical lymph node
Operations on tuberculous cervical lymph nodes
Radical parotidectomy with block dissection
Radical submandibular sialoadenectomy with resection of segment of mandible and block
GENERAL PRINCIPLES
 Details of anatomy tend to be more important in the head and neck than in other regions. Numerous structures are crowded into a small volume and many of them, such as the facial nerve, perform important functions. Some are vital to life itself, such as the recurrent laryngeal nerve and the internal carotid artery. Refresh your memory of the local and neighbouring anatomy before performing a new or unfamiliar operation. Before embarking on any major procedure consider seeking advice from, or collaborating with, a plastic, thoracic, dental or neuro-surgeon or otolaryngologist.


MINIMIZE BLOOD LOSS
1. Discuss likely blood loss with the anaesthetist, who may decide to use hypotensive anaesthesia, lowering the arterial blood pressure by such agents as ganglion blockers. If you do operate under hypotension, remember the increased risk of reactionary haemorrhage shortly after the wound has been closed, so delay closure until you are certain that the blood pressure has been restored to normal.
2. Venous bleeding is more difficult to control than arterial. Venous pressure, and therefore venous bleeding, can be minimized by paying careful attention to posture. Position the patient so that the area being operated on is at a higher level than the heart. Carefully protect local veins from direct pressure resulting from clumsy positioning of the head, neck or shoulders, and the presence of supports or towels, etc. If it is necessary to divide a large vein draining the operative area, postpone this step in the operation to the latest possible moment. The anaesthetist helps to reduce venous pressure by maintaining the clearest possible airway and by keeping arterial carbon dioxide tension normal or below normal.
3. Control blood vessels before dividing them; in this way you obviate excessive blood loss from, for example, a haemostat slipping off the cut vessel. For sizeable vessels, pass two ligatures with an aneurysm needle and tie them around the vessel before dividing the vessel between them.

4. Many surgeons infiltrate the skin and subcutaneous tissues with a solution of 1:200 000 adrenaline (epinephrine) in normal saline, thereby producing vasospasm and reducing bleeding.
5. Diathermy is a valuable aid to haemostasis, but use it carefully. It stops bleeding by coagulating the tissues at more than 1000°C, potentially causing extensive destruction. Cutting diathermy produces high-intensity energy over a small sphere from the active electrode; coagulating current produces a lower intensity over a larger sphere. It is traditional to use the cutting current to incise tissues and the coagulating for producing haemostasis, on the principle that the larger zone of action of the coagulating current compensates for any small inaccuracy in identifying the bleeding point. Use the cutting current for haemostasis, having first made sure that each bleeding point has been accurately identified; this discipline reduces unnecessary tissue destruction to a minimum.
6. After the operation, use suction drainage to obliterate the dead space under the skin flaps, thereby reducing the risk of secondary haemorrhage and haematomas. Note that in the neck a haematoma is a potentially lethal complication, because of its possible effect upon the patency of the airway.
KEY POINTS
Threats to the airway
 After any extensive procedures, especially those involving resection of the lower jaw, ask yourself whether such factors as an unstable tongue or laryngeal oedema might be a particular threat to the maintenance of the airway in the postoperative period.
 Be prepared to perform a temporary tracheostomy in such circumstances.
REPLACE BLOOD LOSS
1. Before operation, ensure that every patient has been asked about any history of a bleeding tendency, that a haemoglobin estimation has been performed and that blood has been taken for grouping and serum saved in case cross-matching becomes necessary.
2. With regard to which cases require blood to be cross-matched before the operation, it is difficult to lay down rules. Much depends upon your experience and that of the anaesthetist. Blood transfusion is rarely necessary for conservative parotidectomy under good hypotensive anaesthesia, but, if you are an inexperienced operator, working with normotensive anaesthesia, have 2 units of blood cross-matched and have 4 units cross-matched before an extensive resection involving bone and/or block dissection of the cervical lymph nodes.
3. Normally, the anaesthetist controls blood replacement during the operation. The principles are accurate measurement of the blood loss by weighing swabs and measuring the volume of the contents of the sucker bottle, with prompt and complete replacement, preferably monitored by the measurement of central venous pressure or of urine output.
PAROTIDECTOMY
Appraise
1. Assess a parotid lump before operation by careful clinical examination. Pain and facial nerve palsy are diagnostic of malignancy unless tuberculosis is suspected. Fine-needle aspiration cytology is accurate in about 85% of cases,2 but the role of needle biopsy is debatable. Small discrete masses usually require surgical rather than conservative management.3 Most parotid neoplasms are benign.4
2. The facial nerve and its five main branches run through the substance of the parotid gland and are at risk in parotidectomy.
3. Plan to expose the facial nerve and its branches at an early stage of any parotidectomy and over a sufficiently wide area to ensure that the required resection is achieved without cutting the nerve (conservative parotidectomy). However, if the object of your operation is to remove a lump in the parotid with a wide margin of normal tissue, you will sometimes find that this condition is impossible to fulfil; an adequate margin cannot be achieved unless you sacrifice the whole nerve (radical parotidectomy) or one or more of its branches (semi-conservative parotidectomy).5
4. If the decision is not clear-cut whether to sacrifice the main nerve, lean towards radicalism in elderly males, conservatism in young females. Biopsy the lump, and ask for an immediate histological opinion on frozen sections, provided:
 You take extreme precautions against spreading the tumour in taking the biopsy: parotid tumours are notorious for their tendency to implant
 Your pathologist is an expert in the histopathology of parotid lesions.6
5. Repair any gap you produce in the facial nerve system by immediate primary suture, if possible, or by bridging the defect with a free cable graft, taken as a routine from the great auricular nerve at the beginning of the operation. Ignore any damage to the fifth (cervical) branch.
6. Operations for recurrent parotitis not due to parotid calculus (i.e. the group of conditions known as Sjogren’s or sicca syndrome) may require total conservative parotidectomy.
Prepare
1. If you confirm a malignant tumour, discuss the implications with the patient, especially if there is a prospect of sacrificing part or all of the facial nerve.
2. Check that male patients are clean-shaven on the side of the tumour.
3. Have the patient lying near your side of the operating table. Tilt the top half of the operating table upwards until the external jugular vein collapses. Extend the patient’s head on the neck, turn it away from you and place it on a head-ring to stabilize it, with a sandbag, or similar, under the shoulder
4. To protect the patient, and protect yourself from charges of negligence, monitor the facial nerve. Insert needle electrodes into the ipsilateral frontalis and mentalis muscles to record electromyographic signals from them, producing audible and visual signals when the facial nerves supplying them are stimulated. The nerve monitor can also be used as an aid to identify a doubtful nerve or to confirm that the nerve is intact by demonstrating a signal on stimulating the nerve.
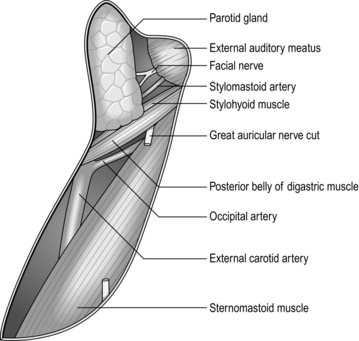
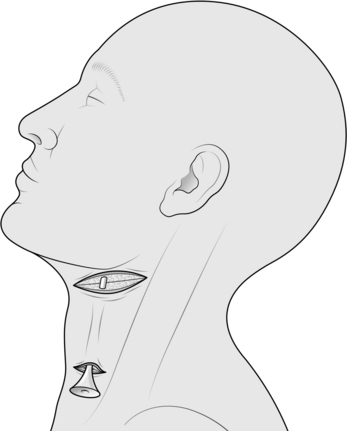
5. Ensure that the patient’s eyes are protected from possible damage by lotions used in the skin preparation. Clean the skin over the area shown in Figure 28.1.
6. Place the towels to leave exposed only the area shown in Figure 28.1. Push some ½″ ribbon gauze (which is added to the swab count) into the external auditory meatus with a pair of artery forceps and then discard them.
7. Ask the anaesthetist to maintain the patient in hypotension if possible.
Access
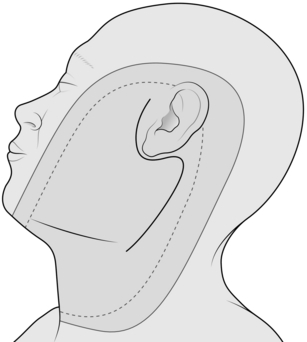
1. Follow the standard S-shaped cervicomastoid-facial incision (Fig. 28.1). The lower, cervical part lies in the upper skin crease of the neck, extending forwards to the external jugular vein. The upper, facial, part lies in the skin crease at the anterior margin of the auricle, extending upwards to the zygoma. Between these two parts, the mastoid part of the incision curves gently backwards over the mastoid process. If you intend to remove a lump in this area, exaggerate the posterior curve to encompass the lump. Make the incision in three parts from below upwards, stopping all bleeding before proceeding to the next part. In this way you avoid bleeding from the upper part of the wound obscuring your field lower down.
2. Start by making the cervical part of the incision. Incise skin, fat and platysma.
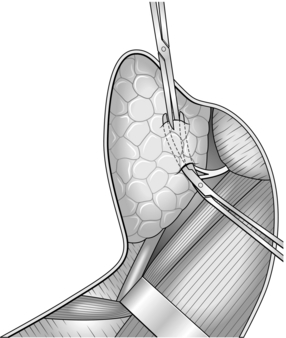
3. Identify the external jugular vein near the anterior end of the wound, and two branches of the great auricular nerve vertically below the anterior margin of the auricle (Fig. 28.2). Preserve the vein but sacrifice the thinner, usually more anterior, branch of the nerve. Dissect free but do not yet excise, about 4 cm of the thicker branch of the nerve.7 The nerve runs upwards towards the ear and breaks up into two or three branches; if possible, include a centimetre of each branch with the segment of stem excised.
4. Facilitate the dissection by placing a row of artery forceps on the subcutaneous fat of the upper margin of the wound. Have your first assistant, standing opposite you, to lift the forceps. Identify the anterior border of the sternomastoid muscle. Follow the border upwards and posteriorly towards the mastoid process, as far as the incision permits. Deepen the dissection to expose in turn the posterior belly of the digastric and the stylohyoid muscles, proceeding at this stage only as far as is convenient.
5. Perform the mastoid part of the incision and deepen it on to the sternomastoid muscle. Continue to expose the anterior border of the muscle right up to the mastoid process. Place more artery forceps on the upper subcutaneous border of the wound and have your assistant pull the superficial part of the lower pole of the parotid gland forwards from the anterior border of the sternomastoid. Friable, yellow parotid tissue forms the visible aspect of the anterior margin of the incision.
6. Continue to expose the posterior belly of the digastric and the stylohyoid muscles upwards towards the mastoid process as far as is convenient at this stage.
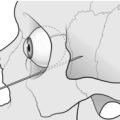
7. Create the facial part of the incision and deepen it along the anterior surface of the cartilaginous external auditory meatus by pushing in an artery forceps and opening the blades in an antero-posterior plane. Deepen this plane until you can feel the junction between the cartilaginous and bony external auditory meatus (Fig. 28.2).
8. You now have a large S-shaped incision in which two deep cavities, one in the neck and one in front of the ear, are separated by a bridge of tissue where the dissection has not been deepened to the same extent, in front of the mastoid process. Whittle away these tissues piecemeal; push a closed, curved artery forceps from the upper cavity downwards at 45° towards the lower cavity so that the tips emerge. Separate the tips of the artery forceps and cut the tissue between them. Concentrate on defining the region where the anterior border of the sternomastoid and the two deeper muscles reach the anterior surface of the mastoid process. The dissection approaches the region of the facial nerve, so take increasing care. Remove smaller bites of tissue. Have the diathermy apparatus turned to the lowest mark.
9. The signal that you are close to the facial nerve is to identify the stylomastoid artery running downwards and forwards in the same general direction as the facial nerve. Control it with ligatures or with diathermy coagulation and divide it. Continue the dissection and about 3 mm deeper you will find the facial nerve trunk. It is 3–6 mm in diameter, white but with fine red vessels visible on its surface, and it bifurcates 1–2.5 cm below the base of the skull.
10. Further steps depend upon the exact operation you wish to perform.
SUPERFICIAL PAROTIDECTOMY
Appraise
1. You cannot determine clinically that a lump in the parotid gland is confined to the superficial part, so cannot determine beforehand to perform a superficial parotidectomy.
2. The definite indication for superficial parotidectomy is therefore recurrent parotitis from a stone in the parotid duct at a site inaccessible from the mouth.8
3. You must remove as much parotid tissue and as long a length of parotid duct as you can reasonably achieve, otherwise there is a risk of recurrent flare-up of the residual infected tissues.
Action
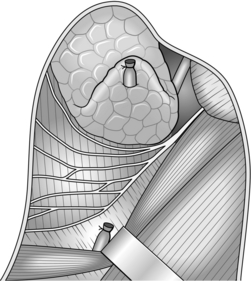
1. Choose either the upper or the lower main division of the nerve to start the dissection, whichever seems the most convenient. Aim to reflect forwards the parotid tissue superficial to the facial nerve and its five branches until you reach the anterior margin of the gland.
2. Place the closed blades of fine, gently curved mosquito forceps, concavity superficial, along the exposed division of the nerve and in contact with the nerve.
3. Push the forceps points along the surface of the nerve for about 5–10 mm into the region where the nerve is still unexposed (Fig. 28.3).
4. Parotid tissue is tough, requiring a surprising amount of force to split it. Separate the points of the artery forceps and elevate the whole instrument to tauten the overlying tissue bridge. Divide the bridge with scissors, exposing a further few millimetres of the nerve.
5. Repeat the manoeuvre, following the more posterior nerve at any bifurcation. You eventually reach beyond the margins of the parotid gland – at the zygoma if you have followed the upper division, beyond the external jugular vein if you have followed the lower division.
6. Repeat the process with the other main division of the facial nerve and its most posterior branch. You have now exposed the facial nerve trunk and its temporal and cervical branches.
7. The zygomatic branch arises from the upper division, the mandibular from the lower division, and there are at least two buccal branches, one from each division, and sometimes a third, usually from the lower division. Working from the periphery towards the centre of the gland, follow the other main nerve branches forwards to the anterior margin of the parotid gland, that is along a vertical line halfway between the anterior and posterior borders of the masseter muscle.
8. Reflect the skin from the anterior flap until you reach the superior and anterior margins of the gland. With a little more dissection along the nerve branches you will free the gland except for the parotid duct.
KEY POINTS
Caution


9. Dissect the parotid duct forwards to the anterior border of the masseter muscle, where it turns medially to perforate the cheek and reach the mouth. Free from it the closely applied buccal nerve branches, then tie the duct at the anterior border of the masseter with an absorbable suture and cut the duct. The excision is complete.
KEY POINTS
Pay attention to the nerves
 If there is a bleeding point so close to the facial nerve that you are afraid that an attempt at stopping the bleeding with artery forceps or diathermy may injure the nerve, ask your assistant to press on the point with a swab and turn your attention to dissecting another part of the facial nerve system. When you return to the original spot the bleeding will probably have stopped.


Checklist
1. Has the anaesthetist raised the blood pressure to normal for the patient or at least greater than 100 mmHg? If not, you risk a high incidence of reactionary haemorrhage. Restore the table to the horizontal position to ensure that any tendency to bleeding becomes immediately manifest. You can ask the anaesthetist to perform a Valsalva manoeuvre to check for any bleeding points.
2. Have you removed the ribbon gauze from the external auditory meatus?
PAROTIDECTOMY FOR A LUMP IN THE PAROTID REGION
Appraise
1. Most lumps in the parotid region are parotid tumours, and most of the tumours are benign adenomas.9 Also, most lumps are clinically unremarkable, that is they present no features that enable you to distinguish between non-neoplastic, neoplastic benign and neoplastic malignant lumps.10 The well-recognized ability of adenoma cells to implant if shed into the wound renders a preliminary open biopsy inadvisable. However, fine-needle aspiration cytology does not seem carry an associated risk of implantation.
2. Controversy besets the decision as to whether to remove the lump with a wide margin of normal tissue after exposing and protecting the facial nerve, or whether to enucleate the lump in the hope of preserving the nerve. The available evidence suggests that enucleation does not reduce the incidence of permanent damage to the facial nerve and that the incidence of recurrence after enucleation and radiotherapy is unacceptably high.1 Standard management in the UK, the universal management in the USA, is for excision of an unremarkable lump with the widest possible margin of normal tissue, with exposure and preservation of the facial nerve unless the tumour is invading it, or a branch of it. In this case the lump is malignant, so sacrifice the nerve element.
Access
1. Employ the cervicomastoid-facial S-shaped incision.
2. Expose the main trunk of the facial nerve and, if possible, its primary bifurcation. Dissect forwards along the nerve or along its upper and lower divisions. It is soon evident whether the lump is in the part superficial to the facial nerve, or deep to the nerve, and whether the nerve trunk or main divisions run into the lesion rather than being pushed aside by it.
Action
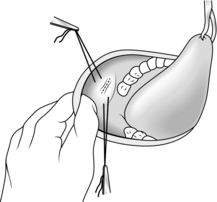
1. Dissect under the trunk, divisions and branches of the facial nerve. With a nerve hook and some nylon ribbon, gently lift the nerves off the underlying deep part of the parotid gland until there is clear space between the nerves and the whole of the deep part of the gland.
2. Identify the external carotid artery and companion vein if there is one, at the upper border of the stylohyoid muscle. Ligate and divide the artery and companion vein.
KEY POINTS
Anatomy


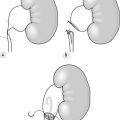
3. Mobilize the deep part of the parotid and its contained lump by working from the anterior and posterior parts of the gland towards the centre and from its lower pole upwards. Aim to mobilize the deep part so as to remove it above or below the facial nerve system, or between the two main divisions in the region of the bifurcation, whichever is most convenient (Fig. 28.4).
4. Facilitate mobilization of a lower pole containing a large tumour by dividing the stylomandibular ligament, of which the anterior insertion is into the angle of the jaw. If necessary, fracture the styloid process to gain more room.
5. Continue to mobilize the deep parotid off the masseter muscle and mandible anteriorly, and the bony external auditory meatus posteriorly. As you approach the upper part of the gland, identify the termination of the external carotid artery at the upper pole where it bifurcates into the superficial temporal artery and the maxillary artery. Tie to divide these arteries and their accompanying veins. The deep parotid is now free and you can remove it.
ACTION
1. Reflect the skin forwards to the anterior margin of the gland.
2. Find the external carotid artery at the lower pole of the gland and divide this and its companion vein between ligatures.
3. Divide the trunk of the facial nerve and mobilize the posterior aspect of the whole gland off the cartilaginous and bony external auditory meatus.
4. Divide the facial nerve branches at the anterior border of the gland and mobilize the whole gland backwards off the masseter muscle and the posterior border of the mandible.
5. Mobilize the whole gland from below upwards. Doubly ligate and divide the superficial temporal and maxillary arteries at the upper pole of the gland and remove the freed whole gland with its contained facial nerve system.
6. A semi-conservative parotidectomy may be performed, sacrificing one or more branches of the facial nerve but preserving at least one of the upper four branches, to preserve an adequate margin round the lump. Repair the cut branches end-to-end if the cut ends will meet; otherwise bridge the gap or gaps using the segment of greater auricular nerve you obtained earlier, with the finest available suture material (usually 8/0 or 10/0).
REFERENCES
1. Hobsley M. A Colour Atlas of Parotidectomy. London: Wolfe Medical Publications; 1983.
2. Al-Khafaji BM, Nestok BR, Katz RL. Fine-needle aspiration of 154 parotid masses with histologic correlation: a 10 year experience at the University of Texas MD Anderson Cancer Center. Cancer 1998;84:153–9.
3. McGurk M, Hussain K. The role of fine needle aspiration cytology in the management of the discrete parotid lump. Ann R Coll Surg Engl 1997;79:198–202.
4. Hibbert J, editor. Laryngology and head and neck surgery. In: Scott Brown’s Otolaryngology, vol. 5. Oxford: Oxford University Press; 1997. 5/20, page 6.
5. Stevens KL, Hobsley M. The treatment of pleomorphic adenomas by formal parotidectomy. Br J Surg 1982;69:1–3.
6. Hobsley M, Thackray AC. Salivary glands. In: Hadfield JG, Hobsley M, Morson BC, editors. Pathology in Surgical Practice. London: Edward Arnold; 1985, p. 22–34.
7. Christensen NR, Jacobsen SD. Parotidectomy: preserving the posterior branch of the greater auricular nerve. J Laryngol Otol 1997;111:556–9.
8. Suleiman SI, Thomson JPS, Hobsley M. Recurrent unilateral swelling of the parotid gland. Gut 1979;20:1102–8.
9. Hobsley M. Salivary tumours. Br J Hosp Med 1973;10:553–62.
10. Hobsley M. Sir Gordon Gordon-Taylor: two themes illustrated by the surgery of the parotid gland. Ann R Coll Surg Engl 1981;63:264–9.
EXPLORATION OF THE LOWER POLE OF THE PAROTID
Appraise
1. The exploration may be used to determine if a lump in the neck is or is not in the lower pole of the parotid gland. The lower pole of the gland extends well down into the neck behind the angle of the jaw and is separated anteriorly from the submandibular salivary gland only by a thickened sheet of fascia, the stylomandibular ligament.
2. The procedure can be employed to obtain a large piece of tissue from the gland for histological examination.
Access
1. Make the incision in the upper skin crease of the neck, starting just in front of the external jugular vein, extending backwards to a point vertically below the lowermost tip of the mastoid process.
2. Identify the external jugular vein and expose the two divisions of the greater auricular nerve. Sacrifice the thinner division of the nerve. Mobilize the thicker division, but preserve it for the moment; you may sacrifice the thicker division later.
3. Define the anterior border of the sternomastoid muscle. Place a row of artery forceps on the subcutaneous fat of the upper margin of the wound and have your assistant raise this edge off the muscle.
Action
1. If the lump is in the parotid, continue the operation as a parotidectomy for a lump. Even if the lump seems very superficial, do not be tempted to excise it locally. To safeguard the facial nerve and ensure complete removal of the lump, you must carry out a formal parotidectomy after exposing the trunk of the facial nerve.
2. If the lump is not in the parotid, remove the lump, leaving the parotid untouched.
3. If you aim to take a generous biopsy of the parotid, undertake step 1 in Access above. Deepen this cervical part of the dissection to expose the posterior belly of the digastric and the stylohyoid muscle. Define these muscles up to the region of the mastoid process.
4. You will find that a large portion of the lower pole of the parotid gland is now elevated with the anterior skin flap. You can remove a large biopsy of this mobilized portion without risk to the facial nerve.
OPERATIONS ON THE PAROTID DUCT ORIFICE IN THE MOUTH
Appraise
1. Stomatoplasty (Greek: stoma = mouth + plassein = to form or reform) is used to enlarge the parotid duct orifice,1 either to enable a calculus in the parotid duct to be passed more easily or to prevent a stricture forming at the orifice after the duct has been explored, for example to remove a stone from the duct.
2. Two branches of the facial nerve are closely applied to the parotid duct in the cheek and may even wind around the duct. Therefore, do not pass ligatures round the duct to prevent a stone from escaping or to assist retraction; contrast this with the procedure for removal of stone from the submandibular duct.
Access
1. Ask the anaesthetist to use a per-nasal endotracheal tube, thereby leaving the mouth free for your manipulations. Also ask him to pack the pharynx around his tube, as a precaution against blood from the mouth being aspirated into the lungs.
2. Fix the patient’s mouth open with a dental prop or Ferguson’s forceps inserted between the teeth or gums of the jaws on the side opposite to your operation. Place a strong silk suture into the tip of the tongue and have your assistant use it to retract the tongue towards the opposite side.
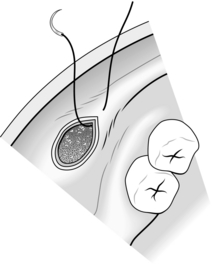
3. Identify the papilla on which the parotid duct opens on the inside of the cheek, immediately opposite the second upper molar tooth. Take an atraumatic 2/0 absorbable synthetic stitch on a half-circle (30 mm) cutting needle and put a stitch into the mucosa and underlying muscle of the cheek, about 5 mm above the papilla. Do not tie this stitch; cut it so that each end is 15 cm long, and grip the ends of the stitch with a pair of artery forceps (Fig. 28.5).
4. Insert a similar stitch about 5 mm below the papilla. Have your assistant pull on the two stitches, thereby elevating the region of the papilla towards you.
Access
1. Feel the region of the papilla with two fingers of one hand, exerting counter-pressure with the fingers of the other hand applied to the external aspect of the cheek. Can you feel a stone?
2. Identify the parotid duct orifice using a lacrimal duct dilator, which is a fine probe with a slight bend at each end in the shape of an elongated letter ‘S’. To facilitate this manoeuvre, use one hand to guide the dilator and, with the other, pull the angle of the mouth forwards towards you with your thumb working against the metacarpo-phalangeal joint of your index finger, and push the cheek inwards with the fingertips.
3. At this stage, you are ready to remove a stone from the parotid duct, or to proceed immediately to stomatoplasty, as indicated by your findings.
REMOVAL OF STONE FROM THE PAROTID DUCT: INTRAORAL APPROACH
Action
1. If you can feel the stone at the orifice, keep the papillary region pushed inwards into the mouth by the manoeuvre just described and cut down on the stone with a short-bladed, long-handled scalpel. Start the incision at the orifice of the duct and carry it horizontally backwards for 1 cm.
2. When you have deepened the incision sufficiently, the stone becomes visible. Grasp it with fine-toothed dissecting forceps, and lift it out of the duct. You will find that your incision has divided two layers of mucosa, the lining of the inside of the cheek and the inner lining of the wall of the parotid duct.
3. If you cannot feel a stone in the duct, pass the lacrimal duct dilator into the orifice and along the duct for 2 cm. Get your assistant to hold the dilator steady, keep the papillary region of the cheek pushed inwards into the mouth with your other hand and cut down on the dilator, carrying the incision from the orifice of the duct horizontally backwards for 1 cm.
4. Explore the duct as far back as possible by passing the lacrimal duct dilator. You may be able to feel a stone grating on the tip of the probe. If you do, try milking the stone forward by digital pressure on the parotid gland and duct from outside. This manoeuvre is not often successful, but is worth trying.
5. Whether or not you found and removed the stone, complete the operation by fashioning a large parotid duct orifice.
PAROTID DUCT STOMATOPLASTY
Closure
You will find that your incision has divided two layers of mucosa, the lining of the inside of the cheek and the inner lining of the wall of the parotid duct. Unite these two layers with a series of interrupted, 3/0 absorbable synthetic sutures around the margins of the incision (Fig. 28.6).
Checklist
1. Make sure all bleeding has stopped.
2. Remove the stay sutures above and below the duct orifice and the suture from the tongue, and check that bleeding does not continue from the puncture wounds.
3. Ask the anaesthetist to remove the pharyngeal pack. If the pack has been effective, there will be no blood on the deeper part of the pack.
REMOVAL OF STONE FROM THE SUBMANDIBULAR DUCT
Appraise
1. Do not attempt this operation unless the stone is easily palpable well forward in the floor of the mouth and its presence has been confirmed by radiological investigation.
2. If the stone is more posterior and can only just be felt in the floor of the mouth, or if the submandibular salivary gland is clearly chronically infected, then remove the whole gland together with the stone and as much duct as possible (see the description of excision of submandibular salivary gland for sialolithiasis, below). If there is any possibility of this situation arising, obtain the patient’s informed consent.
3. A stone easily accessible in the anterior part of the duct may slip back into the gland during manipulations in the region of the duct. To prevent this happening, gain control of the duct behind the stone with a ligature under-running the duct at an early stage of the operation.
Access
1. Ask the anaesthetist to pass a nasal endotracheal tube and to pack off the pharynx.
2. Keep the patient’s mouth open with a dental prop or Ferguson’s forceps inserted between the teeth or gums of the molar region of the contralateral side of the mouth.
3. Grasp the tip of the tongue with a black silk suture and have your assistant retract the tongue towards the contralateral side.
Assess
1. Inspect and feel the submandibular duct in the floor of the mouth. Make sure that the stone is present and where you expect it to be, well forward in the duct.
2. If you cannot feel the stone, do not explore the submandibular duct. Either the stone has passed spontaneously or it has fallen back along the duct into the gland. In the latter circumstance, you should be able to feel it by bimanual palpation via the neck and the floor of the mouth simultaneously. If you can feel the stone in the gland, try to milk it forwards into the duct. If you fail to milk it forwards, the only method of removing the stone safely is to remove the whole salivary gland with it by the cervical route.


3. If the stone is probably, and maybe visibly, situated well forward in the submandibular duct, proceed as below.
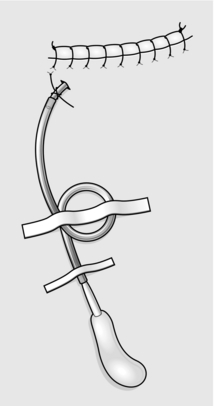
Action (Fig. 28.7)
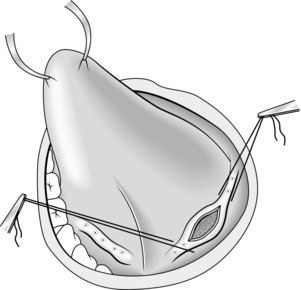
1. Insert an atraumatic 0 monofilament nylon stitch on a 30-mm half-circle cutting needle under-running the submandibular duct, immediately proximal to the stone. Do not tie it. Cut it so that each end is 15 cm long, grasp the two ends in the jaws of a pair of artery forceps, to be drawn upwards and proximally along the duct by your assistant. This kinks and obliterates the lumen, preventing the stone from slipping backwards into the gland.
2. Insert a similar stitch, with a deep bite, vertically into the floor of the mouth in the midline between the terminations of the ridges marking the right and left submandibular ducts for your assistant to pull towards you and to the contralateral side.
3. Identify the orifice of the ipsilateral submandibular duct by passing a fine lacrimal duct dilator through the orifice. With the dilator in place, attempt to leave the terminal 0.5 cm of the duct intact.
4. With a small-bladed, long-handled scalpel, cut boldly down on to the stone along the length of the duct.
5. Lift out the stone with fine-toothed dissecting forceps.
6. Leave open the linear incision in the anterior wall of the duct.
7. If the stone is impacted at the orifice of the duct, try milking it backwards along the duct, so preserving the integrity of the duct orifice. If you are forced to slit open the orifice, complete the operation by performing a stomatoplasty, sewing the duct lining to the mucosa of the floor of the mouth to leave an enlarged (0.5 cm) orifice, exactly as in the operation of parotid duct stomatoplasty.
Checklist
1. Make sure all bleeding has stopped.
2. Remove the two stay sutures, and the towel clip from the tongue, and check that bleeding does not continue from the puncture wounds.
3. Ask the anaesthetist to remove the pharyngeal pack. If this has been effective, there will be no blood on the deeper part of the pack.
SUBMANDIBULAR SIALOADENECTOMY
SUBMANDIBULAR SIALOADENECTOMY FOR CALCULOUS DISEASE
Appraise
1. The mandibular (fourth) branch of the facial nerve dips down into the neck behind the angle of the jaw and then curves upwards and medially to cross superficial to the posterior part of the submandibular salivary gland on its way to the angle of the mouth. This branch is therefore at risk during submandibular sialoadenectomy.
2. The facial artery and vein lie in a groove on the deep aspect of the posterior pole of the superficial lobe of the gland. The vessels are so intimately bound to the gland that you should not attempt to dissect them away from it.
3. The gland has a superficial and a deep lobe; the separation is not complete, the two portions being continuous around the posterior edge of the mylohyoid muscle.
Access
1. Ask the anaesthetist to provide hypotension if possible.
2. Lay the patient close to your side of the table, positioned with head-up tilt from the waist, sufficiently steep to cause collapse of the external jugular vein. Turn the patient’s head away from you, with the head extended on the neck, stabilized on a head ring and a sandbag under the shoulder.
3. After cleaning the skin and applying towels, make an incision through skin and platysma in the upper skin crease of the neck, about 5 cm below the lower border of the mandible, extending from a point 2 cm lateral to the anterior midline of the neck to a point vertically below the angle of the jaw.
Action
1. Identify by palpation the inferior border of the submandibular salivary gland.
2. Deepen the cervical incision in the direction of the inferior border of the gland until you expose the border.
3. Keeping as closely as possible to the surface of the gland, dissect all around the superficial lobe until it is free except for the area where it becomes continuous with the deep lobe. During the course of this dissection, you meet the facial artery and vein both at the lower and upper borders of the posterior pole of the superficial lobe (Fig. 28.8).
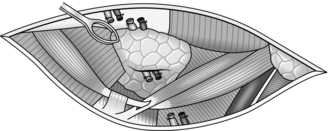
4. Preferably ligate and divide the artery and vein separately, at both the upper and the lower borders, leaving a segment of each vessel remaining attached to the gland. If you keep very close to the superficial surface of the gland, you stand little chance of injuring the mandibular branch of the facial nerve, which is retracted upwards by your assistant within the superficial flap of tissues. You may be able to see the thread-like marginal mandibular nerve as it lies on the deep surface of platysma. The nerve can be stimulated with a disposable nerve stimulator: the lower lip will twitch or an action potential will be recorded if a nerve monitor is being used.
5. Apply a pair of tissue forceps to the gland as it dips deep to the posterior border of the mylohyoid muscle. Have your assistant pull the gland laterally and retract the posterior border of the mylohyoid medially while you free the deep part of the gland from the deep surface of the mylohyoid by blunt dissection. At this stage you may be able to feel the stone stuck in the duct at the point where the duct leaves the anterior pole of the deep lobe.


6. Now have your assistant retract the deep portion of the gland medially, that is round the edge of the mylohyoid muscle. Dissect by blunt dissection along the deep surface of the deep lobe, separating it from the hyoglossus muscle on which it lies. Keep very closely to the gland, because it also lies in contact with the lingual nerve. You can recognize the nerve as a rather broad (7.5 mm) thin band of white tissue, running forwards and medially on the hyoglossus and a little above the level of the submandibular duct.
7. At the anterior pole of the gland you may again feel the calculus, since this is the most common site, and see the commencement of the duct. Now dissect forwards along the duct, taking special care not to damage the lingual nerve as it crosses the superficial aspect of the duct from above downwards, and then winds right round the lower border of the duct to cross its medial aspect from below upwards.
8. Free the duct as far forwards as possible, nearly to its termination in the mouth. Tie the duct distally with an absorbable synthetic ligature, and cut it across. Remove the duct and gland with the contained stone.
Closure
1. Check that haemostasis is perfect when the anaesthetist has raised the blood pressure sufficiently.
2. Close the wound in two layers, with 4/0 absorbable synthetic for the platysma, 6/0 nylon for the skin.
3. Insert a suction drain through a separate stab incision 5 cm below the middle of the wound.
SUBMANDIBULAR SIALOADENECTOMY FOR TUMOUR
Appraise
1. If a submandibular salivary gland swelling is not due to a calculus, assume it to be due to a tumour. Fine-needle aspiration cytology may aid the diagnosis.
2. With clear-cut evidence that the tumour is malignant, a radical submandibular sialoadenectomy with resection of a segment of the mandible (a ‘commando’ operation) may be performed, outlined at the end of the chapter.
3. If there is no evidence of malignancy, assume that the tumour is a mixed salivary tumour and aim to remove the submandibular salivary gland with a wide margin of normal tissue, so as to ensure completeness of the excision and to guard against any implantation recurrence.
4. Warn the patient of possible weakness of the angle of the mouth and the lower lip, loss of general sensation and taste from the ipsilateral half of the anterior two-thirds of the tongue and subsequent development of wasting and paralysis of the ipsilateral half of the tongue.
Access
1. Make a skin crease incision through skin and platysma in the upper skin crease of the neck, extending from 2 cm lateral to the anterior midline of the neck to a point vertically below the angle of the jaw. Do not hesitate to extend this incision in either direction to facilitate removing a large tumour.
2. Deepen the incision towards the lower border of the sub-mandibular salivary gland, but stop a few millimetres short of actually exposing the gland.
Action
1. Dissect free the superficial aspect of the superficial lobe. If the tumour does not reach this aspect, it is acceptable to dissect close to the gland, preserving the mandibular branch of the facial nerve in the overlying platysmal flap as described in the similar operation for sialolithiasis. If the tumour does reach this superficial aspect, perform the mobilization in a plane more remote from the gland. Try to identify the mandibular branch of the facial nerve and preserve it, provided that this does not jeopardize your margin around the tumour. Divide the facial vessels between ligatures, well above and below the posterior pole of the gland.
2. Continue the mobilization of the superficial and deep lobes as described in the corresponding operation for sialolithiasis, but wherever the tumour reaches the surface of the salivary gland make certain of your margin by excising the neighbouring normal tissue. This policy usually only entails the sacrifice of fibres from such muscles as the anterior belly of the digastric anteriorly, the intermediate tendon of the digastric and the stylohyoid muscle inferiorly, the stylomandibular ligament posteriorly and the mylohyoid, stylohyoid, hyoglossus and posterior belly of the digastric medially.
KEY POINTS
Fate of the nerves


3. Dissect the submandibular duct forwards as far as possible, tie and divide it, and lift out the block of tissue.
EXCISION BIOPSY OF A BASAL CELL CARCINOMA OF THE FACE
Appraise
1. A basal cell carcinoma (rodent ulcer) may be treated by operation or by radiotherapy. If you choose to resect it you must excise it with a wide margin of normal tissue, both around the lesion and deep to it. A ‘wide margin’ means preferably 1 cm, but in regions where skin is precious, for example near the eye, 0.5 cm is acceptable.
2. If the ulcer is small, in a region where there is plenty of redundant skin, excision and primary closure may be possible. Otherwise you may need to apply a skin graft, preferably a full-thickness graft, as the cosmetic result following split skin grafting on the face is unacceptable. There are two suitable free full-thickness donor sites. Facial surgeons can rotate flaps to cover large defects, but do not attempt these unless you are experienced with the techniques.
Assess
1. Carefully assess by inspection and palpation the extent of the lesion and the required area of excision. It is not yet possible to determine required depth of excision.
2. Plan the excision taking into account the relaxed skin tension lines.1 After the excision, you may then be able to close the defect by primary suture with the scar lying in the skin crease.


Action
1. Mark out the oval of skin that you intend to excise.
2. Cut vertically through the skin along the oval line, until superficial fat is clearly visible everywhere in the wound.
3. Deepen the incision at one end of the oval. Raise the skin at one end with toothed forceps, using a clean scalpel or scissors including some subcutaneous tissue near the lesion.
4. At this stage you will find it easier to decide by palpation how deeply the lesion extends. Make sure that your plane of cutting is sufficiently deep to give a wide margin of normal tissue below, as well as all round, the tumour.
5. Complete the excision by starting again at the opposite end, meeting the other excision deep to the lesion.
6. Inspect the wound for bleeding and stop it with diathermy.
7. Take a single sheet of petroleum jelly (Vaseline) gauze, lay it on the wound and cut out a piece the shape and size of the wound as a pattern for cutting a full-thickness (Wolfe) graft of skin.
8. Lay the pattern on the chosen donor site. The loose skin immediately below the clavicle and the groove between the side of the head and the medial aspect of the posterior part of the pinna make suitable donor sites. Cut out a full-thickness area of skin corresponding in size and shape to the pattern, with minimal subcutaneous fat. Cut off any remaining fat using a sharp scalpel. Sew up the defect in the donor area.
9. After ensuring there is no residual bleeding following ulcer excision, lay in the graft. Stitch in the graft using interrupted non-absorbable sutures, tying the knots so that they lie on the surrounding intact skin rather than on the skin graft. You should produce sufficient tension in the graft to discourage haematoma without an excess that would produce a strangulation effect on the graft with consequent necrosis.
10. Tie-over sutures over a pad of acriflavine wool or similar can be used as a pressure dressing over full thickness grafts. These will reduce the risk of haematoma formation under the graft.
Checklist
LOCAL EXCISION OR BIOPSY OF AN INTRAORAL LESION
Appraise
1. Small lesions in the surface of the oral mucosa, whether on cheek, tongue, palate, floor of mouth or inner surface of the lips, are best dealt with by excision biopsy, removing a sufficiently wide margin of normal tissue to ensure that excision is complete.
2. Make sure, however, by careful palpation beforehand, how deeply the lesion penetrates beneath the mucosa. Remember that you must achieve an adequate margin of normal tissue on the deep aspect of the lesion as well as around it.
3. The oral tissues are very vascular, so take special precautions to minimize haemorrhage and so prevent aspiration of blood into the lungs.
Access
1. Ask the anaesthetist to pass a laryngeal mask or an endotracheal cuffed tube and to inflate the cuff. A further precaution against aspiration of blood is to have the pharynx packed with 2.5-cm ribbon gauze.
2. Fix the patient’s mouth open with a dental prop or Ferguson’s forceps inserted between the teeth or gums of the molar region on the side opposite to the lesion.
3. Position the patient with a head-up tilt of about 15°, sufficient to cause the external jugular vein to collapse. Use a head-ring to stabilize the position of the head.
Assess
1. Palpate the lesion carefully again to assess its depth. Tissues often feel different when the patient is anaesthetized, making you change your decision about the depth of penetration of the lesion.
2. If you are still sure that you can remove the lesion with a wide margin of normal tissue on all aspects, and without producing deformity or serious loss of function, proceed to excision biopsy, or if you are doubtful, biopsy the lesion (vide infra).
EXCISION BIOPSY
Action
1. Form a mental picture of the exact position and shape of your incision.
2. The area around that to be excised or biopsied can be injected with dental local anaesthetic using 1:80 000 adrenaline (epinephrine) in 2% lidocaine. This will help reduce bleeding.
3. Use a 3/0 absorbable suture on a half-circle 30-mm or 50-mm cutting needle, according to the depth of bite required, insert a stitch through the tissues near each end of your proposed incision. The stitches must traverse the tissues far enough from the incision that they will not be cut when you make the incision. Match the depth of stitch to the required depth of excision. Leave the two ends of each untied but held in four artery forceps.
4. Excise the lesion with at least a 5-mm margin in all directions. Make the wound roughly oval or in the shape of an ellipse, the direction of the long axis of the oval being dictated by the need to minimize damage to neighbouring structures. Do this as speedily as possible, as you cannot control bleeding until the excision is complete.
5. Pull each stitch end across the wound towards the opposite end of the other stitch, forming a cross. This controls the worst of the bleeding if your assistant maintains traction on the stitch ends.
6. Inspect the excised specimen with the naked eye. Does the excision appear complete? Excise more if necessary.
7. If excision appears complete, tie the stitches in the form of the cross, as your assistant has been holding them.
8. Complete haemostasis using diathermy and further sutures if necessary while maintaining a clear field with the sucker.
BIOPSY
Action
1. Insert one or two deep sutures of 3/0 absorbable material through normal tissues on either side of your proposed excision, and leave the ends untied. Do not insert sutures into the lesion itself, since this may spread neoplastic cells.
2. Excise the specimen, taking care not to cut your sutures.
3. Tie the suture or sutures. Usually this stops all bleeding, but if it fails to do so, use diathermy or insert more sutures.
Checklist
1. Was there any blood on the deeper parts of the pharyngeal pack? If there was, monitor the possibility of chest complications later.
2. Are you sure that the specimen has been correctly bottled and labelled, that the request form for the pathology department has been accurately filled out and that you are satisfied with the arrangements for conveying the specimen to the laboratory?
3. Should you send part of the specimen for bacteriological examination, if the lesion could due to infection including tuberculosis? Remember that any such sample must be sent in a sterile container without formalin.
PARTIAL GLOSSECTOMY
Appraise
1. Excise small lesions of the anterior two-thirds of the tongue with a carbon dioxide laser.
2. Excise larger lesions with a wide margin: since tumour planes in the tongue are indiscrete, a 0.8-mm margin is required.


3. We shall describe a wedge excision of the tip of the tongue.
Action
1. Use a dental prop to keep the mouth open. If you are right-handed, stand on the patient’s right. If you are left-handed, reverse all references to side in these instructions.
2. Lay your left index finger along the dorsum of the tongue, your thumb along the ventral aspect, to the right of the right-hand margin of your proposed excision. Squeeze the tongue (Fig. 28.9A).
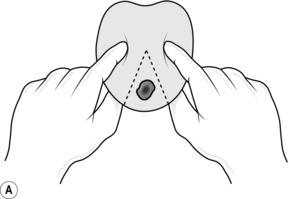
3. Have your assistant, standing on the patient’s left, squeeze the tongue between the index finger and thumb, to the left of the left-hand margin of your proposed excision.
4. Excise the wedge carrying the lesion, using a hand-held carbon dioxide laser or cutting diathermy, if available. If you use a knife, the digital pressure of your assistant and yourself minimizes bleeding.
5. Insert a series of interrupted absorbable 3/0 sutures to approximate the muscles in the deeper parts of the defect (Fig. 28.9B). Temporarily relax the fingers, first on one side and then on the other, to assess the efficacy of these sutures in stopping bleeding from the deeper parts of the wound. Insert further sutures to close the mucosa along the dorsal and ventral surface of the tongue, and to stop bleeding from the superficial layers.
WEDGE EXCISION OF THE LIP
Appraise
1. Early tumours of the lip can be removed with a wide margin by this operation.
2. Particularly in elderly people, up to one-third of the length of the lip can be removed in this way with an acceptable functional and cosmetic result.
3. In a young patient, or if the length of lip to be excised exceeds one-third, various plastic operations are available (see Chapter 33); these are more difficult than they appear, so attempt them only if you are expert.
Action
1. Cut out the wedge, taking the full thickness of the lip, using bipolar diathermy to control the bleeding, if it is available. Alternatively control bleeding with finger pressure. Use mosquito artery forceps and absorbable ties to control bleeding from the labial artery.
2. Close the defect with three layers of interrupted sutures: 3/0 absorbable sutures for the muscle and for the mucosa, and very fine monofilament non-absorbable sutures for the skin and the vermilion border.
KEY POINT
Appearance of the lip
 Pay especial attention to the accuracy with which you join the two edges of the vermilion border and the mucocutaneous junctions. To assist with this it is helpful to ‘tattoo’ the vermilion border, near the proposed excision, with methylene blue dye, using a green hypodermic needle. This will aid approximation of the vermilion borders without leaving a ‘step defect’.
EXCISION OF SUPRAHYOID (SUBMENTAL) CYST
Appraise
1. A cystic, subcutaneous swelling in the midline of the neck above the level of the hyoid bone may be a thyroglossal cyst or a simple lesion such as a dermoid cyst. If the lump moves on swallowing and on protrusion of the tongue, it is likely to be a thyroglossal cyst; if it does not, it is likely to be a dermoid cyst. Of course lymph nodes do occur in this area, and a solid suprahyoid swelling is in all probability a lymph node.
2. The distinction between the two types of cystic lesion can be difficult. Ultrasound scanning of lesions in this area is important in the diagnosis of the lesion and most importantly to confirm that a thyroid gland does exist (in the normal situation). When operating on a lump you have diagnosed as a dermoid cyst, always look for evidence of a track upwards towards the tongue or downwards towards the hyoid. If you find such evidence, you must alter your diagnosis to thyroglossal cyst and change your operation accordingly.
Access
1. The patient lies supine, with the upper half of the table angled sufficiently upwards to cause the external jugular veins to collapse. Extend the head on the neck but flex the cervical spine on the thoracic spine. Achieve this by placing a sandbag under the shoulders and use a head ring. This position facilitates access to the front of the neck, without putting the strap muscles and the superficial tissues on stretch.
2. Clean and disinfect the skin from the level of the mouth to the clavicles, and laterally from the anterior midline of the neck to the posterior border of each sternomastoid muscle.
3. Towel up to expose the lesion and a surrounding margin of 5 cm in all directions. Stick the disposable drapes to the skin of the neck around the exposed area.
4. Make a transverse, skin crease, incision centred over the lump and extending 2–3 cm past its borders on either side. Deepen this through the skin and superficial fascia, and achieve haemostasis using diathermy.
5. With a clean No.15 knife-blade, deepen the incision through the platysma and then through the fascial layers until you reach the surface of the lesion.
6. Raise flaps of skin and the other superficial tissues upwards and downwards using a combination of sharp and blunt dissection, to expose the whole of the superficial aspect of the lump.
Action
1. Using fine, curved artery forceps, open up the plane between the surface of the lump and the surrounding fascia. Continue what should prove a relatively bloodless dissection in all directions until you expose the deep aspect of the lesion.
2. In the region of the deep aspect, be particularly careful not to miss any fibrous extension of the wall of the cyst, either penetrating the median raphe between the underlying right and left mylohyoid muscles on its way to the tongue, or passing downwards towards the hyoid bone.
3. Assuming that you find no such extensions, complete the dissection of the deep aspect to free the lump.
Closure
1. Check haemostasis. Have the table flattened so that bleeding points manifest themselves and can be sealed rather than bleed after the skin is closed.
2. Insert a suction drain 2.5 cm below the incision near either the right or the left extremity of the wound and arrange the tube to lie along the length of the wound. Make sure that there are several side-holes in the part of the tube that is left lying within the wound. Stitch the tube to the skin to maintain the optimal position. Tie the ends of the suture around the tube, firmly anchoring it. Ask the anaesthetist to remove the sandbag.
3. Close the skin with a continuous blanket or a subcuticular suture which may be monofilament nylon or an absorbable material (Fig. 28.10). Skin apposition must be perfect along the whole length of the wound not only to promote healing, but also to create an airtight wound so that the suction drainage can work efficiently, and to achieve the best cosmetic result possible.
4. Connect the drainage tubing to the suction bottle (Fig. 28.10). Check that after the air has been evacuated from the wound the system is airtight.
EXCISION OF THYROGLOSSAL CYST, SINUS AND FISTULA
Appraise
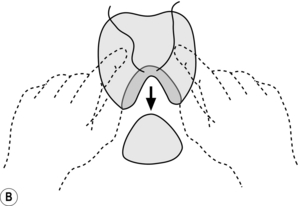
1. The isthmus and part of the lateral lobes of the thyroid gland originate at the foramen caecum (Latin: caecus = blind), at the junction of the posterior third and anterior two-thirds of the tongue, and during fetal life migrate downwards to reach their definitive position anterior to the upper end of the trachea. The course of this migration is midline, first through the tongue itself and between the muscles of the submental region, then closely applied to the hyoid bone, or even through it; at this stage the tract loops upwards and backwards for a short distance before again turning downwards to the isthmus of the thyroid gland (Fig. 28.11).
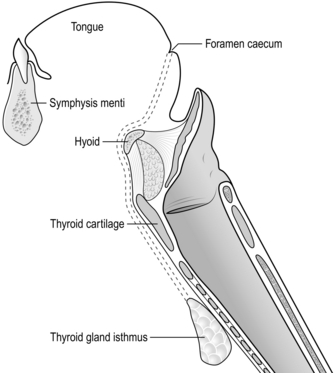
2. Any part, or all of this thyroglossal tract may persist. Persistence of the whole tract produces a fistula between the mouth and the neck, but this is rare. The sinus, which is more common, is an opening in the skin near the level of the thyroid isthmus connecting with a track that proceeds upwards for a variable distance towards the foramen caecum. The most common lesion is the cyst, which may lie at any point in the track but most often in the region of the hyoid bone, and which may have associated with it a variable stretch of persistent track both upwards and downwards.

3. The intimate relationship between the track and the body of the hyoid necessitates excision of a segment of the bone from the midline to make sure that this portion of the track has been excised.
4. Operations are described separately for (a) a thyroglossal sinus and (b) a thyroglossal cyst lying just below the body of the hyoid.
EXCISION OF THYROGLOSSAL SINUS
Access
1. Make a symmetrical elliptical collar incision at the level of the opening of the sinus, circumcising the sinus with an oval of skin and also excising any skin scarred by infections of the track.
2. Raise flaps of skin and platysma together; the lower flap need be raised for only 2–3 cm, but the upper flap must be raised in the midline to a level at least halfway between the hyoid and the symphysis menti (Fig. 28.12).
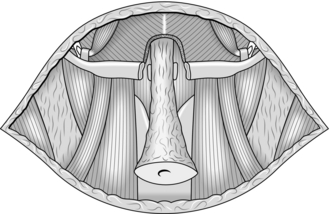
Fig. 28.12 Flaps of skin with platysma have been raised, leaving the opening of the sinus surrounded with an ellipse of skin. The track has been cored out to the body of the hyoid, the central portion of the bone has been detached in continuity with the track, and a cylinder of muscle is cored out in the midline from the submental muscles in a direction backwards and upwards at 45° (see Fig. 28.11).
Action
1. Dissect the oval of skin and superficial fascia and the fibrous tissue around the upward track from the sinus opening, raising a tube of tissues containing the track. At this and every subsequent stage, be careful to keep a margin of tissue between your instruments and the track itself. The tract can be injected with methylene blue dye to assist in identifying its path.
2. The opening of the sinus may be situated above the thyroid isthmus, in which case you may be able to feel a fibrous cord, representing the lowest part of the track, running downwards from your dissected tube. Dissect this cord and follow its lower end downwards to the thyroid isthmus to include it in your specimen.
3. Continue coring out the upper part of the track upwards until you reach the level of the hyoid bone. Pass a blunt dissector, such as Macdonald’s, deep to the body of the hyoid and gently separate the bone from the attached muscles and the underlying thyrohyoid membrane for a distance of about 1 cm, centred on the midline. Use bone-cutting forceps to excise this segment of bone, leaving it in continuity with the track.
4. Above the hyoid, the track plunges through the median raphe of the mylohyoid muscles in a direction sloping at 45° backwards and upwards. It traverses the deeper submental muscles to reach the foramen caecum. Have your assistant put an index finger in the mouth and push the base of the tongue downwards towards you. Core out a cylinder of muscle in the direction described to complete the dissection of the track.
5. The uppermost part of the track is practically never patent, and indeed may not be palpable even as a fibrous cord, but it is wise to extend this procedure for 2 cm deep to the mylohyoid. If necessary, be prepared to continue until you are separated from the mouth and your assistant’s finger by only the mucous membrane covering the tongue. Cut across the core of muscle and remove the whole dissected track. The upper part of the dissection can be ligated with an absorbable suture.
EXCISION OF THYROGLOSSAL CYST (SISTRUNK’S OPERATION)
Action
1. Dissect all around the superficial aspects of the cyst. As you approach the deep aspect, separate the sternohyoid muscles in the midline to facilitate the view of the deep aspect.
2. Search for any downward extension of the track as a fibrous cord in the midline. If you find one, follow it as far downwards as you can feel it, or to the isthmus of the thyroid gland, and excise it separately.
3. Mobilize the cyst upwards on its deep surface. You will find that it is intimately adherent to the body of the hyoid bone in the midline.
4. Resect 1 cm of the body of the hyoid as described above, in continuity with the cyst.
5. Complete the excision by the coring-out procedure of the muscles of the submental region as described above.
OPERATIONS FOR BRANCHIAL CYST, SINUS AND FISTULA
Appraise
1. Portions of the first or second branchial (Greek: branchion = a gill) clefts may remain patent, usually the second cleft. The complete lesion is a fistula with one opening in the pharynx near the posterior pillar of the fauces and the other in the skin at the junction of the middle and lower thirds of the anterior border of the sternomastoid muscle. The complete fistula is not as common as a branchial sinus, where the lower opening and the main track are present but the track does not communicate at its upper end with the pharynx.
2. A branchial cyst is a cystic spherical swelling deep to the junction of the upper and middle thirds of the sternomastoid muscle and becoming superficial at the anterior border of the muscle. There has been considerable debate about the nature of these swellings which may not in fact be congenital in origin but represent cystic degeneration of a lymph node. A large branchial cyst can encroach on what is clinically the parotid region. In such a case, be careful to proceed in a manner that enables you to carry out a formal parotidectomy if necessary (see Exploration of the lower pole of the parotid). The description given in this section assumes that the clinical diagnosis of branchial cyst is straightforward and that there is no possibility that the swelling is a parotid tumour.
3. Finally, the first arch remnant may give rise to a cyst in the parotid region, or the cyst may communicate as a sinus posteriorly with the cartilaginous external auditory meatus or anteriorly with an opening in the skin of the submandibular region, or there may be a complete fistula between the submandibular region and the external auditory meatus. The simple cyst cannot be distinguished clinically from other lumps in the parotid region, and you will remove it by a conservative parotidectomy, with full exposure and identification of the facial nerve. If the cyst communicates with the external auditory meatus, you may find during the parotidectomy that a cartilaginous extension from the external auditory meatus runs into the cyst. You can cut across this funnel of cartilage and leave the resulting defect open, then proceed with the parotidectomy; after the facial nerve is well exposed you can close the cartilaginous defect by sewing soft tissues together over it without danger to the facial nerve.
4. The operations described in detail in this section are those for a typical (second cleft) branchial sinus or fistula and branchial cyst.
EXCISION OF BRANCHIAL SINUS OR FISTULA
Access
1. Put the patient in a supine position, with the upper half of the operating table tilted upwards sufficiently to cause the external jugular vein to collapse. Turn the patient’s head to the opposite side.
2. Clean and disinfect the skin from the level of the mouth to the clavicle, and from the anterior midline of the neck to as far posteriorly as can be reached.
3. Towel up to leave exposed an area from the jaw above to 5 cm below the opening of the sinus below and from the anterior midline of the neck to the anterior border of the trapezius posteriorly.
4. Inject methylene blue dye into the sinus using a syringe attached to a lacrimal cannula. This will stain the sinus tract, facilitating its identification during the dissection.
5. Make an elliptical incision (Fig. 28.13) in the skin around the opening of the sinus; the long axis of the incision should be horizontal, in the skin crease, and about 1–2 cm long, while the short axis should give sufficient clearance above and below the margins of the opening.
6. With a clean knife-blade, deepen the incision through the subcutaneous tissue and the platysma. Exert traction on the skin ellipse with tissue forceps or a stitch, and you should be able to feel the track from the lower aspect of the wound as a fibrous cord running upwards along the anterior border of the sternomastoid, deep to the deep investing cervical fascia.
7. Dissect upwards on all aspects of the track, coring it out from the fascial planes of the neck. To facilitate this dissection, raise the upper skin flap in the plane deep to the platysma and incise the deep fascia upwards along the anterior border of the sternomastoid, superficial to the track.
8. If the track can be palpated to ascend higher in the neck than you can comfortably expose through your incision, make a further horizontal skin crease incision with the skin knife at the level of the hyoid bone, extending from 2 cm short of the anterior midline of the neck to the anterior border of the sternomastoid – a step incision. Use the clean knife to deepen this incision through subcutaneous tissue and platysma, and then elevate the lower flap in the plane deep to the platysma until you can pass a pair of long curved artery forceps downwards through the upper incision to grasp the skin ellipse at the lower end of the track. Pull the skin ellipse upwards under the skin-bridge between the two incisions so that it presents at the upper incision. You now have comfortable access to complete the dissection.
Action
1. Continue the dissection of the track upwards. Remember that the most efficient way of finding the direction of the track is to feel the fibrous cord with your fingers.
2. The usual course of the track is between the external and internal carotid arteries and then deep to the posterior belly of the digastric muscle. Divide the digastric at its intermediate tendon anteriorly and 2 cm behind the track posteriorly, having identified and preserved the hypoglossal nerve. When you have excised the segment of muscle between these points, it is easy to follow the track upwards to its termination.
3. Deep to the posterior belly of the digastric, the track lies superficial to the middle constrictor muscle of the pharynx (Fig. 28.14).


4. Immediately above the glossopharyngeal nerve, the track swings forwards and its fibrous sheath blends with the aponeurosis covering the middle constrictor. At this point there may be a connection between the interior of the track and the lumen of the pharynx, but it is not important to discover whether such a connection exists. Simply apply two pairs of artery forceps to the track where it blends with the muscle, cut between the forceps, and tie off the pharyngeal end.
Closure
1. Insert a drain through skin and platysma via a point just below the lower incision, and lay the part of the tube within the wound up through the bed of the track to the middle constrictor.
2. Repair the vertical incision in the deep fascia with fine silk or absorbable synthetic ligature. Check haemostasis carefully, especially in the tunnel between the upper and lower incisions.
3. Close the skin incisions, fix the tube to the skin and attach the tube to suction as described for the excision of suprahyoid, submental cyst.
EXCISION OF BRANCHIAL CYST
Access
1. Make a horizontal, skin crease, incision at the level of the lesion, which is at the junction of the upper and middle thirds of the sternomastoid, extending from 1 cm anterior to the anterior margin of the lesion to halfway between the anterior and posterior borders of the sternomastoid.
2. Deepen the incision through subcutaneous tissue and platysma, and reflect the flaps upwards and downwards in the plane deep to the platysma, to the upper and lower margins of the lump.
3. Incise the deep, investing cervical fascia over the lump in a direction parallel to the anterior border of the sternomastoid.
4. Use a self-retaining retractor to separate the upper and lower flaps of skin and platysma. Have your assistant retract the anterior border of the sternomastoid posteriorly. You now have excellent access to the swelling.
ACTION
1. Using careful blunt dissection wipe away the intervening areolar tissue to display the wall of the cyst. Continue the dissection around the superficial aspect of the cyst and then proceed around the deep aspect of its lower pole.
2. Immediately deep to the cyst lies the beginning of the external and internal carotid arteries. Be careful not to damage these or the vagus nerve lying behind the internal carotid artery.
3. The cyst wall is often very thin; try not to damage it, as it is easier to be certain that you have removed the whole cyst if it remains intact throughout the operation. If you leave fragments of the wall behind, the lesion may recur.
4. Continue the dissection upwards behind the cyst, mobilizing it from the middle constrictor muscle. Note and preserve the hypoglossal nerve, running forwards between the cyst and the middle constrictor at the level of the lower border of the posterior belly of the digastric, and 1 cm higher up the glossopharyngeal nerve, running in the same direction and in the same plane (Fig. 28.14 shows the relevant anatomy of this area).
5. Sometimes the cyst does not extend much above the level of the posterior belly of the digastric, but often it does extend considerably upwards, deep to the posterior belly. In such a case retract the muscle to gain access to the superior end of the cyst. Very occasionally it may be necessary to excise a segment of the posterior belly, from the middle tendon in front to the posterior margin of the cyst behind, so that the dissection can proceed safely upwards on both superficial and deep aspects of the cyst.
6. Rarely, at the deep aspect of the cyst above the level of the glossopharyngeal nerve, you find a fibrous track arising from the cyst and blending with the fascia covering the middle constrictor, rather like the top end of a branchial fistula. Divide this track between two pairs of curved artery forceps and tie the end attached to the muscle. Usually, you will find no evidence of this track and the simple blunt dissection around the cyst is sufficient to free it. Remove the cyst.
Closure
1. Check for bleeding. Use diathermy to stop bleeding points, with special care not to damage the nerves you have demonstrated during the dissection. Insert a drainage tube via a skin puncture 2 cm below the incision.
2. Repair the deep fascia along the anterior border of the sternomastoid with absorbable sutures, such as Vicryl.
EXCISION BIOPSY OF CERVICAL LYMPH NODE
Appraise
1. Usually this operation should not be performed under local anaesthesia if general anaesthesia is available, provided that you are sure of the nature of the node and its relation to underlying structures. For example, a tumour arising from the brachial plexus may present as a cervical lymph node. In this case, having an awake patient during the dissection may be helpful. Cervical lymph nodes may feel superficial yet lie deeply in the neck, and the dissection to remove them may be much more difficult than you expect.
2. Depending on the position of the lymph node, neighbouring structures may be at risk during the operation. An example commonly encountered is the accessory nerve, either in the anterior triangle of the neck at the junction of upper and middle thirds of the anterior border of the sternomastoid muscle, or in the posterior triangle at the junction of the middle and lower thirds of the sternomastoid.
3. Handle lymph glands very gently during dissection. Rough handling is likely to distort the internal structure of the node and make histological interpretation difficult.
4. The operation described here is for a lymph node lying under cover of the anterior border of the sternomastoid muscle near the junction of its upper and middle thirds. The principles illustrated can be applied to an operation on a lymph node anywhere else in the neck.
Access
1. Position the patient supine, with the upper half of the operating table tilted upwards sufficiently to cause the external jugular vein to collapse. Turn the patient’s head to the opposite side.
2. Clean the skin from the level of the mouth to the clavicle and from the anterior midline of the neck to as far posteriorly as can be reached.
3. Towel up to leave exposed a circular area of radius about 5 cm around the palpable lymph node.
4. Make an incision across the palpable lump and extended for 1 cm beyond its margins in both directions, in the direction of the lines of skin tension, in this case roughly horizontally, with a slight convex curve downwards. Deepen this incision through skin and platysma.
Assess
1. Feel the lump carefully again. Is it covered only with fascia or is any other structure between your fingers and the swelling?
2. If the intervening tissues are fascia only, deepen your incision through these tissues with a clean scalpel until you can see the surface of the lymph node itself.
3. If there is some structure other than fascia in the way, you must move it out of the way, excise it or cut through it so as to reach the surface of the lymph node. Exactly what you do depends upon the nature of the structure. The commonest in this particular site is the anterior border of the sternomastoid muscle. Usually it is easy to spread apart the edges of the wound in the skin and platysma with retractors, to divide the fascia where it joins the anterior border of the muscle over a distance of about 3 cm and retract the anterior border of the muscle laterally. The fascia overlying the lymph node can now be incised.
Action
1. Dissect the lymph node free from its surroundings. A good way to do this is to lay a small, curved artery forceps along the surface of the node, with the curve of the forceps corresponding with the curvature of the surface. Insert the tips of the blades of the forceps between the gland and the free edge of investing fascia where you have cut it in order to reach the swelling. Gently push the forceps further along this plane and then separate the blades, thereby stripping the fascia off the lymph node. Cut the fascia with scissors between the separated blades of the forceps, so as to increase the exposure.
2. Repeat this process of combined blunt and sharp dissection all over the superficial aspect of the lymph node. Minimize bleeding by sealing the vessels using diathermy before you cut them. A dry field facilitates the dissection.
3. During this superficial clearance, there is no need to handle the lymph node at all. As you approach the deep aspect, it becomes necessary to push the gland in one direction so that you can free it in that area of its bed from which you are displacing it. This manipulation is likely to damage the gland; be very gentle, and use a finger rather than a metal instrument.
4. Somewhere in this deep aspect you will nearly always find a fairly large feeding artery to the gland. In this region also it is easy to damage neighbouring important structures such as the accessory nerve, because the exposure is limited by the overhanging gland. The safe rule is to cut only tissues that you can see perfectly.
5. When you have completed the dissection deep to the lymph node, it lies free. Remove the node, cut it into two equal parts, put one into a container that will later be filled with formol saline and sent for histological examination. Put the other into a sterile empty container so that it can be sent for culture, including for tuberculosis. Ensure that both specimens are properly labelled.
Closure
1. Ensure complete haemostasis. Ask the anaesthetist to flatten the operating table; this change of posture raises venous pressure and sometimes starts bleeding, and it is better that this should happen while you have the wound still open than after you have sewn up.
2. Sew up any deep muscle that you have had to divide and platysma, using 2/0 absorbable sutures.
3. If the wound seems perfectly dry it may not be necessary to use a surgical drain, but if in doubt do use a small vacuum drain.
4. Close the skin wound using a subcuticular absorbable suture or a blanket stitch using monofilament nylon.
SCALENE NODE BIOPSY
Appraise
1. The pad of fat lying superficial to the lower end of the scalenus (Greek: skalenos = uneven; usually a triangle with unequal sides) anterior muscle contains a number of small lymph nodes that are often involved, even if they are not palpably enlarged, by diseases of the lungs or mediastinum.
2. If the nodes on the left side are palpable, or if the intrathoracic disease being investigated involves only the upper lobe of the left lung, perform the biopsy on the left side. In all other circumstances perform the biopsy on the right side, since the glands on the right side are much more likely to be involved.
Access
1. Position the patient and drape as for cervical lymph node biopsy.
2. Make a 5-cm horizontal skin-crease incision 2.5 cm above the clavicle, extending from the anterior border of the trapezius muscle to the posterior, lateral, border of the clavicular head of the sternocleidomastoid muscle. Deepen the incision through the platysma muscle.
3. Divide between ligatures the external jugular vein and its tributaries. The main vein runs vertically just deep to the platysma, about the middle of the incision.
4. Divide the clavicular head of sternomastoid by gently passing a blunt dissector, such as a Watson-Cheyne, deep to the muscle and cutting down upon the dissector. Make the cuts in successive small portions, so that you can prevent troublesome bleeding from veins within the muscle. Remember also that your dissector is close to the internal jugular vein, and accordingly take care over this manoeuvre.
Action
1. Retract the margins of the wound with a self-retaining retractor. The fat pad lying superficial to the scalenus anterior muscle is now visible, but it may be overlain by the transverse cervical vessels just above the clavicle. Push these vessels downwards, grasp the fat pad with plain dissecting forceps immediately above the vessels and cut horizontally into the fat pad until the fascia covering the scalenus anterior becomes visible. Lift the fat pad upwards and with scissors or knife elevate the fat pad off the fascia from below upwards (Fig. 28.15).

2. Important structures form the bed of the fat pad and you must take care not to damage them. Lying on the anterior surface of the scalenus anterior muscle, but deep to the fascia, is the phrenic nerve, running more or less vertically downwards but with a trend from lateral to medial. Medial to the scalenus anterior is the internal jugular vein, lateral to the muscle lies the brachial plexus.
3. As the elevation continues, retract the omohyoid muscle upwards; the muscle crosses the upper part of the field obliquely, running in a superomedial direction.
4. When you have freed the fat pad as far as you can conveniently push the omohyoid, cut through the upper end of the pad to remove it completely.
5. Check haemostasis. Note whether lymph is accumulating in the wound. This complication is, of course, more likely on the left side. It is important to find the damaged lymphatic duct or thoracic duct and tie it off.
OPERATIONS ON TUBERCULOUS CERVICAL LYMPH NODES
Appraise
1. You may encounter tuberculous cervical lymph nodes in three main surgical situations:


2. The removal of an enlarged, undiagnosed lymph node in the neck has been described. Remember to send half of the specimen for culture, including culture for acid-fast organisms, as well as the other half for histology. If the histology demonstrates tuberculosis, consult a physician regarding chemotherapy or, if one is not available, start triple therapy, combining three common drugs such as streptomycin, isoniazid and rifampicin, while awaiting the reports on culture of the organisms and sensitivity tests upon them.
3. Biopsy a larger mass of lymph nodes. When a histological report of tuberculosis has been received, start chemotherapy. Usually under its influence the mass shrinks and disappears. If not, suspect that the organisms are not sensitive to the combination of drug that you are using.
 The mass of infected glands becomes larger
 The centre of the mass becomes fluctuant, indicating a cold abscess

4. Aspirate a cold abscess, inserting a hypodermic needle through uninvolved skin at some distance from the lesion so as to produce a long oblique track to minimize the risk of sinus formation. Send the material for culture and sensitivity tests. However, if all or most of the lesion is solid, embark on open operation as described later.
5. Sometimes, though not often now in countries with a high standard of primary health care, you may see a lesion that has already progressed to the stage of a cold abscess, or skin involvement with inflammatory changes and scar formation or even sinuses.


6. In these circumstances, since the material obtained by aspiration of a cold abscess often fails to confirm the diagnosis, carry out open operation.
Principles of open operation
1. Make a horizontal skin-crease incision over the swelling, of a generous length to provide adequate exposure.
2. Modify the incision where necessary to excise all affected skin.
3. Reflect flaps of skin and platysma upwards and downwards to the limits of the involved lymph nodes.
4. Divide the investing fascia of the neck in the region of any fluctuant area or areas, entering the abscesses and evacuating their contents.
5. If the main purpose of the operation is to confirm the clinical diagnosis, scrape the walls of the abscess cavity with a curette to obtain generous portions of the granulation tissue for culture and histology.
6. If the main purpose of the operation is to excise infected glands that have proved resistant to chemotherapy, dissect out as many of the involved lymph nodes as is technically possible. This is a difficult operation, because the lymph nodes tend to be adherent to neighbouring structures that are functionally important and must be preserved.
7. It is not possible to detail more than the principles, nor detail all the difficulties and dangers that you may encounter. These depend on the exact site of the involved lymph nodes. For example, the lymph nodes of the anterior triangle may be adherent to the jugular vein, the common carotid artery and its two branches, and the vagus nerve. The jugulodigastric group may be adherent to the hypoglossal, accessory and glossopharyngeal nerves. Involved lymph nodes in the posterior triangle may lie around the lower part of the accessory nerve.
8. When you have completed the excision, ensure that you have achieved meticulous haemostasis and then close the skin, if possible without drainage. If much skin has been excised, some rearrangement of the skin flaps may be necessary to achieve primary closure.
RADICAL NECK DISSECTION OF CERVICAL LYMPH NODES
Appraise
1. Many carcinomas of the head and neck metastasize to the cervical lymph nodes. Whatever the best mode of treatment for the primary tumour, whether surgery or radiotherapy, control of affected cervical lymph nodes is best obtained by excising them.
2. Your intention is to remove a block of connective tissue containing the nodes from the anterior and posterior triangles, extending from the clavicle below to the base of skull above.


Access
1. If you are removing the primary growth at the same time, extend the standard approach for parotidectomy, glossectomy, mandibulectomy or laryngectomy appropriately, to create flaps that lay open the neck on the side of the growth.
2. If you are performing the block dissection as a separate procedure following apparent cure of the primary tumour, create a modified Y-shaped incision with equal limbs (Fig. 28.16).
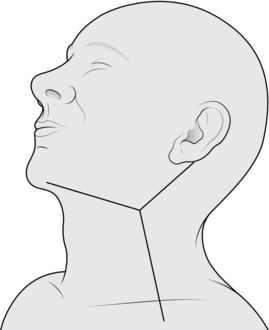
Fig. 28.16 Block dissection of the neck. The incision.
3. Reflect the flaps to expose the entire neck from clavicle to mandible and mastoid and from midline backwards to trapezius. There are many different incisions available, all of which give good exposure and closure. The MacFee approach of two parallel transverse incisions gives limited exposure and should only be used in specialist or experienced hands.
Action
1. Divide the clavicular and sternal heads of the sternomastoid just above their insertions. Gently dissect the lower end of the internal jugular vein, separating it from the common carotid artery and, deep to that, the vagus nerve. Be careful on the left side not to damage the thoracic duct. Ligate and divide the vein, placing two stout non-absorbable ligatures on the lower stump and use a transfixion stitch on the lower end to prevent accidental loss of the suture and subsequent air embolism.
2. Divide the inferior belly of omohyoid and extend the dissection laterally just above the clavicle to the anterior border of trapezius.

3. Deepen the dissection to the prevertebral fascia covering the scalenus muscles and brachial plexus. Find the plane by blunt dissection.
4. In front of the trachea divide the thyroid isthmus and inferior thyroid veins, so that the hemithyroid gland and strap muscles, first divided above the clavicle and sternum, can be stripped upwards. Ligate and divide the inferior thyroid vessels, preserving the recurrent laryngeal nerve unless a laryngectomy has already been carried out. Head and neck surgeons do not perform hemithyroidectomy unless the primary tumour lies close by, such as laryngeal carcinoma, or the tumour arises in the thyroid.
5. Now dissect the block upwards, taking the hemithyroid gland, sternomastoid, internal jugular vein and all connective and lymphoid tissues from the anterior and posterior triangles. Clean the tissues off the trapezius border and leave the brachial plexus, prevertebral fascia, scaleni, vagus and phrenic nerves, thoracic duct, carotid vessels, trachea and oesophagus intact. Try and preserve the accessory nerve as it enters the trapezius and dissect it superiorly through the sternocleidomastoid muscle. At the top of the wound divide the sternomastoid again and carefully cut the deeper fascial planes until, drawing the specimen forwards, you can find and dissect again the upper end of the internal jugular vein. Ligate and divide it as near as can be carried out at the skull base.
6. Cut the deep fascia close to the lower border of the mandible and clear the contents of the submental and submandibular triangles. Divide Wharton’s duct so that the submandibular gland can be removed as part of the block excision. If necessary, be prepared to take the lower pole of the parotid gland, remembering you will probably sacrifice the cervical branch of the facial nerve. Leave intact the lingual and hypoglossal nerves.
7. You need to ligate sundry large veins such as the common and posterior facial, and, as you work downwards, the remaining vascular attachments near the external carotid artery that must be doubly ligated and divided are the facial and sternomastoid arteries. Divide the upper attachments of the sternohyoid and sternothyroid muscles, and the accessory nerve at its entry into the sternomastoid. Divide a few residual shreds of carotid sheath and the specimen is free (Fig. 28.17). Occasionally, you must sacrifice the external carotid artery in the same block.
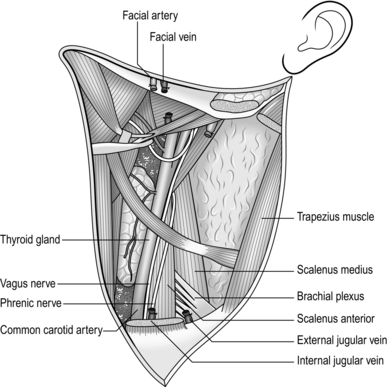
Fig. 28.17 Neck dissection completed.
Technical
1. If it is not necessary to remove the thyroid gland, preserve the sternothyroid and sternohyoid muscles.
2. In selected cases of ‘floor of mouth’ cancer, clearance may be limited to the upper half of the neck.
3. If there are bilateral metastases, preserve the internal jugular vein on one side, if possible. Separate the two block dissections by a period of not less than 6 weeks.
4. Modified radical neck dissection preserves the sternomastoid muscle, accessory nerve and internal jugular vein. It is now the usual mode of treatment for metastatic neck disease.
RADICAL PAROTIDECTOMY WITH BLOCK DISSECTION
1. Patients with proven malignant disease of the parotid gland require a formal block dissection in continuity with the parotidectomy. The posterior end of the upper skin flap is modified by prolonging it as the mastoid-facial part of the standard parotidectomy incision (Fig. 28.18A).
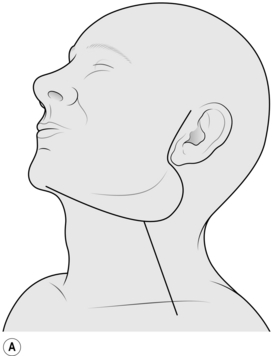

Fig. 28.18 (A) Modified Y-incision for block dissection to include radical parotidectomy. The posterior limb becomes prolonged as the upper two-thirds of a formal parotidectomy incision (see Fig. 28.1). This incision is also suitable for the ‘commando’ operation, provided that the anterior limb is extended fully to the symphysis menti. (B) Modified Y-incision for block dissection with excision of the pinna and radical parotidectomy. The portion of the mandible to be removed if the tumour extends close to that bone is indicated.
2. Frequently, the disease spreads posteriorly to involve the external ear, and anteriorly to involve the mandible in the region of the angle. Remove the pinna and the posterior part of the mandible, including the ramus and the body as far forwards as the second molar tooth, in continuity with the rest of the excised tissue. The modification of the skin incisions is shown in Figure 28.18B.
3. Widely sacrifice any area of skin infiltrated by the tumour. Reflect the upper flap well forwards to expose the masseter muscle and clear the mandible of the buccinator muscle, forwards to the second molar socket.
4. If the patient is edentulous, now clear the medial aspect of the body without opening the oral mucosa. If the molars are present, cut the mucosa in their vicinity to free them from the mouth. Divide the body through the socket of the second molar tooth.
5. Now free the inner aspect of the ramus from the temporalis muscle, which is attached to the coronoid process, and the pterygoid muscles – the lateral attached to the mandibular condyle, the medial to the mandibular angle. Divide the masseter from the zygoma at the upper border of the coronoid and condylar processes to free the bone and attached lower portion of the masseter, and then continue the dissection posteriorly to remove the whole parotid. If indicated, also resect the zygomatic arch. Closure of the skin flaps can be difficult after this operation, if you need to sacrifice much infiltrated skin. A better option is to accept inevitable skin loss and replace skin and subcutaneous soft tissues with a free vascularized or pedicled myocutaneous flap.1
RADICAL SUBMANDIBULAR SIALOADENECTOMY WITH RESECTION OF SEGMENT OF MANDIBLE AND BLOCK
DISSECTION
1. An operation involving resection of a segment of the body of the mandible in continuity with a block dissection of the cervical lymph.
2. Proven malignant disease of the submandibular gland requires resection of the neighbouring segment of mandibular body to achieve a wide clearance. Another indication is carcinoma of the floor of the mouth or of the tongue adjacent to the mandible.
3. The incision is of the type shown in Figure 28.18A, without the posterior parotid extension and with the anterior end of the upper incision prolonged to reach the symphysis menti. Obtain good exposure with wide elevation of the upper flap to the upper border of the body of the mandible.
4. After the excision, repair the mucosa and muscles of the floor of the mouth and submandibular region. The defect in the body of the mandible can be immediately repaired with a titanium prosthesis, provided that the area has not been irradiated. Alternatively, accept the defect. Provided that the region of the symphysis menti is intact, a gap in the body does not produce a severe deformity or instability of the lower jaw.
Fleming, W.B. Infections in branchial cysts. Aust N Z J Surg. 1988; 58:481–483.
Freidberg, J. Pharyngeal cleft sinuses and cysts and other benign neck lesions. Pediatr Clin North Am. 1989; 36:1451–1469.
Jesse, R.H., Ballantyne, A.J., Larson, D. Radical or modified radical neck dissection: a therapeutic dilemma. Am J Surg. 1978; 136:516–519.
Jones, A.S., Cook, J.A., Phillips, D.E. Squamous cell carcinoma presenting as an enlarged cervical lymph node: the occult primary. Cancer. 1993; 72:1756–1761.
Micheau, C., Klijanienko, J., Luboinski, B., et al. So called branchiogenic carcinoma is actually cystic metastases in the neck from tonsillar primary. Laryngoscope. 1990; 100:878–883.
Radkowski, D., Arnold, J., Healy, G.B. Thyroglossal duct remnants: pre-operative evaluation and management. Arch Otolaryngol Head Neck Surg. 1991; 117:1378–1381.
Razack, M. Influence of initial neck node biopsy on the incidence of recurrence in the neck and survival in patients who subsequently undergo curative resectional surgery. Journal of Surgery and Oncology. 1977; 9:347–352.