Gynaecological surgery
GENERAL CONSIDERATIONS
INTRODUCTION
1. Unexpected gynaecological pathology may be found at an emergency abdominal operation or as an incidental lesion during surgery for an unrelated presentation. It is therefore advisable for the general surgeon to become familiar with this pathology and the operations that may need to be performed in an emergency. However, most elective gynaecological operations are of a specialized nature and should not be tried on an occasional basis.
2. Handle the pelvic organs especially gently when operating on premenopausal women. Careless surgery in the female pelvis will result in adhesions, which may considerably decrease a woman’s fertility.
3. Gynaecologists use the Pfannenstiel incision for many operations, but in emergencies dealt with by the general surgeon a midline or paramedian incision will often have been chosen because of the uncertain nature of the diagnosis. If access proves difficult, incise the medial one-third of the rectus abdominis muscles bilaterally, or ligate the inferior epigastric vessels and incise the full width of the rectus muscles (Maylard incision), or divide the rectus aponeurosis ½ cm above the symphysis pubis (Cherney incision).
4. Laparoscopy has been used as a diagnostic tool in acute pelvic pain for many years, as in general surgery. Minimal access surgery now includes a growing range of operative procedures, with the advantages of less postoperative pain, faster recovery and discharge, but it has not replaced laparotomy for many indications. It requires expertise and expensive equipment.
5. Ultrasound is well established as a diagnostic aid in gynaecological conditions, and in many cases exploratory surgery may be avoided where this is available.
6. Perform a pregnancy test on any female aged 12–50 with abdominal pain (with or without vaginal bleeding), as ectopic pregnancy is an important cause of maternal mortality.
Perioperative care
KEY POINTS
Special considerations in gynaecology
 Ensure that your patient is thoroughly informed about the proposed procedure, and clearly document that consent has been given. Give a full explanation of expected (and rare) consequences, particularly if future fertility is likely to be affected. If the woman wishes, keep her partner informed as well. Use drawings, as they aid understanding (and file them in the hospital notes for medico-legal purposes).


Prepare
1. Positioning of patient. Vaginal operations are carried out in the lithotomy position. Laparoscopy is best carried out with the patient in Lloyd-Davies stirrups, with steep head-down tilt. Laparotomy is carried out with the patient supine and with 5–10° of head-down tilt.
2. Catheterization. Empty the bladder by catheterization before all open abdominal procedures and, if the patient has not passed urine immediately prior to surgery, before laparoscopy as well. Separate the labia and swab the urethral meatus with antiseptic solution. Without allowing the labia to close again, pass a silver or plastic catheter well into the bladder. Now let the labia approximate and press firmly and continuously suprapubically. When the urine flow ceases, gradually withdraw the catheter, taking care not to allow air to be sucked into the bladder.
BARTHOLIN’S ABSCESS (OR CYST)
Appraise
1. An abscess of the glands described in 1677 by the Copenhagen Professor Caspar Bartholin (1655–1738). It is an acutely painful condition, so deal with it as an emergency.
2. A sterile cyst may be dealt with electively by excision. Aim to remove (enucleate) the entire cyst, but if rupture occurs continue to remove the whole cyst cavity before obliterating the remaining space and closing the skin with interrupted 2/0 synthetic absorbable sutures.
3. The operation of marsupialization (Greek: marsypion = a pouch) is the procedure of choice for an abscess, since resection of the abscess cavity (as above) may cause considerable bleeding and recurrence is very likely following simple incision and drainage.
4. Ensure that the patient understands that the perineum is likely to be unsightly and very sore for a couple of weeks postoperatively.
Action
1. Make a vertical incision 1 cm long between the ipsilateral labium minor and hymenal remnants. Take a microbiological swab from the discharging pus.
2. Remove an elliptical area of skin and cyst wall from each side of the incision.
3. Break up loculations digitally.
4. Insert half a dozen or so fine synthetic absorbable sutures circumferentially to bring the cyst wall and skin into apposition, so leaving a wide ostium to the gland. Leave a gauze ribbon drain in the cavity for several hours.
REMOVAL OF PRODUCTS OF CONCEPTION FROM THE CERVICAL CANAL
Action
1. After taking a gynaecological history, where a woman is pregnant and has vaginal bleeding or abdominal pain, examine her sensitively with a bright focused light source and Cusco’s bivalve speculum, with gauze and metal sponge-forceps to hand.
2. Open the speculum after full insertion (applying pressure to keep it in place), allowing the cervix to be displaced into the area between the speculum blades.
3. Do not abandon the examination here if there is a lot of blood clot in the vagina. Use gauze held with sponge-forceps to sweep blood and clots from the vagina, and repeat with dry gauze until the vagina is dry, and you obtain a clear view of the vagina and cervix.
4. Look for purple or whitish material in an open cervix. These are products of conception, signifying an inevitable miscarriage. Stop heavy bleeding promptly by grasping this material firmly with the sponge forceps and applying continuous traction, removing the products.
5. Empty the vagina of blood again.
6. Observe the extent of bleeding onto a fresh sanitary pad for the next hour. The heavy bleeding almost always resolves with this intervention, but if not, perform dilatation and curettage (D&C) or evacuation of retained products of conception (ERPC).
DILATATION AND CURETTAGE (D&c), AND EVACUATION OF RETAINED PRODUCTS OF CONCEPTION (ERPC)
Appraise
1. You may need to perform a diagnostic dilatation and curettage (D&C) on a patient with intermenstrual or postmenopausal vaginal bleeding. Therapeutic D&C – or alternatively evacuation of retained products of conception (ERPC) – is performed for heavy prolonged bleeding associated with retained products of conception (RPOC) in the uterine cavity.
2. In women with persistent (greater than 1 week) light vaginal bleeding after the heavy bleeding of a miscarriage, ultrasound is generally of limited use in distinguishing endometritis with altered blood in the uterine cavity from RPOC. Give antibiotics, e.g. co-amoxiclav for 1 week, and only if bleeding persists perform D&C or ERPC.
3. If there are obvious substantial RPOC on ultrasound associated with fever, septic miscarriage/abortion is likely, and in this circumstance the myometrium will be at its softest and most liable to be perforated by ERPC. Give antibiotics intravenously for 1–2 days prior to ERPC unless in extremis.
Prepare
1. Gynaecologists usually perform hysteroscopy prior to a diagnostic D&C, as it allows visualization of the endometrium, polyps and submucous fibroids in situ. For gynaecologists skilled in its use, the operating hysteroscope allows resection of submucous fibroids, polyps or endometrium in the treatment of menorrhagia.
2. Any woman in the reproductive age group (12–50 years) who has heavy bleeding could have a threatened or an incomplete miscarriage. Order a pregnancy test on urine or blood and a transvaginal ultrasound scan of the uterus before she is taken to theatre. Also order a full blood count, and group and save. Blood transfusion is rarely necessary.
3. If the D&C is for missed or threatened miscarriage, give misoprostol 400 μg vaginally 1 hour preoperatively to prime (soften) the cervix. This may also cause uterine contraction and vaginal bleeding which will resolve once the D&C is completed.
4. Ask the anaesthetist to give 5–10 units of synthetic oxytocin (Syntocinon) intravenously immediately before commencing the operation, to reduce bleeding.
5. Thoroughly wash the vagina and perineum with iodine or chlorhexidine to prevent the introduction of infection. This may be achieved by using soaked gauze held by sponge-forceps. Drape the patient.
Access
1. Take great care to perform a thorough bimanual examination to determine the axis and size of the uterus (and to detect any adnexal swellings).
2. Insert a Sims’ speculum into the vagina posteriorly and grasp the anterior lip of the cervix with two vulsellum forceps.
3. Hold the cervix under tension. This straightens the axis of the uterus slightly and helps prevent uterine perforation.
Action
1. Gently pass a curved uterine sound in the direction of the uterine axis to confirm this axis and to determine the length of the uterine cavity. This step is best avoided in a pregnant uterus as the soft pregnant uterus is easily perforated by a sound.
2. Dilate the cervix progressively, increasing by 1 mm at a time, by passing metal dilators devised by Alfred Hegar (1830–1914, Professor of Gynaecology in Freiburg). You may need to press firmly to pass through the internal cervical os, but then be careful to reduce the pressure as soon as you overcome the resistance so as not to continue on and perforate the uterine fundus. This is achieved by holding the dilator not more than 2 cm from the cervix when applying pressure to overcome the resistance of the internal os, or by holding each dilator such that less of the dilator protrudes from your hand than the length of the sound measurement. If insertion of a dilator is difficult, go back to the previous dilator or consider using half-size dilators. Dilate up to 8 mm for a diagnostic D&C; 10 mm for a therapeutic D&C.
3. Pass a pair of polyp forceps, open them, twist through 180°, close them and withdraw any tissue present. Repeat two or three times in different planes or more frequently if there are retained products of conception.
4. Pass a curette, small and sharp in a non-pregnant woman, large and blunt in a patient who has been pregnant, until you reach the fundus of the uterus. With firm pressure on the uterine wall, withdraw the curette and collect the specimen on a swab. Repeat the manoeuvre by going systematically around the uterus, ensuring the cavity is completely empty. The surface of the cavity should feel like a fine sandpaper at the end. Send the curettings for histology.
5. ERPC using a suction curette is the method of choice to remove retained products of conception. It replaces steps 3 and 4 above, results in fewer introductions of instruments into the uterus and, therefore, may reduce the risk of perforation. Measure the suction curette against the sound measurement as in step 2, and insert gingerly between finger and thumb until any resistance is felt (this will tally with the sound measurement). The curette is now at the uterine fundus. Activate the suction and then rotate the suction curette rapidly whilst slowly withdrawing, thus tracing a spiral within the uterine cavity. Performing this a few times is almost always sufficient to empty the cavity safely without the need for further instrumentation.
6. If bleeding is heavy during therapeutic D&C or ERPC, then either the uterus is not yet empty, it is failing to contract, or a uterine perforation has occurred. Try ergometrine 500 μg intramuscularly, (or syntometrine if closer to hand), and if you are confident that perforation has not occurred, continue to check the cavity is empty with either a blunt curette or suction curettage. Very light bleeding signifies that the cavity is empty.
7. Give analgesia and metronidazole 1 g rectally at the end of the procedure, and azithromycin 1 g orally on the ward.
KEY POINTS
Preventing and managing uterine perforation


Postoperative
1. Discharge the patient with simple analgesia the same day in the absence of complications.
2. If there is evidence of infection such as offensive tissue, pyrexia or raised inflammatory markers, treat with broad-spectrum antibiotics in hospital.
3. If there is endometrial hyperplasia or likely carcinoma, refer the patient as soon as possible to a gynaecologist for staging and probable hysterectomy and bilateral salpingo-oophorectomy.
4. Remember to give anti-D within 48 hours to women whose blood group is Rhesus-negative after a miscarriage.
VAGINAL LACERATION
Action
1. After following steps 1 to 3 in the “Removal of products of conception from the cervical canal – Action” section above, use a continuous 2/0 polyglactin 910 suture to close the laceration and achieve haemostasis.
2. Unlike the removal of products of conception from the cervix, this usually requires a general anaesthetic.
LAPAROSCOPY
Appraise
1. This is a very useful and important diagnostic procedure where there is pelvic pain, both acute and chronic. It is particularly valuable in cases of suspected ectopic pregnancy.
2. You may find diagnostic laparoscopy useful in many situations, including the acute abdomen, the diagnosis of ascites, for direct liver biopsy and for peritoneal biopsy.
3. Do not attempt operative laparoscopy unless you are appropriately trained and suitable equipment is available, such as a light source, camera, optic, laparoscopic instruments, diathermy and irrigation.
4. It is contraindicated in the presence of generalized peritonitis, intestinal obstruction or ileus. Be particularly cautious when you suspect extensive adhesions. Pre-existing severe cardiorespiratory disease may also be a contraindication as the sustained increased intra-abdominal pressure of a pneumoperitoneum may further compromise the patient.
Prepare
1. Order a full blood count, group and save, pregnancy test and transvaginal ultrasound scan.
2. Ensure the patient understands that despite the small size of abdominal incisions, laparoscopy should still be regarded as major surgery, and has a small risk of serious complications (bowel, large vessel and ureteric injury requiring conversion to laparotomy and occasionally stoma formation).
Access
1. Place the patient flat in a semi-lithotomy position, with the legs in Lloyd-Davies stirrups.
2. Empty the bladder if the patient has not urinated in the previous hour, and perform a bimanual examination. Apply forceps and a Spackman cannula (or similar) to the cervix in order to allow manipulation of the uterus intraoperatively.
3. Make an incision in or just below the umbilicus; for a 5-mm diagnostic laparoscope a 5-mm incision is sufficient, but if operative laparoscopy is a possibility we prefer a 10-mm laparoscope and incision.


Action
1. Palpate the lower limit of the aorta prior to its bifurcation.
2. Grasp the Veress needle in the right hand with the fingers lying along the shaft of the needle to act as a stop to insertion of excessive needle length. Introduce almost vertically (but slightly towards the pelvis, away from the aortic bifurcation) through the umbilical skin incision. Take care not to allow the needle to deviate laterally so as not to injure the iliac vessels. It is helpful to hold up the lower abdominal wall between the left fingers and thumb to provide counter-traction to the introduction of the Veress needle; the left hand should also be used to elevate the anterior abdominal wall in thin patients. Two clicks are felt as the blunt spring-loaded obturator springs forwards to guard the cutting edge on breaching the rectus sheath and then the peritoneum. As soon as the tip is through the peritoneum, insert the needle only a little further, towards the pelvis.
3. Aspirate the needle with a syringe to check that neither a blood vessel nor a viscus has been entered. Then attach a syringe with 10 ml of physiological saline and remove the plunger to check that the saline passes into the peritoneal cavity by gravity alone.
4. Connect the needle to the carbon dioxide insufflator and start the gas flow. Ensure the initial pressure created is no greater than 10 mmHg (Pressure test). If not, immediately stop the gas flow.
5. Continue to insufflate such that the intra-abdominal pressure rises steadily to 20–25 mmHg, and then remove the Veress needle.
6. With your left hand pressing firmly down on the upper abdomen pass the large trocar and cannula into the peritoneal cavity, in the same direction as used for the Veress needle with a twisting motion. Ensure that the trocar is not inserted too deeply into the peritoneal cavity thereby endangering bowel or the retroperitoneal vessels.
7. Remove the trocar and insert the optic through the cannula; attach the fibreoptic light cable and, whenever possible, the video camera.
8. Insert a second port (5 mm) in order to pass a probe or atraumatic grasper to assist in demonstrating pelvic anatomy clearly. This may be suprapubic or well lateral of the inferior epigastric vessels. Injury to the epigastric vessels is the commonest complication of laparoscopy. Transilluminate the abdomen from within to identify the superficial vessels, and identify the inferior vessels lateral to the medial umbilical ligaments on a laparoscopic view of the anterior abdominal wall. If identification of these vessels is difficult, place the port either in the ‘safe triangle’ (area of the anterior abdominal wall between the symphysis pubis and umbilicus bounded laterally by the umbilical ligaments) or 2–3 cm medial to the anterior superior iliac spine of the pelvic bone.
9. The uterus can be moved by an assistant grasping the Spackman cannula to facilitate visualization of all parts of the pelvis. Ensure that both tubes including their distal ends, ovaries, ovarian fossae, the pouch of Douglas, and anterior and posterior surfaces of the uterus have been visualized.
10. If you detect no disease, look at the appendix, caecum and upper abdomen.
11. Make a decision as to whether operative laparoscopy, laparotomy or no further surgical procedure is necessary.
12. Insert further accessory ports if operative laparoscopy is required.
13. Decrease the pressure relief on the insufflator to 15 mmHg once all ports have been inserted.
14. Perform any necessary procedure. See below for how laparoscopy may be used to treat various conditions. Remove any necessary biopsies with biopsy forceps, using diathermy coagulation to obtain haemostasis.
15. When the procedure is completed, let out as much of the carbon dioxide as possible, remove the trocar and insert one skin suture in each incision.
OVARIAN OPERATIONS
Appraise
1. Ovarian cysts may cause acute abdominal pain because of rupture, haemorrhage or torsion, but a cyst of less than 5 cm diameter rarely causes pain unless secondary to endometriosis (ask about dyspareunia and dysmenorrhoea). Polycystic ovaries are not painful unless there is torsion.
2. Ovarian torsion is characterized by nausea in addition to pain, and infarction by raised inflammatory markers. Endometriotic cysts rarely undergo torsion as they are often stabilized by adhesions.
3. On other occasions you may discover a cyst incidentally on imaging, or whilst operating. If symptomatic at all, ovarian cancer usually presents with only mild non-specific abdominal symptoms.
4. Consider the differential diagnosis of pelvic tuberculosis in a patient from the developing world.
KEY POINTS
Decision making
 Obtain a transvaginal ultrasound (which gives better images than an abdominal scan) if you suspect an ovarian cyst clinically. If confirmed, obtain a CA-125 serum, CEA (a differential diagnosis of a pelvic cyst is colorectal cancer), CA 19-9 (a differential diagnosis of ascites is pancreatic cancer), CRP, FBC, G&S, even if some of these results may only be available postoperatively. Also measure serum AFP (suggestive of a germ-cell tumour) and HCG (suggestive of choriocarcinoma when very high) in a young woman.


 It is wise to call a gynaecologist to help in the assessment.

Access
1. Unless you have had considerable laparoscopic experience, you will need to perform laparotomy to remove most ovarian tumours.
2. Use a transverse suprapubic incision only if preoperative ultrasound or laparoscopy has provided strong evidence that the tumour is benign. In all other cases, employ a vertical incision.
Assess
1. You must recognize physiological cysts which should be left alone: a mature Graafian follicle (simple, straw-coloured fluid-filled cyst up to 2 cm in diameter) or a corpus luteum (Latin: yellow body) cyst. A luteal cyst may develop in early pregnancy; it secretes progesterone to support the early pregnancy and unnecessary removal may result in miscarriage. Simply use diathermy or oversew it if bleeding.
2. Do not operate for an ovarian cyst under 5 cm in diameter without evidence either that it is neoplastic or that it has undergone haemorrhage or rupture, giving rise to acute abdominal pain.
3. If you find an endometrioma, check the pelvis for other evidence of endometriosis (especially the uterosacral ligaments and ovarian fossae).
4. It is of great importance for you to be able to distinguish a benign cyst from ovarian cancer visually. In a woman of reproductive age it is better to err on the side of conservatism, even if a further laparotomy will be required, rather than risk sacrificing healthy ovaries. In general, a smooth ovarian surface indicates a benign cyst. These may be very large. Features of malignancy are an irregular ovarian surface, papillary growth, neovascularization, ascites, adhesions between ovary and bowel and peritoneal, omental or palpable liver surface metastases. Bilaterality is no guide to the likelihood of malignancy.
5. Ovarian cystectomy is the preferred treatment for benign ovarian cysts, but carry out salpingo-oophorectomy if:
 The patient is postmenopausal (bilateral)
 There is evidence of malignancy (bilateral if cancer is obvious)
 The cyst has undergone torsion and is gangrenous
 The tumour is very large and little normal ovarian tissue can be conserved.
6. If you suspect malignancy, explore the whole abdomen, including the diaphragmatic surface of the liver and the undersurface of the diaphragm. Palpate the para-aortic and pelvic lymph nodes and biopsy them if enlarged. Send ascitic fluid or peritoneal washings for cytology. Further treatment depends upon accurate staging. If there are no metastases and the contralateral ovary is grossly normal, split it open and send a slice for histology or frozen section if it is available, before closing the ovary with fine absorbable synthetic or fine non-absorbable sutures.
7. If the ovarian tumour is obviously malignant, remove the uterus, both ovaries and tubes (see Hysterectomy, below), the infracolic omentum, palpable lymph nodes and as much metastatic tumour bulk as possible. Record the extent of residual disease, an important predictor of survival. Adjuvant chemotherapy is generally required. The only exceptions to such radical surgery are in a young woman with disease confined to one ovary and no sign of abdominal metastases, or in a patient who has very extensive disease when primary chemotherapy or even palliative treatment should be considered.
Action
Ovarian cystectomy
1. Separate the tumour from adhesions and draw it out of the wound.
2. Surround the operation site with large gauze packs, and have suction ready in case the cyst is accidentally ruptured.
3. Make a very superficial incision on the medial aspect of the ovary over the cyst.
4. Find the plane of cleavage and shell out the tumour, using blunt dissection with scissors and gauze swab. If the cyst ruptures, remove all the cyst fluid, ensure that you remove all the cyst lining, and thoroughly irrigate the area, and again wash out the peritoneal cavity prior to closure of the abdomen. Dermoid cyst fluid and endometrioma ‘chocolate fluid’ are highly irritant, and leakage of malignant cyst fluid may result in peritoneal metastases.
5. Repair the residual ovarian tissue, using a fine prolene suture; good haemostasis is important to prevent future adhesion formation.
Salpingo-oophorectomy
1. If you decide to remove the whole ovary, skeletonise the ovarian pedicle (infundibulopelvic ligament) taking care to identify the ureter. Place a clamp across this pedicle, and a second across the ovarian ligament and fallopian tube, adjacent to the uterus. Resect the ovary together with the tube and broad ligament between the clamps.
2. Doubly ligate each pedicle with 1-polyglactin 910. Use a transfixion suture or gently release and re-apply the clamp while tying the ligature. At the end of the operation check the pedicles before closing the abdomen.
SURGERY FOR ECTOPIC PREGNANCY
Appraise
1. A classic ruptured ectopic pregnancy is easily diagnosed by the findings of severe abdominal pain and shoulder pain, guarding and rebound tenderness, and hypovolaemic shock. (There is usually little or no vaginal bleeding; if bleeding is heavy the diagnosis of miscarriage is more likely.) A failing ectopic pregnancy or slowly bleeding ectopic pregnancy is less easy to diagnose.
2. The appearance on transvaginal ultrasound scan is of an empty uterus and free pelvic fluid if there is intra-abdominal bleeding. It is much less common to see an adnexal mass. If the serum βHCG is greater than 1500 IU/L, a correctly sited pregnancy should be visible on vaginal ultrasound scan, and so this combination often helps to make the diagnosis.
3. In uncertain cases (e.g. patient haemodynamically stable, βHCG <1500 IU/L and normal ultrasound scan with empty uterus, no free fluid or adnexal mass in the pelvis), repeat the βHCG in 48 hours. Suboptimal increase or decrease of βHCG may signify ectopic pregnancy and should be investigated by serial βHCG testing or laparoscopy. If a non-surgical approach is taken, discharge when the pain settles, with instructions to return urgently if the pain returns or she feels unwell. Very early ectopic pregnancies may be managed medically with a single intramuscular dose of methotrexate.
4. Laparoscopy is required to confirm the diagnosis of unruptured ectopic pregnancy when HCG is greater than 1500 with an empty uterus, or if there is any doubt about the diagnosis.
5. Once the diagnosis of ruptured ectopic has been made, take the patient to the operating theatre as soon as possible. Do not wait for blood to be cross-matched and do not delay for resuscitation. Your patient will improve only when the bleeding fallopian tube is clamped.
6. If the patient is shocked, perform a laparotomy – via a Pfannenstiel incision if you can perform this as rapidly as a midline incision – and never laparoscopy.
Prepare
1. Order a full blood count, group and save serum if not cross-matching, and secure intravenous access as soon as you suspect ectopic pregnancy.
2. Gain consent for laparoscopy and laparotomy, and for salpingectomy and salpingotomy.
3. If the patient is shocked, take her to the operating theatre for immediate laparotomy. In less acute forms arrange for laparoscopy.
4. Remember to give anti-D immune globulin within 48 hours to women whose blood group is Rhesus-negative.
LAPAROSCOPIC SALPINGECTOMY OR SALPINGOTOMY
Access
1. Use a 10-mm laparoscope if available as this gives better visualization in the presence of a haemoperitoneum.
2. Ensure that a suction/irrigation device is available if you contemplate laparoscopic surgery.
3. Have monopolar electro-diathermy equipment available for incising the tube and if possible use bipolar diathermy for obtaining haemostasis.
4. Having introduced the laparoscope, insert a lateral port so that a probe or forceps can be used to demonstrate and manipulate the fallopian tube.
5. If there is copious blood in the peritoneal cavity, aspirate it using the suction/irrigation apparatus to improve the view of the tube.
Assess
1. Make a careful inspection of the uterus and of both tubes and ovaries, in order to decide the most appropriate operation.
2. Decide whether to proceed to laparotomy or complete the operation laparoscopically. Laparotomy is appropriate if there is major bleeding preventing good visualization, the patient becomes shocked or you are not experienced in laparoscopic surgery.
3. The second decision is whether to perform salpingotomy to conserve the tube, or salpingectomy. Salpingectomy is generally the preferred option (as the incidence of persistent trophoblast and future ectopic pregnancy is less, without significantly affecting the future pregnancy rate when the contralateral tube is normal). Even if the contralateral tube is abnormal, salpingectomy should also be performed when:


Action for operative laparoscopy
2. Grasp the affected tube as close as possible to the tubal swelling with grasping forceps near the uterine end.
3. Apply bipolar diathermy to the mesosalpinx parallel and just inferior to the Fallopian tube, and coagulate the tissue with its blood vessels. Divide the mesosalpinx with laparoscopic scissors. Coagulate the proximal tube well, prior to dividing it 1-2 cm from the uterus.
4. Alternatively, partial salpingectomy can be done using an ‘Endoloop’ ligature to occlude the vessels and then remove the tube with scissors.
5. Remove the fallopian tube through a lateral port, enlarged to 10 mm, using a bag if necessary.
6. Irrigate and aspirate the peritoneal cavity to remove as much blood, clot and trophoblast as possible.
7. If you decide that salpingotomy and conservation of the tube is more appropriate make a 10-mm linear incision over the ectopic pregnancy on the antimesenteric border of the fallopian tube using diathermy needle, scissors or hook (Fig. 39.1).
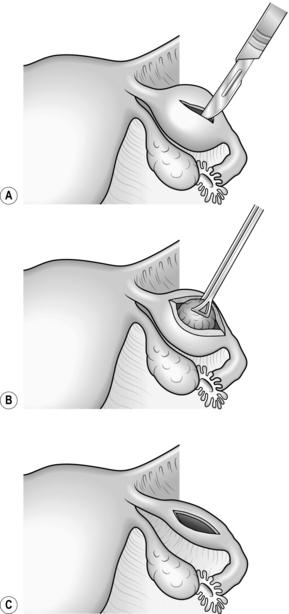
8. Use the suction/irrigation cannula to separate the trophoblast tissue from the tube and then remove the tissue with grasping forceps. If the ectopic pregnancy is aborting through the fimbrial end of the tube, it may be possible to aspirate and remove it through the fimbrial ostium.
9. Extract the tissue from the abdomen through a 10-mm port, unless it is very small, using an extraction bag if necessary.
10. It is not necessary to close the salpingotomy incision but, if there is any residual bleeding after applying pressure, use the diathermy forceps to complete haemostasis.


SALPINGECTOMY OR SALPINGOTOMY BY LAPAROTOMY
Action
1. As soon as the peritoneal cavity is open, aspirate blood with the sucker.
2. Pass a hand into the pelvis and bring the uterus with its appendages up into the wound. Identify the ruptured tube. Place one or more clamps across the mesosalpinx and another clamp across the cornual end of the tube, then excise the damaged tube. In most cases it is neither necessary nor desirable to remove the ovary. Doubly ligate the pedicles beneath the clamps, using 1-polyglactin 910.
3. You can decide to conserve the tube if the other tube is also damaged or has previously been removed and the tubal pregnancy is small. The pregnancy can be removed by aspiration or salpingotomy.
4. If the ectopic pregnancy is small and distal you may aspirate it through the fimbrial end.
5. If not, create a salpingotomy with a 1-cm linear incision using a scalpel or needle diathermy over the swollen portion of the tube (see Fig. 39.1) and remove the pregnancy with a combination of forceps traction and hydrodissection. You do not need to close the tube, but ensure that haemostasis is complete using diathermy coagulation.
6. Inspect the contralateral tube and ovary. The other tube may have a hydro-salpinx or haemato-salpinx but do not be tempted to tamper with it. Bilateral tubal pregnancy is exceedingly rare. Carefully record the state of the pelvis.
7. Before closing the abdomen, aspirate and swab out as much blood as possible, and estimate the volume of blood loss. Washing the peritoneal cavity with normal saline may help to reduce adhesion formation.


Postoperative
1. Obtain as accurate an estimate as possible of the amount of blood aspirated from the peritoneal cavity, and replace it with blood transfusion if the loss exceeds 1 Litre.
2. Use central venous pressure monitoring to gauge blood and fluid replacement if there has been severe shock.
3. Administer prophylactic antibiotics such as co-amoxiclav for three doses if tubal rupture and substantial haemoperitoneum have occurred.
4. If salpingectomy has been performed when the other tube was absent or badly damaged, counsel the woman that assisted conception (e.g. IVF) will be required to try and achieve a pregnancy.
5. If salpingotomy and aspiration of the ectopic have been carried out, perform follow-up serum HCG levels weekly until it is certain that levels are declining, because of the small risk of persistent trophoblast.
6. Counsel the patient about the increased risk of future ectopic pregnancy. Advise early medical assessment in any subsequent pregnancy.
TUBAL LIGATION
Appraise
1. You may be asked to carry out a sterilization procedure either in the course of a caesarean section (see below) or as an additional procedure during the course of an abdominal operation.
2. Sterilization may be carried out by one of the modifications of Pomeroy’s method as described below, or laparoscopically by the simple application of Hulka or Filshie clips across the whole diameter of each tube.
3. Gain informed consent, by ensuring the patient understands that the procedure should be considered irreversible, but that it has a failure rate (<1%) in the same way as other methods of female contraception. Should there be a pregnancy, the risk of it being ectopic is great after female sterilization. Explain other methods, which are reversible and may treat dysmenorrhoea and menorrhagia (e.g. Mirena IUS). Male sterilization is more reliable. Avoid sterilizing a woman under the age of 30 years unless there is a good medical reason.
Action
1. Pick up a loop of fallopian tube with a Spencer Wells forceps 2–3 cm from the uterus (Fig. 39.2A).
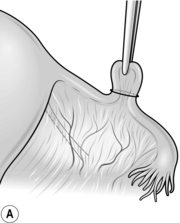
2. Tie an absorbable synthetic ligature tightly around the base of the loop and excise the end of the loop. You may seal each end of the tube with the diathermy needle as an additional precaution (Fig. 39.2B).
HYSTERECTOMY
Appraise
1. You may need to perform a hysterectomy – for example, as part of a larger surgical procedure such as the removal of a rectal cancer, because of fibroids or other benign uterine disease causing severe menorrhagia, or for ovarian carcinoma that had not been diagnosed preoperatively. Do not be tempted to carry out a hysterectomy during the course of another operation because of the incidental finding of large uterine fibroids, unless you have discussed this with the patient preoperatively. Even when they have large fibroids, most women are fertile.
2. Unless there is gynaecological malignancy, conserve at least one ovary whenever possible in premenopausal women.
3. Vaginal hysterectomy and radical hysterectomy, described in 1900 by the Viennese gynaecologist Ernst Wertheim (1864–1920), are not likely to fall within your competence.
Access
1. Empty the bladder by catheterization and cleanse the vagina with an antiseptic. Added Bonney’s blue or methylthioninium chloride (methylene blue) dye has the advantage of staining the vaginal skin, making it more easily recognized at operation.
2. A Pfannenstiel incision is suitable for many hysterectomies, but avoid it if you suspect malignancy, if the uterus is larger than the size of a 16-week pregnancy or if the diagnosis is in doubt. In these cases use a vertical incision.
3. Carefully pack off the intestines, both large and small, to render the operation easier and safer. It is well worth spending a few minutes displacing all the intestines from the pelvis and packing them above the pelvic brim.
4. Insert a self-retaining retractor of the Balfour type, preferably one with a third blade.
Action
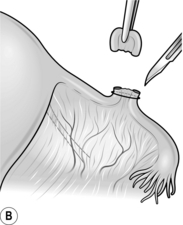
1. If the adnexae are to be preserved, place a strong straight clamp such as Kocher’s type as close to the uterus as possible across the fallopian tube, round ligament, ovarian ligament and upper part of the broad ligament. If these structures are held on the stretch, an avascular window is visible at a depth of about 3 cm into the broad ligament. Aim to put the tip of the clamp into this avascular window. In the case of oophorectomy, the infundibulopelvic pelvic ligament and round ligament pedicles are taken separately.
2. Place a second straight clamp just lateral to the first clamp, again with the tip in the avascular window.
3. Divide the tissue between the clamps down to their tips, and ligate the lateral pedicle with No 1 absorbable synthetic suture material, doubly tied (Fig. 39.3).
4. Repeat this procedure on the opposite side.
5. Open the layers of the broad ligament below the sutured pedicle by inserting closed scissors and gently opening them. Incise the anterior leaf of the broad ligament and gradually continue opening the broad ligament, until you reach the loose fold of uterovesical peritoneum.
6. Now pass the closed scissors in a medial direction, open them and cut the loose uterovesical peritoneum. Carry out the same manoeuvre on the other side until the bladder peritoneum is completely incised in front of the cervix.
7. Pick up the bladder flap with dissecting forceps and apply tension. This manoeuvre displays the loose connective tissue between bladder and cervix, which can be carefully cut with scissors while keeping their points angled towards the cervix.
8. Now push the bladder off the cervix with a swab wrapped around your thumb. Apply pressure on to the cervix rather than the bladder. Once the longitudinal fibres of the vagina are visible, no further displacement of the bladder is necessary. Adequate displacement of the bladder may also be checked by gripping the cervix between thumb and forefinger until you can feel that you are below the level of the cervix.
9. Identify the ureters, either visually or, more often, by palpating the medial leaf of the broad ligament. The ureters feel like whip-cords and typically ‘snap’ as you move your thumb and index finger over them. If required, push the ureters caudally so that the uterine vessels can be clamped (see step 10).
10. Now clamp the uterine vessels. Apply a strong straight or curved hysterectomy clamp (e.g. Maingot’s) at right-angles to the uterus at the level of the utero-cervical junction. Make sure that the tips of the clamp are as close as possible to the uterus. Divide the uterine vessels by cutting with a knife close to the clamp and around its tip and doubly ligate with a 1-synthetic absorbable suture.
11. If the cervix is relatively long, clamp the paracervical tissue by applying a straight clamp medial to the uterine pedicle towards the vagina. Divide the pedicle and tie with a single suture.
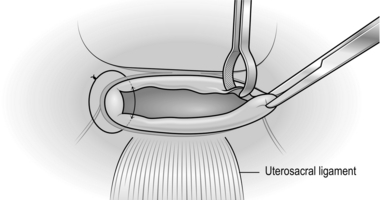
12. Now open the vagina by inserting a scalpel transversely in the midline through the vaginal fascia and then into the vagina itself. Extend the vaginal incision towards the vaginal angles by pulling the opened scissors in the vagina out through the incision. Apply Maingot clamps (or similar) to the vaginal vault by placing one blade inside and the other outside the vaginal angles to include the uterosacral ligaments behind the vagina. Cut off the uterus and cervix from the vagina to complete the hysterectomy.
Closure
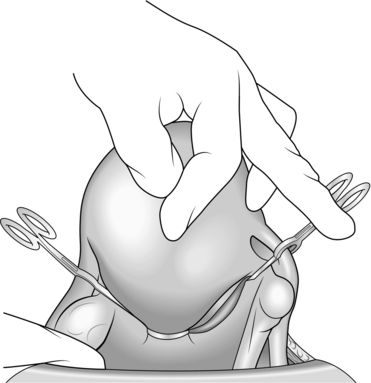
1. The two vaginal angle pedicles are sutured ensuring that the full thickness of the vaginal wall is included. Having tied the suture, leave long and hold with Spencer Wells forceps (Fig. 39.4).
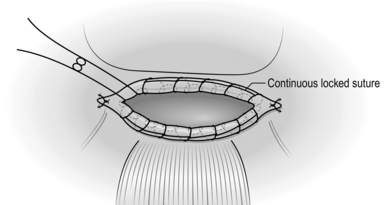
2. Close the vaginal vault with a series of interrupted absorbable sutures. Alternatively, leave it open and arrest oozing by inserting a running suture around the vault (Fig. 39.5).
3. Check that there is no bleeding from the vaginal vault or uterine vessels. Many surgeons now do not close the pelvic peritoneum provided haemostasis is good. If there is oozing it is worth tacking it across with continuous 2/0 synthetic absorbable stitches, starting at one ovarian pedicle and concluding at the other.
4. The parietal peritoneum need not be closed, but carefully close the rectus sheath with 1-polyglactin 910, before closing the skin with clips or sutures.
5. Consider carrying out a cystoscopy if there is any concern about the integrity of the bladder or ureters. Indigo carmine can be given intravenously to make identification of normal ureteric function easier. Consult a urologist if injury is suspected.
Postoperative
If both ovaries have been removed discuss the use of hormone replacement therapy with the patient.
Complications
1. Reactionary or secondary haemorrhage from the vaginal angle may occur and presents as profuse vaginal bleeding. It can be dealt with through the vagina, applying a figure-of-eight suture to the bleeding points.
2. Ureteric or bladder injury are unwelcome complications which will present either as urinary leakage and fistula formation, or loin pain if the ureter is completely tied off. Get expert urological assistance if there is any suggestion of such complications.
MYOMECTOMY
Appraise
1. Do not contemplate the surgical treatment of fibroids unless they are likely to be the cause of the patient’s severe symptoms. Fibroids are common, usually asymptomatic, and almost always benign. Fertility is improved only by the removal of submucous fibroids which substantially protrude into the uterine cavity.
2. As a general surgeon you are unlikely to be called upon to carry out myomectomy. If fibroids are multiple, the operation can be more time-consuming and hazardous than hysterectomy.
3. On the other hand, it is preferable to conserve the uterus in a young woman who has not completed her family, and a solitary pedunculated subserous fibroid which can undergo torsion is easily removed.
Prepare
1. Bear in mind that this is the gynaecological operation with the greatest expected blood loss, so optimize the haemoglobin concentration preoperatively. Cross-match 4 units of blood.
2. Ensure the patient is aware that there is a risk of requiring hysterectomy if bleeding is uncontrolled, and clearly document this on the consent form. Most gynaecologists would not perform myomectomy on a patient who refuses blood products in an emergency.
3. Give intravenous antibiotics on induction, and continue until eating, when a 5-day course may be completed orally.
Access
1. Perform a bimanual examination under anaesthetic to decide on the abdominal incision.
2. In general, if the uterus is mobile and it extends no further than the umbilicus, use a Pfannenstiel incision. Otherwise, use a lower midline incision, which may be extended around or even above the umbilicus if necessary.
3. Once the abdomen is open, deliver the uterus into the wound.
Assess
1. Plan the uterine incision(s): The aim is to remove as many fibroids through as few uterine incisions as possible. Try to avoid incisions in the posterior wall of the uterus, since these often give rise to bowel adhesions.
2. You can remove a posterior fibroid through an anterior incision by crossing the uterine cavity, or via an inverted ‘U’ hood incision in the posterior uterine wall.
3. Generally, it is best not to breach the endometrium if possible, as the risk of uterine rupture during a future labour is thought to be increased.
Action
1. Unless removing a few subserous or pedunculated fibroids, bluntly fenestrate an avascular area of parametrium bilaterally. Through these apply a Bonney’s myomectomy clamp or a rubber pericervical tourniquet to compress the uterine arteries, and bilateral rubber touniquets around the infundibulopelvic ligaments (the ovarian vessels lie within) to reduce haemorrhage during the procedure. These will need to be re-tightened during the procedure should they loosen. An alternative to rubber tourniquets to the ovarian vessels are ovarian artery clamps which can be placed medial to the ovaries, thereby avoiding ovarian ischaemia during surgery (Fig. 39.6).
2. If there are anterior fibroids, try to remove all of them through a single anterior midline incision. To facilitate manipulating the fibroids, extend the cut into each fibroid by about 1 cm.
3. Grasp the fibroid with tissue-holding forceps (e.g. Lane’s). The required plane of cleavage lies directly on the fibroid. Shell it out either digitally or using blunt dissection with Mayo scissors. Remove as many fibroids as possible through this incision. If there are posterior fibroids, continue the myomectomy as described previously.
4. Insert deep 1-polyglactin 910 or other synthetic absorbable sutures to obliterate the cavity left after removal of the fibroids. Several layers of sutures are needed to achieve an adequate repair and achieve haemostasis. If the endometrial cavity has been breached, repair this with a fine 2/0 absorbable suture.
5. Close the serous surface of the uterus with 0-polyglactin 910 or polypropylene sutures.
6. Remove the tourniquets and observe for haemostasis.
7. If there is oozing from the incisions, insert further haemostatic deep figure-of-eight 1-polyglactin 910 sutures.
8. If the uterus is retroverted, you could plicate the round ligaments with non-absorbable suture in order to antevert the uterus. This manoeuvre prevents adhesion formation.
9. Insert a size 16 Robinson drain to the pelvis and close the abdomen.
10. Prescribe prophylactic heparin if there is no sign of ongoing haemorrhage 12 hours postoperatively.
INCIDENTAL GYNAECOLOGICAL CONDITIONS
PELVIC INFLAMMATORY DISEASE
1. Uncomplicated pelvic inflammatory disease (PID) does not require surgery. It is a cause of an acute abdomen and fever. Distinguishing features are of recent sexual activity (which need not be “high-risk”), symmetrical lower abdominal pain, recent vaginal discharge and exquisite deep tenderness on bimanual examination. Take high-vaginal, intracervical and intracervical nucleic acid amplification swabs. Start antibiotics at once, according to local antibiotic guidelines. These usually include a 2-week course of doxycycline to cover Chlamydia trachomatis, (the most common cause in the developed world), a single dose of ceftriaxone to treat gonorrhoea, and a 2-week course of either co-amoxiclav or metronidazole to cover anaerobes.
2. Not uncommonly a patient explored for suspected appendicitis is found to have acute salpingitis. The condition is almost always bilateral, although one tube may be more affected than the other. The tubes are oedematous and reddened, and pus is often seen dripping from the fimbrial end. Swab for bacteriological culture, close the abdomen and treat as above.
3. Tubal infection may progress to pyosalpinx, a tubo-ovarian abscess or pelvic abscess. If there has been little improvement in the patient’s condition after 2 days on antibiotics, laparotomy is justified. Adhere to the usual surgical principle of draining pus (sending some for culture), digitally breaking up loculi, irrigating the pelvis and abdomen (some use antiseptic wash-out) and inserting a drain through a separate abdominal incision. Give antibiotics as above.
4. Unlike many general surgical abscesses there is no perforated viscus and resection of the indurated pelvic organ is unnecessary despite the patient’s toxic state.
FIMBRIAL CYST AND PARAOVARIAN CYST
1. Small cysts may be seen in relation to the distal end of the fallopian tube or broad ligament. They arise in remnants of the mesonephric (Wolffian) duct and occasionally undergo torsion to produce acute abdominal pain.
2. Remove them only if they have undergone torsion. Tie the pedicle before excision.
ENDOMETRIOSIS
1. Most cases of endometriosis are effectively treated medically with hormones, so avoid first-line surgery if the diagnosis is suspected, and do not be radical if you find pelvic endometriosis unexpectedly.
2. This condition may involve the pelvic peritoneum when it typically appears as small purple or dark-brown nodules, but appearances can be varied. Most women with the incidental finding of peritoneal endometriosis have no symptoms, and therefore require no treatment. If symptoms of abdominal pain, dysmenorrhoea and classically deep dyspareunia are present, ablate these areas of peritoneum with diathermy, taking extreme care not to injure vessels or the ureters deep to this tissue.
3. When involving the ovaries, endometriosis may be seen superficially and treated as above, or may form endometriomata (otherwise known as ‘chocolate cysts’). Rupture of a chocolate cyst produces acute abdominal pain. Excise the cyst cavity, ensure haemostasis and repair the ovary with a fine polyglactin 910 suture if the cyst was large. Irrigate the pelvis at the end of surgery.
4. Occasionally, endometriosis involves the intestine. It is a cause of rectal bleeding and the appearance may mimic a carcinoma. In the large intestine it may produce sub-acute obstruction and can be extremely difficult to differentiate from carcinoma.
CAESAREAN SECTION
Appraise
1. You may be asked to perform a caesarean section (said to have been the method of delivery of Caius Julius Caesar) if you work in a hospital where there is no specialist obstetrician.
2. It is likely that the patient has been in labour for some hours, although occasionally it is necessary to perform the operation on a patient who is bleeding heavily from a placenta praevia or severe placental abruption.
3. The lower segment operation is almost universally employed nowadays, being associated with less bleeding and fewer postoperative complications than the ‘classical’ (midline longitudinal uterine) section.
Prepare
1. Establish the haemoglobin concentration and group and save the patient. It may be wise to cross-match 4 units of blood preoperatively if blood is not immediately available, if the starting haemoglobin is low, or if blood loss is expected to be higher than usual for any reason.
2. Give ranitidine to decrease the gastric acidity and hence the risk of pneumonitis should the patient aspirate gastric contents.
3. Perform the operation under spinal or epidural rather than general anaesthesia when possible; a regional anaesthetic carries a lower mortality in most circumstances. If a general anaesthetic is employed, a cuffed endotracheal tube is mandatory, to prevent aspiration of gastric contents, which are more liable to reflux in pregnancy.
4. Anti-thromboembolic compression stockings should be worn.
5. Insert an indwelling catheter.
6. Apply about 15° of left lateral tilt to the patient by tilting the operating table, or by placing a wedge under the patient’s buttocks to avoid compression of the inferior vena cava prior to emptying the uterus.
7. Give a single dose of a broad-spectrum antibiotic such as co-amoxiclav.
Access
1. A Pfannenstiel incision is suitable, but if you are inexperienced you may find a vertical sub-umbilical midline incision easier. If you are right-handed, it is better to stand on the patient’s right so that you can use your right hand to deliver the fetal head.
2. After opening the peritoneal cavity, place a large Doyen retractor into the lower edge of the wound.
Action
1. Identify the loose fold of uterovesical peritoneum. Pick it up with dissecting forceps and incise it with scissors centrally. Extend the incision laterally almost to the broad ligament on each side.
2. Push the bladder downwards with a swab and replace the Doyen retractor over the bladder to retract it well away from the lower uterine segment.
3. Incise the lower segment transversely, beginning in the midline, 2 cm inferior to the original reflection of the uterovecical peritoneum. The lower segment may be very thin, especially if the patient has been in labour for a long time, so take care not to cut too deeply and injure the neonate. Use several shallow incisions, wiping the bleeding edge of the partially cut myometrium with a finger. Once the fetal membranes are seen, insert the index finger of each hand through the myometrial incision and extend it laterally by stretching until the incision is approximately 11 cm in length (Fig. 39.7).
4. Rupture the exposed membranes with scissors while your assistant aspirates liquor and blood with a sucker.
5. Insert all fingers of your right hand into the uterus inferior to the fetal head, remove the Doyen retractor, and displace the fetal head superiorly out of the pelvis.
6. Flex the fetal head on its neck, and deliver the head into the wound, whilst your assistant applies sustained firm fundal pressure (practically speaking, this involves leaning with some of the assistant’s weight on the patient’s abdomen). Once the head is delivered, displace the fetal head inferiorly, firmly but gently, to deliver the superior shoulder, and then displace the fetal head superiorly to deliver the posterior shoulder. Withdraw the baby from the uterus. Immediately after delivery of the baby, have the anaesthetist give an intravenous injection of synthetic oxytocin (Syntocinon) 10 units.
7. Lay the baby on the mother’s thighs and apply two clamps to the umbilical cord. Divide the cord between the clamps and hand the baby to the midwife.
8. Deliver the placenta by firmly massaging the uterine fundus and applying gentle cord traction, taking care to remove all fetal membranes.
9. Use large swabs to remove blood from the wound and again insert the Doyen retractor between the uterovesical peritoneum and uterus.
10. Grasp the lateral ends of the uterine incision with Green-Armytage clamps and also place two of these clamps on the upper and lower edges of the uterine incision where bleeding is greatest. This will control most of the bleeding.
Closure
1. Using an atraumatic 0 or 1-synthetic absorbable suture, include one lateral angle of the uterine incision in a stitch, ensuring that you have also taken the angle on the deep surface of the uterus. Close the incision with a continuous running suture. Insert a second continuous running suture to invaginate the first, so closing the uterus in two layers.
2. Apply a swab firmly over the uterine incision for 2 minutes. When it is removed there may be one or two small bleeding vessels, which need to be dealt with by individual figure-of-eight stitches.
3. Swab out any blood or liquor from the paracolic gutters on each side.
4. Ensure haemostasis of the inferior epigastric vessels running on and perforating the deep aspect of the rectus sheath.
Postoperative
1. Encourage breastfeeding as soon as possible after delivery. It aids contraction of the uterus, thereby decreasing bleeding, keeps the baby warm and helps ‘bonding’.
2. Maintain intravenous fluids for 12 hours, but start oral fluids and indeed normal diet as soon as tolerated – often within hours.
3. In most cases give prophylactic subcutaneous heparin from 6 hours postoperatively.
4. Aim to mobilize the patient within 24 hours.
5. Leave a urinary catheter in place until the patient is mobile.
6. The patient should be ready for discharge 2–4 days postoperatively.
Complications
1. Pyrexia may be due to urinary infection, breast abscess, wound infection or endometritis. Examine the patient thoroughly, and take appropriate microbiological samples before starting antibiotics.
2. Excessive bleeding after caesarean section should be initially assumed to be due to uterine atony. Use uterotonic therapy as in the ‘Difficulty’ box above.
3. Broad ligament haematoma is a rare but important problem. Suspect it if there is excessive pain, fall in haemoglobin and pyrexia, possibly with a mass in the iliac fossa. If bleeding is ongoing, it will require laparotomy and possibly hysterectomy and salpingooophorectomy on the affected side.
EMERGENCY SURGERY IN PREGNANCY


PLACENTAL ABRUPTION
1. Detachment of the placenta prior to delivery may result in fetal death and cause profound life-threatening maternal shock.
2. The presentation is of severe abdominal pain and bleeding (which may or may not be apparent vaginally). The uterus is very tender and classically woody-hard.
3. A lesser extent of abruption may cause diagnostic difficulty.
4. Unless labour occurs spontaneously, if near 37 weeks’ gestation induce with prostaglandins and amniotomy – artificial rupture of the fetal membranes.
5. Where shock is present at any gestation or impending fetal demise likely (abnormal fetal heart rate pattern) perform caesarean section immediately. Emptying the uterus will allow it to contract and cease maternal bleeding. This may also save the fetus.
Hudson, C.N., Setchell, M.E. Shaw’s Textbook of Operative Gynaecology, 6th ed. New Delhi: Elsevier; 2004.
Monaghan, J.M., Lopes, T., Naik, R. Bonney’s Gynaecological Surgery, 10th ed. Oxford: Blackwell Science; 2004.
Monson, J., Duthie, G., O’Malley. Surgical Emergencies. Oxford: Blackwell Science; 1999.
Rock J.A., Jones H.W., eds. Te Linde’s Operative Gynecology, 10th ed., Philadelphia: Lippincott Williams & Wilkins, 2008.
Setchell, M.E. Gynaecological surgery. In Kirk R.M., ed.: General Surgical Operations, 5th ed., London: Elsevier Science, 2006.
Sutton, C.J., Diamond, M.P. Endoscopic Surgery for Gynaecologists. Philadelphia: Saunders; 1998.