[level-membership-for-plastic-reconstructive-surgery-category]
CHAPTER 70 Gluteal augmentation
History
The norms of beauty for the gluteal region have changed over the centuries, and probably more during the past 10 to 15 years. The Rubenesque curves of the Renaissance are no longer acceptable to many women today. Contemporary women search for an athletic look with well-defined curves in the buttock area. Standards of beauty include a well-projected gluteus and a uniform line that on the lateral view makes a natural curve from the waist to the knee.1
The demand for gluteal augmentation has been growing since the 1960s, even though no surgical technique had been described at that time. The first way to augment the buttocks was with round silicone gel breast implants, but problems related to their use in the buttock region led to the development of implants designed specifically for gluteal augmentation.2 Surgical procedures were then developed to improve the aesthetic results. Gonzalez-Ulloa was one of the first surgeons to reconstruct the gluteal region, either by lifting “sagging” buttocks or placing a subcutaneous implant to augment them.3 With his technique, the aponeurotic expansions running from the gluteal aponeurosis to the dermis must be divided. Following that, the skin is loose and displacement of the implant results in poor aesthetic results. The second generation of implants included Dacron patches on the back. The goal was to affix the implant within the pocket. However, these patches were not sufficient to maintain implant position. Since that time, techniques for gluteal augmentation have progressed through three other anatomic planes: submuscular, intramuscular and subfascial (Fig. 70.1).
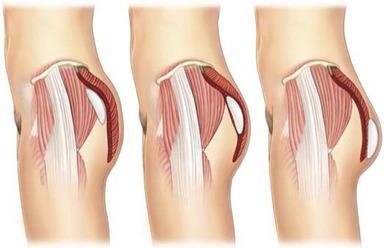
In 1984, Robles described the submuscular approach.4 This approach preserved the aponeurotic system that holds the gluteal skin in position. However, it introduced a new anatomical problem with the potential risk of injury to the sciatic nerve. The intramuscular plane was developed by disrupting the gluteal muscle fibers.5,6 The goal was to leave a 3–4 mm thickness of gluteus maximus muscles attached to the aponeurosis. In fact, it is very difficult to estimate the quantity of muscle on top because undermining was done blindly with no anatomic landmarks to guide the dissection. Moreover, the possibility of injuring the sciatic nerve was not totally eliminated and seroma incidence and complication rate are above 30%. To solve problems encountered with other techniques, we sought to identify a new anatomic plane that could hold gluteal implants securely with little morbidity. Extensive anatomic dissections were performed in which we studied the gluteal aponeurosis. Our subfascial technique is based on these anatomic studies.7–10
Physical evaluation
• Candidates: those who lack projection of the gluteal region and desire an improved shape of the gluteus.
• Ideal candidates: thin patients with an athletic build and little or no ptosis; they can obtain spectacular results.
• Overweight patients may also benefit from this technique, but often require a more extensive liposculpture in the same surgery.
• Know in advance the exact measurements of the subfascial space as well as the patient’s expectations to help to determine the implant size.
• The most appropriate size of the implant can be selected before surgery using templates.
• Lipodystrophy may be corrected with liposculpture of the neighboring areas.
• Aesthetics of this region include the waist–hip ratio that must be ± 1:1.6.
• Intergluteal sulcus must be in the middle third of the gluteus maximus muscle and about the same size of the lumbosacral–intergluteal sulcus distance.
Technical steps
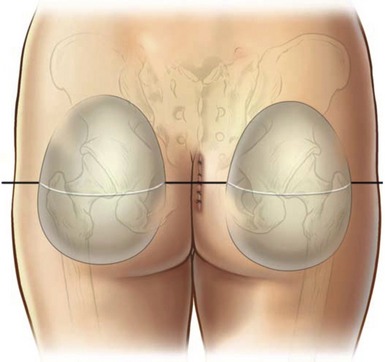
With the patient in the upright position, skin markings are made using a custom-designed template (Fig. 70.2). This template must fit perfectly into the gluteal region leaving 5 cm above the infragluteal sulcus and 2 cm lateral to the external rim of the sacral bone. The sacral triangle must be preserved; it is an important aesthetic landmark of this region. The implant should never be placed on top of the sacral bone. Laterally, the template will extend to the external border of the gluteal region, leaving at least 2 cm from the external line (continuation from the iliotibial line of the thigh) (Figs 70.3 and 70.4).
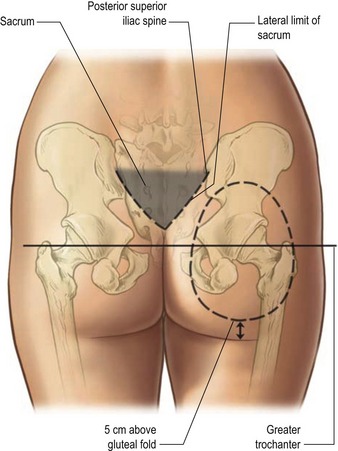
Fig. 70.3 Skin marking with the template. Markings must follow the anatomical shape of the gluteal region.

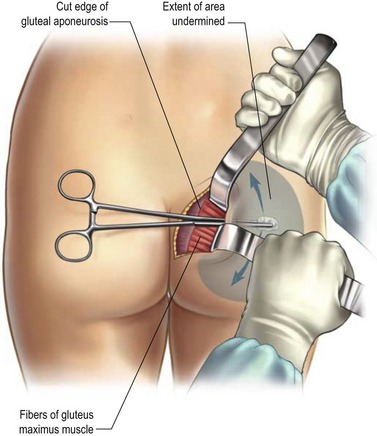
The marking of the incision is then done. Two paramedial incisions are drawn 1 cm lateral to the midline (intergluteal crease), which leaves the crease intact. These incisions start 4 cm above the anus, which corresponds to the level of the distal tip of the coccyx, and extend cephalically for 6–7 cm. The incision, which remains above the presacral fascia, includes skin and subcutaneous tissue (no undermining in performed over the sacral bone) and proceeds laterally until the lateral border of the sacral bone is reached. Then, an 8–10 cm incision is made parallel to the lateral edge of the sacrum in the gluteal aponeurosis and reaching the subfascial space. Care is taken to not cut any of the muscle fibers. Infiltration of Klein’s solution is done under the aponeurosis. This facilitates the identification of the avascular plan deep to the fascia, an area containing a network of septa emerging from the posterior aspect of the gluteal aponeurosis (Fig. 70.5). These aponeurotic expansions are not easily divided, but the tumescent infiltration permits sharp dissection of the septa in the subfascial plan. Accurate division of the expansions in this plan raises an intact fasciocutaneous flap in the area outlined by the template marking.
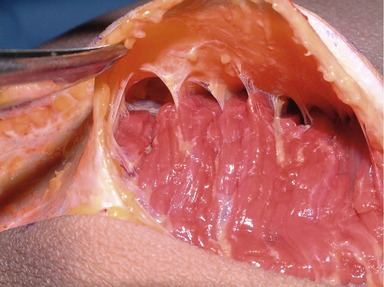
Sharp dissection, lighted retractors and long instruments are mandatory for safe retraction, cutting and coagulation to ensure that all aponeurotic expansions over the muscle are divided. Bleeding is minimal if undermining and coagulation are done carefully and simultaneously. Perforator vessels from the superior and inferior gluteal arteries are identified and ligated. To facilitate undermining, it is advisable to dissect from medial to lateral and from cephalic to caudal, while maintaining a wide field of exposure without going beyond the skin marking (Fig. 70.6).
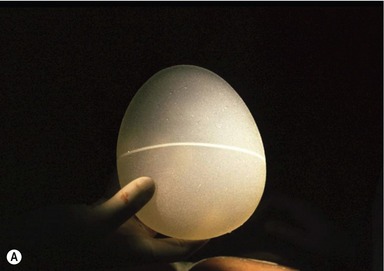
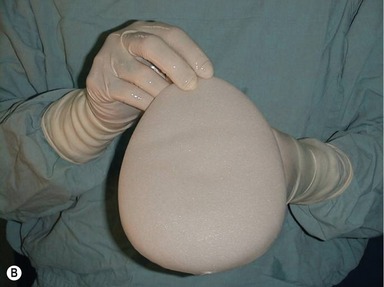
Once the pocket is completed, an implant sizer is used to confirm the size of the definitive implants and to determine if any further dissection is needed (Fig. 70.7). Even if these are not the definitive implants, they are handled with the same no-touch technique used for the definitive implants. They are soaked in a saline solution with antibiotic until the end of the surgery. It is better to develop both pockets before inserting the implants so the volume of the buttock plus an implant on one side does not interfere with the dissection of the contralateral pocket.

Once the final implants are selected, double-checking for hemostasis is done and closed suction drains are inserted to help maintain the adhesion of soft tissues to the implant. Then a definitive implant is inserted using the no-touch technique, making sure that the implant is perfectly aligned on its long axis. The implant must fit loosely in the pocket, and closure of the aponeurosis must be without any tension. Tissues are rearranged to comfortably drape over the implant. Anatomical implants designed for this operation must be used and are in three presentations with the same sizes and volumes (Fig. 70.8):
• High cohesive gel-filled implant texturized surface.
• High cohesive gel-filled implant polyurethane cover surface.
Finally, closure of the pocket begins by reinserting the aponeurosis without tension. An absorbable suture such as 2-0 Monocryl should be used. The closure is done by placing sutures without tying them in order to maintain control over the closure and being sure not to pinch the implant. The superficial and deep subcutaneous fascias are closed separately, with 4-0 Monocryl, on both sides of the presacral fascia. Finally, each skin incision is closed separately and the intergluteal crease is maintained in the midline (Fig. 70.9). Tissue glue is used to maintain the incision closed and dry. A watertight closure is critical at all levels to avoid infection.
Postoperative care
Immediately after surgery, a compressive garment is used and is kept for 1 month. The urinary catheter is left in place for the next 12 hours. Patients are taken to the recovery room in a supine position with a pillow above and below the buttocks. They start moving their legs and feet as soon as possible. They can lie in the lateral, supine or prone positions. Ambulation is started next morning. Once ambulatory, patients may stand, walk, lie in bed or be upright on their knees, but sitting is restricted to the bathroom only for the first 2 weeks. The constant vacuum drains are left in place for 7–10 days and are removed once the drainage is less then 30 mL per day. The wound does not need any special treatment, but at the subsequent follow-up visit, the patient may require additional Dermabond to maintain the watertight seal of the incision. After 2 weeks, the patient may return to normal activities, except for exercise and prolonged sitting. For the first 3 weeks, patients can only take showers. Exercise is permitted after 2 months, but patients are asked to refrain from activities that would apply pressure to the buttocks or stretch the incision, such as riding a bicycle or horse, which may lead to wound dehiscence. It is advisable to take good care of the scar for the next 3 months.
Complications
Pearls & pitfalls
Pearls
• Ideal candidates: thin patients with an athletic build and little or no ptosis; they can obtain spectacular results.
• Overweight patients may also benefit from this technique, but often require a more extensive liposculpture in the same surgery.
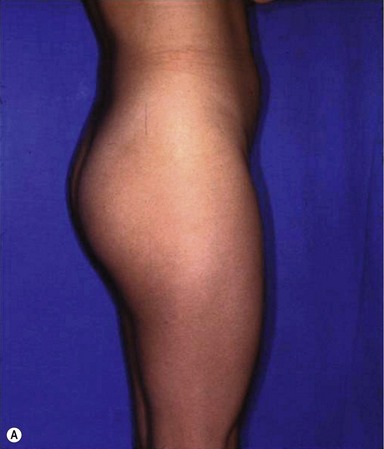
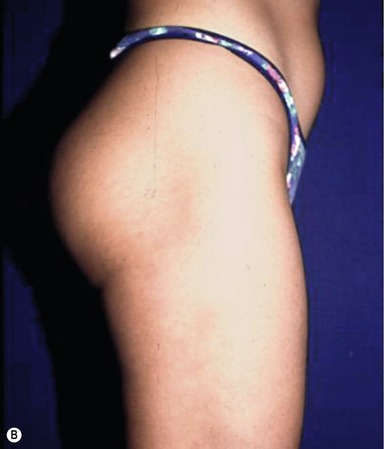
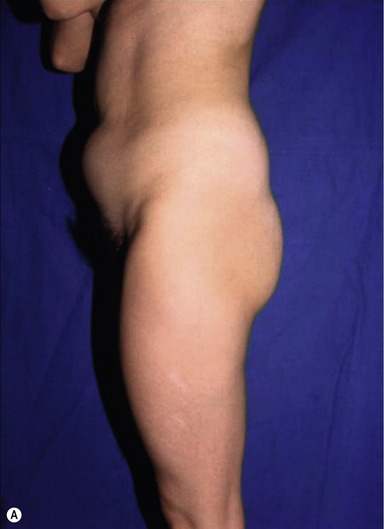
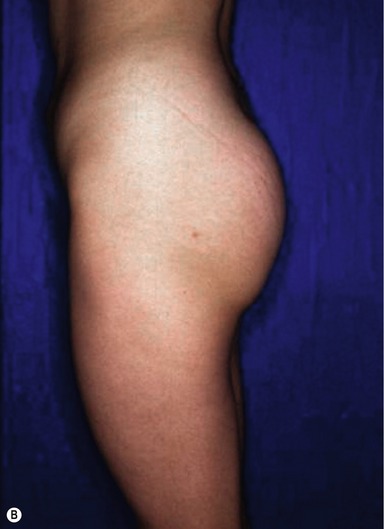
• This anatomic approach produces natural, reliable results, providing the best option for a truly cosmetic gluteal augmentation (Figs 70.10, 70.11 and 70.12).
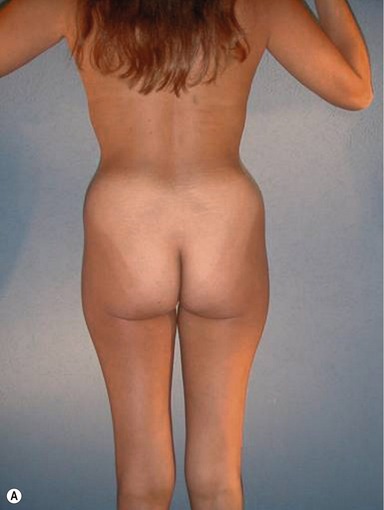
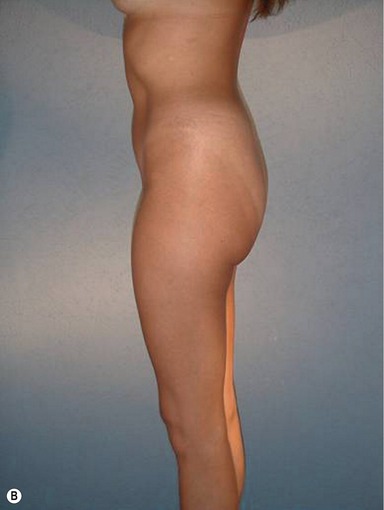
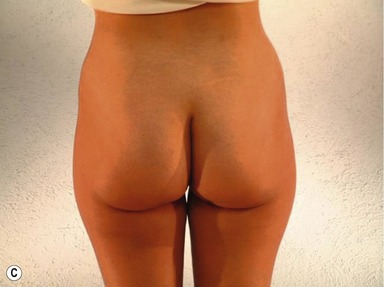
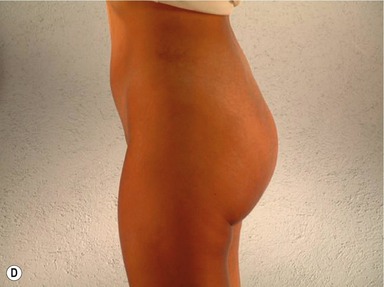
Fig. 70.10 A&B, Preoperative views of a 34-year-old woman. C&D, 1 year after liposculpture and subfascial gluteal augmentation with 385 mL Silimed high-cohesive gel-filled implants. de la Peña JA, Rubio OV, Cano JP, Cedillo MC, Garcés MT. Subfascial technique for gluteal augmentation. Aesthetic Surg J 2004; 24:265–273.
Pitfalls
• There are very few criticisms associated with this technique. Most important is marking exactly as described and staying inside the markings during the dissection of the pockets. If not, the implants will not be in the correct position and the result will be mitigated. Patient comfort is optimal with the use of cohesive-gel implants, but the use of these implants is not permitted in some countries.
Summary of steps
1. Make the correct candidate selection for gluteal augmentation.
2. Determine the patient’s expectations and evaluate the size of the proposed implant with templates.
3. Fourteen days before surgery, stop all medications that promote bleeding.
4. The day before the surgery, give an enema to the patient and begin antibiotics to avoid prevent infection.
5. Make the marking with the patient standing.
6. Place the patient in the prone position on the operating table.
7. Skin incisions are made lateral to the midline.
8. Subcutaneous undermining in the sacral area is minimal and the skin and tissue at the midline remain intact.
9. Subfascial undermining and flap elevation begins at the lateral border of the sacrum, where the subfascial space is entered.
10. Dissection is done from medial to lateral and from cephalic to caudal, taking care to stay within the markings.
11. An implant sizer is used to confirm the size of the definitive implants and to determine if any further dissection is needed.
12. Both pockets are developed before inserting the definitive implants.
13. The anatomical implants specially designed for gluteal augmentation in the subfascial space should fit loosely in the subfascial pocket.
14. A closed suction drain is placed in each implant pocket.
15. All closures must be watertight.
16. If liposculpture is done simultaneously, care must be taken to not join the liposuction space with the implant pocket.
17. The anatomical system for gluteal augmentation designed by the senior author includes:
1. De la Pena JA, Rubio OV, Cano JP, Cedillo MC, Garcés MT. History of gluteal augmentation. Clin Plastic Surg. 2006;33:307–319.
2. Bartels RJ, Ó’Malley JE, Douglas WM, et al. An unusual use of the Cronin breast prosthesis. Case report. Plast Reconstr Surg. 1969;44:500.
3. Gonzalez-Ulloa M. Gluteoplasty: A ten-year report. Aesthet Plast Surg. 1991;15:85–91.
4. Robles JM, Tagliapietra JC, Grandi MA. Gluteoplastia de augmento: implante submuscular. Cirplast Ibero Latinoam. 1984;10:365–369.
5. Vergara R, Marcos M. Intramuscular gluteal implants. Aesthet Plast Surg. 1996;20:259–262.
6. Mendieta CG. Gluteoplasty. Aesthet Surg J. 2003;23:441–455.
7. De la Pena JA, López HM, Gamboa LF. Augmentation gluteoplasty: anatomical and clinical considerations. Key Issues Plast Cosmetic Surg. 2000;17:1–12.
8. De la Pena JA. Subfascial technique for gluteal augmentation. Aesthet Surg J. 2004;24:265–273.
9. De la Pena JA, Rubio OV, Cano JP, Cedillo MC, Garcés MT. Subfascial gluteal augmentation. Clin Plastic Surg. 2006;33:405–422.
10. Nahai F. The art of aesthetic surgery: Principles of techniques. St Louis, MO: Quality Medical Publishing; 2005. pp. 2461–2481
[/level-membership-for-plastic-reconstructive-surgery-category][not-level-membership-for-plastic-reconstructive-surgery-category]
CHAPTER 70 Gluteal augmentation
History
The norms of beauty for the gluteal region have changed over the centuries, and probably more during the past 10 to 15 years. The Rubenesque curves of the Renaissance are no longer acceptable to many women today. Contemporary women search for an athletic look with well-defined curves in the buttock area. Standards of beauty include a well-projected gluteus and a uniform line that on the lateral view makes a natural curve from the waist to the knee.1
The demand for gluteal augmentation has been growing since the 1960s, even though no surgical technique had been described at that time. The first way to augment the buttocks was with round silicone gel breast implants, but problems related to their use in the buttock region led to the development of implants designed specifically for gluteal augmentation.2 Surgical procedures were then developed to improve the aesthetic results. Gonzalez-Ulloa was one of the first surgeons to reconstruct the gluteal region, either by lifting “sagging” buttocks or placing a subcutaneous implant to augment them.3 With his technique, the aponeurotic expansions running from the gluteal aponeurosis to the dermis must be divided. Following that, the skin is loose and displacement of the implant results in poor aesthetic results. The second generation of implants included Dacron patches on the back. The goal was to affix the implant within the pocket. However, these patches were not sufficient to maintain implant position. Since that time, techniques for gluteal augmentation have progressed through three other anatomic planes: submuscular, intramuscular and subfascial (Fig. 70.1).
In 1984, Robles described the submuscular approach.4 This approach preserved the aponeurotic system that holds the gluteal skin in position. However, it introduced a new anatomical problem with the potential risk of injury to the sciatic nerve. The intramuscular plane was developed by disrupting the gluteal muscle fibers.5,6 The goal was to leave a 3–4 mm thickness of gluteus maximus muscles attached to the aponeurosis. In fact, it is very difficult to estimate the quantity of muscle on top because undermining was done blindly with no anatomic landmarks to guide the dissection. Moreover, the possibility of injuring the sciatic nerve was not totally eliminated and seroma incidence and complication rate are above 30%. To solve problems encountered with other techniques, we sought to identify a new anatomic plane that could hold gluteal implants securely with little morbidity. Extensive anatomic dissections were performed in which we studied the gluteal aponeurosis. Our subfascial technique is based on these anatomic studies.7–10
Physical evaluation
• Candidates: those who lack projection of the gluteal region and desire an improved shape of the gluteus.
• Ideal candidates: thin patients with an athletic build and little or no ptosis; they can obtain spectacular results.
• Overweight patients may also benefit from this technique, but often require a more extensive liposculpture in the same surgery.
• Know in advance the exact measurements of the subfascial space as well as the patient’s expectations to help to determine the implant size.
• The most appropriate size of the implant can be selected before surgery using templates.
• Lipodystrophy may be corrected with liposculpture of the neighboring areas.
• Aesthetics of this region include the waist–hip ratio that must be ± 1:1.6.
• Intergluteal sulcus must be in the middle third of the gluteus maximus muscle and about the same size of the lumbosacral–intergluteal sulcus distance.
Technical steps
With the patient in the upright position, skin markings are made using a custom-designed template (Fig. 70.2). This template must fit perfectly into the gluteal region leaving 5 cm above the infragluteal sulcus and 2 cm lateral to the external rim of the sacral bone. The sacral triangle must be preserved; it is an important aesthetic landmark of this region. The implant should never be placed on top of the sacral bone. Laterally, the template will extend to the external border of the gluteal region, leaving at least 2 cm from the external line (continuation from the iliotibial line of the thigh) (Figs 70.3 and 70.4).
Fig. 70.3 Skin marking with the template. Markings must follow the anatomical shape of the gluteal region.
[/not-level-membership-for-plastic-reconstructive-surgery-category]
