[level-membership-for-orthopaedics-category]
CHAPTER 12 Fragment-Specific Fixation of Distal Radius Fractures
Of the various types of distal radius fractures, those with intra-articular extension have the most to gain from operative intervention. Many of these fractures are inherently unstable and not amenable to conservative methods of reduction and cast immobilization. Treatment that fails to correct residual incongruity of the joint and leaves a significant step-off or gap in the articular surface can result in chronic osteoarthritis and pain.1–4 Furthermore, unreduced fragments that alter the geometry and normal kinematics of the radiocarpal or distal radioulnar joint can cause painful movement, restricted motion, and joint instability. Ideally, treatment should be directed at stable restoration of normal anatomy of the articular surface.
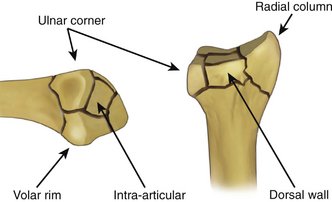
Although intra-articular fractures of the distal radius do not occur as a single, homogeneous pattern, the majority of these injuries contain a subset of five basic fracture elements: the radial column, ulnar corner, dorsal wall, volar rim, and free intra-articular fragments (Fig. 12-1). Occasionally, these fracture elements themselves may have further comminution. In addition to these cortical elements, these fractures may have other associated pathological processes, such as compressive damage to the metaphyseal bone, fractures of the distal ulna, and soft tissue injuries of the triangular fibrocartilaginous complex (TFCC), distal radioulnar joint (DRUJ), and radioulnar syndesmosis. In more complex fracture patterns, appropriate treatment of distal radius fractures often must be customized to the specific components and mechanism of the particular injury. Although recently there has been a rise in the popularity of fixed-angle volar plates for the treatment of distal radius fractures, this method of treatment can be inadequate for fractures with small distal fragments or injuries with complex, multiarticular patterns.5 Treatment starts with careful analysis of the injury and initial postreduction radiographs.6 When needed, computed tomography (CT) can supplement standard radiographs to help with the interpretation of the fracture pattern. These topics have been covered in previous chapters.
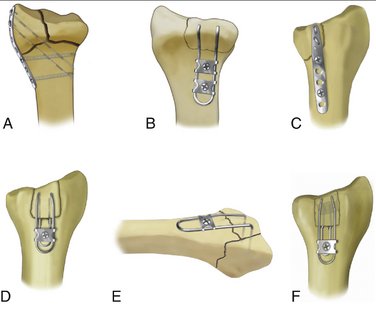
Fragment-specific fixation is a treatment approach in which each independent major fracture fragment is stabilized with an implant specifically designed for that particular fracture element (Fig. 12-2).7–10 One objective of fragment-specific fixation is to restore a stable, anatomical joint surface by direct and independent fixation of each major fracture fragment. As a general rule, fragment-specific fixation is a load-sharing construct in which each fracture element is pieced back together into a unified composite structure. Fragment-specific implants are intentionally designed to be extremely low profile and conform to the local surface topography at the site of application, avoiding the need for bulky plates that can irritate tendons or large distal screw holes that can cause further comminution of small distal fragments. Another goal of treatment is to achieve enough stability to allow motion immediately after surgery.
Fragment-Specific Implants
Although the primary function of the radial pin plate is to provide rigid fixation of the radial column, the radial pin plate has a secondary role that can also help with stabilization of many articular fractures. Although the plate is thin, because it is applied along the plane of the radial border, it is extremely stiff in resisting bending moments caused by flexion and extension movements of the wrist. Moreover, the radial pin plate is slightly overcontoured to the curve of the radial border and flattens like a leaf spring against the bone as it is secured to the proximal fragment. This causes the plate to push the distal fragment toward the ulna, locking intra-articular fragments in place and improving DRUJ stability by seating the ulnar head within the sigmoid notch of the radius. Because this property of the radial pin plate is quite effective in securing intra-articular fragments in whatever position they happen to be, it is generally a good idea to ensure that articular fragments are first fully reduced before securing the radial pin plate to the proximal fragment.
The volar buttress pin is an implant that is designed for unstable fragments that involve the volar rim. Fragmentation of the volar rim is usually the result of either a volar shear or axial loading mechanism. If the volar rim fragment is small, plate fixation can be inadequate; flexion or axial loading of the wrist can cause this fragment to displace over the edge of the plate, carrying the carpus with it into the palmar soft tissues. Alternatively, if the volar rim fragment is dorsiflexed with a depressed teardrop angle, plate fixation may further aggravate the angular deformity by pushing up on the volar surface of the fragment. The volar buttress pin is often a simple, effective solution for these complicated problems. Like the dorsal buttress pin, the legs of the volar buttress pin can be driven like a clip into the volar rim fragment and the implant then used as a joystick to manipulate and correct the position and angular deformity of the fragment. Once reduction is achieved, the wire form is simply fixed proximally with two screws and washers or a small wire plate.
Surgical Approaches
Radial Palmar Exposure
The surgical approach to apply a radial pin plate and volar buttress pin can be called “radial palmar” not only because of the implant locations but also because of the incision (Fig. 12-3). Typically, a 7-cm linear incision is made on the “radial palmar” aspect of the distal forearm, extending proximally from the level of the radial styloid.11 The incision is about halfway between the true midlateral line of the forearm and its palmar surface. Another way to situate the incision is to feel the radial artery pulse and make the incision a little radial to this landmark.
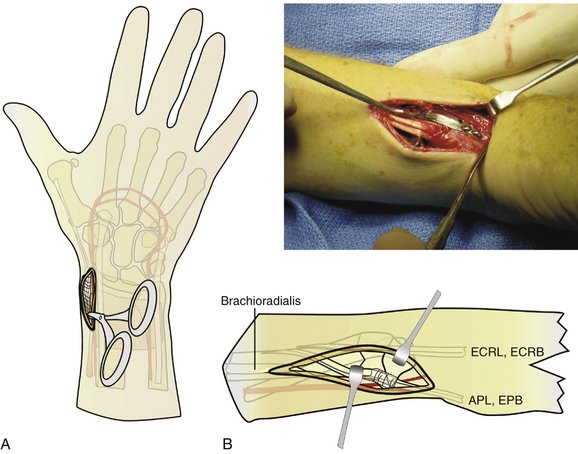
The brachioradialis should be released for two reasons. Its insertion obscures access to the radial column fracture site and it must be released completely to allow mobilization of this segment. Additionally, the brachioradialis produces a deforming force on the radial column fracture and release of this tendon insertion reduces the tendency for subsidence of the fracture. The brachioradialis insertion becomes the floor of the first extensor compartment, and at the margins of the radial styloid prominence it blends into the first extensor compartment tendon sheath.
Dorsal Exposure
Access to the dorsal aspect of the distal radius is required to address dorsal wall and ulnar corner fragments, as well as impacted free articular fragments. A dorsal exposure can also be used to aid in the reduction of particularly impacted radial styloid fragments or help elevate and use bone grafts in depressed articular segments. The dorsal incision is longitudinal and typically 5 cm long, located about 1 cm radial to the ulnar head and ending about 1 cm distal to the radiocarpal joint line (Fig. 12-4). Although there are fewer sensory nerves deep to this incision compared with the radial palmar region, care should be taken to pursue blunt dissection until the extensor retinaculum is encountered. There are usually a few large veins that can be either retracted or cauterized. The retinaculum overlying the fourth extensor compartment is next opened longitudinally, and the common digital extensor (and extensor indicis proprius and extensor digiti quinti) tendons can be retracted ulnarly to expose the dorsal metaphyseal area. The extensor pollicis longus should be mobilized by releasing the retinaculum proximally in a longitudinal fashion; often the retinaculum overlying Lister’s tubercle can be left in place and the extensor pollicis longus can be satisfactorily retracted radially. Occasionally, it can be helpful to fully release the extensor pollicis longus from Lister’s tubercle, thereby allowing it to be retracted farther radially. This is particularly helpful when the dorsal wall fragment extends radially and involves Lister’s tubercle as part of the fracture pattern.
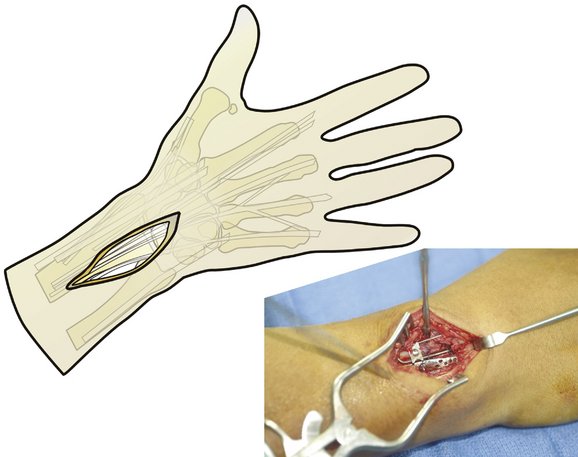
Exposure of the dorsal fracture fragments requires patience and attention to detail. Although this part of the surgery does not need to take more than 10 minutes, two critical issues must be addressed to allow placement of the appropriate hardware. First, the soft tissue around the dorsal fragments must be released enough to enable both good direct visualization as well as adequate mobility of the individual fragments so that they can be reduced. Use of a small elevator is helpful to pry apart any hematoma, incipient fracture callus, and periosteal attachments so that dorsal fracture pieces can be clearly identified. Sometimes it is even necessary to free up the retinacular extensions of the second compartment tendons (wrist extensors) as well as transpose the extensor pollicis longus radially so that the dorsal wall and region around Lister’s tubercle can be more easily treated.
Fracture Patterns
Extra-articular Fracture
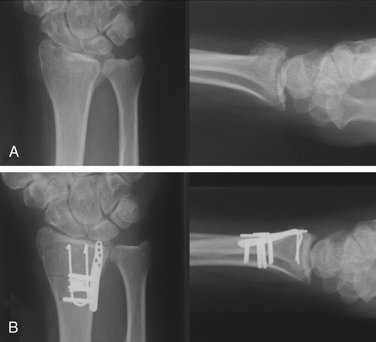
Internal fixation of the metaphyseal fracture segment can be accomplished through a single, radial palmar incision. A secure construct and anatomical reduction can be achieved by using a radial pin plate and a volar buttress pin (Fig. 12-5). The radial pin plate restores radial column length, and the volar buttress pin prevents dorsal or palmar translation. The volar buttress pin also has the effect of anatomically reducing the thick cortical margin on the palmar surface of the radius, which helps resist the tendency for proximal subsidence of the metaphyseal segment. It should also be noted that a key effect of the radial pin plate is application of a medially directed vector on the metaphyseal segment, which not only aids in restoration of radial length but just as importantly reduces the DRUJ and allows the cortical perimeter of the distal radius to be anatomically reduced, adding stability to the whole construct. This fracture can be visualized like the top of a rectangular box that has been sawed off and the box top then slides a little sideways and has one or two sides overhanging the base. Exact realignment of the box top allows all four sides of the top to contact the base edges and provides four sides of support.
The radial styloid and entire metaphyseal fracture piece (which are together just one piece) can be reduced with the aid of an elevator inserted into the fracture site. Once the metaphyseal part is reduced, a smooth 0.045-inch K-wire is drilled through the radial styloid tip and secured into the cortical bone of the radial shaft, proximal to the fracture site. Anchoring the wire into cortical bone is critical to creating a strong construct. A radial pin plate is then placed over the K-wire, with the tip of the plate situated at the tip of the radial styloid. Checking the plate’s position with intraoperative mini-fluoroscopy should confirm that the gentle curve of the radial pin plate matches the shape of the distal radius in the anteroposterior projection. Small adjustments may be necessary to situate the plate so that it exactly matches the contour of the radial styloid region. Bending the plate manually is usually not necessary and means that the plate is not seated correctly relative to the native curve of the radial styloid region. Additional proximal dissection of the brachioradialis is often required to allow the radial pin plate to sit on the cortical margin of the radial shaft in the midlateral line. Also, the placement of the radial styloid K-wire will determine where the plate sits at its distal tip. Having the wire situated too dorsally or too palmarly will cause the proximal end of the pin plate to ride off the radial shaft. The shape of the distal radius and, in particular, of the styloid region, can be misleading, because the styloid area looks quite prominent palmarly and there is a tendency to place the K-wire starting point too palmar. A good anteroposterior landmark is the first extensor tendon sheath. Placement of the K-wire exactly at the dorsal, outer margin of the tendon sheath’s dorsal slip will usually result in the radial pin plate being seated in the exact midlateral line of the distal radius. If the plate is situated correctly, the first compartment tendons will cross over the plate in its distal third, with the pin holes of the plate being dorsal to the tendons and the screw holes of the plate being palmar to them.
As an alternative, extra-articular fractures may also be effectively treated with a radial pin plate along the radial column and dorsal fixation with either an ulnar pin plate or dorsal buttress pin (Fig. 12-6). Like the previous technique, these combinations also create a 90/90-degree construct. Either a second dorsal incision can be used, or both implants can be placed through a single dorsal incision by elevating a radial skin flap and supinating the forearm to gain access to the radial column.
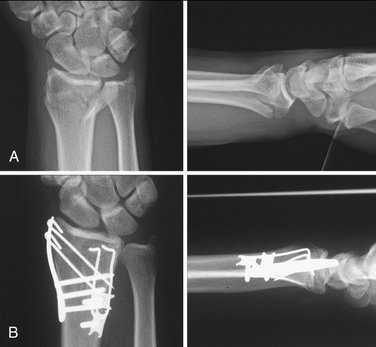
Dorsal Shear Fracture
The dorsal shear fracture, or posterior marginal fracture, is equivalent to a “dorsal Barton” fracture and requires stabilization from the dorsal side (Fig. 12-7). Through a dorsal approach, this fracture can be secured by using an ulnar pin plate, or if the fracture segments do not extend too far proximally, a variety of wire forms can be applied to reduce the fracture. It is critical to gain solid purchase in good bone proximally, so if the fracture segment is large a pin plate (or even two pin plates) may be a better choice.
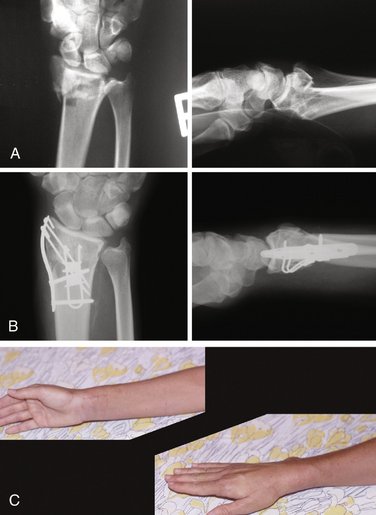
Three-Part Articular Fracture
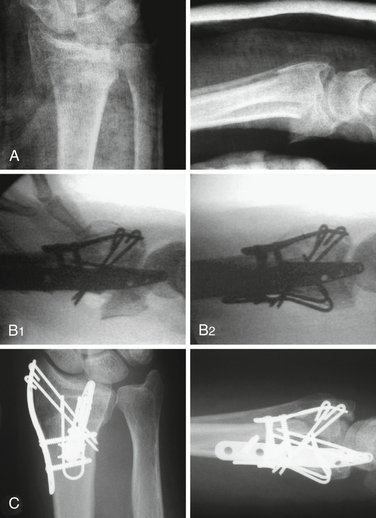
Three-part articular fractures are common low-energy injuries that are the result of a combination of dorsal bending and axial loading mechanisms. These fractures are characterized by a large radial column fragment and a smaller fragment at the ulnar corner of the dorsal radius. Although treatment with a fixed-angle volar plate is often effective, at times it is not adequate to reduce or stabilize the ulnar corner fragment. Fragment-specific fixation, on the other hand, provides a simple, direct approach that allows fixation of both radial column and dorsal fragments.12 In addition, the fragment-specific approach to this pattern often requires a much more limited surgical exposure with less soft tissue dissection and is particularly appropriate for younger patients with higher functional demands.
The combination of a radial pin plate with either an ulnar pin plate or dorsal buttress pin is the most common fragment-specific approach for the treatment of three-part articular fractures (Fig. 12-8). Typically, this is done through a two-incision approach, using the radial palmar incision for application of the radial pin plate and a limited dorsal incision for applying the buttress pin or ulnar pin plate. Alternatively, this pattern may be approached through a single dorsal incision by elevating a subcutaneous flap radially and supinating the forearm to gain access to the radial column.
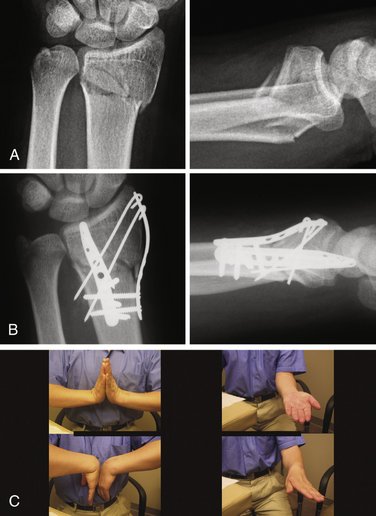
Complex Articular Fracture
Complex articular fractures are ideally suited for the fragment-specific approach (Figs. 12-9 and 12-10). The key to fractures with many pieces is that the reduction is achieved in little steps. Reduction and fixation of one part will have an influence on the ability to reduce another fragment, and, consequently, some “tweaking” of the reduction is required. The entire distal radius is like a puzzle that has several interlocking pieces, and sometimes it is necessary to alternate between different fracture pieces and “nudge” the reduction in different spots until the whole radius can be anatomically puzzled back together.
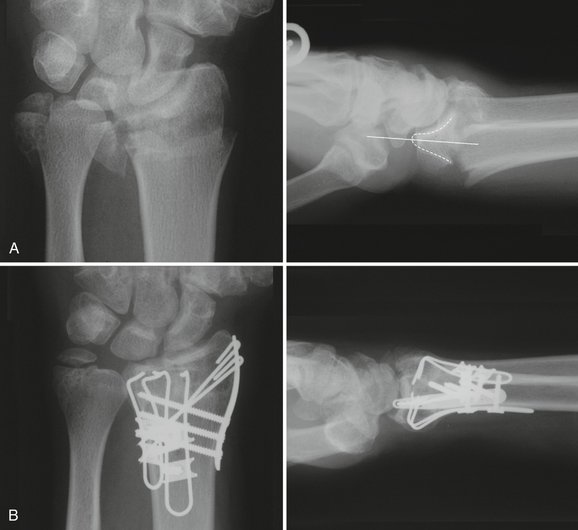
Fluoroscopy can be used to check hardware position and reduction of the ulnar corner. Particular attention should be paid to assessing the congruency of the DRUJ. Once the ulnar corner has been reduced, attention can be returned to the radial styloid region. The provisional K-wire previously placed can be removed and relocated so that it is exactly in the tip of the radial styloid. A radial pin plate (usually five-hole length) is then placed over the K-wire and seated along the midlateral aspect of the radial column. By securing the plate with two 2.3-mm screws, it will push the radial styloid not only distally (restoring length) but also ulnarly, which has the effect of closing down any articular surface gaps and additionally restoring the correct inclination angle to the distal radius.
The technique of fragment-specific fixation is characterized by some inherent “tinkering” with the fracture fragments and the hardware. The nature of multifragmented articular fractures is such that anatomical reduction of the entire distal radius requires puzzling little pieces back together, and sometimes a perfect reduction of one fragment will actually preclude another piece from being seated into place. Consequently, it may be necessary to make minor adjustments, alternating between individual pieces, so that the entire construct can be eventually reduced perfectly. It may be necessary, for example, to back out the radial styloid K-wire while reducing the ulnar corner if the K-wire blocks the ability of the ulnar corner fragment from being fully reduced. Similarly, if the ulnar pin plate is not holding the ulnar corner and/or the dorsal wall fragment fully out to length, the radial styloid fragment will not reduce properly when the radial column is addressed. Although the fracture-specific fixation method is characterized by a stepwise approach to the distal radius fracture, making numerous, alternating adjustments throughout the course of the surgery is essential to ultimately achieving an anatomical reduction of all the individual fracture fragments.
Implant Fixation: Technical Tips
Sometimes adjustments need to be made to the radial styloid reduction after a radial pin plate has already been secured to the shaft of the radius. These situations often relate to improving the radial column length a little bit more after other fracture segments have been reduced. Instead of removing the radial pin plate and starting over, a helpful trick can be to simply remove the distal K-wires from the pin holes, manually apply traction to restore length of the radial column, and re-drill new K-wires directly through pin holes. This method can also be used to make minor adjustments in the rotation or palmar tilt of the radial styloid.
Complications
Injury to normal structures is always a possibility in any operation, especially during surgical exposures that are in close proximity to nerves and arteries.13 It is important to carefully protect the radial artery and vein during the radial-palmar approach and be aware that the artery crosses obliquely over the distal portion of the incision. Although release of the arm tourniquet is rarely necessary before wound closure, if the artery or any of its small branches are particularly troublesome to mobilize, release of the tourniquet to check for bleeding may avoid a postoperative hematoma.
Clinical Outcome Data
There have been only a few published reports regarding the outcome of fragment-specific fixation to date. Use of fixed-angle plates as the sole implant to stabilize comminuted distal radius fractures has gained popularity, and good results have been reported.14 Use of a fixed-angle plate as the only approach to distal radius fractures is certainly attractive due to the simplicity of operative planning and ease of application. A prospective, controlled study directed comparing the surgical morbidity and clinical outcomes of comminuted intra-articular fractures treated with fixed-angle plates and a fragment-specific approach has not yet been published, and these types of studies would be needed to clearly advocate one method over another.
Some authors, however, have noted that the stability of highly comminuted distal radius fractures depends also on reduction and fixation of smaller fragments in addition to the major fracture segments.15 Additionally, biomechanical studies have demonstrated that pin plates, wire forms, and K-wires as used in a fragment-specific approach are more stable than K-wire–supplemented external fixation.16 Using cadaver models, Taylor and coworkers showed that fragment-specific constructs were comparable in strength to fixed-angle plates and that ulnar corner fractures of the distal radius were much better addressed via a fragment-specific approach.17 Grindel and coworkers showed that fragment-specific implants used with a fixed-angle plate provided a stronger construct than use of a fixed-angle plate alone.18 In addition to the biomechanical evidence supporting the stability of fragment-specific fixation, it should also be realized that comminuted distal radius fractures present with a wide variation in stability and fracture geometry and that a fragment-specific approach uniquely enables internal fixation to be tailored to the exact needs of the fracture.
Konrath and colleagues reported on 27 patients with a 2-year minimum follow-up treated by fragment-specific fixation.19 Pin plates and various wire forms were used in all patients. There was a high level of patient satisfaction, and only one fracture lost reduction; there were no tendon ruptures. Schnall reported on two groups of patients treated with fragment-specific fixation.20 Group 1 consisted of 20 patients with high-energy trauma, and group 2 consisted of 17 patients treated at another institution. Average time to return to work in group 1 was 6 weeks and all fractures united. In group 2, there was no significant loss of reduction and grip strength averaged 67% that of the contralateral limb.
A research group for one of the authors (L.S.B.) recently performed a retrospective evaluation of 81 patients, representing 85 intra-articular distal radius fractures, with a minimal follow-up of 1 year (mean follow-up, 32 months).21 All patients were treated with fragment-specific fixation and were evaluated at final follow-up with physical examination, repeat radiographs, and outcome scoring according to Gartland and Werley as well as a Disabilities of the Arm, Shoulder, and Hand (DASH) outcome survey. Patients were allowed to start motion in the immediate postoperative period and underwent supervised occupational therapy for at least the first month after surgery.
Within the first 6 weeks after operation, 62% of patients achieved a 100-degree arc of motion in the flexion/extension plane as well as normal forearm rotation. Comparison of radiographs between final follow-up and immediately after surgery demonstrated that fracture alignment was maintained and that no cases of post-traumatic arthritis had developed. The average DASH score was 9 and, using Gartland and Werley scoring, 61% of patients had excellent and 24% had good results. Grip strength of the operated side recovered to 92% of that of the uninjured side and the flexion/extension range of motion of the fractured wrist, when compared with the normal side, averaged 85% and 92%, respectively. Analysis of the fracture reductions obtained with the fragment-specific approach showed that palmar tilt was on average within 4 degrees of the normal side and that ulnar variance changed on average by 1.2 mm. Average changes for radial height and inclination angle were within 1 mm and 1 degree of the uninjured side, respectively. Articular congruity was unchanged. There were no infections or complications relating to nerve, artery, or tendon injuries. Several patients required a second operation to address symptomatic hardware; overall, the rate of hardware removal after the primary procedure was 6%. One patient required a second operation 9 months after the primary procedure to perform a distal ulna resection to address painful forearm rotation.
The clinical experience from the other author (R.J.M.) is quite similar. Over an 8-year period, 187 unstable distal radius fractures were treated with internal fixation; of these, 136 fractures had fragment-specific fixation. There were 24 A3 fractures (unstable bending injuries), 16 C1 fractures (three-part articular fractures), 4 shear fractures (AO type B2 and B3), and 92 comminuted articular fractures (AO type C2 and C3). In all but three patients, motion was started immediately after surgery. Resistive loading was not allowed until signs of radiographic healing was evident on follow-up radiographs. By 1 month, patients regained an average motion of over 80 degrees of flexion/extension arc, 60 degrees of supination, and 70 degrees of pronation. Finger motion returned rapidly. In addition, grip strength at 1 month averaged 50% of the uninvolved side, increasing to an average of 90% of the uninvolved side by final follow-up (Table 12-1).
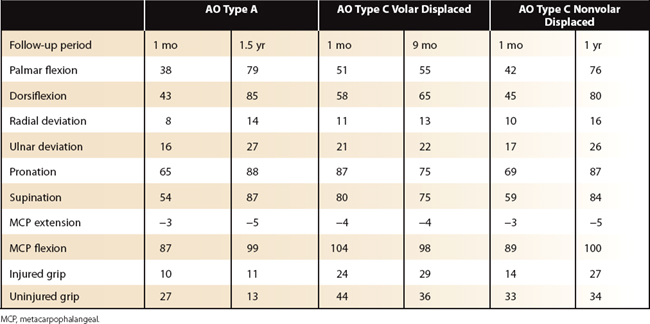
Radiographs on these patients showed near-anatomical restoration of the joint surface, with correction of radiographic parameters postoperatively that remained essentially unchanged until union (Table 12-2). All fractures united. Three fractures had failure of fixation, and two patients had a dorsal extensor tendon rupture, although the cause of one tendon rupture was from an untreated but displaced dorsal fragment. Final DASH scores were 8 ± 10 for AO type A fractures, 30 ± 21 for displaced AO type C fractures with volar displacement, and 13 ± 18 for displaced AO type C fractures with axial or dorsal displacement (with a range from 0 to 100 with 0 being the best DASH score possible). Patient-Rated Wrist Evaluation (PRWE) scores were 1 ± 2 for AO type A fractures and 2 ± 2 for AO type C fractures (with a range from 0 to 10 with 0 being the best PRWE score possible) (Table 12-3).

TABLE 12-3 Fragment-Specific Fixation: Clinical Outcome Scores
| Fracture Type | Avg DASH | Avg PRWE |
|---|---|---|
| AO type A (2 year) | 8 ± 10 | 1 ± 2 |
| AO type C volar displaced (6 months) | 30 ± 21 | 2 ± 2 |
| AO type C nonvolar displaced (1 year) | 13 ± 18 | 2 ± 2 |
DASH, Disabilities of the Arm, Shoulder, and Hand (DASH) outcome survey; PRWE, Patient-Rated Wrist Evaluation (PRWE) score.
Conclusion
Fragment-specific fixation is a highly flexible technique that can allow “minimal implant surgery” for simple bending fractures yet can provide all of the tools necessary for stable restoration of highly complex articular injuries. The technical difficulty of fragment-specific fixation is directly proportional to the complexity of the fracture pattern. Extra-articular fractures and simple three-part articular fractures can be typically treated with straightforward surgical techniques; highly comminuted articular injuries often require a piecemeal approach to sequentially interlock the various fracture components back together and consequently are more demanding. Although treatment of the more complex articular fractures often requires a higher level of surgical skill and expertise, these are often the very same fracture patterns in which fragment-specific fixation is the only reasonable option capable of reconstructing the articular surface.
1. Knirk J, Jupiter J. Intra-articular fractures of the distal end of the radius in young adults. J Bone Joint Surg Am. 1986;68:647-659.
2. Catalano L, Cole R, Evanoff R, et al. Displaced intra-articular fractures of the distal aspect of the radius: long-term results in young adults after open reduction and internal fixation. J Bone Joint Surg Am. 1997;79:1290-1302.
3. Missakian M, Cooney W, Amadio P, Glidewell H. Open reduction and internal fixation for distal radius fractures. J Hand Surg [Am]. 1992;17:745-755.
4. Trumble T, Schmitt S, Vedder N. Factors affecting functional outcome of displaced intra-articular distal radius fractures. J Hand Surg [Am]. 1994;19:325-340.
5. Medoff R. Plating of distal radius fractures. In: Trumble T, Budoff J, editors. Wrist and Elbow Reconstruction & Arthroscopy: A Master Skills Publication. Rosemont, IL: American Society for Surgery of the Hand, 2006.
6. Medoff R. Essential radiographic evaluation for distal radius fractures. Hand Clin. 2005;21:279-288.
7. Leslie B, Medoff R. Fracture specific fixation of distal radius fractures. Tech Orthop. 2000;15:336-352.
8. Medoff R. Fragment specific fixation of distal radius. In: Trumble T, Budoff J, editors. Wrist and Elbow Reconstruction & Arthroscopy: A Master Skills Publication. Rosemont, IL: American Society for Surgery of the Hand, 2006.
9. Bae D, Koris M. Fragment-specific internal fixation of distal radius fractures. Hand Clin. 2005;21:355-362.
10. Barrie K, Wolfe S. Internal fixation for intraarticular distal radius fractures. Tech Hand Up Extrem Surg. 2002;6:10-20.
11. Swigart C, Wolfe S. Limited incision open techniques for distal radius fracture management. Orthop Clin North Am. 2001;30:317-327.
12. Shumer E, Leslie B. Fragment-specific fixation of distal radius fractures using the Trimed device. Tech Hand Up Extrem Surg. 2005;9:74-83.
13. Cooney W, Dobyns J, Linscheid R. Complications of Colles’ fractures. J Bone Joint Surg Am. 1980;62:613-619.
14. Orbay J, Fernandez D. Volar fixed-angle plate fixation for unstable distal radius fractures in the elderly patient. J Hand Surg [Am]. 2004;29:96-102.
15. Harness N, Jupiter J, Orbay J, et al. Loss of fixation of the volar lunate facet fragment in fractures of the distal part of the radius. J Bone Joint Surg Am. 2004;86:1900-1908.
16. Dodds S, Cornelissen S, Jossan S, Wolfe S. A biomechanical comparison of fragment-specific fixation and augmented external fixation for intra-articular distal radius fractures. J Hand Surg [Am]. 2002;27:953-964.
17. Taylor K, Parks B, Segalman K. Biomechanical stability of a fixed-angle volar plate versus fragment-specific fixation system: cyclic testing in a C2-type distal radius cadaver fracture model. J Hand Surg [Am]. 2006;31:373-381.
18. Grindel S, Wang M, Gerlach M, et al. Biomechanical comparison of fixed-angle volar plate versus fixed-angle volar plate plus fragment-specific fixation in a cadaveric distal radius fracture model. J Hand Surg [Am]. 2007;32:194-199.
19. Konrath G, Bahler S. Open reduction and internal fixation of unstable distal radius fractures: results using the Trimed system. J Orthop Trauma. 2002;16:578-585.
20. Schnall S, Kim B, Abramo A, Kopylov P. Fixation of distal radius fractures using a fragment specific system. Clin Orthop Relat Res. 2006;445:51-57.
21. Benson L, Minihane K, Stern L, et al. The outcome of intra-articular distal radius fractures treated with fragment-specific fixation. J Hand Surg [Am]. 2006;31:1333-1339.
[/level-membership-for-orthopaedics-category][not-level-membership-for-orthopaedics-category]
CHAPTER 12 Fragment-Specific Fixation of Distal Radius Fractures
Of the various types of distal radius fractures, those with intra-articular extension have the most to gain from operative intervention. Many of these fractures are inherently unstable and not amenable to conservative methods of reduction and cast immobilization. Treatment that fails to correct residual incongruity of the joint and leaves a significant step-off or gap in the articular surface can result in chronic osteoarthritis and pain.1–4 Furthermore, unreduced fragments that alter the geometry and normal kinematics of the radiocarpal or distal radioulnar joint can cause painful movement, restricted motion, and joint instability. Ideally, treatment should be directed at stable restoration of normal anatomy of the articular surface.
Although intra-articular fractures of the distal radius do not occur as a single, homogeneous pattern, the majority of these injuries contain a subset of five basic fracture elements: the radial column, ulnar corner, dorsal wall, volar rim, and free intra-articular fragments (Fig. 12-1). Occasionally, these fracture elements themselves may have further comminution. In addition to these cortical elements, these fractures may have other associated pathological processes, such as compressive damage to the metaphyseal bone, fractures of the distal ulna, and soft tissue injuries of the triangular fibrocartilaginous complex (TFCC), distal radioulnar joint (DRUJ), and radioulnar syndesmosis. In more complex fracture patterns, appropriate treatment of distal radius fractures often must be customized to the specific components and mechanism of the particular injury. Although recently there has been a rise in the popularity of fixed-angle volar plates for the treatment of distal radius fractures, this method of treatment can be inadequate for fractures with small distal fragments or injuries with complex, multiarticular patterns.5 Treatment starts with careful analysis of the injury and initial postreduction radiographs.6 When needed, computed tomography (CT) can supplement standard radiographs to help with the interpretation of the fracture pattern. These topics have been covered in previous chapters.
Fragment-specific fixation is a treatment approach in which each independent major fracture fragment is stabilized with an implant specifically designed for that particular fracture element (Fig. 12-2).7–10 One objective of fragment-specific fixation is to restore a stable, anatomical joint surface by direct and independent fixation of each major fracture fragment. As a general rule, fragment-specific fixation is a load-sharing construct in which each fracture element is pieced back together into a unified composite structure. Fragment-specific implants are intentionally designed to be extremely low profile and conform to the local surface topography at the site of application, avoiding the need for bulky plates that can irritate tendons or large distal screw holes that can cause further comminution of small distal fragments. Another goal of treatment is to achieve enough stability to allow motion immediately after surgery.
Fragment-Specific Implants
Although the primary function of the radial pin plate is to provide rigid fixation of the radial column, the radial pin plate has a secondary role that can also help with stabilization of many articular fractures. Although the plate is thin, because it is applied along the plane of the radial border, it is extremely stiff in resisting bending moments caused by flexion and extension movements of the wrist. Moreover, the radial pin plate is slightly overcontoured to the curve of the radial border and flattens like a leaf spring against the bone as it is secured to the proximal fragment. This causes the plate to push the distal fragment toward the ulna, locking intra-articular fragments in place and improving DRUJ stability by seating the ulnar head within the sigmoid notch of the radius. Because this property of the radial pin plate is quite effective in securing intra-articular fragments in whatever position they happen to be, it is generally a good idea to ensure that articular fragments are first fully reduced before securing the radial pin plate to the proximal fragment.
The volar buttress pin is an implant that is designed for unstable fragments that involve the volar rim. Fragmentation of the volar rim is usually the result of either a volar shear or axial loading mechanism. If the volar rim fragment is small, plate fixation can be inadequate; flexion or axial loading of the wrist can cause this fragment to displace over the edge of the plate, carrying the carpus with it into the palmar soft tissues. Alternatively, if the volar rim fragment is dorsiflexed with a depressed teardrop angle, plate fixation may further aggravate the angular deformity by pushing up on the volar surface of the fragment. The volar buttress pin is often a simple, effective solution for these complicated problems. Like the dorsal buttress pin, the legs of the volar buttress pin can be driven like a clip into the volar rim fragment and the implant then used as a joystick to manipulate and correct the position and angular deformity of the fragment. Once reduction is achieved, the wire form is simply fixed proximally with two screws and washers or a small wire plate.
Surgical Approaches
Radial Palmar Exposure
The surgical approach to apply a radial pin plate and volar buttress pin can be called “radial palmar” not only because of the implant locations but also because of the incision (Fig. 12-3). Typically, a 7-cm linear incision is made on the “radial palmar” aspect of the distal forearm, extending proximally from the level of the radial styloid.11 The incision is about halfway between the true midlateral line of the forearm and its palmar surface. Another way to situate the incision is to feel the radial artery pulse and make the incision a little radial to this landmark.
The brachioradialis should be released for two reasons. Its insertion obscures access to the radial column fracture site and it must be released completely to allow mobilization of this segment. Additionally, the brachioradialis produces a deforming force on the radial column fracture and release of this tendon insertion reduces the tendency for subsidence of the fracture. The brachioradialis insertion becomes the floor of the first extensor compartment, and at the margins of the radial styloid prominence it blends into the first extensor compartment tendon sheath.
Dorsal Exposure
Access to the dorsal aspect of the distal radius is required to address dorsal wall and ulnar corner fragments, as well as impacted free articular fragments. A dorsal exposure can also be used to aid in the reduction of particularly impacted radial styloid fragments or help elevate and use bone grafts in depressed articular segments. The dorsal incision is longitudinal and typically 5 cm long, located about 1 cm radial to the ulnar head and ending about 1 cm distal to the radiocarpal joint line (Fig. 12-4). Although there are fewer sensory nerves deep to this incision compared with the radial palmar region, care should be taken to pursue blunt dissection until the extensor retinaculum is encountered. There are usually a few large veins that can be either retracted or cauterized. The retinaculum overlying the fourth extensor compartment is next opened longitudinally, and the common digital extensor (and extensor indicis proprius and extensor digiti quinti) tendons can be retracted ulnarly to expose the dorsal metaphyseal area. The extensor pollicis longus should be mobilized by releasing the retinaculum proximally in a longitudinal fashion; often the retinaculum overlying Lister’s tubercle can be left in place and the extensor pollicis longus can be satisfactorily retracted radially. Occasionally, it can be helpful to fully release the extensor pollicis longus from Lister’s tubercle, thereby allowing it to be retracted farther radially. This is particularly helpful when the dorsal wall fragment extends radially and involves Lister’s tubercle as part of the fracture pattern.
Exposure of the dorsal fracture fragments requires patience and attention to detail. Although this part of the surgery does not need to take more than 10 minutes, two critical issues must be addressed to allow placement of the appropriate hardware. First, the soft tissue around the dorsal fragments must be released enough to enable both good direct visualization as well as adequate mobility of the individual fragments so that they can be reduced. Use of a small elevator is helpful to pry apart any hematoma, incipient fracture callus, and periosteal attachments so that dorsal fracture pieces can be clearly identified. Sometimes it is even necessary to free up the retinacular extensions of the second compartment tendons (wrist extensors) as well as transpose the extensor pollicis longus radially so that the dorsal wall and region around Lister’s tubercle can be more easily treated.
Fracture Patterns
Extra-articular Fracture
Internal fixation of the metaphyseal fracture segment can be accomplished through a single, radial palmar incision. A secure construct and anatomical reduction can be achieved by using a radial pin plate and a volar buttress pin (Fig. 12-5). The radial pin plate restores radial column length, and the volar buttress pin prevents dorsal or palmar translation. The volar buttress pin also has the effect of anatomically reducing the thick cortical margin on the palmar surface of the radius, which helps resist the tendency for proximal subsidence of the metaphyseal segment. It should also be noted that a key effect of the radial pin plate is application of a medially directed vector on the metaphyseal segment, which not only aids in restoration of radial length but just as importantly reduces the DRUJ and allows the cortical perimeter of the distal radius to be anatomically reduced, adding stability to the whole construct. This fracture can be visualized like the top of a rectangular box that has been sawed off and the box top then slides a little sideways and has one or two sides overhanging the base. Exact realignment of the box top allows all four sides of the top to contact the base edges and provides four sides of support.
[/not-level-membership-for-orthopaedics-category]
