W4 Intramedullary Fixation of Distal Radius Fractures
Our understanding of distal radius fractures has continued to grow exponentially over the last 2 decades. Distal radius fractures are among the most common injuries affecting the musculoskeletal system, and investigators have developed many different methods of treating these fractures over the years. Treatment for these fractures have evolved as recognition of differing fracture types, fracture alignment, and morphology has improved.1 The long-standing treatment of cast immobilization has been used less frequently in recent years as patient demand, improved fracture reduction, and a quicker return to the activities of daily living have driven an increasing trend toward internal fixation. Improved biomaterials and implant technology have led to a veritable deluge of different implants designed to treat fractures of the distal radius. As the elderly population continues to increase in number owing to rapidly improving health care, the incidence of this common fracture will only continue to increase.
Standard treatment for distal radius fractures previously was cast immobilization. Closed reduction and percutaneous pinning came into vogue with the advent of the Kirschner wire. The external fixator began to take root as a viable treatment method as well.2 There were limits to the types of fractures that could be treated closed, however, leading to increasing recognition of the importance of restoring articular congruity and fracture alignment.3,4 This needed to be done in an open fashion, and open reduction and internal fixation became much more common. Various types of plate and screw constructs were used to treat fractures of the distal radius. Plates were applied internally to the distal radius because the idea of rigid fracture fixation with an internal implant was appealing to surgeons and patients.5
This trend has accelerated rapidly over the last decade, and at this point the most commonly used implant to treat fractures of the distal radius has become the volar plate.6 Other pioneers in the field of upper extremity surgery have championed the cause of column-specific fixation with smaller implants addressing specific load-bearing areas of the distal radius in an attempt to provide more rigid fixation with smaller implants.7 These methods all have been tremendously successful in treating fractures of the distal radius; however, problems still remain.8
There is a thin soft tissue envelope surrounding the distal radius, and the neurovascular structures are in very close proximity. Tendon and nerve complications are common with surgery of the distal radius despite advances in implant technology and lower profile implants.9,10 Locking screw technology has definitely improved fracture fixation and allowed for fewer complications because implants are lower profile; however, significant problems remain with tendon irritation and rupture, nerve problems, scar formation, stiffness, and the occasional need to remove implants.
The only type of implant that could potentially avoid these types of complications is an intramedullary one because the implant could be seated completely underneath the cortical surface and not cause impingement on neighboring soft tissue and neurovascular structures. In addition, these implants can be inserted in the most minimally invasive fashion.
As modern medicine has rapidly surged forward, a greater understanding of the basic science of fracture healing has resulted. It has become clear that preservation of the blood supply to fracture fragments can greatly aid in fracture healing and lead to better clinical results. If one could successfully reduce a fracture and maintain its alignment with a minimal amount of soft tissue trauma, while preserving the vascularity of fracture fragments, this would be optimal.
Intramedullary implants have become the standard of care for diaphyseal fractures of the tibia and the femur in patients who need operative fixation.11 These implants have been shown to have excellent results. The benefits of intramedullary fixation include less soft tissue trauma, preservation of the vascularity of fracture fragments, and an implant that acts as a load-sharing device, rather than a load-bearing one. Some prior investigators have examined the concept of intramedullary fixation for fractures of the distal radius, but no specific completely intramedullary implant for the distal radius had been developed.12–19
In an attempt to avoid many of the mentioned complications associated with the current surgical treatment of distal radius fractures, several investigators in conjunction with Wright Medical Technologies, Inc., have developed a novel intramedullary device (MICRONAIL) for fixation of distal radius fractures (Fig. W4-1). This implant uses fixed-angle locking screw technology in conjunction with an intramedullary construct to stabilize fractures of the distal radius rigidly, while preserving fracture fragment vascularity and minimizing soft tissue trauma.
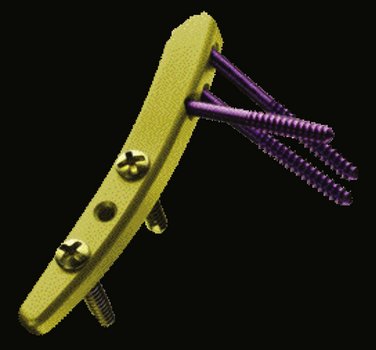
FIGURE W4-1 MICRONAIL distributed by Wright Medical Technologies, Inc. (Arlington, Tennessee) has purple distal fixed-angle locking screws and gold proximal bicortical screws.
Indications
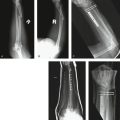
Intramedullary nail fixation is best indicated for extra-articular distal radius fractures that are unstable and cannot be maintained with closed reduction (Fig. W4-2). Simple intra-articular fractures of the distal radius also can be treated with this device, but the fracture should have a minimum number of stable articular fragments and should not have extensive articular comminution. Fractures also should not have excessive metaphyseal-diaphyseal comminution with proximal extension because the proximal fixation point for the device could be compromised resulting in a loss of reduction.
The device is an excellent choice for malunion surgery and is best indicated for extra-articular malunions of the distal radius. The device can provide an immediate rigid construct in malunion surgery and better disperse loading forces through the distal radius because it is a load-sharing device rather than a load-bearing one. This immediate rigid construct is of great benefit in malunion surgery because the cortical defect that results after surgical correction can take several months to reintegrate, and during this time plate and screw constructs are subjected to tremendous loads that can lead to implant failure. It is necessary to evaluate carefully the initial injury and postreduction films to determine the appropriate patients amenable to intramedullary fixation.
Preoperative Planning
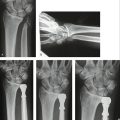
The preoperative radiographic evaluation follows a detailed history and physical examination and includes standard anteroposterior, lateral, and oblique radiographs of the injured wrist (Fig. W4-3). Careful assessment of the ipsilateral upper extremity, particularly the elbow and forearm, is necessary to rule out more complex injury patterns (e.g., Essex-Lopresti injuries). Further radiographs of the forearm and elbow can be acquired if deemed necessary from the physical examination and history. A thorough neurovascular examination is necessary, and a careful assessment of the associated soft tissue injury is of paramount importance.
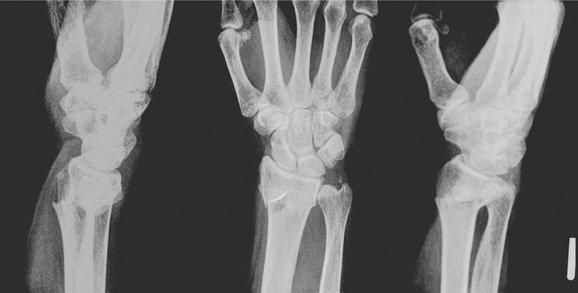
FIGURE W4-3 Initial injury films showing dorsal angulation, radial shortening, and loss of radial inclination.
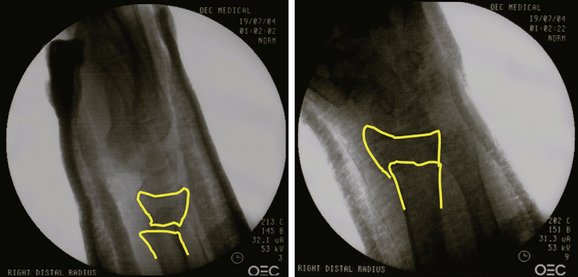
Contralateral radiographs of the opposite wrist are recommended to evaluate carefully each patient’s individualized anatomy of the distal radius and are useful in preoperative templating for implant selection. Postreduction radiographs if available also should be evaluated to assess fracture stability further (Fig. W4-4). Prior history of injury or malunion of the injured distal radius needs to be addressed preoperatively because significant alteration in the normal parameters of the distal radius may prevent implant insertion.
Necessary Equipment
The minimally invasive surgical technique for intramedullary nail fixation of distal radius fractures described subsequently requires the following specific equipment: (1) Wright Medical Intramedullary Implant System, (2) one 0.62-inch Kirschner wire (K-wire) and two 0.45-inch K-wires, (3) K-wire driver, (4) drill, (5) small rongeur, and (6) intraoperative fluoroscopy.
Surgical Technique
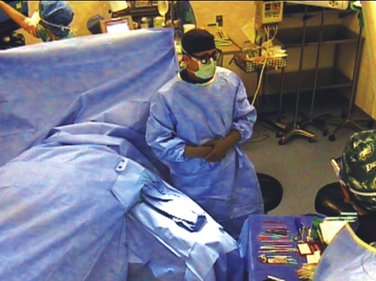
Operative Setup
The versatility of the intramedullary system is that nail fixation can be performed if necessary in a multiply-injured patient, in the supine, lateral decubitus, or prone position. If there is no contraindication, surgery is most easily performed with the patient in the supine position. A standard arm board is attached to the side of the operating room table and is used to support the operative extremity (Fig. W4-5). Alternatively, a hand table can be used, but the single arm board is more versatile because it can be moved out of the way during the procedure when the fluoroscopic unit is in use. A mini-C-arm fluoroscopy unit is preferred because of its decreased radiation exposure, but a standard fluoroscopy unit can be used as well.
Surgical Landmarks
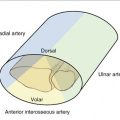
When the patient has been properly positioned, and the arm prepared and draped in the usual sterile fashion, several key surgical landmarks should be identified. The radiocarpal and radioulnar joints should be palpated and identified. The tip and dorsal and volar contours of the radial styloid also should be identified. If excessive soft tissue swelling makes this difficult, fluoroscopy can be used to determine these crucial landmarks, and these areas can be marked on the skin to aid in the proper placement of surgical incisions.
Surgical Approach
Before the sterilely draped injured extremity is properly positioned on the arm board, the arm board should be adequately covered with a sterile drape, allowing the surgeon to grasp the arm board and move it without the risk of contamination. The fluoroscopic unit is used to assess the fracture to confirm that it can be reduced easily or is able to be reduced with minimal percutaneous incisions. After it has been confirmed that the fracture can be reduced anatomically, the tip of the radial styloid is palpated and identified. A 2- to 3-cm longitudinal incision is made centered over the tip of the radial styloid and midline between the dorsal and volar contours of the styloid (Fig. W4-6). Surgical dissection proceeds carefully at this point, and any branches of the radial sensory nerve that are in the field are identified and carefully retracted. No skeletonization of these nerve branches should be done, and they should be retracted with their neighboring fat and vessels to avoid any radial sensory nerve problems postoperatively.
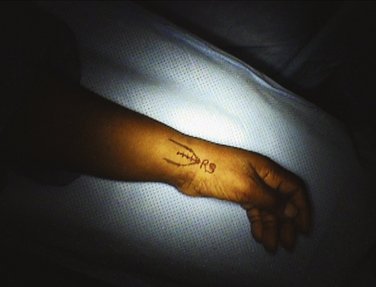
FIGURE W4-6 Lateral view of injured extremity showing contours of radial styloid (RS) and proposed surgical incision.
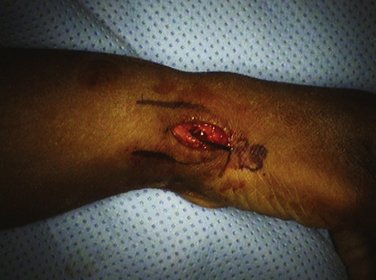
After the edges of the first and second dorsal extensor tendon compartments are identified, the periosteum between them is incised in line with the skin incision, and the cortical surface of the radial styloid is exposed just enough for the entrance hole for the intramedullary nail. The periosteum should be preserved if possible so that it can be closed over the entrance hole later to prevent any adherence of the tendons or nerve branches to the nail underneath, which should be recessed below the cortical surface of the styloid.
Preliminary Reduction
It is of benefit to the surgeon to have an anatomical reduction of the fracture, which is held with K-wire fixation before nail insertion for several reasons. First, when the external jig is in place, it can be difficult to visualize the joint line and alignment of the fracture because the jig and the nail are radiopaque. Second, the nail may have a degree of intramedullary fill, which, although it helps the stability of the fracture reduction, it can prevent any fine-tuning of the reduction when the implant is in place, particularly in terms of dorsal or volar translation or restoration of volar tilt. It is recommended that the fracture be anatomically reduced and held before nail insertion.
The reduction generally can be easily done, and fluoroscopy should be used to verify the anatomical reduction. When the fracture is reduced, the distal fragment is preliminarily pinned with a 0.62-inch K-wire inserted through the radial styloid with fixation in the shaft proximally. This K-wire should be inserted if possible in the volar portion of the styloid so that it does not interfere with insertion of the nail, but provides stable fixation of the distal fragment and helps to protect and retract the tendons of the first dorsal extensor compartment and sensory branches of the radial sensory nerve (Fig. W4-7). This can be a difficult K-wire to insert, but is well worth the effort because it makes the rest of the procedure much easier.
A second percutaneous 0.45-inch K-wire is inserted dorsally typically between the fourth and fifth dorsal extensor compartments. A small 1-mm stab incision can be made here to ensure that the correct interval has been entered, and that the K-wire does not entangle tendons or sensory nerve branches. Typically, a guide can be slid down over the K-wire when it is in the proper 4-5 interval before insertion to prevent any soft tissues from wrapping around the wire. This K-wire should capture the dorsal ulnar corner of the distal fragment and in conjunction with the 0.62-inch K-wire through the radial styloid provide rigid 90/90 fixation of the distal fragment (Fig. W4-8).
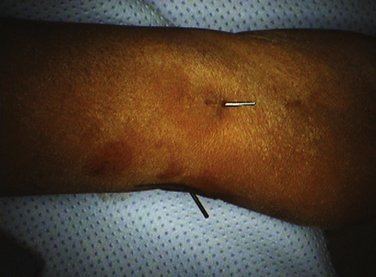
FIGURE W4-8 Preliminary reduction maintained with dorsal ulnar and radial styloid Kirschner wires providing rigid 90/90 fixation.
It is recommended to achieve this anatomical rigid 90/90 fixation before nail insertion because although insertion of the nail should be a gentle process, it can disrupt the preliminary reduction if inadequate K-wire fixation is achieved. The rigid 90/90 fixation provided by the two K-wires best resists any displacement forces created through the nail insertion process (Fig. W4-9).
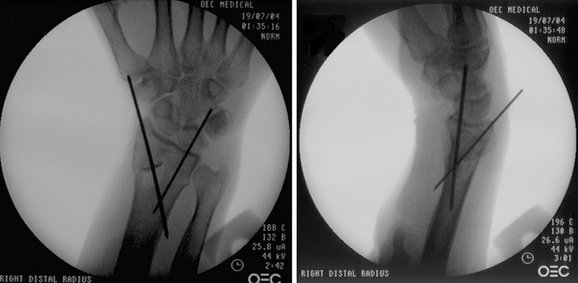
FIGURE W4-9 Fluoroscopic images show typical Kirschner wire positions to maintain preliminary reduction. Note volar position of 0.62-inch Kirschner wire in the lateral view, and note the dorsal ulnar position of the 0.45-inch Kirschner wire in the posteroanterior view.
If the reduction of the fracture cannot be achieved by closed means, one can use the anticipated small dorsal incision for the proximal locking screws as a window to help with the reduction without making any additional incisions. The nail can be placed on the dorsal surface of the skin in its expected intramedullary position with the wrist in a posteroanterior position on the fluoroscopic unit. Fluoroscopy reveals the anticipated incision site for the proximal locking screws. A Freer elevator can be inserted through this incision to help reduce difficult fractures, particularly in the region of the sigmoid notch, and simple articular fractures. When reduction has been achieved, the K-wires should be inserted as previously described.
Nail Insertion
At this point, the tip of the radial styloid is identified, and a cortical window is made in the styloid approximately 5 mm proximal to the tip of the styloid. This cortical window must be made proximal enough in the styloid to prevent violation of the articular surface of the scaphoid facet with successive broaching, but not too proximal to prevent adequate subchondral support with the distal locking screws. An awl or the 6.1 cannulated drill bit can be used to make this entrance hole in the styloid (Fig. W4-10). Fluoroscopy should be used at this critical step to ensure the proper entrance hole for insertion of the intramedullary implant.
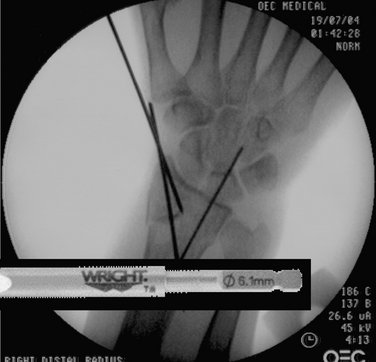
FIGURE W4-10 Guidewire placed in tip of styloid for cannulated drill insertion to create entrance hole for implant.
After the cortical window has been made, a small rongeur can be used to expand the window typically in the proximal direction longitudinally in line with the radius for about 5 mm to allow atraumatic broach insertion. A small canal finder is inserted gently into the intramedullary canal (Fig. W4-11). It is crucial that the canal finder should stay along the radial cortex during insertion to prevent penetration of the ulnar cortex of the radial shaft. Using fluoroscopy to ensure proper entry, a small broach is inserted across the fracture site and advanced proximally across the metaphyseal-diaphyseal junction (Fig. W4-12). Increasingly larger broaches are inserted sequentially until the broach is large enough within the canal to resist spinning when rotational torque is applied and to provide reasonable intramedullary fill. Preoperative templating using the contralateral wrist radiographs also should provide the surgeon with valuable information as to which size implant is the likely size that would be used.
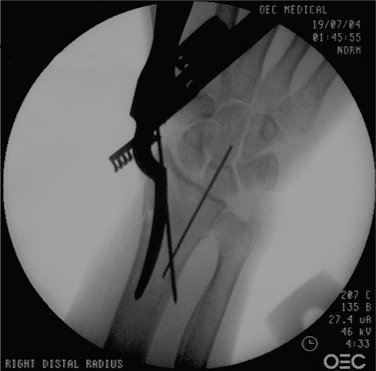
FIGURE W4-11 Canal finder insertion. Note the canal finder hugs the radial cortex to prevent ulnar cortical perforation.

After the last broach has been removed, the implant is mounted on the external jig and gently inserted following the path of the prior broach (Fig. W4-13). The nail should be carefully inserted toward the sigmoid notch far enough medially into the radius so that no part of the nail is protruding above the radial cortex (Fig. W4-14). This prevents any contact between the nail and the undersurface of the tendons of either the first or the second compartment. In addition, the nail is inserted gently proximally enough so that the distalmost locking screw is just underneath the subchondral bone supporting the radiocarpal articular surface. A K-wire or a drill bit can be inserted through the distalmost drill guide and checked under fluoroscopy to ensure that the distalmost locking screw is in the desired subchondral position (Fig. W4-15).
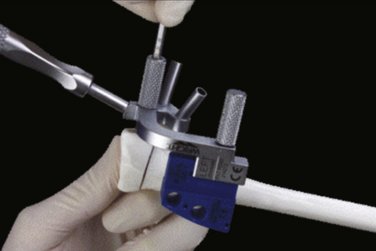
FIGURE W4-13 Close-up view of external jig showing screw alignment guides for proximal and distal screw insertion in sawbones model.
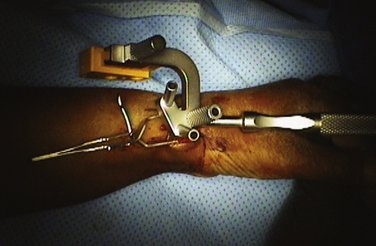
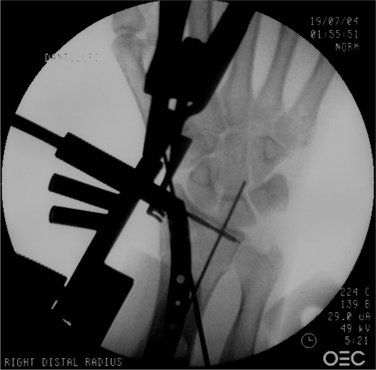
FIGURE W4-15 Drilling of distal locking screws with care to avoid penetration of radiocarpal and radioulnar joints.
At this point, the distal locking screw holes are drilled and measured, and three distal locking screws are inserted into the nail with the distalmost screw inserted first (Fig. W4-16). Fluoroscopy also should be used when measuring the length of the screws to ensure that they do not penetrate the sigmoid notch and enter the distal radioulnar joint (Fig. W4-17). The sigmoid notch has a concavity for the distal ulna so that a screw may appear to be safely out of the distal radial ulnar joint on the fluoroscopic view, but still may actually be penetrating this joint. It is best to have these screws err on the side of being 2 mm short and be sure to check for crepitus. When all of the distal locking screws have firmly locked into the nail, the fracture reduction should be carefully assessed (Fig. W4-18). If there has been a slight loss of reduction of the fracture because of nail insertion, an attempt can now be made gently to reduce the fracture anatomically before proximal screw insertion.
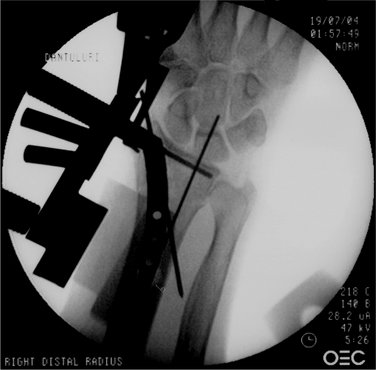
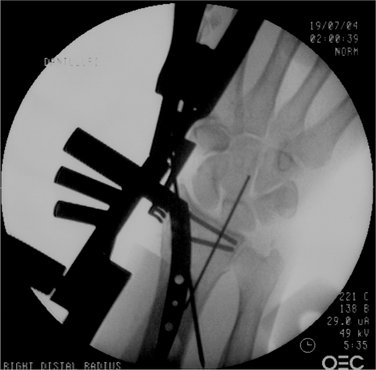
FIGURE W4-17 Insertion of remaining distal locking screws, keeping them short of the sigmoid notch to avoid penetration.
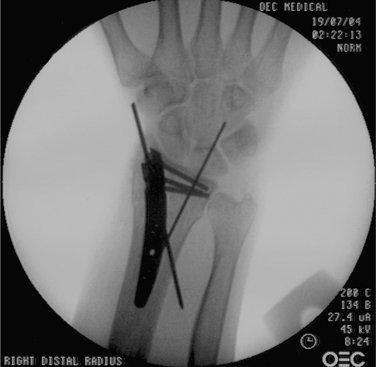
FIGURE W4-18 Fluoroscopic image after completed distal locking screw insertion shows ideal distal locking screw positions.
At this stage, a 0.45-inch K-wire is inserted through the dorsal cortex and the nail to hold the implant rigidly in place and prevent subtle displacement of the implant within the canal or loss of reduction. The proximal screws can be inserted through two small 1-cm incisions or one single 2-cm dorsal incision. The appropriate drill guide and sleeves are used to drill and insert the proximal screws (Fig. W4-19). These screws achieve bicortical purchase and lock the implant in place. It is important to prevent any soft tissue such as extensor tendons from being trapped under the screw heads. Also, it is critical not to compromise purchase of the proximal locking screws by overtightening because there are only two proximal locking screws, and they are crucial in maintaining implant position and proximal fixation, especially if there is not good intramedullary fill of the implant. A good technique to avoid stripping these screws is retracting the drill guides for the last few turns so that this can be done under direct visualization so that it is clear when the screw heads are down tight on the dorsal cortex of the radius.
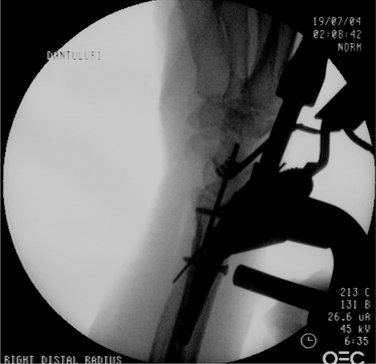
FIGURE W4-19 Proximal locking insertion showing how drill guide can be withdrawn for the final few turns to allow direct visualization and avoid stripping of the screws.
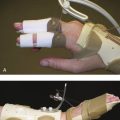
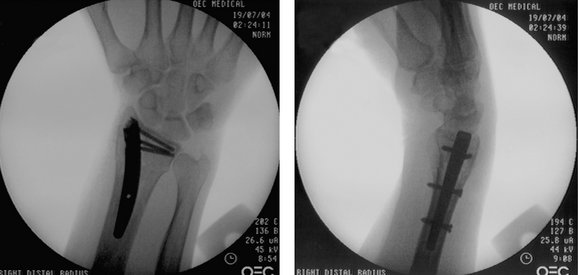
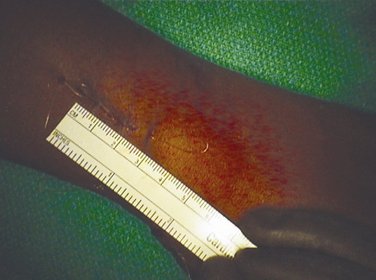
Final fluoroscopic images are used to verify that the reduction of the fracture has been accomplished, and that the implant and all screws are in appropriate positions (Fig. W4-20). The periosteum is closed over the cortical window in the radial styloid if possible to prevent any contact of the nail with the surrounding soft tissues. The deeper subcutaneous tissues are closed with a minimum of 2.0 polyglactin 910 (Vicryl) suture, and the skin is closed with 3.0 poliglecaprone 25 (Monocryl) subcuticular suture (Fig. W4-21). Benzoin and Steri-strips are applied, and patients are placed into a temporary short arm splint for comfort.
Postoperative Care
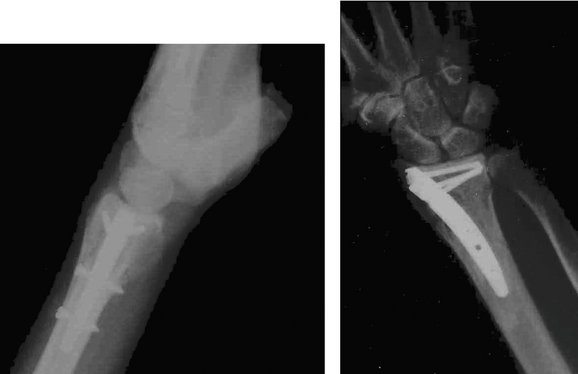
Patients are instructed to begin immediate postoperative finger, elbow, and shoulder range of motion to avoid stiffness and reduce swelling. Patients are typically seen for their first postoperative visit at 1 week to 10 days. At that visit, they are given a removable orthoplast short-arm splint for comfort only. At this point, unrestricted active range of motion is allowed for the wrist as well, and patients are placed in occupational therapy to monitor and aid in their rehabilitation. Patients are followed with serial radiographs to evaluate bony union, which typically occurs at around 6 weeks postoperatively (Fig. W4-22).
Follow-up Results and Complications
It has been shown at least in short-term follow-up that distal radius fractures can be treated successfully with intramedullary fixation. Tan and colleagues20 presented a prospective study of 23 consecutive fractures treated with intramedullary fixation using the MICRONAIL. This study showed that outcomes were excellent at 6-month follow-up in terms of maintenance of alignment of the distal radius, range of motion, and improvement of grip strength. Outcome measurements using standardized outcome tools (Disabilities of the Arm, Shoulder, and Hand [DASH]) also showed excellent results. Complications were few and consisted of three transient radial sensory nerve injuries; three patients had loss of fracture reduction, but these patients all had more complex intra-articular fracture types. As with any surgical implant, improperly measured screws can lead to soft tissue complications or loss of reduction. Screws not placed just underneath the articular surface of the distal radius can result in possible fracture subsidence and loss of alignment. Penetration of either the radiocarpal or the radioulnar joints with screws can lead to irreversible articular damage.
Currently, a prospective randomized multicenter trial is in progress comparing several forms of operative fixation of distal radius fractures including intramedullary fixation. It is clear in early follow-up that intramedullary fixation of distal radius fractures is not only possible, but also can lead to excellent results in properly selected patients.21
Conclusion
Despite the success of open reduction and internal fixation of distal radius fractures, problems persist, including loss of reduction, hardware failure, tendon and nerve injuries, and infection. Significant scarring of tendons and neurovascular structures can occur with extensive surgical dissection leading to limitation of function. The thin soft tissue envelope surrounding the distal radius and the close proximity of tendons, nerves, and vascular structures to the distal radius may contribute to the development of some of these complications. Intramedullary fixation of the distal radius has been developed as a new treatment option for fractures of the distal radius in an attempt to minimize these potential complications. Careful surgical technique and proper patient selection can lead to successful outcomes in patients with distal radius fractures treated with intramedullary nail fixation.21
1. Simic P, Weiland A. Fractures of the distal aspect of the radius: changes in treatment over the past two decades. J Bone Joint Surg Am. 2003;85:552-564.
2. McQueen MM. Redisplaced unstable fractures of the distal radius: a randomized prospective study of bridging versus non-bridging external fixation. J Bone Joint Surg Br. 1998;80:665-669.
3. Knirk JL, Jupiter JB. Intraarticular fractures of the distal end of the radius in young adults. J Bone Joint Surg. 1986;68:647-659.
4. Lafontaine M, Hardy D, Delince P. Stability assessment in distal radius fractures. Injury. 1989;20:208-210.
5. Ruch DS, Papadonikolakis A. Volar versus dorsal plating in the management of intraarticular distal radius fractures. J Hand Surg [Am]. 2006;31:9-16.
6. Orbay JL, Fernandez DL. Volar fixed-angle plate fixation for unstable distal radius fractures in the elderly patient. J Hand Surg. 2004;29:96-102.
7. Ring D, Prommersberger K, Jupiter JB. Combined dorsal and volar plate fixation of complex fractures of the distal part of the radius. J Bone Joint Surg Am. 2004;86:1646-1652.
8. Jakob M, Rikli DA, Regazzoni P. Fracture of the distal radius treated by internal fixation and early function: a prospective study of 73 consecutive patients. J Bone Joint Surg. 2000;82:340-344.
9. Rozental TD, Beredjiklian PK, Bozentka DJ. Functional outcome and complications following two types of dorsal plating for unstable fractures of the distal part of the radius. J Bone Joint Surg Am. 2003;85:1956-1960.
10. Rozental TD, Blazar PE. Functional outcome and complications after volar plating for dorsally displaced, unstable fractures of the distal radius. J Hand Surg [Am]. 2006;31:359-365.
11. Tarr RR, Wiss DA. The mechanics and biology of intramedullary fracture fixation. Clin Orthop. 1986;212:10-17.
12. Pritchett JW. External fixation or closed medullary pinning for unstable Colles’ fractures? J Bone Joint Surg. 1995;77:267-269.
13. Saeki Y, Hashizume H, Nagoshi M, et al. Mechanical strength of intramedullary pinning and transfragmental Kirschner wire fixation for Colles’ fractures. J Hand Surg [Br]. 2001;26:550-555.
14. Sato O, Aoki M, Kawaguchi S, et al. Antegrade intramedullary K-wire fixation for distal radius fractures. J Hand Surg. 2002;27:707-713.
15. Street DM. Intramedullary forearm nailing. Clin Orthop. 1986;212:219-230.
16. Van der Reis WL, Otsuka NY, Moroz P, et al. Intramedullary nailing versus plate fixation for unstable forearm fractures in children. J Pediatr Orthop. 1998;18:9-13.
17. Gao H, Luo CF, Zhang CO, et al. Internal fixation of diaphyseal fractures of the forearm by interlocking intramedullary nail: short term result in eighteen patients. J Orthop Trauma. 2005;19:384-391.
18. Sasaki S. Modified Desmanet’s intramedullary pinning for fractures of the distal radius. J Orthop Sci. 2002;7:172-181.
19. Bennett GL, Leeson MC, Smith BS. Intramedullary fixation of unstable distal radius fractures: a method of fixation allowing early motion. Orthop Rev. 1989;18:210-216.
20. Tan V, Capo JT, Warburton M. Distal radius fracture fixation with an intramedullary nail. Tech Hand Upper Extrem Surg. 2005;9:195-201.
21. Brooks KR, Capo JT, Warburton M, et al. Internal fixation of distal radius fractures with novel intramedullary implants. Clin Orthop. 2006;445:42-50.