[level-membership-for-anesthesiology-category]
41 Epidural Block
Perspective
Epidural anesthesia is the second primary method of neuraxial block. In contrast to spinal anesthesia, epidural block requires pharmacologic doses of local anesthetics, making systemic toxicity a concern. In skilled hands, the incidence of post–dural puncture headache should be lower with epidural anesthesia than with spinal anesthesia. Nevertheless, as outlined in Chapter 40, Spinal Block, I do not believe this should be the major differentiating point between the two techniques. Spinal anesthesia is typically a single-shot technique, whereas frequently intermittent injections are given through an epidural catheter, thus allowing reinjection and prolongation of epidural block. Another difference is that epidural block allows production of segmental anesthesia. Thus, if a thoracic injection is made and an appropriate amount of local anesthetic is injected, a band of anesthesia that does not block the lower extremities can be produced.
Placement
Anatomy
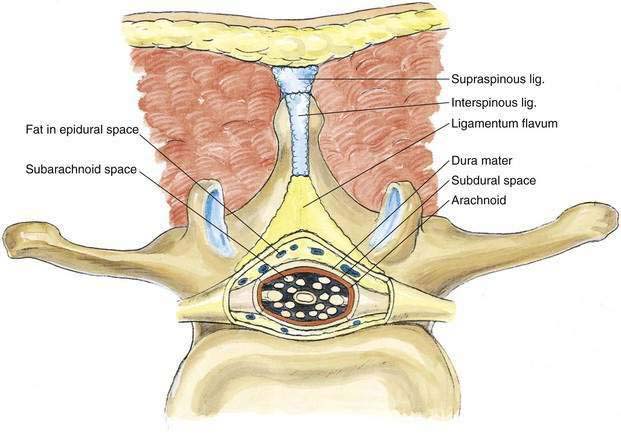
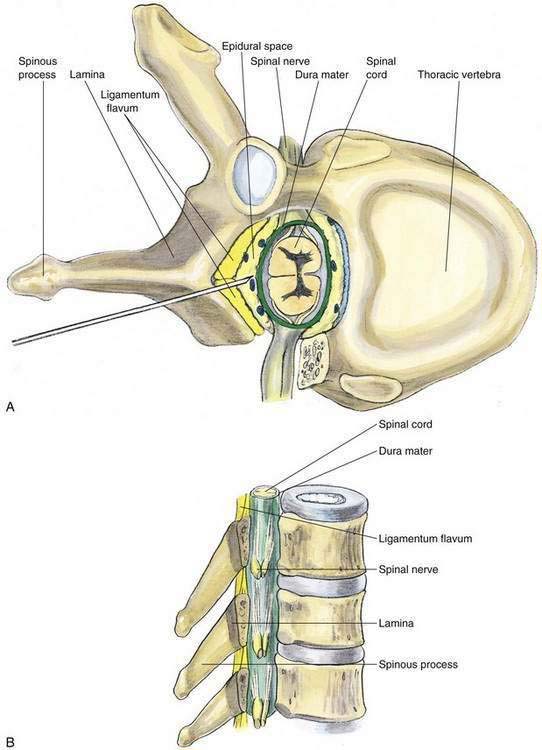
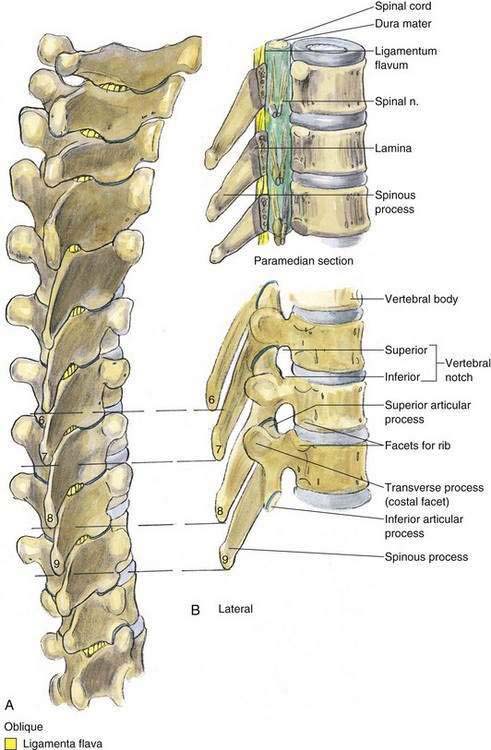
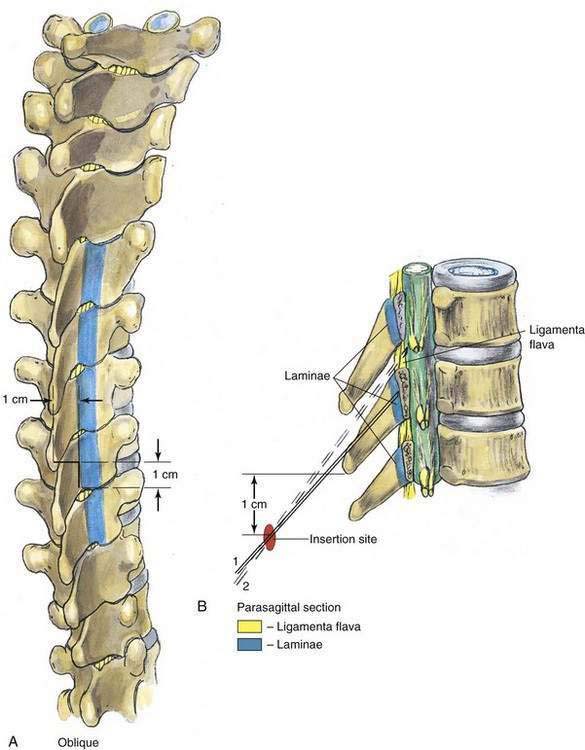
As with spinal anesthesia, the key to carrying out successful epidural anesthesia is understanding the three-dimensional midline neuraxial anatomy that underlies the palpating fingers (Fig. 41-1). When a lumbar approach to the epidural space is used in adults, the depth from the skin to the ligamentum flavum is commonly near 4 cm; in 80% of patients the epidural space is cannulated at a distance of 3.5 to 6 cm from the skin. In a small number of patients the lumbar epidural space is as near as 2 cm from the skin. In the lumbar region, the ligamentum flavum is 5 to 6 mm thick in the midline, whereas in the thoracic region it is 3 to 5 mm thick. In the thoracic region, the depth from the skin to the epidural space depends on the degree of cephalad angulation used for the paramedian approach as well as the body habitus of the patient (Fig. 41-2). In the cervical region the depth to the ligamentum flavum is approximately the same as that in the lumbar region, 4 to 6 cm.
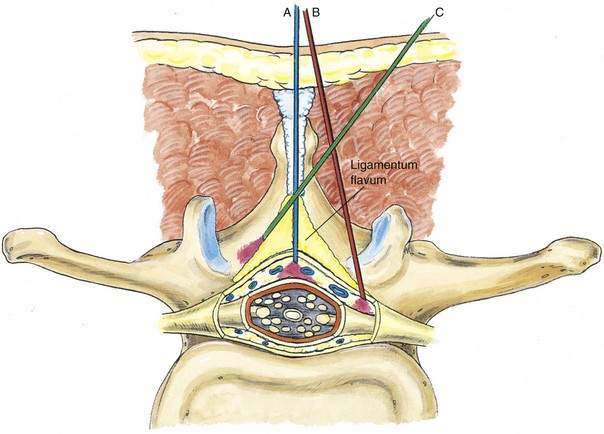
The ligamentum flavum will be perceived as a thicker ligament if the needle is kept in the midline than if the needle is inserted off the midline and enters the lateral extension of the ligamentum flavum. Figure 41-3 illustrates how important it is to maintain the midline position of the epidural needle (needle A) during lumbar epidural techniques. If an oblique approach is taken, a “false release” can be produced (needle C) or the perception of a thin ligament can be reinforced (needle B).
Needle Puncture: Lumbar Epidural
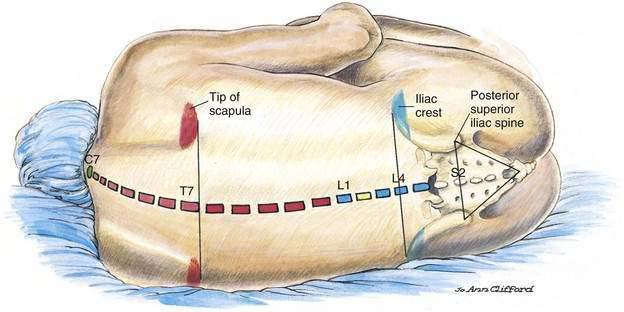
A technique similar to that used for spinal anesthesia should be carried out to identify the midline structures, and the bony landmarks should be used to determine the vertebral level appropriate for needle insertion (Fig. 41-4). When choosing a needle for epidural anesthesia, one must decide whether a continuous or single-shot technique is desired. This is the principal determinant of needle selection. If a single-shot epidural technique is chosen, a Crawford needle is appropriate; if a continuous catheter technique is indicated, a Tuohy or other needle with a lateral-facing opening is chosen.
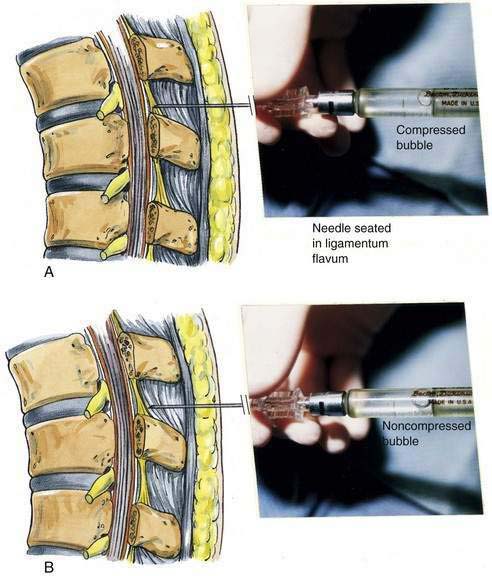
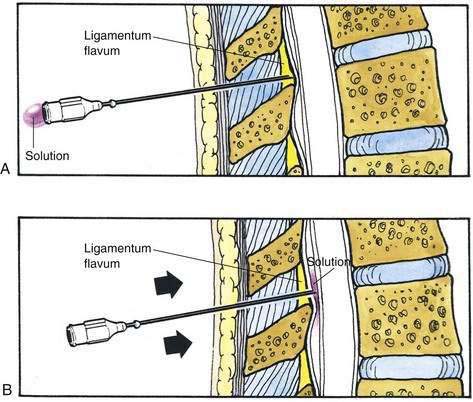
The midline approach is most often indicated for a lumbar epidural procedure. The needle is inserted into the midline in the same way as for spinal anesthesia. In the epidural technique, the needle is slowly advanced until the change in tissue resistance is noted as the needle abuts the ligamentum flavum. At this point, a 3- to 5-mL glass syringe is filled with 2 mL of saline solution, and a small (0.25 mL) air bubble is added. The syringe is attached to the needle, and if the needle tip is in the substance of the ligamentum flavum, the air bubble will be compressible (Fig. 41-5A). If the ligamentum flavum has not yet been reached, pressure on the syringe plunger will not compress the air bubble (Fig. 41-5B). Once compression of the air bubble has been achieved, the needle is grasped with the nondominant hand and pulled toward the epidural space, while the dominant hand (thumb) applies constant steady pressure on the syringe plunger, thus compressing the air bubble. When the epidural space is entered, the pressure applied to the syringe plunger will allow the solution to flow without resistance into the epidural space. An alternative technique, although one that I believe has a less precise end point, is the hanging-drop technique for identifying entry into the epidural space. In this technique, when the needle is placed in the ligamentum flavum a drop of solution is introduced into the hub of the needle (Fig. 41-6A). No syringe is attached, and when the needle is advanced into the epidural space, the solution should be “sucked into” the space (Fig. 41-6B).
Needle Puncture: Thoracic Epidural
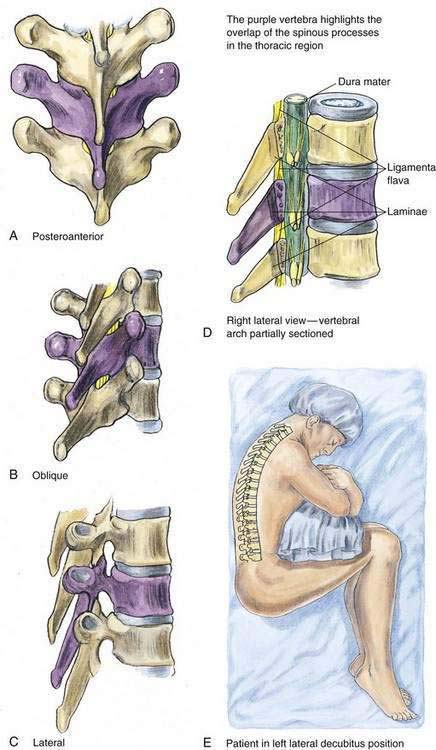
As with lumbar epidural anesthesia, patients are usually placed into a lateral decubitus position for needle insertion into the thoracic epidural space (Fig. 41-7). In this technique, the paramedian approach is preferred because it allows easier access to the epidural space. This is because the spinous processes in the mid-thoracic region overlap each other from cephalad to caudad (Fig. 41-8). The paramedian approach is carried out in a manner similar to that used for the lumbar epidural space, although in almost every instance the initial needle insertion will result in contact with the thoracic vertebral lamina by the epidural needle (Fig. 41-9). When this occurs, the needle is withdrawn slightly and the tip redirected cephalad in small, incremental steps until the needle is firmly seated in the ligamentum flavum. At this point, the loss-of-resistance technique and insertion of the catheter are carried out in a manner identical to that used for lumbar epidural block. Again, the hanging-drop technique is an alternative method of identifying the thoracic epidural space, although the classic Bromage needle–syringe grip is my first choice for the thoracic epidural block (Fig. 41-10).
Needle Puncture: Cervical Epidural
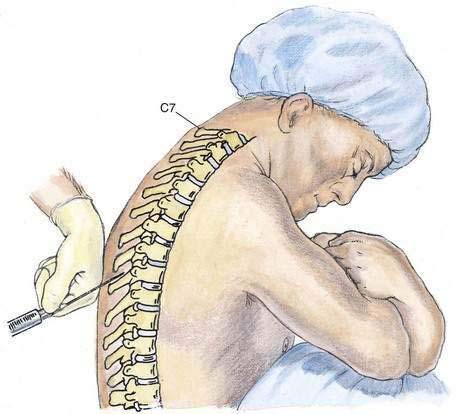
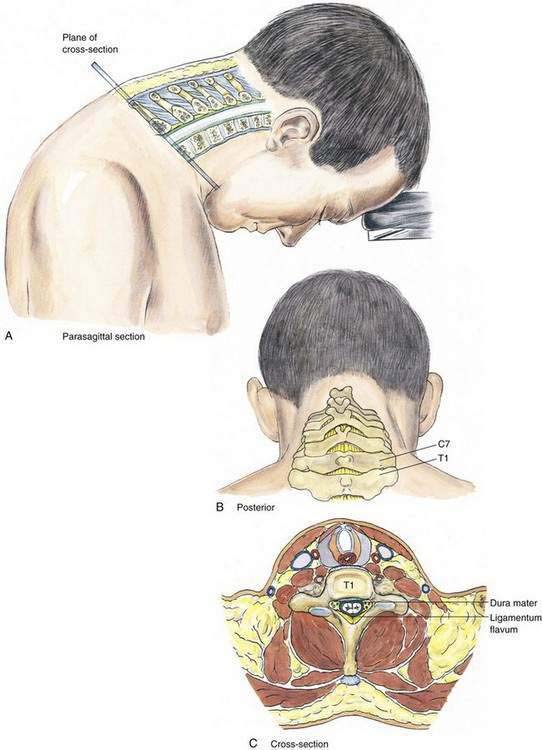
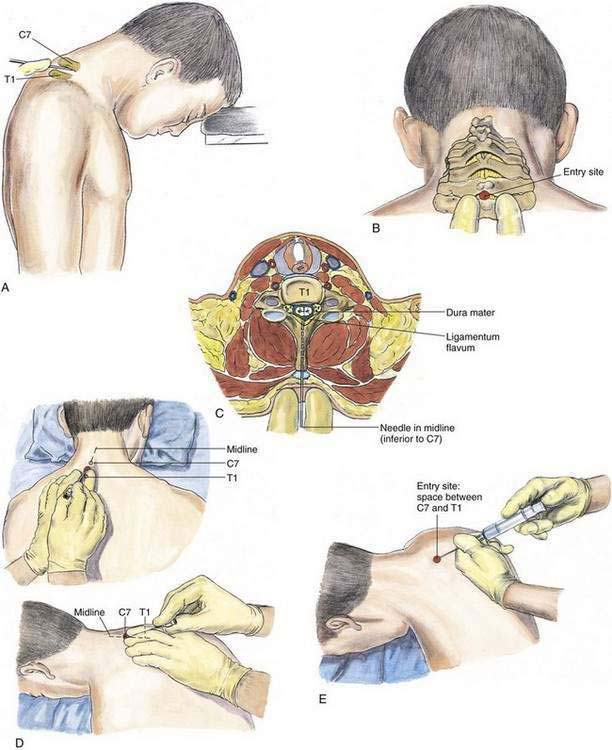
In the cervical epidural technique, the patient is typically in a sitting position with the head bent forward and supported on a table (Fig. 41-11). A comparison of the cervical epidural block with the lumbar epidural block reveals many similarities. The spinous processes of the cervical vertebrae are nearly perpendicular to the long axis of the vertebral column; thus, a midline technique is applicable for the cervical epidural block. The most prominent vertebral spinous processes, those of C7 and T1, are identified with the neck flexed (Fig. 41-12). The second (index) and third fingers of the palpating hand straddle the space between C7 and T1, and the epidural needle is slowly inserted in a plane approximately parallel to the floor (or parallel to the long axis of the cervical vertebral spinous processes). Abutment of the needle onto the ligamentum flavum will be appreciated at a depth similar to that seen in the lumbar epidural block (i.e., 3.5 to 5.5 cm), and needle placement is then performed using the loss-of-resistance technique as in the other epidural methods. The hanging-drop method is also an option for identification of the cervical epidural space.
Potential Problems
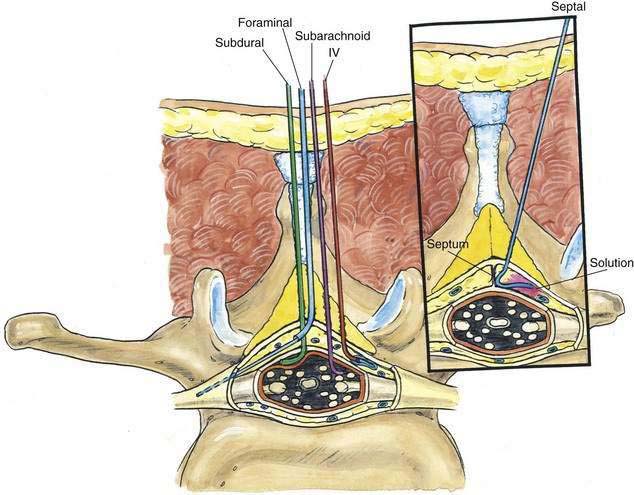
One of the most feared complications of epidural anesthesia is systemic toxicity resulting from intravenous injection of the intended epidural anesthetic (Fig. 41-13). This can occur with either catheter or needle injection. One way to minimize intravenous injection of the pharmacologic doses of local anesthetic needed for epidural anesthesia is to verify needle or catheter placement by administering a test dose before the definitive epidural anesthetic injection. The current recommendation for the test dose is 3 mL of local anesthetic solution containing 1:200,000 epinephrine (15 µg of epinephrine). Even if the test dose is negative, the anesthesiologist should inject the epidural solution incrementally, be vigilant for unintentional intravascular injection, and have all necessary equipment and drugs available to treat local anesthetic–induced systemic toxicity.
Pearls
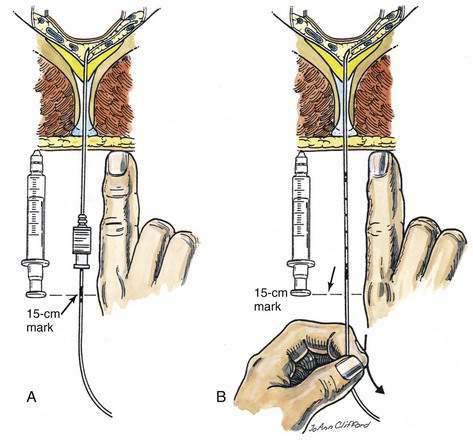
Epidural catheters are indicated in many situations, especially when the technique is used for postoperative analgesia. To place a known length of catheter into the epidural space, either the catheter and needle must have distance markers, or a way must be found to maintain the catheter position once the needle has been withdrawn over the catheter. Because some epidural needles do not have distance markers, a method of maintaining catheter position while the needle is withdrawn over the catheter is required. One technique of positioning the catheter is illustrated in Figure 41-14. An object of known length, such as a syringe or the anesthesiologist’s finger, is selected, and that object is placed next to the needle–catheter assembly after the catheter has been inserted 3 cm (or other known distance) into the epidural space. Because the catheter is marked, a known point on the catheter can be related to a known point on either the finger or the syringe. As shown in Figure 41-14A, the 15-cm mark is opposite the plunger on the syringe or the anesthesiologist’s knuckle. Once this relationship has been noted, the needle is removed while the catheter position is maintained. The measurement object is then placed next to the catheter, as illustrated in Figure 41-14B, and the catheter is withdrawn to the point at which the distance marker on the catheter relates to the previously identified point. In this example, the 15-cm mark on the catheter is placed opposite the plunger of the syringe or the anesthesiologist’s knuckle. By using this technique, the epidural catheter can be accurately placed without the need for either a marked needle or a ruler.
[/level-membership-for-anesthesiology-category][not-level-membership-for-anesthesiology-category]
41 Epidural Block
Perspective
Epidural anesthesia is the second primary method of neuraxial block. In contrast to spinal anesthesia, epidural block requires pharmacologic doses of local anesthetics, making systemic toxicity a concern. In skilled hands, the incidence of post–dural puncture headache should be lower with epidural anesthesia than with spinal anesthesia. Nevertheless, as outlined in Chapter 40, Spinal Block, I do not believe this should be the major differentiating point between the two techniques. Spinal anesthesia is typically a single-shot technique, whereas frequently intermittent injections are given through an epidural catheter, thus allowing reinjection and prolongation of epidural block. Another difference is that epidural block allows production of segmental anesthesia. Thus, if a thoracic injection is made and an appropriate amount of local anesthetic is injected, a band of anesthesia that does not block the lower extremities can be produced.
Placement
Anatomy
As with spinal anesthesia, the key to carrying out successful epidural anesthesia is understanding the three-dimensional midline neuraxial anatomy that underlies the palpating fingers (Fig. 41-1). When a lumbar approach to the epidural space is used in adults, the depth from the skin to the ligamentum flavum is commonly near 4 cm; in 80% of patients the epidural space is cannulated at a distance of 3.5 to 6 cm from the skin. In a small number of patients the lumbar epidural space is as near as 2 cm from the skin. In the lumbar region, the ligamentum flavum is 5 to 6 mm thick in the midline, whereas in the thoracic region it is 3 to 5 mm thick. In the thoracic region, the depth from the skin to the epidural space depends on the degree of cephalad angulation used for the paramedian approach as well as the body habitus of the patient (Fig. 41-2). In the cervical region the depth to the ligamentum flavum is approximately the same as that in the lumbar region, 4 to 6 cm.
The ligamentum flavum will be perceived as a thicker ligament if the needle is kept in the midline than if the needle is inserted off the midline and enters the lateral extension of the ligamentum flavum. Figure 41-3 illustrates how important it is to maintain the midline position of the epidural needle (needle A) during lumbar epidural techniques. If an oblique approach is taken, a “false release” can be produced (needle C) or the perception of a thin ligament can be reinforced (needle B).
Needle Puncture: Lumbar Epidural
A technique similar to that used for spinal anesthesia should be carried out to identify the midline structures, and the bony landmarks should be used to determine the vertebral level appropriate for needle insertion (Fig. 41-4
[/not-level-membership-for-anesthesiology-category]
