CHAPTER 16 Endoscopic facial rejuvenation
History
Endoscopic facial rejuvenation is an approach that was started by the pioneering work on the forehead by Luis Vasconez and associates in the early 1990s.1 Many of us working independently and almost simultaneously developed our own methods to address the upper face.2–4 I had the privilege to perform the first ever recorded case of a complete endoscopic facelift that included the forehead, midface and neck,5 although a year earlier in April of 1992 at the First International Workshop on Facial Rejuvenation in Baltimore, Maryland, Oscar Ramirez and Robert Oneal telecasted live surgery demonstrations of two cases of endoscopic “assisted” open subperiosteal facelifts at the Johns Hopkins Hospital (video records). In the evolution of my own procedure, I also issued the first paper on the tridimensional approach to midface rejuvenation.6 A more extensive report followed in the years 2000 and 2001.3–8
Physical evaluation
The preoperative evaluation of my prospective patient follows this sequence.
• I place the patient in a chair with two mirrors, each at 45 degrees for tridimensional evaluation of the face and observation of the digital maneuvers to be performed on the face. The two mirrors help to see the face from different angles including the lateral views.
• I assess the quality, texture and laxity of the skin and the amount of subcutaneous tissues and fat pads. I look for sun-damaged skin, areas of subcutaneous fat atrophy and for areas of fat accumulation.
• I assess the patient’s facial expression: position of the brows, lateral canthal area, laxity of the lower eyelid (snap test). Next, I check position of the corners of the mouth, sagging of the cheeks, and jowl formation.
• I evaluate the facial skeletal support: orbital rim support (upper and lower), malar bone prominence, pyriformis area, chin projection and height, gonial angle projection and height.
• I examine the neck from different angles: observation of excessive subcutaneous and/or subplatysma fat is critical. The digital maneuvers and visual observations for this might be deceiving and unreliable. Definite assessment of the location of fat accumulation may have to be postponed until the time of the surgery.
• I inspect to determine whether there is digastric bulge and/or salivary gland ptosis and/or enlargement.
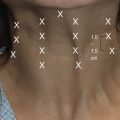
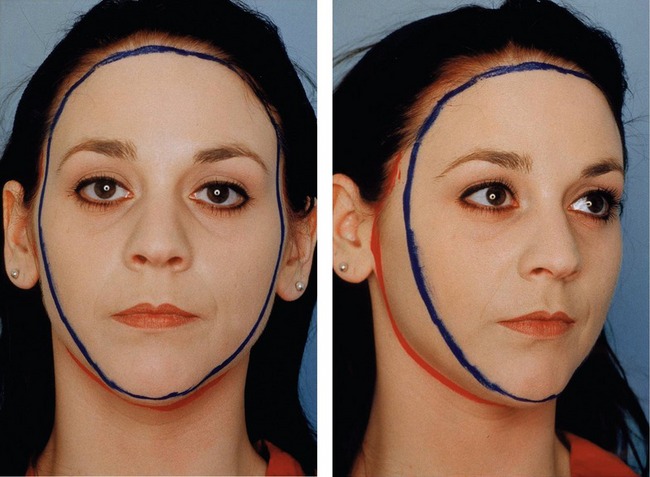
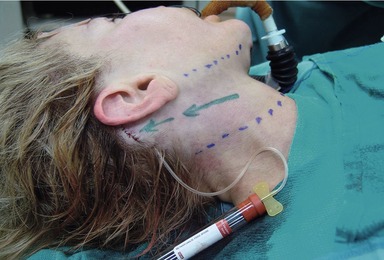
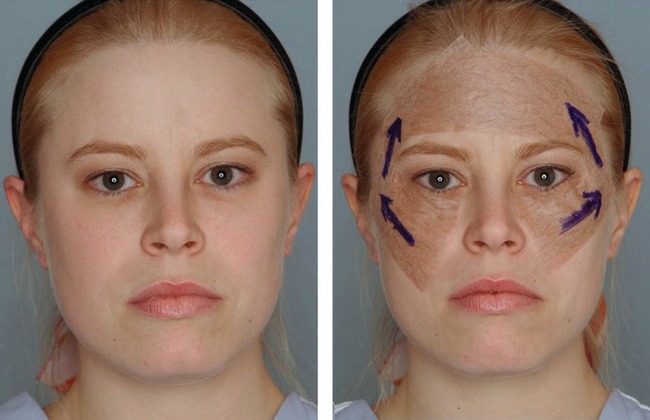
• I then perform digital maneuvers with lifting of the soft tissues of the brows, lateral canthal areas, lower eyelids, cheeks, corners of the mouth and jowls. I do these in a vertical or more oblique direction and I ask the patient which way they like the most. This will determine my vectors of pull during surgery. Generally, I lift the central oval of the face in a more vertical direction and the peripheral hemicircle in an oblique/horizontal direction. As the direction of the peripheral hemicircle changes from superior to inferior the vector of pull changes from oblique to horizontal. The more superior the structure, the more oblique the pull (e.g. temples). The more inferior the structure, the more horizontal the pull (jawline and neck) (Fig. 16.1). I compare and assess pulling and lifting versus anterior posterior projection. You can digitally pinch and imbricate the brows and cheeks; you can lift the mentum; you can pull the lax soft tissues in the directions indicated to see the desired changes.
• Digital elevation of the brow to the desired position will help you assess the need for concomitant upper eyelid blepharoplasty. Likewise, digital elevation of the cheek will determine how much skin can be safely removed from the lower eyelid.
• Examine the face in a three-quarter view. Observation from a true oblique position should allow visualization of both medial canthi. In this position, you can evaluate the reciprocal multicurvilinear line of beauty (“double ogee” line) of the face and the need to reconstruct this beautiful and youthful line.9
Anatomy
The central oval is where the ocular, nasal, and oral frames are located. Therefore, they are the most mobile and dynamic parts of the face. These are the areas where the facial mimetic muscles are located. The areas of transition between the central oval and peripheral hemicircle is where the motor branches of the facial nerve are most susceptible to injury. If surgical dissection continues from the superficial layers on the peripheral hemicircle to the intermediate layers of the central oval, more chances of nerve and muscle injury are likely (Fig. 16.2).
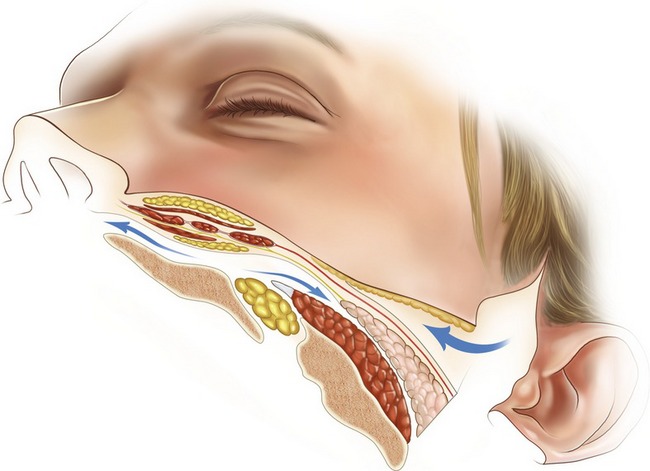
Fig. 16.2 Combination of subperiosteal dissection in the central oval with subcutaneous dissection in the peripheral hemicircle is the safest plane. Dissection coming from superficial in the peripheral hemicircle to deeper planes in the central oval poses a high risk of nerve and/or muscle injury.
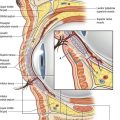
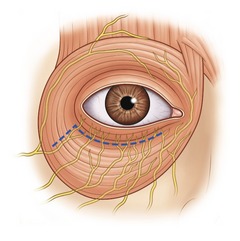
An important finding of our research is that the lower orbicularis oculi muscle is innervated by branches of the zygomatic and buccal nerves that penetrate the undersurface of this muscle, not from the lateral aspect as originally was presumed, but from the inferior border.10 Therefore, when cutting or separating the pretarsal portion from the preseptal muscle portions during routine lower blepharoplasty (the McIndoe operation), the pretarsal muscle is denervated (Fig. 16.3). The extent of denervation will depend on how aggressive is the separation medially. Limited separation will preserve some of the innervations. Likewise, lifting the innervated preseptal portion over or close to the denervated pretarsal portion during canthopexy or orbicularis oculi muscle suspension will favor a quicker neurotization.
Another important anatomical characteristic relevant to my technique is that the orbicularis oculi muscle is attached to the bony orbital rim. Better redraping and upper lifting of this muscle requires the detachment of this bony origin. The suborbicularis oculi fat (SOOF) is a fatty structure deep to the orbicularis oculi muscle. This is in continuity with another fatty structure that I call a “deep orbital malar fat” (DOMF). Both provide deep structural support to the orbit and midface. These fatty structures are rich in fibrous tissue. This fibroadipose character allows application of sutures for support and lifting. These deep fatty structures are not isolated from the more superficial fatty structures located over the mimetic muscles of the face. They are interconnected through the intermuscular spaces forming a network of soft tissue structural support in which the mimetic muscles, motor and sensory nerves, and vessels are located. It seems that atrophy of this deep fat is more important in the aging appearance of the older face. The superficial fat with a less fibrous component is more prone to sagging, forming the ptotic nasolabial folds and jowls that you see with aging.
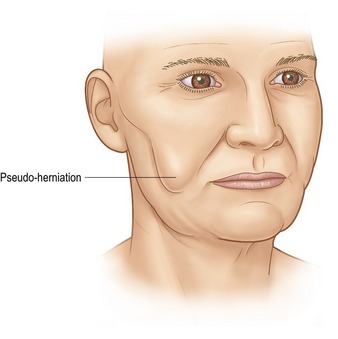
The eyelid fat pads and the buccal fat pad (Bichat’s) allow the gliding mechanism of the ocular motor muscles and the masticatory muscles respectively. They are also more prone to herniation because of the muscle activity of the related muscles and the lack of external support overlying these fat pads. They are also encased in a thin fascial pouch that allows gliding. This gliding also facilitates their expulsion from their original anatomical locations. This is clinically seen as a pseudo-herniation (Fig. 16.4). The Bichat’s fat pad is an important component of the upper jowl, located lateral to the oral commissure. Here forms the typical bulging of aging. Structurally some young individuals also have fullness in this area. Therefore excision or reposition of this structure helps improve the aesthetics of this portion of the face.
Another important anatomical and aesthetic configuration of the face is the presence of planes and curves. The face has multifaceting not unlike the faceting of the nose that has been previously described elsewhere. The most important curve of the face is seen in a three-quarter oblique view while both inner canthi are seen in this view. I call this the “reciprocal multicurvilinear line of beauty” or “double ogee” line.9 The single ogee of the cheek, also called “sigma,” has been previously described by William Little; however in my view the “double ogee” line is a more complete observation of the outline of the face (Fig. 16.5).
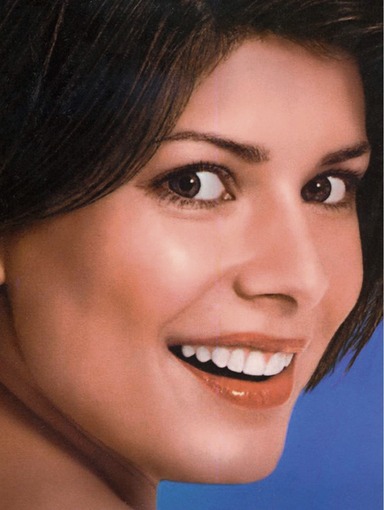
 view. The presence of this line characterizes youth and beauty.
Technical steps
• Inject 0.5% xylocaine with 1 : 200,000 epinephrine solution in titrated amounts as surgery progresses. I use typically 60 ml for the forehead, 60 ml for the midface, and 120 ml for the neck.
• Mark the forehead from zones 1A to 4. Zones 1B and 4 are dissected under strict endoscopic control. Zones 1A, 2 and 3 are done in a blind fashion. Follow the sequence of zones for injection and dissection.
• For the endoforehead, make four incisions: two paramedian incisions, each 2 cm from the midline and one incision in each temporalis scalp. Each one of these incisions measures about 1.8 cm. A complete and wide dissection under the temporoparietalis fascia on the temporal area and under the periosteal plane on the frontal forehead is made.
• Resect 80% of the corrugator muscles and transect the procerus at the nasoglabellar angle (Figs 16.6, 16.7). Release the periosteum at the arcus marginalis. Protect the supraorbital and supratrochlear nerves. Place a butterfly drain in the glabella with exit high on the frontal scalp. Fix it with 4-0 PDS suture.
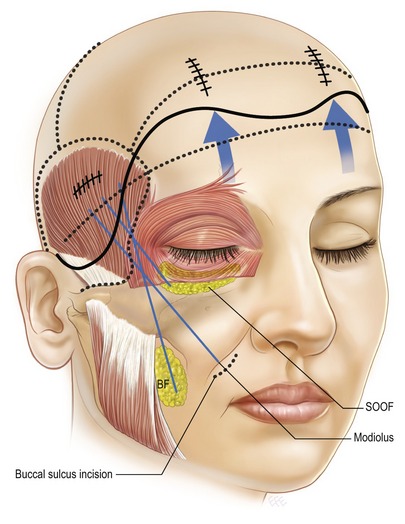
• Make a vertical or oblique 2 cm incision in the gingivobuccal mucosa at the level of the canine tooth. Do a subperiosteal dissection of the maxilla and zygoma protecting the infraorbital nerve. Continue dissection up to inferior arcus marginalis, zygomatic arch, and under the masseteric fascia. Use the endoscope for dissection of the upper half of the midface. Connect the midface dissection with a temporal area dissection across the anterior two-thirds of the zygomatic arch.
• Fixate the central SOOF (1.5 cm below the orbital rim) to the arcus marginalis at the level of the pupillary vertical line with a 4-0 polydioxanone (PDS) suture. Apply 3-0 PDS suture to the lateral SOOF (2.5 cm below the lateral canthal tendon) and a 4-0 PDS suture to the modiolus fat. Open the buccal space and mobilize the buccal fat pad. Apply 4-0 PDS suture to this structure (Figs 16.8, 16.9). Pass all these sutures through the temporal scalp opening.
• Fixation of the midface sutures to the temporal fascia proper is placed from medial to lateral and follows this sequence: first the buccal fat pad, second the modiolus, and third the lateral SOOF (Fig. 16.10). Prior to fixation, place a butterfly drain in the midface, exit it through the temporal scalp and fixate with a 4-0 PDS suture.
• Pull and anchor the temporoparietalis fascia to the temporal fascia proper in a superomedial orientation with a 3-0 PDS suture. Close the skin with staples or with 5-0 Prolene sutures. Next, close the paramedian incisions in two layers: 4-0 PDS for the galea-periosteal layer and the skin with skin staples or 5-0 Prolene sutures. Apply moderate traction on the frontal scalp in a superomedial direction to lift the tail of the brows; make 2 or 3 mm stab wound incision on the upper frontal scalp. Then, add percutaneous self-retaining, self-stabilizing Endoposts (Synthes), one on each side just lateral and slightly superior to the paramedian ports.
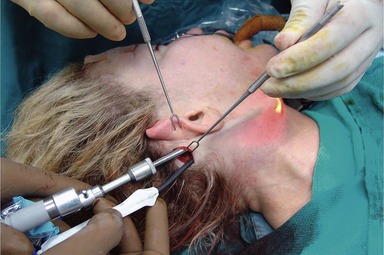
• The neck is approached according to the degree of the problem. Minimal neck deformities will require liposuction and cervical suture suspension. Mild to moderate deformities with good skin quality and bone support can be treated with the approach described here. Severe deformities, those with poor skin quality and poor skeletal support will require the traditional cervicofacial approach with skin excision. In the endoscopic assisted technique the neck is approached with a 3 cm incision made 1.5 cm posterior to the submental crease. Two additional incisions: one on each occipital scalp just inside the hairline and posterior to the mastoid process are done. A wide subcutaneous dissection starting from the submental incision is made. The limit of this is the anterior border of the sternocleidomastoid muscle done under direct visualization using the fiberoptic light retractor. Dissection coming from the retroauricular (occipital) incision is done initially with scissors and then with a #4 Ramirez endoperiosteal elevator (Snowden-Pencer, Inc., Tucker Georgia). This is performed under endoscopic control to preserve the integrity of the greater auricular nerve and to obtain precise hemostasis using the suction coagulator (Fig. 16.11). The posterior dissection is connected with the anterior dissection. The extent of the posterior dissection is similar to the open approach but without the long incisions (Fig. 16.12).
• Liposuction under direct visualization using “the vacuum cleaner” technique is performed. Thinning of the elevated flap is also done under direct control. Hemostasis is achieved with the suction coagulator.
• A deep subplatysmal cervicoplasty is done as needed (a full description of this is beyond the scope of this chapter). A corset platysmaplasty with inverted 3-0 nylon sutures is done.
• Next “the cervical suture suspension” is carried out. The medial border of each platysma at the level of the hyoid bone is reapproximated with a 2-0 nylon suture. The loop of both sutures is criss-crossed and both ends passed to the opposite occipital incision. During this process, each suture is woven onto the platysma muscle, particularly in the area over the submaxillary salivary gland. At the level of the occipital incision and about half a centimeter anteriorly, a fascial incision is made. Both ends of the nylon sutures are deepened through this fascia and anchored to the deep fascia/periosteum. Moderate tension is applied to define the submental/submaxillary trough. The knots of the nylon are buried further with 4-0 Prolene inverted sutures. A butterfly drain on each side of the neck is introduced. The incisions are closed in layers with 5-0 Prolene sutures.
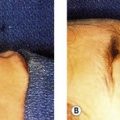
• Half an inch of brown micropore tape is used to obtain stabilization and “splinting” of the forehead and midface. The cervical flap is “advanced” to the retroauricular area using the same micropore tape. Thus, the excess submental/submaxillary skin is translocated to the tighter retroauricular area (Fig. 16.13).
• A well-contoured circumferential head and neck dressing is applied.
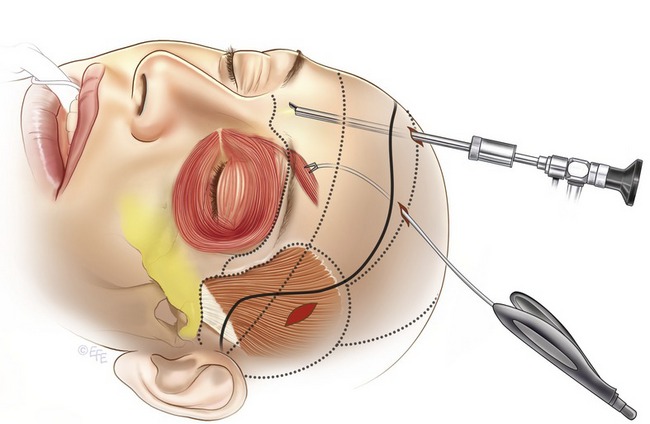
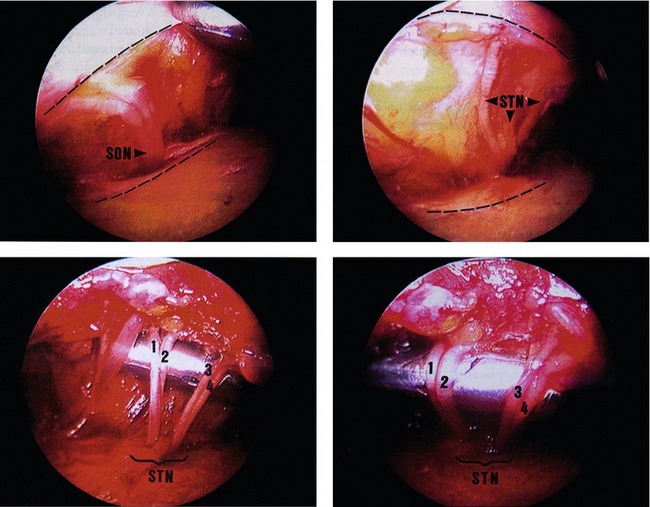
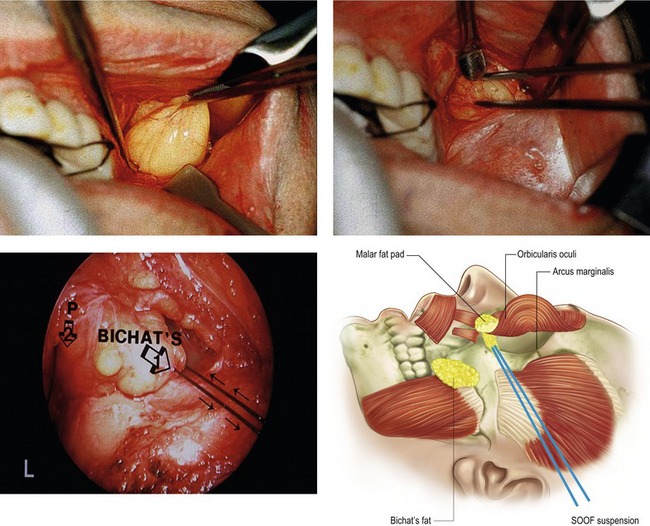
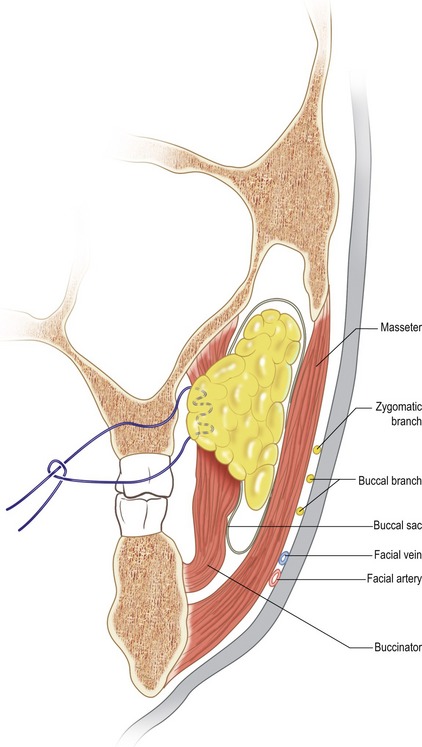
Fig. 16.9 The Bichat’s fat pad is being mobilized from the buccal space with a PDS suture. This fat pad tends to herniate down between the masseter muscle and lip depressors.
Complications
Pearls & pitfalls
Pearls
• Lifting of the glabella and brow during endoforehead tends to flatten these structures. The additional fat grafting by injection provides a volumetric augmentation to give a more youthful shape.
• Drains placed in the glabella, midface and neck collect about 10–15 ml of fluid per drain. Drainage of this amount of fluid is enough to decrease periorbital ecchymosis and edema, acute and chronic midface edema, and indurations on the neck skin.
• In patients with a heavy neck due to supraplatysmal fat, excess suction-assisted lipectomy without significant undermining may be enough to contour the neck, but if a mild skin excess in the submental area without significant fat accumulation exists, a generous skin undermining is needed to allow redraping of excess skin from the loose submental to the tighter retroauricular area. The retroauricular area will absorb minimal to mild skin excess; however moderate to large amounts of skin excess will require a traditional excisional approach.
• The subperiosteal plane already developed on the cheeks can receive a cheek implant if needed. Likewise, the addition of a wide subperiosteal dissection of the chin and the mandibular rim can be done through the same submental incision used for the cervicoplasty and can accept a chin implant if needed. Alternatively, a mentopexy with fixation of the chin fat to the pogonium helps to lift the ptotic chin and to redistribute the lax skin of the submental area (see case example). This subperiosteal release will also help to further remodel the mandibular area and will help to elevate the corners of the lips by the lifting of the modiolus during the endomidface. When this effect is sought, fixation of the midface should be done after the periosteal release of the chin and mandible.
• Taping of the forehead, midface, and neck is an excellent addition to aid in stabilization and it decreases ecchymosis and edema.
Pitfalls
• During the endoforehead always dissect zone IA and B first and release the periosteum along the temporal line of fusion before doing dissection on zone two to four. If you dissect from frontal to temporal first, you might tend to elevate the temporal fascia proper and end up in the wrong plane of dissection.
• During midface dissection, always include the masseteric fascia to free up the tissue attachments as much as possible laterally. This way, when you pull tissues for an imbrication effect and/or local fat repositioning, you will get the desired volumetric changes where you want to create the ogee line maximal projection on the cheek, which is more lateral than anteriorly located.
• When you are applying the lateral SOOF suture, bite enough tissue to give you a good purchase for elevation, but do not leave the suture too deep (from subperiosteal to skin direction) otherwise, unsightly indentation will develop postoperatively.
• Dissect the buccal fat pad extruded from the buccal space using blunt forceps. Sharp forceps will tear the fine facial capsule that surrounds the buccal fat pad and you will be unable to use it as a pedicle flap. Likewise during fixation, apply the utmost care and minimal tension to prevent tearing of the fat pad.
• Upward lifting of the cheek will create redundancy of the skin on the lower eyelid. You need to do a skin only lower blepharoplasty. Be conservative, because you might tend to overestimate the amount of skin excess.
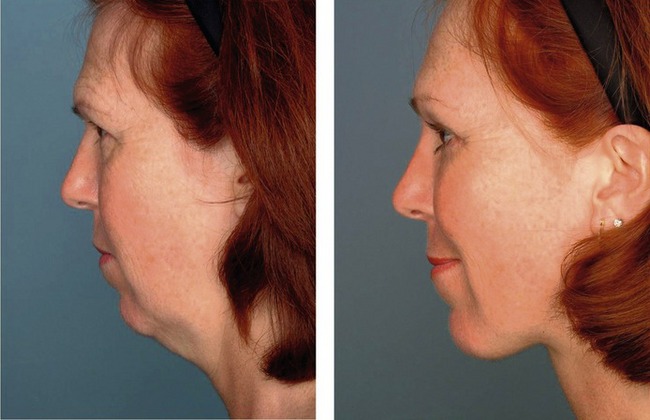
Clinical case example
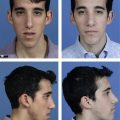
The pre- and postop picture of a 47-year-old female is presented. She underwent an endoforehead, endomidface, endocervicoplasty and mentopexy. In addition, she had a skin only lower blepharoplasty and 14 ml of fat grafting distributed into the glabella, infrabrow areas, nasolabial creases and lips. The postoperative photos are shown after 12 months (Figs 16.14–16.18).
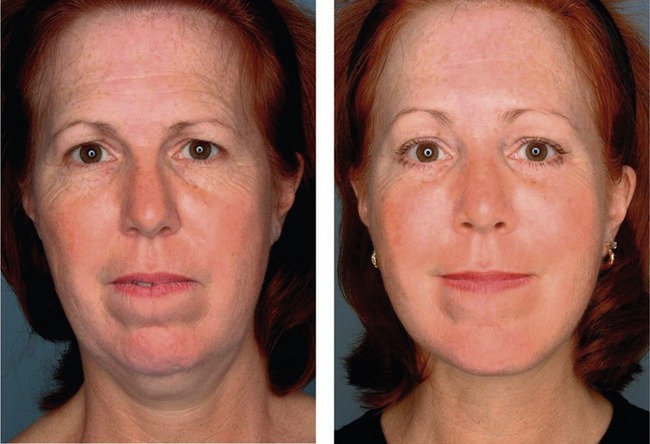
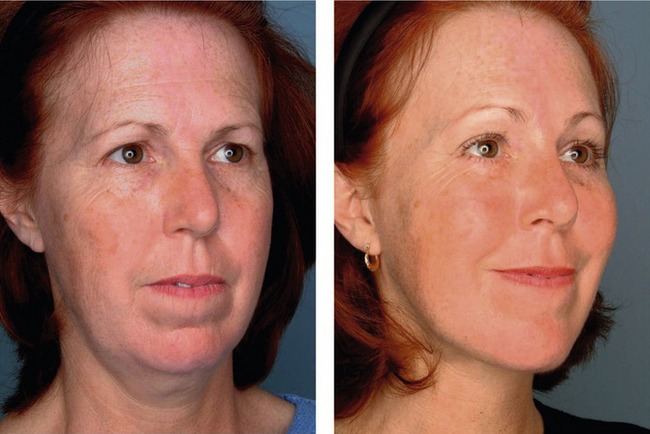
Fig. 16.15 Three-quarter view (right side) before and after shows the enhancement of the double ogee line.
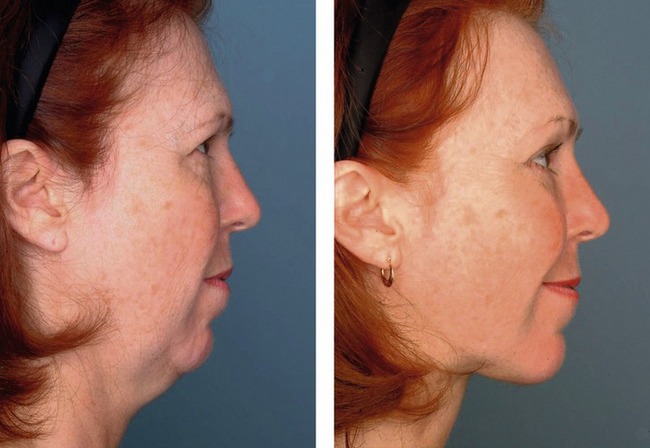
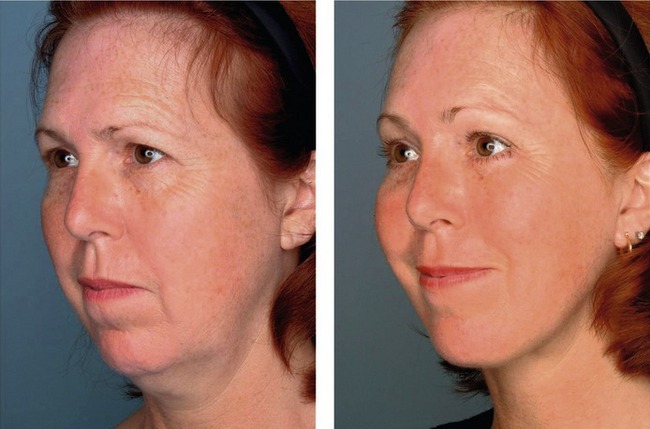
Fig. 16.17 Three-quarter view (left side) demonstrates the beautiful double ogee line and the overall rejuvenation and beautification of the patient’s face.
Summary of steps
1. Inject 0.5% xylocaine with 1 : 200,000 epinephrine solution in titrated amounts as surgery progresses.
2. Mark the forehead into zones and follow the sequence of zones for injection and dissection.
3. Make the first incisions and commence dissection.
4. Resect 80% of the corrugator muscles and transect the procerus at the nasoglabellar angle. Place a butterfly drain in the glabella with exit high on the frontal scalp. Fix it with 4-0 PDS suture.
5. Connect the midface dissection with a temporal area dissection across the anterior two-thirds of the zygomatic arch.
6. Fixate the central SOOF (1.5 cm below the orbital rim) to the arcus marginalis at the level of the pupillary vertical line with a 4-0 polydioxanone (PDS) suture.
7. Fixation of the midface sutures to the temporal fascia proper is placed from medial to lateral.
8. Pull and anchor the temporoparietalis fascia to the temporal fascia proper in a superomedial orientation with a 3-0 PDS suture. Close the skin with staples or with 5-0 Prolene sutures.
9. Minimal neck deformities will require liposuction and cervical suture suspension. Mild to moderate deformities with good skin quality and bone support can be treated with the approach described above.
10. Liposuction under direct visualization using “the vacuum cleaner” technique is performed.
11. “The cervical suture suspension” is carried out.
12. Half an inch of brown micropore tape is used to obtain stabilization and “splinting” of the forehead and midface.
13. A well-contoured circumferential head and neck dressing is applied.
1. Vasconez LO, Core GB, Gamboa-Bobadilla M, et al. endoscopic techniques in coronal brow lifting. Plast Reconstr Surg. 1994;94:788–793.
2. Isse NG. Endoscopic facial rejuvenation: Endoforehead, the functional lift. Aesthet Plast Surg. 1994;18:21–29.
3. Ramirez OM. Endoscopic techniques and facial rejuvenation: I. An overview. Aesthet Plast Surg. 1994;18:141–147.
4. Ramirez OM. Endoscopic full facelift. Aesthet Plast Surg. 1994;18:363–371.
5. Ramirez OM. Endoscopy in plastic surgery: Myth or reality? Advances in Plastic and Reconstructive Surgery. 1997;14:1–38.
6. Ramirez OM. Fourth generation subperiosteal approach to the midface: The tridimensional functional cheek lift. Aesthet Surg J. 1998;18:133–135.
7. Ramirez OM. The central oval of the face: Tridimensional endoscopic rejuvenation. Facial Plast Surg. 2000;16:280–298.
8. Ramirez OM. Full face rejuvenation in three dimensions: A “face lifting” for the new millennium. Aesthet Plast Surg. 2001;25:152–164.
9. Ramirez OM, Volpe CR, Double ogee facial rejuvenation, Chapter 43, pp. Panfilov DE, ed.. Aesthetic surgery of the facial mosaic, Springer Verlag, Berlin: Heibelber; New York, 2007;288–299.
10. Ramirez OM, Santamarina R. Spatial orientation of motor innervation to the lower orbicularis oculi muscle. Aesthet Surg J. 2000;20:1007–1013.