[level-membership-for-plastic-reconstructive-surgery-category]
CHAPTER 2 Clinical photography for the aesthetic patient
The world is filled with forms: objects, people and other things that we look at, identify, enjoy, define, interact with, and make judgments about. When we look at these we are not seeing the things themselves, we are seeing how they interrelate with the light that they are seen in.
Digital photography has advanced quickly to become the main tool used by plastic surgeons for clinical documentation. Digital imaging is less expensive, more flexible and easier to archive than film, though backup becomes an issue. The resolution of the images continues to improve. Early in the evolution of digital photography, digital point and shoot cameras were popular; however the image quality with small zoom lenses and small image sensors left much to be desired.1
Lighting
The exploration of light, shadow, form and position has been one of the triumphs of western art. Highly talented people have devoted careers to understanding these relationships and there is a sizeable literature on photography for these ends. Unlike portraiture, where the intent is to capture a face or body in a flattering way, or to reveal an essential truth about someone or something, the goals of clinical photography are not artistic. They should be an unremittingly honest designation of what is there. It is a visual transcription.2
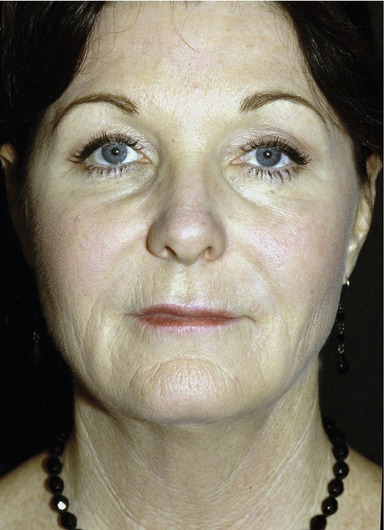
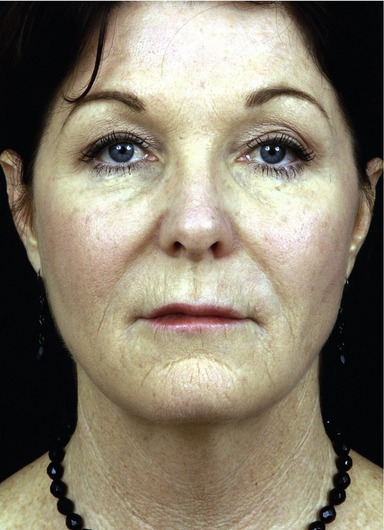
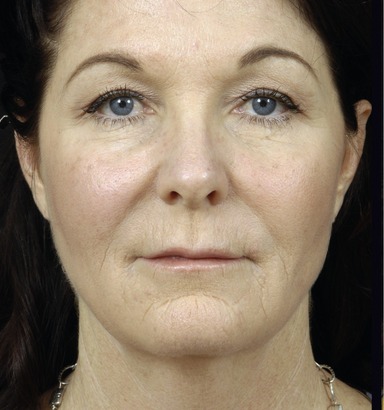
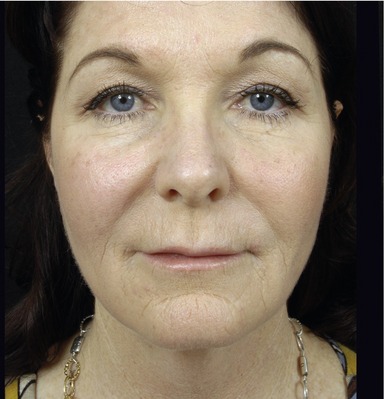
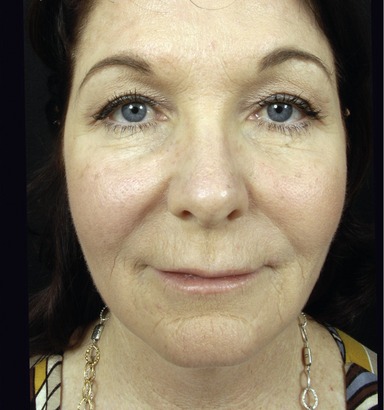
What defines facial and bodily features in the world of daily life is the light one sees them in, or more properly the interplay of light and shadows that visually defines them. Tangential light shows wrinkles, contours and shapes in a very different way than hard anterior light or soft “wrap around” light, which flatten and minimize them (Fig. 2.1).
Lighting schemes
Many plastic surgery lighting designs have been developed. They vary from on camera flashes of different complexities to external lights in different configurations. Portrait lighting is usually asymmetrical, i.e. the sides of the face or body are lit differently for purposes of interpretation of the subject.2 In general clinical lighting should be symmetrical. If time, space, and temperament of the surgeon allow, we like the use of small silver twin umbrellas, mounted higher than the patient’s eye level. This light is somewhat forgiving, but shows reasonable skin detail and by shifting the lights up or down one can see greater degrees of skin detail. The disadvantage of this lighting is that it casts shadows across the nasolabial fold (NLF) and tends to overexpose the tear troughs (Fig. 2.1).
However this lighting scheme is versatile and has enough spread to show body contours well. Even without a dedicated photo room, small slaved flash units with diffusers may be attached to the wall. More vertical light gives very accurate body skin rendition, and so the lights may be elevated or bounced off the ceiling to show skin irregularities for body shots. Light boxes may be used, though we find this light overly flattering. All of these light sources have been used successfully in different offices and all have adherents. The clinical examples shown here use twin umbrella lighting.1
Other on-camera lighting systems are available and are useful for specialized applications.3 We do not think that a ring light is very useful for clinical photography of body parts other than close-ups of the skin itself. The light that it casts is co-axial with the camera lens and is flat and shadowless by design. These attributes make the ring light useful in fashion photography, but it hides too many relevant skin contours to be recommended for clinical photography other than to illuminate deep into cavities, under flaps or for dermatologic reasons.
Perspective changes occur when a three dimensional object is portrayed in two dimensions. In plastic surgery the classic example is a face taken full frame with a wide-angle lens (the distance from the subject to the camera is short) and a longer lens (the distance from the camera to the subject is greater). In the first case the central, closer part of the face will seem to bulge and the ears will seem to recede. In the second case the face will look flatter, the nose will get smaller and the ears will widen out (Fig. 2.2). This effect is commonly ascribed to the lens, but is in reality solely a function of camera to lens distance. For body and face, a taking distance of 4–6 feet is adequate. We will use a lens of 105 mm (or 105 mm equivalence for most digital cameras) at a distance of about 5 feet for the face and a lens of 50 mm (or equivalent) for body.4
Position
Clinical pictures should have a strong element of ritual to them and should always be taken the same way. We put the patient on a rotating stool and once the AP is taken have her rotate without tuning the neck. For both face and body photography we find it helpful to place numbered cards or markers on the wall at 45 degree increments to help the patient face the appropriate direction.5
Faces
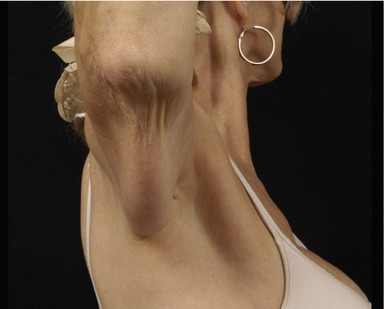
We also take an AP of the neck from below with the platysma in repose and in animation and any other special views that the case may call for (Fig. 2.3).
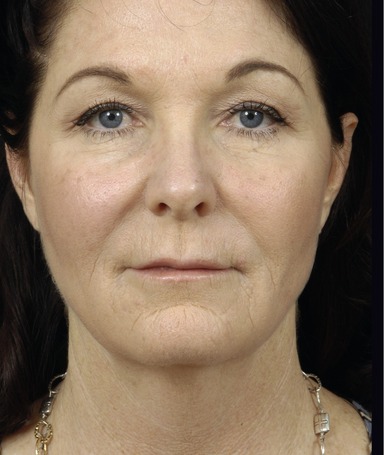
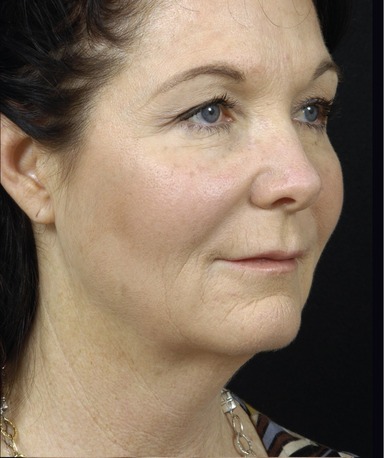
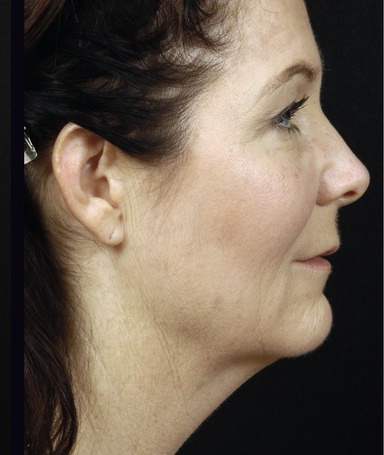
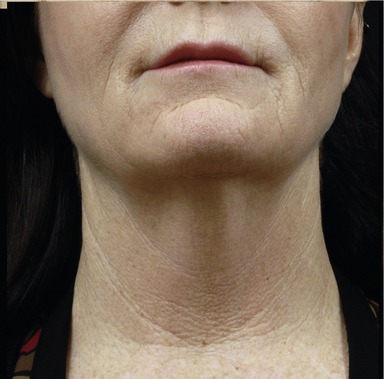

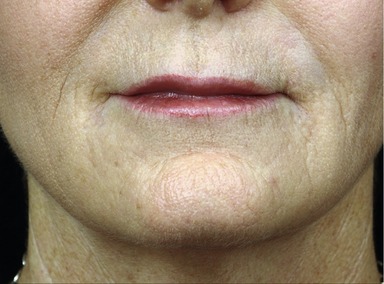
Fig. 2.3 One half of the face series is shown. We like to take the oblique with the nasal tip at the mid-pupillary line. A smiling image is taken in each of the cardinal positions (not shown). Platysma views are taken as shown in repose and with animation and close-up views are taken of any other area of interest. Any other animation views are included as desired. Ears should be visible in pre- and postoperative images. Though it is frequently difficult to persuade patients to remove makeup, most can be convinced into clipping their hair back. These pictures should be ritualistic in their position.
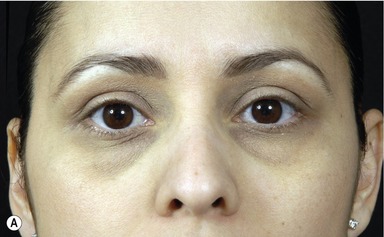
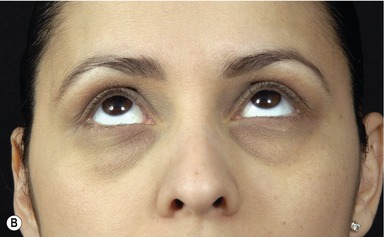
Eyelids are taken with the face pictures and in close-up in the AP in superior gaze as well as laterals (Fig. 2.4).
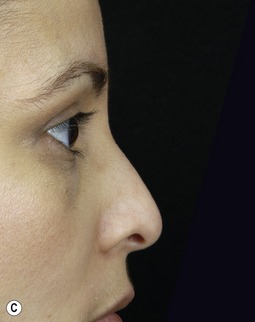
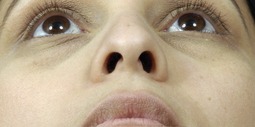
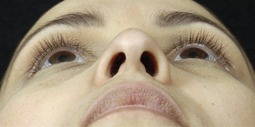
Photography of the nose is contained in the facial series. Anteroposterior images are taken (ensuring that the ears are equally visible to control rotation), obliques and lateral. In addition smiling views are taken of the AP and the lateral images to demonstrate the effect of the lip on the nose. In addition basilar views are taken, one looking directly up the dorsum and one with more head uptilt for a true basilar view.3,6–8 Camera viewfinders with grids are useful to align the eyes or ears for uniformity in position (Fig. 2.5).
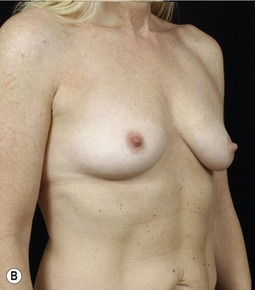
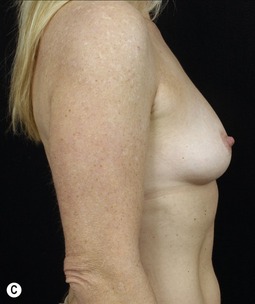
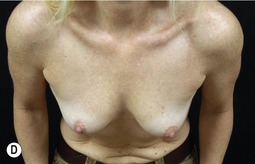
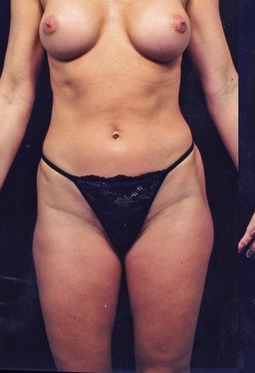
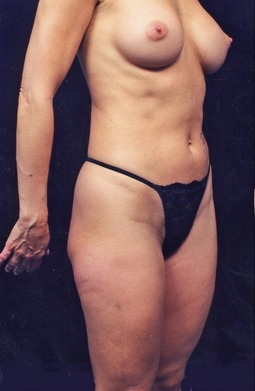
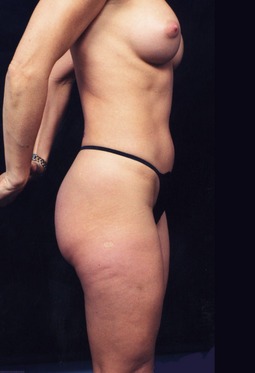
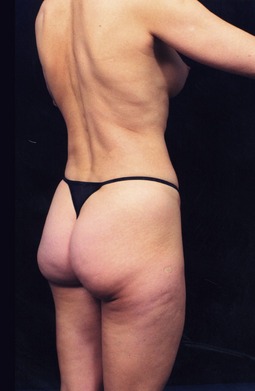
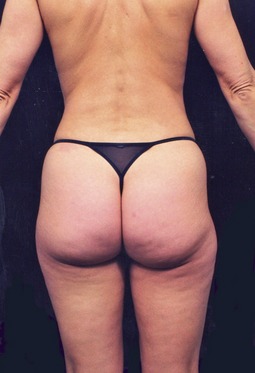
Breast images
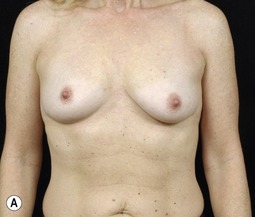
These are simply AP obliques and laterals. We also include a relaxed and pectoralis contracting view such as pushing the hands on the hips, in the case of breast implants. Sometimes a forward leaning view is useful to demonstrate asymmetry (Fig. 2.6A–D).
PA
Additional detail images are taken of the knees, medial thighs and arms as necessary. We have the patient stand on a designated spot and then face markers on the wall of the room at 45 degrees apart for consistency of position. In some patients with excess skin a “diver’s view” is helpful to look at redundant skin. We think that the arms should be included in the pictures as arm position can influence the way the skin drapes on the torso and the torso may be made to look artificially good if the arms are elevated out of the picture area (Fig. 2.7).

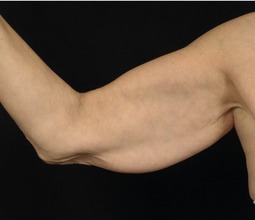
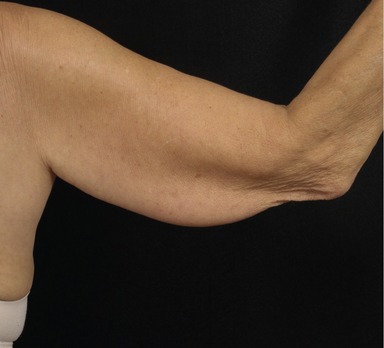
Arms are photographed in abduction with the elbow flexed vertically. When the arm is photographed end on from and below the elbow any redundancy in the skin is instantly visible. Focus is at the mid-arm (Fig. 2.8).
Integrity in photography
Different light shows different things. Wrinkles hollows and other imperfection on the face and body are defined by the shadows that they cast. In the absence of shadows, wrinkles disappear and results can look miraculous. It is very possible to make the skin and other contours look far better than they really do by altering the direction, quality and brightness of the light, a practice sometimes seen in books, journals and presentations, where on occasion most of the clinical result is from the difference in photography. This may sometimes be a naïve mistake, but in fact most of the unflattering images are seen in the preoperative pictures and the better ones in the postoperative ones.
It is not uncommon to see eyelid surgery presented with the light coming more vertically in the preoperative picture accentuating the upper lid shadow and tear trough and the postoperative lights coming from straight anterior, flattening these shadows.9 Strangely both patients and doctors continue to be fooled by elementary tricks like this and be impressed with the results that they purport to show. The lighting and position should be the same. The ability of photo editing programs to alter images is a frightening part of the brave new digital world.
1. Galdino GM, Vogel JE, Vander K, Craig A. Standardizing digital photography: it’s not all in the eye of the beholder. Plast Reconstr Surg. 2001;108(5):1334–1344.
2. Upton B, Upton J. Photography. Boston: Scott, Foresman and Company; 1989.
3. Galdino GM, DaSilva D, Gunter JP. Digital photography for rhinoplasty. Plast Reconstr Surg. 2002;109(4):1421–1434.
4. Dickason WL, Hanna DC. Pitfalls of comparative photography in plastic and reconstructive surgery. Plast Reconstr Surg. 1976;58:166.
5. DiBernardo BE, Adams RL, Krause J, et al. Photographic standards in plastic surgery. Plast Reconstr Surg. 1998;102(2):559–568.
6. Rohrich R, personal communication, February 2008.
7. Daniel R, personal communication, February 2008.
8. Guyuron B, personal communication, February 2008.
9. Sommer DD, Mendelsohn MMD. Pitfalls of nonstandardized photography in facial plastic surgery patients. Plast Reconstr Surg. 2004;114(1):10–14.
[/level-membership-for-plastic-reconstructive-surgery-category][not-level-membership-for-plastic-reconstructive-surgery-category]
CHAPTER 2 Clinical photography for the aesthetic patient
The world is filled with forms: objects, people and other things that we look at, identify, enjoy, define, interact with, and make judgments about. When we look at these we are not seeing the things themselves, we are seeing how they interrelate with the light that they are seen in.
Digital photography has advanced quickly to become the main tool used by plastic surgeons for clinical documentation. Digital imaging is less expensive, more flexible and easier to archive than film, though backup becomes an issue. The resolution of the images continues to improve. Early in the evolution of digital photography, digital point and shoot cameras were popular; however the image quality with small zoom lenses and small image sensors left much to be desired.1
Lighting
The exploration of light, shadow, form and position has been one of the triumphs of western art. Highly talented people have devoted careers to understanding these relationships and there is a sizeable literature on photography for these ends. Unlike portraiture, where the intent is to capture a face or body in a flattering way, or to reveal an essential truth about someone or something, the goals of clinical photography are not artistic. They should be an unremittingly honest designation of what is there. It is a visual transcription.2
What defines facial and bodily features in the world of daily life is the light one sees them in, or more properly the interplay of light and shadows that visually defines them. Tangential light shows wrinkles, contours and shapes in a very different way than hard anterior light or soft “wrap around” light, which flatten and minimize them (Fig. 2.1).
Lighting schemes
Many plastic surgery lighting designs have been developed. They vary from on camera flashes of different complexities to external lights in different configurations. Portrait lighting is usually asymmetrical, i.e. the sides of the face or body are lit differently for purposes of interpretation of the subject.2 In general clinical lighting should be symmetrical. If time, space, and temperament of the surgeon allow, we like the use of small silver twin umbrellas, mounted higher than the patient’s eye level. This light is somewhat forgiving, but shows reasonable skin detail and by shifting the lights up or down one can see greater degrees of skin detail. The disadvantage of this lighting is that it casts shadows across the nasolabial fold (NLF) and tends to overexpose the tear troughs (Fig. 2.1).
However this lighting scheme is versatile and has enough spread to show body contours well. Even without a dedicated photo room, small slaved flash units with diffusers may be attached to the wall. More vertical light gives very accurate body skin rendition, and so the lights may be elevated or bounced off the ceiling to show skin irregularities for body shots. Light boxes may be used, though we find this light overly flattering. All of these light sources have been used successfully in different offices and all have adherents. The clinical examples shown here use twin umbrella lighting.1
[/not-level-membership-for-plastic-reconstructive-surgery-category]
