Clinical examination of the lower leg, ankle and foot

History
Although the main question is the current problem – where the pain is now – it is best to try to obtain a chronological account, as summarized in Box 55.1. In order to work out the problem systematically, the questions asked should follow the order given below.
• What has been the evolution since the onset? No change? Gradually worse or gradually better? Ups and downs, with complete or no recovery between attacks? Do changes depend on exertion?
The present complaints should be investigated further:
• Where do you feel the pain now? Posterior, middle or anterior segment? Medial, lateral or all over the joint(s)?
• Is there pain at rest or during the night? Pain at night indicates a high degree of inflammation.
• Is there long-standing morning stiffness? This also suggests a serious inflammatory disorder.
• What brings the pain on? Is there any pain during normal walking or normal running? Can you participate in your usual sports?
• Is there equal pain on walking and standing?
• Can you walk on uneven surfaces? Because walking upstairs and downstairs demands normal mobility of the ankle joint, it is worth asking if the patient can do so without problems.
• Is the pain provoked by particular movements?
• Is the pain felt at the beginning of, during or after exertion?
• Does the pain depend on the sort of shoes you wear? Sometimes an in-built wedge relieves or aggravates the pain. In Achilles tendinitis or plantar fasciitis, a raised heel with a horizontal surface relieves the stress on these affected tissues and therefore relieves the pain.
Further questioning should establish whether there are ‘twinges’ or instability:
• Do you have twinges, and when? A twinge in the foot is a very important symptom. It is a sudden, sharp pain, mostly occurring during walking. It should always be differentiated from ‘giving way’. In a twinge, there is only momentary pain and not a feeling of instability. By the time the patient realizes it, the pain has disappeared. A twinge is very often an indication of a momentary impaction of a loose body in the ankle or subtalar joint. If localized in the forefoot, it can be a symptom of Morton’s metatarsalgia or sesamoiditis.
• Do you have a feeling of instability? If so, describe it. Real instability of the ankle or foot is only important in sports. Normal walking or even running on a flat surface hardly ever causes a feeling of giving way. In the occasional case where this does happen, it is the result of neurological weakness of the peronei muscles, rather than of a ligamentous lesion.
Functional examination
In the foot, the clinical tests consist of 18 movements (Box 55.2). Other than rising on tiptoe, the clinical examination is performed in the supine-lying position. Consecutively, the ankle joint, the subtalar joint, the midtarsal joints, the ligaments and the muscles are tested.
Rising on tiptoe
This movement (Fig. 55.1) is used to test the plantiflexor mechanism of the foot. If rising on tiptoe hurts and resisted eversion and inversion remain painless, the triceps surae muscles must be at fault. Because plantiflexion is almost entirely performed by the contraction of the triceps, rising on tiptoe will, in particular, test the integrity of triceps, the Achilles tendon and its insertion on the calcaneus. Note is taken of whether the movement is strong or weak, painless or painful.
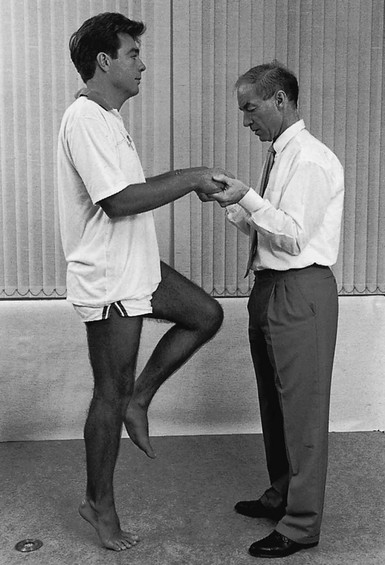
Fig 55.1 Rising on tiptoe.
Tests for the ankle joint
Plantiflexion
Normally, an ankle can be plantiflexed until the dorsal aspect of the foot falls into line with the leg (Fig. 55.2). Plantiflexion is limited by the engagement of the heel via the Achilles tendon against the back of the tibia. Therefore the normal end-feel is soft.

Ligamentous tests at ankle and foot
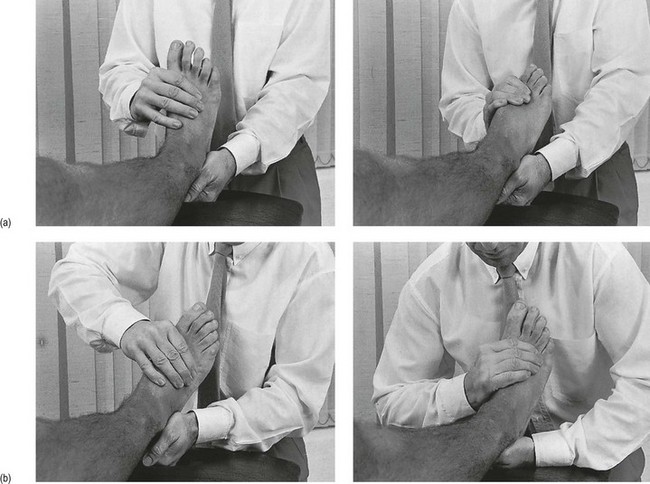
Lateral ligaments
Technique
The ipsilateral hand of the examiner fixes the leg at the distal and medial side (i.e. the left hand of the examiner on the right leg of the patient). The contralateral hand is placed on the midfoot, so that the heel of the hand rests at the fifth metacarpal bone and the fingers encircle the medial border. The heel of the hand now presses the foot downwards and inwards. Meanwhile, supination is performed by an upward pulling of the fingers at the medial border (Fig. 55.3).
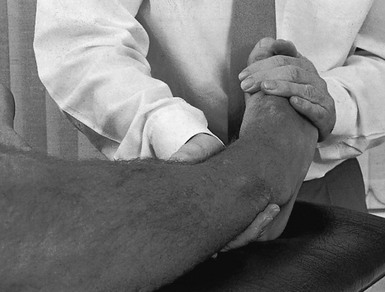
Fig 55.3 Testing the lateral ligaments.
Medial ligaments
Technique
With the contralateral hand, the examiner fixes the patient’s lower leg at the distal and lateral side. The ipsilateral hand encircles the midfoot. The hand lies on the first metatarsal and the fingers encircle the lateral border. The hand forces the foot into plantiflexion and valgus. Meanwhile, the fingers provide a pronation movement (Fig. 55.4).
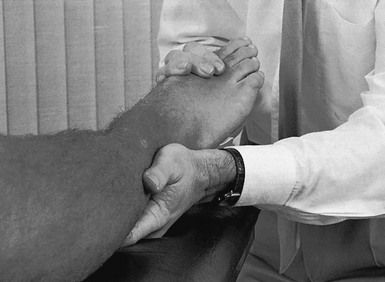
Fig 55.4 Testing the medial ligaments.
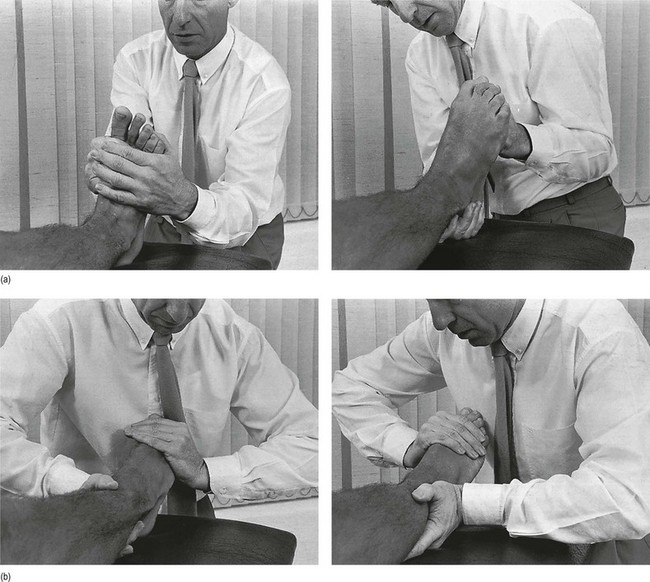
Tibiofibular ligaments
A strong varus movement applied to the talus held in a neutral position forces this bone as a wedge between the two malleoli, so testing the integrity of the distal tibiofibular ligaments. In a normal ‘mortice’, the strong tibiofibular and lateral collateral ligaments prevent separation of the tibia and fibula. When there is ligamentous rupture or laxity, the fibula can be pressed outwards, a circumstance that is detected by a palpable click when the tibia and the fibula engage after their momentary separation. In total rupture of the anterior talofibular or the calcaneofibular ligaments, this test will also be positive. Differentiation should then be made using the anterior drawer test (see p. 784).
Technique
The ipsilateral hand fixes the patient’s leg at its inner side, just above the ankle. This position of the hand is important, both to give counterpressure and to detect the click when pressure is released. The contralateral hand grasps the foot at the heel and forces it into varus with a strong, quick thrust (Fig. 55.5).
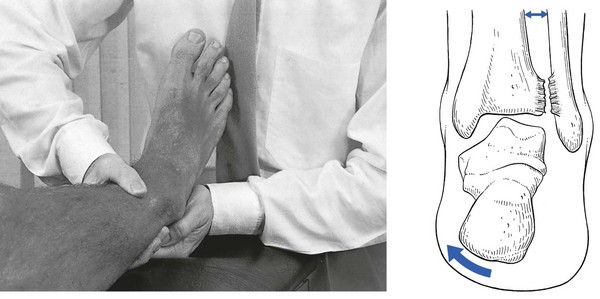
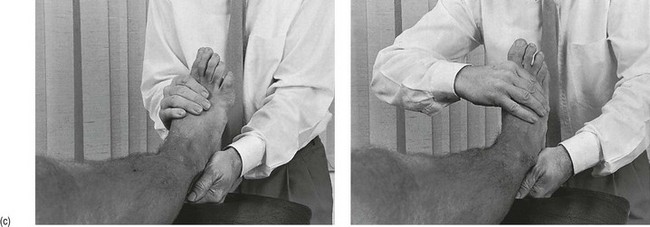
Mobility of the subtalar joint
Varus and valgus
Technique
The heel is firmly grasped between the two hands, the fingers clasped behind the heel. Dorsiflexion is performed by traction on the heel (Fig. 55.6). Because the test involves a very strong joint, with little mobility, and because it is hardly possible to obtain any leverage, the examiner must keep the heel as steady as possible. By swinging the upper half of the body, it is possible to gain a good idea of the range of motion.
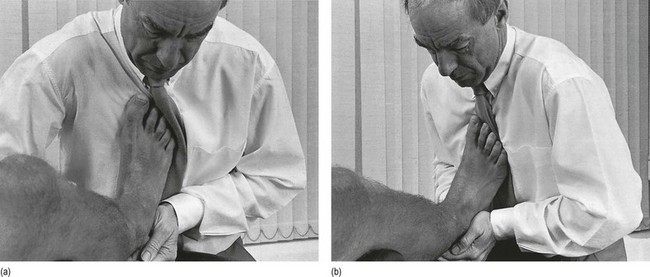
Fig 55.6 Varus (a) and valgus (b).
Passive tests for the midtarsal joints
Flexion–extension, pronation–supination, abduction–adduction
Because of anatomical characteristics, plantiflexion is often accompanied by some adduction and dorsiflexion by some abduction (see online chapter Applied anatomy of the lower leg, ankle and foot).
Technique
The ipsilateral hand encircles the forefoot, so that the thumb comes to lie under the metatarsal heads and the fingers at the dorsum of the metatarsal shafts. In this position, the examiner can easily perform plantiflexion–dorsiflexion in the foot by a simple pronation–supination movement of the arm. An adduction–abduction movement is achieved by an adduction–abduction movement of the wrist, and pronation–supination by a flexion–extension movement (Fig. 55.7). Although the range of movement varies considerably between individuals, it is surprising how much movement the normal midtarsal joints allow.