[level-membership-for-surgery-category]Chapter 43
Chest Tube Placement
Superficial Anatomy and Topographic Landmarks
1. Identification of superficial landmarks
2. Relationship of the ribs and neurovascular bundle
3. Recognition of the boundaries of the chest and pleural space
4. Differences between right and left chest
5. Cross-sectional anatomy to visualize layers of the chest wall
The first important concept of placing a chest tube or accessing the pleural space involves the ability to identify superficial anatomic landmarks (Fig. 43-1, A). The key landmarks for accessing the pleural space are identification of the clavicular head; midclavicular line; the anterior, middle, and posterior axillary lines; and intercostal spaces with corresponding ribs. The ability to count ribs accurately will facilitate the placement of chest tubes. In a female patient the nipple should not be used as a landmark. Instead, the inframammary fold should be used to identify the 5th rib at the anterior axillary line. In a male patient the lower border of the pectoralis major muscle is a good approximation for the site of tube insertion.
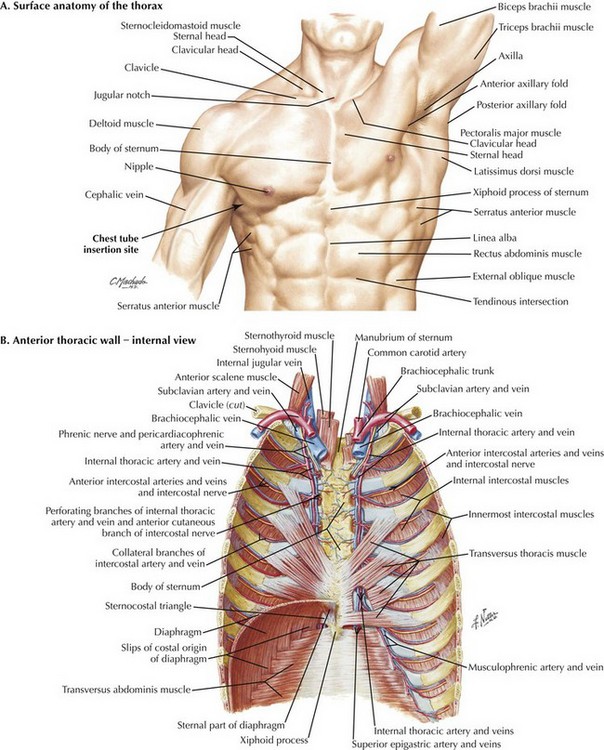
The second key concept when accessing the pleural space is to recognize that the intercostal neurovascular bundles lie just below the inferior portion of the ribs (Fig. 43-1, B). Thus it is important to place the chest tube over the most superior portion of the rib to avoid injuring the intercostal neurovascular bundle.
The third anatomic principle is to recognize the boundaries of the chest and pleural space. Failure to recognize these boundaries can result in misadventures in chest tube placement such as placing a tube into or below the diaphragm, which can cause bleeding or injury to intraabdominal or major vascular structures (Fig. 43-2, A).
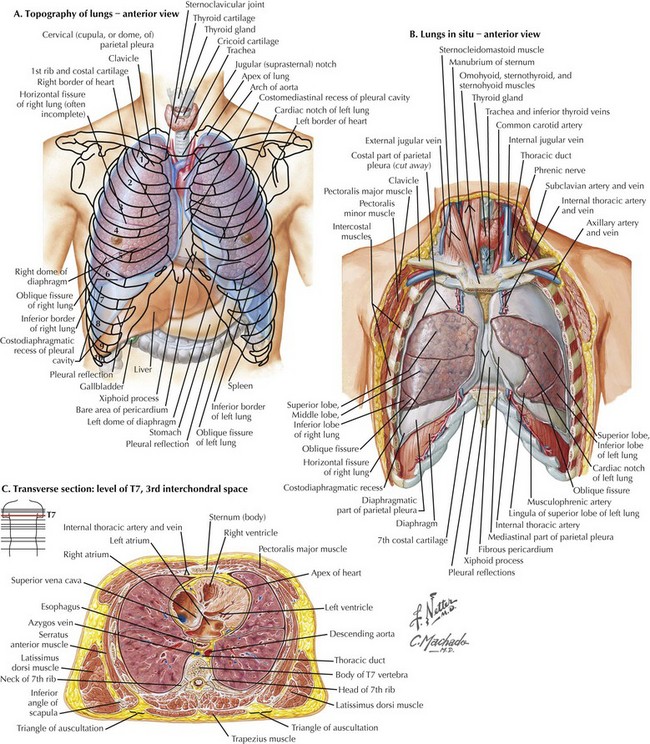
The fourth critical anatomic concept is to understand the difference between the left and right chest (Fig. 43-2, B). The key differences between the left and right chest must be appreciated when accessing the pleural space. The right lung has three lobes and the left has two lobes. The location of the horizontal fissure on the right and oblique fissure on the left is at approximately the 4th rib at the anterior axillary line. Staying below this rib can help avoid placement of the tube within a fissure.
The fifth and final important anatomic detail is to understand the cross-sectional anatomy of the chest wall and the layers that must be traversed to access the chest. These layers include the skin, subcutaneous tissue, intercostal muscles, and parietal pleura (Fig. 43-2, C).
Specific Indications and Conditions
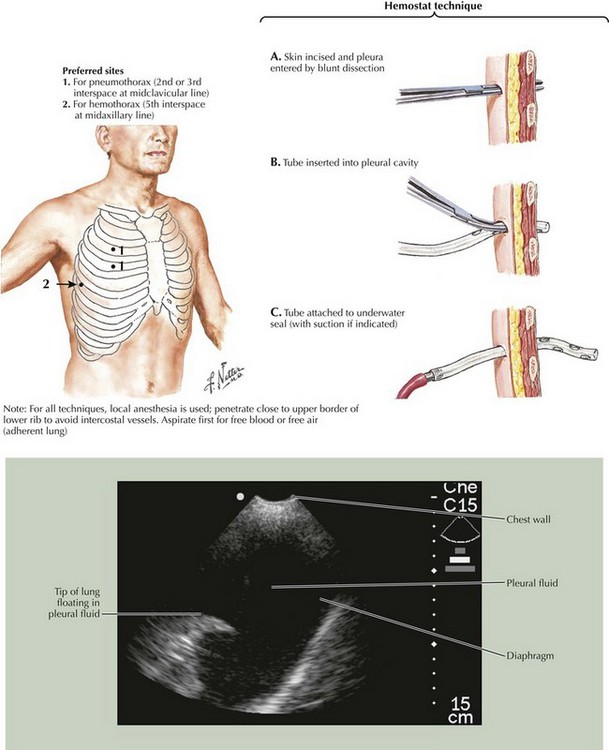
After the incision is made, tunnel through the intercostal muscles and the parietal pleura, and enter the pleural space. The classic description is to use a medium or large Kelly clamp with combined pushing and spreading, but in an urgent situation, this procedure should be done quickly with one or two passes. Once the chest cavity is entered, be sure to spread enough to allow a finger to be placed into the chest. The chest tube can be inserted through this tunnel with the assistance of the large Kelly clamp. Either close the Kelly clamp over the tube, or place the clamp tip through one of the side holes and slide it out the end of the tube (Fig. 43-3). The Kelly clamp can assist in directing the tube posteriorly to evacuate fluid or anteriorly to evacuate a pneumothorax. All the holes in the chest tube must be within the pleural space for the tube to work properly.
Dev, SP, Nascimiento, B, Simone, C, Chien, V. Chest-tube insertion. N Engl J Med. 2007;357:e15.
Hoth, JJ, Kincaid, EH, Meredith, JW, Injuries to the chest. Ashley SW, ed. ACS surgery: principles and practice. Decker: Hamilton, Ontario, 2012. www.acssurgery.com.
Varghese, TK, Jr. Chest trauma. In: Mulholland MH, et al, eds. Greenfield’s surgery: scientific principles and practice. 5th ed. Philadelphia: Wolters Kluwer/Lippincott, Williams & Wilkins; 2011:370–384.
[/level-membership-for-surgery-category][not-level-membership-for-surgery-category]Chapter 43
Chest Tube Placement
Superficial Anatomy and Topographic Landmarks
1. Identification of superficial landmarks
2. Relationship of the ribs and neurovascular bundle
3. Recognition of the boundaries of the chest and pleural space
4. Differences between right and left chest
5. Cross-sectional anatomy to visualize layers of the chest wall
The first important concept of placing a chest tube or accessing the pleural space involves the ability to identify superficial anatomic landmarks (Fig. 43-1, A). The key landmarks for accessing the pleural space are identification of the clavicular head; midclavicular line; the anterior, middle, and posterior axillary lines; and intercostal spaces with corresponding ribs. The ability to count ribs accurately will facilitate the placement of chest tubes. In a female patient the nipple should not be used as a landmark. Instead, the inframammary fold should be used to identify the 5th rib at the anterior axillary line. In a male patient the lower border of the pectoralis major muscle is a good approximation for the site of tube insertion.
[/not-level-membership-for-surgery-category]
