CERVICAL SPINE
SELECTED MOVEMENTS

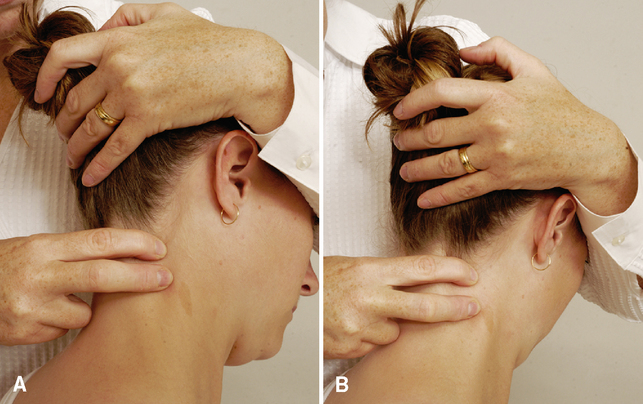
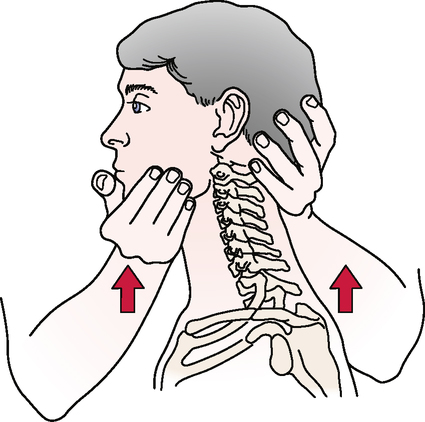
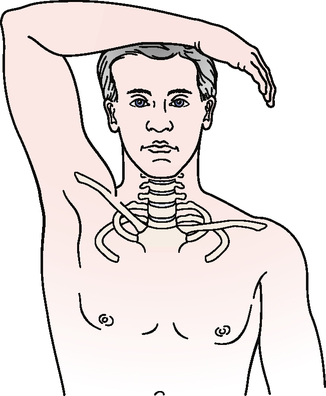
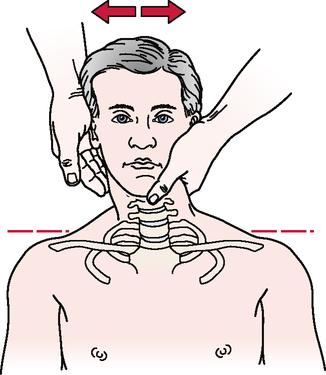
• As the patient flexes (nods) the head, the examiner can palpate the relative movement between the mastoid and transverse process of C1 on each side, comparing the two sides for hypomobility or hypermobility between C0 and C1. The examiner also can palpate the posterior arch of C1 and the lamina of C2 during the nodding movement to compare the relative movement.
• As the patient forward-flexes, the examiner should look for a posterior bulging of the spinous process of the axis (C2). This bulging may result from forward subluxation of the atlas, which allows the spinous process of the axis to become more prominent. If this sign appears, the examiner should exercise extreme caution during the remainder of the cervical assessment. To verify the subluxation, the Sharp-Purser test may be performed (see that test under Special Tests for Cervical Instability); however, it must be done with extreme care.
• The mastoid process moves away from the C1 transverse process on flexion and extension.
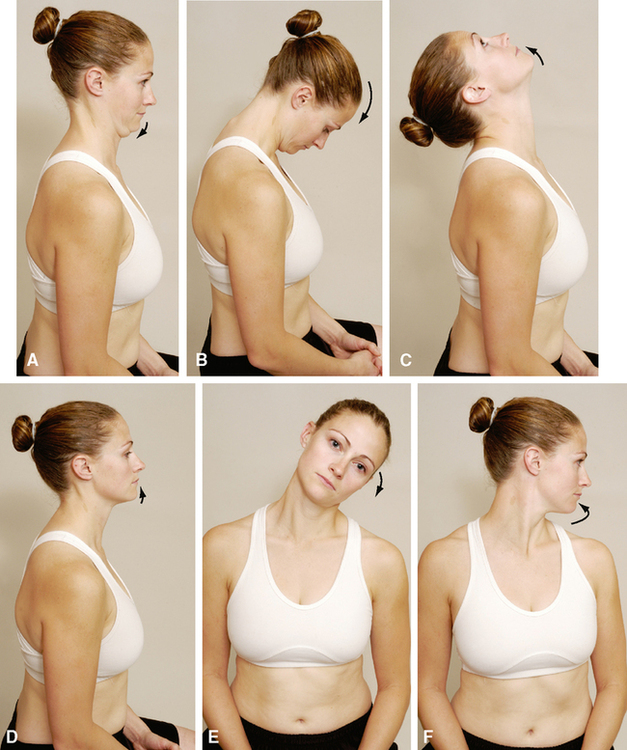
• If the deep neck flexors are weak, the sternocleidomastoid muscles will initiate the flexion movement; this causes the jaw, rather than the nose, to lead the movement, because the sternocleidomastoid muscles cause the chin to elevate before flexion occurs.
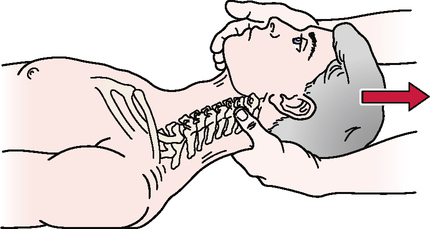
• In flexion, the intervertebral disc widens posteriorly and narrows anteriorly.
• The intervertebral foramen is 20% to 30% larger on flexion than on extension.
• The vertebrae shift forward in flexion and backward in extension.
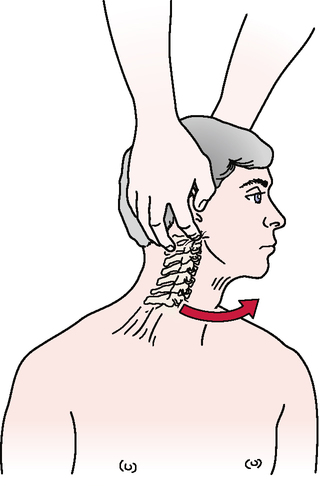
Side Flexion/Side Bend—Lower Cervical Spine
INDICATIONS OF A POSITIVE TEST
Side or lateral flexion is approximately 20° to 45° to the right and left.
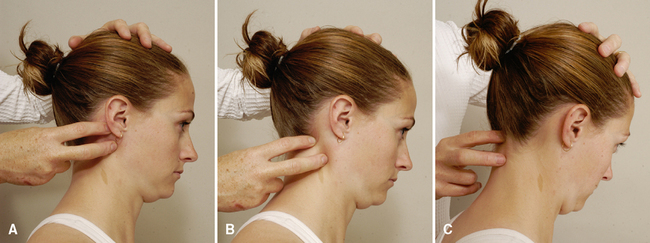
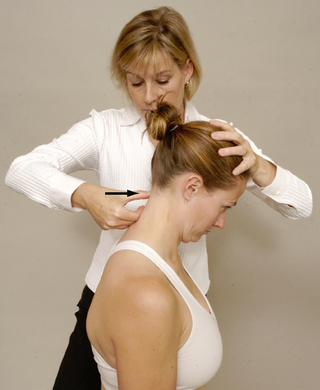
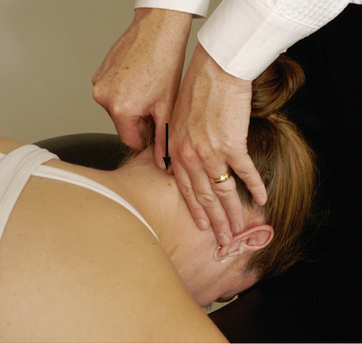
• As the patient does the movement, the examiner can palpate adjacent transverse processes on the convex side to determine relative movement at each level.
• When the patient does the movement, the examiner should make sure the ear moves toward the shoulder and not the shoulder toward the ear.
• As with rotation, the examiner should look for compensations that occur with the side flexion motion. The most common deviations are flexion and rotation. These compensations should be corrected and the motion retested. The end of motion is the point where these compensations begin to occur.
• Rotation and side flexion always occur together (coupled movement) but not necessarily in the same direction. This combined movement, which may or may not be visible in a given patient, occurs because of the coronally oblique shape of the articular surfaces of the facet joints.
• As the patient rotates the head, the examiner should note when the person begins to physically side-bend the head instead of rotate it. Although rotation and side flexion are coupled movements, visually to the examiner patients should be able to do both movements individually. This is a normal compensation for lack of rotation. The patient should be instructed not to side-bend the head, and the motion should be retested. The end of the motion is the point where the compensation begins to occur.

Side Flexion/Side Bend—Upper Cervical Spine
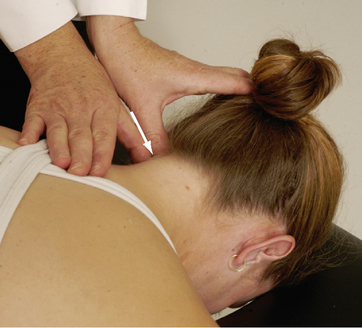
• Very little side bend occurs in the upper cervical region.
• If excessive motion occurs with this test, the examiner should suspect a pathological condition or laxity in the upper cervical region. Examiner error also may be a factor if the examiner is side-bending through the middle and lower cervical regions.
• Movement at each segment during side flexion and rotation may be felt by palpating the adjacent transverse processes on each side while doing the movement.
• Palpation in the area of the C1 transverse process generally is painful, so care must be taken during this technique.
• With all of these movements, the end feel should be tissue stretch.

INDICATIONS OF A POSITIVE TEST
Weakness or pain (or both) in the cervical spine when the muscles are tested.
• If the patient’s history includes a complaint that certain loaded or combined movements (i.e., movements that give resistance other than gravity) are painful, the examiner should not hesitate to carefully test these movements isometrically to better determine the problem.
• The examiner should make sure these movements are done with the cervical spine in the neutral position and that painful movements are done last. Resistance to the head should be built up slowly.
PERIPHERAL JOINT SCANNING EXAMINATION

Temporomandibular Joints (TMJs)
• The examiner should observe the patient as the person opens and closes the mouth and should watch for any deviation during the movement.
• The examiner will be able to see the mandibular condyle move anteriorly (visually, it appears to move laterally) on the side of dysfunction as the patient opens the mouth.


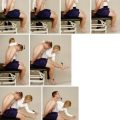
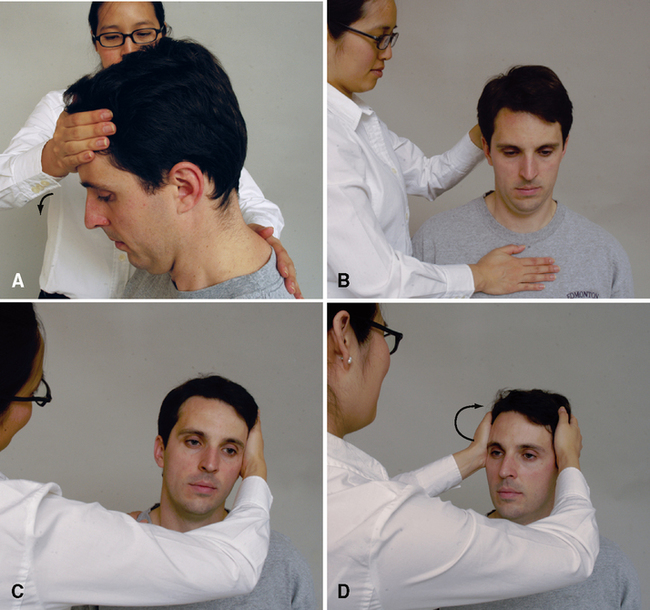
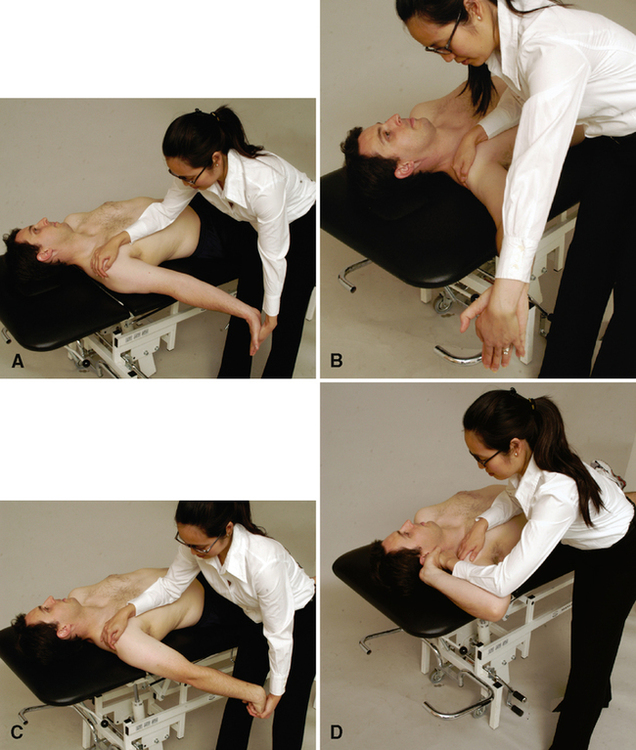
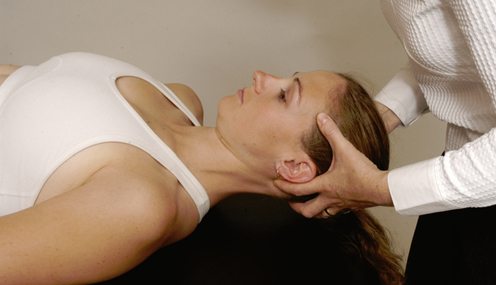
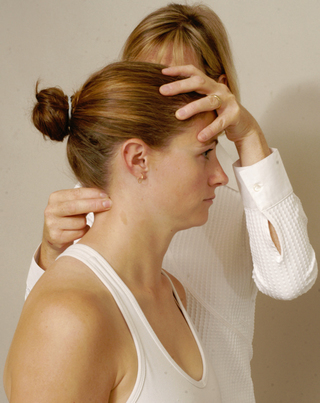
C1-C2 myotome (neck flexion). The patient’s head should be slightly flexed (a nod). The examiner applies pressure to the patient’s forehead while stabilizing the patient’s trunk with a hand between the scapulae (A). The examiner should make sure the patient’s neck does not extend when pressure is applied to the forehead.
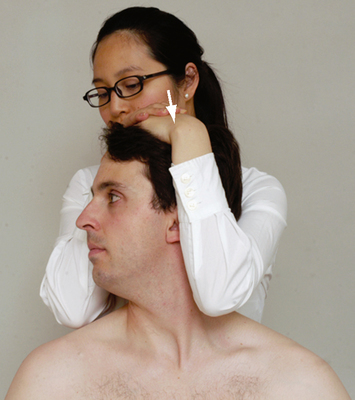
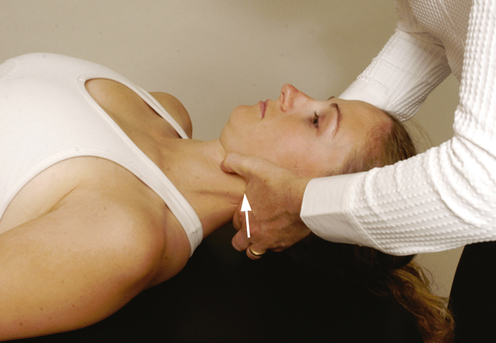
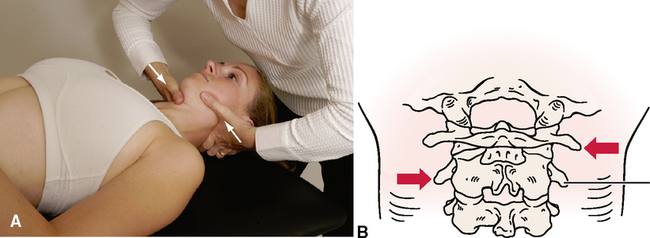
C3 myotome and cranial nerve XI (neck side flexion). The examiner places one hand above the patient’s ear and applies a side-flexion force to the head while stabilizing the patient’s trunk with the other hand on the opposite shoulder (B). Both right and left side flexion must be tested.
C4 myotome and cranial nerve XI (shoulder elevation). The examiner asks the patient to elevate the shoulders to about half of full elevation. The examiner applies a downward force on both of the patient’s shoulders while the patient attempts to hold them in position (C). The examiner should make sure the patient is not “bracing” the arms against the thighs if testing is done with the patient sitting.
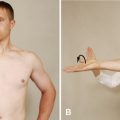
C5 myotome (shoulder abduction). The examiner asks the patient to elevate the arms to about 75° to 80° in the scapular plane with the elbows flexed to 90° and the forearms pronated or in neutral. The examiner applies a downward force on the humeral shaft while the patient attempts to hold the arms in position (D). To prevent rotation, the examiner places his or her forearms over the patient’s forearms while applying pressure to the humerus.
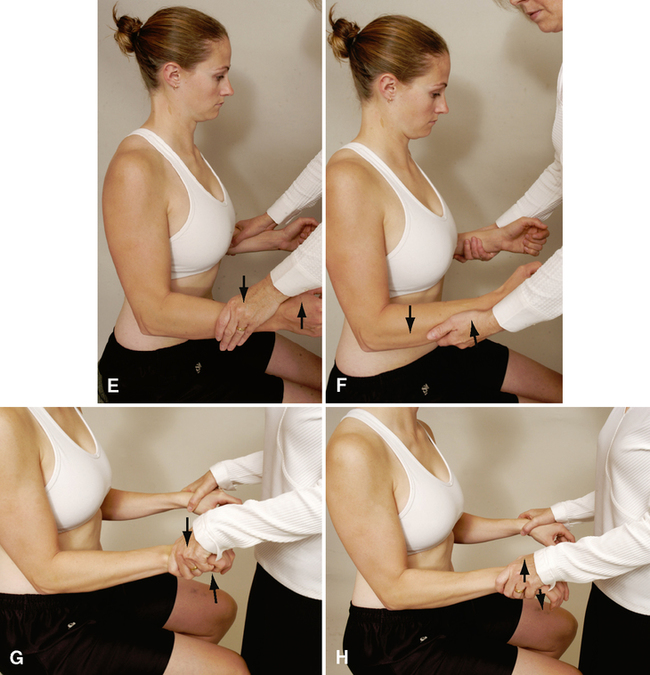
C6 and C7 (elbow flexion and extension). The examiner asks the patient to put the arms by the sides with the elbows flexed to 90° and the forearms in neutral. The examiner applies a downward isometric force to the forearms to test the elbow flexors (C6 myotome) (E) and an upward isometric force to test the elbow extensors (C7 myotome) (F). For testing of wrist movements (extension, flexion, and ulnar deviation), the patient has the arms by the side, the elbows at 90°, the forearms pronated, and the wrists, hands, and fingers in neutral. The examiner applies a downward force to the hands to test wrist extension (C6 myotome) (G) and an upward force to test wrist flexion (C7 myotome) (H).
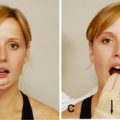
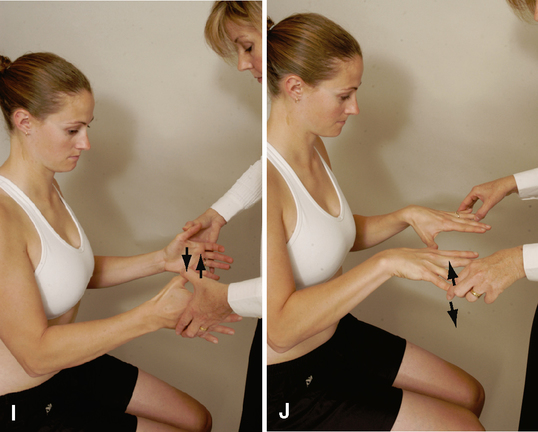
C8 myotome (thumb extension). The patient extends the thumb just short of full ROM. The examiner applies an isometric force to bring the thumb into flexion (I). A lateral force (radial deviation) to test ulnar deviation may also be performed to test the C8 myotome. The clinician stabilizes the patient’s forearm with one hand and applies a radial deviation force to the side of the hand.
T1 myotome (finger abduction/adduction). To test hand intrinsics (T1 myotome), the examiner may have the patient squeeze a piece of paper between the fingers (usually the fourth and fifth fingers) while the examiner tries to pull it away. Alternatively, the patient may squeeze the examiner’s fingers, or the patient may abduct the fingers slightly with the examiner isometrically adducting the fingers (J).

SPECIAL TESTS FOR NEUROLOGICAL SIGNS AND SYMPTOMS
Relevant Special Tests
Foraminal compression test (Spurling’s test)
Maximum cervical compression test
Upper limb tension tests (ULTTs) (brachial plexus tension or Elvey test)
Epidemiology and Demographics
Radicular and neurological symptoms cannot be diagnosed solely on the basis of demographics or epidemiology. The neurological symptoms are a reflection of another pathological condition (that is, the nerve is damaged or irritated, but the source of the damage or irritation is another structure or a part of the injury healing process); therefore, the symptoms take on the demographics of that particular pathological condition. According to a study by Wainner et al.,15 the prevalence of radicular symptoms was 23% in a sample of patients who underwent a standardized electrophysiological examination.
Relevant Signs and Symptoms
A common pattern for this pathological condition may or may not include the following:
• Pain in the neck, intrascapular region, or upper extremity
• Radiation of symptoms into the shoulder, elbow, or distal component of the dorsal and/or palmar aspect of the hand, depending on whether a nerve root (dorsal and palmar) or peripheral nerve (dorsal and/or palmar) is involved
• Pain, tingling, and/or numbness into the shoulder (anterior or posterior) and/or arm
• Aggravation of symptoms by neck movement or different postures
• Symptoms of short or long duration
• A patient over 40 years of age
• Limited ROM as a result of muscle spasm
• Weakness (atrophy may or may not be present, depending on the amount and duration of pressure on the nerve)
• Pain associated with limited ROM of the cervical spine (usually as a result of muscle spasm)
• Sensation changes along the dermatome pattern of the suspected radiculopathy or peripheral nerve lesion
Mechanism of Injury
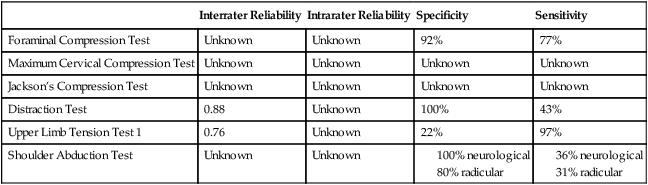
RELIABILITY/SPECIFICITY/SENSITIVITY COMPARISON15–20
| Interrater Reliability | Intrarater Reliability | Specificity | Sensitivity | |
| Foraminal Compression Test | Unknown | Unknown | 92% | 77% |
| Maximum Cervical Compression Test | Unknown | Unknown | Unknown | Unknown |
| Jackson’s Compression Test | Unknown | Unknown | Unknown | Unknown |
| Distraction Test | 0.88 | Unknown | 100% | 43% |
| Upper Limb Tension Test 1 | 0.76 | Unknown | 22% | 97% |
| Shoulder Abduction Test | Unknown | Unknown |
FORAMINAL COMPRESSION TEST (SPURLING’S TEST)15–17,21,22 
• Bradley et al.22 advocated doing this test in three stages, each of which is increasingly provocative; if symptoms are produced, the examiner does not proceed to the next stage. The first stage involves compression with the head in neutral. The second stage involves compression with the head in extension. The final stage involves compression with the head in extension and rotation to the unaffected side. If this is negative, compression with the head in extension and rotation to the affected side is tested.
• Radiculitis implies pain in the dermatomal distribution of the affected nerve root.
• If pain is felt in the side opposite that to which the head is taken, this is called a reverse Spurling’s sign. It indicates muscle spasm in conditions such as tension myalgia.
• Bilateral symptoms may indicate a myelopathy.
• A common clinical mistake is to pull the head into further rotation and extension when loading the spine. Instead, the force should be compressive with no further rotation or extension occurring.
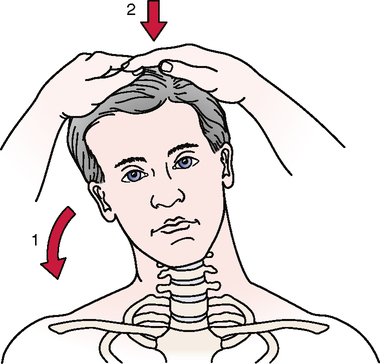
MAXIMUM CERVICAL COMPRESSION TEST23,24 
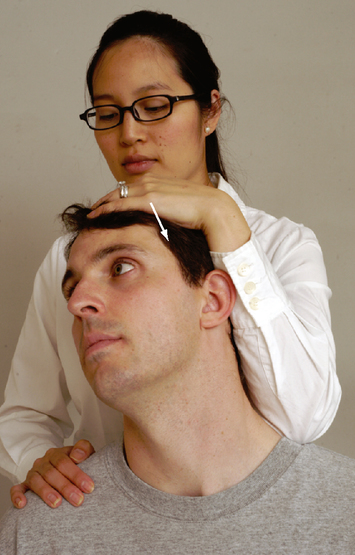
• The second position (side flexion, rotation, and extension) may also compress the vertebral artery. If the vertebral artery is being tested, the position should be held for 20 to 30 seconds to elicit symptoms (e.g., dizziness, nystagmus, feeling faint, nausea) that would indicate compression of the vertebral artery rather than a neurological problem.
• Neck pain with no radiation into the shoulder or arm does not constitute a positive test result.


• If the patient abducts the arms while traction is applied, the symptoms in the shoulder often are further relieved or lessened, especially if the C4 or C5 nerve roots are involved. Nevertheless, the test findings still indicate nerve root pressure in the cervical spine, not a pathological condition of the shoulder.
• Increased pain on distraction may be the result of muscle spasm, ligament sprain, muscle strain, dural irritability, or disc herniation.
• It may take a few minutes for the neurological symptoms to change.
UPPER LIMB TENSION TESTS (ULTTs) (Brachial Plexus Tension or Elvey Test)12,15,17–20,24,26,27 
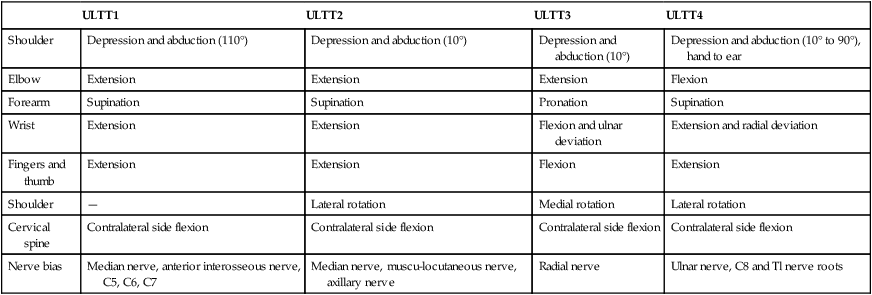
The examiner decides which of the four tests would be relevant based on the patient’s symptoms (Table 2-1). In each test, the unaffected side is tested first. The examiner positions the shoulder first, followed by the forearm, wrist, fingers, and, last, because of its large ROM, the elbow. This allows easier measurement of the available ROM, which can change as the condition improves or worsens. Each phase is added until neurological symptoms are produced. Once symptoms have been produced, the location of the symptoms is noted and the test is stopped. To further “sensitize” the test, side flexion of the cervical spine may be performed to further increase symptoms.
Table 2-1
Upper Limb Tension Tests (ULTT) Showing Order of Joint Positioning and Nerve Bias
| ULTT1 | ULTT2 | ULTT3 | ULTT4 | |
| Shoulder | Depression and abduction (110°) | Depression and abduction (10°) | Depression and abduction (10°) | Depression and abduction (10° to 90°), hand to ear |
| Elbow | Extension | Extension | Extension | Flexion |
| Forearm | Supination | Supination | Pronation | Supination |
| Wrist | Extension | Extension | Flexion and ulnar deviation | Extension and radial deviation |
| Fingers and thumb | Extension | Extension | Flexion | Extension |
| Shoulder | — | Lateral rotation | Medial rotation | Lateral rotation |
| Cervical spine | Contralateral side flexion | Contralateral side flexion | Contralateral side flexion | Contralateral side flexion |
| Nerve bias | Median nerve, anterior interosseous nerve, C5, C6, C7 | Median nerve, muscu-locutaneous nerve, axillary nerve | Radial nerve | Ulnar nerve, C8 and Tl nerve roots |
• These stress tests are contraindicated if the neurological signs are worsening or in the acute phase when the patient history is taken.
• During tension testing, symptoms are more easily aggravated with upper limb testing than with lower limb testing.
• The elbow position often is not performed until last, because the large elbow ROM is easiest to measure if the available range is being recorded to show change in the condition over time.
• The tests are designed to stress tissues. In addition to the neurological tissues, they stress some contractile and inert tissues. Differentiation among the types of tissues depends on the signs and symptoms manifested.

SPECIAL TEST FOR VASCULAR SIGNS AND SYMPTOMS31–33
Relevant Special Test
Vertebral artery (cervical quadrant) test
Epidemiology and Demographics
In the United States, 25% of strokes occur in a vertebrobasilar distribution. Age is a factor in that the incidence of vertebrobasilar insufficiency (VBI) increases with age. The incidence is highest in individuals 60 to 70 years old. Men are more prone to VBI then women, and African Americans have a greater prevalence then Caucasians.34–36
Mechanism of Injury
Licht et al.37,38 conducted two studies that addressed the effect of cervical position on blood flow. They found no significant decrease in contralateral blood flow volume despite decreases in blood flow velocity. Yi-Kai et al.39 found that vertebral artery flow decreased with extension and rotation in both the contralateral and ipsilateral vertebral arteries, with the most significant decrease occurring in the contralateral artery.
After an extensive review of studies on vertebral artery blood flow, Terrett40 concluded that rotation with or without extension applies the most stress to the vertebral arteries, with the greatest stress to the vertebral artery occurring between the atlas and axis transverse foramina. Lateral flexion of the neck appeared to have little effect on vertebral artery blood flow.
Reliability/Specificity/Sensitivity Comparison
VERTEBRAL ARTERY (CERVICAL QUADRANT) TEST41–54 
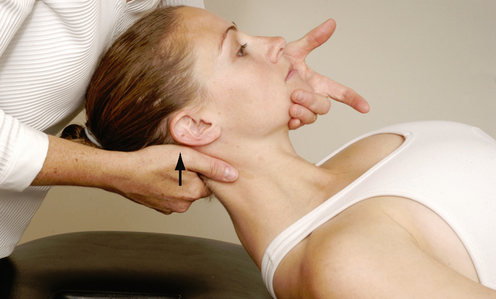
• The DeKleyn-Nieuwenhuyse test performs a similar function but involves extension and rotation rather than extension and side flexion. Both tests may be used to assess nerve root compression in the lower cervical spine, but the symptoms will be different.
• To test the upper cervical spine, the examiner “pokes” the patient’s chin and follows with extension, side flexion, and rotation of the cervical spine and holds the position for 30 seconds or until symptoms appear.
• The vertebral artery (cervical quadrant) test is similar to Spurling’s test for nerve root compression. The chief difference is that no compressive force is placed through the spine when the examiner is assessing blood flow.
SPECIAL TESTS FOR CERVICAL INSTABILITY
Relevant Special Tests
Aspinall’s transverse ligament test
Transverse ligament stress test
Anterior shear or sagittal stress test
Atlantoaxial lateral (transverse) shear test
Epidemiology and Demographics
In adults, 15% of all fractures of the cervical spine involve the odontoid process; in children under age 7 years, 75% of these fractures involve the odontoid.55–57 Cervical spine subluxations are seen in 43% to 86% of patients with rheumatoid arthritis. They occur more frequently in men, even though women have a greater propensity for rheumatoid arthritis. Atlantoaxial subluxation occurs in 11% to 39% of patients with rheumatoid arthritis.58–60 Cervical instability should be highly suspected if the patient history includes a complaint of a feeling of instability, a lump in the throat, lip paresthesia, severe headache (especially with movement), muscle spasm, nausea, or vomiting.4
Mechanism of Injury
Common means of injury include motor vehicle accidents and falls that involve head trauma. Biomechanically, if the transverse ligament or odontoid process is damaged, C1 translates forward (subluxes) on C2 during upper cervical flexion. This results in spinal cord or brain stem symptoms as the posterior aspect of C1 encroaches on the spinal cord. Some have hypothesized that odontoid fractures occur as a result of trauma that involves a combination of flexion, extension, and rotation.55,56 Although the mechanism of injury typically is trauma, some disease processes (e.g., rheumatoid arthritis, Cushing’s disease, and Down’s syndrome) can weaken the bone and ligaments to the point of failure or increased laxity.
Clinical Note/Caution
• The examiner should use caution when testing for upper cervical instability. Generally, these patients have significant muscle guarding in the upper cervical region, and if spinal segments truly are injured or lax, care must be taken not to injure the involved structures further. Slow, gentle motions should be used for the test.

• If the odontoid process is intact, the patient may be reluctant to forward flex the head, because if the transverse ligament has been torn, the odontoid process could press against the spinal cord.
• Caution should be used in testing for upper cervical instability. Generally, these patients have significant muscle guarding in the upper cervical region, and if spinal segments are truly injured or lax, care must be taken not to injure the involved structures further. Slow, gentle motions should be used for the test.


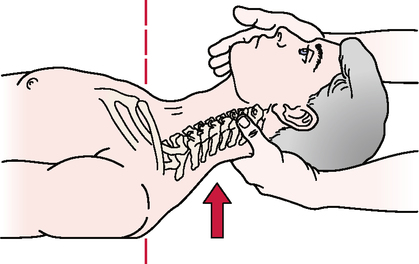
ANTERIOR SHEAR OR SAGITTAL STRESS TEST64,65 
• This test is designed to move an unstable superior segment anteriorly on a stable caudal segment in the cervical spine. If enough instability exists, the anterior motion results in compression of the spinal cord or the inferior portion of the brain stem. In either case, care should be taken not to injure these two structures.
• Motions should be slow and controlled. Excessive force or motion is not required to produce symptoms if instability exists.
ATLANTOAXIAL LATERAL (TRANSVERSE) SHEAR TEST63,64 
• The patient should be warned before the test is performed that pain is a normal sensation, because soft tissues are compressed against bone.
• This technique also can be used to test other levels of the cervical spine (e.g., C2 to C7).
• Caution should be used in testing for upper cervical instability. Generally, these patients have significant muscle guarding in the upper cervical region, and if spinal segments truly are injured and lax, care must be taken not to injure the involved structures further. Slow, gentle motions should be used for the test.
LATERAL FLEXION ALAR LIGAMENT STRESS TEST63,64,66 

SPECIAL TEST FOR MUSCLE STRENGTH
Relevant Special Test
Epidemiology and Demographics
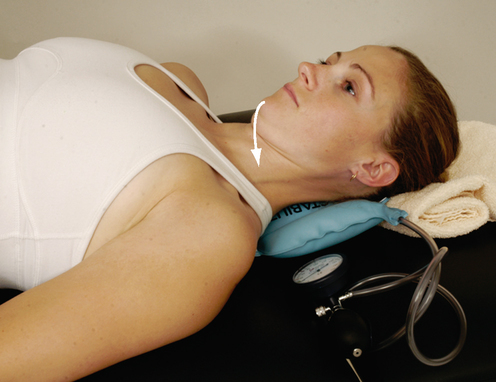
Neck pain affects 10% of the population in the United States at any given time. It is more common in women then in men.67 Although the exact number of patients with altered muscle recruitment patterns is not known, it seems logical to hypothesize that many, if not all, individuals with neck pain also have altered muscle strength and endurance in the cervical deep neck flexors.

SPECIAL TEST FOR FIRST RIB MOBILITY
Relevant Special Test
Relevant Signs and Symptoms
• Upper thoracic and/or cervicothoracic pain
• Cervical tightness or pain (muscle spasm)
• Symptoms that can be exacerbated by breathing
• Symptoms that radiate into the upper extremity, including numbness, tingling, skin pallor, and changes in skin temperature
• Neurological or vascular symptoms in the upper quarter region (thoracic outlet syndrome/brachial plexus injury)
Mechanism of Injury
The condition may manifest as thoracic outlet syndrome, brachial plexus injury, or limited cervical or shoulder motion. Clinically, first rib dysfunction or first rib mobility limitations are more commonplace. Lindgren71 postulated that the first rib is “susceptible to subluxation because it lacks a superior supporting ligament.” Subluxation of the first rib may be due to the pull of the scalene muscles. If an accessory movement pattern is seen with respiration or if the scalene muscles are guarding injured cervical tissue, the mobility of the first rib may be affected. Fracture of the first rib may result from direct blows to the rib, but actual fractures are rare. This may be due partly to the smaller size of this rib compared with the other ribs and its protected position behind the clavicle. When they occur, fractures of the first rib can cause subsequent trauma to the arteries, veins, and nerves of the upper extremity. First rib dysfunction also may result from automobile accidents, which may cause either compressive or tensile forces on the first rib.

• This test also may be performed with the patient prone. With the patient in the prone position, the examiner again palpates and pushes the first rib caudally.
• Although the first rib normally is included in the assessment of the thoracic spine or shoulder, the examiner should always test for mobility of the first rib when examining the cervical spine, especially if side flexion is limited and pain or tenderness is present in the area of the first rib, T1, or scalenes.
JOINT PLAY MOVEMENTS


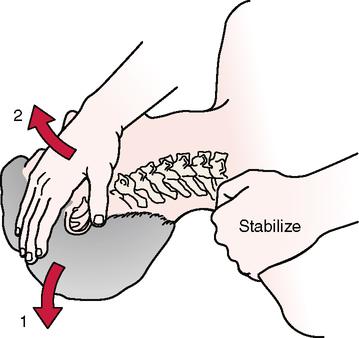
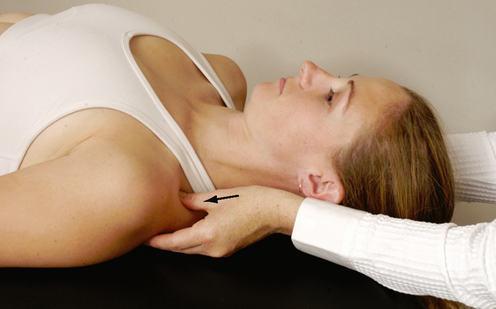
POSTERIOR-ANTERIOR UNILATERAL VERTEBRAL PRESSURE (PAUVP)74 
TRANSVERSE VERTEBRAL PRESSURE (TVP)74 
• This technique also can be performed with the patient in the side-lying position; however, care must be taken to maintain neutral alignment of the cervical spine. This can be accomplished through the use of pillows or a folded towel.
• The movement of the affected vertebrae can be compared with that of the unaffected vertebrae.