[level-membership-for-neurosurgery-category]
Chapter 76 Cervical Discectomy
Indications for Cervical Discectomy
Age-related degeneration as well as trauma can lead to disc pathology requiring surgical excision. Commonly accepted indications for cervical discectomy include myelopathy and persistent radiculopathy that is unresponsive to nonsurgical measures.1,2 Less commonly accepted indications include axial neck pain and/or headaches3 that can be attributed to the disc pathology. The pathologic cervical disc can be approached ventrally and dorsally. Both approaches have been in use for over a half century4–8 and still find utility today.
The dorsal approach is indicated for a soft, foraminal (lateral) disc herniation with radiculopathy.1 One of the major advantages is that the posterior approach can be performed via a “keyhole” foraminotomy without creating instability at the segment. Disadvantages include the technical challenges (positioning, epidural bleeding, wound complications) and the surgeon’s learning curve, as this procedure is less commonly performed than is the more versatile ventral approach in most centers. Additionally, central disc herniations, “hard” disc herniations with uncovertebral bone spurs, and myelopathy are not adequately addressed via this approach. The dorsal approach for a discectomy via a foraminotomy can be accomplished with a small traditional midline incision and a self-retaining retractor9,10 or with a tubular retractor system.11
The ventral approach is very familiar to most spine surgeons. In most patients, the C3-4 level down to the C7-T1 level can be approached via a standard ventrolateral approach. Advantages of the ventral approach include access for central and bilateral foraminal decompression. Although some authors have reported good results for anterior discectomy without interbody fusion, interbody fusion following discectomy has become the standard of care in most centers. Recent trends include the use of allograft along with ventral cervical plates.12 Cervical disc arthroplasty devices are now available and can be used for postdiscectomy reconstruction; excellent results have been reported in properly selected patients.13,14
Anterior Cervical Discectomy
Anterior Cervical Discectomy and Fusion Technique
Preoperative Planning
It may be appropriate in revision settings to get a preoperative otolaryngology consult to evaluate vocal cord paralysis.15 If a vocal cord paralysis exists, the approach should be made on the ipsilateral side to avoid a potential bilateral paralysis. An approach on the right side may put the recurrent laryngeal nerve at more risk, while a low approach on the left side may put the thoracic duct at risk.
Intraoperative Procedures
The anesthesiologist administers 10 mg of intravenous decadron to minimize ventral swelling and prophylactic antibiotics (usually cefazolin 1 g) to minimize the risk of infection.
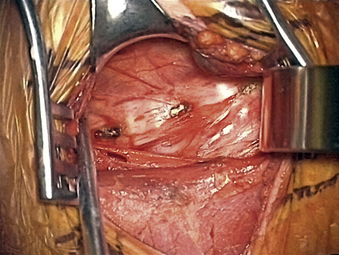
The carotid tubercle, usually at C6, and ventral osteophytes can be palpated to estimate levels. The prevertebral fascia is cleared off the discs (hills) and vertebral bodies (valleys) using scissors and forceps with a nick-and-spread technique. The hand-held retractor is then replaced under this layer (Fig. 76-1).
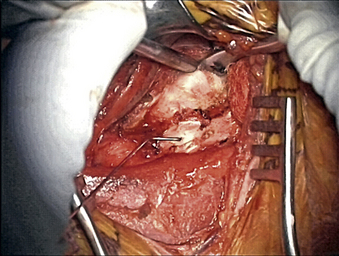
Once the radiology technician is present, a bent 12-mm, 14-mm, or 16-mm spine needle (based on preoperative radiographic measurement) is placed in the disc space of choice. The carotid tubercle and/or ventral osteophytes can be used to predict the level (Fig. 76-2). Dissection can continue while the film is being processed. The sterile draped microscope is then brought into the field. The “valley” of the ventrolateral aspect of the vertebral body above and below the suspected disc is cauterized to get the segmental arteries and perforating branches. The longus colli is elevated off the vertebral body “valley” by using coagulate (cranial and caudal enough to place the plate comfortably) and then off the ventral disc “hill.” The safe (nonanomalous) position of the vertebral artery should be confirmed on the preoperative axial MRI or CT prior to elevation of the longus. The longus colli in the upper cervical spine (i.e., C3-4 and higher) is less muscular and less well defined. A Penfield 2 can be used to safely elevate the longus at the vertebral body out laterally over the transverse process. Bleeding bone on the front side of the vertebral body under the elevated longus can be coagulated with bone wax used as needed. If bleeding starts from the undersurface of the longus or out laterally, a hemostatic agent and a large cottonoid patty can be used. The self-retaining (Shadowline or similar) retractors are placed underneath the elevated layer of the longus colli. The hand-held retractor is used to move the esophagus so that the self-retaining retractor blade can be safely placed under the longus. An assistant’s hand on the medial self-retaining retractor handle can stabilize downward and keep it correctly positioned (Fig. 76-3). The vertebral body just cranial and caudal to the disc space is prepared for insertion of the Caspar retraction posts. Prior to insertion of the Caspar pins, a rongeur or bur is used to remove the ventral osteophytes until they are flat with the ventral surface of the vertebral body. Caspar pins (usually 14 mm or 16 mm based on preoperative and localizing radiographs) are inserted by hand. Careful insertion is important if the patient is very myelopathic or stenotic. The superior post should be farther away from the cranial inferior end plate, but the inferior post is just below the caudal superior end plate. This is due to the angled shape and orientation of the cervical vertebral bodies, and will allow good purchase of the screws. The Caspar pins can be inserted slightly diverging to allow for lordosis. Proper insertion of the Caspar posts is critical. The posts must both be in the center of the vertebral bodies, since going off center with one post may result in vertebral twisting and scoliosis after the Caspar retractor is placed. If the posts are not placed in the center but are both off to one side, the distraction of the interspaces will be asymmetrical and lead to uneven end-plate preparation while the posts are retracting. Excellent visualization of the bodies before placing the posts will help to avoid errors at this step. Centering with reference to the spine is more reliable than centering with reference to the patient’s chin and sternal notch. The cranial angulation of the disc space should be parallel to the path of the Caspar pin in the sagittal plane. It can be helpful to identify the disc space with a Bovie or #15 blade if the surgeon is unsure of the location or angle. The posts must diverge or be parallel when inserted to lordose the spine and prevent the cephalad post from entering the end plate, given the upward sloping nature of the end plate. If the Caspar pins are not placed divergently, the threads of the cephalad post may be encountered while burring out the end plate.

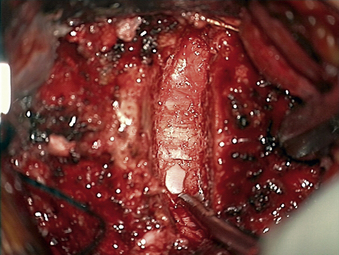
A #15 blade is used to cut the width of the ventral anulus (the cutting portion of a #15 blade is 11 mm exactly). Multiple passes are made through the disc, going no deeper than the cutting portion of the blade while turning the blade vertically at the lateral edges of the disc space. The lateral border of the vertebral body is a reasonable guide to determine the location of the vertebral artery. A Penfield 4 can be placed around the edge of the body just for conceptualization. A pituitary rongeur is used to remove initial disc fragments. The Caspar retraction can be increased once the ventral anulus has been excised. A curette (Codman Microsect 4B) can be held like a dagger or a pencil while scraping the disc thoroughly. A side-to-side motion is safe as far lateral as the uncovertebral joint allows. The path of the curette should be smile-shaped during the initial passes, not just horizontal. Resting the hand on the patient with all maneuvers will give stabilization and control. A pituitary rongeur is again used to remove numerous pieces of disc and bone and cartilaginous end plate from the field. Keeping the nondominant hand on the patient and using two hands to control the pituitary rongeur will avoid plunging into the canal. A smaller curette (Codman Microsect 2B) can be used to get into foramen by first using a twisting or scooping motion to get the cartilage out of the uncovertebral joint and then using an upward pulling motion to get the uncovertebral process to break and come out of the foramen ventrally. The curette tip should always be kept against the superior vertebral bone medially to prevent accidental injury to an artery. The microscope should be tilted to angle into the intervertebral space optimally. Suction in the nondominant hand should rest on the patient for control and stability while in the disc space. A bur is used to remove the inferior end plate of cephalad vertebrae ventrally. Constant irrigation will keep the field clear. The goal is to make the end plates bleed and flat. The end plates are burred centrally back to the posterior longitudinal ligament (PLL). The last anular fibers can be burred away, leaving longitudinally oriented PLL fibers. The disc space can be squared off by going laterally and taking down some of uncinate bilaterally. The smaller curette can be used to remove any remaining dorsal anular fibers and dorsal osteophyte/PLL if necessary. The PLL may need to be removed only if the surgeon is going after extruded disc. Any remaining dorsal lip of vertebral body can be removed with the bur before the PLL is taken, as the PLL serves as a safety backboard (Fig. 76-4). Inadequate foraminal decompression may lead to residual radicular symptoms. For unciatectomy or wide foraminotomy, the uncinate can be identified by carefully going out of the joint laterally with the 2B curette and turning caudally. A Penfield 4 and then a Penfield 2 can be used to identify the lateral aspect of uncinate (protecting the vertebral artery). With the Penfield held by the assistant, the uncinate can be burred in a ventral-to-dorsal direction. A medial-to-lateral direction is more dangerous, because the bur is then moving toward the vertebral artery, which lies lateral to the uncinate (Fig. 76-5).

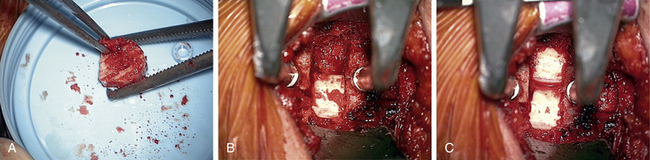
After the decompression is complete, a sizer is used to check for the size of interbody graft. A typical graft size is somewhere around 7 to 9 mm and can be estimated from preoperative imaging studies (especially of adjacent healthy levels). If the sizer is not going in smoothly, it is much safer to gently tap it into place with a mallet than to push toward the spinal cord in an uncontrolled manner (Fig. 76-6). In attempting to access C7-T1 when visualization is difficult because of the angle of the disc space and obstruction of the clavicle, it may be necessary to perform a greater end-plate resection of C7 or even a corpectomy if the added end-plate resection results in a weak surface for graft support.
The retractors are then removed, and radiographs are taken. While radiographs are being processed, the wound is checked for bleeders, and hemostasis is obtained with hemostatic agents and cottonoids (see Fig. 76-3).
Complications of Anterior Cervical Discectomy
Complications following anterior cervical discectomy are infrequent but can be life threatening.16,17 In addition to neurologic deterioration, dural injury, and inadequate decompression with persistent or recurrent symptoms, injuries to vital structures in the neck including the esophagus and the vertebral artery have been reported. These must be promptly recognized and properly treated to minimize patient morbidity. Likewise, postoperative airway compromise must be promptly recognized and emergently treated to avoid patient mortality. Soft tissue swelling associated with prolonged retraction, hematoma, seroma, and implant/graft dislodgement can all contribute to airway compromise. Dysphagia and dysphonia occur following ventral cervical approaches and have traditionally been underreported in the literature. Most of these will resolve with time but in recalcitrant cases should be referred for otolaryngology evaluation.
Esophageal injuries may not be detected with intraoperative dye.18 If any suspicion of esophageal injury exists, it is prudent to keep the patient nil per os (NPO) and obtain consultation from a thoracic or head and neck surgeon.
Dorsal Cervical Discectomy
Dorsal Cervical Foraminotomy and Discectomy Technique
Intraoperative Procedures
Patients are placed prone on the operating table with the neck in flexion. Gardner-Wells tongs are used to apply traction (10 to 20 pounds) via a flexion vector. On the OSI table, three pins should be in place at the superior portion of the bed. The head of the bed should have the pin placed in the superiormost hole, and the foot of the bed should be placed lower in the H-bar to allow for maximum reverse Trendelenburg position (minimizes venous bleeding). Two traction ropes for intraoperative traction (one for flexion and one for extension) can be used if the plan is to instrument and fuse after the discectomy. The flexion vector is usually through the central portal, and the extension vector is over the central groove in the traction H-bar. The flexion position is used for the incision and closure as well as decompression (foraminotomy/discectomy). The extension rope is used in performing a concomitant instrumented fusion to allow lordosis. It can also be used to check the adequacy of the foraminal decompression with the patient’s neck extended. The full chest pad is placed in the appropriate position with two iliac crest pads placed at the level of the pelvis and a sling for the legs. A strap or tape across the buttocks will prevent caudal migration of the patient once in reverse Trendelenburg position.
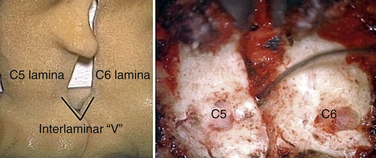
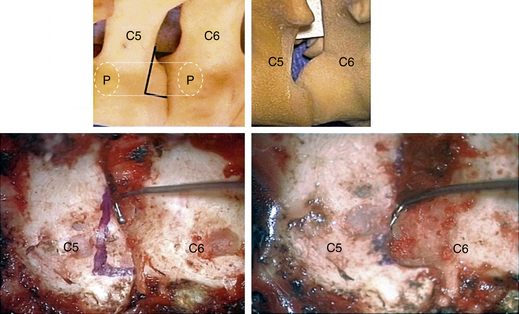
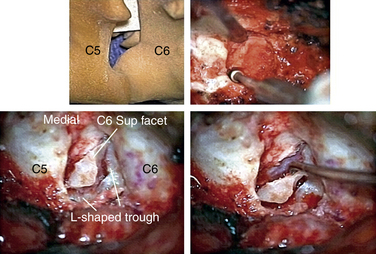
In performing a foraminotomy, the interlaminar V of the lateral aspect of the desired laminar interspace is the starting point (Fig. 76-7). The interlaminar V points to the affected joint and disc level. A high-speed bur is used with one hand held like a pencil as close to the bottom of the bur as possible for better control. The surgeon’s fingers should point down into the wound as a result; the other hand holds a small Frazier suction tip, and the assistant irrigates. The bur is maneuvered in small, circular motions, getting gradually deeper (ventral); in-and-out motions are to be avoided. The inferior articular process of the superior vertebra is burred away, leaving the superior articular process of the inferior vertebra (Fig. 76-8). If the facet joints are arthritic and have large spurs, the foraminotomy hole can become quite deep. Frequent irrigation and suction will maintain visualization. Burring is stopped once soft tissue is seen protruding through the remaining bone at the “floor” or on the “walls” of the foraminotomy or the bone takes on a translucent appearance from becoming so thin (Fig. 76-9).
It is preferable to complete the drilling laterally first, rather than medially, because if the medial cortex if perforated first, the engorged vein underneath protrudes while the surgeon is trying to complete the lateral drilling and causes considerable bleeding and difficult visualization.
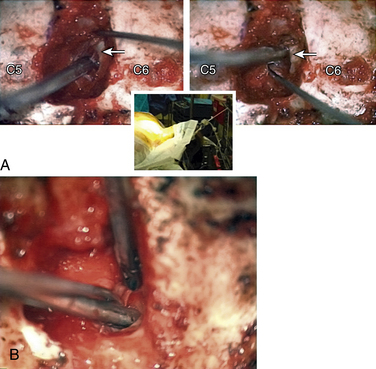
The thoroughness of the decompression is assessed by palpating the superior and inferior pedicles with the tip of the Codman curette or a nerve hook. Once the entire interpedicular region has been unroofed, the bony decompression is done(Fig. 76-10). The nerve root can be gently retracted superiorly and the disc material removed with a small nerve hook or pituitary rongeur. Resecting 50% of the cervical facet does not typically require fusion or stabilization (Fig. 76-11).
Anderson P.A., Sasso R.C., Riew K.D. Update on cervical artificial disk replacement. Instr Course Lect. 2007;56:237-245.
Daniels A.H., Riew K.D., Yoo J.U., et al. Adverse events associated with anterior cervical spine surgery. J Am Acad Orthop Surg. 2008;16(12):729-738.
Edwards C.C.II, Karpitskaya Y., Cha C., et al. Accurate identification of adverse outcomes after cervical spine surgery. J Bone Joint Surg [Am]. 2004;86(2):251-256.
Lehman R.A.Jr., Riew K.D. Thorough decompression of the posterior cervical foramen. Instr Course Lect. 2007;56:301-309.
Rhee J.M., Yoon T., Riew K.D. Cervical radiculopathy. J Am Acad Orthop Surg. 2007;15:486-494.
Riew K.D., Buchowski J.M., Sasso R., et al. Cervical disc arthroplasty compared with arthrodesis for the treatment of myelopathy. J Bone Joint Surg [Am]. 2008;90(11):2354-2364.
1. Rhee J.M., Yoon T., Riew K.D. Cervical radiculopathy. J Am Acad Orthop Surg. 2007;15:486-494.
2. Riew K.D., Buchowski J.M., Sasso R., et al. Cervical disc arthroplasty compared with arthrodesis for the treatment of myelopathy. J Bone Joint Surg [Am]. 2008;90(11):2354-2364.
3. Riina J., Anderson P.A., Holly L.T., et al. The effect of an anterior cervical operation for cervical radiculopathy or myelopathy on associated headaches. J Bone Joint Surg [Am]. 2009;91(8):1919-1923.
4. Cloward R.B. The anterior approach for removal of ruptured cervical discs. J Neurosurg. 1958;15:602-614.
5. Mixter W.J., Barr J.S. Rupture of the intervertebral disc with involvement of the spinal canal. N Engl J Med. 1934;211:210-215.
6. Robinson R.A., Smith G.W. Anterolateral cervical disc removal and interbody fusion for cervical disc syndrome. Bull Johns Hopkins Hosp. 1955;96:223-224.
7. Scoville W.B., Whitcomb B.B., McLaurin R.L. The cervical ruptured disc: report of 115 operative cases. Trans Am Neurol Assoc. 1951;76:222-224.
8. Spurling R.G., Scoville W.B. Lateral rupture of the cervical intervertebral disc: a common cause of shoulder and arm pain. Surg Gynecol Obstet. 1944;78:350-358.
9. Henderson C.M., Hennessy R.G., Shuey H.M.Jr., Shackelford E.G. Posterior-lateral foraminotomy as an exclusive operative technique for cervical radiculopathy: a review of 846 consecutively operated cases. Neurosurgery. 1983;13(5):504-512.
10. Lehman R.A.Jr., Riew K.D. Thorough decompression of the posterior cervical foramen. Instr Course Lect. 2007;56:301-309.
11. Adamson T.E. Microendoscopic posterior cervical laminoforaminotomy for unilateral radiculopathy: results of a new technique in 100 cases. J Neurosurg. 2001;95(Suppl 1):51-57.
12. Anderson P.A., Subach B.R., Riew K.D. Predictors of outcome after anterior cervical discectomy and fusion. Spine. 2009;34(2):161-166.
13. Anderson P.A., Sasso R.C., Riew K.D. Update on cervical artificial disk replacement. Instr Course Lect. 2007;56:237-245.
14. Anderson P.A., Sasso R., Riew K.D. Comparison of adverse events between the Bryan artificial cervical disc and anterior cervical arthrodesis. Spine. 2008;33(12):1305-1312.
15. Paniello R.C., Martin-Bredahl K.J., Henkener L.J., Riew K.D. Preoperative laryngeal nerve screening for revision anterior cervical spine procedures. Ann Otol Rhinol Laryngol. 2008;117(8):594-597.
16. Daniels A.H., Riew K.D., Yoo J.U., et al. Adverse events associated with anterior cervical spine surgery. J Am Acad Orthop Surg. 2008;16(12):729-738.
17. Edwards C.C.II, Karpitskaya Y., Cha C., et al. Accurate identification of adverse outcomes after cervical spine surgery. J Bone Joint Surg [Am]. 2004;86(2):251-256.
18. Taylor B., Patel A.A., Okubadejo G.O., et al. Detection of esophageal perforation using intraesophageal dye injection. J Spinal Disord Tech. 2006;19(3):191-193.
[/level-membership-for-neurosurgery-category][not-level-membership-for-neurosurgery-category]
Chapter 76 Cervical Discectomy
Indications for Cervical Discectomy
Age-related degeneration as well as trauma can lead to disc pathology requiring surgical excision. Commonly accepted indications for cervical discectomy include myelopathy and persistent radiculopathy that is unresponsive to nonsurgical measures.1,2 Less commonly accepted indications include axial neck pain and/or headaches3 that can be attributed to the disc pathology. The pathologic cervical disc can be approached ventrally and dorsally. Both approaches have been in use for over a half century4–8 and still find utility today.
The dorsal approach is indicated for a soft, foraminal (lateral) disc herniation with radiculopathy.1 One of the major advantages is that the posterior approach can be performed via a “keyhole” foraminotomy without creating instability at the segment. Disadvantages include the technical challenges (positioning, epidural bleeding, wound complications) and the surgeon’s learning curve, as this procedure is less commonly performed than is the more versatile ventral approach in most centers. Additionally, central disc herniations, “hard” disc herniations with uncovertebral bone spurs, and myelopathy are not adequately addressed via this approach. The dorsal approach for a discectomy via a foraminotomy can be accomplished with a small traditional midline incision and a self-retaining retractor9,10 or with a tubular retractor system.11
The ventral approach is very familiar to most spine surgeons. In most patients, the C3-4 level down to the C7-T1 level can be approached via a standard ventrolateral approach. Advantages of the ventral approach include access for central and bilateral foraminal decompression. Although some authors have reported good results for anterior discectomy without interbody fusion, interbody fusion following discectomy has become the standard of care in most centers. Recent trends include the use of allograft along with ventral cervical plates.12 Cervical disc arthroplasty devices are now available and can be used for postdiscectomy reconstruction; excellent results have been reported in properly selected patients.13,14
Anterior Cervical Discectomy
Anterior Cervical Discectomy and Fusion Technique
Preoperative Planning
It may be appropriate in revision settings to get a preoperative otolaryngology consult to evaluate vocal cord paralysis.15 If a vocal cord paralysis exists, the approach should be made on the ipsilateral side to avoid a potential bilateral paralysis. An approach on the right side may put the recurrent laryngeal nerve at more risk, while a low approach on the left side may put the thoracic duct at risk.
Intraoperative Procedures
The anesthesiologist administers 10 mg of intravenous decadron to minimize ventral swelling and prophylactic antibiotics (usually cefazolin 1 g) to minimize the risk of infection.
The carotid tubercle, usually at C6, and ventral osteophytes can be palpated to estimate levels. The prevertebral fascia is cleared off the discs (hills) and vertebral bodies (valleys) using scissors and forceps with a nick-and-spread technique. The hand-held retractor is then replaced under this layer (Fig. 76-1).
Once the radiology technician is present, a bent 12-mm, 14-mm, or 16-mm spine needle (based on preoperative radiographic measurement) is placed in the disc space of choice. The carotid tubercle and/or ventral osteophytes can be used to predict the level (Fig. 76-2). Dissection can continue while the film is being processed. The sterile draped microscope is then brought into the field. The “valley” of the ventrolateral aspect of the vertebral body above and below the suspected disc is cauterized to get the segmental arteries and perforating branches. The longus colli is elevated off the vertebral body “valley” by using coagulate (cranial and caudal enough to place the plate comfortably) and then off the ventral disc “hill.” The safe (nonanomalous) position of the vertebral artery should be confirmed on the preoperative axial MRI or CT prior to elevation of the longus. The longus colli in the upper cervical spine (i.e., C3-4 and higher) is less muscular and less well defined. A Penfield 2 can be used to safely elevate the longus at the vertebral body out laterally over the transverse process. Bleeding bone on the front side of the vertebral body under the elevated longus can be coagulated with bone wax used as needed. If bleeding starts from the undersurface of the longus or out laterally, a hemostatic agent and a large cottonoid patty can be used. The self-retaining (Shadowline or similar) retractors are placed underneath the elevated layer of the longus colli. The hand-held retractor is used to move the esophagus so that the self-retaining retractor blade can be safely placed under the longus. An assistant’s hand on the medial self-retaining retractor handle can stabilize downward and keep it correctly positioned (Fig. 76-3). The vertebral body just cranial and caudal to the disc space is prepared for insertion of the Caspar retraction posts. Prior to insertion of the Caspar pins, a rongeur or bur is used to remove the ventral osteophytes until they are flat with the ventral surface of the vertebral body. Caspar pins (usually 14 mm or 16 mm based on preoperative and localizing radiographs) are inserted by hand. Careful insertion is important if the patient is very myelopathic or stenotic. The superior post should be farther away from the cranial inferior end plate, but the inferior post is just below the caudal superior end plate. This is due to the angled shape and orientation of the cervical vertebral bodies, and will allow good purchase of the screws. The Caspar pins can be inserted slightly diverging to allow for lordosis. Proper insertion of the Caspar posts is critical. The posts must both be in the center of the vertebral bodies, since going off center with one post may result in vertebral twisting and scoliosis after the Caspar retractor is placed. If the posts are not placed in the center but are both off to one side, the distraction of the interspaces will be asymmetrical and lead to uneven end-plate preparation while the posts are retracting. Excellent visualization of the bodies before placing the posts will help to avoid errors at this step. Centering with reference to the spine is more reliable than centering with reference to the patient’s chin and sternal notch. The cranial angulation of the disc space should be parallel to the path of the Caspar pin in the sagittal plane. It can be helpful to identify the disc space with a Bovie or #15 blade if the surgeon is unsure of the location or angle. The posts must diverge or be parallel when inserted to lordose the spine and prevent the cephalad post from entering the end plate, given the upward sloping nature of the end plate. If the Caspar pins are not placed divergently, the threads of the cephalad post may be encountered while burring out the end plate.
