[level-membership-for-cardiovascular-category]
Care of the Patient with an Artificial Airway
An artificial airway is a tube inserted in the trachea either through the mouth or nose or by a surgical incision. Artificial airways have been known to medical science for 3000 years. George Washington ultimately died of upper airway obstruction because his physicians could not agree on the use of tracheostomy. It was not until 1909, when Chevalier Jackson published his classic paper on tracheotomy,1 that this procedure gained some acceptance. The procedure did not become a highly specialized technique in patient care until the invention of modern tracheostomy tubes and the development of intermittent positive-pressure ventilators. In today’s clinical practice, artificial airways have the following four basic purposes: to bypass upper airway obstruction, to assist or control respirations over prolonged periods, to facilitate the care of chronic respiratory tract infections, and to prevent aspiration of oral and gastric secretions. Multiple disease processes and traumatic problems can require an artificial airway, but each situation, simple or complex, can fit into one or several of these categories (Box 44-1).
Box 44-1
Disease Processes That Could Require an Artificial Airway Because of Respiratory Insufficiency
 Primary lung disease (e.g., emphysema, chronic bronchitis, pulmonary fibrosis, cystic fibrosis, severe pneumonia, burned lung, and toxic inhalation)


 Trauma (e.g., head/neck/chest surgery or injuries)
 Diseases complicated by extremes of age (e.g., premature infant or older adult)


From Selecky PA: Tracheostomy—a review of present-day indications, complications, and care, Heart Lung 3:272-283, 1974.
Indications of Need
The respiratory care team can play a vital role in recognizing patient need for a tracheostomy by noting physiological changes that indicate respiratory distress.2 Cardinal signs of dangerous airway obstruction are stridor and chest wall retractions. Early clinical signs may include restlessness, agitation, tachycardia, confusion, motor dysfunction, and decreased oxygen saturation on pulse oximetry. These signs may be accompanied by headache, flapping tremor, audible wheezing, congestion, and diaphoresis. Cyanosis from impaired oxygenation of the blood is a late, ominous sign.
Tracheostomy Tubes
Metal Tubes
Polyvinyl Chloride (Plastic) Disposable Tubes
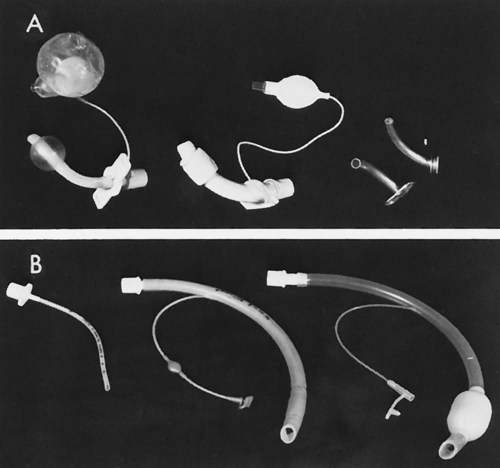
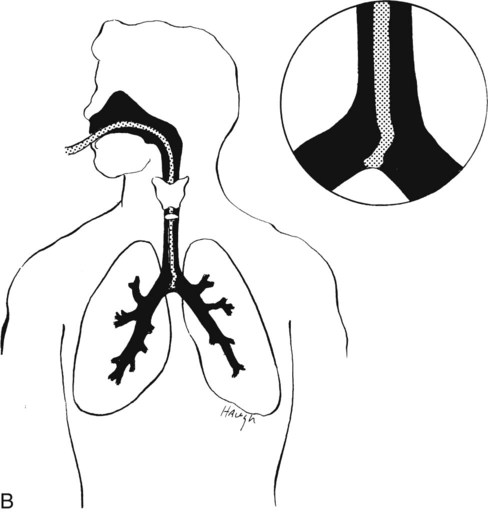
The cuffed tracheostomy tube is primarily used in conjunction with a positive-pressure ventilator to form a closed system (Figure 44-1). It is also used to reduce the possibility of aspiration because of absent reflexes, protective laryngeal reflexes, or pharyngeal reflexes. The inflatable cuff is located around the lower portion of the tube and, when inflated, seals the trachea from most airflow except through the tube itself (see Figure 44-1). The cuff, usually made of pliable plastic, is inflated by injecting air into the fine-bore tubing. A small pilot balloon is located proximally in the tubing and indicates that the cuff is inflated. The inflation end of the cuff and the balloon must be checked before insertion of the tube into the trachea to be certain that there are no leaks. The Luer valve inflation port to the pilot balloon is self-sealing. Some Luer valves have a relief valve when pressure exceeds 25 mm Hg.
Cuff Inflation
There are two commonly used methods of cuff inflation: minimal air leak, in which a small amount of air escapes on inspiration; and minimal occlusive volume, in which just enough air is placed in the cuff to stop air from escaping on inspiration. According to Crabtree Goodnough (1988)4, the minimal leak cuff technique may produce less injury than the minimal occlusive volume inflation technique. Regardless of which technique is used, the pressure of the cuff should be checked every 4 to 8 hours and the pressures documented. With continued research and monitoring of tracheal cuff pressures, potential tracheal injury can be prevented.
Other Airway Devices
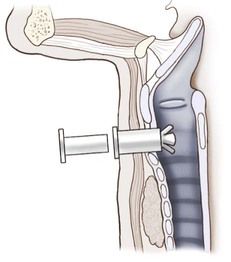
The Olympic tracheostomy button is used as an interim airway after tracheostomy tube removal (Figure 44-2). This method is another example of weaning a patient from the tracheostomy tube but still maintaining the stoma should a tracheostomy be again needed. Patients that may benefit most from this device are those with chronic obstructive pulmonary disease (COPD). This is one method used to facilitate secretion removal after hospitalization when it becomes necessary because of the disease process. The Olympic tracheostomy button allows the tracheostomy patient the opportunity to reestablish an unobstructed airway and at the same time allows the patient to speak.
Many other speaking tracheostomy tubes are available.5 Airway clearance needs to be optimized before a speaking valve is used. If a patient has increased secretions, he or she may find it difficult to tolerate the procedure. A benefit of the valve, however, is that the patient may be able to simulate coughing and promote mobilization of upper airway secretions.
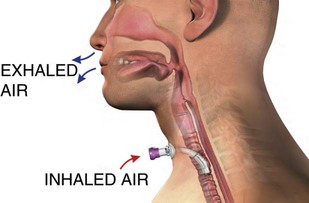
One common speaking valve is the Passy-Muir Swallowing and Speaking valve (Figure 44-3). The Passy-Muir is a one-way valve that allows inspiration only and redirects exhalation through the upper airway. It is important to note that the cuff must be deflated when using the valve, or a cuffless tracheostomy tube may be used. Breath stacking exercises (taking a few breaths in without exhaling) can be used to get more air into the lungs before exhalation. Using the valve, the upper airway muscles gradually recover, allowing for transition to a fenestrated tube or a smaller size tracheostomy tube and thereby preparing the patient for eventual decannulation.6 Another benefit may be an improved ability to swallow. Also, some patients claim that they can taste their food again, which may promote improved nutrition and hydration.7,8
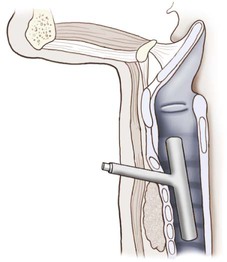
The management of major airway obstruction by tracheal tumor, external compression, or tracheal disease below the thoracic inlet still presents difficult problems. The Montgomery T tube is a bifurcated silicone rubber stent designed to preserve patency of the airways in a patient with injury to the trachea or main stem bronchi (Figure 44-4). When the T tube is in place, the patient breathes normally through the nose and mouth and can speak. The T tube is helpful in long-term therapy to alleviate obstruction or during reconstructive surgery. This device does not cause any adverse tissue reaction on a long-term basis, according to Montgomery.9,10
Airway Care
Normally, the mucociliary escalator and the cough reflex provide airway clearance. When these mechanisms fail, suctioning of the airways, manual cough assistance, or the cough machine is indicated. Suctioning does have potential hazards, but it should be a safe procedure with proper guidance and care.11 Health care professionals also need to protect themselves during open system suctioning. This procedure can cause dissemination of particle droplets in the immediate area. Ng and colleagues (1999)12 studied 50 consecutive suctioning procedures with intubated patients using an open system (i.e., the mechanical ventilator tubing is removed from the tracheostomy or endotracheal tube to suction the patient). Visible droplets were scattered from 25 to 168 cm from the artificial airway. When they were cultured, the same bacteria aspirated grew on the agar plates. This highlights how important it is for the person performing the suction procedure to use protective eyewear and to take necessary precautions.12
Suctioning
When preparing to suction, three phases should be considered (Table 44-1)13,14:
Awareness of the appropriate depth of insertion is essential, and time limits for the procedure must be observed.
A decision must be made as to how many passes of the catheter will be needed.
Monitoring of the patient by ECG and pulse oximetry will demonstrate the patient’s tolerance of the procedure.

Open Versus Closed Suctioning Systems
Patients on mechanical ventilators may be suctioned by disconnecting the ventilator tubing and suctioning (open system), or suctioning may be done directly in-line with the ventilator tubing (closed system). Studies have shown that a closed system maintains better physiological stability, less oxygen desaturation, and fewer dsyrhythmias.15–18
Suction Procedure
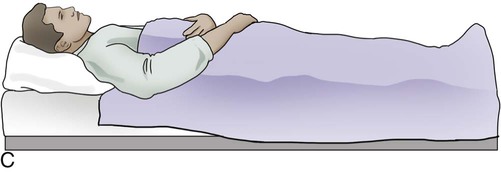
Position the patient properly unless contraindicated. Nasotracheal and/or pharyngeal suctioning should be done with the patient in Fowler position, 60 to 70 degrees (Figure 44-5, A), or semi-Fowler position, approximately 45 degrees, with the neck hyperextended (Figure 44-5, B). The supine position is best for the patient with tracheostomy or endotracheal tubes (Figure 44-5, C).

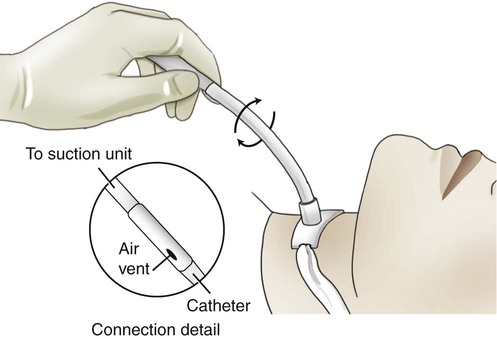
Insertion of the suction catheter should be done gently, using aseptic technique and sterile gloves. Goggles are used as part of universal precautions if there is any danger of coughed-out secretions. The catheter should first be moistened in sterile saline or with a water-soluble gel. Suction is not applied while the catheter is passed down into the trachea. Proper insertion of the catheter will stimulate coughing when it contacts the carina (Figure 44-6, A). It is then immediately withdrawn one cm before suction is applied (Figure 44-6, B). Do not force the catheter up and down while suctioning. Suction is applied only while the catheter is being withdrawn. Rotating the catheter during withdrawal results in suctioning a larger area and increases the surface contact of the trachea and tracheostomy tube (Figure 44-7).

Left main-stem bronchus aspiration is more difficult because of the anatomical arrangement of the bronchus. It was formerly thought that left bronchial aspiration was facilitated by turning the patient’s head to the right. Studies by Kirimli and colleagues (1970)19 and Panacek and colleagues (1989)20 indicate that left bronchial aspiration is best accomplished by using a Coudé tip catheter. After its insertion into the trachea, the curved tip should be positioned to point toward the left main-stem bronchus. Even so, insertion is difficult, and auscultation by stethoscope is necessary to thoroughly access the suctioning.
Excessive suctioning can be harmful. Use judgment to determine just how often a patient requires suctioning. It should not be routine; rather, it should be based on the need of the patient.21,22 Assessment by auscultation and patient clinical observations should be used to determine the need for suctioning. Suction only when it is needed.23 Allow the patient to rest and breathe between each insertion of the suction catheter and, if necessary, ventilate the patient for a few minutes before further suctioning. Remember that each suctioning attempt removes air as well as secretions. Hyperoxygenation with 100% oxygen has been suggested to provide better results and fewer complications. Hyperventilation was previously encouraged, but studies have shown that it is not necessary; hyperoxygenation is the important factor.24,25
Suctioning Artificial Airways
Nasopharyngeal Airways
Sterile Suctioning
One method for determining the size of the catheter used for suctioning is to double the size of the tracheostomy tube in place and add 2. For example, if the patient has a #6 tube, the calculation would be as follows: 6 + 6 = 12, 12 + 2 = 14. Therefore a 14-F catheter would be the largest catheter that could be used to suction the #6 tracheostomy. See Table 44-2 for a correlation of tracheostomy sizes to catheter sizes.
Table 44-2
The Pediatric Tracheostomy Card
| Tracheostomy Size | Recommended Catheter Size |
| Pediatric tubes | |
| 00 PT | 6.5 F |
| 0 PT | 6.5 F |
| 1 PT | 8 F |
| 2 PT | 8 F |
| 3 PT | 10 F |
| 4 PT | 10 F |
| Neonatal tubes | |
| 00 NT | 6.5 F |
| 0 NT | 6.5 F |
| 1 NT | 6.5 F |
| Single cannula tracheostomy (SCT) tubes | |
| 5 SCT | 10 F |
| 6 SCT | 12 F |
| 7 SCT | 14 F |
| 8 SCT | 14 F |

From Warnoch C, Porpora K: A pediatric trache card: transforming research into practice, Pediatric Nursing 20:186-188, 1994.
General Suctioning Procedure for an Artificial Airway
 Hyperoxygenate with 100% oxygen for three to five breaths with manual resuscitation bag.
 Place the patient’s neck in extension.
 Lubricate the catheter with sterile saline or water-soluble gel.


 Allow the patient to rest for several seconds and preoxygenate the patient again.
 Check the patient’s breath sounds and repeat the procedure, if necessary, to remove more secretions.


Extubation/Decannulation
Extubation or decannulation is the removal of the artificial airway. In general, this is done when the reason for establishing the artificial airway no longer exists. In certain cases the artificial airway may be removed to facilitate airway clearance and aspiration. This can be prevented with thorough attention and care of the tracheostomy tube.28,29 The patient is aided in gradually relearning normal breathing through his or her upper respiratory tract before the tube is removed. This can be a time of considerable fear and anxiety for patients because they have learned they can breathe safely through their tracheostomy, and they may become apprehensive when asked to breathe in a normal manner. The relearning process can be accomplished under the physician’s direction by reducing the lumen of the tube for a day or two or by partially obstructing the tube’s outer opening for increasing lengths of time. Eventually the patient is able to tolerate the complete occlusion of the tracheostomy opening. This is sometimes difficult and similar to breathing through a straw.
[/level-membership-for-cardiovascular-category][not-level-membership-for-cardiovascular-category]
Care of the Patient with an Artificial Airway
An artificial airway is a tube inserted in the trachea either through the mouth or nose or by a surgical incision. Artificial airways have been known to medical science for 3000 years. George Washington ultimately died of upper airway obstruction because his physicians could not agree on the use of tracheostomy. It was not until 1909, when Chevalier Jackson published his classic paper on tracheotomy,1 that this procedure gained some acceptance. The procedure did not become a highly specialized technique in patient care until the invention of modern tracheostomy tubes and the development of intermittent positive-pressure ventilators. In today’s clinical practice, artificial airways have the following four basic purposes: to bypass upper airway obstruction, to assist or control respirations over prolonged periods, to facilitate the care of chronic respiratory tract infections, and to prevent aspiration of oral and gastric secretions. Multiple disease processes and traumatic problems can require an artificial airway, but each situation, simple or complex, can fit into one or several of these categories (Box 44-1).
Box 44-1
Disease Processes That Could Require an Artificial Airway Because of Respiratory Insufficiency
Primary lung disease (e.g., emphysema, chronic bronchitis, pulmonary fibrosis, cystic fibrosis, severe pneumonia, burned lung, and toxic inhalation)
Trauma (e.g., head/neck/chest surgery or injuries)
Diseases complicated by extremes of age (e.g., premature infant or older adult)
From Selecky PA: Tracheostomy—a review of present-day indications, complications, and care, Heart Lung 3:272-283, 1974.
Indications of Need
The respiratory care team can play a vital role in recognizing patient need for a tracheostomy by noting physiological changes that indicate respiratory distress.2 Cardinal signs of dangerous airway obstruction are stridor and chest wall retractions. Early clinical signs may include restlessness, agitation, tachycardia, confusion, motor dysfunction, and decreased oxygen saturation on pulse oximetry. These signs may be accompanied by headache, flapping tremor, audible wheezing, congestion, and diaphoresis. Cyanosis from impaired oxygenation of the blood is a late, ominous sign.
Tracheostomy Tubes
Metal Tubes
Polyvinyl Chloride (Plastic) Disposable Tubes
The cuffed tracheostomy tube is primarily used in conjunction with a positive-pressure ventilator to form a closed system (Figure 44-1). It is also used to reduce the possibility of aspiration because of absent reflexes, protective laryngeal reflexes, or pharyngeal reflexes. The inflatable cuff is located around the lower portion of the tube and, when inflated, seals the trachea from most airflow except through the tube itself (see Figure 44-1
[/not-level-membership-for-cardiovascular-category]
