[level-membership-for-plastic-reconstructive-surgery-category]
Chapter 4 Breast Augmentation
Introduction
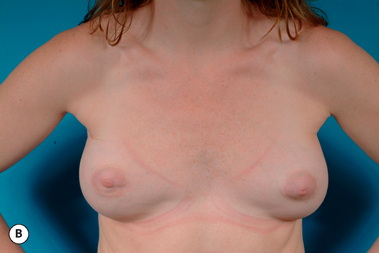
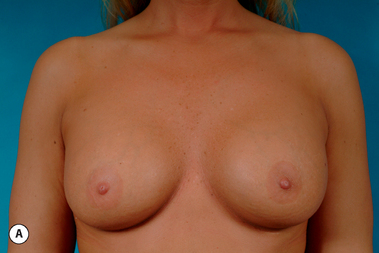
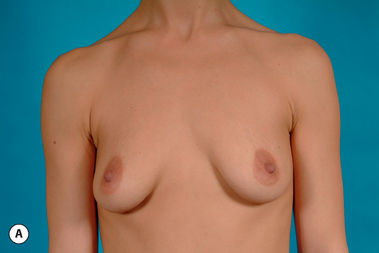
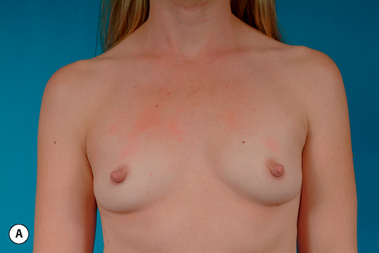
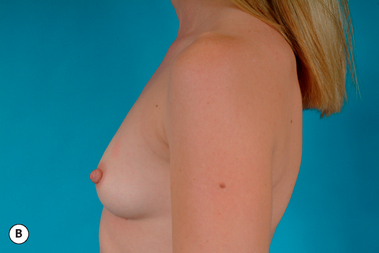
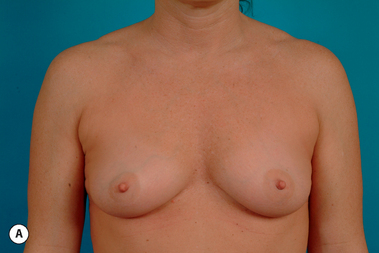
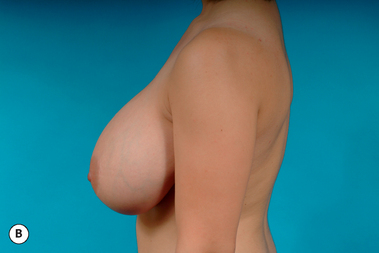
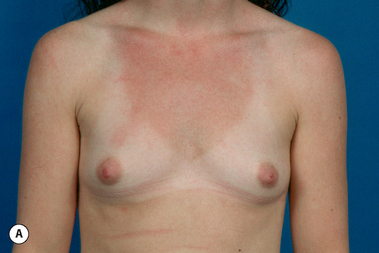
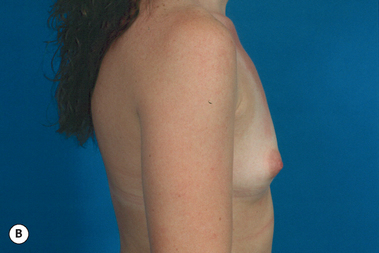
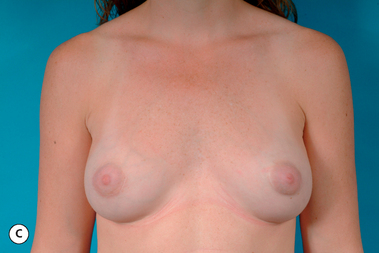
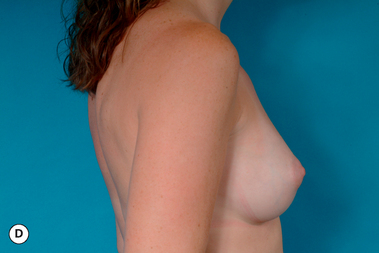
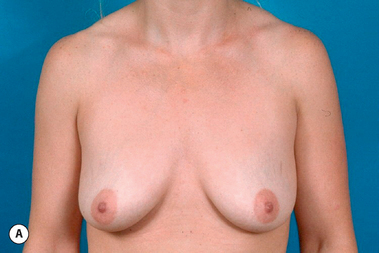
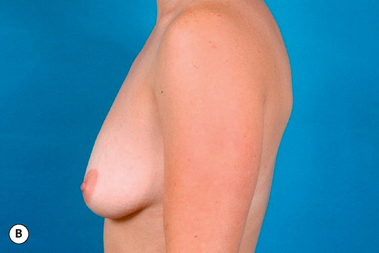
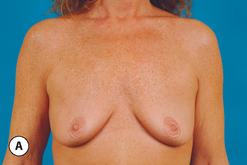
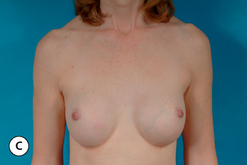
In many respects, breast augmentation is the defining procedure for the aesthetic breast surgeon and the ability to obtain outstanding results in a consistent fashion requires sound judgment, technical expertise and fastidious attention to detail. However, with experience comes the realization that developing this skill is harder than it might first appear to be. Perhaps the most significant reason for this relates to the tremendous variability that exists in the preoperative appearance of patients who present for breast augmentation (Figure 4.1) with differences in body habitus, breast size, nipple position and skin elasticity being just a few of the many variables that can significantly influence the final result. Also, there can be significant variability in the goals patients have for their surgical outcome. However, perhaps the most stressful facet of the procedure that must always be respected relates to the fact that these patients will almost uniformly have very high expectations for the quality of their result. Coupling all this with the fact that this high-quality result must be delivered in one operation with the barest minimum of complications highlights the importance that a sound surgical strategy performed with exacting technical expertise will have on achieving a successful outcome.
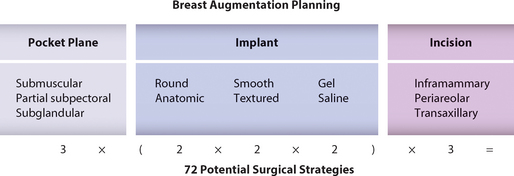
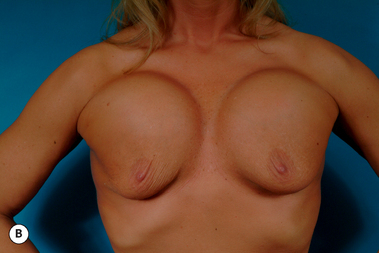
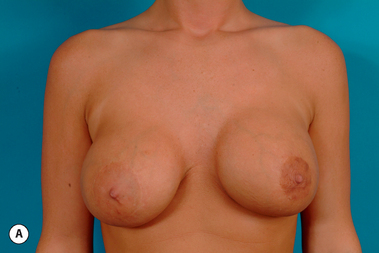
To this end, over the past decade, many of the finer details of the operation have been re-examined and new techniques described, all in the hope of improving the aesthetic results and minimizing complications. However, despite this in-depth review, for many surgeons the subject of breast augmentation remains as confusing and controversial as ever. This is a direct result of the fact that there are multiple surgical options that can be mixed and matched in numerous ways to create a viable operative strategy (Figure 4.2). For instance, in a given patient one surgeon might choose a smooth round saline implant placed in a partial subpectoral plane through a transaxillary incision, while another might choose a textured round gel implant placed in the subglandular plane through an inframammary fold incision. It is very likely that both approaches would produce equally acceptable aesthetic results that could very well be indistinguishable from each other. Further complicating the matter is the fact that, for nearly every technical decision that is made in planning and executing a breast augmentation, each advantage is directly offset to a greater or lesser degree by a specific compromise or disadvantage. For instance, the subglandular plane can be used to eliminate the potential for postoperative breast animation; however, the risk for a visible implant edge in the upper pole of the breast will be greater. For the novice surgeon, organizing the variables involved in planning a breast augmentation and predicting how the various decisions and approaches will interact with each other can create confusion when attempting to decide the optimal surgical approach for a given patient. It is helpful to step back from this confusing and, at times, contradictory exercise and realize that the basic procedure of breast augmentation simply involves making a pocket and inserting a spacer (implant) that, together with the existing soft tissue, will create the final breast form. When the existing soft tissue layer is thin, the implant and pocket location will to a greater degree determine the eventual shape of the breast and greater care will be required in choosing the best implant and pocket plane to provide an optimal result. When the soft tissue layer is thicker, these variables will have a comparatively less significant impact on the shape of the breast, and specific implant and pocket plane selection becomes less important. The goals of this chapter will be to describe the variables that need to be addressed when evaluating an individual patient for breast augmentation, provide a system for implant selection that can help guide the surgeon to select the optimal implant for a specific patient and to describe the technical details of the various surgical approaches that must be mastered successfully to perform the procedure.
Preoperative Planning
Incision
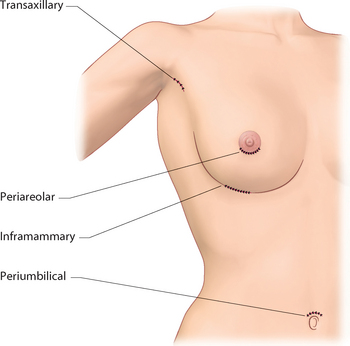
When planning an incision for breast augmentation, the need for locating the incision in a position that allows for easy pocket dissection and implant insertion must be balanced with the desire to ‘hide’ the incision in an inconspicuous area. With this in mind, there are four potential incision locations for breast augmentation (Figure 4.3).
Inframammary fold
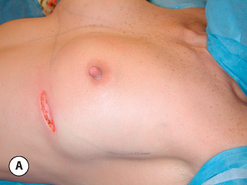
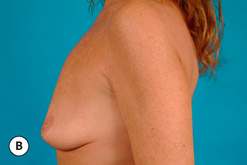
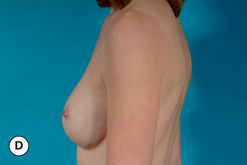
Placing the incision in the inframammary fold (IMF) affords perhaps the best compromise between providing direct access to the breast at the expense of creating a scar. The IMF incision offers straightforward exposure for pocket dissection with the aid of a simple lighted retractor. Submuscular, subpectoral, subfascial and subglandular pockets can all be created with ease and the limits of the dissection can be determined under direct vision. Complete hemostasis can also be assured as individual vessels can be controlled and pocket manipulation with precise soft tissue release is also easily facilitated. The position of the inframammary fold can be maintained or lowered with accuracy due to the direct access afforded by the proximity of the incision. Implant insertion and positioning are also easily accomplished, a fact that is particularly advantageous when using shaped implants that must be oriented correctly. The disadvantage relates to the creation of a telltale cutaneous scar in the vicinity of the breast. For this reason, it is best to place the scar directly in the IMF as it tends to be quite inconspicuous in this location, particularly when the breast is of sufficient size to fall over the fold (Figure 4.4). In these situations, the scar will only be visible when the patient lies flat or raises her arms up over her head.
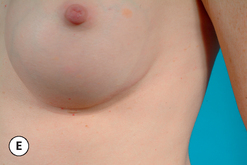
Periareolar
Although in terms of popularity, the periareolar incision is second to the inframammary fold incision, it remains as an attractive option for many plastic surgeons for two reasons. First, the resulting scar generally heals in a fine line fashion and is essentially imperceptible in many patients (Figure 4.5). The fact that the scar is situated at the junction of the pigmented areolar skin with the lighter lower pole breast skin assists greatly in visually masking the scar. Second, the only time the scar is potentially visible is when the breast is bare which, for many women, occurs only in controlled private settings. One unique situation where the periareolar incision has particular advantage is in the patient who presents with very small breasts with little to no inframammary fold. Here, the breast often cannot be augmented enough to cause the breast to fold over an inframammary fold incision with the result being an immediately obvious and visible inframammary fold scar. In these cases, rather than risk scar visibility, a better option is the periareolar incision location, where the scar is better camouflaged. Other advantages of the periareolar incision location include the fact that, as with the IMF incision, direct access is afforded to the breast, which allows accurate pocket dissection and direct hemostasis. The incision is generally made along the inferior hemisphere of the areola, at the junction with the lighter lower pole breast skin. From here, two approaches can be used to access the underside of the breast and create the pocket:
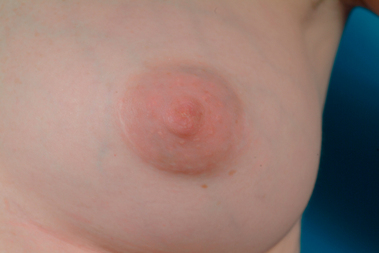
Figure 4.5 Appearance of the scar along the inferior border of the areola 1 year after breast augmentation.
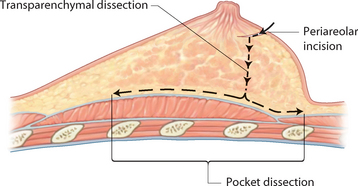
Table 4.1 The circumference of a circle can be calculated using the formula π× diameter. By using this formula and dividing the circumference by two, the static length of a periareolar incision can be calculated for areolas of several different commonly encountered dimensions
| Areolar diameter (cm) | Incision length (cm) |
| 3.0 | 4.7 |
| 3.5 | 5.5 |
| 4.0 | 6.3 |
| 4.5 | 7.1 |
| 5.0 | 7.9 |
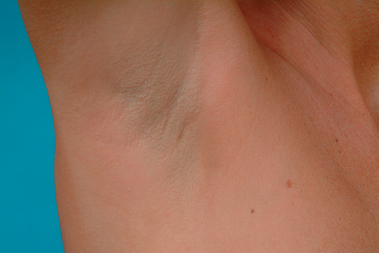
Transaxillary
The transaxillary incision provides an access site to the breast which heals with a well-hidden and, in most instances, imperceptible scar that is not located on or near the breast (Figure 4.9). As such, it is not generally recognized as a telltale sign of previous breast surgery. This significant advantage must be weighed against the potential for compromised accuracy in pocket dissection due to the remote location of the incision as well as the occasional patient who forms a bad scar in this otherwise visible location. There are two techniques to utilize this incision as it relates to pocket development. In both methods, the incision is located high in the axilla and is oriented horizontally at a point just lateral to the lateral margin of the pectoralis major muscle. The skin is incised and spreading dissection is used to identify the lateral border of the pectoralis major. At this point the underside of the pectoralis can be separated bluntly using a sound-type elevator to develop this plane, which opens up very easily. Crossing vessels from the chest wall to the muscle are simply avulsed and go into spasm, which usually checks the bleeding. Any tethering of the fibers of origin of the pectoralis major that adversely affect the shape of the breast are released by likewise avulsing these fibers loose until the pocket of the desired shape and dimension is developed. The implant is inserted and the incision closed. Clearly, the major difficulties associated with this approach involve the blunt and relatively blind nature of pocket development and the potential for uncontrolled bleeding due to the lack of direct control of bleeding points. Even with these potential difficulties, it must be pointed out that many surgeons can and do use this approach with success. However, in an attempt to increase the control afforded by this approach, some surgeons have incorporated endoscopic technique into the procedure. Once the plane on the underside of the pectoralis major is developed, an endoscope is inserted and, with the aid of standard endoscopic instruments, bleeding points are controlled and the fibers of origin of the pectoralis major muscle are released as needed under direct endoscopic vision to accurately create the desired pocket and position the inframammary fold with precision. Combining the use of the endoscope with the well-concealed transaxillary incision is an excellent way to combine the advantages of direct pocket development with a remote and imperceptible scar. The disadvantages are related to the requirement for extra instrumentation, the additional technical expertise required to utilize the endoscope and the potential for bleeding that may be difficult to control even with the aid of the endoscope, particularly if the second intercostal perforator in the upper inner portion of the pocket is inadvertently divided. Additionally, plane selection is limited as, although it may be technically feasible to utilize the subglandular plane with this approach, it is difficult and, practically speaking, most surgeons use the subpectoral plane with this technique. It must also be pointed out to the patient ahead of time that, should future problems develop such as capsular contracture or implant malposition, many patients are going to receive an additional scar on the breast in the course of correcting the problem. Finally, this technique allows saline implants to be placed without difficulty; however, larger gel devices, textured devices and anatomically shaped cohesive gel devices all may prove to be variably difficult to insert without damaging the implant. These potential disadvantages do not diminish the utility of the transaxillary approach and many surgeons do use it successfully. However, all of these factors must be taken into account when contemplating the use of the transaxillary incision location.
Transumbilical
In a further effort to erase any stigmata of a procedure on the breast, the transumbilical breast augmentation (TUBA) procedure has been developed. In this approach, an incision is made in the umbilicus and a hollow trocar is bluntly inserted through the subcutaneous tissue, angling upwards toward each breast. The pocket, either subpectoral or, more recently, subglandular, is bluntly opened enough to allow the passage of an uninflated temporary ‘expander’. This device is attached to a long fill tube which exits through the umbilicus. By over inflating the ‘expander’ with air, the pocket is developed bluntly as the muscle and/or breast is avulsed away from the more rigid chest wall. The more dense attachments of the inframammary fold prevent to some degree inadvertent lowering of the fold, and the pocket opens more or less under the breast. The ‘expander’ is deflated and removed and the final saline implant shell is passed through the trocar uninflated and attached to a second long fill tube. The implant is filled with saline to the desired fill volume and the fill tube and trocar are removed to complete the procedure. TUBA remains a controversial procedure. It must be stated that the scar generally is well hidden and some surgeons are able to obtain consistent aesthetic results using the technique. However, the disadvantages and potential complications are significant and must be taken into serious consideration when contemplating the approach. Due to the limited access tunnel, it is possible to use only saline implants, which limits implant selection. Also, because pocket dissection is performed bluntly from a remote location, control over the size, location and symmetry of the dissection space is compromised compared to the direct control afforded by incisions located closer to the breast. If bleeding occurs, it cannot be stopped other than with direct pressure, which increases the potential risk for hematoma development. One potential complication unique to the TUBA procedure involves the creation of permanent soft tissue distortion with visible grooving in the upper abdomen extending up from the umbilicus to the breast that can develop in trim patients as a result of the trocar passing through the thin subcutaneous layer. Finally, any revisionary procedure that cannot be performed through the periumbilical access site will require an additional separate incision on the breast. For these reasons, TUBA is viewed less than favorably by many surgeons and the lack of direct control of many of the factors involved in offering consistent results in breast augmentation is deemed enough of a disadvantage to make the remote and inconspicuous umbilical scar an unreasonable tradeoff.
Pocket Plane
Complete submuscular
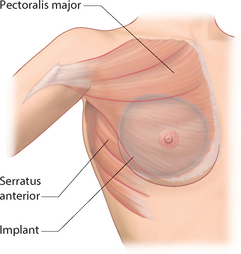
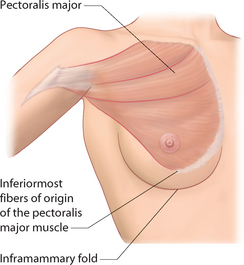
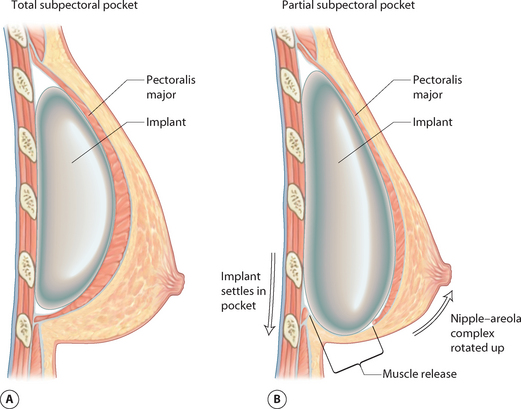
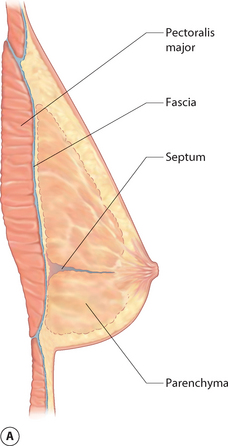
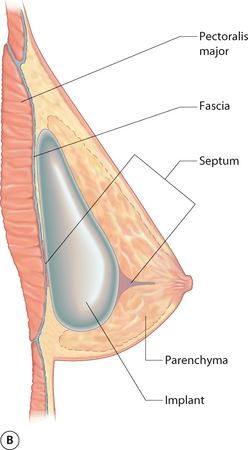
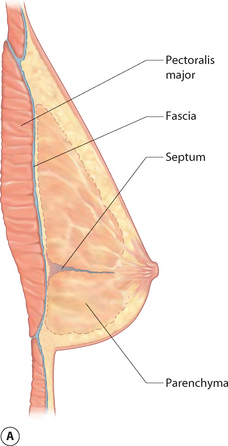
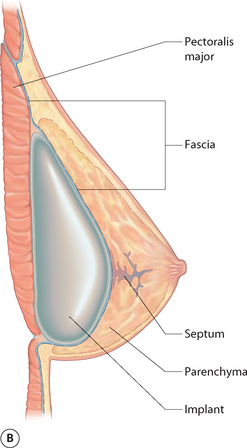
Early on in the development of breast augmentation as a viable aesthetic procedure, it made intuitive sense to place the implant directly under the breast on top of the underlying musculature. It soon became clear, however, that, with this technique, capsular contracture was an alarmingly common complication and one possible etiology was thought to be bacterial contamination of the implant space from the ducts in the overlying breast. Therefore, in an attempt to isolate completely the breast implant from the overlying breast parenchyma and thus minimize any bacterial contamination, the submuscular pocket was developed. In this procedure, a pocket is created under the pectoralis major muscle by lifting the lateral margin of the muscle away from the chest wall and undermining the muscle over to the medial fibers of origin just lateral to the sternum. Typically, every attempt is made to keep the fibers of origin along the inframammary fold intact to prevent the implant from slipping out from under the muscle inferiorly thus preserving the completely submuscular location of the pocket. Laterally, the muscle fibers or simply the superficial fascia of the serratus anterior muscle are elevated away from the chest wall and the implant is slipped under this muscle/fascial layer. By approximating the lateral margin of the pectoralis major to the serratus muscle/fascia, the implant is completely isolated from the overlying breast parenchyma (Figure 4.10). Theoretically, providing a barrier to potential bacterial seeding of the implant space from the breast ducts will prevent or at least moderate the subsequent development of capsular contracture. Also, keeping the inferior muscle fiber attachments intact is thought to provide strong support to the inferior pole of the breast, which can prevent postoperative inferior migration or ‘bottoming out’ of the breast implant. Also, by covering the implant with a layer of muscle, the contours of the superior and superomedial borders of the breast along the edge of the implant are softened, creating a more natural breast shape. While these factors may be an advantage, there are significant drawbacks to this technique. Perhaps the greatest problem associated with the use of the completely submuscular pocket is the potential for superior implant malposition. This is because anatomically, in many patients, the position of the inferiormost fibers of origin of the pectoralis major muscle can be located slightly above the location of the attachments of the inframammary fold (Figure 4.11). When this relationship is present, placing an implant in a completely submuscular pocket or, for that matter, even in a subpectoral pocket, without release of the inferior fibers of origin of the pectoralis major muscle will not allow the breast implant to sit low enough and it will be appear to be superiorly malpositioned in relation to the position of the breast mound on the chest wall. The resulting breast contour will then very likely demonstrate a superior pole bulge with the breast appearing to fall away from the inferior pole of the implant. When severe, this appearance has been referred to by some as a ‘snoopy dog’ type deformity (Figure 4.12). The identification of a mismatch in breast position versus implant position can be difficult to appreciate intraoperatively as the implant malposition may not become apparent until the patient is placed upright. Lying supine, the breast mound tends to shift superiorly and an implant in a submuscular pocket may appear to be well matched to the breast positionally. It is only later when the patient is seen upright in the office that the malpositioned breast implant becomes apparent. It is likely that this phenomenon is at least partially responsible for the widely held opinion that submuscular implants tend to ‘ride high’. It may be that the so-called high-riding implant more accurately represents an implant that was unwittingly malpositioned superiorly at the time of surgery. This observation is but one of many that underscores the importance of sitting any breast patient up 80 to 90 degrees during the procedure so these types of relationships can be accurately assessed intraoperatively and appropriate changes made in implant position as needed. Another limitation associated with the use of a submuscular pocket relates to the volume of the space that can be opened up under the muscles. The pectoralis major and serratus anterior muscles are normally closely applied to the chest wall in their resting state and the degree to which they can be elevated away from the chest wall and still keep the peripheral attachments intact is limited. For this reason, larger implants may not comfortably fit within the confines of the dissected pocket. Also, should the pocket be constricted at all, due either to an inelastic muscle cover or to the use of a large volume device, there is a tendency for the implant to become compressed, particularly in the lower pole, resulting in lower pole flattening and excess upper pole fullness. It is for these reasons that the total submuscular pocket is used only sparingly in breast augmentation.
Partial subpectoral
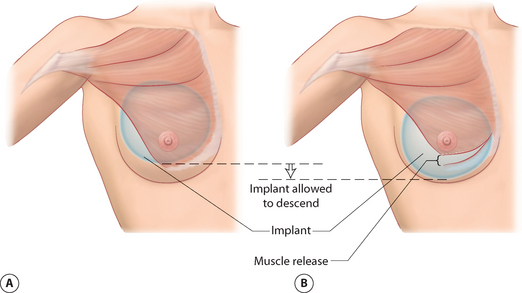
In an attempt to address the apparent difficulties associated with the completely submuscular pocket, the partial subpectoral pocket was developed. In this procedure, the pectoralis major is released along the lateral border of the muscle and the subpectoral space is developed as before. Here, however, no portion of the serratus anterior is elevated at all and the inferomedial fibers of attachment of the pectoralis major muscle are released, allowing the muscle to retract up and away from the inframammary fold. The net effect of this release is twofold. First, the tension on the pocket is reduced significantly as a result of releasing the muscle fiber attachments. When the total submuscular pocket is used, the broad, flat pectoralis major can function as a tethering layer, preventing the pocket from expanding fully to accommodate the implant. By releasing the inferior attachments of this tethering layer, the muscle is released and the skin envelope of the lower pole of the breast is recruited to assist in defining the dimensions of the pocket. The result is a bigger pocket with less compressive force on the implant and a more compliant soft tissue/implant interface, allowing the creation of a softer breast. Second, as a result of releasing the muscle along the inframammary fold, the implant can now be positioned low enough to place the inframammary fold in an anatomically correct position. As a result, the upper portion of the implant remains covered by the pectoralis major muscle but the lower portion of the device is in contact with the underside of the breast (Figures 4.13, 4.14). The portion of the implant that is covered by muscle will change from patient to patient as breast position on the chest wall and the exact point of origin of the pectoralis major is subject to anatomic variation. However, the ultimate effect of this pocket plane is to once again soften the upper medial pole of the breast due to the padding created by the muscle and yet allow the breast implant to be positioned low enough on the chest wall to anatomically fill out the breast contour. The pocket is also very easily developed either under direct vision or bluntly through any incision location. The subpectoral pocket is also the preferred pocket location for women undergoing mammographic screening of the breast as the breast implant is relatively easily pushed up and out of the way, a maneuver that affords better breast compression and a more complete mammogram.
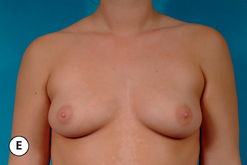
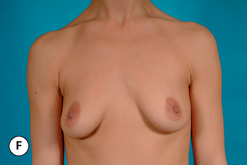
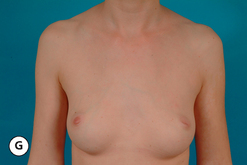
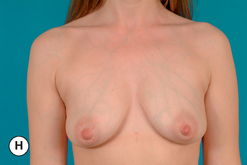
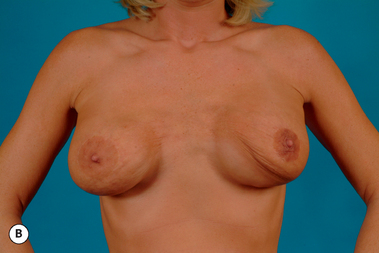
When either the total submuscular or partial subpectoral pocket plane is used, it must be recognized that the overlying musculature retains its contractile ability. As a result, when a breast implant is placed under the pectoralis major muscle, the implant will be compressed when the muscle contracts. Typically, this movement tends to draw the implant in an up and out direction and this directed compression creates a contour deformity in the breast that can easily be seen when the patient places her hands on the hips and pushes inward. Occasionally, the deformity is so prominent that the distortion in breast shape can be seen through tight-fitting clothes. The magnitude of the deformity caused by this breast animation is highly variable and, fortunately, it is usually only minimal to moderate in severity (Figures 4.15, 4.16). However, at times, the degree of the distortion created by contraction of the pectoralis major muscle can be dramatic (Figure 4.17) and, in revisionary patients, undesired breast animation is often one of many issues that can lead patients to seek re-operation (Figure 4.18). In an attempt to head off any potential postoperative dissatisfaction and ensure a fully informed patient, it is very reasonable to discuss breast animation as a potential complication during the preoperative evaluation and education of the patient. Short video clips (DVD clips 2.01, 2.02, 2.03, 2.04) are very instructive and can ensure that the patient understands completely the rationale for using the partial subpectoral pocket and what effect that decision may well have on her postoperative result.
Subglandular
The second most commonly utilized pocket for breast implant placement is the subglandular pocket. In this procedure, the subglandular space above the pectoralis major muscle is opened leaving the pectoralis muscle fascia attached to the muscle (Figure 4.19). The space dissects open readily and the limits of pocket development can be precisely controlled, which eases the technical challenge of dissecting pockets of the same dimension and location for each breast. Crossing vessels and nerves can be identified and preserved medially and laterally as desired and the pocket can be easily accessed through either a periareolar or an inframammary fold incision. Any type of implant can be used with a subglandular pocket and shaping maneuvers such as scoring of the underside of the breast to release tethering constrictions are greatly facilitated due to the direct exposure of the gland. As a result of placing the implant above the muscle, postoperative animation of the breast is markedly diminished and, at most, only a slight shape change may occasionally be noted with contraction of the pectoralis major muscle due to tethering of the capsule to the muscle. Typically, the recovery after undergoing a subglandular breast augmentation is more straightforward with many patients reporting a less painful experience overall. Despite these advantages, the subglandular pocket is used with care as the disadvantages can be significant. Perhaps, most importantly, it is generally agreed that the incidence of capsular contracture is greater in subglandular breast augmentation. What remains unknown is what effect that newer breast implant designs will have on this complication. More recent silicone gel breast implants have been designed to have an outer shell that is much more resistant to gel bleed than earlier implants and recent studies have reported rates of capsular contracture that are not much different from those associated with subpectoral placement. Perhaps just as important is the effect of the subglandular pocket on breast shape. Because the upper inner portion of the pocket is not padded by the pectoralis major muscle, implant edge visibility and palpability in this area can become an issue in thinner patients who do not have enough native breast parenchyma to mask the shape of the underlying device. This implant visibility becomes more apparent as the patient flexes the pectoralis major muscles and a sharper medial and superior implant margin can become evident (Figure 4.20). For these reasons, many surgeons limit the use of the subglandular pocket to those patients who have an upper chest soft tissue thickness of 2 cm or more, or in patients who will require soft tissue scoring on the underside of the breast as in patients who present with a tubular breast deformity. Also, in mastopexy patients, the soft tissue lifting effect of placing an implant under the breast is enhanced if the pectoralis major muscle is not positioned as a potentially tethering layer inhibiting implant projection. As a result, many surgeons will choose the subglandular plane for those patients undergoing augmentation mastopexy.
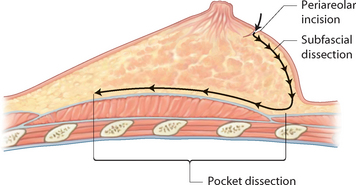
Subfascial
Closely related to the subglandular space is the subfascial pocket. This technique was designed in an attempt to minimize the potential disadvantages traditionally associated with the partial subpectoral pocket related to postoperative breast animation and yet preserve the improved upper and medial pole contour that the partial subpectoral pocket can provide. In this technique, the lower border of the breast is elevated along with the investing fascia of the pectoralis major muscle. Initially, this plane can be somewhat difficult to develop as the attachments of the breast septum must be dissected free as they course transversally across the mid-aspect of the pectoralis major muscle. Associated with this fascial attachment will be several prominent perforators that are easily controlled. Above this point, however, the fascia comes up easily and any small bleeding points that are encountered are easily controlled. Dissection then continues superiorly under the breast until the superior extent of pocket dissection is complete (Figure 4.21). Although quite thin, theoretically this fascia is thought to provide a tethering force around the perimeter of the breast implant that then softens the contours of the peripheral edges of the breast, leading to less implant visibility. It is postulated that this effect is similar to the softening of the superomedial implant edges that occurs with partial subpectoral placement, but without the attendant subpectoral distortion that variably occurs when an implant is placed under the pectoralis major muscle. In practice, this plane is rather easy to develop; however, the fascial layer is quite thin and any resulting improvement in breast shape that occurs is modest at best with other factors including body habitus, implant style and size and implant fill exerting a much more profound impact on breast shape. For this reason, use of the subfascial pocket has yet to attain wide popularity. One unexpected advantage that can seen when using this plane relates to the accuracy of pocket dissection. By elevating the fascia with the breast in the medial portion of the pocket, it is technically easier to identify and preserve the medial internal mammary perforators and avoid inadvertent injury to this vigorous source of blood supply to the breast. Another more theoretical advantage relates to a potential shaping advantage afforded by differentially scoring the fascia in the lower half of the breast. The resulting release of tension in the lower half of the pocket coupled with a mild fascial-induced tethering in the upper half can create differential tension on the pocket that tends to restrict upper pole fullness and maximize lower pole projection. However, whether or not such differential pocket dissection can aid in ‘shaping’ the subsequent breast implant, creating an improved breast shape over the long term, remains to be demonstrated.
Implant Choice
Despite this apparent complexity, the fact remains that there are a wide range of different implants that, for a given patient, would be equally optimal and even more that would be practically acceptable. The ultimate determining factors become the thickness of the overlying soft tissue cover of the breast and the degree of ptosis. Patients with 2 cm or more of fat and breast parenchyma at the peripheral margins of the breast and, in particular, in the superior pole of the breast will do very well with almost any type of implant. In these patients, any asymmetry, wrinkle or mild malposition problem will be masked by the native breast volume. Put another way, when the implant provides roughly 75% or less of the total volume of the breast, less stress is placed on the implant to determine the final shape of the breast. However, as patients become thinner, or as increasing degrees of ptosis become present, specific implant selection begins to play a more important role and must be more carefully individualized for each patient as any imperfection in the implant will tend to be more noticeable and may potentially detract from the quality of the aesthetic result.
Preoperative Evaluation
Positional Measurements
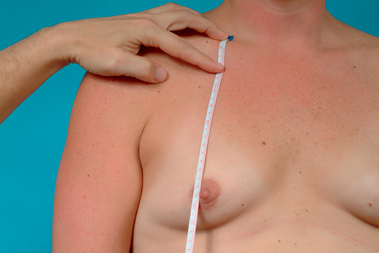
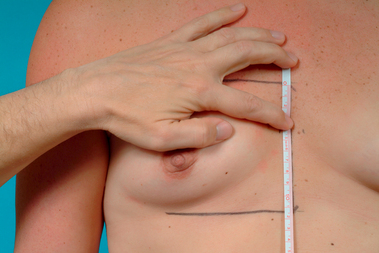
Clavicle to nipple
This distance is measured from the mid-aspect of the sternum in line with the visual breast meridian down to the nipple (Figure 4.22). This measurement will vary based on the degree of ptosis as well as the height of the patient and the size of the breast. Typically, it ranges from 17 cm in a petite patient to 20 cm or more in very ptotic patients. The measurement is noted for both breasts and it is not uncommon for the measured distance to vary significantly from one side to the other. Possible etiologies for this include asymmetry in nipple position or breast size, or just as commonly asymmetry in the position of the clavicle. By noting this measurement, all of these relationships are brought into focus, which is important as they can adversely influence the final result if these asymmetries are not recognized ahead of time. For instance, if the same measured distance from the clavicle to the nipple on each side is used as the determinant of nipple position and the clavicles are asymmetric, then the resulting NAC position will also be asymmetric. Also, since this measurement focuses attention on shoulder position, asymmetries can be recognized preoperatively and appropriate adjustments in shoulder position can be made intraoperatively to allow accurate breast shaping and NAC positioning to be performed.
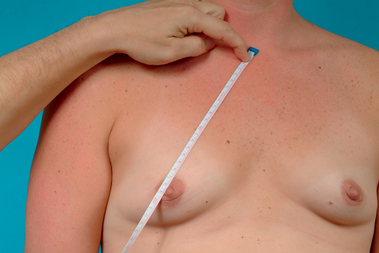
Sternal notch to nipple
This distance is measured from the sternal notch down to the nipple on each side (Figure 4.23). Because the sternal notch point is static, this measurement becomes a more accurate and consistent indicator of nipple location asymmetry, which can then trigger appropriate discussions with the patient about how this asymmetry will be managed and what effect the asymmetry may have on the final result.
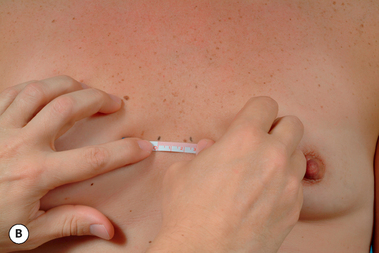
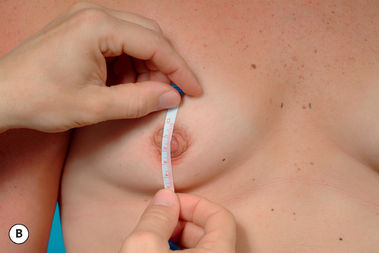
Inframammary fold to nipple
This distance is measured along the contour of the lower pole of the breast from the existing fold up to the nipple (Figure 4.24). This measurement is related to the size of the breast, the position of the fold and the position of the nipple on the breast. There can be great variability in this measurement with the distance measuring as little as 3–4 cm in very small patients and up to 9 cm or more in taller patients, patients with larger breasts and in patients with pseudoptotic expansion of the lower pole breast skin envelope. Noting this measurement triggers discussion of issues related to fold position, nipple position, selection of implant projection, the need for mastopexy and postoperative breast size. As such it is a very important measurement to document.

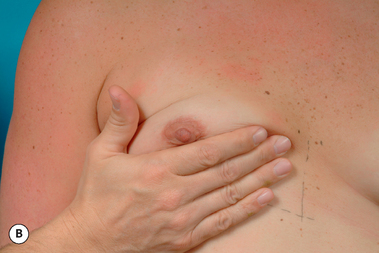
Inframammary fold to nipple under stretch
This distance is measured from the inframammary fold up to the nipple with the lower pole breast skin placed under stretch. The skin is stretched by stabilizing the fold with the thumb and using the index finger placed at the nipple to maximally stretch the lower pole breast skin upward (Figure 4.25). By comparing this measurement to the resting distance from the inframammary fold to the nipple, a rough estimate is provided regarding the elasticity of the lower pole soft tissue skin envelope of the breast. By noting the degree of elasticity, variables such as implant volume and implant projection can be better matched to the soft tissue characteristics of the patient and errors in implant selection can be avoided. Specifically, when the degree of stretch is 3 cm or more, a more projecting implant is indicated to fill out appropriately the lax skin envelope. When the degree of stretch is less than 3 cm, the use of a highly projecting implant can create pressure on the implant secondary to the inelastic soft tissue cover, making a moderate-profile implant a better choice.
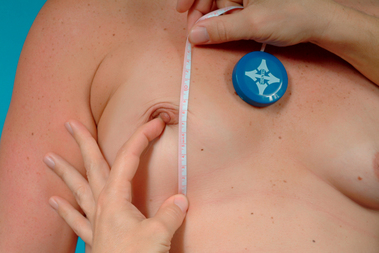
Intermammary distance
This measurement reflects the distance between the most medial aspect of each breast as the breast is slightly pushed inward to accentuate this landmark (Figure 4.26). By itself, this measurement does not directly impact breast implant selection but it does highlight the patient’s pre-existing anatomy and triggers a very important discussion concerning ‘cleavage’. Many patients present with the assumption that a breast augmentation will significantly enhance the degree to which the breasts will touch in the midline. This is often misinterpreted by patients as an expected outcome of an increase in the size of the breast. However, many patients have breasts that are positioned somewhat laterally on the chest wall and present with a wide distance across the sternum between the breasts. Any attempt to create ‘cleavage’ in a patient such as this may be ill advised as the skin in this portion of the breast and over the sternum is so thin that unacceptable implant visibility or palpability may result. Also, to expand the base diameter of the implant to try to fill in this medial contour may result in the use of an implant that is so big that it distorts the other contours of the breast. These are very important discussions to have with the patient preoperatively and any limitation in the amount of cleavage that can be safely created by the breast augmentation procedure must be documented and agreed upon ahead of time to prevent potential postoperative patient dissatisfaction (Figure 4.27).
NAC dimensions
The width and length of the areolar diameter is measured under no tension and preferably before the areola is manipulated so that contracture of the areolar smooth muscle fibers does not artificially constrict the areola (Figure 4.28). Again, by itself, this measurement does not directly affect implant selection; however, it does identify those patients who present with an enlarged areola. In these patients (resting areolar diameters of >5 cm), breast augmentation can often cause the areola to stretch to excessive dimensions that detract from the overall result (Figure 4.29). To prevent this from occurring, some patients may elect to undergo an areolar-reducing purse-string procedure to restore a proportionate relationship between the areola and the breast. In addition, should the areolar dimensions be asymmetric, appropriate discussions are triggered with regard to how the final result will be affected and what, if anything, might be done to restore symmetry. Discussing this aspect of the procedure ahead of time can again help head off any potential for patient disappointment. It also helps to identify those patients who might benefit from a periareolar approach to access the breast for placement of the implant.


NAC asymmetry
This is an observation that can be demonstrated by laying an extended tape measure or shining a laser leveler across the chest at the level of the nipple to visualize any asymmetry that might be present in the location of the NAC (Figure 4.30). Surprisingly, many times patients are unaware of their asymmetric NAC position and it can helpful to have the patient stand in front of a mirror and visualize for themselves the degree of asymmetry that is present. NAC asymmetry is a key preoperative anatomic relationship to recognize and discuss with the patient during the preoperative evaluation because, should NAC asymmetry persist postoperatively, it can be a major cause of patient dissatisfaction. By noting preoperative differences in nipple height, appropriate discussions are triggered with the patient about whether or not the asymmetry will be addressed with the operative plan.
Inframammary fold asymmetry
By similarly using an extended tape measure or laser leveler, any asymmetry in the most inferior aspect of the inframammary fold on each side can be demonstrated and this asymmetry can be measured and documented (Figure 4.31). Asymmetry in the position of the inframammary fold is very important to identify preoperatively as differences in the location of the fold can have a tremendous impact on the shape and overall symmetry of the augmented breast. When asymmetry in fold location is present, some alteration in operative technique is very often required to restore a sense of symmetry to this critical breast landmark.
Breast volume
The volume of each breast is determined by gently cupping the breast and estimating the contained volume (Figure 4.32). The accuracy of this estimate will be subject to variability depending on the experience of the surgeon; however, the true utility of this maneuver is to compare the estimated volume from side to side in an attempt to identify any volume asymmetry in the breast that might be corrected with the use of different-sized implants.
Shaping Measurements
Desired breast base diameter
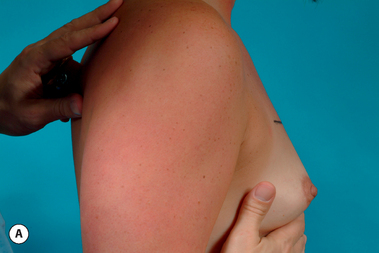
This measurement is designed to identify the maximal base diameter of the breast after augmentation. A slide rule is positioned under the breast and the measuring points are positioned where it is estimated that the medial and lateral breast contours of the augmented breast will be located (Figure 4.33). This estimated measurement therefore includes not only the width of the breast implant but also the thickness of the soft tissue cover located at the medial and lateral edges of the breast.
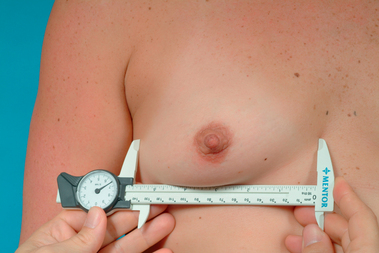
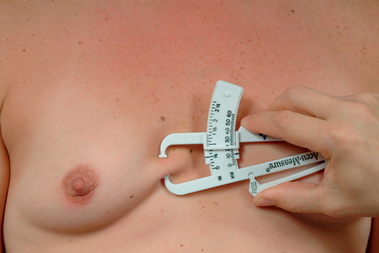
Medial and lateral pinch thickness
Standard skin fold measuring calipers are used to measure the thickness of the soft issue cover present at the medial and lateral margins of the breast. These calipers are readily available and have been used to good effect in determining body fat percentages for patients undergoing weight loss and, in particular, for athletes preparing for bodybuilding and fitness competitions. With experience, repeatable and accurate measurements can be obtained. By pulling the soft tissues of the breast away from the chest wall and pinching the breast such that a fold is created that includes the skin and underlying breast parenchyma and fat, the thickness of this fold can be directly measured by placing the calipers across the fold and noting the thickness measured in millimeters (Figures 4.34, 4.35). It must be remembered that the actual thickness of the soft tissue cover in these two areas will be half of the measured fold thickness as the skin fold is doubled on itself with the pinching maneuver. These measurements indicate what the contribution of the medial and lateral aspects of the soft tissue cover of the breast will be to the overall base diameter of the augmented breast.
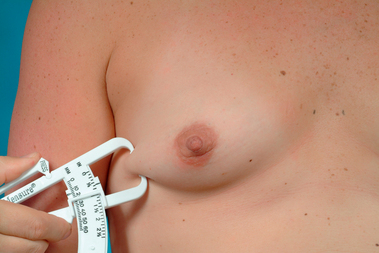
Upper pole pinch thickness
This measurement is made in the upper pole of the breast at the point where it is expected that the most superior aspect of the breast implant will be positioned (Figure 4.36). By pinching the skin and fat of the upper pole of the breast together, it is possible to apply the calipers to measure the thickness of the resulting fold. As with the reading obtained at the medial and lateral margins of the breast, the thickness of the soft tissue cover will be one half the measured skin fold thickness. This measurement can be used to assist in making the decision of which pocket plane to use. If this soft tissue thickness is measured at 1.5–2 cm (actual fold thickness of 3–4 cm), then there will be enough of a soft tissue cover to allow a round, firm and potentially distorting saline implant to be used in the subglandular plane without risking a visible or palpable implant edge. For round silicone gel implants, this soft tissue thickness measurement can be reduced to 1–1.5 cm as gel implants settle into the pocket in a more conforming way and there is less of a risk for upper pole show due to the implant. Finally, for cohesive anatomic gel implants that provide a more contoured upper pole takeoff in the device, this measurement can be reduced further to 0.5–1 cm. It must be remembered that these measurement recommendations are approximations and all the other variables that can affect the postoperative result must be taken into account when considering the subglandular pocket plane.
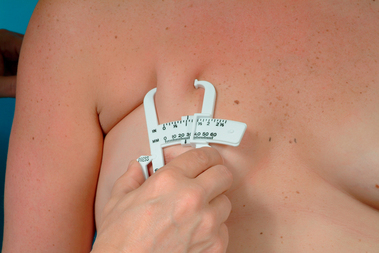
Breast height
The height of the breast must be measured when using anatomically shaped cohesive gel implants as these devices have specific vertical dimensions that must be accurately matched to the patient to obtain the optimal result. To measure vertical height, the proposed level of the inframammary fold is set and marked. The breast is then translocated superiorly with the cupped hand until a break point or fold is observed in the superior pole of the breast and this point is marked (Figures 4.37, 4.38). This represents the eventual top of the augmented breast or the point at which the soft tissues will begin to pull away from the chest wall as the implant is inserted underneath. By carrying the location of these two points over to the sternum and measuring the distance between them, the vertical height of the implant can be estimated (Figure 4.39).
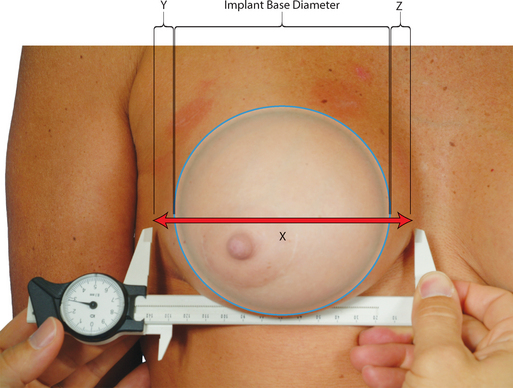
Implant base diameter
Once these variables have been measured, the optimal base diameter for the implant can be calculated by taking the maximal base width and subtracting one half the medial and lateral soft tissue pinch thicknesses (Figure 4.40). Theoretically, this would be the base diameter measurement of the implant that would best fit under the soft tissues of the breast to appropriately fill out the skin envelope. Practically speaking, this measurement can be expanded or reduced by as much as 1 cm in some instances and still provide for an excellent result. This is due to the distensibility of the skin and the role that other factors such as body habitus, breast size and the desires of the patient have on the ultimate shape of the breast. When picking an implant, this measured parameter provides an excellent starting point which can then be modified according to other variables.
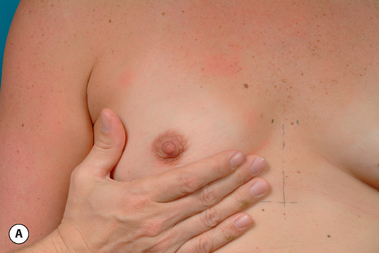
Skin Envelope Characteristics
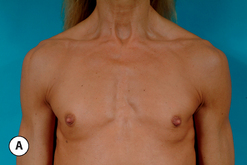
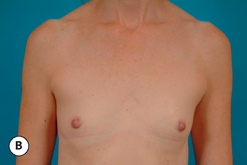
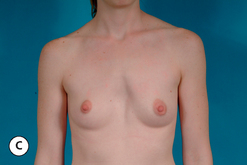
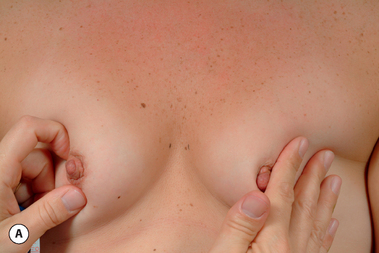
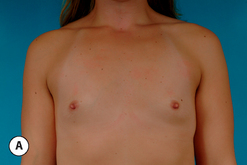
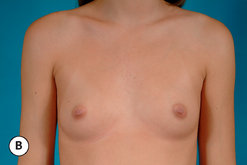
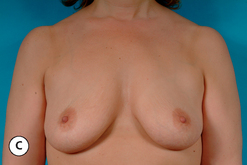
Once the breast sizing measurements have been taken, a subjective assessment of the skin envelope is performed. By examining and palpating the breast, the elasticity of the skin envelope is graded as tight, moderate or loose (Figure 4.41A–C). Also, the presence of any ptosis is noted. The importance of this assessment relates to the projection of the implant that is ultimately chosen. For a tight skin envelope, a moderate- or moderate plus-type implant is more appropriate as a high-profile implant with enhanced projection may not fit under the skin envelope without appearing crowded with prominent edges being noted around the periphery of the device. Conversely, for a loose skin envelope, a moderate-profile device may not effectively fill out the skin envelope and a high-profile device may be a better option.
Result type 1

A very modest breast augmentation which gently fills out the skin envelope, but does not distort the breast. Even close friends may not notice that the breast has been operated on. Postoperative bra size may not change. The implant size is small and falls short of the maximal size that could be used in another circumstance.
Result type 2
A more aggressive breast augmentation that completely fills out the skin envelope. The breast is enlarged to the point where it is fuller, but still has a natural appearance. Most importantly, there is no excessive bulging in the upper pole of the breast. In a bathing suit it will not be obvious or, at the most, some question will exist as to whether or not the breast has been augmented. Close friends will likely notice the size change and the bra size will go up.
Result type 3
An even more aggressive breast augmentation where not only is the breast completely filled out but it has a mildly artificial appearance. This can manifest as excessive upper pole fullness or simply a breast that is so large that it appears out of proportion to the remainder of the body habitus. It is obvious that a breast augmentation has been done and even casual acquaintances will notice the size change.
Result type 4
Using this result classification accomplishes two very important tasks. First, it allows a clear understanding on the part of the surgeon as to what type of result the patient is hoping for. This can greatly reduce the chance for a misunderstanding between the patient and the surgeon leading to unfortunate re-operations for size change. Secondly, it describes the desired result more in terms of shape rather than focusing only on volume. This is important as patients typically do not have the knowledge base to understand that specific size requests can often have adverse effects on breast shape. By re-focusing the discussion with regards to the final postoperative result on the appearance of the breast, rather than volume, the surgeon is more accurately describing what the operation can and cannot provide and the limitations that may result from choosing larger implants can be discussed. With this system, patient goals involving a specific bra cup size are minimized and a more meaningful discussion can be had regarding breast shape and what limitations the patient’s own pre-existing anatomy may have on that shape. In this fashion, patients generally become very well educated about the process of selecting a breast implant and are able to accept the fact that the bra cup size may vary, but the intended size and shape will be influenced more by the limitations of their own anatomy rather than trying to achieve a particular bra cup size. Most tellingly, bra cup size typically does not enter into the equation until after all the decisions have been made. At this point, many patients will inquire about what bra cup size might result from the chosen implant with the understanding that it is the end result of all the variables discussed beforehand rather than the over-riding factor governing a specific implant choice. Using this system of measurements and goal assessment has greatly enhanced the understanding that patients eventually gain about the breast augmentation procedure and it is rare to have any degree of patient dissatisfaction postoperatively related to the size of the breast.
Choosing an Implant
Now armed with patient-specific measurements, the process of selecting an implant to optimally match the breast can be performed. Most simply, for any round breast implant there are three structural design variables that describe how the breast will interact with the soft tissues of the breast to define the eventual breast shape and these include projection, volume and base diameter (Figure 4.46). Each of these variables has unique characteristics that can be thoughtfully manipulated to optimally select a particular implant for a specific patient. Combining these variables requires an organized approach with a specific goal in mind as to how the implant will interact with the soft tissues to provide the optimum result. To do this, it is helpful to designate one of the structural variables in implant design as the primary variable and then manipulate the other two in a fashion that maximizes choice to provide the desired result. This strategy is called the prioritized variable method of implant selection.
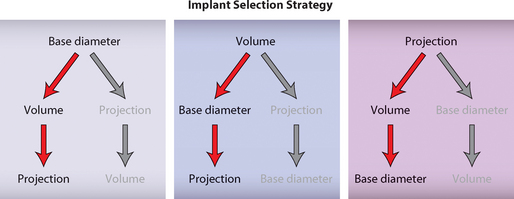
Base diameter as the primary variable
By using the evaluation system outlined previously, an implant base diameter measurement will have been determined and this measurement can be used as the primary variable in implant selection. It is important to realize that this measurement represents the midpoint of what is actually a range of base diameters that will provide an acceptable result and this range can vary up to 1 cm or more depending on the body habitus of the patient. This leaves volume and projection as potential choices for the secondary variable. If volume is chosen as the second variable, a range of potential volumes that are separated by small increments can be considered to meet the goals of an individual patient. However, similar to the situation noted with volume as the primary variable, projection has only three potential choices and this can be somewhat limiting when it comes to matching the correct implant to a given patient. Therefore, after taking first base diameter and then volume into consideration, projection is chosen third such that it will optimally allow the implant to fit the patient.
Sizers
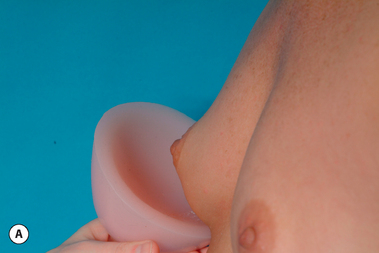
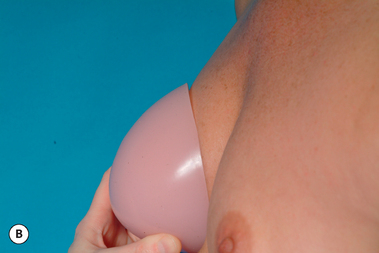
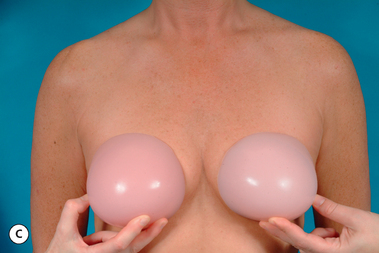
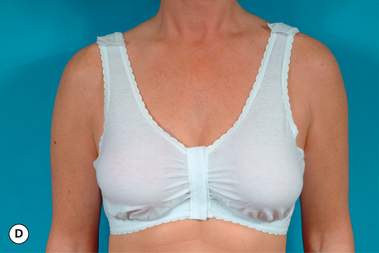
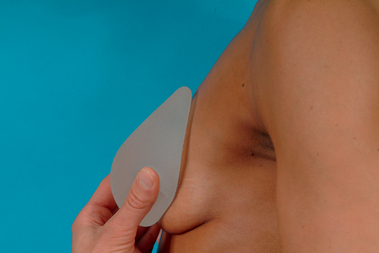
Once either a particular implant or even an implant range has been selected, many surgeons will then utilize external sizers to help confirm the implant choice. These sizers allow the patient to participate in implant selection and provide a very rough idea of what the augmented breast might look like. Many different strategies for sizer construction have been utilized, ranging from very rudimentary devices such as baggies filled with rice to more sophisticated shaped forms designed to be put inside a bra (Figures 4.47, 4.48). Whatever type of external sizer is utilized, it is undeniable that many patients become very engaged in the implant selection process when afforded the opportunity to use these sizers. While the exact shape of the breast may not be accurately predicted by the use of external sizers, the degree of patient education that occurs is well worth the effort as patients begin to understand how their own anatomy will interact with the volume provided by the breast implant. Perhaps just as importantly, the volume of the external sizer that the patient selects can help confirm to the surgeon what type of result the patient is looking for and can trigger appropriate discussion as to whether or not that result is advisable and/or achievable.
Basic Technique
Inframammary Fold Subglandular Breast Augmentation
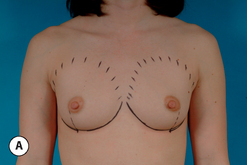
Patient marking
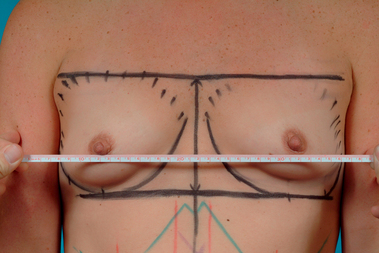
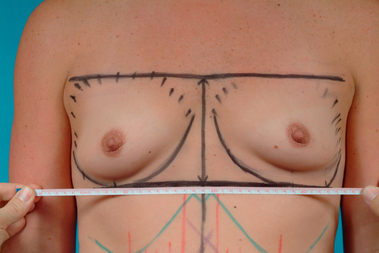
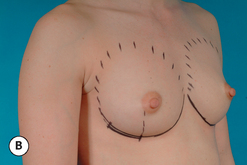
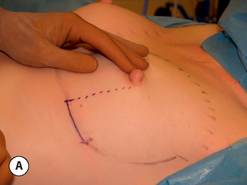
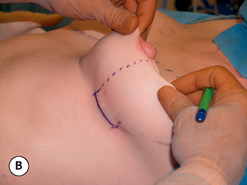
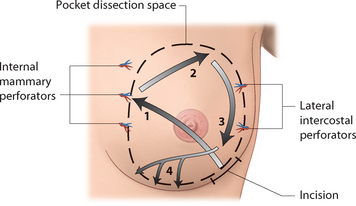
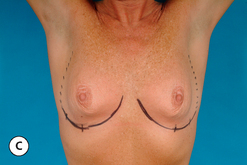
The patient is marked in the upright standing position with the arms hanging loosely at the sides. The existing inframammary fold is marked and comparison is made from side to side to ensure symmetry. Although it is common practice to center the inframammary fold incision directly on the breast meridian in the center of the breast, controlling the exact location of the fold can sometimes be a technical challenge when the incision is located directly in the fold as there can be a tendency to inadvertently lower the fold as the skin edges are retracted during the dissection of the remainder of the pocket. For this reason, the incision is moved laterally by drawing a perpendicular line down from the lateral margin of the areola to the inframammary fold. The incision line then extends laterally from this point along the fold for a distance of 3–6 cm depending on which type of implant is to be used (Figure 4.49). In this fashion, the access portal to the dissection space is moved away from the main portion of the fold, which allows this very important contour to be dissected and positioned accurately without distortion. In patients where the fold must be lowered to accommodate the implant, the location for the proposed new fold is marked and the incision is marked as before in this new fold location (Figure 4.50). The lateral, medial and superior extent of the proposed pocket dissection is then outlined and the patient is readied for surgery.
Pocket development
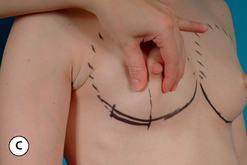
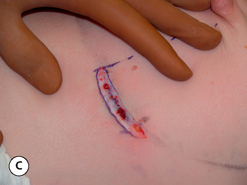
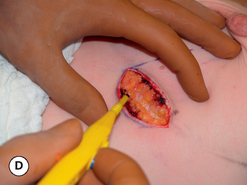
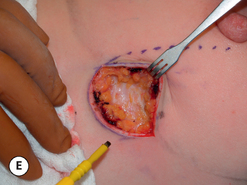
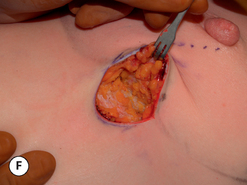
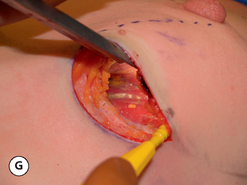
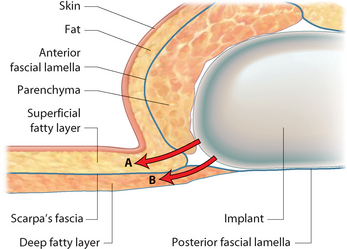
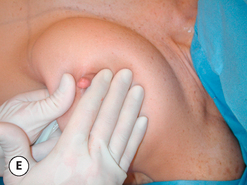
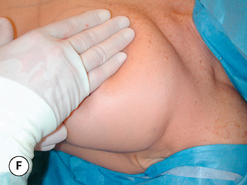
At surgery, the accuracy of the incision location is confirmed by pulling the breast away from the chest wall and applying downward pressure on the lower pole of the breast (Figure 4.51A,B). This maneuver mimics the forces that an implant will exert on the breast and can be used to make sure that the location of the incision will fall directly at the level of the inframammary fold. The incision is then made through the skin after first infiltrating the dermis with a dilute solution of local with epinephrine (Figure 4.51C). Dissection is carried through the dermis and superficial layer of fat until Scarpa’s fascia is identified (Figure 4.51D). By placing hooked retractors in the superior skin edge and pulling upward, the plane between the superficial layer of fat and Scarpa’s fascia can be easily delineated. Dissection is performed with bovie cautery and proceeds superiorly on top of Scarpa’s fascia until it blends with the fibers of the anterior lamella of the breast (Figure 4.51E). At this point, the fibers of the anterior breast lamella are divided and the underside of the breast is entered on top of the posterior lamella of the breast (Figure 4.51F). Superiorly directed dissection will now identify the lateral border of the pectoralis major muscle. At this point, a lighted retractor is inserted into the pocket and, with strong upward traction, the dissection space just above the fascia of the pectoralis major muscle is opened (Figure 4.51G).
Once the dissection of the main portion of the pocket has been completed, the critical inferior and inferomedial limits of the pocket along the inframammary fold are carefully dissected free. This is done by again respecting the insertion of Scarpa’s fascia into the anterior breast lamella. By directing the release of the breast more superficially along the fold in the plane between Scarpa’s fascia and the skin, the insertion of Scarpa’s fascia into the posterior breast lamella remains undisturbed and inadvertent opening up of the loose subscarpal space will be avoided. In this fashion, any tendency for the breast implant to migrate inferiorly over time will be prevented as the stronger, more fibrous superficial fatty layer becomes the major support structure for the inferior pole of the breast (Figures 4.52, 4.53).
Many instances of postoperative implant malposition have as their root cause unrecognized pocket over- or under-dissection at the time of surgery. To prevent this from occurring and to increase the overall accuracy of pocket dissection, several different maneuvers can be used to properly assess the pocket. An air-filled implant sizer can be inserted and inflated to see the true pocket dimensions. Lap sponges can also be inserted with some pressure to accomplish the same goal. One very simple maneuver is to insert the fingers of the operating hand up into the pocket and pull the breast up and away from the chest wall. The resulting vacuum causes air to be sucked up into the pocket. By then occluding the incision with the base of the fingers, the air becomes trapped inside the breast. By pressing on the outer skin envelope to increase the pressure inside the pocket, the true limits of pocket dissection can easily be seen as the balloon effect of the compressed air magnifies the step off created at the edges of the dissection space. This quick and simple maneuver not only shows the limits of pocket dissection but also outlines the shape of the edges of the pocket to help ensure smooth even contours after breast augmentation (Figure 4.54).

Implant insertion
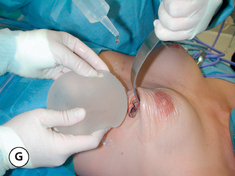
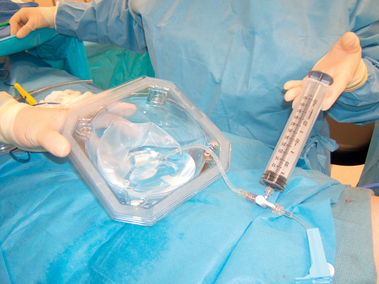
In preparation for implant insertion, the pocket is irrigated with a combination solution of the antibiotics Ancef (1 g), gentamicin (80 mg) and bacitracin (50 000 units). An occlusive drape is applied to the breast such that it covers the NAC as well as the incision and an access portal is cut in the drape. The chosen implant is opened and immediately covered with the antibiotic solution to prevent airborne surface contamination of the device. The surgical gloves are changed and washed in the antibiotic solution and the implant is then inserted into the pocket (Figure 4.55).


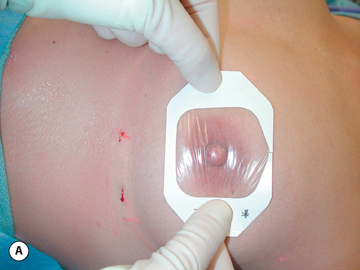
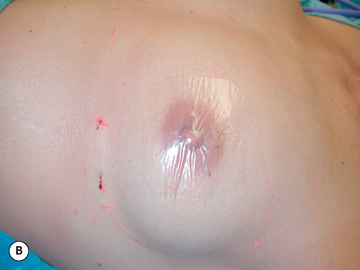
It may be helpful to cover the nipple with an occlusive drape even at the beginning of the procedure (Figure 4.56). During the manipulation of the breast, pressure is applied to the ductal system that could result in fluid contaminated with bacteria to spill out of the nipple onto the breast. It has been postulated that seeding of the implant pocket with bacteria could be one potential cause of capsular contracture, therefore, covering the nipple in this fashion may help prevent such inadvertent contamination of the operative field.
Silicone gel implants are inserted using a gentle pressure/counterpressure maneuver that gradually works a different portion of the implant through the incision with each repeating advance of the index finger while stabilizing the remainder of the device with the other hand as the implant is worked into the pocket. The antibiotic solution is splashed onto the implant and incision as the device is inserted to reduce friction and ease implant insertion. Saline implants are inserted pre-filled with only 50–100 cc of fluid and any residual intraluminal air is evacuated. The implant is inserted easily through the incision in this markedly underfilled state and the final volume is added using a closed system with the fill valve attached to an IV saline bag via a three-way stopcock (Figure 4.57). The closed system approach eliminates the possibility of surface contamination of the saline should it be allowed to sit in a bowl exposed to airborne contamination, or to inadvertent direct contamination as the tip of the filling syringe is inserted into the bowl repeatedly as the implant is progressively filled. Anatomically shaped cohesive gel implants are inserted using the same technique as round gel devices; however, closer attention needs to be given to proper implant orientation. One simple technique is to turn the anatomic implant clockwise 90 degrees as insertion is begun and then, with each pass of the index finger, easing a portion of the implant into the pocket, the device is slowly rotated into the upright position as it is finally positioned completely in the pocket. With any style of implant, it is necessary at this point to manipulate the implant/soft tissue interface inside the pocket with the index finger to be certain the device is properly seated against the chest wall and the breast without any fold, ridges or other catch points and that the inferior portion of the implant is seated directly at the inframammary fold. This is particularly true of both round and anatomic textured devices as the textured surface may create enough friction between the implant and the overlying tissue to prevent the implant from lying smoothly. One final check with anatomic cohesive gel devices involves making sure the orientation marks on the device are properly aligned and, in particular, the mark on the bottom midline of the implant is located at the bottom midline of the breast (Figure 4.58). When being sure that the implant is properly seated, it can be helpful to have the patient raised to the 80 to 90 degree position. This will help minimize the tendency for implants and, in particular, textured devices to get hung up in the superior portion of the pocket. By reaching under the device with the index finger, the base of the implant can be rolled downward and outward to be certain that the implant is properly seated directly at the inframammary fold.

Postoperative care
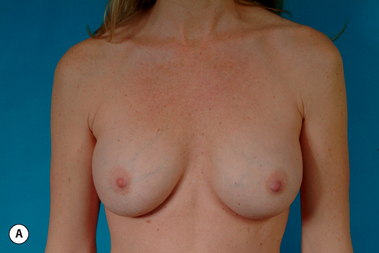
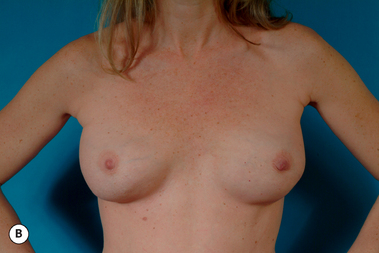
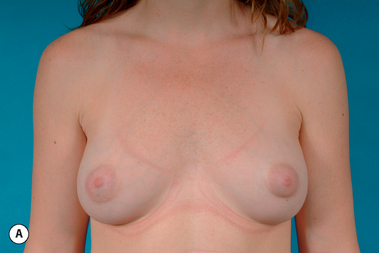
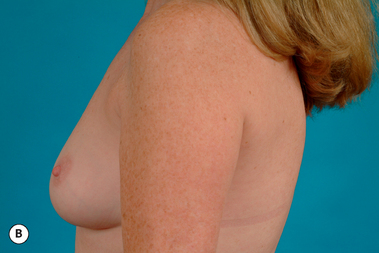
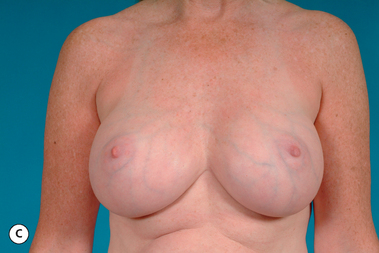
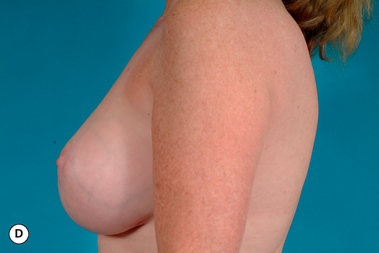
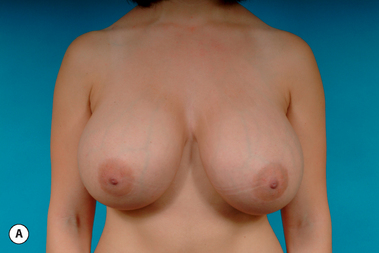
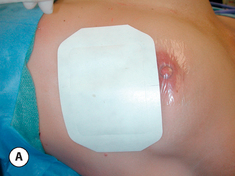
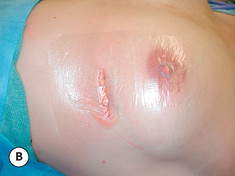
Patients are maintained on oral antibiotics for 1 week and oral pain medication is gradually weaned during that same time period. The support garment is worn to comfort as desired by the patient. The patient is seen back in the office at approximately 1 week, where the occlusive dressing is removed and the exposed suture ends on either side of the incision are clipped. Instructions for postoperative implant displacement exercises are reviewed in cases where a ‘round’ implant, either silicone or saline, was used and these exercises are begun as soon as they can be performed with comfort. Vigorous activity is restricted for 4 weeks postoperatively, at which point return to aerobic activities is gradually resumed. Return office visits are planned at 6 weeks, 6 months and 1 year postoperatively (Figures 4.59–“>4.63).
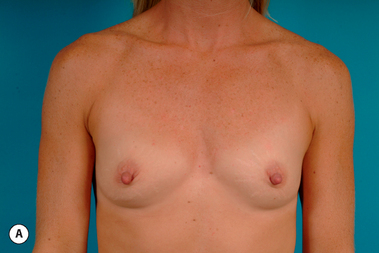
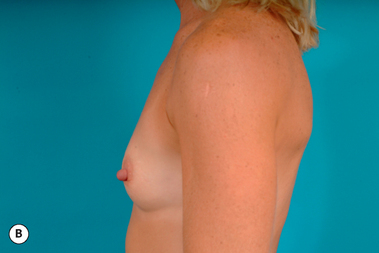

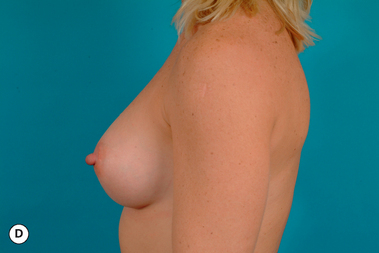
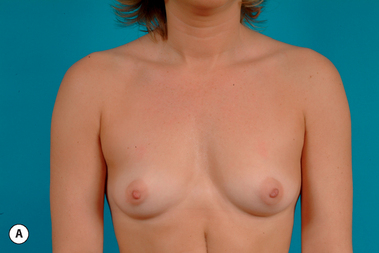
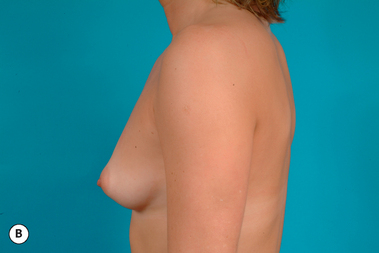
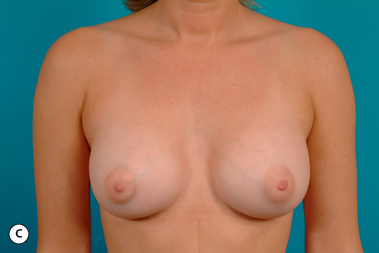
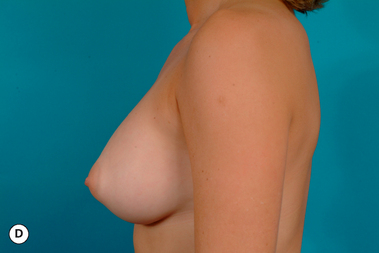
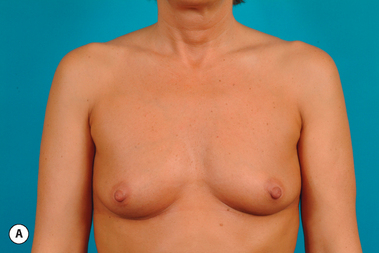
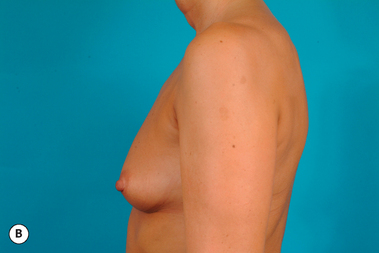
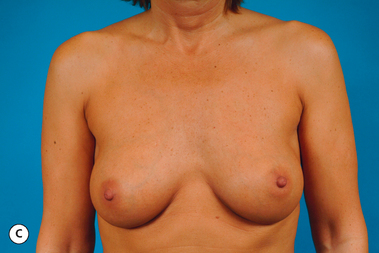
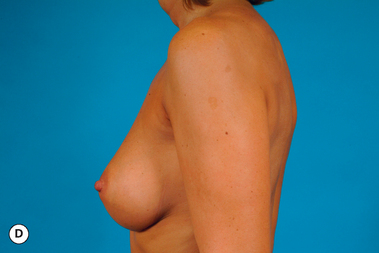

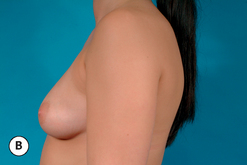
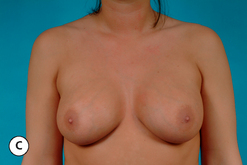
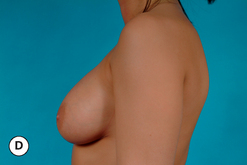
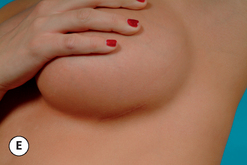
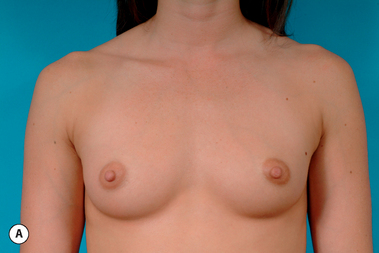
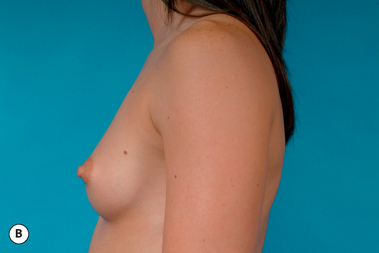
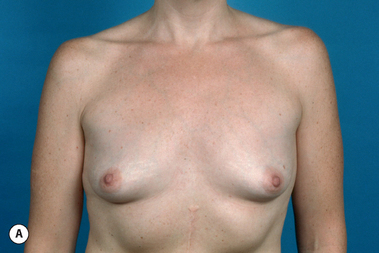
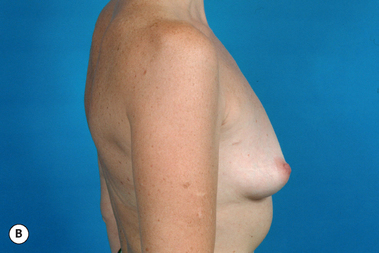
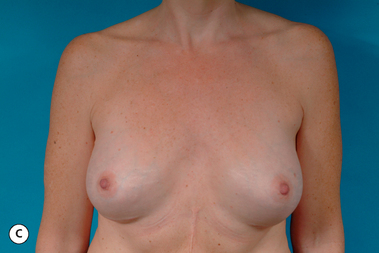
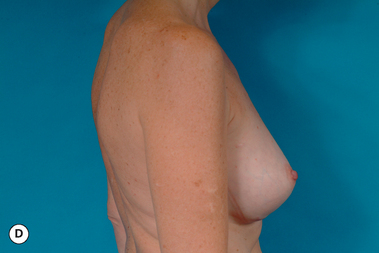
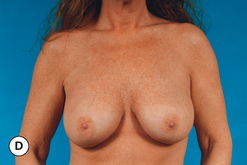
Figure 4.63 (A,B) Preoperative appearance of a 24-year-old woman in preparation for breast augmentation. She desires a type 2 result with a full natural appearance to the augmented breast. (C,D) Ten-month postoperative result after placement of 280 cc mid-height low-projection anatomically shaped textured cohesive silicone gel implants in the subglandular plane. Despite the placement of the same implant that was used in Figure 4.62, the breast has a slightly more rounded appearance due to the thinner body habitus of this patient, an observation that underscores the importance of correctly matching the implant size and shape to the patients pre-existing anatomy to achieve the desired result.
Inframammary Fold Subpectoral Breast Augmentation
When placing an implant in the subpectoral space, the marking, incision placement and development, implant insertion and closure proceed exactly as in the subglandular technique. What is different is the development of the subpectoral pocket. As the incision is opened, the lateral margin of the pectoralis major muscle will be visualized. By grasping this muscle edge and pulling upward, the areolar space under the muscle will become evident. Using a lighted retractor, the space under the muscle can be opened under direct vision by dividing the loose areolar fibers which separate the pectoralis major muscle from the underlying pectoralis minor. Large intercostal crossing vessels can be directly controlled with bovie cautery. At this point, the accessory fibers of origin will be encountered and they can cause confusion, leading to the inaccurate conclusion that the medial border of the muscle has been reached. However, release of the fibers directly at the level of the rib reveals a new space extending beyond to the next accessory fiber. Generally, there are two to three of these muscular bands extending from the anterior cranial surfaces of the ribs up into the muscle. All these accessory fibers must be divided until the true medial border of the pocket is reached. Even here, the band of origin of the main substance of the muscle can be up to 2 cm thick. When required, the medial portion of this main band of origin can be released further to enlarge the pocket. It is here that some variability in muscular anatomy may become evident. Some patients have a muscular origin that extends directly down to the level of the fold. In these patients, it is not necessary to completely divide the muscular origin in the inferomedial corner as the implant can be properly positioned at the level of the fold and still be completely covered by muscle. If the muscular cover does not flatten the breast and distort the breast shape, these fibers can be left intact to support the breast implant and prevent inferior migration of the device. If there is some degree of flattening, all but the most superficial muscle fibers and fascia can be divided to release tension in this area and improve the shape of the breast. If, however, the muscular origin is located above the inframammary fold or if the retained muscle fibers are restricting the shape of the breast in the lower inferomedial fold area, these fibers of origin must be completely released. Technically, this can create some difficulty as releasing the same amount of muscle on each side can be a challenge and it is possible for an asymmetrical muscle release to lead to implant malposition and an overall breast asymmetry. Conversely, if not enough of the muscle is released, an overly wide parasternal flattening with lateral implant malposition can be the result. Also, it can be relatively easy to over-release the muscular origin in the inferomedial corner of the breast, leading to a step off deformity in the medial portion of the augmented breast with implant visibility or palpability. Finally, with release of the inferomedial corner of the muscular origin, sometimes an inadvertent and unintended lowering of the inframammary fold can result in inferior implant migration. For these reasons, it is my preference to perform this muscular origin management under direct vision with a lighted retractor and bovie cautery rather than using a blunt technique. Muscle fibers are released carefully under direct vision until the pocket is dissected precisely as planned. If the inferomedial corner of the subpectoral pocket does need to be released, care is taken to release only the muscle fibers and not the soft tissues on the other side of the muscle. If the fold does need to be lowered further, it is done as in subglandular pocket development by dissecting through the anterior breast lamella and then on top of Scarpa’s fascia. By paying close attention to these details and recognizing the variable anatomy that can be associated with the origin of the pectoralis major muscle, accurate pocket preparation can be accomplished (Figure 4.64).
Notes on the ‘dual plane’ technique
While this technique is often discussed in isolation as a useful technical maneuver in breast shaping, it is important to realize that ‘dual plane’ dissection addresses just one of several tissue-related variables that can adversely affect the shape of the breast after breast augmentation. Essentially, when an implant is placed under the breast, the best results will be obtained in cases where there is minimal tension on the device itself from the overlying soft tissue. In this ideal situation, the implant settles to the bottom of the pocket and conforms to the pressures placed on it by the overlying soft tissue framework. If there is any tendency for the soft tissue framework to constrict, tether or otherwise alter the shape of the pocket, the aesthetic results can be adversely affected. In the breast, there are several tissue layers that can create such a constriction and potentially alter the shape of the breast, including the skin, fat and parenchyma, investing breast fascia and muscle. When faced with an intraoperative situation where the shape of the newly augmented breast is less than ideal, it is incumbent on the surgeon to determine what layer is causing the distortion. This is best performed by working from deep to superficial. Using this constricting layer model of breast shaping in breast augmentation, the pectoralis major muscle is the first layer that must be considered. It is here that the dual plane technique can offer advantage in releasing any constriction which may be present. By dissecting on top of the muscle as described or even more effectively releasing more of the inferomedial fibers of origin, the tendency for the muscle to constrict the lower pole of the breast can be minimized or even eliminated. In this regard, it is important to note that an even more effective way to prevent the muscle from distorting the shape of the breast, either actively or passively, is simply to remove it from the equation altogether and utilize instead a subglandular plane if the supporting soft tissue framework is of sufficient thickness to cover the implant appropriately. Once the muscle has been eliminated as a potential cause of shape distortion, the fascia along the underside of the breast is considered. It is technically straightforward to score the underside of the breast lightly with the bovie cautery to release any tendency for this fascial envelope to restrict the ability of the underlying implant to fit comfortably in the dissection pocket. This is easily done when using the subglandular pocket. When using the subpectoral pocket, only the lower portion of the underside of the breast can be treated in this fashion, but still, the effect can be significant. As the scoring is performed, the effect can be immediately discerned as the tightness of the pocket is relieved. Occasionally, it is possible strategically to release the underside of the breast fascia just in the lower pole of the breast, in an attempt to create differential forces within the pocket. By scoring the underside of the lower pole of the breast, but leaving the upper pole intact, an anatomically shaped fascial release pattern can be created that could theoretically at least create a tendency for a round gel implant to assume an anatomic shape due to the differential stresses placed on the device. The resulting shape of the augmented breast is therefore improved and any tendency toward excess upper pole fullness can be minimized. In cases of tuberous breast deformity, the constriction goes beyond simply fascia or muscle and often the fat and parenchyma itself is responsible for distorting the shape of the breast. In these cases, it is necessary to score through the breast fat and parenchyma in addition to simply releasing the deep fascial layer to allow the soft tissue framework to relax enough to comfortably accept an implant. Commonly, it is necessary to release the constricting elements of the parenchyma and fat all the way to the dermis, particularly in the lower pole of the breast in order to obtain an acceptable breast shape. Eventually, it becomes necessary to consider the skin envelope as the final constricting layer of the breast. The skin can be restrictive because there is simply not enough of it as can be seen in very hypoplastic breasts, or can have a history of injury due to previous surgery, scarring or radiation. Unfortunately, of the four layers that can potentially affect the shape of the breast, this layer is relatively immune to immediate surgical manipulation. In very hypoplastic breasts, it is possible to lower what is usually a high fold so as to recruit abdominal skin to assist in forming the lower pole of the newly augmented breast. In reconstruction or in cases of tuberous breast deformity, tissue expanders can be used to stretch the available breast skin better to accept an underlying implant. However, in breast augmentation, tissue expansion plays virtually no role in basic surgical technique and outside of lowering the fold to recruit upper abdominal skin, there is no easy way to increase the skin surface area of the breast without resorting to reconstructive techniques. For this reason, when the adequacy of the skin envelope becomes the limiting factor in breast augmentation, it is a far better option to tailor the implant choice to the limitations imposed by the tight skin envelope rather than to attempt to make the skin envelope fit around a poorly chosen implant. To a great extent, how well the surgeon can recognize and manipulate these potentially constricting layers and choose an implant that will best complement the soft tissue framework of the breast will, to a great extent, determine the quality of the overall result in breast augmentation.
Periareolar Breast Augmentation
One very important advantage afforded by the periareolar approach is that the inframammary fold is approached from above. The entire fold can be visualized without any possibility of distortion created by an incision in the fold as can happen with the inframammary fold incisional approach. As such, the shape and position of the fold can be easily assessed with the patient upright and the effect of an implant sitting on the fold can be immediately seen. Small alterations in fold position or contour can be made with accuracy even with the implant in place by simply gently moving the implant aside and releasing any restricting bands that might be tenting the fold. Also, the previously noted anatomical arrangements concerning Scarpa’s fascia are easily respected from this approach and the fold can be lowered as desired by dissecting through the anterior lamella and into the superficial layer of fat. This firm fatty/connective tissue layer provides excellent support for the implant, resists inferior fold migration and provides a reliable framework that can be surgically manipulated to help accurately position the implant and aesthetically shape the breast.
Despite these advantages, periareolar incisions tend to be shorter than inframammary fold incisions and this limited exposure can at times make pocket dissection and implant insertion difficult. In particular, the technique of dissecting down and around the breast to avoid dividing the gland can be a particular technical challenge in smaller patients with a relatively inelastic skin envelope, particularly when it comes to implant insertion. As a result, the periareolar approach is optimally used in patients who have an enlarged areola preoperatively (>4 cm) such that exposure will not be a problem, or in patients who are undergoing a periareolar mastopexy (Figure 4.65).
Transaxillary Breast Augmentation
As with the other techniques, the basic tenets of pocket development and inframammary fold management are the same. The incision is placed in the axilla just posterior to the edge of the pectoralis major muscle. After the skin has been incised, spreading scissors dissection exposes the underside of the pectoralis major, and the loose areolar plane between this and the pectoralis minor muscle is opened up with blunt finger dissection. Although blunt release of the muscle can be accomplished, endoscopic control of the pocket dimensions does afford better control of the implant space and also provides for direct hemostasis as needed. The origins of the pectoralis major muscle are released and the fold position is determined and dissected free as with the other approaches. Saline implants are easiest to insert through this approach as the empty implant shell is rolled into a cylinder and inserted into the pocket and then brought to the desired volume. Round silicone gel implants are more difficult to insert, particularly if they are textured. Anatomically shaped cohesive gel implants present a particular challenge in that they are always textured and additionally must be properly oriented. Therefore, to reduce the risk of injuring the implant during insertion and to ensure proper positioning and orientation, either the inframammary or periareolar approach is a better incision choice when using these devices.
Round versus Anatomic Implants
In patients who demonstrate any tendency toward ptosis of the skin envelope or the position of the NAC, a round implant may accentuate the contour of the upper pole of the breast to a fault and create an unnatural or ‘augmented’ breast appearance. This likelihood is increased in trim patients as there is less soft tissue to mask the shape of the round implant (Figure 4.66). In these patients, anatomic textured cohesive silicone gel implants can negate this tendency toward excessive upper pole fullness as a result of the aggressive inherent shape engineered into these devices (Figure 4.67). By limiting the degree of upper pole fill, a more tapered contour can be created that avoids excess fullness in the upper pole of the breast (Figure 4.68). Almost as important is the tendency for shaped gel implants to preferentially fill out the lower pole of the breast. This has the net effect of lifting the position of the NAC relative to the rest of the breast volume (Figure 4.69). By utilizing the contour control afforded by the these implants in conjunction with the lifting effect on the NAC, very aesthetic results can be obtained in challenging patients who are trim and have hypoplastic breasts with an inferiorly positioned NAC (Figure 4.70).


Lowering the Fold
To locate properly the position of the new fold and thus identify where the inframammary fold incision should be made, the dimensions of the breast implant must be determined. This measurement comes directly from the preoperative measurement system described earlier in this chapter. The base width (X) of the implant that is felt to most likely give the optimal result is centered on the midline of the breast. From the midline over to the medial extent of the pocket will represent half this measurement (1/2 X), as will the distance from the midline over to the lateral extent of the pocket. It follows then that measuring from the center of the proposed breast (usually the NAC) downward to the new inframammary fold will also be 1/2 X and this measurement will define the inferior border of the pocket (Figure 4.71). These measurements are most consistently made with the patient supine as the distorting and unidirectional effect of gravity is removed with the breast in this position. Once the basic position of the fold has been determined, an allowance must then be made for the elasticity of the skin as influenced by the distending effect of the underlying implant and the position of the fold must be adjusted lower. This is because the mass effect of the implant will pull the inferior pole breast skin away from the chest wall and the effective distance between the NAC and the inframammary fold will increase. The degree of adjustment will vary from patient to patient; however, for moderate- to mid-profile implants, the proposed incision and fold location must be lowered up to 5 mm to ensure placement of the scar in the inframammary fold. For mid- to high-profile implants, the proposed incision location as well as the position of the fold must be lowered up to 1 cm.
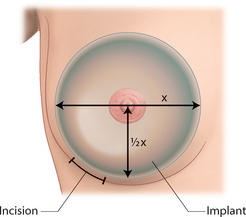
Once the location of the fold has been set, the dissection techniques described previously are used to be certain that the eventual fold is not lowered any further due to inadvertent release of the fascial support structure of the breast. By dissecting on top of Scarpa’s fascia and using the strong superficial fatty layer to support the breast implant, a stable fold position can be created that withstands the forces placed on it over time (Figure 4.72). Even in cases where the patient has become pregnant and has breast-fed, the fold has held up and provided solid support for the overlying implant with no subsequent implant malposition or breast distortion (Figure 4.73). By determining fold location in this fashion and technically creating the fold as described, a stable foundation can be set that allows the other variables of pocket plane and implant selection to be manipulated to maximal effect.
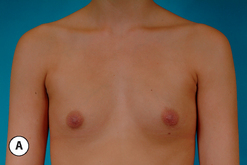
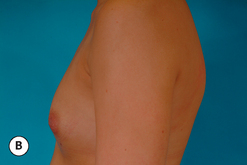
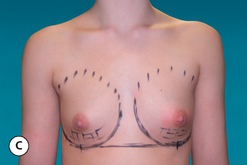
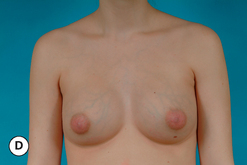
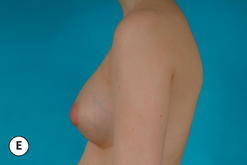
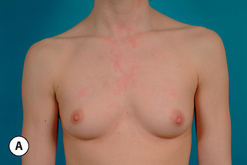
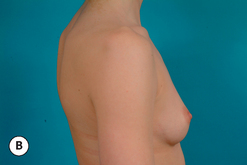
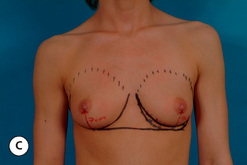
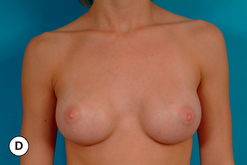
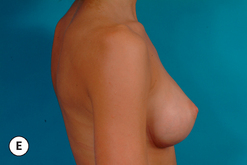
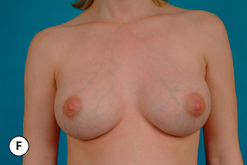
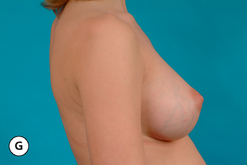
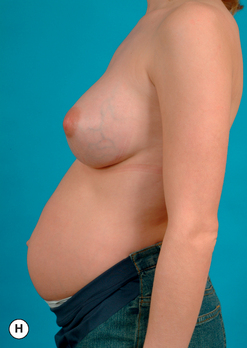
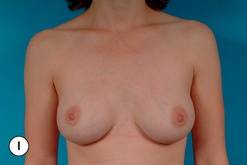
[/level-membership-for-plastic-reconstructive-surgery-category][not-level-membership-for-plastic-reconstructive-surgery-category]
Chapter 4 Breast Augmentation
Introduction
In many respects, breast augmentation is the defining procedure for the aesthetic breast surgeon and the ability to obtain outstanding results in a consistent fashion requires sound judgment, technical expertise and fastidious attention to detail. However, with experience comes the realization that developing this skill is harder than it might first appear to be. Perhaps the most significant reason for this relates to the tremendous variability that exists in the preoperative appearance of patients who present for breast augmentation (Figure 4.1) with differences in body habitus, breast size, nipple position and skin elasticity being just a few of the many variables that can significantly influence the final result. Also, there can be significant variability in the goals patients have for their surgical outcome. However, perhaps the most stressful facet of the procedure that must always be respected relates to the fact that these patients will almost uniformly have very high expectations for the quality of their result. Coupling all this with the fact that this high-quality result must be delivered in one operation with the barest minimum of complications highlights the importance that a sound surgical strategy performed with exacting technical expertise will have on achieving a successful outcome.
To this end, over the past decade, many of the finer details of the operation have been re-examined and new techniques described, all in the hope of improving the aesthetic results and minimizing complications. However, despite this in-depth review, for many surgeons the subject of breast augmentation remains as confusing and controversial as ever. This is a direct result of the fact that there are multiple surgical options that can be mixed and matched in numerous ways to create a viable operative strategy (Figure 4.2). For instance, in a given patient one surgeon might choose a smooth round saline implant placed in a partial subpectoral plane through a transaxillary incision, while another might choose a textured round gel implant placed in the subglandular plane through an inframammary fold incision. It is very likely that both approaches would produce equally acceptable aesthetic results that could very well be indistinguishable from each other. Further complicating the matter is the fact that, for nearly every technical decision that is made in planning and executing a breast augmentation, each advantage is directly offset to a greater or lesser degree by a specific compromise or disadvantage. For instance, the subglandular plane can be used to eliminate the potential for postoperative breast animation; however, the risk for a visible implant edge in the upper pole of the breast will be greater. For the novice surgeon, organizing the variables involved in planning a breast augmentation and predicting how the various decisions and approaches will interact with each other can create confusion when attempting to decide the optimal surgical approach for a given patient. It is helpful to step back from this confusing and, at times, contradictory exercise and realize that the basic procedure of breast augmentation simply involves making a pocket and inserting a spacer (implant) that, together with the existing soft tissue, will create the final breast form. When the existing soft tissue layer is thin, the implant and pocket location will to a greater degree determine the eventual shape of the breast and greater care will be required in choosing the best implant and pocket plane to provide an optimal result. When the soft tissue layer is thicker, these variables will have a comparatively less significant impact on the shape of the breast, and specific implant and pocket plane selection becomes less important. The goals of this chapter will be to describe the variables that need to be addressed when evaluating an individual patient for breast augmentation, provide a system for implant selection that can help guide the surgeon to select the optimal implant for a specific patient and to describe the technical details of the various surgical approaches that must be mastered successfully to perform the procedure.
Preoperative Planning
Incision
When planning an incision for breast augmentation, the need for locating the incision in a position that allows for easy pocket dissection and implant insertion must be balanced with the desire to ‘hide’ the incision in an inconspicuous area. With this in mind, there are four potential incision locations for breast augmentation (Figure 4.3).
Inframammary fold
Placing the incision in the inframammary fold (IMF) affords perhaps the best compromise between providing direct access to the breast at the expense of creating a scar. The IMF incision offers straightforward exposure for pocket dissection with the aid of a simple lighted retractor. Submuscular, subpectoral, subfascial and subglandular pockets can all be created with ease and the limits of the dissection can be determined under direct vision. Complete hemostasis can also be assured as individual vessels can be controlled and pocket manipulation with precise soft tissue release is also easily facilitated. The position of the inframammary fold can be maintained or lowered with accuracy due to the direct access afforded by the proximity of the incision. Implant insertion and positioning are also easily accomplished, a fact that is particularly advantageous when using shaped implants that must be oriented correctly. The disadvantage relates to the creation of a telltale cutaneous scar in the vicinity of the breast. For this reason, it is best to place the scar directly in the IMF as it tends to be quite inconspicuous in this location, particularly when the breast is of sufficient size to fall over the fold (Figure 4.4). In these situations, the scar will only be visible when the patient lies flat or raises her arms up over her head.
Periareolar
Although in terms of popularity, the periareolar incision is second to the inframammary fold incision, it remains as an attractive option for many plastic surgeons for two reasons. First, the resulting scar generally heals in a fine line fashion and is essentially imperceptible in many patients (Figure 4.5). The fact that the scar is situated at the junction of the pigmented areolar skin with the lighter lower pole breast skin assists greatly in visually masking the scar. Second, the only time the scar is potentially visible is when the breast is bare which, for many women, occurs only in controlled private settings. One unique situation where the periareolar incision has particular advantage is in the patient who presents with very small breasts with little to no inframammary fold. Here, the breast often cannot be augmented enough to cause the breast to fold over an inframammary fold incision with the result being an immediately obvious and visible inframammary fold scar. In these cases, rather than risk scar visibility, a better option is the periareolar incision location, where the scar is better camouflaged. Other advantages of the periareolar incision location include the fact that, as with the IMF incision, direct access is afforded to the breast, which allows accurate pocket dissection and direct hemostasis. The incision is generally made along the inferior hemisphere of the areola, at the junction with the lighter lower pole breast skin. From here, two approaches can be used to access the underside of the breast and create the pocket:
Figure 4.5 Appearance of the scar along the inferior border of the areola 1 year after breast augmentation.
Table 4.1 The circumference of a circle can be calculated using the formula π× diameter. By using this formula and dividing the circumference by two, the static length of a periareolar incision can be calculated for areolas of several different commonly encountered dimensions
| Areolar diameter (cm) | Incision length (cm) |
| 3.0 | 4.7 |
| 3.5 | 5.5 |
| 4.0 | 6.3 |
| 4.5 | 7.1 |
| 5.0 | 7.9 |
Transaxillary
The transaxillary incision provides an access site to the breast which heals with a well-hidden and, in most instances, imperceptible scar that is not located on or near the breast (Figure 4.9). As such, it is not generally recognized as a telltale sign of previous breast surgery. This significant advantage must be weighed against the potential for compromised accuracy in pocket dissection due to the remote location of the incision as well as the occasional patient who forms a bad scar in this otherwise visible location. There are two techniques to utilize this incision as it relates to pocket development. In both methods, the incision is located high in the axilla and is oriented horizontally at a point just lateral to the lateral margin of the pectoralis major muscle. The skin is incised and spreading dissection is used to identify the lateral border of the pectoralis major. At this point the underside of the pectoralis can be separated bluntly using a sound-type elevator to develop this plane, which opens up very easily. Crossing vessels from the chest wall to the muscle are simply avulsed and go into spasm, which usually checks the bleeding. Any tethering of the fibers of origin of the pectoralis major that adversely affect the shape of the breast are released by likewise avulsing these fibers loose until the pocket of the desired shape and dimension is developed. The implant is inserted and the incision closed. Clearly, the major difficulties associated with this approach involve the blunt and relatively blind nature of pocket development and the potential for uncontrolled bleeding due to the lack of direct control of bleeding points. Even with these potential difficulties, it must be pointed out that many surgeons can and do use this approach with success. However, in an attempt to increase the control afforded by this approach, some surgeons have incorporated endoscopic technique into the procedure. Once the plane on the underside of the pectoralis major is developed, an endoscope is inserted and, with the aid of standard endoscopic instruments, bleeding points are controlled and the fibers of origin of the pectoralis major muscle are released as needed under direct endoscopic vision to accurately create the desired pocket and position the inframammary fold with precision. Combining the use of the endoscope with the well-concealed transaxillary incision is an excellent way to combine the advantages of direct pocket development with a remote and imperceptible scar. The disadvantages are related to the requirement for extra instrumentation, the additional technical expertise required to utilize the endoscope and the potential for bleeding that may be difficult to control even with the aid of the endoscope, particularly if the second intercostal perforator in the upper inner portion of the pocket is inadvertently divided. Additionally, plane selection is limited as, although it may be technically feasible to utilize the subglandular plane with this approach, it is difficult and, practically speaking, most surgeons use the subpectoral plane with this technique. It must also be pointed out to the patient ahead of time that, should future problems develop such as capsular contracture or implant malposition, many patients are going to receive an additional scar on the breast in the course of correcting the problem. Finally, this technique allows saline implants to be placed without difficulty; however, larger gel devices, textured devices and anatomically shaped cohesive gel devices all may prove to be variably difficult to insert without damaging the implant. These potential disadvantages do not diminish the utility of the transaxillary approach and many surgeons do use it successfully. However, all of these factors must be taken into account when contemplating the use of the transaxillary incision location.
Transumbilical
In a further effort to erase any stigmata of a procedure on the breast, the transumbilical breast augmentation (TUBA) procedure has been developed. In this approach, an incision is made in the umbilicus and a hollow trocar is bluntly inserted through the subcutaneous tissue, angling upwards toward each breast. The pocket, either subpectoral or, more recently, subglandular, is bluntly opened enough to allow the passage of an uninflated temporary ‘expander’. This device is attached to a long fill tube which exits through the umbilicus. By over inflating the ‘expander’ with air, the pocket is developed bluntly as the muscle and/or breast is avulsed away from the more rigid chest wall. The more dense attachments of the inframammary fold prevent to some degree inadvertent lowering of the fold, and the pocket opens more or less under the breast. The ‘expander’ is deflated and removed and the final saline implant shell is passed through the trocar uninflated and attached to a second long fill tube. The implant is filled with saline to the desired fill volume and the fill tube and trocar are removed to complete the procedure. TUBA remains a controversial procedure. It must be stated that the scar generally is well hidden and some surgeons are able to obtain consistent aesthetic results using the technique. However, the disadvantages and potential complications are significant and must be taken into serious consideration when contemplating the approach. Due to the limited access tunnel, it is possible to use only saline implants, which limits implant selection. Also, because pocket dissection is performed bluntly from a remote location, control over the size, location and symmetry of the dissection space is compromised compared to the direct control afforded by incisions located closer to the breast. If bleeding occurs, it cannot be stopped other than with direct pressure, which increases the potential risk for hematoma development. One potential complication unique to the TUBA procedure involves the creation of permanent soft tissue distortion with visible grooving in the upper abdomen extending up from the umbilicus to the breast that can develop in trim patients as a result of the trocar passing through the thin subcutaneous layer. Finally, any revisionary procedure that cannot be performed through the periumbilical access site will require an additional separate incision on the breast. For these reasons, TUBA is viewed less than favorably by many surgeons and the lack of direct control of many of the factors involved in offering consistent results in breast augmentation is deemed enough of a disadvantage to make the remote and inconspicuous umbilical scar an unreasonable tradeoff.
Pocket Plane
Complete submuscular
Early on in the development of breast augmentation as a viable aesthetic procedure, it made intuitive sense to place the implant directly under the breast on top of the underlying musculature. It soon became clear, however, that, with this technique, capsular contracture was an alarmingly common complication and one possible etiology was thought to be bacterial contamination of the implant space from the ducts in the overlying breast. Therefore, in an attempt to isolate completely the breast implant from the overlying breast parenchyma and thus minimize any bacterial contamination, the submuscular pocket was developed. In this procedure, a pocket is created under the pectoralis major muscle by lifting the lateral margin of the muscle away from the chest wall and undermining the muscle over to the medial fibers of origin just lateral to the sternum. Typically, every attempt is made to keep the fibers of origin along the inframammary fold intact to prevent the implant from slipping out from under the muscle inferiorly thus preserving the completely submuscular location of the pocket. Laterally, the muscle fibers or simply the superficial fascia of the serratus anterior muscle are elevated away from the chest wall and the implant is slipped under this muscle/fascial layer. By approximating the lateral margin of the pectoralis major to the serratus muscle/fascia, the implant is completely isolated from the overlying breast parenchyma (Figure 4.10). Theoretically, providing a barrier to potential bacterial seeding of the implant space from the breast ducts will prevent or at least moderate the subsequent development of capsular contracture. Also, keeping the inferior muscle fiber attachments intact is thought to provide strong support to the inferior pole of the breast, which can prevent postoperative inferior migration or ‘bottoming out’ of the breast implant. Also, by covering the implant with a layer of muscle, the contours of the superior and superomedial borders of the breast along the edge of the implant are softened, creating a more natural breast shape. While these factors may be an advantage, there are significant drawbacks to this technique. Perhaps the greatest problem associated with the use of the completely submuscular pocket is the potential for superior implant malposition. This is because anatomically, in many patients, the position of the inferiormost fibers of origin of the pectoralis major muscle can be located slightly above the location of the attachments of the inframammary fold (Figure 4.11). When this relationship is present, placing an implant in a completely submuscular pocket or, for that matter, even in a subpectoral pocket, without release of the inferior fibers of origin of the pectoralis major muscle will not allow the breast implant to sit low enough and it will be appear to be superiorly malpositioned in relation to the position of the breast mound on the chest wall. The resulting breast contour will then very likely demonstrate a superior pole bulge with the breast appearing to fall away from the inferior pole of the implant. When severe, this appearance has been referred to by some as a ‘snoopy dog’ type deformity (Figure 4.12). The identification of a mismatch in breast position versus implant position can be difficult to appreciate intraoperatively as the implant malposition may not become apparent until the patient is placed upright. Lying supine, the breast mound tends to shift superiorly and an implant in a submuscular pocket may appear to be well matched to the breast positionally. It is only later when the patient is seen upright in the office that the malpositioned breast implant becomes apparent. It is likely that this phenomenon is at least partially responsible for the widely held opinion that submuscular implants tend to ‘ride high’. It may be that the so-called high-riding implant more accurately represents an implant that was unwittingly malpositioned superiorly at the time of surgery. This observation is but one of many that underscores the importance of sitting any breast patient up 80 to 90 degrees during the procedure so these types of relationships can be accurately assessed intraoperatively and appropriate changes made in implant position as needed. Another limitation associated with the use of a submuscular pocket relates to the volume of the space that can be opened up under the muscles. The pectoralis major and serratus anterior muscles are normally closely applied to the chest wall in their resting state and the degree to which they can be elevated away from the chest wall and still keep the peripheral attachments intact is limited. For this reason, larger implants may not comfortably fit within the confines of the dissected pocket. Also, should the pocket be constricted at all, due either to an inelastic muscle cover or to the use of a large volume device, there is a tendency for the implant to become compressed, particularly in the lower pole, resulting in lower pole flattening and excess upper pole fullness. It is for these reasons that the total submuscular pocket is used only sparingly in breast augmentation.
Partial subpectoral
In an attempt to address the apparent difficulties associated with the completely submuscular pocket, the partial subpectoral pocket was developed. In this procedure, the pectoralis major is released along the lateral border of the muscle and the subpectoral space is developed as before. Here, however, no portion of the serratus anterior is elevated at all and the inferomedial fibers of attachment of the pectoralis major muscle are released, allowing the muscle to retract up and away from the inframammary fold. The net effect of this release is twofold. First, the tension on the pocket is reduced significantly as a result of releasing the muscle fiber attachments. When the total submuscular pocket is used, the broad, flat pectoralis major can function as a tethering layer, preventing the pocket from expanding fully to accommodate the implant. By releasing the inferior attachments of this tethering layer, the muscle is released and the skin envelope of the lower pole of the breast is recruited to assist in defining the dimensions of the pocket. The result is a bigger pocket with less compressive force on the implant and a more compliant soft tissue/implant interface, allowing the creation of a softer breast. Second, as a result of releasing the muscle along the inframammary fold, the implant can now be positioned low enough to place the inframammary fold in an anatomically correct position. As a result, the upper portion of the implant remains covered by the pectoralis major muscle but the lower portion of the device is in contact with the underside of the breast (Figures 4.13, 4.14). The portion of the implant that is covered by muscle will change from patient to patient as breast position on the chest wall and the exact point of origin of the pectoralis major is subject to anatomic variation. However, the ultimate effect of this pocket plane is to once again soften the upper medial pole of the breast due to the padding created by the muscle and yet allow the breast implant to be positioned low enough on the chest wall to anatomically fill out the breast contour. The pocket is also very easily developed either under direct vision or bluntly through any incision location. The subpectoral pocket is also the preferred pocket location for women undergoing mammographic screening of the breast as the breast implant is relatively easily pushed up and out of the way, a maneuver that affords better breast compression and a more complete mammogram.
When either the total submuscular or partial subpectoral pocket plane is used, it must be recognized that the overlying musculature retains its contractile ability. As a result, when a breast implant is placed under the pectoralis major muscle, the implant will be compressed when the muscle contracts. Typically, this movement tends to draw the implant in an up and out direction and this directed compression creates a contour deformity in the breast that can easily be seen when the patient places her hands on the hips and pushes inward. Occasionally, the deformity is so prominent that the distortion in breast shape can be seen through tight-fitting clothes. The magnitude of the deformity caused by this breast animation is highly variable and, fortunately, it is usually only minimal to moderate in severity (Figures 4.15, 4.16). However, at times, the degree of the distortion created by contraction of the pectoralis major muscle can be dramatic (Figure 4.17) and, in revisionary patients, undesired breast animation is often one of many issues that can lead patients to seek re-operation (Figure 4.18). In an attempt to head off any potential postoperative dissatisfaction and ensure a fully informed patient, it is very reasonable to discuss breast animation as a potential complication during the preoperative evaluation and education of the patient. Short video clips (DVD clips 2.01, 2.02, 2.03, 2.04) are very instructive and can ensure that the patient understands completely the rationale for using the partial subpectoral pocket and what effect that decision may well have on her postoperative result.
Subglandular
The second most commonly utilized pocket for breast implant placement is the subglandular pocket. In this procedure, the subglandular space above the pectoralis major muscle is opened leaving the pectoralis muscle fascia attached to the muscle (Figure 4.19). The space dissects open readily and the limits of pocket development can be precisely controlled, which eases the technical challenge of dissecting pockets of the same dimension and location for each breast. Crossing vessels and nerves can be identified and preserved medially and laterally as desired and the pocket can be easily accessed through either a periareolar or an inframammary fold incision. Any type of implant can be used with a subglandular pocket and shaping maneuvers such as scoring of the underside of the breast to release tethering constrictions are greatly facilitated due to the direct exposure of the gland. As a result of placing the implant above the muscle, postoperative animation of the breast is markedly diminished and, at most, only a slight shape change may occasionally be noted with contraction of the pectoralis major muscle due to tethering of the capsule to the muscle. Typically, the recovery after undergoing a subglandular breast augmentation is more straightforward with many patients reporting a less painful experience overall. Despite these advantages, the subglandular pocket is used with care as the disadvantages can be significant. Perhaps, most importantly, it is generally agreed that the incidence of capsular contracture is greater in subglandular breast augmentation. What remains unknown is what effect that newer breast implant designs will have on this complication. More recent silicone gel breast implants have been designed to have an outer shell that is much more resistant to gel bleed than earlier implants and recent studies have reported rates of capsular contracture that are not much different from those associated with subpectoral placement. Perhaps just as important is the effect of the subglandular pocket on breast shape. Because the upper inner portion of the pocket is not padded by the pectoralis major muscle, implant edge visibility and palpability in this area can become an issue in thinner patients who do not have enough native breast parenchyma to mask the shape of the underlying device. This implant visibility becomes more apparent as the patient flexes the pectoralis major muscles and a sharper medial and superior implant margin can become evident (Figure 4.20). For these reasons, many surgeons limit the use of the subglandular pocket to those patients who have an upper chest soft tissue thickness of 2 cm or more, or in patients who will require soft tissue scoring on the underside of the breast as in patients who present with a tubular breast deformity. Also, in mastopexy patients, the soft tissue lifting effect of placing an implant under the breast is enhanced if the pectoralis major muscle is not positioned as a potentially tethering layer inhibiting implant projection. As a result, many surgeons will choose the subglandular plane for those patients undergoing augmentation mastopexy.
Subfascial
Closely related to the subglandular space is the subfascial pocket. This technique was designed in an attempt to minimize the potential disadvantages traditionally associated with the partial subpectoral pocket related to postoperative breast animation and yet preserve the improved upper and medial pole contour that the partial subpectoral pocket can provide. In this technique, the lower border of the breast is elevated along with the investing fascia of the pectoralis major muscle. Initially, this plane can be somewhat difficult to develop as the attachments of the breast septum must be dissected free as they course transversally across the mid-aspect of the pectoralis major muscle. Associated with this fascial attachment will be several prominent perforators that are easily controlled. Above this point, however, the fascia comes up easily and any small bleeding points that are encountered are easily controlled. Dissection then continues superiorly under the breast until the superior extent of pocket dissection is complete (Figure 4.21). Although quite thin, theoretically this fascia is thought to provide a tethering force around the perimeter of the breast implant that then softens the contours of the peripheral edges of the breast, leading to less implant visibility. It is postulated that this effect is similar to the softening of the superomedial implant edges that occurs with partial subpectoral placement, but without the attendant subpectoral distortion that variably occurs when an implant is placed under the pectoralis major muscle. In practice, this plane is rather easy to develop; however, the fascial layer is quite thin and any resulting improvement in breast shape that occurs is modest at best with other factors including body habitus, implant style and size and implant fill exerting a much more profound impact on breast shape. For this reason, use of the subfascial pocket has yet to attain wide popularity. One unexpected advantage that can seen when using this plane relates to the accuracy of pocket dissection. By elevating the fascia with the breast in the medial portion of the pocket, it is technically easier to identify and preserve the medial internal mammary perforators and avoid inadvertent injury to this vigorous source of blood supply to the breast. Another more theoretical advantage relates to a potential shaping advantage afforded by differentially scoring the fascia in the lower half of the breast. The resulting release of tension in the lower half of the pocket coupled with a mild fascial-induced tethering in the upper half can create differential tension on the pocket that tends to restrict upper pole fullness and maximize lower pole projection. However, whether or not such differential pocket dissection can aid in ‘shaping’ the subsequent breast implant, creating an improved breast shape over the long term, remains to be demonstrated.
Implant Choice
Despite this apparent complexity, the fact remains that there are a wide range of different implants that, for a given patient, would be equally optimal and even more that would be practically acceptable. The ultimate determining factors become the thickness of the overlying soft tissue cover of the breast and the degree of ptosis. Patients with 2 cm or more of fat and breast parenchyma at the peripheral margins of the breast and, in particular, in the superior pole of the breast will do very well with almost any type of implant. In these patients, any asymmetry, wrinkle or mild malposition problem will be masked by the native breast volume. Put another way, when the implant provides roughly 75% or less of the total volume of the breast, less stress is placed on the implant to determine the final shape of the breast. However, as patients become thinner, or as increasing degrees of ptosis become present, specific implant selection begins to play a more important role and must be more carefully individualized for each patient as any imperfection in the implant will tend to be more noticeable and may potentially detract from the quality of the aesthetic result.
