[level-membership-for-surgery-category]19
Breast
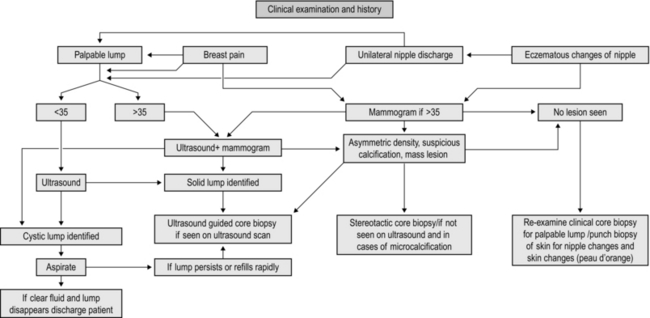
MANAGEMENT OF BREAST SYMPTOMS (Fig. 19.1)
Assessment
1. Management of breast disease involves a multidisciplinary team approach. Interact with and use the expertise of the different members of the team to deliver the best results.
2. Breast pain, lumps, lumpiness, deformity and nipple changes including inversion, bleeding and discharge are the common symptoms that are seen in a breast clinic. Ideally, manage all patients in a triple assessment clinic with facilities for concurrent radiological and cytopathological investigations.
3. Offer all patients with palpable breast lumps and asymmetrical nodularity ‘triple assessment’.
4. Triple assessment includes history and clinical examination, breast imaging – mammography, ultrasound or magnetic resonance imaging (MRI), and tissue diagnosis (core biopsy/cytology). Order mammography and/or ultrasound to complement clinical examination for women over the age of 35 years. Order ultrasound examination as the first choice of imaging investigation for women aged below 35 years.
5. Consider MRI scans for patients with lobular carcinoma, young women and those with dense breast tissue, to assess the size and extent of malignant lesions and assessment of the contralateral breast. MRI scans are used as a screening tool in patients who fall in the high risk category for family history of breast cancer in the age groups of 30–40.
6. For discrete breast lumps, ultrasound is useful to differentiate cystic from solid lesions. Obtain a needle biopsy, preferably under image guidance, from all solid lumps. The advantage of core biopsy is that you obtain a definite tissue diagnosis. In malignant lesions it establishes whether the lesion is invasive or non-invasive and determines receptor status. Fine needle aspiration cytology (FNAC) of breast lesions is now used less frequently than formerly. Reserve it for younger patients with clinically benign breast disease and for the assessment of axillary lymph node abnormalities.
7. Breast cysts are common findings, appear suddenly and are of concern to the patient. They are most common before and around the menopause but can occur at any age. Assess and confirm all cysts which appear as a lump with ultrasound. Aspirate and drain the cyst, establishing the diagnosis and ‘curing’ the condition so you can immediately reassure the patient.


8. You can leave alone lumps that prove to be benign on core biopsy or cytology. You can offer excision if the woman is above the age of 35, if the lump increases in size or is associated with pain, if the histology is equivocal or if the patient is anxious and requests an excision. As an alternative to observation or excision you can offer a younger patient with a confirmed fibroadenoma a variety of percutaneous methods such as vacuum-assisted Mammotome excision, laser ablation, microwave or cryo-ablation.
9. Obtain a core biopsy on all lesions that have indeterminate cytology (C3, C4), or inadequate cells (C1). For lesions with core biopsies reported to be equivocal, repeat the core biopsy or undertake formal excision. If a core biopsy/excision biopsy is performed for microcalcification or abnormal calcification a specimen radiograph must be obtained to confirm the presence of calcification and this should also be confirmed on histology, otherwise repeat biopsy must be considered.
10. Frozen section is no longer considered an investigation of choice in breast surgery.
11. Assess patients with a family history of breast cancer and stratify their risks based on published guidelines; in the United Kingdom refer to National Institute for Clinical Excellence (NICE) guidelines for Family History of Breast Cancer. Arrange regular follow-up including appropriate surveillance investigations based on local guidelines. Organize for all patients who fall in the high-risk category to have risk assessment and genetic counselling.
12. Arrange for patients who fall into a high-risk category for developing familial breast cancer, with BRCA1, BRCA2, CDH1, PTEN, STK11, and TP53 genetic defects to be appropriately counselled for genetic testing. If they prove to be a gene carrier, you can offer a risk-reducing mastectomy with immediate breast reconstruction.
13. A small group of patients present to you with problems related to the breast size and symmetry, including large or small breasts or asymmetry. They are best managed by a trained breast oncoplastic surgeon or in conjunction with a plastic surgeon.
14. You will also be referred male patients with breast symptoms including breast lumps and gynaecomastia (Greek: gynaikos = woman + mastos = breast). Treat male breast cancer like a female breast cancer, except that there is no role for breast conservation surgery.
15. Breast surgery for cancer is based on two important values: careful attention to oncological principles and consideration of the aesthetic and cosmetic outcome.
16. Surgical management of breast cancer has become less radical (Latin: radix = root; by the roots) over the years without compromising the local control or long-term survival.
17. Multimodality treatments of breast cancer, using new generations of drugs, have made a significant impact in improving survival.
BREAST BIOPSY
FINE NEEDLE ASPIRATION CYTOLOGY
1. This procedure is performed in the outpatient clinic and involves insertion of a fine needle (21–23 G) into the lesion and aspiration of cells which are spread on glass slides and stained. This has the advantage of being fast and applicable for all breast lumps and requiring the minimum of special equipment.
2. It has the disadvantage of requiring the special skills of an experienced cytologist and the quality of the aspirate is operator-dependent, demanding experience and skill. Moreover, it is not possible to differentiate between invasive and non-invasive cancer.
3. The cytological aspirate is usually reported as containing no cells (C0), blood and debris or inadequate cells for reporting (C1), benign epithelial cells (C2), atypical cells, probably benign (C3), cells suspicious of carcinoma (C4) or diagnostic of carcinoma (C5).
Action
1. After obtaining verbal consent, attach a 21G (green) or 23G (blue) needle to a 10-ml syringe with or without an extractor gun.
2. Clean the overlying skin then fix the lump between thumb and index finger of the non-dominant hand. If necessary, use ultrasound localization as an aid while performing a FNA.
3. Warn the patient. Insert the needle into the middle of the lump and apply suction to the syringe plunger. Move the needle in several different directions through the lump while maintaining negative pressure. Do not allow the needle point to leave the skin or air enters the needle and the aspirated material is drawn into the syringe.

4. Release the pressure and then withdraw the needle. Ask the patient or your assistant to apply pressure to the breast for 2 minutes to avoid haematoma formation.
5. Eject a drop of aspirate onto the end of a dry and clean microscope slide. Gently spread this out with another slide to create a thin smear.
6. Immediately label the slide and ensure that no material falls onto the table, which could then be picked up onto the back of the next set of slides. Spray the slide with, or immerse it in, a fixative. Send the slide for reporting.
7. If you do not succeed in aspirating any cells, repeat the procedure.
CORE-CUT OR ‘TRU-CUT’ NEEDLE BIOPSY(Fig. 19.2)
Appraise

Fig. 19.2 Tru-cut needle.
1. Ideally, remove a core biopsy from every lump. Even if the lump is clinically palpable, where possible employ ultrasound guidance.
2. Core biopsy is a more accurate method of tissue diagnosis, allowing for a definite diagnosis to be based on the results of core biopsy.
3. The receptor status can be performed on core biopsy and decision for hormonal therapy can be made based on that.
4. Drag cytology (touch preparation cytology) obtained from the core samples can be used to give an immediate report similar to cytology.
5. Ductal carcinoma in situ (DCIS) can be diagnosed only on core biopsy.
6. Core biopsy can be performed clinically, under US guidance or under stereotactic control
Action

1. Infiltrate the skin over the lump with 1% lidocaine. Introduce the needle into the skin and superficial tissue to inject the local anaesthetic. Deep infiltration with local anaesthetic can obscure a small lump. Preferably perform this procedure under US guidance.
2. Wait 2 minutes for the anaesthetic to work.
3. Make a small nick in the skin with the tip of a sharp-pointed scalpel (no. 11 blade).
4. Fix the tumour within the breast between finger and thumb, to provide a static target.
5. Prefer to approach the lump from the side to avoid firing the needle backwards and penetrating the chest wall.
6. Insert the core biopsy needle, in its closed position, through the skin incision until you reach the edge of the tumour.
7. A spring-driven automatic biopsy needle can obtain a sample more rapidly than the one obtained by the manual hand driven one and it causes less discomfort for the patient.
8. Warn the patient about the clicking sound before firing the automatic device.
9. If microcalcification is a dominant feature, perform the biopsy under stereotactic mammographic control. X-ray the specimen to ensure you have obtained the correct specimen.
10. Obtain at least three samples in different directions from the lesion and transfer the specimens into small bottles containing formalin and label them appropriately.
11. Dispose sharp objects into appropriate containers.


12. Vacuum-assisted Mammotome biopsy is being used for obtaining cores of tissue from impalpable lesions, or for completely excising small impalpable lesions. Insert a small metallic marker clip if all the microcalcifications have been removed to allow subsequent localization of an abnormal area.
NEEDLE-LOCALIZATION BIOPSY
Prepare
1. Discuss the imaging (mammograms/ultrasound scans) with the radiologist who inserts the localization needle and wire.
2. Discuss the needle-insertion site, direction and depth with the radiologist, and the type of wire used, such as simple hook, Reidy or Nottingham needle. It is helpful if the distance between the needle entry site and the lesion is as short as possible.
3. Ensure that the mammograms are taken in two planes (cranio-caudal and medio-lateral oblique) following wire insertion. Check that the images are available in the operating theatre.
4. Frozen section has no role in assessment of biopsy specimen.
Access
Plan a cosmetically satisfactory incision (Fig. 19.3) and estimate the likely surface marking of the lesion from the preoperative mammograms. The incision need not be placed at the point of wire entry. It is useful to measure the length of the wire that is outside. This helps to determine the length of wire inside and helps guide your excision.
Action
1. Raise a skin flap between the chosen site of incision and the needle entry site until you reach the wire in the subcutaneous plane. Grasp the wire with an artery forceps and cut off the excess wire.
2. Follow the wire down towards the site of the lesion by sharp dissection or use the diathermy. Use a scalpel instead of heavy scissors as the latter can bend or inadvertently cut the wire. When using the diathermy for excision, be careful not to activate diathermy whilst it is in contact with the wire, to avoid burning the skin.
3. Once you reach the point of the wire at least 2 cm above the tip (site of the suspected lesion) excise the lesion with an appropriate radial margin (depending on whether the excision is diagnostic or therapeutic). Mark the specimen with metal clips to facilitate orientation and obtain the specimen that was identified by radiography.

4. Achieve haemostasis, and check the cavity for any residual suspicious tissue.
5. Check the radiograph of the specimen to confirm that it contains the mammographic abnormality. If the lesion is close to a specific margin, excise that specific margin. If the lesion is not visible, you need to re-excise and repeat the specimen radiography until you find it.
6. Close the wound as for excision biopsy.
7. Take extra care to avoid needle-stick injury from the wire. Label the specimen container clearly and warn the pathology staff about the wire and the risk of needle-stick injury.
8. Localization of lesions with radioactive injection (ROLL, radioactive occult lesion localization) is another approach currently used in many centres. Results from a recent study on the use of radioactive seed localization also show significant promise.


PUNCH BIOPSY
Appraise
1. Reserve punch biopsy of the skin for nipple biopsy suspected of Paget’s disease, recurrence in the skin following surgery for breast cancer, or in suspected inflammatory cancer (where dermal lymphatics are involved with cancer, giving an appearance of inflammation).
2. Paget’s disease starts in the nipple and then moves on to the areola and underlying breast ducts.
3. Always perform a mammogram in Paget’s disease to rule out underlying malignancy or DCIS.
Action
2. Infiltrate with 2 ml of 1% lidocaine using a blue needle (size 23 G).
3. Use a 3.5- or 4-mm size punch for performing the biopsy.
4. Use the punch to press on the area where you wish to obtain the biopsy.
5. Hold the obtained tissue with forceps and use scissors or a blade to cut the tissue from the underlying breast.
6. Send the obtained sample to the pathology laboratory in formalin.
7. Compress the area of biopsy for 5 minutes to stop the bleeding.
8. You can apply Steristrips to close the defect left by the punch.
BREAST ABSCESS
Appraise
1. This develops most commonly during lactation. Empty the affected breast by manual pressure, but encourage the mother to continue breast feeding.
2. Treat early infection with antibiotics alone but do not wait for fluctuation, or widespread destruction of the underlying breast tissue may have developed by then. Start co-amoxiclav early. If an abscess is present clinically or on ultrasound, aspirate it using a wide-bore needle under US guidance and repeat aspiration as necessary.
3. If the skin over the abscess has become thin, drain it under general anaesthesia.
Action
1. Site the incision over the point of skin thinning, but if it is near the nipple use a peri-areolar incision.
2. Send pus for culture and antibiotic sensitivities. If necessary, change to the appropriate antibiotic.
3. Introduce a gloved finger into the abscess cavity and rotate it to break down all loculi in a potentially multiloculated cavity.
4. If the cavity allows, introduce a retractor and examine the walls. Stop any bleeding using diathermy.
5. If this is a lactational abscess cavity it is not necessary to obtain biopsy specimens. Otherwise remove a specimen from the cavity to exclude a carcinoma.
6. Ensure that the incision is sufficiently long to allow the wound to heal from the deepest parts upwards, in order to prevent the development of a chronic abscess.
7. Insert a drain if you observe a large residual cavity. Alternatively, loosely pack the cavity.
8. Apply a non-adhesive dressing.
9. Advise the patient to wear a supportive brassiere to diminish the risk of developing a haematoma.
10. Allow bilateral breastfeeding to recommence as soon as it is comfortable.


DUCT ECTASIA AND MAMMARY DUCT FISTULA
Appraise
1. Duct ectasia (Greek: ex = out + tenein = to stretch; dilatation), is widening of the breast lactiferous ducts and is often related to breast inflammation. It is a benign condition characterized by nipple discharge, swelling, retraction of the nipple or a lump that can be felt.
2. Occasionally, a fistula develops between a duct and the skin at the areolar margin. This discharges pus, and often heals spontaneously before breaking down again. As it is related to smoking, advise abstention.
3. If a mammary duct fistula does not heal, you may need to excise it under antibiotic cover (see below).
Action
1. If there is a fistula, insert a probe through the external opening and hook it up though the nipple. Cut around the areola, extending to no more than a quarter of the nipple and excise the fistulous track to the back of the nipple.
2. Obtain perfect haemostasis.
3. Close the wound with interrupted absorbable sutures.
4. If you are operating to excise the major ducts (Hadfield’s operation), you need a longer periareolar incision – but no more than half the circumference of the areola.
5. Ensure that you are beneath the subareolar plexus. Cut the subcutaneous tissue down to the duct system.
6. Use blunt and sharp dissection to reach the plane, circumferentially around the terminal lactiferous ducts, just deep to the areola and nipple. Preferably, use bipolar diathermy. If you are using monopolar diathermy, do so cautiously to avoid nipple necrosis.
7. Divide the ducts close to the nipple and remove them with a conical wedge of tissue including the distal 1–2 cm of the subareolar tissue, as well as the major lactiferous ducts and sinuses.
8. If there is a fistulous tract, ensure that you excise it in its entirety with all the granulation tissue.
9. Send all tissue for histological examination.
10. Insert a small vacuum drain and close the wound with 3/0 subcuticular absorbable sutures or interrupted 4/0 polypropylene.
NIPPLE DISCHARGE AND BLEEDING
Appraise
1. If the nipple discharge is serous (watery), serosanguinous, or frank blood arises from a solitary duct, then manage it as for nipple bleeding (below).
2. Test for blood. This is usually done using Dip-Stix. Nipple discharge can be sent for cytological examination. Intraductal papilloma is the commonest cause of bloody nipple discharge.
3. If one duct is associated with blood-stained discharge and imaging is negative, then a microdochectomy (Greek: small duct cutting out) (Fig. 19.4) may be required.
4. If embarrassing nipple discharge occurs in patients above the age of 45, prefer Hadfield’s procedure (excision of major ducts).
5. Multiduct multicolour nipple discharge is often physiological and does not need intervention.

NIPPLE BLEEDING
Appraise
1. Determine from which duct the blood is coming.
2. Arrange an ultrasound scan and a mammogram to exclude underlying malignancy.
3. Send the material for cytology; it may yield papillary cells or, very occasionally, carcinoma cells.
4. Consider ductoscopy when this available
5. Surgically explore the breast unless the bleeding occurs during pregnancy, in which case it is frequently bilateral and stops spontaneously after parturition, or in a patient who is taking anticoagulants.
Access
1. Perform the procedure either under a local or general anaesthetic.


2. Infiltrate the area with bupivacaine 0.5% and adrenaline (epinephrine) 1: 200 000 to minimize bleeding and postoperative pain.
3. When you pick up the nipple between finger and thumb, you may feel thickening along one duct, or feel the probe within the duct.
Action
1. Make a circumareolar incision and dissect down to expose the duct.
2. Excise the duct with a small amount of surrounding breast tissue and send it for histology.
Total duct excison (Hadfield’s procedure)
1. Make a peri-areolar incision (but no more than three-fifths of the circumference of the areola).
2. Cut the subcutaneous tissue down to the duct system.
3. Use blunt and sharp dissection to reach the plane circumferentially around the terminal lactiferous ducts, just deep to the areola and nipple.
4. Divide the ducts close to the nipple and remove them with a conical wedge of tissue including the distal 1–2 cm of the subareolar tissue, including the major lactiferous ducts and sinuses. Orientate the specimen with marking suture for the pathologist.
5. Take a purse-string suture around the subcutaneous tissue where you have removed a wedge of retroareolar tissue, to prevent sinking of the nipple.
6. You may insert an inverted suture with vicryl from inside the nipple to prevent it from inverting.
7. Close the subcutaneous layer with absorbable sutures and skin with a non-absorbable suture such as prolene or ethilon.

FIBROADENOMAS
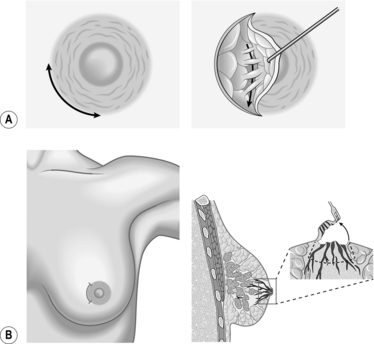
Action
1. Make an incision depending upon the location of the fibroadenoma. (see Fig. 19.5). Make either a periareolar, submammary or a lateral incision as preferred.
2. If excision biopsy is indicated, prefer a peri-areolar incision. This results in the best cosmetic outcome.
3. Move the fibroadenoma to the site of the nipple–areola complex using your non-dominant hand.
4. With your dominant hand, make a peri-areolar or inframammary incision directly over the fibroadenoma, and excise the lesion through this incision.
5. Excise the fibroadenoma using sharp dissection, staying close to the edge of the lesion.
6. After removing the fibroadenoma pay meticulous attention to haemostasis using electrocautery.
7. Irrigate the wound then approximate the skin edges with a 3/0 or 4/0 Monocryl subcuticular stitch.
CARCINOMA AND DUCTAL CARCINOMA IN SITU
Appraise
1. The local management of breast carcinoma demands excision of the tumour with clear margins. If the tumour is small in comparison with the total breast volume, achieve this by wide local excision. Up to 20% of breast volume can be removed without significant cosmetic differences being observed by the patient. The long-term survival after wide local excision and radiotherapy equals that of a mastectomy. Some form of axillary surgery is still required to stage the patient and if necessary to treat the axillary disease. The importance of axillary node staging is reinforced by the evidence that adjuvant cytotoxic chemotherapy can reduce the relative risk of death by 20–25% in the node-positive population. A similar benefit is seen in patients who have hormone-responsive tumours, if they are given tamoxifen or the newer generation aromatase inhibitors. Sentinel node biopsy is now the accepted standard of care in staging the axilla (see below).
 Simple or total mastectomy: In this procedure, the entire breast is removed, but the lymph nodes and surrounding muscle are left intact.


3. Mastectomy with immediate reconstruction, using either an implant or a myocutaneous flap, is increasingly used by breast surgeons (oncoplastic surgery), sometimes in conjunction with plastic surgery colleagues. This procedure is also valuable in the management of extensive intraduct carcinoma and as a prophylactic procedure in patients with a very strong family history with proven BRCA gene mutation. This is discussed in further detail below.
4. Primary endocrine therapy (tamoxifen or aromatase inhibitors) may be used in frail elderly patients. Primary cytotoxic chemotherapy may be appropriate in otherwise fit patients with locally advanced cancer such as ‘inflammatory’ carcinoma. In patients with large tumours that are operable by mastectomy, primary (or neoadjuvant) chemotherapy may be used to shrink the tumour and allow breast conservation in up to 50% of cases.
5. Risk-reducing mastectomy is a term used when prophylactic mastectomy is offered to women with a family history of breast cancer that are considered high risk, including the ones with genetic mutations (BRCA1, BRCA2 gene defects).
PAGET’S DISEASE
1. Described by Sir James Paget (1814–1899), this disease frequently presents with a chronic, eczematous rash on the nipple and adjacent areolar skin. Proper recognition of this disorder is required to initiate an appropriate work up (e.g. skin biopsy) for differentiating it from other benign conditions like eczema. When you suspect this disease, perform a biopsy of the nipple area under local anaesthetic to confirm the diagnosis histologically. It may also be possible to do so with imprint cytology of the nipple.
2. When Paget’s cells are demonstrated there is usually an underlying intraduct carcinoma, which is invasive in 50% of cases.
3. Mastectomy is usually recommended, but wide excision of the nipple and underlying breast tissue and radiotherapy are possible alternatives in less extensive cases.
Breast conservation surgery
WIDE LOCAL EXCISION/QUADRANTECTOMY
Appraise
Perform simple wide local excision in patients who will lose less than 20% of breast tissue.
The different incisions for wide local excision are shown in Figure 19.5.
1. The aim is to excise the lesion with an adequate zone of normal breast tissue (at least 1 cm) and producing the least cosmetic defect.

2. Preliminary excision biopsy is occasionally necessary for a minority of patients with a breast carcinoma in whom the diagnosis cannot be established by preoperative cytology, core-cut needle biopsy and/or mammography. Definitive operation is then required as a second procedure after paraffin-section histological examination.
Prepare

1. Check that the lesion is still present on admission. Occasionally, lesions disappear; this has been seen in certain patients who have been put on neoadjuvant drug therapy. Check also that no new lesion has appeared in either breast.
2. Mark the exact site of the lesion on the breast with the patient lying in the operating position; otherwise you may be unable to find the mass once the patient is anaesthetized.
3. Obtain informed consent for the operation and carefully explain the potential risks.
4. Check that you have the correct patient in the anaesthetic room and are operating on the correct side.

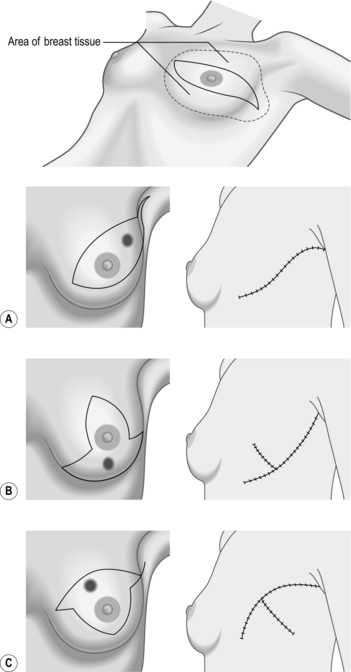
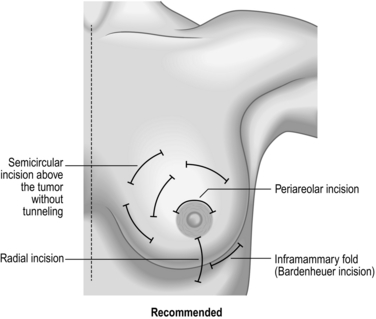
Access (Fig. 19.5)
1. Incise over the region of the lump. Place the incision to minimize scarring.
2. Peri-areolar incisions heal with least visible scars, but may not always be suitable.
3. Incisions in the medial half of the breast have a tendency to develop keloid scars.
4. Avoid radial incisions except medially.
5. Place the incision within the area of skin that could be included within a mastectomy if it is deemed necessary subsequently. This avoids an unnecessary additional scar to the mastectomy scar.
Action
1. Ensure to excise the lump completely without cutting into it. Use sharp dissection with scissors or knife, or use diathermy whilst dissecting around the tumour.
2. Try not to cut into the specimen. The pathologist needs to report on the margins of excision and so needs to incise the lesion. Palpate the resected specimen to make sure you have removed the palpable abnormality. Excise a zone of normal breast tissue at least 1 cm around the palpable abnormality in all directions.
3. When you are operating on a benign lesion, it is unnecessary to resect cavity margins.
4. Ensure that you obtain good haemostasis. Try using the spray setting, if there is one, on the diathermy machine. Spray diathermy, also called fulguration mode, employs a high voltage. The electrode is held 2–4 mm from the tissue so that the current jumps across the air gap and spreads to create widespread coagulation. It is useful to cauterize small vessels without the need to pick them up in forceps.
Closure
1. In the majority of cases you do not need to introduce a drain. Otherwise insert a small suction drain to reduce the risk of a haematoma.
2. Close the skin using a subcuticular suture of 3/0 absorbable material. Support the closed wound with steri-strips.
KEY POINTS
 As a rule do not approximate the residual breast tissue at the edges of the cavity. However, this may leave an unacceptably large defect.

 Avoid radial incisions and curvilinear incisions in the inferior and superolateral quadrant.
 Avoid radial incisions near the areola as they cause severe nipple retraction.
ONCOPLASTIC SURGERY
Appraise
Two levels of oncoplastic surgery procedures (OPS) have been described: the decision to choose the level of procedure is dependent on the extent of loss of volume relative to the breast, the extent of skin incision and the density of breast tissue – whether it is glandular or fatty in nature. Criteria for choosing the Level I or II procedure are described in Table 19.1.
Table 19.1
| Criteria | Level I | Level II |
| Maximum excision volume ratio | 20% | 20–50% |
| Requirement of skin excision for reshaping | No | Yes |
| Mammoplasty | No | Yes |
| Glandular characteristics | Dense | |
| (reference Krishna Clough) |
Level I procedures are performed using the prescribed steps described in Table 19.2 in order to prevent severe deformities that arise due to careless breast operations. The basic principles of a Level I procedure are to choose the correct incision, accomplish dual plane mobilization of breast tissue, complete full-thickness excision of the breast and volume displacement and glanduloplasty. Nipple–areolar complex (NAC) repositioning is performed using de-epithelialization of the peri-areolar skin.
Table 19.2
Level I OPS: step-by-step surgical approach
| Procedure | Result |
| Skin incision | Allows wide access for excision and reshaping |
| Skin undermining | Facilitates wide excision and glandular mobilization for reshaping |
| NAC undermining | Avoids displacement of nipple towards excision defect |
| Full-thickness excision | Prevents anterior and posterior margin involvement |
| Glandular reapproximation | Late-occurring deformity is avoided |
| De-epithelialization and NAC repositioning | Re-centres NAC on new breast mound |
The flow chart (Fig. 19.6) along with the adjoining figures (Fig. 19.7) describes the various operations that can be performed as part of the Level II procedures for OPS. Note that the size of the breasts and the ptosis of the breast determine the choice of the procedure.
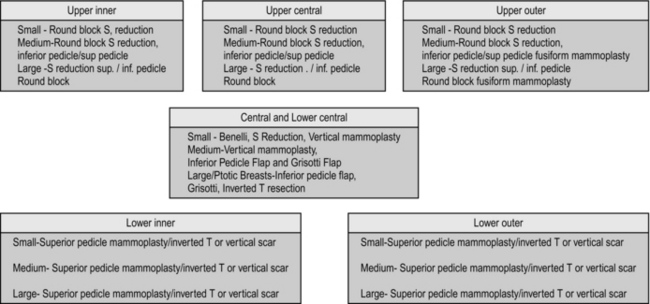
Fig. 19.6 Recommended procedures for level II oncoplastic surgery depending on the quadrant of tumour.
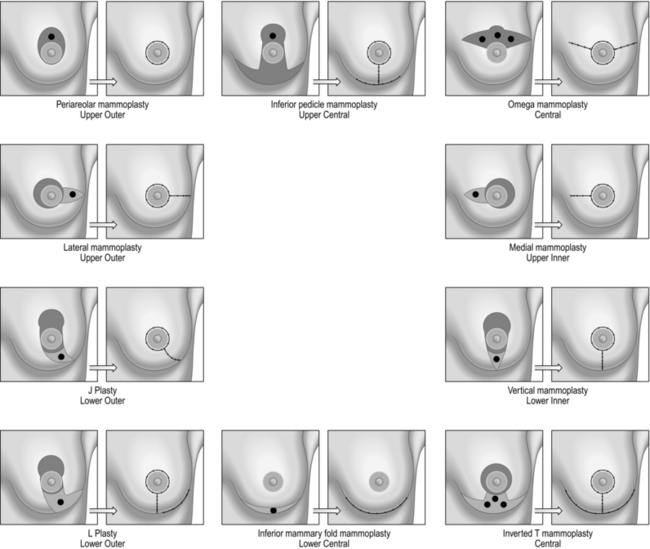
Fig. 19.7 Oncoplastic surgery operations.
AXILLARY SURGERY
 Axillary nodal status remains the most important prognostic indicator and, combined with the tumour size and grade, it forms the Nottingham Prognostic Index (NPI).

 All node-positive patients on preoperative work up should be offered axillary clearance.


SENTINEL NODE BIOPSY
Prepare
1. Discuss with the patient if you intend to proceed to a full axillary clearance if you discover positive nodes, so you have informed consent.
2. Warn the patient about the need for a second operation if the sentinel node is found to be positive subsequent to surgery.
3. Mention injection of blue dye carries around 1% risk of allergic reaction and will cause the urine to become green. Warn the patient about the blue staining/tattooing of the skin.
4. Check the lymphoscintigram (if available) for the presence and number of hot nodes in the axilla.
5. If you have intra-operative diagnostic techniques available, perform SLN biopsy before breast surgery.
Access
1. Allow enough time for the blue dye to travel from the injection site to the axilla. This is of the order of 5–10 minutes, therefore inject the dye before scrubbing.
2. Make a short incision over the site of maximum radioactivity as detected by the gamma probe.
3. If no clear signal is obtained, make the incision just below and medial to the edge of the hair-bearing skin.
Action
1. When you open the axilla you usually see blue lymphatic vessels. Follow these to the relevant node. The node can also be localized using the gamma probe, which directs you by the shortest route to the SLN.
2. Gently remove the node without damaging it.
3. When you have excised the SLN, carefully check that there are not other sentinel nodes present.
AXILLARY LYMPH NODE DISSECTION
Appraise
1. Axillary dissection must be performed only as a therapeutic procedure in breast cancer patients with proven axillary disease and has no place as a staging procedure.
2. Level II (up to the medial border of pectoralis minor) or level III (beyond the medial border of pectoralis minor and below the axillary vein) axillary lymph node dissection (ALND) is an operation that is therapeutic, providing local disease control without the need for axillary irradiation.
3. The combination of axillary surgery and irradiation is associated with high risk of lymphoedema.
Prepare
Access
1. Axillary clearance performed either through an oblique incision just behind, and parallel to, the lateral edge of the pectoralis major muscle provides good access but has the disadvantage of producing an ugly scar and limitation of shoulder abduction. We prefer a transverse incision with its anterior corner at the pectoral edge and the posterior angle just crossing the anterior border of latissimus dorsi, with the arm abducted at 90°. Cosmetically the latter incision produces better result.
2. Use a combination of sharp and blunt dissection at either end of the axillary incision to identify the lateral border of pectoralis major and the anterior border of latissimus dorsi muscles. These landmarks form the anterior and posterior limits of your axillary dissection.
3. Dissect up and down along the lateral border of the pectoralis major muscle and identify the underlying pectoralis minor muscle. Insinuate a finger under the insertion of pectoralis minor to separate it from the underlying structures and have your assistant retract the muscle forwards and medially in order to expose the axillary contents of level II.
4. If you intend to carry out a level III clearance, define both borders of the pectoralis minor muscle. It may be necessary to divide the insertion into the coracoid process but with good assistance it is usually possible to dissect behind the muscle.
5. Flex and abduct the shoulder and flex the elbow so that the forearm lies across the patient’s towelled-off face to facilitate exposure of the subpectoral area. Have the arm supported by an assistant or sling it from the crossbar of the anaesthetist’s drape support.
KEY POINTS
Preserve structures
 Carefully follow and preserve the thoracodorsal trunk down into latissimus dorsi muscle and the nerve to serratus anterior (long thoracic nerve of Bell).
 Also avoid damaging the lateral division of the medial pectoral nerve and the long thoracic nerve.
 Try and preserve the intercostobrachial nerve if possible.
 Identify and carefully ligate the angular vein which runs anteriorly into the thoracodorsal trunk.
6. Gently ‘stroke’ the axillary contents away from the chest wall and off the subscapularis muscle using a gauze swab or ‘peanut’ swab, to identify the nerve to serratus anterior in the posterior axillary line, and the nerve to latissimus dorsi travelling with the subscapular vessels.
7. Identify the intercostobrachial nerve and dissect it free from the axillary contents (if possible), preserving as many branches as feasible.
8. Now you have defined the limits of the dissection and the nerves, you can complete the removal of the axillary contents.
Closure
1. Insert a vacuum drain into the axilla and suture the skin with subcuticular sutures.
2. Personally supervise the dressing of the wound. In particular, squeeze out all blood and air from under the flaps into the vacuum containers in order to avoid the subsequent development of an axillary seroma.
3. Before sending the specimen to the pathology laboratory mark the apex of the specimen with a stitch. This helps the pathologist to orientate around the specimen and subsequently report on it.
SIMPLE MASTECTOMY
Appraise
Indications for performing a mastectomy
3. Recurrence after breast conserving therapy when radiotherapy has already been given.
4. Patients with DCIS more than 4 cm or multifocal DCIS.
5. Women with certain serious connective tissue diseases such as scleroderma, which make them especially sensitive to the side-effects of radiation therapy.
6. Pregnant women who would require radiotherapy (risking harm to the child).
7. A tumour larger than 5 cm that doesn’t shrink significantly with neoadjuvant therapy.
8. A cancer that is large relative the breast size.
9. Women who have tested positive for a mutation on the BRCA1 or BRCA2 gene and opt for prophylactic removal of the breasts.
Appraise
1. Check that the histological diagnosis of breast carcinoma has been confirmed.
2. If the diagnosis rests on positive cytology, ensure that you are satisfied clinically and radiologically about the diagnosis.
3. If axillary ultrasound does not reveal any abnormality, offer sentinel node biopsy and if an abnormal node is detected, after cytological confirmation of involvement with metastatic cancer, proceed with axillary dissection.
4. In case of doubt perform a preliminary biopsy for paraffin sections to be examined.

Prepare
1. Confirm that the patient has seen the Breast Clinical Nurse Specialist and has had an opportunity to fully discuss her diagnosis and treatment.
2. Breast reconstruction should be available for every patient undergoing mastectomy. Ensure that the patient is aware of this, offered either immediately or as a delayed procedure.
3. Mark the side and site of the carcinoma.
4. Cross-matched blood is seldom necessary, but establish the patient’s blood group.
5. With a skin-marking pen, mark the position of the lump. Draw an ellipse for the incision, lying transversely and encompassing approximately 5 cm of skin around the lesion and also the nipple (Fig. 19.5). Mark the patient in standing up position and mark the inframammary crease as well.
Access
1. Position the patient on the operating table in the supine position, with the arm on the operative side extended on an arm board.
2. Prepare the skin and place the towels to allow access to the breast and axilla. Wrap the arm separately to facilitate axillary dissection (see below).
3. If a transverse incision is impracticable, then make an oblique incision, but do not place it high. The current trend is to place the mastectomy incision as low as possible near the inframammary fold, which gives much better cosmetic outcome after delayed reconstruction.
4. Ensure that you will be able to approximate the wound edges at the end of the operation before you make the incisions along your marked lines.
Action
1. Elevate the skin flaps in the plane between subcutaneous fat and mammary fat. This can be facilitated by subcutaneous infiltration with 1:400 000 adrenaline (epinephrine) in saline or 0.25% bupivacaine (Marcaine) and adrenaline (epinephrine).
2. Have your assistant hold up the skin flaps and constantly check the flap thickness. Ensure that the flap is not too thin, resulting in ‘button-holing’ or ischaemia and not too thick that you leave breast tissue in the flaps.


3. Raise the upper flap to the upper limit of the breast. This is usually 2–3 cm below the clavicle, but varies from patient to patient. A good guide is the second intercostal space.
4. Catch any bleeding points with diathermy forceps and take care not to burn the skin. If skin is inadvertently burned, excise the damaged area (Fig. 19.8). Burnt skin takes many weeks to heal and is painful.
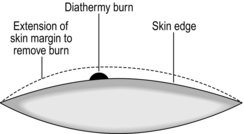
Fig. 19.8 Removal of accidental diathermy burn.
5. Raise the lower flap in a similar manner, to the inframammary fold.
6. Try to preserve the inframammary fold if reconstruction of breast is planned.
7. Place a large tissue forceps, such as Lane’s, on the breast which is to be removed, handing it to an assistant to apply traction, thus facilitating the subsequent dissection.
8. Return to the uppermost part of the breast and dissect down until you see the fascia of pectoralis major. Pectoral fascia is taken if the tumour is deeply placed or is attached to the muscle.
9. Proceed in this plane in a downwards direction, identifying and ligating the perforating vessels as they appear (mainly second and third intercostal spaces), before dividing them. This considerably reduces the amount of operative bleeding.
10. If the tumour appears to infiltrate into the pectoralis muscle, then excise a portion of this muscle with the specimen.
11. Continue downwards, elevating the breast alternatively laterally and medially but leaving the axillary tail of the breast in continuity with the axillary contents.
12. Place dry packs under each skin flap.
13. Perform a SLNB or ALND based on the plan for staging the axilla. If you have facilities for intra-operative testing of SLN, perform SLN biopsy before mastectomy.
Closure
1. Insert two vacuum drains, one for the flaps and a second for the axilla.
2. Suture the skin edges with subcuticular sutures. If there is a discrepancy between the lengths of the two flaps, close the wound using interrupted sutures placed halfway along the incision then halfway between these lengths and so on, thus avoiding a ‘dog-ear’ at one end.
3. After completing the closure, activate the vacuum drains and squeeze out all the fluid and air from beneath the skin flaps so that they adhere to the chest wall.
Aftercare
1. Encourage early mobilization to prevent deep vein thrombosis (DVT). Use TED stockings in all patients.
2. All patients must be offered supply and fitting of a breast prosthesis during the postoperative period.
3. Make yourself aware of the range and variety of prostheses available. In the UK, under Health Service regulations, any woman is entitled to the type and size of prosthesis of her choice. In addition, these may be replaced as frequently as necessary. If you are unaware of the variety available, delegate the responsibility to the Appliance Officer.
4. Many centres now employ mastectomy counsellors who, as well as providing psychosocial rehabilitation of the patient, are responsible for the physical rehabilitation. This includes the prescription of a soft temporary prosthesis immediately postoperatively, which can be worn for about 6 weeks until the wound is healed and not sensitive and then replaced by the permanent prosthesis worn within the brassiere.
5. Commence active physiotherapy within 24 hours of operation and provide the patient with a list of exercises for abduction of the arm to minimize shoulder stiffness.
SKIN-SPARING MASTECTOMY (Fig. 19.9)
Usually, skin-sparing mastectomy (SSM) is performed with an immediate reconstruction.
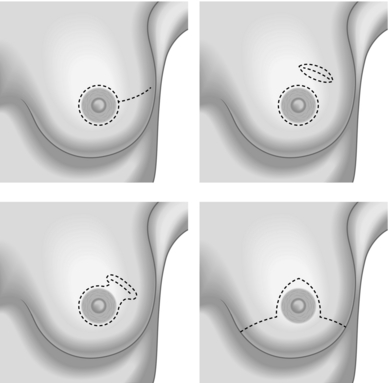
Fig. 19.9 Skin sparing mastectomy.
Appraise
The common indications for SSM include:
1. Risk-reducing mastectomy in patients with genetic mutations.
2. Patients having mastectomy for DCIS.
3. Skin-sparing mastectomy and immediate breast reconstruction (SSM and IBR) is the treatment of choice for early stage breast cancer patients who need or desire a mastectomy.
4. Patients with locally advanced breast cancer or patients with local recurrences after breast conservative surgery (BCS).
Prepare
1. The inframammary fold is delineated preoperatively with a marking pen with the patient in the upright position. The nipple–areolar complex, skin overlying superficial cancers and previous biopsy incisions are marked.
2. Four possible incisions can be used in SSM:
 A type 1 peri-areolar incision with or without lateral extension is useful in non-palpable tumours and smaller breasts.
 Type II SSM is used when a superficial tumour or previous biopsy is in proximity to the areola.

 A type IV SSM Wise pattern is used in large, ptotic breasts when a reduction is planned on the opposite breast (see Fig. 19.9).

Action
1. Place patient in supine position in arms abducted to 90° position.
2. Prepare both breasts and expose the arms to the mid humerus level.
3. Elevate the skin flaps superficial to the enveloping fascia of the breasts. The skin thickness depends upon the body habitus. Keep the cautery in a low blend mode and elevate the skin in a centripetal direction. Use double-pronged skin hooks for skin retraction. If a Wise pattern is used the vertical limbs can be de-epithelialized and used to cover an implant or an expander.

4. Superiorly, the breast falls away from the skin as the clavicle is approached. Follow the fascia down to the pectoralis major muscle.
5. Medially, the fascia is not very well defined, stop the dissection at the border of the sternum.
6. Perforating vessels of the internal mammary artery are frequently encountered along the sternal border. Preserve these perforators to improve the blood supply of the skin flap. These vessels can also be used as recipient vessels in free flap breast reconstruction.
7. Inferiorly, follow the superficial layer of the fascia to its junction with the deep layer. The skin is adherent to the anterior abdominal wall at this juncture.
8. Laterally, continue the dissection over the pectoralis muscle toward the humerus, enabling removal of the axillary tail.
9. Use a lighted retractor or an extended electrocautery when the access becomes very deep.
10. Remove the breast by elevating the fascia of the pectoralis major muscle with the specimen. This is best accomplished by dissecting parallel to the muscle fibres.
BREAST RECONSTRUCTION
1. In order to undertake breast reconstruction you need skill in assessing the patient’s suitability for the various procedures as well as in the technical performance of a procedure.
2. While most patients with operable breast cancer can now be treated by breast-conserving surgery, careful attention must be paid to patient selection and technique to achieve optimal cosmetic results. All patients undergoing mastectomy should be offered the option of a reconstruction, as either an immediate or a delayed procedure (Table 19.3). Fears about hiding local recurrence or affecting survival are unfounded and have been disproved.
3. The aims of a breast reconstruction are to achieve symmetry, provide a lasting result and satisfy the patient’s requirement for a good aesthetic result in terms of shape, form, consistency and size. These demand a skilled, experienced surgeon specializing in breast reconstruction.
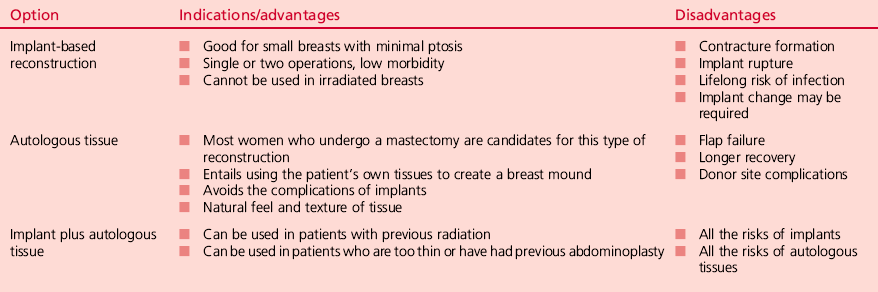
4. There are many available techniques including the insertion of a submuscular silicone implant, placement of a tissue expansion device with subsequent implant insertion, implantation of a ‘permanent’ expander, and autologous tissue transfer using either the latissimus dorsi myocutaneous flap with or without a silicone implant or a myocutaneous flap (DIEP flap or TRAM flap), which has the advantage of not requiring an implant.
5. Consider construction of a new nipple/areola complex and adjustment of the contralateral breast.
6. Loss of more than 20% of the breast volume is associated with a cosmetic defect. Some patients may be suitable for ‘fill’ procedures such as latissimus dorsi mini-flap without transposition of skin.
BREAST RECONSTRUCTION WITH A ‘PERMANENT’ TISSUE EXPANDER/SILICONE IMPLANTS
Appraise
1. Prior chest wall irradiation is a relative contraindication to this procedure.
2. Following mastectomy a breast mound can be recreated using a subpectoral silicone prosthesis. This can be done either at the time of mastectomy or as a delayed procedure at any time later.
3. Note that only a very moderate degree of ptosis can be achieved by an implant and there is a limit to the size of breast mound that can be made. In patients with large and/or ptotic breasts either a myocutaneous flap such as LD with or without implant or DIEP flap may be indicated. Alternatively, the contralateral breast can be reduced or lifted.


Prepare
1. Discuss the operation and complications with the patient, including any concerns she may have about silicone. You can reassure the patient that the use of silicone implants is safe.
2. Order selection of implants if a bank of implants is not available. To gain enough expertise in reconstruction operations, it is likely you will be working in a unit that has access to all these facilities.
3. Preoperatively, mark the breast borders, including the position of the inframammary fold.
Action
1. If the procedure is being performed at the same time as mastectomy, following removal of the breast and appropriate axillary surgery make an incision in the line of the fibres of pectoralis major at about the level of the sixth intercostal space.
2. If the procedure is delayed, open the old mastectomy scar and free skin flaps from underlying fascia and muscle using sharp dissection.
3. Form a pocket between pectoralis major and the underlying ribs and intercostal muscles. Use a combination of blunt and sharp dissection, including diathermy.


4. You may need to employ sharp dissection under the fibres of rectus abdominis muscle.
5. Open the implant and soak it in an antiseptic or antibiotic solution. If using an expander, remove all air from the expander. Insert the expander or implant into the submuscular pocket (Fig. 19.10).

Fig. 19.10 Subpectoral silicone implant.
6. If using an expander with a port, the tubing is brought out of the submuscular pocket at the lateral side of the chest wall, through pectoralis major muscle. You need to form a subcutaneous pocket using dissecting scissors, well away from the implant.
8. Close the pectoralis muscle over the implant. Inflate the implant with saline provided the muscle tension allows this.
Aftercare
1. Arrange for the patient to wear a firm brassiere or compression garment for at least 2 weeks.
2. If expanders are used, commence expansion of the prosthesis as an outpatient procedure under sterile conditions. Insert a butterfly needle into the port at the side of the chest wall (or use the magnet to identify the site of the insertion of the needle into the self-sealing prosthesis) and inject 50–100 ml of saline. Repeat this at weekly or longer intervals until you achieve the correct volume to match the opposite breast. Some devices, such as the Becker, require over-expansion for a time.
3. Warn the patient that achieving ptosis can take up to 1 year.
LATISSIMUS DORSI FLAP RECONSTRUCTION
1. The latissimus dorsi is generally a safe flap and is within the expertise of an experienced oncoplastic breast surgeon (see Chapter 33).
2. Develop the ability to think in three dimensions so you can assess which part of the skin, if necessary, needs to be rotated to fill the defect.
3. The flap area can be used without skin to fill large defects.
DEVELOPMENTAL ABNORMALITIES
Appraise
1. Mastitis neonatorum occurs in the first few days of life, is associated with maternal hormones and subsides spontaneously. Rarely, infection supervenes, requiring surgical drainage.
2. Extra or supernumerary breasts and/or nipples are encountered along the milk line from midclavicular region to groin. Do not intervene unless they become involved with a disease process such as may affect normal breast tissue or unless the size is cosmetically unacceptable. Lactation may occur with pregnancy, and carcinoma occasionally arises in a supernumerary breast. Treatment is as for any breast disease.
3. With the onset of puberty, one breast disc may enlarge in a young girl from the age of 8 years onwards. If the disc is excised, no breast will develop on this side of the body; if it is biopsied, the developed breast may be deformed.


4. In some racial groups (Afro-Caribbean and some Asians), axillary accessory breast tissue can be a problem. This accessory tissue is occasionally removed for cosmesis or if it enlarges extensively during pregnancy. The scars are often unattractive and may become infected, so counsel the patient beforehand.
5. Poland’s syndrome is an uncommon congenital chest-wall deformity characterized by unilateral absence of the sternal head of the pectoralis major muscle, deficiency of the breast and nipple, chest-wall deformity and abnormalities of the upper extremity including finger-shortening and syndactyly. Correction is difficult and requires specialist expertise.
6. Breast size is rarely uniform and you may be consulted by patients asking for a procedure to make them even. Should you enlarge the smaller breast or reduce the larger breast? Generally, prefer the latter unless the smaller breast is very undeveloped. Timing is important. The under-developed breast may catch up towards the end of puberty; balance this against the embarrassment that unevenness may cause during this period of a girl’s life.
GYNAECOMASTIA
Appraise
1. This is frequently unilateral and may occur in boys and young men. It usually settles without treatment.
2. If it does not settle, it may be necessary to excise the breast disc on one or both sides. Carry this out through a peri-areolar incision or a round block technique without leaving a noticeable scar, but there is a high incidence of postoperative haematomas. It is best to leave a nubbin of breast tissue attached to the areola for best cosmetic results.
3. Gynaecomastia also occurs in old age, associated with drugs given for hypertension or congestive cardiac failure. Less frequently nowadays it is seen in men treated with high doses of oestrogens for prostatic cancer and in men suffering from alcoholic cirrhosis. Occasionally, subcutaneous mastectomy is indicated if the condition is an embarrassment or is causing pain and tenderness. One of the common causes is cannabis usage.
4. Operations for gynaecomastia are often performed badly and patient dissatisfaction is high. You must warn the patient about the likely outcome and, if you feel that the patient has inappropriate expectations, refer him to a specialist. Newer techniques of endoscopic surgery and liposuction are available.
Bostwick, J. Plastic and Reconstructive Breast Surgery. St Louis: Quality Medical Publishing; 1997.
Clough, K.B., Kaufman, G.J., Nos, C., et al. Improving breast cancer surgery: a classification and quadrant per quadrant atlas for oncoplastic surgery. Ann Surg Oncol. 2010; 17(5):1375–1391.
Curran, D., van Dongen, J.P., Aaronson, N., et al. Quality of life of early stage breast cancer patients treated with radical mastectomy or breast conserving procedures. Eur J Cancer. 1998; 34:307–314.
Dixon, M. ABC of Breast Disease. London: BMJ Publishing Group; 1995.
Early Breast Cancer Trialists’ Collaborative Group. Effects of radiotherapy and surgery in early breast cancer. N Engl J Med. 1995; 333:1444–1455.
Early Breast Cancer Trialists’ Collaborative Group. Ovarian ablation in early breast cancer: an overview of the randomised trials. Lancet. 1996; 348:1189–1196.
Early Breast Cancer Trialists’ Collaborative Group. Tamoxifen for early breast cancer: an overview of the randomised trials. Lancet. 1998; 351:1451–1467.
Early Breast Cancer Trialists’ Collaborative Group. Polychemotherapy for early breast cancer: an overview of the randomised trials. Lancet. 1998; 352:930–942.
Fisher, B., Redmond, C., Poisson, R., et al. Eight year results of a randomized trial comparing total mastectomy and lumpectomy with or without radiation in the treatment of breast cancer. N Engl J Med. 1989; 320:822–828.
Fitoussi, A., Berry, M.G., Couturaud, B., Salmon, R.J. Oncoplastic and Reconstructive Surgery for Breast Cancer: The Institut Curie Experience. France: Springer; 2008.
Fitzal F., Schrenk P., eds. Oncoplastic Breast Surgery: A Guide to Clinical Practice. New York: Springer, 2010.
Harris, J.R., Hellman, S., Henderson, I.C., et al. Breast Diseases. Philadelphia: Lippincott; 1987.
Hermon, C., Beral, V. Breast cancer mortality rates are levelling off or beginning to decline in many western countries: an analysis of time trends, age-cohort and age-period models of breast cancer mortality in 20 countries. Br J Cancer. 1996; 73:955–960.
Hughes, L.E., Mansel, R.E., Webster, D.J.T. Benign Disorders and Diseases of the Breast: Concepts and Clinical Management. London: Bailliere Tindall; 1989.
Jatoi, I., Kaufman, M., Petit, J.Y. Atlas of Breast Surgery. London: Springer; 2006.
Keshtgar, M.R.S., Ell, P.J. Sentinel lymph node detection and imaging. Eur J Nucl Med. 1999; 26:57–67.
Mariani, L., Salvadori, B., Marubini, E., et al. Ten year results of a randomised trial comparing two conservative treatment strategies for small size breast cancer. Eur J Cancer. 1998; 34:1156–1162.
Silverstein, M.J. Ductal carcinoma in situ of the breast. Br Med J. 1998; 317:734–739.
[/level-membership-for-surgery-category][not-level-membership-for-surgery-category]19
Breast
MANAGEMENT OF BREAST SYMPTOMS (Fig. 19.1)
Assessment
1. Management of breast disease involves a multidisciplinary team approach. Interact with and use the expertise of the different members of the team to deliver the best results.
2. Breast pain, lumps, lumpiness, deformity and nipple changes including inversion, bleeding and discharge are the common symptoms that are seen in a breast clinic. Ideally, manage all patients in a triple assessment clinic with facilities for concurrent radiological and cytopathological investigations.
3. Offer all patients with palpable breast lumps and asymmetrical nodularity ‘triple assessment’.
4. Triple assessment includes history and clinical examination, breast imaging – mammography, ultrasound or magnetic resonance imaging (MRI), and tissue diagnosis (core biopsy/cytology). Order mammography and/or ultrasound to complement clinical examination for women over the age of 35 years. Order ultrasound examination as the first choice of imaging investigation for women aged below 35 years.
5. Consider MRI scans for patients with lobular carcinoma, young women and those with dense breast tissue, to assess the size and extent of malignant lesions and assessment of the contralateral breast. MRI scans are used as a screening tool in patients who fall in the high risk category for family history of breast cancer in the age groups of 30–40.
6. For discrete breast lumps, ultrasound is useful to differentiate cystic from solid lesions. Obtain a needle biopsy, preferably under image guidance, from all solid lumps. The advantage of core biopsy is that you obtain a definite tissue diagnosis. In malignant lesions it establishes whether the lesion is invasive or non-invasive and determines receptor status. Fine needle aspiration cytology (FNAC) of breast lesions is now used less frequently than formerly. Reserve it for younger patients with clinically benign breast disease and for the assessment of axillary lymph node abnormalities.
7. Breast cysts are common findings, appear suddenly and are of concern to the patient. They are most common before and around the menopause but can occur at any age. Assess and confirm all cysts which appear as a lump with ultrasound. Aspirate and drain the cyst, establishing the diagnosis and ‘curing’ the condition so you can immediately reassure the patient.
8. You can leave alone lumps that prove to be benign on core biopsy or cytology. You can offer excision if the woman is above the age of 35, if the lump increases in size or is associated with pain, if the histology is equivocal or if the patient is anxious and requests an excision. As an alternative to observation or excision you can offer a younger patient with a confirmed fibroadenoma a variety of percutaneous methods such as vacuum-assisted Mammotome excision, laser ablation, microwave or cryo-ablation.
9. Obtain a core biopsy on all lesions that have indeterminate cytology (C3, C4), or inadequate cells (C1). For lesions with core biopsies reported to be equivocal, repeat the core biopsy or undertake formal excision. If a core biopsy/excision biopsy is performed for microcalcification or abnormal calcification a specimen radiograph must be obtained to confirm the presence of calcification and this should also be confirmed on histology, otherwise repeat biopsy must be considered.
10. Frozen section is no longer considered an investigation of choice in breast surgery.
11. Assess patients with a family history of breast cancer and stratify their risks based on published guidelines; in the United Kingdom refer to National Institute for Clinical Excellence (NICE) guidelines for Family History of Breast Cancer. Arrange regular follow-up including appropriate surveillance investigations based on local guidelines. Organize for all patients who fall in the high-risk category to have risk assessment and genetic counselling.
12. Arrange for patients who fall into a high-risk category for developing familial breast cancer, with BRCA1, BRCA2, CDH1, PTEN, STK11, and TP53 genetic defects to be appropriately counselled for genetic testing. If they prove to be a gene carrier, you can offer a risk-reducing mastectomy with immediate breast reconstruction.
13. A small group of patients present to you with problems related to the breast size and symmetry, including large or small breasts or asymmetry. They are best managed by a trained breast oncoplastic surgeon or in conjunction with a plastic surgeon.
14. You will also be referred male patients with breast symptoms including breast lumps and gynaecomastia (Greek: gynaikos = woman + mastos = breast). Treat male breast cancer like a female breast cancer, except that there is no role for breast conservation surgery.
15. Breast surgery for cancer is based on two important values: careful attention to oncological principles and consideration of the aesthetic and cosmetic outcome.
16. Surgical management of breast cancer has become less radical (Latin: radix = root; by the roots) over the years without compromising the local control or long-term survival.
17. Multimodality treatments of breast cancer, using new generations of drugs, have made a significant impact in improving survival.
BREAST BIOPSY
FINE NEEDLE ASPIRATION CYTOLOGY
1. This procedure is performed in the outpatient clinic and involves insertion of a fine needle (21–23 G) into the lesion and aspiration of cells which are spread on glass slides and stained. This has the advantage of being fast and applicable for all breast lumps and requiring the minimum of special equipment.
2. It has the disadvantage of requiring the special skills of an experienced cytologist and the quality of the aspirate is operator-dependent, demanding experience and skill. Moreover, it is not possible to differentiate between invasive and non-invasive cancer.
3. The cytological aspirate is usually reported as containing no cells (C0), blood and debris or inadequate cells for reporting (C1), benign epithelial cells (C2), atypical cells, probably benign (C3), cells suspicious of carcinoma (C4) or diagnostic of carcinoma (C5).
Action
1. After obtaining verbal consent, attach a 21G (green) or 23G (blue) needle to a 10-ml syringe with or without an extractor gun.
2. Clean the overlying skin then fix the lump between thumb and index finger of the non-dominant hand. If necessary, use ultrasound localization as an aid while performing a FNA.
3. Warn the patient. Insert the needle into the middle of the lump and apply suction to the syringe plunger. Move the needle in several different directions through the lump while maintaining negative pressure. Do not allow the needle point to leave the skin or air enters the needle and the aspirated material is drawn into the syringe.
4. Release the pressure and then withdraw the needle. Ask the patient or your assistant to apply pressure to the breast for 2 minutes to avoid haematoma formation.
5. Eject a drop of aspirate onto the end of a dry and clean microscope slide. Gently spread this out with another slide to create a thin smear.
6. Immediately label the slide and ensure that no material falls onto the table, which could then be picked up onto the back of the next set of slides. Spray the slide with, or immerse it in, a fixative. Send the slide for reporting.
7. If you do not succeed in aspirating any cells, repeat the procedure.
CORE-CUT OR ‘TRU-CUT’ NEEDLE BIOPSY(Fig. 19.2)
Appraise
Fig. 19.2 Tru-cut needle.
1. Ideally, remove a core biopsy from every lump. Even if the lump is clinically palpable, where possible employ ultrasound guidance.
2. Core biopsy is a more accurate method of tissue diagnosis, allowing for a definite diagnosis to be based on the results of core biopsy.
3. The receptor status can be performed on core biopsy and decision for hormonal therapy can be made based on that.
4. Drag cytology (touch preparation cytology) obtained from the core samples can be used to give an immediate report similar to cytology.
5. Ductal carcinoma in situ (DCIS) can be diagnosed only on core biopsy.
6. Core biopsy can be performed clinically, under US guidance or under stereotactic control
Action
1. Infiltrate the skin over the lump with 1% lidocaine. Introduce the needle into the skin and superficial tissue to inject the local anaesthetic. Deep infiltration with local anaesthetic can obscure a small lump. Preferably perform this procedure under US guidance.
2. Wait 2 minutes for the anaesthetic to work.
3. Make a small nick in the skin with the tip of a sharp-pointed scalpel (no. 11 blade).
4. Fix the tumour within the breast between finger and thumb, to provide a static target.
5. Prefer to approach the lump from the side to avoid firing the needle backwards and penetrating the chest wall.
6. Insert the core biopsy needle, in its closed position, through the skin incision until you reach the edge of the tumour.
7. A spring-driven automatic biopsy needle can obtain a sample more rapidly than the one obtained by the manual hand driven one and it causes less discomfort for the patient.
8. Warn the patient about the clicking sound before firing the automatic device.
9. If microcalcification is a dominant feature, perform the biopsy under stereotactic mammographic control. X-ray the specimen to ensure you have obtained the correct specimen.
10. Obtain at least three samples in different directions from the lesion and transfer the specimens into small bottles containing formalin and label them appropriately.
11. Dispose sharp objects into appropriate containers.
12. Vacuum-assisted Mammotome biopsy is being used for obtaining cores of tissue from impalpable lesions, or for completely excising small impalpable lesions. Insert a small metallic marker clip if all the microcalcifications have been removed to allow subsequent localization of an abnormal area.
NEEDLE-LOCALIZATION BIOPSY
Prepare
1. Discuss the imaging (mammograms/ultrasound scans) with the radiologist who inserts the localization needle and wire.
2. Discuss the needle-insertion site, direction and depth with the radiologist, and the type of wire used, such as simple hook, Reidy or Nottingham needle. It is helpful if the distance between the needle entry site and the lesion is as short as possible.
3. Ensure that the mammograms are taken in two planes (cranio-caudal and medio-lateral oblique) following wire insertion. Check that the images are available in the operating theatre.
4. Frozen section has no role in assessment of biopsy specimen.
Access
Plan a cosmetically satisfactory incision (Fig. 19.3) and estimate the likely surface marking of the lesion from the preoperative mammograms. The incision need not be placed at the point of wire entry. It is useful to measure the length of the wire that is outside. This helps to determine the length of wire inside and helps guide your excision.
Action
1. Raise a skin flap between the chosen site of incision and the needle entry site until you reach the wire in the subcutaneous plane. Grasp the wire with an artery forceps and cut off the excess wire.
2. Follow the wire down towards the site of the lesion by sharp dissection or use the diathermy. Use a scalpel instead of heavy scissors as the latter can bend or inadvertently cut the wire. When using the diathermy for excision, be careful not to activate diathermy whilst it is in contact with the wire, to avoid burning the skin.
3. Once you reach the point of the wire at least 2 cm above the tip (site of the suspected lesion) excise the lesion with an appropriate radial margin (depending on whether the excision is diagnostic or therapeutic). Mark the specimen with metal clips to facilitate orientation and obtain the specimen that was identified by radiography.
4. Achieve haemostasis, and check the cavity for any residual suspicious tissue.
5. Check the radiograph of the specimen to confirm that it contains the mammographic abnormality. If the lesion is close to a specific margin, excise that specific margin. If the lesion is not visible, you need to re-excise and repeat the specimen radiography until you find it.
6. Close the wound as for excision biopsy.
7. Take extra care to avoid needle-stick injury from the wire. Label the specimen container clearly and warn the pathology staff about the wire and the risk of needle-stick injury.
8. Localization of lesions with radioactive injection (ROLL, radioactive occult lesion localization) is another approach currently used in many centres. Results from a recent study on the use of radioactive seed localization also show significant promise.
PUNCH BIOPSY
Appraise
1. Reserve punch biopsy of the skin for nipple biopsy suspected of Paget’s disease, recurrence in the skin following surgery for breast cancer, or in suspected inflammatory cancer (where dermal lymphatics are involved with cancer, giving an appearance of inflammation).
2. Paget’s disease starts in the nipple and then moves on to the areola and underlying breast ducts.
3. Always perform a mammogram in Paget’s disease to rule out underlying malignancy or DCIS.
Action
2. Infiltrate with 2 ml of 1% lidocaine using a blue needle (size 23 G).
3. Use a 3.5- or 4-mm size punch for performing the biopsy.
4. Use the punch to press on the area where you wish to obtain the biopsy.
5. Hold the obtained tissue with forceps and use scissors or a blade to cut the tissue from the underlying breast.
6. Send the obtained sample to the pathology laboratory in formalin.
7. Compress the area of biopsy for 5 minutes to stop the bleeding.
8. You can apply Steristrips to close the defect left by the punch.
BREAST ABSCESS
Appraise
1. This develops most commonly during lactation. Empty the affected breast by manual pressure, but encourage the mother to continue breast feeding.
2. Treat early infection with antibiotics alone but do not wait for fluctuation, or widespread destruction of the underlying breast tissue may have developed by then. Start co-amoxiclav early. If an abscess is present clinically or on ultrasound, aspirate it using a wide-bore needle under US guidance and repeat aspiration as necessary.
3. If the skin over the abscess has become thin, drain it under general anaesthesia.
Action
1. Site the incision over the point of skin thinning, but if it is near the nipple use a peri-areolar incision.
2. Send pus for culture and antibiotic sensitivities. If necessary, change to the appropriate antibiotic.
3. Introduce a gloved finger into the abscess cavity and rotate it to break down all loculi in a potentially multiloculated cavity.
4. If the cavity allows, introduce a retractor and examine the walls. Stop any bleeding using diathermy.
5. If this is a lactational abscess cavity it is not necessary to obtain biopsy specimens. Otherwise remove a specimen from the cavity to exclude a carcinoma.
6. Ensure that the incision is sufficiently long to allow the wound to heal from the deepest parts upwards, in order to prevent the development of a chronic abscess.
7. Insert a drain if you observe a large residual cavity. Alternatively, loosely pack the cavity.
8. Apply a non-adhesive dressing.
9. Advise the patient to wear a supportive brassiere to diminish the risk of developing a haematoma.
10. Allow bilateral breastfeeding to recommence as soon as it is comfortable.
DUCT ECTASIA AND MAMMARY DUCT FISTULA
Appraise
1. Duct ectasia (Greek: ex = out + tenein = to stretch; dilatation), is widening of the breast lactiferous ducts and is often related to breast inflammation. It is a benign condition characterized by nipple discharge, swelling, retraction of the nipple or a lump that can be felt.
2. Occasionally, a fistula develops between a duct and the skin at the areolar margin. This discharges pus, and often heals spontaneously before breaking down again. As it is related to smoking, advise abstention.
3. If a mammary duct fistula does not heal, you may need to excise it under antibiotic cover (see below).
Action
1. If there is a fistula, insert a probe through the external opening and hook it up though the nipple. Cut around the areola, extending to no more than a quarter of the nipple and excise the fistulous track to the back of the nipple.
2. Obtain perfect haemostasis.
3. Close the wound with interrupted absorbable sutures.
4. If you are operating to excise the major ducts (Hadfield’s operation), you need a longer periareolar incision – but no more than half the circumference of the areola.
5. Ensure that you are beneath the subareolar plexus. Cut the subcutaneous tissue down to the duct system.
6. Use blunt and sharp dissection to reach the plane, circumferentially around the terminal lactiferous ducts, just deep to the areola and nipple. Preferably, use bipolar diathermy. If you are using monopolar diathermy, do so cautiously to avoid nipple necrosis.
7. Divide the ducts close to the nipple and remove them with a conical wedge of tissue including the distal 1–2 cm of the subareolar tissue, as well as the major lactiferous ducts and sinuses.
8. If there is a fistulous tract, ensure that you excise it in its entirety with all the granulation tissue.
9. Send all tissue for histological examination.
10. Insert a small vacuum drain and close the wound with 3/0 subcuticular absorbable sutures or interrupted 4/0 polypropylene.
NIPPLE DISCHARGE AND BLEEDING
Appraise
1. If the nipple discharge is serous (watery), serosanguinous, or frank blood arises from a solitary duct, then manage it as for nipple bleeding (below).
2. Test for blood. This is usually done using Dip-Stix. Nipple discharge can be sent for cytological examination. Intraductal papilloma is the commonest cause of bloody nipple discharge.
3. If one duct is associated with blood-stained discharge and imaging is negative, then a microdochectomy (Greek: small duct cutting out) (Fig. 19.4) may be required.
4. If embarrassing nipple discharge occurs in patients above the age of 45, prefer Hadfield’s procedure (excision of major ducts).
5. Multiduct multicolour nipple discharge is often physiological and does not need intervention.
NIPPLE BLEEDING
Appraise
1. Determine from which duct the blood is coming.
2. Arrange an ultrasound scan and a mammogram to exclude underlying malignancy.
3. Send the material for cytology; it may yield papillary cells or, very occasionally, carcinoma cells.
4. Consider ductoscopy when this available
5. Surgically explore the breast unless the bleeding occurs during pregnancy, in which case it is frequently bilateral and stops spontaneously after parturition, or in a patient who is taking anticoagulants.
Access
1. Perform the procedure either under a local or general anaesthetic.
2. Infiltrate the area with bupivacaine 0.5% and adrenaline (epinephrine) 1: 200 000 to minimize bleeding and postoperative pain.
3. When you pick up the nipple between finger and thumb, you may feel thickening along one duct, or feel the probe within the duct.
Action
1. Make a circumareolar incision and dissect down to expose the duct.
2. Excise the duct with a small amount of surrounding breast tissue and send it for histology.
Total duct excison (Hadfield’s procedure)
1. Make a peri-areolar incision (but no more than three-fifths of the circumference of the areola).
2. Cut the subcutaneous tissue down to the duct system.
3. Use blunt and sharp dissection to reach the plane circumferentially around the terminal lactiferous ducts, just deep to the areola and nipple.
4. Divide the ducts close to the nipple and remove them with a conical wedge of tissue including the distal 1–2 cm of the subareolar tissue, including the major lactiferous ducts and sinuses. Orientate the specimen with marking suture for the pathologist.
5. Take a purse-string suture around the subcutaneous tissue where you have removed a wedge of retroareolar tissue, to prevent sinking of the nipple.
6. You may insert an inverted suture with vicryl from inside the nipple to prevent it from inverting.
[/not-level-membership-for-surgery-category]
