[level-membership-for-orthopaedics-category]
Chapter 50 Bone–Patellar Tendon–Bone Anterior Cruciate Ligament Reconstruction Using the Endobutton Continuous Loop Bone–Tendon–Bone Fixation System
The Endobutton-CL is a small metal button that is attached to a continuous loop of nylon. The continuous loop means that there is no knot, thus eliminating the risk of knots loosening or tightening under a load; both situations lead to a lengthening of a construct and thus failure. The continuous loop (CL) comes threaded through the metal Endobutton. The loop is then threaded through the graft and back on itself. Thus it is a closed loop system that eliminates a weak link. This minimizes creep or failure of the construct. It is well accepted that the weak link in ACL reconstruction surgery is fixation of the graft during the immediate postoperative period. The Endobutton-CL offers one of the strongest forms of fixation available, with pullout strengths averaging 1345N compared with interference screws that average approximately 700N.*
Technique Overview
Technique in Detail
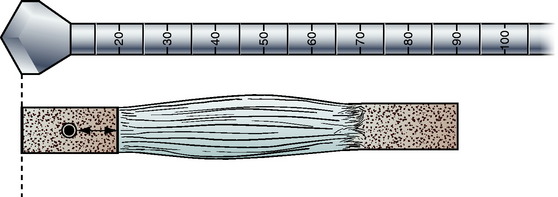
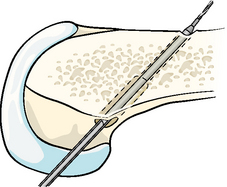
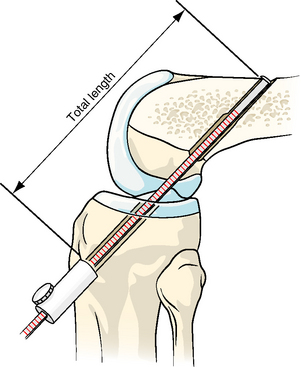
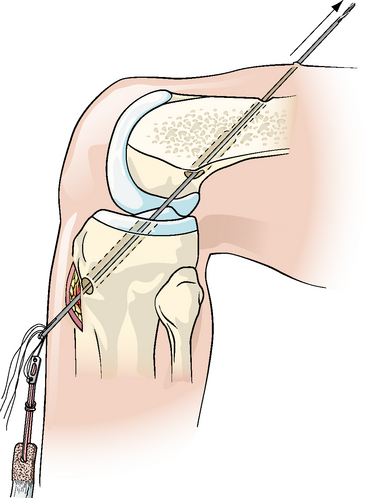
Tibial and femoral tunnels are likewise drilled in the usual manner. In fact, the femoral tunnel can be drilled right off the posterior femoral cortex without fear of breaking through of the posterior wall, as it will not compromise fixation. I use a 6-mm offset guide for a 10-mm tunnel, which places the femoral tunnel immediately against the posterior femoral cortex. Before reaming the femoral tunnel, check the length of the graft. Grafts usually measure approximately 80 to 90 mm in total length (Fig. 50-1). Ream the femoral tunnel to a depth of the length of the graft as measured directly off the reamer at the tibial cortex. For example, if the graft length is 90 mm, ream to a depth of 90 mm as measured on the reamer at the opening of the tibial tunnel (Fig. 50-2). By doing this, the reamer is mimicking the graft itself and therefore mimicking where the graft will be placed, thus allowing the tibial bone plug to end flush with the tibial cortex. It is no longer necessary to measure the femoral tunnel; however, as a check, the femoral tunnel is usually reamed to a depth of approximately 30 mm. Then ream an extra 10 mm deeper to allow room for the Endobutton to flip outside of the lateral femoral cortex. Try to not perforate the lateral femoral cortex with the reamer. On longer grafts, you can run the risk of running out of room for the femoral tunnel. One way to effectively add length to the femoral tunnel is to flex the knee less than 90 degrees. This lessens the angle of the femoral tunnel, placing it more in line with the femur, and therefore adds length to the femoral tunnel if needed for longer grafts (Fig. 50-3). However, if there is inadvertent perforation of the femoral tunnel, it can be dealt with using the Xtendobutton, which is discussed later in this chapter.

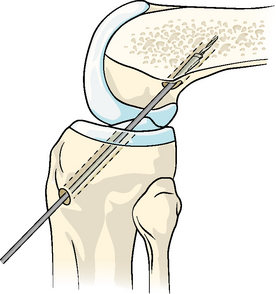
Leave the guide pin in place, and drill over it with the 4.5-mm Endobutton drill bit (Fig. 50-4). Remove the guide pin.
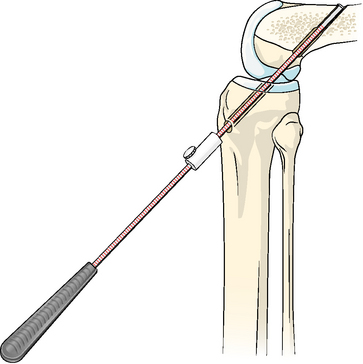
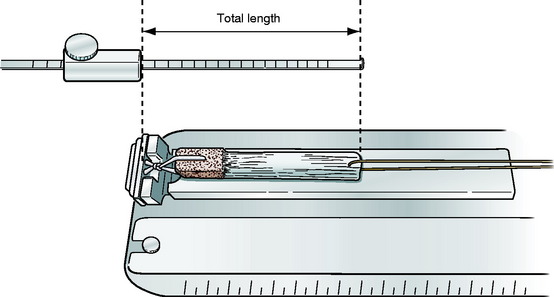
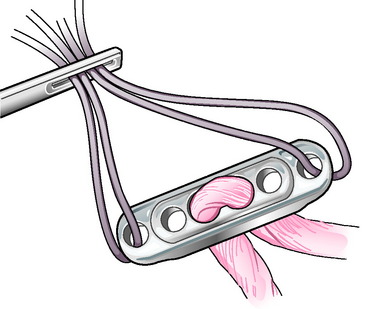
Smith & Nephew makes a depth gauge with a stop on it (Fig. 50-5). Measure from the lateral femoral cortex to the opening of the tibial tunnel. Set the stop at the opening of the tibial tunnel (Fig. 50-6). This will be the length of the entire construct from the Endobutton to the end of the tibial bone plug on your graft. You do not need to know the actual number or distance; simply hand the depth gauge with the stop in place to the associate who is preparing the graft. The associate will lay the graft next to the depth gauge with the tibial bone plug at the stop. Measure directly the length of the needed CL, which is usually 40 to 45 mm (Fig. 50-7; shown here with a quadriceps tendon graft with a bone block on only one end).
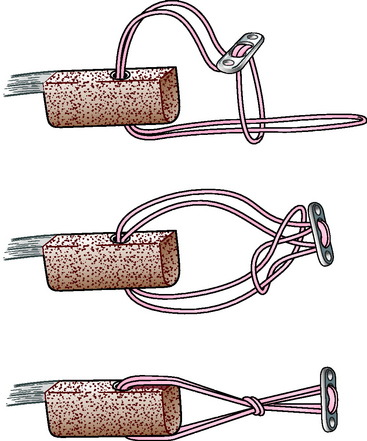
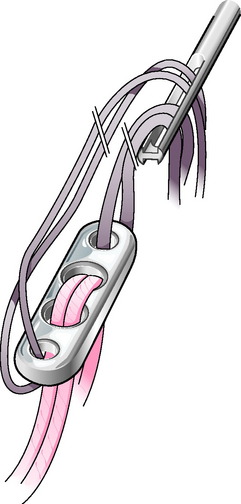
Attach the CL to the graft. The Endobutton-CL can be divided into three areas: a long loop, a short loop, and the Endobutton (Fig. 50-8). When passing the CL, it is much easier to pull it rather than push it. Trying to push the CL only causes it to fray. Therefore it is advisable to pull the CL through its path with a small nonbraided suture. Simply loop this suture around the long loop of the CL. Pull the long loop of the CL via the suture through either the bone–tendon junction or through a small 2-mm drill hole in the bone block. When using a drill hole through the bone block, make sure that it passed through the cortical side of the block and is more than half the distance toward the tendon to avoid the CL from pulling through soft bone. Instron studies while the BTB CL was under development showed no difference in pullout strength when passing the CL at the bone–tendon junction versus through a 2-mm hole in the bone block. Then pull the long loop through the short loop, and slip it over the Endobutton (Fig. 50-9). Pull to tighten. Check the total length against the depth gauge to ensure accuracy.
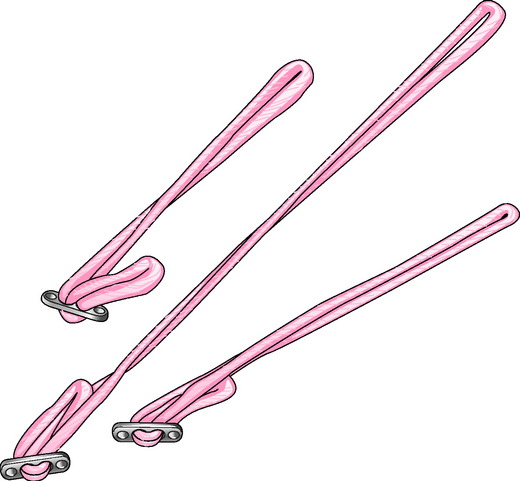
Fig. 50-8 The Endobutton-CL can be divided into three areas: a long loop, a short loop, and the Endobutton.
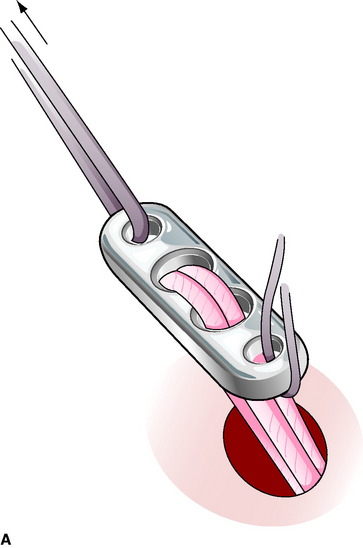
Pull the graft into place. Attach a #5 suture through one of the holes in the Endobutton and a #2 suture through the other, or place different-colored sutures through each hole so that you will be able to tell them apart when passed (Fig. 50-10). Thread all sutures through a passing pin (the two sutures for the Endobutton and the passing suture through the bone block). Pull the passing pin out the lateral thigh with the sutures (Fig. 50-11). Separate the sutures. Pull the graft into position with the #5 suture and the passing suture, letting the #2 suture trail (Fig. 50-12). The graft will have a definite stop when it is passed far enough to flip the button. In addition, you will know the graft is far enough when the tibial bone plug is within the tibial tunnel. Flip the Endobutton by rocking the Endobutton back and forth using the #5 and #2 sutures. Then hold the Endobutton perpendicular to the lateral femoral cortex and pull back on the graft, ensuring fixation (Fig. 50-13). The tibial bone plug should be flush with the tibial cortex.

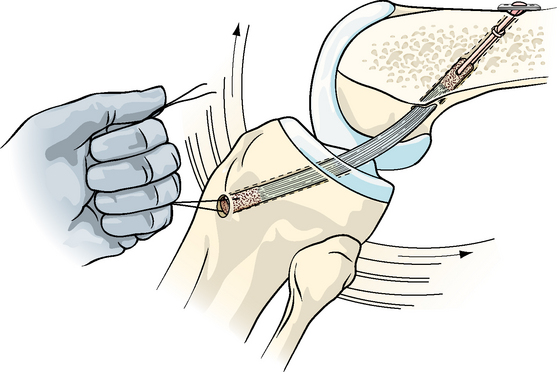
Tension the graft, and fix the tibial bone block accordingly.
Revision Anterior Cruciate Ligament Surgery
Xtendobutton
A newer addition to the family of Endobutton-CL for BTB is the Xtendobutton (Fig. 50-14), which is being finalized at the time of publication of this chapter. This is simply a larger button that fits over the Endobutton, effectively making the Endobutton a larger button. The Endobutton slides through a 4.5-mm hole and will not slide back when flipped. The Xtendobutton slides through a larger hole (e.g., a 10-mm hole) and will not slide back when flipped. This can be used for inadvertent reaming through the lateral femoral cortex when drilling the femoral tunnel. Some surgeons in preliminary trials prefer to use this exclusively for femoral fixation, eliminating yet one more step. In other words, the surgeon could ream the tibial and femoral tunnels all the way through both cortices without measuring off the reamer and eliminating the need to drill with the 4.5-mm drill altogether.
Troubleshooting
Another potential trouble spot may be if the surgeon routinely countersinks the femoral bone block so that the tibial bone block will lay flush with the tibial cortex, as I do. This usually requires a slightly longer femoral tunnel than the femoral bone block (approximately 10 mm longer). In other words, the longer the ACL graft, the longer the femoral tunnel needed so as to not have any of the tibial bone block or graft protruding out of the tibial tunnel. If the surgeon flexes the knee greater than 90 degrees, as is usually taught for interference fixation, then there is the potential to have a femoral tunnel too short to accommodate the graft. The surgeon then runs the risk of reaming through the lateral femoral cortex, which would not allow the use of the standard Endobutton-CL. There are a couple of ways around this. First, when using this system, I actually flex the knee less than 90 degrees. This lessens the angle of the guide pin and reamer, which in fact lengthens the femoral tunnel (see Fig. 50-3). Obviously one would not want to lessen the angle too far, as then the guide pin will exit the thigh near the tourniquet or leg holder if these were used. I have simply become accustomed to placing the guide pin so that it will exit the thigh just distal to the tourniquet. This requires the knee to be flexed slightly less than 90 degrees and usually leaves ample room for a femoral tunnel. If a surgeon inadvertently reams through the lateral femoral cortex, then he or she has a couple of options. First, the surgeon could fix the femoral bone plug with a standard interference screw. However, a more appealing option would be to simply slip an Xtendobutton over the Endobutton and fix the graft as though using a standard Endobutton, as described earlier.
Results
The Endobutton-CL BTB has been available for implantation for nearly 2 years at the time of writing this chapter. To my knowledge, the results have been impressive. There have been no known failures or complications to date; however, it must be stressed that these results are subjective. Objective laboratory tests prior to release showed the Endobutton-CL to be possibly the strongest fixation available, both in terms of ultimate strength and creep.*
[/level-membership-for-orthopaedics-category][not-level-membership-for-orthopaedics-category]
Chapter 50 Bone–Patellar Tendon–Bone Anterior Cruciate Ligament Reconstruction Using the Endobutton Continuous Loop Bone–Tendon–Bone Fixation System
The Endobutton-CL is a small metal button that is attached to a continuous loop of nylon. The continuous loop means that there is no knot, thus eliminating the risk of knots loosening or tightening under a load; both situations lead to a lengthening of a construct and thus failure. The continuous loop (CL) comes threaded through the metal Endobutton. The loop is then threaded through the graft and back on itself. Thus it is a closed loop system that eliminates a weak link. This minimizes creep or failure of the construct. It is well accepted that the weak link in ACL reconstruction surgery is fixation of the graft during the immediate postoperative period. The Endobutton-CL offers one of the strongest forms of fixation available, with pullout strengths averaging 1345N compared with interference screws that average approximately 700N.*
Technique Overview
Technique in Detail
Tibial and femoral tunnels are likewise drilled in the usual manner. In fact, the femoral tunnel can be drilled right off the posterior femoral cortex without fear of breaking through of the posterior wall, as it will not compromise fixation. I use a 6-mm offset guide for a 10-mm tunnel, which places the femoral tunnel immediately against the posterior femoral cortex. Before reaming the femoral tunnel, check the length of the graft. Grafts usually measure approximately 80 to 90 mm in total length (Fig. 50-1). Ream the femoral tunnel to a depth of the length of the graft as measured directly off the reamer at the tibial cortex. For example, if the graft length is 90 mm, ream to a depth of 90 mm as measured on the reamer at the opening of the tibial tunnel (Fig. 50-2). By doing this, the reamer is mimicking the graft itself and therefore mimicking where the graft will be placed, thus allowing the tibial bone plug to end flush with the tibial cortex. It is no longer necessary to measure the femoral tunnel; however, as a check, the femoral tunnel is usually reamed to a depth of approximately 30 mm. Then ream an extra 10 mm deeper to allow room for the Endobutton to flip outside of the lateral femoral cortex. Try to not perforate the lateral femoral cortex with the reamer. On longer grafts, you can run the risk of running out of room for the femoral tunnel. One way to effectively add length to the femoral tunnel is to flex the knee less than 90 degrees. This lessens the angle of the femoral tunnel, placing it more in line with the femur, and therefore adds length to the femoral tunnel if needed for longer grafts (Fig. 50-3). However, if there is inadvertent perforation of the femoral tunnel, it can be dealt with using the Xtendobutton, which is discussed later in this chapter.
