[level-membership-for-allergy-and-immunology-category]
Basic Serologic Laboratory Techniques
At the conclusion of this chapter, the reader should be able to:
• Identify and explain the parts of a procedure.
• Describe the preparation of blood specimens for testing.
• Provide examples of the types of specimens that can be tested using immunologic procedures.
• Explain how complement is inactivated in a serum sample.
• Compare the differences between the two types of pipettes typically used in the immunology-serology laboratory.
• Describe and demonstrate pipetting techniques using manual and automatic pipettes.
• Calculate the concentration of a substance using the dilution factor.
• Calculate the concentration of a single dilution.
• Compare the characteristics of the acute and chronic phases of illness.
• Define the term antibody titer.
• Analyze a case study with the interpretation of the assay results.
• Correctly answer case study related multiple choice questions.
• Be prepared to participate in a discussion of critical thinking questions.
Procedures Manual
The procedures manual must be a complete document of current techniques and approved policies that is available at all times in the immediate bench area of laboratory personnel. It is extremely important that all personnel review this manual periodically. The manual should comply with the CLSI format for a procedure (see Box 7-1). The procedural format found in this text generally follows these guidelines.
Pipettes
Pipettes are used in the immunology-serology laboratory for the quantitative transfer of reagents and the preparations of serial dilutions of specimens such as serum (Fig. 8-1). Although semiautomated micropipettes have replaced traditional glass pipettes in the laboratory, traditional methods may still be needed at times.
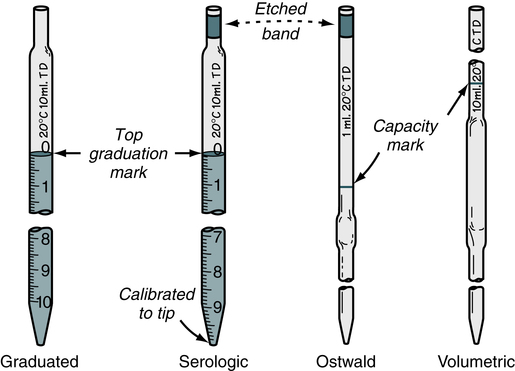
TD, To deliver. (From Turgeon ML: Linné & Ringsrud’s clinical laboratory science: the basics and routine techniques, ed 6, St Louis, 2012, Mosby.)


Inspection and Use
• Aspirate liquid to about 1 inch (2.5 cm) above the top (zero) line of the pipette.
• Raise the pipette vertically to avoid the introduction of air bubbles and wipe off the exterior surface with a clean gauze or tissue square.
• Working at eye level, slowly lower the liquid so that the meniscus is at zero.
• Aspirate the contents of the pipette into the appropriate test tube or vessel.
• Wear gloves during pipetting procedures in compliance with Standard Precautions.
Pipetting Techniques
Manual Pipettes
With practice, it is important to develop a good technique for handling pipettes (Fig. 8-2). The same general steps apply to pipetting with all manual pipettes (Box 8-1), with few exceptions.
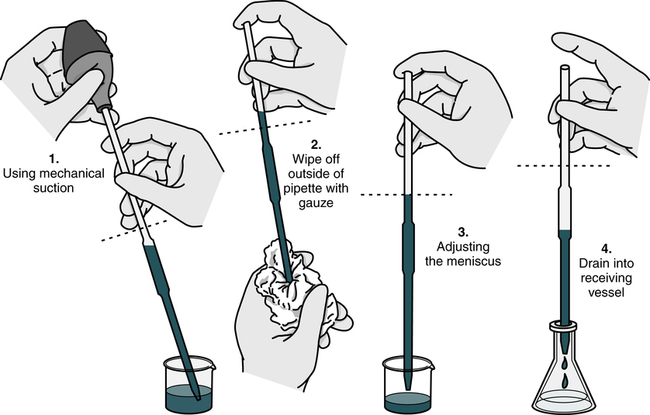
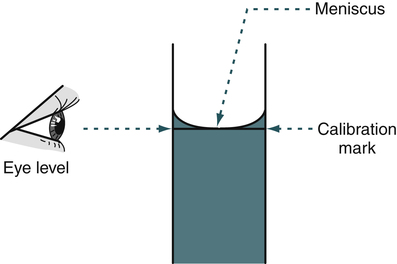
After the pipette has been filled above the top graduation mark, removed from the vessel, and held in a vertical position, the meniscus must be adjusted. The meniscus is the curvature in the top surface of a liquid (Fig. 8-3). The pipette should be held so that the calibration mark is at eye level. All readings must be made with the eye at the level of the meniscus. The delivery tip is touched to the inside wall of the original vessel, not the liquid, and the meniscus of the liquid in the pipette is eased, or adjusted, down to the calibration mark.
Automatic Pipettes
Micropipettors
The piston, usually in the form of a thumb plunger, is depressed to a stop position on the pipetting device. The tip is placed in the liquid to be measured, and then the plunger is slowly allowed to rise back to the original position (Fig. 8-4). This will fill the tip with the desired volume of liquid. The tips are usually drawn along the inside wall of the vessel from which the measured volume is drawn, so that any adhering liquid is removed from the end of the tip. These pipette tips are not usually wiped, as is done with the manual pipettes, because the plastic surface is considered nonwettable. The tip of the pipette device is then placed against the inside wall of the receiving vessel and the plunger is depressed. When the manufacturer’s directions for the device being used are followed, sample delivery volume is judged to be extremely accurate.
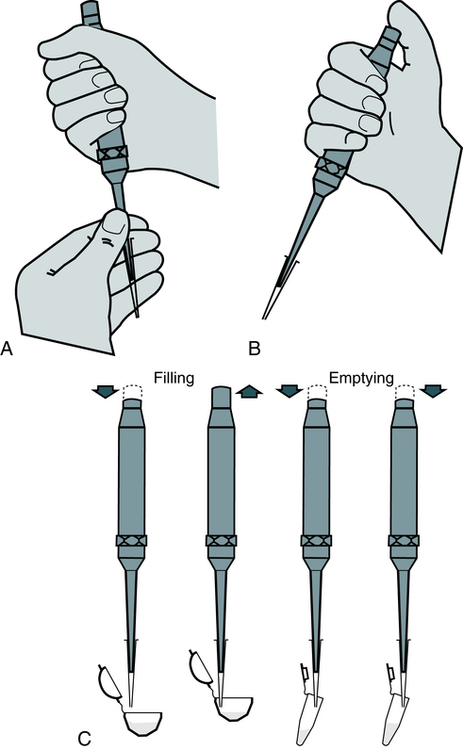
A, Attaching proper tip size for range of pipette volume, and twisting tip as it is pushed onto pipette to give an airtight, continuous seal. B, Holding pipette before use. C, Follow instructions for filling and emptying pipette tip. (From Kaplan LA, Pesce A: Clinical chemistry: theory, analysis, correlation, ed 5, St Louis, 2010, Mosby.)
1. Attach the proper tip to the pipettor and set the delivery volume.
2. Depress the piston to a stop position on the pipettor.
3. Place the tip into the solution and allow the piston to rise back slowly to its original position (this fills the pipettor tip with the desired volume of solution).
4. Some tips are wiped with a dry gauze at this step and some are not. Follow the manufacturer’s directions.
5. Place the tip on the wall of the receiving vessel and depress the piston, first to a stop position where the liquid is allowed to drain and then to a second stop position where the full dispensing of the liquid takes place.
6. Dispose of the tip in the waste disposal receptacle. Some pipettors automatically eject the used tips, minimizing biohazard exposure.
Dilutions


Serial Dilutions
Several laboratory procedures, especially serologic methods, make use of a dilution series in which all dilutions, including or following the first one, are the same. Such dilutions are referred to as serial dilutions (Table 8-1). A complete dilution series usually contains 5 or 10 tubes, although any single dilution may be made directly from an undiluted specimen or substance. In calculating the dilution or concentration of a substance or serum in each tube of the dilution series, the rules previously discussed apply.
Table 8-1
Example of Preparation of a Serial Dilution
| Tube | ||||||||||
| 1 | 2 | 3 | 4 | 5 | 6 | 7 | 8 | 9 | 10 | |
| Saline (mL) | 1 | 1 | 1 | 1 | 1 | 1 | 1 | 1 | 1 | 1 |
| Patient serum or preceding dilution (mL) | 1 | 1 of 1:2 | 1 of 1:4 | 1 of 1:8 | 1 of 1:16 | 1 of 1:32 | 1 of 1:64 | 1 of 1:128 | 1 of 1:256 | 1 of 1:512 |
| Final dilution | 1:2 | 1:4 | 1:8 | 1:16 | 1:32 | 1:64 | 1:128 | 1:256 | 1:512 | 1:1024 |

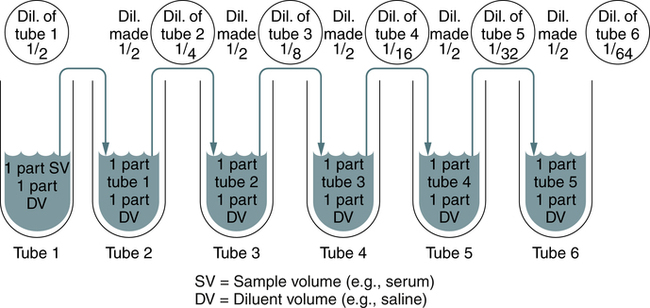
A twofold dilution may be prepared as follows (Fig. 8-5). A serum specimen is diluted 1:2 with buffer. A series of five tubes are prepared, in which each succeeding tube is rediluted 1:2. This is accomplished by placing 1 mL of diluent into each of four tubes (tubes 2 to 5). Tube 1 contains 1 mL of undiluted serum. Tube 2 contains 1 mL of undiluted serum plus 1 mL of diluent, resulting in a 1:2 dilution of serum. A 1-mL portion of the 1:2 dilution of serum is placed in tube 3, resulting in a 1:4 dilution of serum (½ × ½ × ¼). A 1-mL portion of the 1:4 dilution from tube 3 is placed in tube 4, resulting in a 1:8 dilution (¼ × ½ ×  ). Finally, 1 mL of the 1:8 dilution from tube 4 is added to tube 5, resulting in a 1:16 dilution (
 × ½ ×
× ½ ×  ). One milliliter of the final dilution is discarded so that the volumes in all the tubes are equal.


Antibody Titer
1. Preparing a serial dilution of the antibody-containing solution (e.g., serum)
2. Adding an equal volume of antigen suspension to each dilution
CASE STUDY
| Tube | ||||||
| 1 | 2 | 3 | 4 | 5 | 6 | |
| Saline (µL) | — | 50 | 50 | 50 | 50 | 50 |
| Serum (µL) | 50 | 50 | 50 (1:2) | 50 (1:4) | 50 | 50 |
| Mix and transfer to next tube | 50 | 50 | 50 | 50 | 50 | |
| Dilution/titer | 1:1 | 1:2 | 1:4 | 1:8 | 1:16 | 1:32 |
| IU/mL | 200 | 4008 | 800 | 1600 | 3200 | 6400 |
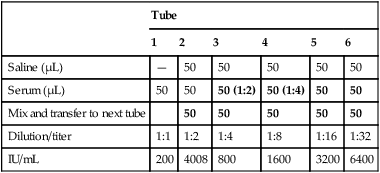
The results of the parallel testing of the acute and convalescent specimens revealed the following:
• Acute specimen positive, 1:1 dilution/titer (IU/mL 200)
• Convalescent specimen positive, 1:4 dilution/titer (IU/mL 800)
See Appendix A for the answers to these questions.
 for the discussion of the answers to these questions.
 Serial Dilution
Chapter Highlights
• Traditional serologic tests have been done for viral and bacterial diseases. Other common tests include pregnancy tests for human chorionic gonadotropin (hCG) and immunologic tests for infectious mononucleosis and syphilis.
• The procedures manual describes current techniques (in CLSI format) and approved policies and is always available to laboratory personnel.
• After a blood sample has clotted, serum should be promptly removed for testing or frozen at −20° C. Standard Precautions must be followed when blood specimens are handled.
• Lipemia, hemolysis, and bacterial contamination can make the specimen unacceptable. Icteric or turbid serum may give valid results or may interfere. Blood specimens should be collected before a meal to avoid chyle. Contamination with alkali or acid must be avoided.
• Some procedures require inactivated serum. Complement can be inactivated by heating to 56° C for 30 minutes or, after 4 hours, reinactivated by heating for 10 minutes.
• A graduated pipette delivers the liquid between two calibration marks. A serologic pipette resembles the graduated pipette, but has a frosted ring and enlarged tip opening.
• Automatic pipettes allow fast repetitive measurement and delivery of solutions of equal volumes.
• All dilutions are a ratio. Dilution is an indication of relative concentration.
• A dilution factor is used to correct for having used a diluted sample in a determination rather than the undiluted sample. The result (answer) using the dilution must be multiplied by the reciprocal of the dilution made.
• When the concentration is too high or less specimen is available for analysis, the original specimen may be diluted or the initial dilution (or filtrate) further diluted. These single dilutions are usually expressed as a ratio (1:2, 1:5, 1:10) or a fraction (½, ⅕,  ).
).
• A dilution is the volume or number of parts of the substance to be diluted in the total volume, or parts, of the final solution. A dilution is an expression of concentration, the relative amount of substance in solution. Dilutions can be made singly or in series.
• In a dilution series, all dilutions, including or following the first one, are the same, called serial dilutions.
• A complete dilution series usually contains 5 or 10 tubes, although any single dilution may be made directly from an undiluted specimen or substance.
• When testing antibody levels for a specific infectious organism, blood should be drawn during both the acute and convalescent phases.
• A difference in the amount of antibody present, or the antibody titer, may be noted when two different samples are tested concurrently. A rise in titer is central to serologic testing.
• The antibody titer is defined as the reciprocal of the highest dilution of the patient’s serum in which the antibody is still detectable.
[/level-membership-for-allergy-and-immunology-category][not-level-membership-for-allergy-and-immunology-category]
Basic Serologic Laboratory Techniques
At the conclusion of this chapter, the reader should be able to:
• Identify and explain the parts of a procedure.
• Describe the preparation of blood specimens for testing.
• Provide examples of the types of specimens that can be tested using immunologic procedures.
• Explain how complement is inactivated in a serum sample.
• Compare the differences between the two types of pipettes typically used in the immunology-serology laboratory.
• Describe and demonstrate pipetting techniques using manual and automatic pipettes.
• Calculate the concentration of a substance using the dilution factor.
• Calculate the concentration of a single dilution.
• Compare the characteristics of the acute and chronic phases of illness.
• Define the term antibody titer.
• Analyze a case study with the interpretation of the assay results.
• Correctly answer case study related multiple choice questions.
• Be prepared to participate in a discussion of critical thinking questions.
Procedures Manual
The procedures manual must be a complete document of current techniques and approved policies that is available at all times in the immediate bench area of laboratory personnel. It is extremely important that all personnel review this manual periodically. The manual should comply with the CLSI format for a procedure (see Box 7-1). The procedural format found in this text generally follows these guidelines.
Pipettes
Pipettes are used in the immunology-serology laboratory for the quantitative transfer of reagents and the preparations of serial dilutions of specimens such as serum (Fig. 8-1). Although semiautomated micropipettes have replaced traditional glass pipettes in the laboratory, traditional methods may still be needed at times.
TD, To deliver. (From Turgeon ML: Linné & Ringsrud’s clinical laboratory science: the basics and routine techniques, ed 6, St Louis, 2012, Mosby.)
Inspection and Use
• Aspirate liquid to about 1 inch (2.5 cm) above the top (zero) line of the pipette.
• Raise the pipette vertically to avoid the introduction of air bubbles and wipe off the exterior surface with a clean gauze or tissue square.
• Working at eye level, slowly lower the liquid so that the meniscus is at zero.
• Aspirate the contents of the pipette into the appropriate test tube or vessel.
• Wear gloves during pipetting procedures in compliance with Standard Precautions.
Pipetting Techniques
Manual Pipettes
With practice, it is important to develop a good technique for handling pipettes (Fig. 8-2). The same general steps apply to pipetting with all manual pipettes (Box 8-1), with few exceptions.
After the pipette has been filled above the top graduation mark, removed from the vessel, and held in a vertical position, the meniscus must be adjusted. The meniscus is the curvature in the top surface of a liquid (Fig. 8-3). The pipette should be held so that the calibration mark is at eye level. All readings must be made with the eye at the level of the meniscus. The delivery tip is touched to the inside wall of the original vessel, not the liquid, and the meniscus of the liquid in the pipette is eased, or adjusted, down to the calibration mark.
Automatic Pipettes
Micropipettors
The piston, usually in the form of a thumb plunger, is depressed to a stop position on the pipetting device. The tip is placed in the liquid to be measured, and then the plunger is slowly allowed to rise back to the original position (Fig. 8-4
[/not-level-membership-for-allergy-and-immunology-category]
