[level-membership-for-plastic-reconstructive-surgery-category]
Chapter 6 Augmentation Mastopexy
Introduction
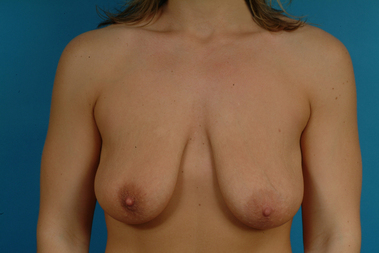
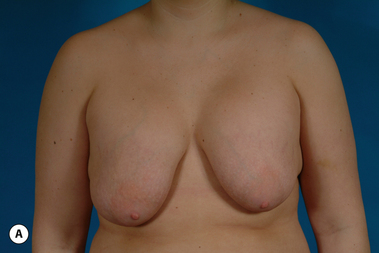
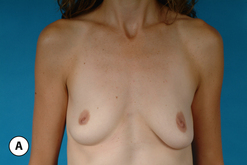
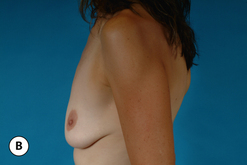
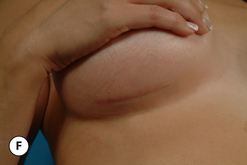
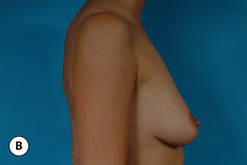
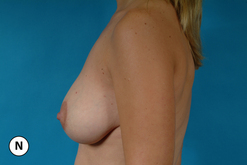
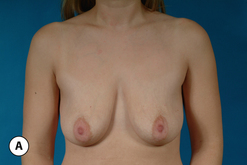
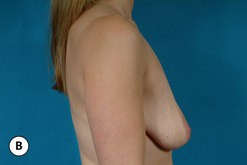
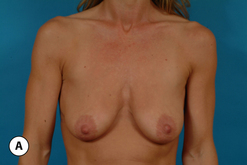
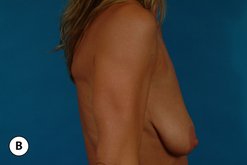
For many patients, breast hypoplasia and ptosis of either the gland or the nipple–areola complex (NAC) very often occur together. Perhaps the most common scenario for this presentation is the postpartum patient who presents after having delivered and breast-fed several children. After the transient increase in breast size that stretches out the supporting structures of the breast, involution may occur that then leaves the skin envelope variably underfilled and ptotic. Also, the NAC is very often positioned low on the breast mound (Figure 6.1). In these patients, simply performing a breast augmentation alone can result in a superiorly malpositioned implant in relation to the breast mound and an NAC position that remains far too low to be aesthetically acceptable (Figure 6.2 A,B). Conversely, performing a mastopexy alone may leave the remaining breast skin envelope underfilled as there is often not enough existing breast parenchyma to provide the result the patient is trying to achieve. For these reasons, to obtain the best result, it becomes necessary to combine the two procedures. While the rewards for such a surgical undertaking can be tremendously gratifying, the difficulty of the procedure is greater than for either operation alone. This is related to the fact that the two operations have opposing goals. Breast augmentation increases the volume of the breast and therefore expands the surface area to accommodate the new volume. In contrast, mastopexy generally reduces the skin surface area in the process of accomplishing the lifting of the NAC. Therefore, any operative procedure designed to treat hypoplasia with ptosis must artistically coordinate these two competing surgical maneuvers in such a manner so as to allow a lifting of the NAC and a reduction in the skin envelope but yet leave behind enough skin to easily accommodate the new breast volume provided by the implant. Also, these goals must be accomplished in a manner that reliably preserves the blood supply to the NAC, results in the least amount of cutaneous scar possible and provides an aesthetic and long-lasting result, all in one operation. When viewed in this context, it is easy to understand why many surgeons believe augmentation mastopexy to be one of the most challenging aesthetic procedures performed on the breast. However, by strategically applying the principles outlined in the previous chapters on augmentation and mastopexy, a sound and reliable surgical plan can be developed that will allow these two procedures to be combined successfully.
Indications
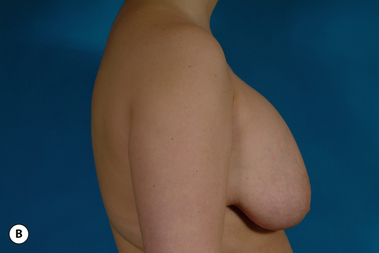
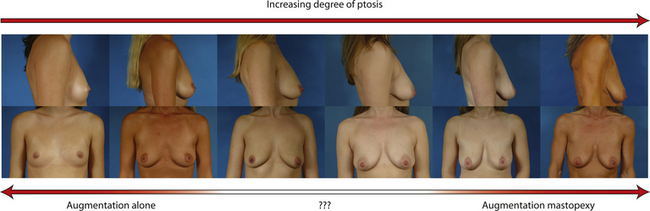
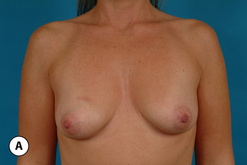
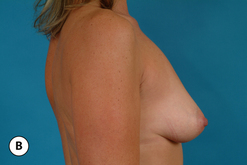
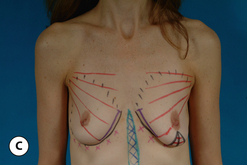
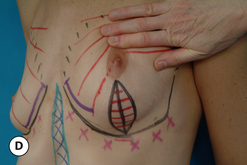
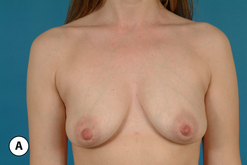
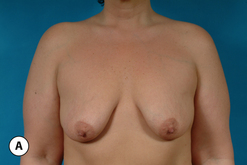
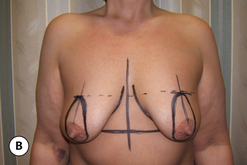
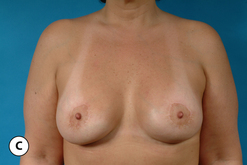
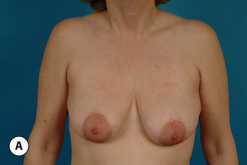
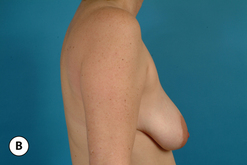
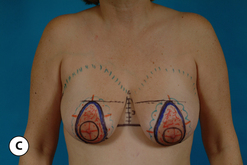
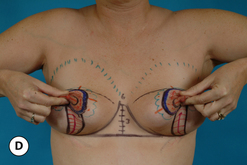
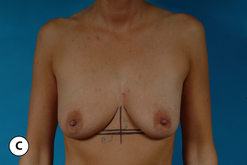
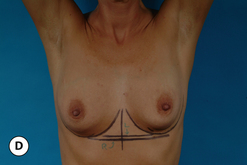
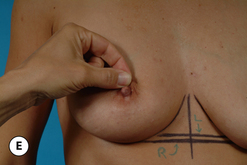
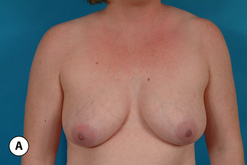
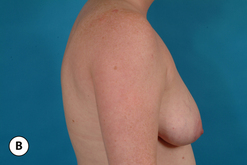
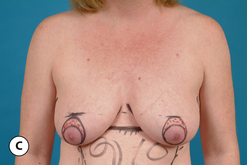
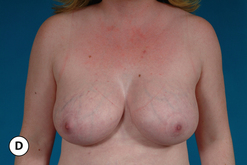
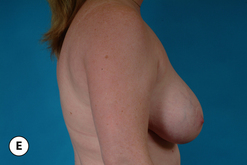
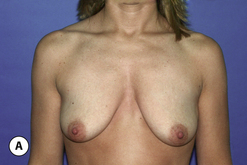
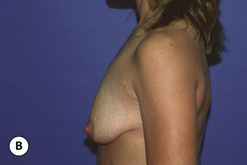
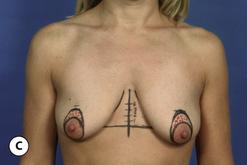
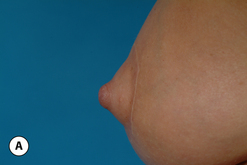
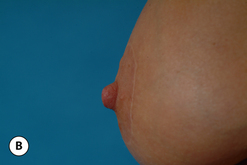
In evaluating patients for breast augmentation, it is easy to recognize those patients who have an NAC position that is located well up onto the breast and who will do well with the simple placement of an implant. In these patients, the NAC will end up being located directly at the apex of the breast and an aesthetic relationship between the breast mound and the NAC position can be achieved. Conversely, it is also easy to identify those patients who have such profound ptosis that nothing short of a mastopexy will restore balance to the breast mound and nipple position. However, there are many patients who present for breast augmentation who seem to fall in between these two extremes (Figure 6.3). Not only is the breast deficient in volume, but the location of the NAC falls somewhere between the apex of the breast and the lower breast border. This anatomic relationship is extremely common, particularly in postpartum patients, and it presents for the plastic surgeon one of the most difficult decisions that must be made in the patient with breast hypoplasia, namely, when to add a mastopexy to the overall operative plan to achieve the best result. The difficulty in making this decision lies in the fact that ptosis is not an all or none phenomenon. How much ptosis in the position of the NAC that can be accepted and still have a reasonable result may well come down to a matter of personal preference for both the patient and the surgeon. Whether to accept a slightly less than ideal breast volume to NAC relationship must be weighed against the scar that would be created on the breast to accomplish the mastopexy. Many patients are reluctant to accept anything more than an inconspicuous inframammary fold or transaxillary scar and will therefore accept a slightly low NAC position to avoid an additional scar on the breast. However, determining exactly where the NAC will end up in relation to the remainder of the breast can be difficult as the simple act of adding an implant to the underfilled skin envelope of the breast will result in a minor lifting effect on the NAC and how much lift will be achieved can be difficult to predict. One preoperative anatomic relationship I have found useful in making the decision of whether or not to perform a mastopexy with the augmentation involves observing the position of the nipple in relation to the inframammary fold (IMF). This relationship is assessed by drawing a line across the chest connecting the most inferior extent of the two inframammary folds together and then standing back and observing where the nipple lies in relation to this fold line (Figure 6.4). In the case of a fold asymmetry, it is advisable to base decisions on the higher of the two folds as this will be the rate-limiting contour influencing the final result. By using this static line drawn across the midline, an accurate determination of where the nipple lies in relation to the fold can be made without to need to perform any lifting or other manipulation of the breast. Assuming the location of the IMF remains unchanged and stable postoperatively, it is then possible to use the nipple to fold relationship as a guide to assessing the need for a mastopexy. Three types of relationships are possible:
Nipple above fold – This is the easiest clinical presentation to manage as the vast majority of patients will achieve an aesthetic result with simply an augmentation alone. Of course, the higher the position of the NAC the better, as the ideal location for the NAC after the placement of the implant is at the most projecting portion of the new breast mound. However, even in patients where the nipple is just slightly above the fold, a reasonable result can be obtained using standard augmentation techniques and incision locations without the need for a mastopexy (Figure 6.5 A–G). One nuance that can be utilized in these types of patients is to lean more towards a periareolar approach for the breast augmentation rather than using an inframammary or transaxillary incision. In this fashion, should a periareolar mastopexy ever become necessary in the future, the extra scar burden is minimized since half the scar is already present.
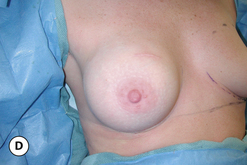
One unique clinical situation where a mastopexy is indicated despite the fact that the nipple is above the fold involves the occasional patient who presents with pseudoptosis. In these cases, a significant portion of the gland can descend into the lower pole of the breast and yet the NAC is positioned normally. Typically, the skin envelope in the lower pole is redundant and underfilled. This clinical presentation is potentially troublesome and must be recognized preoperatively as simply inserting an implant in this type of patient can create an over-expansion of the lower pole and result in an exaggerated and overly rounded lower pole contour with an NAC position which appears to be superiorly displaced. Therefore, while these patients do not necessarily require a periareolar mastopexy, they can often benefit from a ‘vertical’ mastopexy where the redundant and ptotic skin and gland of the lower pole of the breast is plicated from the bottom of the areola down to the IMF to create the desired lower pole shape. By taking up the excess tissue in the lower pole of the breast, the position and shape of the breast mound are brought into better harmony with the position of the NAC. Also, the vertical incision affords ready access to the breast and can easily be used to develop the pocket and place the implant. This very straightforward and easily performed technique adds a powerful shaping strategy to the overall operative plan and can lead to excellent results in appropriately selected patients (Figure 6.6 A–G).
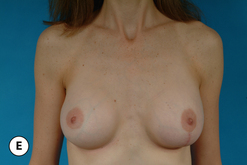
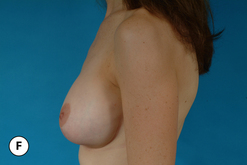
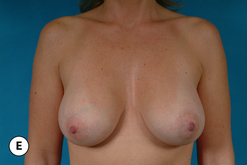
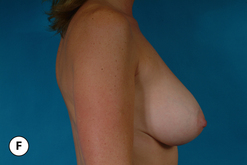
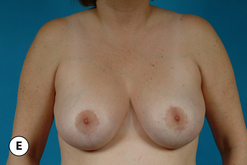
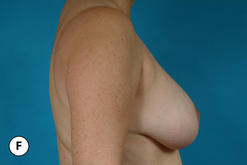
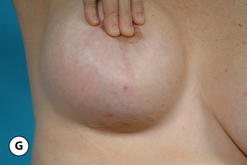
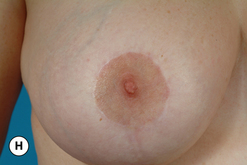
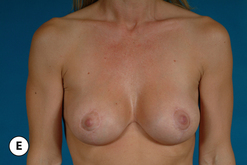
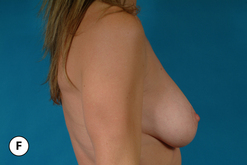
Nipple at the fold – Many patients present with one or both nipples at or very near the level of the inframammary fold. It is in these patients that the decision to perform a mastopexy becomes difficult. Both the patient and the surgeon are eager to avoid placing any more scars on the breast than are absolutely necessary and this leads to an understandable reluctance on the part of both to proceed with mastopexy. One surgical maneuver that can be used in these types of patients is to lower the inframammary fold as part of the surgical approach. Although this can result in an overall breast contour that appears somewhat low on the chest wall, the volume provided by the breast implant ends up being properly positioned directly under the NAC. Therefore, as far as the location of both the NAC and the breast mound is concerned, the breast implant is aesthetically positioned. If the degree of lowering of the overall breast position is not excessive, this approach can be used to great advantage. In these cases, it is helpful to use an anatomically shaped gel implant to avoid a contour irregularity in the upper pole of the breast. The more natural upper pole slope of these types of devices helps prevent an unaesthetic step off from becoming visible as could occur with, for instance, a round saline device. Also, because the volume of a shaped cohesive gel implant is more aggressively distributed in the lower pole of the device, there is a more effective filling out of the lower pole of the breast, which tends to lift the NAC position to greater extent than a round implant does (Figure 6.7 A–F). In essence, this strategy involves lowering the implant to fit the breast, which stands in contrast to the usual augmentation mastopexy strategy, which involves raising the breast and NAC to fit the implant. Not all patients are candidates for this approach as there is a limit as to how far the fold can be lowered without creating significant shape or breast position problems. For this reason, many patients who present with the nipple at the level of the fold benefit from the inclusion of a mastopexy done in conjunction with the breast augmentation.
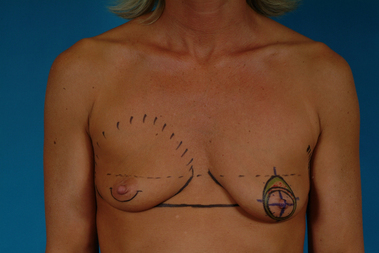
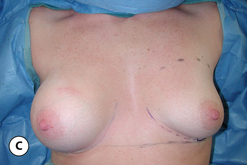
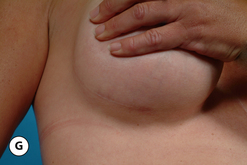
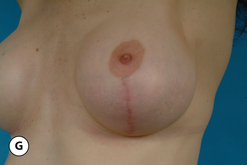
When the nipple is located at the level of the fold and the decision has been made to incorporate a mastopexy with the breast augmentation, this can most often be accomplished with a periareolar approach alone. It can be rationalized that the resulting periareolar scar is only slightly more extensive than would be associated with a traditional periareolar incision alone for breast augmentation where the scar is limited to the lower half of the areolar border, and the improvement in the overall aesthetic appearance of the breast seems worth the extra scar burden. However, the major drawback to the periareolar approach remains the flattened breast contour that can result when the dimensions of the periareolar pattern become too large. Not only does the apex of the breast appear flattened, but the contour of the lower pole appears to bulge, which creates an overly rounded appearance. In selected cases, this bulging can be partially corrected by extending the lower portion of the periareolar pattern slightly inferiorly into the lower pole breast skin. By taking up this redundant skin into the periareolar pattern and combining it with a breast augmentation, the excess lower pole skin is reduced and it may be possible to avoid placing a vertical scar on the breast to correct this contour deformity. However, there is a limit to which this maneuver can be applied without creating a periareolar defect that is too large to be comfortably managed and, if the overall shape of the breast appears distorted or flattened in any way, it may become necessary to add a vertical component to the skin pattern. Typically, depending on the other variables involved for a particular patient, the NAC can be lifted up to 6 cm using a periareolar pattern alone without creating a significant deformity (Figure 6.8 A–C). Beyond 6 cm, a circumvertical skin pattern becomes increasingly necessary to appropriately take up the redundant skin envelope, particularly in the lower pole, and restore an aesthetic breast contour. This is a decision which is easily made at the time of surgery. After placement of the implant, the proposed periareolar pattern can be plicated into position to assess the breast contour. The effect of adding a vertical component can then be assessed. Typically, if the contour of the breast is improved even slightly by adding the vertical component, it is advisable to incorporate this into the pattern. Most patients will be more satisfied with an aesthetic breast contour with a vertical scar than a flatted and distorted result with only a periareolar scar. With adequate preoperative education, most patients can accept the vertical scar as a necessary part of their procedure.
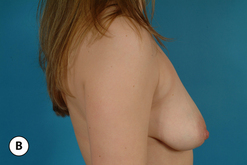
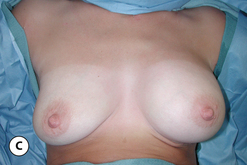
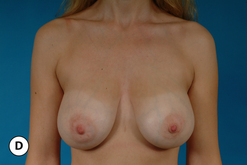
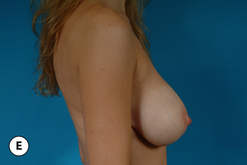
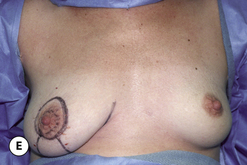
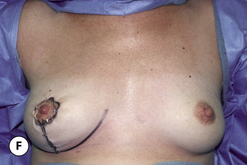
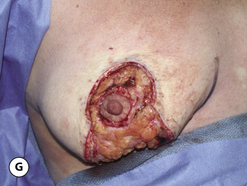
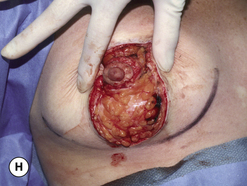
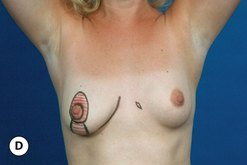
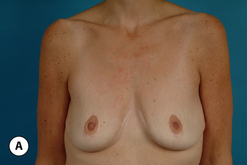
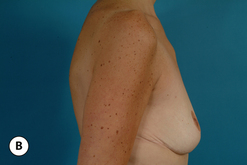
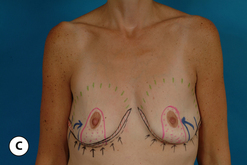
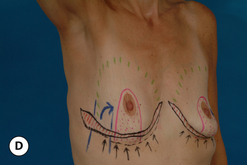
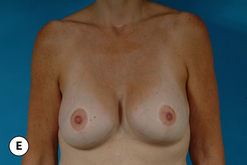
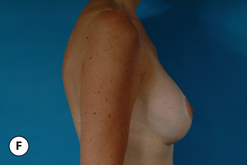
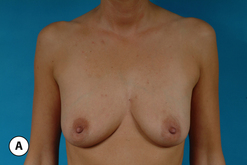
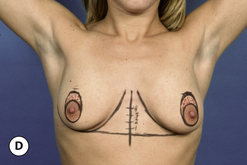
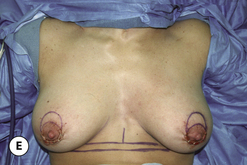
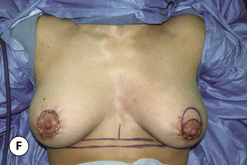
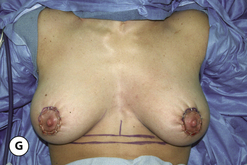
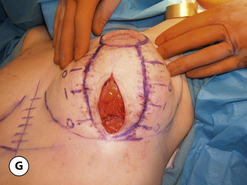
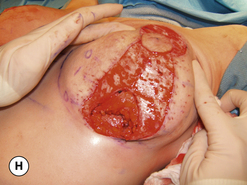
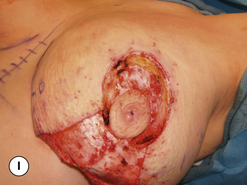
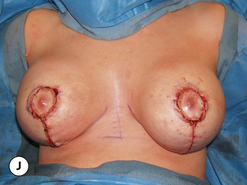
Nipple below the fold – This is the most severe situation and represents the greatest mismatch in the location of the breast mound in relation to the NAC. Typically, there is a redundant and ptotic skin envelope associated with this combination of variables and the surgical plan must include all of the critical elements involved in surgical correction including adding the appropriate volume to the breast with the implant, taking up the redundant skin envelope and lifting the position of the NAC. In these cases, the operative strategy can be summarized as keeping the inframammary fold in position and placing the breast implant anatomically on the chest wall and then lifting not only the NAC but the entire breast up and over the implant to bring the implant and the breast into better positional harmony. Although there is the occasional patient who can have all of these surgical goals reached with only a periareolar approach, most patients in this category will need a circumvertical skin pattern to achieve the optimal result. The significant advantage afforded by this technique relates to the addition of the vertical component to the skin pattern. The plication of the lower pole in a vertical direction is one of the most powerful shaping maneuvers that can be performed on the soft tissues of the breast. It effectively narrows a widened breast base diameter, elevates the NAC and increases the projection of the breast, all with one simple maneuver. In essence, the vertical plication serves variably to reverse all of the changes that result from the loss of structural support which leads to breast ptosis in the first place. Also, the incision can be used to access the underside of the breast to place an implant into either the subpectoral or the subglandular position. Knowing ahead of time that the vertical component will be used also removes any uncertainty in the scar pattern that is created, which allows the patient to be fully educated about her result. For these reasons, although these types of patients are the most challenging in terms of the degree of preoperative deformity, they are also the most straightforward as far as surgical planning is concerned and, in that respect, easier to correct surgically (Figure 6.9 A–H).
Staging
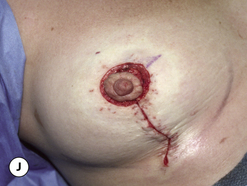
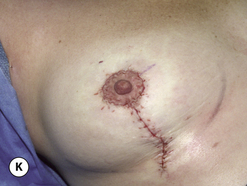
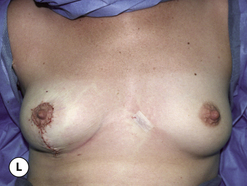
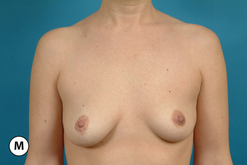
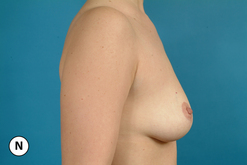
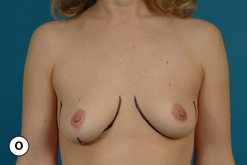
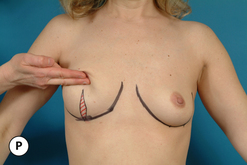
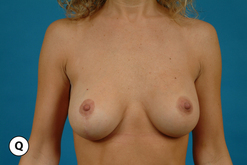
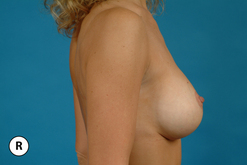
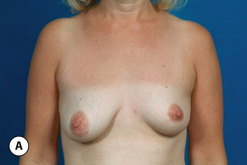
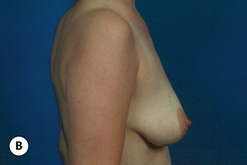
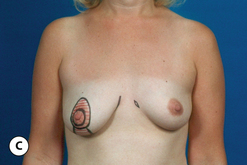
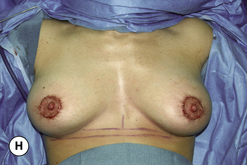
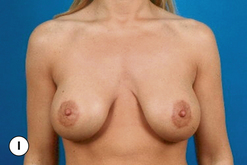
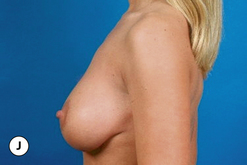
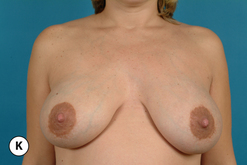
Despite the complexity of the procedure, most surgeons attempt to perform augmentation mastopexy as a single operation. The advantages associated with this combined approach include the cost savings associated with one operation rather than two, as well as the safety and convenience factor of not having to come back for a second procedure. Certainly, it is possible and entirely acceptable to perform augmentation mastopexy as a single procedure. With appropriate operative planning followed by adept surgical technique, outstanding results can be obtained. However, of all the aesthetic operations performed on the breast, augmentation mastopexy is arguably the most complicated. As such, it is not surprising that there is a higher complication and revision rate than that associated with other simpler breast procedures. To help reduce these potential complications and improve the reliability of the procedure, a staged approach to augmentation mastopexy has been advocated. Typically, this planning strategy involves performing the mastopexy first to allow the new skin envelope and nipple position to settle and heal completely. At a later date, generally 6–12 months later after all swelling has subsided, the implant is inserted and the aesthetics of the breast and/or NAC are revised as needed to provide for the optimal result. This strategy allows the size and shape of the breast implant to be chosen with greater confidence since the skin envelope dimensions and NAC position are now stable. Any potential for there to be a mismatch between the breast and the implant is minimized due to the increased control the staged approach provides in the decision-making process (Figures 6.10 A–R and 6.11 A–F). As an alternative, it is possible to reverse the order of the procedures and perform the augmentation first and then follow up a later date with the mastopexy. This strategy can work well for patients who present with mild ptosis and will require only a minimal breast lift. In these cases, it is reasonable to proceed with the augmentation first and assess the quality of the result after full healing has taken place. If there is any persistent ptosis at that point, then a small periareolar mastopexy can be performed to obtain the optimal result. This strategy is utilized only with the full understanding of the patient that two procedures may well be required to obtain the desired result. For patients with a greater degree of ptosis, the implant first, mastopexy second strategy has less appeal as the degree of deformity that is present after the breast augmentation may be significant and waiting for the breast to settle before performing the mastopexy may be unacceptable to many patients.

Technique
The surgical technique for augmentation mastopexy requires the application all of the elements previously described for either procedure alone; however, combining these two operations does require several important alterations in planning and execution. Four basic techniques will be described including periareolar augmentation mastopexy, circumvertical augmentation mastopexy, inverted T augmentation mastopexy and an advanced method of breast shaping called resuspension circumvertical augmentation mastopexy.
Periareolar Augmentation Mastopexy
Marking
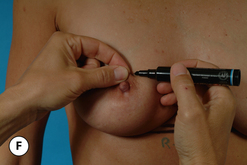
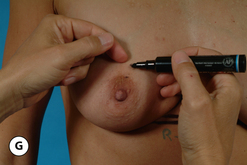
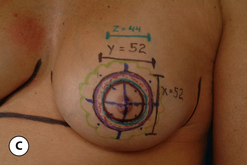
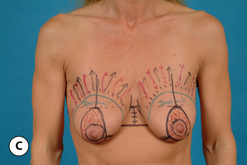
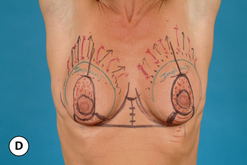
The patient is marked in the upright position. The most important landmark to determine is the top of the periareolar pattern. This is done first by gently pinching the top of the proposed areolar incision and manually lifting it up onto the breast until a point is reached where the NAC is positioned directly at the apex of the breast mound. The skin is then marked at this point, which represents the 12 o’clock position of the periareolar pattern. By releasing the NAC and letting it fall down, the amount of skin between the top of the areola and the upper margin of the periareolar incision that will need to be de-epithelialized can be seen (Figure 6.12 A–I). The same point is then identified on the opposite breast and care is taken to ensure that the apex of the periareolar pattern has been symmetrically located on each breast. As a check to the proper location of the top of the periareolar pattern, a measurement from the inframammary fold line that runs across the chest wall extending from one breast to the other to a similar line connecting the tops of the matching periareolar marks can be made. This measurement is often 6 cm or more, depending on other variables including IMF location, breast size and skin elasticity. The fact that the top of the periareolar pattern can extend this far above the IMF can be very surprising and even alarming to many surgeons as, historically, one of the more distressing complications associated with augmentation mastopexy is bottoming out of the breast, creating an expanded lower pole and a superiorly displaced NAC. With the techniques concerning management of the inframammary fold described previously, it must be recognized that the location of the inframammary fold will not change as long as the attachments of Scarpa’s fascia to the inferior border of the breast remain intact. As such, the IMF provides a solid foundation to the breast that will not descend in an unanticipated fashion postoperatively. Certainly, the skin can stretch but, because of the support provided by the fold, a more secure NAC location can be predicted and experience has shown that the degree of lift above the fold line can be up to 6 cm for many patients or the resulting NAC position will be low in relation to the rest of the breast mound (Figure 6.13 A–E). While this measurement is important, it must be realized that, with this technique, the final determinant that governs the placement of the top of the areola is the manual lifting maneuver, as using artistic judgment to determine the location of the NAC ultimately will be more accurate than adhering to any sort of fixed measurement strategy. If the distance from the top of the proposed areolar incision and the apex of the periareolar pattern is less than 3 cm, the procedure should be very straightforward. If the distance measures 3–6 cm, the increased periareolar dimensions place more stress on the periareolar closure as well as on the shape of the breast. The effect of this incision pattern must then be carefully assessed during surgery to determine if a vertical segment will be needed in the skin pattern to obtain the optimal result. If the distance exceeds 6 cm, caution in the use of the periareolar pattern alone must be exercised as compromise in the size, shape or location of the NAC becomes more likely and the shape of the breast can be adversely affected. If this occurs, a vertical segment must be added to the skin pattern to obtain the best result.
Surgical technique (Figure 6.14 A–N)


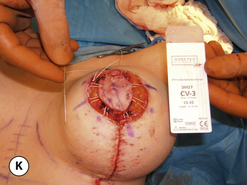
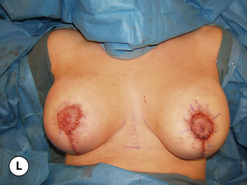
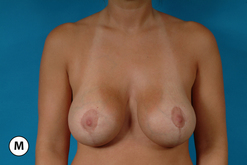
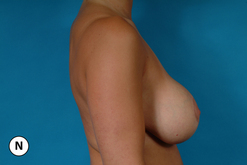
At times, there can be a tendency for the areola to bulge after placement of an implant done in conjunction with a periareolar mastopexy. Simple periareolar revision with tightening of the areola using the interlocking Gore-Tex technique can completely correct this tendency for areolar herniation (Figure 6.15 A–K).

Circumvertical Augmentation Mastopexy
Marking
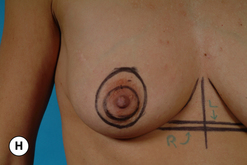
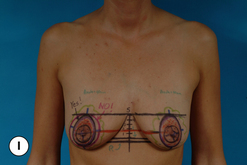
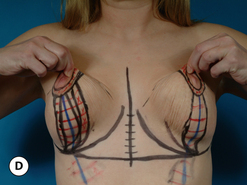
The markings for a circumvertical approach are very similar to the periareolar markings described above (Figure 6.16 A–D). Locating the top of the periareolar pattern and deciding on the horizontal and vertical dimensions is performed exactly as in a periareolar mastopexy. The only difference is that a vertical component is added to the marking pattern. While the top of the periareolar pattern is an important and relatively fixed landmark, the dimensions of the vertical takeout are entirely subject to adjustment intraoperatively and therefore these initial vertical marks can be viewed as preliminary. Again, a manual pinching together of the lower pole skin can provide a visual clue about how much skin will likely need to be removed to narrow the base diameter of the breast appropriately and take up the excess skin in the lower pole. Although this vertical takeout can be positioned slightly medially or laterally in some patients to good effect, it is generally ideal to base it directly in the meridian line of the breast. This will ensure that a more or less equal amount of breast skin will be removed medially as well as laterally, which tends to enhance the creation of a symmetric breast contour. In smaller breasts, the vertical takeout extends directly down to the inframammary fold but not beyond. It is actually advantageous to end the vertical resection just above the proposed IMF as there is a tendency for the bottom of the pattern to extend down onto the chest wall as the exact dimensions of the pattern are finalized during surgery. In larger breasts, it may become necessary to curve the pattern out laterally above the fold to take up the redundant skin. The necessity of this alteration in the pattern can be assessed at the time of marking by gently gathering together the lower pole breast skin, sometimes with the tips of the fingers of both hands, and observing the effect of varying degrees of skin tightening on the shape of the breast. With practice, a properly positioned and appropriately aggressive vertical takeout can be accurately applied using this maneuver, again remembering that the exact dimensions will be determined intraoperatively. What this does accomplish, however, is a general identification of which portion of the breast will be eventually involved in the vertical plication. This area then becomes a free zone in which an incision can be made to access the breast and develop a pocket for the breast implant. This incision is diagrammed directly in the center of the proposed vertical takeout. By using the vertical incision to gain access to the breast, less manipulation is done to the periareolar tissues, which results in less risk for potential vascular compromise to the NAC. After the location of the vertical segment has been estimated, other marks can be applied regarding the placement of the interlocking Gore-Tex suture, as well as diagramming the borders of the breast to help guide dissection intraoperatively. This completes the marking pattern.

Surgical technique
Strategically, there are two options that can be used to sequence the procedure. In selected cases, it may be advisable to perform the mastopexy first and then add an implant once the skin pattern and dimensions have been set. Typically, this technique can be used to good effect when only a very modest implant will be used. In these cases, the more significant alteration in the anatomy of the breast is the skin envelope reduction and the addition of the implant does not change the volume to skin envelope relationship to a great degree. Therefore, it is easier to precisely set the skin envelope and then add a small implant. However, if the effect of adding the implant is comparatively more significant than the skin envelope reduction, it is far more predictable to place the implant first and then re-tailor the skin envelope around the new breast volume (see Figure 6.16 E). This approach will guard against an inadvertently overexuberant skin envelope reduction from hindering the easy placement of an appropriately sized device. For these reasons, it is usually preferable to place the implant first in nearly every instance and then add the circumvertical pattern to fit the new breast volume. This stepwise approach allows the most control over the result and allows an appropriate augmentation to be performed without risking an over-resection of the skin envelope, which is surprisingly easy to do.
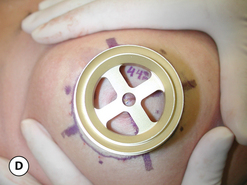
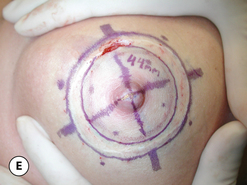
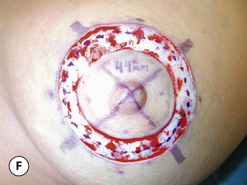
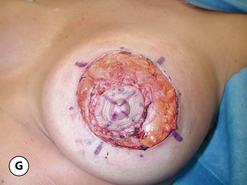
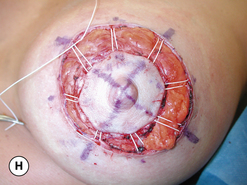
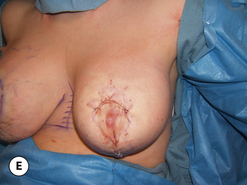
With this in mind, the procedure is begun by making an incision in the center of the previously marked vertical resection area and the underside of the breast is exposed. It is important to stay above Scarpa’s fascia as it inserts into the base of the breast as the pocket is developed to avoid opening up the loose subscarpal space below the fold. In this fashion, the anatomical integrity of the fold will be maintained and the likelihood of inadvertently lowering the fold will be reduced. From this access point it is possible to easily develop either a subglandular or a subpectoral pocket. Because the changes that are going to be made in the size and shape of the breast tend to be significant, it can be very helpful to use implant sizers to guide implant selection. The chosen sizer is inserted and the skin envelope is then plicated around the new breast volume. A very reproducible sequence to apply the pattern is first to staple the areola into the defect and then, with the patient upright, plicate the inferior pole as needed to create an attractive and rounded lower pole contour. In patients with a greater degree of ptosis and larger breast skin envelopes, it will be necessary gently to curve the plication out laterally to avoid running the plication line down onto the abdominal wall. This will result in a ‘J’-shaped line of plication with the only difference between smaller and larger breast skin envelopes being that the plication line runs out laterally more in the breasts with a relatively greater amount of redundant skin. With this technique, there will be some minor bunching of the skin just under the areola but, because the dimensions of the vertical segment tend not to be excessively wide and skin in these patients tends to be quite elastic, a controlled and stepwise plication of the vertical segment can be achieved that allows a direct and accurate molding of a contoured breast shape. The pattern can be easily adjusted by adding or removing staples as needed to create the desired result. In this fashion, the skin envelope can be accurately tailored to match the volume and dimensions of the newly augmented breast without the risk of over-resection of skin. It is helpful to proceed to the opposite breast at this point and place the implant and plicate the skin envelope in a similar fashion. Once both breasts have been plicated, the patient can be placed upright and any fine tuning to the plication pattern can be performed as needed to create the best symmetry. This is most helpful in patients who present with a preoperative asymmetry and it is very common to develop a slightly different plication pattern on each breast in an attempt to correct the asymmetry. Once the final breast volume and shape have been determined, the vertical plication, line is marked with a surgical pen. It is highly recommended to apply crosshatch marks with the pen to allow the two sides of the vertical incision to be accurately reapproximated after the vertical segment has been de-epithelialized. If this is not done, it can be at times surprisingly difficult to realign the vertical incision along the lines that were determined by the initial plication, which can then adversely affect the shape of the breast (see Figure 6.16 F). It should be noted that the dimensions of the periareolar opening can be altered as well and, if this has been done, these areas are likewise marked. The staples are then removed and the skin within the vertical segment is de-epithelialized (see Figure 6.16 G,H). The implant is inserted and properly positioned and the breast parenchyma is reapproximated along the vertical incision with an absorbable 4–0 monofilament by closing the medial and lateral parenchymal pillars with both deep and superficial sutures. This will help prevent the parenchymal tissues in the vertical segment from inadvertently separating and allowing the implant to semi-herniate into the lower pole of the breast. The vertical skin incision is closed in layers, again with a layer of interrupted absorbable 4-0 monofilament sutures followed by a subcuticular suture of the same material. This technique plicates the de-epithelialized dermis in the vertical segment upon itself, which tends to create a vertical strut that runs down the inferior central lower pole of the breast. The plicated dermis tends to be somewhat stiffer than the surrounding parenchyma and, in selected patients, this may provide an additional layer of support for the lower pole of the breast.
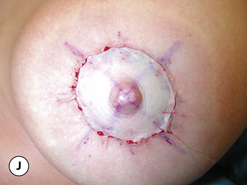
Finally then, the interlocking Gore-Tex suture is applied to the remaining periareolar defect and the areola is inset as before (see Figure 6.16 I–K). It is very common for the periareolar closure to proceed in a more comfortable fashion when using the circumvertical approach due to the fact that the vertical segment reduces the dimensions of the periareolar opening. As a result, there is less of a mismatch in the size of the areolar diameter versus the size of the periareolar opening and it is easier to inset the areola without creating an inordinate amount of tissue pleating or bunching. This, along with the ability to create a more contoured and shapely lower pole in the breast, highlights the major advantages of the circumvertical skin pattern. By combining the NAC lifting effect of the periareolar skin pattern with the shaping power of the vertical plication, an aesthetic breast mound with a properly positioned NAC can be achieved in a straightforward and controlled fashion (see Figure 6.16 L–N). For these reasons, the circumvertical approach is perhaps the most reliable and effective skin pattern for use in augmentation mastopexy.
Resuspension Augmentation Mastopexy
As noted previously, the most effective way to shape the breast in any type of aesthetic breast procedure is to insert a breast implant. The volume provided by the implant directly fills the upper pole of the breast and, in many patients, corrects the preoperative concavity that is often present. However, in patients who are very thin with little soft tissue cover in the upper pole of the breast, a step off can sometimes be seen at the upper border of the implant as it lies against the chest wall. In the case of saline implants, this step off can be particularly prominent and can result in an unnatural and augmented look to the breast, even after the lifting and skin tightening effect of the mastopexy has been applied. Cohesive anatomic gel implants can be used to help correct this step off; however, for many reasons including lack of availability, risk of rotation or simply patient or surgeon preference, these devices may not be appropriate for some patients. In these instances, it can be helpful to utilize the patients own tissues as an internal flap to autoaugment the upper peripheral contours of the breast in an attempt to soften the edges of the breast and create a more natural appearance. This technique is called the resuspension augmentation mastopexy.
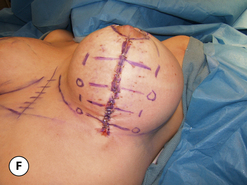
The procedure is usually performed in conjunction with a circumvertical pattern as the vertical incision affords easy access to the underside of the breast. The preoperative markings are performed as in any circumvertical augmentation mastopexy. At surgery, the underside of the breast is exposed through the vertical incision and a subglandular pocket is created. The upper half of the pocket is over-dissected beyond the limits required to place an implant to allow the underside of the breast to be resuspended superiorly. With the aid of a lighted retractor, the deep surface of the breast just at the junction of the superior pole with the chest wall is sutured superiorly a distance of 4–6 cm to pull this tissue up and under the upper breast flap. Three to four sutures along the upper peripheral margin are used to resuspend the superior pole of the breast in an attempt to fill in the peripheral hollow these types of patients can present with. Once the superior pole has been filled in, there is ample room then to place the breast implant into either the remaining subglandular space or a subpectoral pocket (Figure 6.17A–F). Together, this ‘autoaugmentation’ of the upper pole of the breast along with the placement of a breast implant can completely reshape the upper pole contour into a very natural slope and create a full but not obviously augmented look to the breast. It is advisable to overcorrect the initial upper pole contour as some settling will occur over time. This resuspension maneuver provides an additional and very effective technique for breast shaping in patients who are at risk for visible implant contours after traditional augmentation mastopexy.
[/level-membership-for-plastic-reconstructive-surgery-category][not-level-membership-for-plastic-reconstructive-surgery-category]
Chapter 6 Augmentation Mastopexy
Introduction
For many patients, breast hypoplasia and ptosis of either the gland or the nipple–areola complex (NAC) very often occur together. Perhaps the most common scenario for this presentation is the postpartum patient who presents after having delivered and breast-fed several children. After the transient increase in breast size that stretches out the supporting structures of the breast, involution may occur that then leaves the skin envelope variably underfilled and ptotic. Also, the NAC is very often positioned low on the breast mound (Figure 6.1). In these patients, simply performing a breast augmentation alone can result in a superiorly malpositioned implant in relation to the breast mound and an NAC position that remains far too low to be aesthetically acceptable (Figure 6.2 A,B). Conversely, performing a mastopexy alone may leave the remaining breast skin envelope underfilled as there is often not enough existing breast parenchyma to provide the result the patient is trying to achieve. For these reasons, to obtain the best result, it becomes necessary to combine the two procedures. While the rewards for such a surgical undertaking can be tremendously gratifying, the difficulty of the procedure is greater than for either operation alone. This is related to the fact that the two operations have opposing goals. Breast augmentation increases the volume of the breast and therefore expands the surface area to accommodate the new volume. In contrast, mastopexy generally reduces the skin surface area in the process of accomplishing the lifting of the NAC. Therefore, any operative procedure designed to treat hypoplasia with ptosis must artistically coordinate these two competing surgical maneuvers in such a manner so as to allow a lifting of the NAC and a reduction in the skin envelope but yet leave behind enough skin to easily accommodate the new breast volume provided by the implant. Also, these goals must be accomplished in a manner that reliably preserves the blood supply to the NAC, results in the least amount of cutaneous scar possible and provides an aesthetic and long-lasting result, all in one operation. When viewed in this context, it is easy to understand why many surgeons believe augmentation mastopexy to be one of the most challenging aesthetic procedures performed on the breast. However, by strategically applying the principles outlined in the previous chapters on augmentation and mastopexy, a sound and reliable surgical plan can be developed that will allow these two procedures to be combined successfully.
Indications
In evaluating patients for breast augmentation, it is easy to recognize those patients who have an NAC position that is located well up onto the breast and who will do well with the simple placement of an implant. In these patients, the NAC will end up being located directly at the apex of the breast and an aesthetic relationship between the breast mound and the NAC position can be achieved. Conversely, it is also easy to identify those patients who have such profound ptosis that nothing short of a mastopexy will restore balance to the breast mound and nipple position. However, there are many patients who present for breast augmentation who seem to fall in between these two extremes (Figure 6.3). Not only is the breast deficient in volume, but the location of the NAC falls somewhere between the apex of the breast and the lower breast border. This anatomic relationship is extremely common, particularly in postpartum patients, and it presents for the plastic surgeon one of the most difficult decisions that must be made in the patient with breast hypoplasia, namely, when to add a mastopexy to the overall operative plan to achieve the best result. The difficulty in making this decision lies in the fact that ptosis is not an all or none phenomenon. How much ptosis in the position of the NAC that can be accepted and still have a reasonable result may well come down to a matter of personal preference for both the patient and the surgeon. Whether to accept a slightly less than ideal breast volume to NAC relationship must be weighed against the scar that would be created on the breast to accomplish the mastopexy. Many patients are reluctant to accept anything more than an inconspicuous inframammary fold or transaxillary scar and will therefore accept a slightly low NAC position to avoid an additional scar on the breast. However, determining exactly where the NAC will end up in relation to the remainder of the breast can be difficult as the simple act of adding an implant to the underfilled skin envelope of the breast will result in a minor lifting effect on the NAC and how much lift will be achieved can be difficult to predict. One preoperative anatomic relationship I have found useful in making the decision of whether or not to perform a mastopexy with the augmentation involves observing the position of the nipple in relation to the inframammary fold (IMF). This relationship is assessed by drawing a line across the chest connecting the most inferior extent of the two inframammary folds together and then standing back and observing where the nipple lies in relation to this fold line (Figure 6.4). In the case of a fold asymmetry, it is advisable to base decisions on the higher of the two folds as this will be the rate-limiting contour influencing the final result. By using this static line drawn across the midline, an accurate determination of where the nipple lies in relation to the fold can be made without to need to perform any lifting or other manipulation of the breast. Assuming the location of the IMF remains unchanged and stable postoperatively, it is then possible to use the nipple to fold relationship as a guide to assessing the need for a mastopexy. Three types of relationships are possible:
Nipple above fold – This is the easiest clinical presentation to manage as the vast majority of patients will achieve an aesthetic result with simply an augmentation alone. Of course, the higher the position of the NAC the better, as the ideal location for the NAC after the placement of the implant is at the most projecting portion of the new breast mound. However, even in patients where the nipple is just slightly above the fold, a reasonable result can be obtained using standard augmentation techniques and incision locations without the need for a mastopexy (Figure 6.5 A–G). One nuance that can be utilized in these types of patients is to lean more towards a periareolar approach for the breast augmentation rather than using an inframammary or transaxillary incision. In this fashion, should a periareolar mastopexy ever become necessary in the future, the extra scar burden is minimized since half the scar is already present.
One unique clinical situation where a mastopexy is indicated despite the fact that the nipple is above the fold involves the occasional patient who presents with pseudoptosis. In these cases, a significant portion of the gland can descend into the lower pole of the breast and yet the NAC is positioned normally. Typically, the skin envelope in the lower pole is redundant and underfilled. This clinical presentation is potentially troublesome and must be recognized preoperatively as simply inserting an implant in this type of patient can create an over-expansion of the lower pole and result in an exaggerated and overly rounded lower pole contour with an NAC position which appears to be superiorly displaced. Therefore, while these patients do not necessarily require a periareolar mastopexy, they can often benefit from a ‘vertical’ mastopexy where the redundant and ptotic skin and gland of the lower pole of the breast is plicated from the bottom of the areola down to the IMF to create the desired lower pole shape. By taking up the excess tissue in the lower pole of the breast, the position and shape of the breast mound are brought into better harmony with the position of the NAC. Also, the vertical incision affords ready access to the breast and can easily be used to develop the pocket and place the implant. This very straightforward and easily performed technique adds a powerful shaping strategy to the overall operative plan and can lead to excellent results in appropriately selected patients (Figure 6.6 A–G).
Nipple at the fold – Many patients present with one or both nipples at or very near the level of the inframammary fold. It is in these patients that the decision to perform a mastopexy becomes difficult. Both the patient and the surgeon are eager to avoid placing any more scars on the breast than are absolutely necessary and this leads to an understandable reluctance on the part of both to proceed with mastopexy. One surgical maneuver that can be used in these types of patients is to lower the inframammary fold as part of the surgical approach. Although this can result in an overall breast contour that appears somewhat low on the chest wall, the volume provided by the breast implant ends up being properly positioned directly under the NAC. Therefore, as far as the location of both the NAC and the breast mound is concerned, the breast implant is aesthetically positioned. If the degree of lowering of the overall breast position is not excessive, this approach can be used to great advantage. In these cases, it is helpful to use an anatomically shaped gel implant to avoid a contour irregularity in the upper pole of the breast. The more natural upper pole slope of these types of devices helps prevent an unaesthetic step off from becoming visible as could occur with, for instance, a round saline device. Also, because the volume of a shaped cohesive gel implant is more aggressively distributed in the lower pole of the device, there is a more effective filling out of the lower pole of the breast, which tends to lift the NAC position to greater extent than a round implant does (Figure 6.7 A–F). In essence, this strategy involves lowering the implant to fit the breast, which stands in contrast to the usual augmentation mastopexy strategy, which involves raising the breast and NAC to fit the implant. Not all patients are candidates for this approach as there is a limit as to how far the fold can be lowered without creating significant shape or breast position problems. For this reason, many patients who present with the nipple at the level of the fold benefit from the inclusion of a mastopexy done in conjunction with the breast augmentation.
When the nipple is located at the level of the fold and the decision has been made to incorporate a mastopexy with the breast augmentation, this can most often be accomplished with a periareolar approach alone. It can be rationalized that the resulting periareolar scar is only slightly more extensive than would be associated with a traditional periareolar incision alone for breast augmentation where the scar is limited to the lower half of the areolar border, and the improvement in the overall aesthetic appearance of the breast seems worth the extra scar burden. However, the major drawback to the periareolar approach remains the flattened breast contour that can result when the dimensions of the periareolar pattern become too large. Not only does the apex of the breast appear flattened, but the contour of the lower pole appears to bulge, which creates an overly rounded appearance. In selected cases, this bulging can be partially corrected by extending the lower portion of the periareolar pattern slightly inferiorly into the lower pole breast skin. By taking up this redundant skin into the periareolar pattern and combining it with a breast augmentation, the excess lower pole skin is reduced and it may be possible to avoid placing a vertical scar on the breast to correct this contour deformity. However, there is a limit to which this maneuver can be applied without creating a periareolar defect that is too large to be comfortably managed and, if the overall shape of the breast appears distorted or flattened in any way, it may become necessary to add a vertical component to the skin pattern. Typically, depending on the other variables involved for a particular patient, the NAC can be lifted up to 6 cm using a periareolar pattern alone without creating a significant deformity (Figure 6.8 A–C). Beyond 6 cm, a circumvertical skin pattern becomes increasingly necessary to appropriately take up the redundant skin envelope, particularly in the lower pole, and restore an aesthetic breast contour. This is a decision which is easily made at the time of surgery. After placement of the implant, the proposed periareolar pattern can be plicated into position to assess the breast contour. The effect of adding a vertical component can then be assessed. Typically, if the contour of the breast is improved even slightly by adding the vertical component, it is advisable to incorporate this into the pattern. Most patients will be more satisfied with an aesthetic breast contour with a vertical scar than a flatted and distorted result with only a periareolar scar. With adequate preoperative education, most patients can accept the vertical scar as a necessary part of their procedure.
[/not-level-membership-for-plastic-reconstructive-surgery-category]
