[level-membership-for-critical-care-medicine-category]
30 Assessment and management of the airway
Airway Obstruction: A mechanical impediment to the delivery of air to the lungs or to the absorption of oxygen in the lungs.
Auscultate: To listen, most commonly with a stethoscope, for sounds within the body to aid in assessment of the frequency, intensity, duration, and quality of sounds.
Blind Nasotracheal Intubation: Nasotracheal intubation performed without the use of a laryngoscope.
Cricothyrotomy: A puncture through the cricothyroid membrane with a large-bore cricothyrotomy catheter or large-bore intravenous catheter for immediate access to the airway.
Extubate: The removal of an endotracheal or nasotracheal tube from the trachea.
Laryngoscopy: Use of a laryngoscope to view the anatomy of the larynx.
Laryngospasm: An involuntary, spasmodic closure of the vocal cords of the larynx.
Nasopharyngeal Airway: A device, usually a flexible tube, placed through the nares to create an air passage between the nose and the nasopharynx.
Nasotracheal Intubation: Insertion of a breathing tube through the nose into the trachea for facilitation of a patent airway.
Oropharyngeal Airway: A device placed in the oropharynx to conduct air or gases into the trachea; commonly referred to as an oral airway.
Oropharynx: One of three anatomic components of the pharynx; it extends behind the mouth from the soft palate to directly above the hyoid bone. The oropharynx contains the palatine and lingual tonsils and lies between the nasopharynx and the laryngopharynx.
Orotracheal Intubation: The insertion of a breathing tube through the mouth into the trachea for facilitation of a patent airway.
Sellick Maneuver: Also referred to as cricoid pressure, it is the application of external pressure to the cricoid bone before and during laryngoscopy in an effort to compress the esophagus, preventing regurgitation through the esophagus during intubation of the trachea.
Tracheostomy: An opening through the neck into the trachea that provides a conduit for the placement of an indwelling tube to establish a patent airway.
Airway management is a fundamental skill essential to all personnel in perianesthesia nursing. Airway assessment and airway management are crucial for providing safe and effective care to patients after surgery. As these vulnerable patients enter the postanesthesia care unit (PACU), they are extremely susceptible to many events that can compromise ventilation and adequate oxygenation of vital body tissues. Of particular concern are the residual effects of many potent and potentially life-threatening medications given by anesthesia personnel during the intraoperative period. These medications include, but are not limited to, opioids, sedatives, hypnotics, inhalational gases, neuromuscular blockers, insulin, intravenous fluids, and blood products. In addition, predisposing factors have the potential to affect the patency of the postsurgical airway. These factors include histories of obstructive sleep apnea, obesity, snoring, smoking, asthma, and ear, nose, and throat surgery and neck surgery.1 Anticipation and early recognition of respiratory distress coupled with adequate airway assessment and management skills are paramount in assuring the best possible patient outcome.
Airway management
Patients arrive in the PACU still experiencing the depressant effects of anesthesia. They may be obtunded, which renders them unable to maintain their own airway. Loss of important airway reflexes soon leads to airway obstruction. In some instances, the obtunded patient’s tongue and epiglottis fall back on the posterior pharyngeal wall, further occluding the airway. Indications of airway obstruction include increased respiratory effort, retraction of the muscles of respiration, a rocking chest motion, abnormal or absent breath sounds, cyanosis, and signs associated with hypoxemia and hypercarbia.2 Upon recognizing an airway obstruction, the nurse should place the patient supine, position a pillow beneath the head, tilt the head backward, and extend the neck, unless contraindicated. The nurse should then lift the lower jaw upward using moderate pressure (Fig. 30-1). Often this maneuver is all that is necessary for spontaneous respiratory effort to be effective. If the airway obstruction does not clear, the oral cavity should be inspected for foreign material and the oral pharynx should be suctioned if necessary. If large particles are present, the nurse should turn the patient’s head to the side and remove the particles manually.3
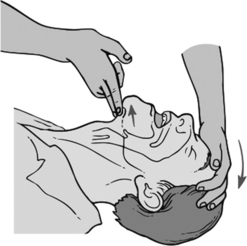
FIG. 30-1 Opening of airway with head-chin-lift maneuver.
(From Lewis S, et al: Medical-surgical nursing: assessment and management of clinical problems, ed 8, St. Louis, 2011, Mosby.)
If spontaneous respiratory effort is absent, positive pressure breathing must be initiated. A bag-mask unit that is connected to an oxygen source should be used. The requirements for a bag-mask unit are addressed in Box 30-1.3 For optimal airway management, the perianesthesia nurse should be positioned behind the patient’s head. The mask should be securely placed over the patient’s mouth and nose with the neck extended. The lower jaw should be lifted at its angle with the other fingers of the hand holding the mask. The thumb of that hand should be placed at the top of the mask. Moderate downward pressure provides compression over the bridge of the nose and reduces air leaks (Fig. 30-2).
BOX 30-1 Requirements for Bag-Mask Unit
• Self-refilling but without sponge rubber inside
• Nonjam valve system at 15 L/min oxygen inlet flow
• Transparent plastic face mask with an air-filled or contoured resilient cuff
• Standard 15-mm inside/22-mm outside diameter fittings
• No pop-off valve, except in pediatric models
• System for delivery of high concentrations of oxygen through an ancillary oxygen outlet at the back of the bag or via an oxygen reservoir
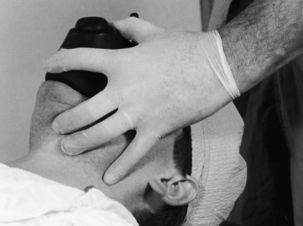
FIG. 30-2 Holding of mask with one hand.
(From Miller R, et al: Miller’s anesthesia, ed 7, Philadelphia, 2010, Churchill Livingstone.)
After the mask is properly placed, ventilation of the patient’s lungs should be attempted. While the perianesthesia nurse is ventilating the lungs, an assistant should auscultate the chest and assess the quality of breath sounds. If an assistant is unavailable, the perianesthesia nurse should check to determine whether the chest rises with inspiration and falls with expiration. This observation is merely a crude estimate of ventilation.4 If breath sounds are not audible during auscultation, or if the crude estimate of ventilation is inconclusive, an appropriately sized oropharyngeal airway should be inserted and bag-valve-mask ventilation should be resumed (Fig. 30-3). The oral airway is noxious to conscious or lightly sedated patients and should be used with extreme caution in this population.5 The untoward consequences associated with inappropriate use of the oral airway include bradycardia, retching, vomiting, and laryngospasm.6

FIG. 30-3 Insertion of oral airway. Airway is inserted with use of tongue blade to displace tongue forward.
(From Sanders MJ: Mosby’s paramedic textbook, ed 3, St. Louis, 2007, Mosby.)
The oropharyngeal airway relieves an airway obstruction by providing a mechanical conduit for air to pass between the base of the tongue and the posterior oropharynx.3 For placement of an oropharyngeal airway, the perianesthesia nurse should first open the patient’s mouth with the right hand and place a tongue blade toward the posterior aspect of the tongue with the left hand. Slight pressure should then be applied to draw the tongue forward. With the oropharyngeal airway held in the right hand, the nurse should slip the airway in over the tongue blade into the oropharynx. The airway should not be twisted or forced into place, and placement should be accomplished quickly with careful avoidance of trauma to the soft tissue and teeth.
In comparison with the oropharyngeal airway, the nasopharyngeal airway is less stimulating to the irritant receptors in the upper airway, especially in awake or lightly sedated patients.7 The nasopharyngeal airway should be lubricated with a local anesthetic water-soluble lubricant, such as 1% lidocaine gel or ointment, and gently passed with the right hand through the nostril along the curvature of the nasopharynx into the oropharynx. The nasopharyngeal airway should never be forced. If resistance is encountered on placement, the other nostril should be considered unless otherwise indicated. When positioned properly, the nasopharyngeal airway should rest between the base of the tongue and the posterior pharyngeal wall.7 This airway should not be used in a patient with a nasal-septal deformity, a leakage of cerebrospinal fluid from the nose, or a coagulation disorder.6
After the oropharyngeal or the nasopharyngeal airways has been placed properly, ventilation should be attempted. Assessment of ventilatory effort should be continuous. With insertion of the oropharyngeal airway, the airway obstruction often clears. In this instance, the patient should be given a breath via the bag-valve-mask unit to assist with the spontaneous ventilatory effort and to help with removal of accumulated carbon dioxide. If apnea persists, positive-pressure breathing should be initiated via bag-mask with adequate tidal volumes. For a normal healthy adult, the perianesthesia nurse should consider tidal volumes of 8 to 12 mL/kg at a rate of 12 to 14 breaths/min as initial settings. For prevention of oxygen delivery into the stomach, pressure on the bag-mask device should not exceed 25 cm H2O.6
Intubation of the trachea
Intubation of the trachea is a proficiency reserved for only those nursing personnel with advanced airway management training and who are properly credentialed to intubate. Nurses should be familiar with their states’ Nurse Practice Acts as well as their hospitals’ policies regarding intubation privileges. The perianesthesia nurse should be familiar with the technique of intubation and capable of performing it quickly and efficiently should it be necessary and if it is in his or her scope of practice to do so. Airway management skills, such as endotracheal intubation, can be developed in the operating room setting under the mentorship of a certified registered nurse anesthetist or a physician anesthesiologist. With the same mentor, the perianesthesia nurse should continue to practice intubation skills on a monthly basis in the operating room. In an airway emergency, the properly trained perianesthesia nurse should intubate the trachea if ventilation of the patient’s lungs is unsuccessful. Endotracheal intubation indicates the placement of an endotracheal tube directly into the trachea. When the endotracheal tube is placed through the mouth, the method is called orotracheal intubation. When the endotracheal tube is placed through the nose, the method is called nasotracheal intubation. Other indications for endotracheal intubation in the PACU include the inability of the patient to protect the airway, prolonged mechanical ventilation, and cardiac and respiratory arrest.8
Equipment for endotracheal intubation
Adult and pediatric intubation equipment should be kept in the PACU at all times. This equipment should be inspected daily and after each use for proper functioning. For a list of the suggested airway management items to be kept in the PACU, see Box 30-2. Table 30-1 shows the recommended sizes for endotracheal tubes given the patient demographic. The formula age / 4 + 4 may be used as a guide when preparing endotracheal tubes for pediatric patients.9 For example, a size 5.0 mm endotracheal tube may be prepared for a 4-year-old child. Because of their importance, the laryngoscope and endotracheal tubes are discussed in detail.
BOX 30-2 Suggested Equipment for PACU Pediatric and Adult Airway Management Carts
Pediatric endotracheal equipment
• No. 2 Macintosh curved blade
• No. 1 and No. 2 Miller straight blades
• Assorted pediatric oral airways
• Pediatric masks of various sizes
• Empty 5-mL syringe for inflation of an endotracheal tube cuff
• Reverse-angle endotracheal tubes
• Endotracheal and oral suction catheters
Adult endotracheal equipment
• Sterile gauze with topical water-soluble lubricant
• Sizes 6-mm through 9-mm cuffed tracheal tubes
• Endotracheal and oral suction catheters
• Tape for securing endotracheal tube
• 10-mL syringe for inflation of the endotracheal tube cuff
• Tongue blades for airway insertion
| GROUP | INTERNAL DIAMETER (mm) |
|---|---|
| Pediatric | |
| Premature | 2.0 |
| Newborn | 2.5 |
| 6 months | 3.5 |
| 1 year | 4.0 |
| 2 years | 4.5 |
| 4 years | 5.0 |
| 6 years | 5.5 |
| 8 years | 6.0 |
| 10 years | 6.0-6.5 |
| 12 years | 6.5-7.0 |
| 14 years | 7.0-7.5 |
| Adult | |
| Female | 7.0-7.5 |
| Male | 7.5-8.0 |
Laryngoscope
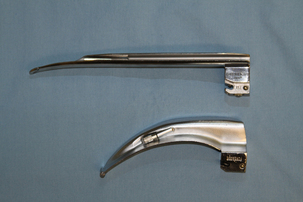
The laryngoscope is used for visualization of the larynx and the anatomic structures in close proximity to the larynx (Fig. 30-4). The laryngoscope has two main parts: the handle and the blade. The handle holds the blade and houses batteries that provide electricity for the light on the side of the blade. The blade consists of three sections: the spatula, the flange, and the tip. The spatula can be straight or curved; it is the long main shaft of the blade. It compresses and moves the soft tissue of the lower jaw for facilitation of direct vision of the larynx.10 The flange, which is on the side of the spatula, deflects tissue that may obstruct the direct vision of the larynx. The tip, at the distal end of the spatula, is either curved or straight and serves to elevate the epiglottis, either directly or indirectly. The blade is attached to the handle at a connection called the hook-on fitting. The perianesthesia nurse is strongly encouraged to practice connecting the blade to the handle before using the laryngoscope in an emergency.
The Macintosh and Miller blades are the most popular types of laryngoscope blades in clinical use. The Macintosh is a curved blade with the flange on the left side for aid in moving the tongue, which enhances visual exposure of the larynx. The Macintosh blade (Fig. 30-5) comes in four sizes: No. 1 for the infant, No. 2 for the child, No. 3 for the medium adult, and No. 4 for the large adult. For most adults, the No. 3 medium adult is the blade of choice. The Miller blade (see Fig. 30-5) has a straight spatula with a slightly curved tip. This blade has five sizes: No. 0 for the premature infant, No. 1 for the infant, No. 2 for the child or small adult, No. 3 for the medium adult, and No. 4 for the large adult. The Miller Nos. 0 and 1 are the blades of choice for premature and full-term infants, whose anatomic structures are more receptive to the use of a straight blade.9 Many anesthesia practitioners use the No. 2 Miller for intubation of adults. The perianesthesia nurse is encouraged to use both the straight and the curved blades if learning the technique. In most instances, the curved blade is easier to use than the straight blade; however, the exposure of the vocal cords might not be as good as with the straight blade.
Endotracheal tube
The cuff is an inflatable sleeve that provides a leak-resistant fit between the tube and the trachea when inflated. It also prevents aspiration and allows positive-pressure ventilation of the lungs. The cuff is permanently attached to the endotracheal tube at the distal end. High-volume or low-volume cuffs are available. The high-volume cuff is also referred to as a low-pressure cuff. The low-volume cuff is also referred to a high-pressure cuff. The arterial pressure in the tracheal wall is approximately 30 torr, and the venous pressure in that area is approximately 20 torr.11 Most clinicians agree that a low-pressure (high-volume) thin-walled cuff should be inflated to a pressure of 17 to 23 torr.4 Local tracheal damage is associated with high cuff pressures, especially after long periods of intubation. Excessive cuff pressure is a primary factor that leads to ulceration, necrosis, and tracheal stenosis. These complications occur because high cuff pressure reduces the blood supply to the tracheal mucosa. For long-term ventilation, the cuff should be long, with a large residual volume (low-pressure).
In an emergency, the perianesthesia nurse should prepare a cuffed endotracheal tube that is one size smaller than the size normally recommended for the patient. In making this choice, many clinicians look at the little finger of the patient; a smaller than normal little finger indicates that the patient has an opening at the vocal cords that is smaller than normal. In addition, a stylet made of malleable metal or plastic should be inserted inside the endotracheal tube to improve its curvature and maintain its shape on insertion. A stylet should never be used with nasotracheal intubation.3 Before the stylet is placed inside the tracheal tube, it must be covered with a water-soluble lubricant to ease its withdrawal from the tube after placement. The end of the stylet should be approximately 3 cm from the distal end of the tracheal tube and should not protrude beyond the bevel because damage to the vocal cords can occur. If a cuffed endotracheal tube will be used, an empty 10-mL syringe should be available for inflation of the cuff.
Oral endotracheal intubation
Before oral endotracheal intubation is attempted, additional equipment should be immediately available and ready for use. Such equipment includes a tonsil suction connected to a working suction device, McGill forceps, 1-inch tape, a 10-mL empty syringe, an anesthesia bag system or bag-mask unit, and an oxygen source. Throughout the procedure, the patient’s oxygen saturation should be monitored continuously with a pulse oximeter.12
Positioning the head
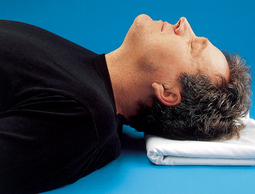
Place a firm 4-inch pillow or blanket under the patient’s occiput. Flex the patient’s head at the neck. This position is called the sniffing position (Fig. 30-6). Extend the patient’s head unless contraindicated.
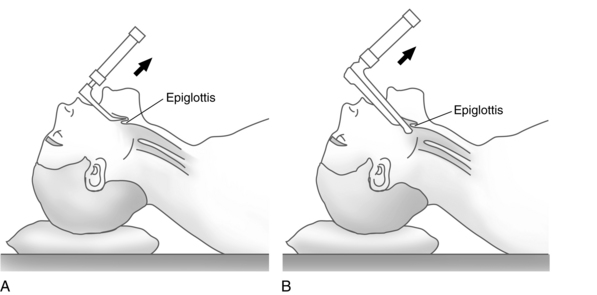
Raising the epiglottis and visualizing the vocal cords
With the epiglottis in direct vision, slip the straight blade just beneath the tip of the epiglottis, gently lift the blade forward and upward at a 45-degree angle, and hold the wrist rigid (Fig. 30-7). If a curved blade is used, slip the tip of the blade between the epiglottis and the base of the tongue (see Fig. 30-7). With the left hand, lift forward and upward on the handle at a 45-degree angle. The epiglottis folds onto the blade, and the vocal cords should then be visible.
Assessing the patient for proper endotracheal tube placement
After the endotracheal tube is placed, correct placement must be verified. Remove the blade with the left hand while holding onto the endotracheal tube with the right hand. Slowly remove the stylet without dislodging the tracheal tube and place the laryngoscope blade in an emesis basin or other container for cleaning. With a 10-mL syringe, inject a volume of air (4 to 6 mL) into the pilot balloon of the endotracheal tube cuff until leakage around the cuff is minimal or stops. A cuff leak is assessed with placement of the bell of the stethoscope over the larynx.5 The end of the endotracheal tube should be connected to a bag-mask unit or an anesthesia bag system and ventilated while an assistant auscultates the chest for breath sounds. Breath sounds should be assessed in all four quadrants, and the stomach should also be auscultated. If no breath sounds are audible or if a gurgling sound is heard over the stomach, deflate the cuff, remove the endotracheal tube, and ventilate the patient’s lungs by mask with 100% oxygen. These signs indicate an esophageal intubation. While ventilating the lungs, consider why the attempt was unsuccessful, review the procedure, and reintubate the patient. If breath sounds are audible on only the right side of the chest, a right endobronchial intubation should be suspected.6 If this condition occurs, withdraw the tube at 1-cm intervals and auscultate until breath sounds are bilateral. Confirmation of endotracheal intubation is also verified with bilateral and symmetric chest rise and the presence of expiratory carbon dioxide. The gold standard for assessing proper placement of an endotracheal tube is the measurement of expired carbon dioxide.6 Expired carbon dioxide can be measured with spectroscopy, often found only in the operating room, or disposable carbon dioxide detectors used specifically for this purpose. Disposable carbon dioxide detectors are placed between the ventilating device and the endotracheal tube. If carbon dioxide is present, indicating proper placement of the endotracheal tube, the pH-sensitive indicator on the device changes color.3 When correct endotracheal tube placement and cuff pressure are confirmed, insert an oral airway and secure the tube with adhesive tape or another appropriate device.
Ventilating the lungs
The adult patient’s lungs should be ventilated approximately 12 to 14 times per minute at a tidal volume of 8 to 12 mL/kg.6 Infants should be ventilated at approximately 26 to 30 times per minute at a volume large enough to raise the chest on inspiration. However, when time permits, a tidal volume of 7 mL/kg should be used. Children’s lungs should be ventilated at a rate of 18 to 24 breaths/min. The tidal volume to be delivered can be determined in the same manner for infants.9
Nasotracheal intubation
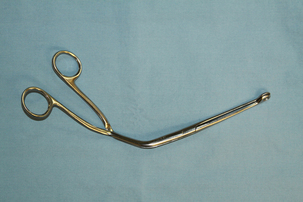
When the endotracheal tube is inserted through the nose, the method is called nasotracheal intubation. When nasotracheal intubation is attempted without the use of a laryngoscope, the method is called a blind nasotracheal intubation. Direct-vision intubation is the insertion of an endotracheal tube with the aid of a laryngoscope. Using the direct-vision method of a nasotracheal intubation, the laryngoscopist can use Magill forceps designed to direct the tip of the endotracheal tube to the glottic opening (Fig. 30-8). A description of the nasal intubation technique can be found in many anesthesia textbooks.
Emergency airway management
At times, the perianesthesia nurse must care for a patient with a documented or undocumented difficult airway. A difficult airway implies an inability to ventilate or intubate under optimal conditions by an airway expert. The perianesthesia nurse must be familiar with methods to manage this life-threatening event. The American Society of Anesthesiologists (ASA) Difficult Airway Algorithm is a helpful tool that can be easily referenced for decision support while managing this complex patient.13 Patients at increased risk of a difficult airway in the PACU include, but are not limited to, those who are obese; patients recovering from ear, nose, and throat surgery or neck surgery; and those who have a history of a difficult airway. Patients at increased risk for difficult ventilation can include those who have a beard, are edentulous, have a history of snoring, and are elderly. A copy of the ASA Difficult Airway Algorithm, or one like it, should be available in the PACU at all times.
Implications for practice
Perianesthesia nurses are in an ideal position to make a significant contribution to patient safety. Through knowledge and application of the ASA Difficult Airway Algorithm, nurses can perform more effectively should a patient require immediate assistance with ventilation and oxygenation in the perioperative period.
Cricothyrotomy is a last attempt at securing an airway; it is instituted only after all other viable options of securing the airway have been exhausted. Cricothyrotomy is a puncture through the cricothyroid membrane with a large-bore cricothyrotomy catheter or large-bore intravenous catheter.14 The perianesthesia nurse should become familiar with locating the cricothyroid membrane, which falls midline between the thyroid cartilage and the cricoid cartilage on the anterior portion of the neck around the level of the sixth cervical vertebra. Before ventilating through this temporary airway, the nurse should confirm correct placement into the trachea, which is evidenced by the aspiration of air through the catheter into an attached syringe. A jet ventilator, which delivers oxygen at high pressure, is ideal for ventilating through this type of airway because the resistance is difficult to overcome. Witnessing the egress of air after each inspiration with the jet ventilator is crucial to avoid excessive accumulation of pressure in the lungs. For this procedure to be successful, the nurse must know where the requisite supplies are located and how the equipment functions. Cricothyrotomy is merely a bridge until a more definitive airway can be established, such as a surgical cricothyrotomy or tracheostomy.
Source: Caplan RA, et al: Practice guidelines for management of the difficult airway: an updated report by the American Society of Anesthesiologists Task Force on Management of the Difficult Airway, Anesthesiology 98(5):1269–1277, 2003.
Perianesthesia care of the intubated patient
Nursing care of the intubated patient involves: (1) frequent auscultation of the chest for bilateral breath sounds to ensure correct placement of the endotracheal tube; (2) frequent suctioning of the oral cavity and, if clinically necessary, suctioning inside the endotracheal tube to remove secretions (delivery of at least five maximal ventilations of 100% oxygen before endotracheal suctioning is performed should be considered); and (3) maintenance of communication between patient and nurse to reduce anxiety.12 The perianesthesia nurse must reassure the patient of continuous observation and monitoring and provide the patient with a means to effectively communicate his or her needs and concerns.
Adverse sequelae after tracheal intubation
Hoarseness and sore throat
On emergence from anesthesia, some patients who have been intubated during surgery may complain of a sore throat. Although the duration of sore throat after intubation is short, it can be a significant discomfort, especially after long surgeries.15 The incidence of sore throat may increase dramatically when the patient’s head is turned frequently or is placed in an abnormal position during surgery.
Laryngospasm
Partial or complete closure of the vocal cords can occur because of increased secretions or as a reflex caused by stimulation of the irritant receptors.6 Assessment reveals reduced or no breath sounds. If partial laryngospasm is present, the patient may make crowing sounds, especially on inspiration. Interventions include the administration of 100% oxygen under positive pressure with a bag-mask unit. If the patient’s lungs cannot be ventilated, the perianesthesia nurse should call for help; intravenous administration of succinylcholine and reintubation of the trachea may be mandated (see Chapter 23).
Airway adjuncts
Laryngeal mask airway–classic
The LMA-Classic was designed to provide an alternative method of airway management that is intermediate in invasiveness between the face mask and the endotracheal tube (ETT; Fig. 30-9). The reusable latex-free device consists of three basic components. The first component is the soft inflatable cuff that, when inserted correctly, conforms to the hypopharynx with its opening facing the patient’s laryngeal opening. At the proximal end, on the inside of the cuff, is a set of aperture bars located at the junction of the cuff and airway tube. The aperture bars allow passage of air into the cuff yet prevent airway anatomy, such as the epiglottis, from entering the tube and blocking the airway passage. The cuff is connected to the second component, an airway tube, which is a large-bore tube with a 15-mm standard connector on the end. The tube acts as a gas conduit for ventilation and, if needed, an endotracheal tube can be passed through the LMA through the vocal cords for intubation. The size of the ETT able to pass through the LMA depends on the size of the LMA inserted. Last, a long thin inflation tube is attached to a pilot balloon that permits inflation and deflation of the LMA cuff.
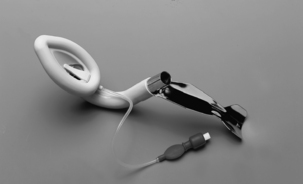
FIG. 30-9 LMA-Classic.
(Used with permission of The Laryngeal Mask Company Limited, United Kingdom.)
The LMA-Classic is used for a variety of patient circumstances during general anesthesia and is commonly reserved for patients who will be spontaneously breathing throughout the surgical procedure. The LMA is often well tolerated in the patient who is lightly anesthetized and semiconscious. The LMA is available in eight sizes and can be used in patients ranging in size from neonates to more than 100 kg. More importantly, the LMA has been used routinely in management of difficult and emergent airway situations. The device has proved successful in providing a bridge or temporary airway in patients in whom a permanent airway has not been obtained. Recently, the LMA has been included in two nationally recognized association protocols: the ASA Difficult Airway Algorithm and the American Heart Association Guidelines for Cardiopulmonary Resuscitation and Emergency Cardiovascular Care for Advanced Cardiac Life Support.3,13
Insertion of the LMA is simple, and most providers find the learning curve to be gentle. After the cuff is deflated so that it is flat and free of wrinkles, the anterior portion of the cuff is lubricated with a water-soluble product. The patient then is placed in the preferred position, the sniffing position, although a neutral position can be used in patients with actual or suspected cervical spine injury. The provider places the dominant index finger at the junction between the cuff and the airway tube while ensuring that the solid black line on the tube faces the patient’s upper lip. The cuff is placed against the patient’s hard palate and is moved back and forth against the palate to effectively lubricate the airway and prevent the cuff from folding over on insertion. Without forcing, the LMA is advanced as far down into the pharynx as possible. The nondominant hand holds the tube, and the dominant finger is withdrawn from the LMA device. Without the nurse holding onto the device, the LMA is inflated following the recommended maximum cuff inflation volumes. Correct placement of the LMA may be observed during inflation; a slight and upward movement of the LMA in the airway and notable swelling in the neck may occur after cuff inflation. Insertion of an oral airway next to the LMA tube may be necessary to prevent occlusion of the airway tube as the patient regains consciousness. Auscultation of bilateral breath sounds and the presence of end-tidal carbon dioxide confirm placement of the LMA device.
Other laryngeal mask airway products
Additional LMA products are available for management of the patient’s airway. The LMA-Unique is the disposable version of the LMA-Classic. This product is often found in prehospital settings and in code carts and other airway management carts. The LMA-Flexible has a mask similar to the LMA-Classic but with a flexible, wire-reinforced tube. The LMA-Flexible is used primarily for procedures that involve the head or neck area. The flexible airway tube permits the airway product to be positioned away from the surgical field while an adequate seal is maintained. The LMA-Fastrach is designed to facilitate endotracheal intubation (Fig. 30-10). The reusable device differs from the classic LMA design primarily in its rigid anatomically curved airway tube that is connected to a metal handle. The handle is used to facilitate one-handed insertion and removal and to adjust the LMA cuff position and the glottic alignment of the ETT. The aperture bars of the classic LMA have been replaced in the LMA-Fastrach with an epiglottic elevating bar. The elevating bar is designed to lift the epiglottis as the ETT passes through the LMA device, which may decrease the risk of arytenoid trauma or esophageal placement.
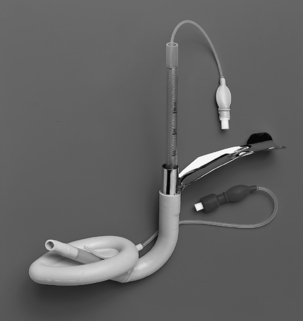
FIG. 30-10 LMA-Fastrach.
(Used with permission of The Laryngeal Mask Company Limited, United Kingdom.)
The LMA products are also contraindicated in patients with upper airway pathology or obstruction. LMA devices are advantageous for use in patients who are professional speakers or singers who need a general anesthetic. Because LMA devices do not come in contact with the vocal cords, voice changes caused by vocal cord trauma are less likely. The devices are especially useful in patients who have a difficult mask airway because of distorted facial anatomy or the presence of a beard. LMA products have gained acceptance in many areas of health care. The ease of insertion combined with a variety of different products has allowed health care professionals to offer a greater degree of airway management and safety for surgical patients.
Summary
Throughout the postoperative period, surgical patients remain vulnerable to the respiratory effects of anesthetic medications and the surgical procedure. The perianesthesia nurse should be vigilant at all times in monitoring the postoperative patient’s respiratory status. It is essential for the nurse to be prepared to respond immediately to airway problems that may arise in the PACU. Knowledge of airway management techniques coupled with early recognition of difficulties are key in optimizing patient outcomes in the perioperative setting.
1. Atlee J. Complications in anesthesia, ed 2. Philadelphia: Saunders; 2007.
2. Dolenska S. Basic science for anaesthetists. London: Cambridge University Press; 2006.
3. Sinz E, et al. American Heart Association advanced cardiac life support provider manual. Dallas: American Heart Association; 2011.
4. Miller RD, Pardo MCJr. Basics of anesthesia, ed 6. New York: Churchill Livingstone; 2011.
5. Nagelhout J, Plaus K. Nurse anesthesia, ed 4. St. Louis: Saunders; 2009.
6. Barash P, et al. Clinical anesthesia, ed 6. Philadelphia: Lippincott Williams & Wilkins; 2009.
7. Miller R, et al. Miller’s anesthesia, ed 7. Philadelphia: Churchill Livingstone; 2009.
8. Alspach J. Core curriculum for critical care nursing, ed 6. Philadelphia: Saunders; 2006.
9. Davis PJ, et al. Smith’s anesthesia for infants and children, ed 8. St. Louis: Mosby; 2011.
10. Hagberg C. Benumof’s airway management, ed 2. St. Louis: Mosby; 2007.
11. Hall J. Guyton & Hall’s textbook of medical physiology, ed 12. Philadelphia: Saunders; 2010.
12. Schick L, Windle PE. Perianesthesia nursing core curriculum: preprocedure, phase I and phase II PACU nursing. ed 2. Philadelphia: Saunders; 2010.
13. Caplan RA, et al. Practice guidelines for management of the difficult airway: an updated report by the American Society of Anesthesiologists Task Force on Management of the Difficult Airway. Anesthesiology.2003;98(5):1269–1277.
14. Orebaugh SL. Atlas of airway management: techniques and tools. Philadelphia: Lippincott Williams & Wilkins; 2007.
15. Biro P, et al. Complaints of sore throat after tracheal intubation: a prospective evaluation. Eur J Anaesthesiol.2005;22(4):307–311.
[/level-membership-for-critical-care-medicine-category][not-level-membership-for-critical-care-medicine-category]
30 Assessment and management of the airway
Airway Obstruction: A mechanical impediment to the delivery of air to the lungs or to the absorption of oxygen in the lungs.
Auscultate: To listen, most commonly with a stethoscope, for sounds within the body to aid in assessment of the frequency, intensity, duration, and quality of sounds.
Blind Nasotracheal Intubation: Nasotracheal intubation performed without the use of a laryngoscope.
Cricothyrotomy: A puncture through the cricothyroid membrane with a large-bore cricothyrotomy catheter or large-bore intravenous catheter for immediate access to the airway.
Extubate: The removal of an endotracheal or nasotracheal tube from the trachea.
Laryngoscopy: Use of a laryngoscope to view the anatomy of the larynx.
Laryngospasm: An involuntary, spasmodic closure of the vocal cords of the larynx.
Nasopharyngeal Airway: A device, usually a flexible tube, placed through the nares to create an air passage between the nose and the nasopharynx.
Nasotracheal Intubation: Insertion of a breathing tube through the nose into the trachea for facilitation of a patent airway.
Oropharyngeal Airway: A device placed in the oropharynx to conduct air or gases into the trachea; commonly referred to as an oral airway.
Oropharynx: One of three anatomic components of the pharynx; it extends behind the mouth from the soft palate to directly above the hyoid bone. The oropharynx contains the palatine and lingual tonsils and lies between the nasopharynx and the laryngopharynx.
Orotracheal Intubation: The insertion of a breathing tube through the mouth into the trachea for facilitation of a patent airway.
Sellick Maneuver: Also referred to as cricoid pressure, it is the application of external pressure to the cricoid bone before and during laryngoscopy in an effort to compress the esophagus, preventing regurgitation through the esophagus during intubation of the trachea.
Tracheostomy: An opening through the neck into the trachea that provides a conduit for the placement of an indwelling tube to establish a patent airway.
Airway management is a fundamental skill essential to all personnel in perianesthesia nursing. Airway assessment and airway management are crucial for providing safe and effective care to patients after surgery. As these vulnerable patients enter the postanesthesia care unit (PACU), they are extremely susceptible to many events that can compromise ventilation and adequate oxygenation of vital body tissues. Of particular concern are the residual effects of many potent and potentially life-threatening medications given by anesthesia personnel during the intraoperative period. These medications include, but are not limited to, opioids, sedatives, hypnotics, inhalational gases, neuromuscular blockers, insulin, intravenous fluids, and blood products. In addition, predisposing factors have the potential to affect the patency of the postsurgical airway. These factors include histories of obstructive sleep apnea, obesity, snoring, smoking, asthma, and ear, nose, and throat surgery and neck surgery.1 Anticipation and early recognition of respiratory distress coupled with adequate airway assessment and management skills are paramount in assuring the best possible patient outcome.
Airway management
Patients arrive in the PACU still experiencing the depressant effects of anesthesia. They may be obtunded, which renders them unable to maintain their own airway. Loss of important airway reflexes soon leads to airway obstruction. In some instances, the obtunded patient’s tongue and epiglottis fall back on the posterior pharyngeal wall, further occluding the airway. Indications of airway obstruction include increased respiratory effort, retraction of the muscles of respiration, a rocking chest motion, abnormal or absent breath sounds, cyanosis, and signs associated with hypoxemia and hypercarbia.2 Upon recognizing an airway obstruction, the nurse should place the patient supine, position a pillow beneath the head, tilt the head backward, and extend the neck, unless contraindicated. The nurse should then lift the lower jaw upward using moderate pressure (Fig. 30-1). Often this maneuver is all that is necessary for spontaneous respiratory effort to be effective. If the airway obstruction does not clear, the oral cavity should be inspected for foreign material and the oral pharynx should be suctioned if necessary. If large particles are present, the nurse should turn the patient’s head to the side and remove the particles manually.3
FIG. 30-1 Opening of airway with head-chin-lift maneuver.
(From Lewis S, et al: Medical-surgical nursing: assessment and management of clinical problems, ed 8, St. Louis, 2011, Mosby.)
If spontaneous respiratory effort is absent, positive pressure breathing must be initiated. A bag-mask unit that is connected to an oxygen source should be used. The requirements for a bag-mask unit are addressed in Box 30-1.3 For optimal airway management, the perianesthesia nurse should be positioned behind the patient’s head. The mask should be securely placed over the patient’s mouth and nose with the neck extended. The lower jaw should be lifted at its angle with the other fingers of the hand holding the mask. The thumb of that hand should be placed at the top of the mask. Moderate downward pressure provides compression over the bridge of the nose and reduces air leaks (Fig. 30-2).
BOX 30-1 Requirements for Bag-Mask Unit
• Self-refilling but without sponge rubber inside
• Nonjam valve system at 15 L/min oxygen inlet flow
• Transparent plastic face mask with an air-filled or contoured resilient cuff
• Standard 15-mm inside/22-mm outside diameter fittings
• No pop-off valve, except in pediatric models
• System for delivery of high concentrations of oxygen through an ancillary oxygen outlet at the back of the bag or via an oxygen reservoir
FIG. 30-2 Holding of mask with one hand.
(From Miller R, et al: Miller’s anesthesia, ed 7, Philadelphia, 2010, Churchill Livingstone.)
After the mask is properly placed, ventilation of the patient’s lungs should be attempted. While the perianesthesia nurse is ventilating the lungs, an assistant should auscultate the chest and assess the quality of breath sounds. If an assistant is unavailable, the perianesthesia nurse should check to determine whether the chest rises with inspiration and falls with expiration. This observation is merely a crude estimate of ventilation.4 If breath sounds are not audible during auscultation, or if the crude estimate of ventilation is inconclusive, an appropriately sized oropharyngeal airway should be inserted and bag-valve-mask ventilation should be resumed (Fig. 30-3). The oral airway is noxious to conscious or lightly sedated patients and should be used with extreme caution in this population.5 The untoward consequences associated with inappropriate use of the oral airway include bradycardia, retching, vomiting, and laryngospasm.6
FIG. 30-3 Insertion of oral airway. Airway is inserted with use of tongue blade to displace tongue forward.
(From Sanders MJ: Mosby’s paramedic textbook, ed 3, St. Louis, 2007, Mosby.)
The oropharyngeal airway relieves an airway obstruction by providing a mechanical conduit for air to pass between the base of the tongue and the posterior oropharynx.3 For placement of an oropharyngeal airway, the perianesthesia nurse should first open the patient’s mouth with the right hand and place a tongue blade toward the posterior aspect of the tongue with the left hand. Slight pressure should then be applied to draw the tongue forward. With the oropharyngeal airway held in the right hand, the nurse should slip the airway in over the tongue blade into the oropharynx. The airway should not be twisted or forced into place, and placement should be accomplished quickly with careful avoidance of trauma to the soft tissue and teeth.
In comparison with the oropharyngeal airway, the nasopharyngeal airway is less stimulating to the irritant receptors in the upper airway, especially in awake or lightly sedated patients.7 The nasopharyngeal airway should be lubricated with a local anesthetic water-soluble lubricant, such as 1% lidocaine gel or ointment, and gently passed with the right hand through the nostril along the curvature of the nasopharynx into the oropharynx. The nasopharyngeal airway should never be forced. If resistance is encountered on placement, the other nostril should be considered unless otherwise indicated. When positioned properly, the nasopharyngeal airway should rest between the base of the tongue and the posterior pharyngeal wall.7 This airway should not be used in a patient with a nasal-septal deformity, a leakage of cerebrospinal fluid from the nose, or a coagulation disorder.6
After the oropharyngeal or the nasopharyngeal airways has been placed properly, ventilation should be attempted. Assessment of ventilatory effort should be continuous. With insertion of the oropharyngeal airway, the airway obstruction often clears. In this instance, the patient should be given a breath via the bag-valve-mask unit to assist with the spontaneous ventilatory effort and to help with removal of accumulated carbon dioxide. If apnea persists, positive-pressure breathing should be initiated via bag-mask with adequate tidal volumes. For a normal healthy adult, the perianesthesia nurse should consider tidal volumes of 8 to 12 mL/kg at a rate of 12 to 14 breaths/min as initial settings. For prevention of oxygen delivery into the stomach, pressure on the bag-mask device should not exceed 25 cm H2O.6
Intubation of the trachea
Intubation of the trachea is a proficiency reserved for only those nursing personnel with advanced airway management training and who are properly credentialed to intubate. Nurses should be familiar with their states’ Nurse Practice Acts as well as their hospitals’ policies regarding intubation privileges. The perianesthesia nurse should be familiar with the technique of intubation and capable of performing it quickly and efficiently should it be necessary and if it is in his or her scope of practice to do so. Airway management skills, such as endotracheal intubation, can be developed in the operating room setting under the mentorship of a certified registered nurse anesthetist or a physician anesthesiologist. With the same mentor, the perianesthesia nurse should continue to practice intubation skills on a monthly basis in the operating room. In an airway emergency, the properly trained perianesthesia nurse should intubate the trachea if ventilation of the patient’s lungs is unsuccessful. Endotracheal intubation indicates the placement of an endotracheal tube directly into the trachea. When the endotracheal tube is placed through the mouth, the method is called orotracheal intubation. When the endotracheal tube is placed through the nose, the method is called nasotracheal intubation. Other indications for endotracheal intubation in the PACU include the inability of the patient to protect the airway, prolonged mechanical ventilation, and cardiac and respiratory arrest.8
Equipment for endotracheal intubation
Adult and pediatric intubation equipment should be kept in the PACU at all times. This equipment should be inspected daily and after each use for proper functioning. For a list of the suggested airway management items to be kept in the PACU, see Box 30-2. Table 30-1 shows the recommended sizes for endotracheal tubes given the patient demographic. The formula age / 4 + 4 may be used as a guide when preparing endotracheal tubes for pediatric patients.9 For example, a size 5.0 mm endotracheal tube may be prepared for a 4-year-old child. Because of their importance, the laryngoscope and endotracheal tubes are discussed in detail.
BOX 30-2 Suggested Equipment for PACU Pediatric and Adult Airway Management Carts
Pediatric endotracheal equipment
• No. 2 Macintosh curved blade
• No. 1 and No. 2 Miller straight blades
• Assorted pediatric oral airways
• Pediatric masks of various sizes
• Empty 5-mL syringe for inflation of an endotracheal tube cuff
• Reverse-angle endotracheal tubes
• Endotracheal and oral suction catheters
Adult endotracheal equipment
• Sterile gauze with topical water-soluble lubricant
• Sizes 6-mm through 9-mm cuffed tracheal tubes
• Endotracheal and oral suction catheters
• Tape for securing endotracheal tube
• 10-mL syringe for inflation of the endotracheal tube cuff
• Tongue blades for airway insertion
| GROUP | INTERNAL DIAMETER (mm) |
|---|---|
| Pediatric | |
| Premature | 2.0 |
| Newborn | 2.5 |
| 6 months | 3.5 |
| 1 year | 4.0 |
| 2 years | 4.5 |
| 4 years | 5.0 |
| 6 years | 5.5 |
| 8 years | 6.0 |
| 10 years | 6.0-6.5 |
| 12 years | |
