[level-membership-for-surgery-category]23
Arteries
Exposure of the major peripheral arteries
Unilateral aortofemoral/iliofemoral bypass
Iliac artery angioplasty and stenting
Femoropopliteal and infrapopliteal saphenous vein bypass
Femoropopliteal and infrapopliteal bypass with prosthetic graft
Repair of abdominal aortic aneurysm – open surgery
Repair of thoracic and thoracoabdominal aneurysms
INTRODUCTION


INDICATIONS FOR OPERATION
1. Injury. This may result from sharp or blunt trauma secondary to assault or road traffic accident. Iatrogenic injuries are becoming more prevalent as a consequence of percutaneous arterial access for diagnostic procedures and treatments such as coronary interventions. Challenging self-induced injuries are also seen as a result of intravenous drug addiction.
2. Aneurysm. This is defined as a pathological, permanent dilatation of an artery. Arterial aneurysms may involve the aorta and/or peripheral arterial system. The three main sites for aneurysms are the abdominal aorta, femoral and popliteal arteries. Most vascular surgeons consider the aorta to be dilated once it is twice its normal diameter; for non-aortic vessels an arterial aneurysm is defined by an increased diameter of 50% or more. Aneurysmal disease secondary to atherosclerosis is responsible for considerable morbidity and mortality in the developed world and the prevalence of abdominal aortic aneurysm is increasing. Vascular disease is rarely localized and it is essential to exclude co-existent pathology in other vessels.
Infected (mycotic) aneurysms are much less common than those caused by degenerative disease. True mycotic aneurysms result from septic emboli of cardiac origin (endocarditis), which may result in multiple aneurysms at different sites. With an ageing population, microbial aneurysmal arteritis is seen more frequently than true mycotic aneurysms; this results from bacterial seeding into diseased arterial intima with subsequent pseudoaneurysm formation, the most common infecting organisms being the Salmonella species, Escherichia coli, Staphylococcus species and Klebsiella pneumoniae. In approximately 25% of cases no organisms are isolated.
3. Occlusion and stenosis. Most arterial occlusions result from thrombosis of a diseased vessel and are part of a generalized atherosclerotic process. Surgical intervention is not always necessary and careful assessment and management of risk factors is required before surgery is planned. Less commonly an artery is blocked by an embolus. Sudden occlusion of an otherwise normal major artery may threaten both the limb and the life of the patient and warrants emergency intervention either by embolectomy or dissolution of the occlusion. The management of acute-on-chronic limb ischaemia is quite different: this develops following thrombotic occlusion of a previously diseased vessel and cannot usually be treated effectively with thrombectomy alone.
The sections which follow assume that the patient has already been critically evaluated and the need for operation established.
GENERAL PRINCIPLES
EQUIPMENT
Instruments
1. Clamps. A good selection of lightweight vascular clamps is essential. The DeBakey Atraugrip range is suitable for large intra-abdominal and thoracic vessels. For smaller vessels (e.g. femoral, popliteal, subclavian, brachial and carotid arteries), miniature clamps of the Castaneda type designed for paediatric cardiac surgery are ideal. The springs should be gentle and not cause intimal damage. A selection of small ‘bulldog’ clamps is useful to control bleeding while minimizing arterial damage. Alternatively, control of small distal vessels can be gained with the use of fine nylon loops or smooth, round-ended atraumatic intraluminal catheters.
2. Dissecting instruments. Handle arteries gently, and only with non-toothed forceps such as the DeBakey Atraugrip range. Following an initial arteriotomy with an appropriate-sized scalpel blade (a No. 15 for infrainguinal surgery), Pott’s scissors angles in two planes are required for lengthening the arterial incisions. For dissection within the vessel, in order to remove adherent thrombus or elevate the plaque in an endarterectomy, Watson-Cheyne and James MacDonald’s dissectors are ideal. Long tunnelling instruments are necessary for conveying grafts between unconnected incisions.
3. Catheters and shunts. Atraumatic (umbilical) catheters ranging from 3F to 6F in size are useful for intraluminal irrigation and to control small vessels. In addition, a range of the Pruitt type catheters are helpful as they have dual ports to irrigate and occlude vessels. These catheters are particularly useful where heavily calcified vessels may preclude the use of traditional vascular clamps, which may cause iatrogenic injury. A similar size range of Fogarty embolectomy catheters is also required. Catheters with a central lumen allow their introduction over a guidewire under fluoroscopic control, to facilitate intra-operative radiological imaging as well as the instillation of anticoagulant solutions, for example heparinized saline or tissue plasminogen activator (tPA).
It is sometimes necessary to employ an intraluminal shunt as a temporary bypass during reconstruction of a vessel, most commonly in carotid endarterectomy or during arterial and venous reconstruction following trauma. There are two basic types: the Javid and Pruitt-Inihara. A Javid shunt is a tapered plastic tube with a bulbous expansion at each end; these allow large and small ring clamps to be applied to the outside of the vessel once the shunt has been introduced into the artery (see Fig. 23.35).
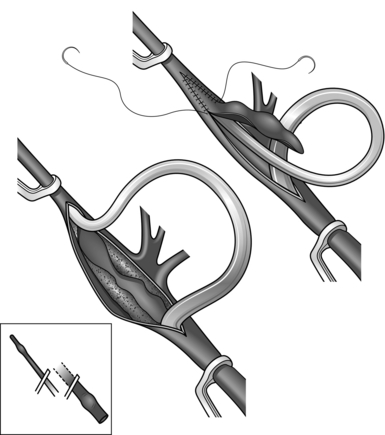
Fig. 23.35 Application of the Javid shunt.
The second type is a modification of the Pruitt catheter described above, with a balloon at each end to retain it in place and to control bleeding, and a side-arm for withdrawal of blood or air from the lumen.
4. Endovascular equipment. For the most part, percutaneous procedures are the remit of the interventionalist and/or the vascular specialist. Procedures may involve both open and endoluminal techniques. It is paramount that procedures involving radiation and contrast medium are undertaken by appropriately trained staff with the requisite certification. For the non-specialist a basic understanding of the guidewires (variety of diameters, thickness, lengths and coatings as well as stiffness, depending on usage, tip shapes and steering capabilities), catheters and sheaths available is all that is required. It is not recommended that surgeons lacking the requisite training and skills undertake these techniques.
5. Sutures, needle-holders and suture clamps. Arteries are always sewn with non-absorbable stitches. There are three types:
 Fine monofilament material such as polypropylene (Prolene) has the advantage of being very smooth and slipping easily through the tissues so that a loose suture can be drawn tight. The material possesses a slight ‘memory’ which can easily be compensated for with familiarity of use. Its main disadvantage is that it has a tendency to fracture with direct handling with metal instruments.


Grafts and stents
1. Dacron. This is an inert polymer that is spun into a thread and then either woven or knitted; it is available as straight or bifurcated grafts measuring from 5 to 40 mm in diameter. In general, the knitted variety with a velour lining is preferred as its porosity leads to better anchoring of the internal ‘neointimal’ surface. The original knitted grafts needed to be carefully preclotted with blood taken from the patient prior to the administration of heparin and in an emergency such as a ruptured aneurysm it was necessary to use a woven graft, which leaks less. However, most vascular surgeons now use knitted grafts that have been presealed with bovine collagen, gelatin or albumin. These grafts have very low porosity at the time of insertion and so do not require preclotting. Dacron grafts perform well when used to bypass large arteries with a high flow-rate (e.g. the aorta and iliac arteries) and are the conduit of choice in these situations provided there is no obvious infection present. In general, Dacron grafts are used above the groin and PTFE below the groin. Dacron grafts are available with external ring supports to prevent compression or kinking.
2. Expanded polytetrafluoroethylene (PTFE) is more expensive than Dacron, but its performance is superior for reconstruction of small arteries. PTFE grafts are again available with an external polypropylene ring support to prevent compression or kinking of the graft. It is essential to use this type of graft when traversing a joint (for example the knee joint). Further developments in this field include preshaped grafts which are manufactured from PTFE to reproduce an anastomosis of ‘ideal’ configuration without the need to form a vein cuff at the distal anastomosis. The long-term patency rate is inferior to that of vein grafts.
3. Biological. The first arterial substitutes tried were arterial or venous allografts or xenografts but these degraded and were abandoned. Grafts from cryopreserved human umbilical veins have been advocated for bypass procedures in the presence of infection; however they are prone to aneurysmal dilatation and therefore their use is limited.
4. Compliant grafts. Prosthetic grafts are stiff and non-compliant and hence their patency is inferior to that of human vessels. Newer grafts developed using nanotechnology have an excellent compliance profile; they are currently in clinical trials and may prove to be a significant new material in the armamentarium of the vascular surgeon.
5. Stents and stent-grafts. Metallic stents made from either stainless steel or nitinol may be used as an adjunct to balloon angioplasty in order to maintain patency of a vessel. There are two types: balloon expandable (e.g. Palmaz stent) and self-expanding (e.g. Wallstent). Stent-grafts are used for endovascular aneurysm repair and are made of polyester/PTFE attached to a metal stent (either stainless steel or nitinol, which is a nickel–titanium alloy). The metal stent provides both radial and longitudinal support, with the aneurysm being excluded from the circulation by the graft material. Endografts are usually self-expanding but balloon expandable devices have been made. All endoluminal stent-grafts rely on being oversized by 10–15% relative to the normal diameter of the artery in which they are placed. One further variable is the proximal fixation method, which usually consists of hooks or barbs which secure the device to the proximal aortic wall to minimize distal migration. Most stent-grafts are either bifurcated aortoiliac or uni-iliac devices and are either one piece or modular in design. If a uni-iliac device is deployed, the contralateral iliac artery has to be occluded, usually with a radiological plug, and a femoro-femoral crossover graft performed to allow perfusion of the contralateral lower limb.
GENERAL CONSIDERATIONS
Antibiotics. Infection is disastrous in vascular surgery and antibiotic cover is essential, particularly if a prosthesis is to be used. The local regimen should be consulted; however, appropriate cover for Staphylococcus should be given intravenously before the first incision is made.
Anticoagulation. Before arteries are clamped systemic anticoagulation should be given, this is calculated at 70 units of heparin per kg (approximately 5000 units of heparin for a standard 70 kg person given intravenously) and is given 2 minutes before arterial clamps are applied. In complex thoracoabdominal open or endovascular procedures the heparin regimen differs and is usually determined and controlled by regular monitoring of the ACCT with appropriate reversal at the end of the procedure.
BASIC TECHNIQUES OF ARTERIAL REPAIR, ANASTOMOSIS AND TRANSLUMINAL ANGIOPLASTY
Arteriotomy


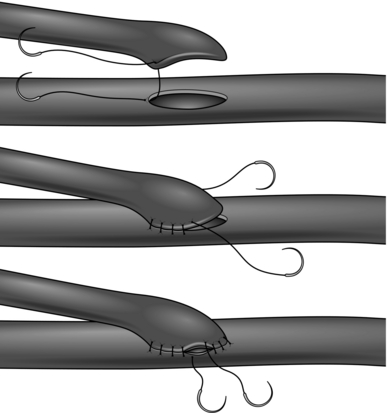
Simple suture
1. Longitudinal arteriotomies in large or medium-sized arteries can usually be closed by simple suture (Fig. 23.1).
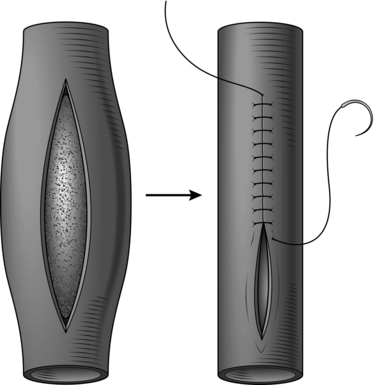
2. Use the finest suture material compatible with the thickness and quality of the arterial wall. The aim is to produce an everted suture line that is leak-proof, with apposition of the intima. This is quite different from bowel anastomosis, where the mucosa is deliberately inverted into the lumen and tension on the sutures is minimal to prevent necrosis of the edges. There is no need to use everting mattress sutures which would narrow the lumen: a simple over-and-over stitch is adequate provided that care is taken to ensure that the intima turns outwards. The needle must pass through all layers of the arterial wall with every stitch. The inner layers must be included to ensure good intimal apposition and to prevent flap dissection, and the outer layers must be included since the main strength of the arterial wall resides in its adventitia. A good surgical assistant who follows your stitches and maintains firm, even tension on the suture at all times is important. Experience is required in order to judge the spacing and size of each bite, and this varies with the size and nature of the artery. Occasionally, for example in aortic aneurysm repair, large irregular stitches may be required but in general evenly spaced regular stitching is best.
Closure with a patch
1. Close vessels of less than 4 mm in diameter with a patch in order to avoid narrowing of the lumen (Fig. 23.2).
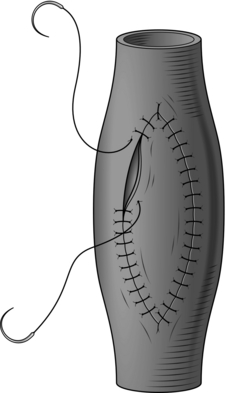
2. This technique may also be used to widen the lumen of a vessel that has become stenosed by disease (e.g. the profunda femoris artery). For small vessels use a patch of autologous vein. Do not use the proximal end of the long saphenous vein for this purpose. Use either a segment taken from the ankle, a tributary or a piece of vein from another site (e.g. an arm vein). For larger vessels prosthetic material (either Dacron or PTFE) or bovine or equine patches may be used. When cutting the patch to shape, always ensure that the ends are rounded rather than tapered to a sharp point: this prevents narrowing of the lumen caused by clustering of sutures at the pointed end. After shaping the patch use a single double-ended stitch commencing close to one end and working around each side. Do not finish the stitching at the apex as knots here are at risk of causing significant narrowing: carry one of the sutures around to the other side to complete the closure and tie the knot a short distance to one side. This technique permits direct vision of the internal suture line and allows final trimming of the patch to be delayed until closure is nearly complete in order to ensure a perfect match for size.
End-to-end anastomosis
1. For small delicate arteries this is accomplished most safely by applying the principles of the triangulation technique originally described by Carrel.1 Join the vessels with a suture placed in the centre of the back or deepest aspect of the anastomosis (Fig. 23.3). Be sure to tie the knot on the outside. Place two more sutures so as to divide the circumference of the vessels equally into three. Any disparity in calibre can be compensated for at this stage. If the vessel is small it is better to insert interrupted sutures to prevent narrowing. Use the three original stay sutures to apply gentle traction and to rotate the vessel and facilitate exposure of each segment of the anastomosis in turn. Complete the back two segments first, leaving the easiest segment at the front to be finished last.
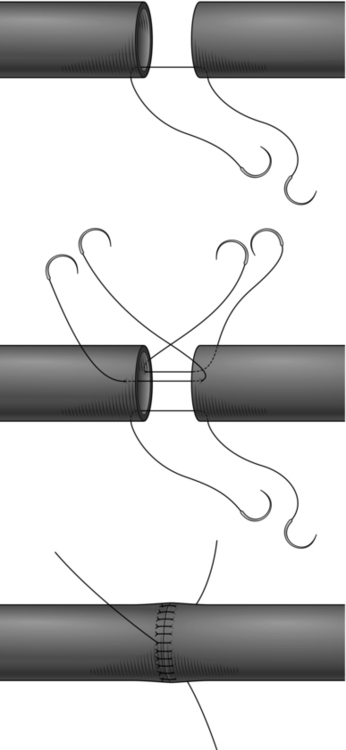
2. For larger vessels it is permissible to use continuous sutures. Cut the ends of the vessels to be joined obliquely then make a short incision longitudinally to create a spatulated shape and reduce the risk of narrowing at the anastomosis.
3. A different technique of end-to-end anastomosis, the inlay technique, is routinely used in open operations for aneurysms (see below).
End-to-side anastomosis
1. This is the standard form of anastomosis for bypass operations. It should be oblique and its length should be 2–2.5 times the diameter of the lumen of the graft. To avoid narrowing the lumen, it is important that the end of the graft is fashioned into a spatulated shape, which on completion of the anastomosis has a smooth curved ‘cobra-head’ appearance rather than an angulated ‘V’ appearance. The end of the anastomosis in the angle with the native vessel is referred to as the ‘heel’ and the other end as the ‘toe’. Place a double-ended stitch at the heel and another at the toe and run sutures along each margin, ending with a knot at the halfway point on each side. Alternatively, start with a double-ended suture at the heel and leave the toe free. Run the suture up each side to beyond the midpoint and then place the suture in a ‘rubber-shod’ clamp to prevent damage. Take a new double-ended suture and start at the toe end and suture around the apex towards the midpoint on either side and then tie to the previously retained threads. This is sometimes known as the ‘four-quadrant technique’ (Fig. 23.4), and has the advantage of keeping the inside of the suture line in view as much as possible.
The ‘toe’ and ‘heel’ are the most crucial points of an end-to-side anastomosis. To ensure that the toe is completed as smoothly as possible, offset the starting point of the ‘toe’, suturing a few millimetres to one side or the other of the apex. In order to further reduce the risk of causing a stricture at this point, some surgeons prefer to place a few interrupted sutures around the toe. It is essential that this end of the anastomosis is performed under direct vision and to ensure that each stitch is placed carefully without causing narrowing.
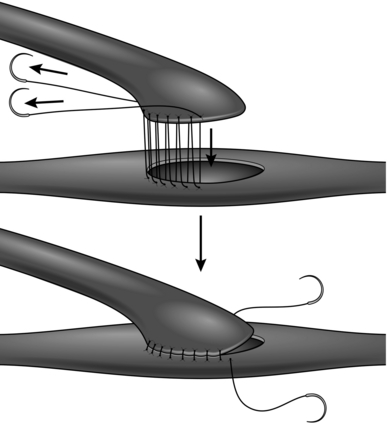
2. A stricture of the heel may be avoided by stenting the vessel with an intraluminal catheter of appropriate size until this portion of the anastomosis is complete. An alternative method is the ‘parachute’ technique (Fig. 23.5). This is particularly useful where access is difficult and good visualization of the anastomosis is impaired, but it is applicable to most situations. With the graft and the recipient artery separated, place a series of running sutures between them at what will become the heel of the anastomosis. These sutures are then pulled tight as the vessels are approximated.


Transluminal angioplasty (Fig. 23.6)
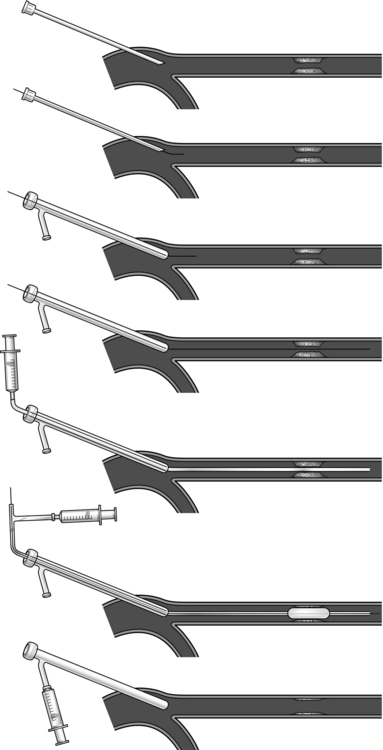
Fig. 23.6 Percutaneous angioplasty.
1. Angioplasty is performed by appropriately trained vascular interventionalists. Most patients with symptoms secondary to peripheral arterial occlusion are now treated with endoluminal techniques rather than open surgery. Prior to offering patients transluminal angioplasty, optimize the patient’s risk factors with best medical therapy, cessation of smoking and a supervised exercise programme.2
It is paramount to consider these patients in the context of a multidisciplinary meeting. Most surgeons and radiologists will not offer angioplasty to patients with calf claudication as the risks may outweigh the benefits. Angioplasty and, if required, placement of a stent may be warranted in patients with buttock claudication with iliac stenosis, as the risks of emboli and consequent limb loss are lower. Patients with critical ischaemia and tissue loss should be considered for an endoluminal approach.
Patients with diabetes mellitus may present with challenging long occlusions extending from superficial femoral to crural vessels in tandem with significant co-morbidites. In these patients an endoluminal approach may be offered in isolation or in conjunction with surgical revascularization: subintimal angioplasty may be preferred to a transluminal approach; however, this should not be undertaken without due consideration and by an experienced endovascular specialist. Specialist equipment such as the ‘Outback’ catheter and ‘Ree kross’ balloon can achieve endoluminal revascularization of long occlusions and may result in a successful outcome in patients with critical limb ischaemia or tissue loss who may not be candidates for traditional surgery.
2. Essential requirements are fluoroscopy with ‘subtraction’ and ‘road-mapping’ functions and skilled radiographic assistance. Use a radiolucent operating table.
3. Ensure all operating theatre staff are properly protected against radiation.
4. In the case of elective procedures ensure that patients are prescribed antiplatelet therapy at least 48 hours prior to the procedure. Minimize contrast-induced renal damage by ensuring adequate rehydration with intravenous fluids pre and post procedure.
5. Consider giving mild sedation and oxygen; ensure regular non-invasive monitoring of blood pressure, heart rate and oxygen saturation. Well-chosen music in the operating room may help patients to relax.
6. Transluminal angioplasty can be undertaken percutaneously or using an open technique to expose the relevant artery. Be aware that this technique may be used concurrently with open arterial reconstruction (for example, iliac angioplasty and femorodistal bypass).
7. If the chosen entry vessel cannot easily be palpated consider using ultrasound to locate the vessel, allowing accurate single puncture entry. An introducer sheath is always used and permits repeated endovascular access with minimal trauma to the vessel. The size of sheath required is determined by the procedure to follow – balloon angioplasty usually requires a 4–7F sheath; stent placement may require a larger catheter. All manufacturers recommend the appropriate sheaths on their instructions and packaging.
8. The common femoral artery is the access vessel for most endovascular procedures and it is important to be familiar with its position with reference to surface landmarks (see Exposure of the common femoral artery, below).
9. For percutaneous access, clean the skin and apply drapes as for an open procedure. Inject a small amount of local anaesthetic at the chosen puncture site and make a nick in the skin with a no. 11 scalpel blade. While palpating the common femoral artery with the fingers of one hand introduce a Potts-Cournand or similar needle. These needles have a central trocar that allows blood to ‘flashback’ into a chamber on the hub when the lumen of the vessel is entered. Angle the needle to facilitate access of the guide wire in the direction required and to avoid puncture of the back wall or creation of a false lumen and dissection. For infrainguinal procedures, puncture the artery just distal to the inguinal ligament, allowing room to manoeuvre the tip of the needle within the lumen of the common femoral artery whilst negotiating the guide wire into the superficial femoral artery. Note that the inguinal ligament lies approximately 2 cm proximal to the groin crease. Care should be taken to identify the landmarks accurately in all patients: do not be misled in obese patients whose groin crease will be significantly lower than the inguinal ligament. For access to the upstream iliac arteries the puncture site may be a little lower, but take care to avoid unintended puncture of the superficial or profunda femoris arteries. When no pulse is palpable or percutaneous access is difficult use an ultrasound-guided arterial puncture technique. Alternatively, ‘cut-down’ onto the common femoral artery under local infiltration anaesthesia.
10. When ‘flashback’ occurs you should observe strong pulsatile flow from the needle. Unless there is severe inflow obstruction, the absence of pulsatile flow from the needle indicates that the tip is not properly positioned within the lumen. Do not attempt to advance a guide wire, but re-position the needle to gain access to the arterial lumen.
11. When satisfied with the position of the needle, advance a short J guide-wire down the trocar (normally a suitable wire is packaged as a part of the introducer set) and check with fluoroscopy. A guide-wire that is within the lumen passes without resistance: if resistance is encountered do not apply force as this is likely to result in dissection of the subintimal plane. Stop, withdraw the guide-wire and readjust the position of the needle. For downstream procedures the guide-wire must be manipulated into the superficial femoral artery by adjusting the angle of the needle. This requires that stiff metallic rather than soft plastic or Silastic needles are used. Simple fluoroscopy without contrast is usually sufficient to guide this manoeuvre, but if persistent difficulty is encountered obtain a road-map by injection of contrast through the needle. Never pass a hydrophilic guide-wire through a metallic needle: the hydrophilic coating will be stripped off by the needle when the wire is withdrawn, with potentially dire consequences.
12. If angioplasty is to be performed through the exposed common femoral artery (see Exposure of the common femoral artery, below), do not clamp and open the artery. Place a purse-string suture of 5/0 polypropylene (Prolene) around the artery before puncturing the vessel directly with a Potts-Cournand needle. Then proceed in the same way as for a percutaneous procedure.
13. When you are satisfied that the guide-wire is in place, withdraw the needle and insert the introducer sheath with its dilator. Remove the dilator. Flush the sheath with heparinized saline through the side channel, which is fitted with a tap. This channel can also be used for injection of contrast medium in order to obtain an angiographic image of the lesion.
14. Withdraw the short guide-wire and replace it with the wire chosen to navigate the lesion to be treated. The size of guide-wire required is indicated on the packaging of the balloon catheter – most often 0.035 inches in diameter for peripheral arterial procedures. Introduce it through the sheath floppy end first, using the small plastic introducer cone that comes with the wire to penetrate the valve. If difficulty is encountered in crossing the lesion use a hydrophilic guide-wire. Always wipe the guide-wire with a swab soaked in heparinized saline after removing a catheter as dried blood on the surface obstructs the smooth passage of a subsequent catheter.
15. If navigation of the guide-wire has been difficult, pass an appropriately sized catheter across the lesion and obtain an angiogram to ensure that the natural lumen has been entered beyond the lesion before passing a balloon catheter. If a subintimal space has been entered consider abandoning the procedure.
16. For most applications select a balloon catheter of 4 cm in length. For accurate sizing of the balloon obtain an angiogram using a measuring catheter with 1 cm markings. Match the size of the balloon to the diameter of the unstenosed artery. However, this degree of precision is not normally necessary: for lesions in the superficial femoral artery balloons with a diameter of 6 mm, and for iliac lesions 8 mm, are usually appropriate. Be cautious when selecting catheters for female patients with small arteries.
17. Use a hand-operated syringe driver to inflate the balloon to a pressure of 5–10 atmospheres with a 50/50 mixture of contrast medium and saline. Observe the shape of the balloon as it inflates; ‘popping’ of the ‘waist’ caused by the stenosis indicates that the plaque has given way and, usually, a satisfactory outcome. It is not necessary to maintain inflation of the balloon for more than a few seconds but a second inflation helps smooth the irregularities of the flow surface that result from splitting and fissuring of the plaque.
18. Obtain a completion angiogram to assess the final result. Remember that some irregularity of the flow surface at the site of angioplasty is usual. This tends to remodel naturally within a few weeks. Also, dilatation may continue to occur at the angioplasty site for a short time. If a significant stenosis remains, or if a large intimal flap has developed following iliac artery angioplasty, consider the use of an intraluminal stent. Stents do not perform well in arteries below the groin and should only be used in exceptional circumstances.
19. Following withdrawal of the introducer sheath apply digital pressure to the puncture site for a minimum of 10 minutes, and longer if needed, before applying a dressing and moving the patient. Give clear instructions to the nursing staff regarding duration of bed rest prior to mobilization to minimize haematoma and pseudoaneurysm formation. If the artery has been exposed, tie the purse-string suture to secure haemostasis or apply clamps and proceed with the open procedure.
20. Unless contraindicated, prescribe subcutaneous heparin or low-molecular-weight heparin postoperatively. Monitor peripheral perfusion and the groin for signs of haematoma or formation of a false aneurysm. Ensure post procedure antiplatelet therapy is continued indefinitely.
EXPOSURE OF THE MAJOR PERIPHERAL ARTERIES
Common femoral artery
1. The common femoral artery needs to be exposed more frequently than any other vessel in the body and it is important to know how to do this swiftly and correctly (Fig. 23.7).
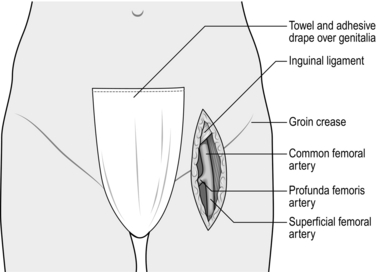
Fig. 23.7 Exposure of the common femoral artery.
KEY POINTS
Anatomy


2. The position of the groin crease does not correspond to that of the inguinal ligament, but lies distal to it by 2–3 cm.
3. The midpoint of the incision should roughly correspond to the groin crease. Inexperienced surgeons tend to make the incision too low. When limited exposure of the common femoral artery is required (e.g. access for an endovascular intervention), it is permissible to use a transverse incision, which heals better and less painfully than a vertical incision crossing the groin crease. Position a transverse incision two fingers breadth above the groin crease.
4. Deepen the incision through the subcutaneous fat, taking care not to cut across any lymph nodes. Expose the femoral sheath and incise it longitudinally to expose the artery. The femoral vein lies medially and must be protected, but the femoral nerve on the lateral side lies in a deeper plane and is not usually at risk. However, do not be over zealous with positioning of a self-retainer, as the nerve can easily be stretched and a neuropraxia ensues.
5. Dissect a length of the common femoral artery and without undue force pass a Lahey clamp around the back of the artery in order to draw through a plastic sling. Gently lift the artery with the sling and identify its branches and its bifurcation into the superficial and profunda femoral arteries. Isolate these similarly with slings. Take care to avoid damage to the profunda vein, a tributary of which always passes anterior to the main stem of the profunda artery. For a more extensive exposure of the profunda femoris artery divide this vein between ties.
6. If exposure of the greater saphenous vein is required at the same operation make a ‘lazy-S’ incision, commencing vertically over the artery at the inguinal ligament and then deviating medially over the vein in the upper thigh.
7. Transection of the many lymphatics in the femoral triangle may cause a troublesome lymphocele or lymphatic fistula after the operation. There is no sure way of avoiding this, but approach the artery from its lateral rather than its medial side and gently reflect any lymph nodes and visible lymph vessels off the femoral sheath with minimal damage. If there are any obvious lymph leaks at the time of surgery suture the lymphatic channels closed with 6/0 Prolene.
Popliteal artery
1. The popliteal artery can be exposed above and below the knee by medial approaches. Prior to embarking on this surgery decide which part of the artery needs to be accessed and consider how the patient should be positioned on the operating table. The most inaccessible part lies directly behind the joint line and if its exposure at this level is required a posterior approach is essential (see paragraph 4 below).
2. To expose the supragenicular part of the artery the patient is placed supine with adequate support to flex the lower thigh and knee; a longitudinal incision is then made over the medial aspect of the lower thigh (Fig. 23.8). If you intend to perform a bypass with a saphenous vein graft, mark the vein before surgery; otherwise the incision should correspond with the anterior border of the sartorius muscle – the tendency is to place this incision too anteriorly. Deepen the incision to expose the sartorius muscle, which is retracted posteriorly to reveal the neurovascular bundle enveloped by the popliteal fat pad. The artery lies on the bone and the nerve lies some distance away with the vein in between. The popliteal artery is always surrounded by a plexus of veins, which must be carefully separated and divided in order to avoid troublesome bleeding.

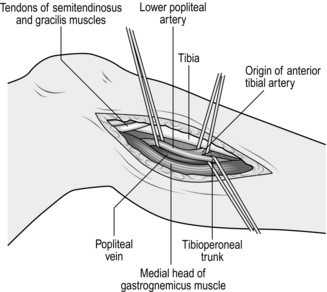
3. In order to expose the infrageniculate popliteal artery, make an incision on the medial aspect of the calf along the border of the gastrocnemius muscle (Fig. 23.9). To optimize exposure to this area the tendons of sartorius, semitendinosus and gracilis can be divided. If the greater saphenous vein is to be harvested identify the vein first along an appropriate length before continuing the dissection between the medial head of gastrocnemius and the tibia to reveal the neurovascular bundle. The vein is exposed first and this has to be lifted carefully away to give access to the artery. By dividing the soleus muscle along its attachment to the medial border of the tibia it is possible to expose the origin of the anterior tibial artery and the whole extent of the tibioperoneal trunk through this incision. If necessary, completely divide the medial head of gastrocnemius; this results in little functional disability.
4. If exposure of the whole length of the popliteal artery is required it is better to use a posterior approach. With the patient placed prone, make a ‘lazy-S’ incision (medial proximally to lateral distally) through the popliteal fossa. Deepen the incision through the popliteal fascia and fat pad and define the diamond between the hamstring muscles above and the two heads of gastrocnemius below; then follow the lesser saphenous vein into the neurovascular bundle. In a posterior approach the popliteal artery will be superficial, with the vein and nerve lying deeper.
Tibial arteries
1. The proximal end of the anterior tibial artery is relatively inaccessible, but the remainder of this vessel and its terminal dorsalis pedis branch can be readily exposed through lateral or anterior incisions made directly over the vessels. Retract the tibialis anterior and extensor digitorum longus muscles anteriorly to reveal the artery lying on the interosseous membrane (Fig. 23.10). If exposure of the proximal anterior tibial artery is required this can be achieved very effectively by excision of the upper part of the fibula with disarticulation of the proximal tibiofibular joint. The common peroneal nerve, which winds around the neck of the fibula, must be protected carefully. This approach destroys the lateral ligament of the knee and, while this is well tolerated in elderly, relatively immobile patients, it is best avoided in younger and fitter individuals.
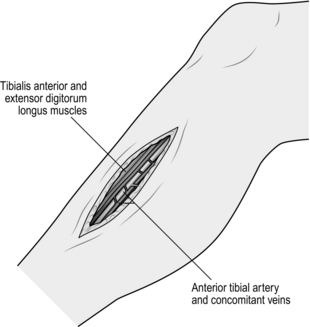
Fig. 23.10 Exposure of the anterior tibial artery.
2. The peroneal artery can also be exposed through a lateral incision following removal of a segment of fibula. The peroneal artery lies directly deep to the fibula: it is accompanied only by vein and has no neurovascular bundle. Take care to divide and tie the veins which interdigitate around the artery. Do not be tempted to use diathermy to gain haemostasis. In most cases, however, it is preferable to expose this vessel by a medial approach (see below).
3. To expose the posterior tibial artery, make a longitudinal incision on the medial aspect of the calf centred over the junction between gastrocnemius muscle and its Achilles tendon. Incise the deep fascia and develop the plane between the gastrocnemius and soleus muscles to reveal the posterior tibial vessels and nerve lying on the surface of soleus beneath a layer of fascia (Fig. 23.11). Alternatively, the posterior tibial artery and its terminal lateral plantar branch may be exposed by an incision made directly over it, as it lies behind the medial malleolus where it is covered only by deep fascia, and then following it into the foot.
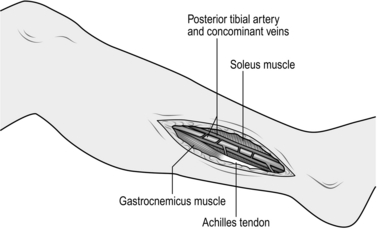
Fig. 23.11 Exposure of the posterior tibial artery.
4. To expose the peroneal artery by a medial approach, split the lateral fibres of soleus and flexor hallucis longus muscles. This reveals the artery surrounded by its concomitant veins in the depths of the wound.
Subclavian artery
1. Make a transverse incision 1 cm above the medial third of the clavicle; divide the platysma muscle in the same plane (Fig. 23.12). This exposes the clavicular head of the sternocleidomastoid muscle, which is divided, and also a fat pad containing the scalene lymph nodes. Dissect and retract this fat pad superiorly off the surface of the scalenus anterior muscle. Identify the phrenic nerve, which passes obliquely from lateral to medial across the front of this muscle to lie along the medial border of its tendon and usually separated from it by a few millimetres. Pass the blade of a MacDonald’s dissector behind the tendon of scalenus anterior muscle, in such a way as to protect the phrenic nerve, and divide the tendon by cutting down on to the dissector with a pointed scalpel blade. Retraction of the muscle superiorly exposes the subclavian artery with its vertebral, internal mammary and thyrocervical branches. The first thoracic nerve root and the lower trunk of the brachial plexus cross the first rib above and posterolateral to the artery. The subclavian vein is deep to the clavicle and is not normally seen through this approach. On the left side the thoracic duct enters the confluence of the internal jugular and subclavian veins. If it is damaged, ligate it to prevent the development of a troublesome postoperative chylous fistula.
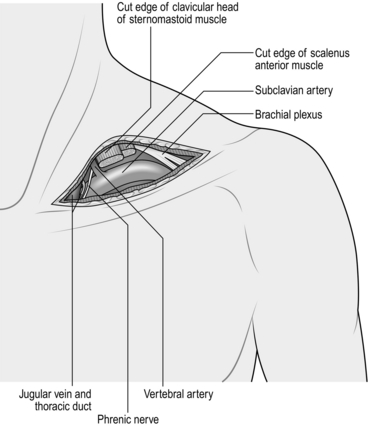
Fig. 23.12 Exposure of the subclavian artery.
2. Extensive exposure of the subclavian artery can be obtained by excision of the inner two-thirds of the clavicle, although this is rarely necessary. The two most common operations on the subclavian artery are carotid-subclavian anastomosis or bypass for a proximal occlusion (subclavian steal syndrome) and repair of a subclavian aneurysm (this is usually a misnomer since most so-called subclavian aneurysms involve the first part of the axillary artery). The former is usually completed without difficulty through the approach described above, and the latter is most conveniently accomplished with separate incisions above and below the clavicle to expose the subclavian and axillary arteries (see below).
3. Operations that involve direct exposure of the origin of the subclavian artery have been largely superseded by extrathoracic bypass procedures (carotid-subclavian and subclavian-subclavian bypass). On the rare occasions when direct exposure is considered essential this is best achieved by splitting the manubrium and upper sternum.
Make a right-angled incision with a horizontal component above the medial third of the clavicle and a vertical component in the midline over the manubrium and upper sternum. Complete the supraclavicular exposure of the artery as described above. Deepen the vertical incision through the subcutaneous tissue and periosteum. The periosteum is extremely vascular and diathermy is required to seal the small arteries. Commencing at the suprasternal notch, open a retrosternal plane by finger dissection, and then, with a sternal chisel and hammer or a properly protected reciprocating saw, divide the manubrium and sternum in the midline and spread the edges with a self-retaining retractor. Dissection of the thymus and anterior mediastinal fat is necessary to expose the arch of the aorta and the origins of the supra-aortic vessels. The innominate vein is stretched across the upper part of the incision and must be protected. It is not usually necessary to divide the sternal tendon of the sternocleidomastoid muscle. Close with peristernal wire or strong nylon sutures, taking care to avoid damage to the internal mammary and intercostal arteries when inserting them.
The origin of the left subclavian artery, which arises far back on the aortic arch, can also be exposed through a posterolateral thoracotomy through the bed of the second or third ribs.
AXILLARY AND BRACHIAL ARTERIES
1. Access to the axillary artery is most often required for axillofemoral bypass and occasionally for subclavian aneurysm repair (see above). For an axillofemoral bypass procedure consider placing the arm in abduction to facilitate estimating the length of the graft required. Make a horizontal incision 1 cm below the lateral third of the clavicle, and split the fibres of pectoralis major muscle (Fig. 23.13). This exposes the infraclavicular fat pad, beneath which lies the pectoralis minor muscle. Divide the tendon of this muscle close to its origin at the tip of the acromion process. Some branches of the acromiothoracic vessels may need to be divided. Find the axillary artery surrounded by the cords of the brachial plexus, which must be carefully protected. The axillary artery can be a friable vessel and care should be taken when slings and clamps are applied. Care should also be taken when performing an anastomosis that the back wall of the artery is not inadvertently incorporated in to the suture line.
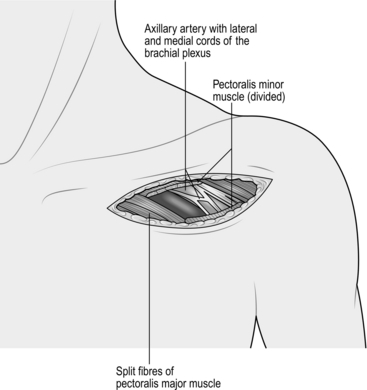
Fig. 23.13 Exposure of the axillary artery.
2. The proximal brachial artery is found in the groove between biceps and brachialis muscles on the inner aspect of the upper arm (Fig. 23.14). At this point it is still enclosed by cords of the brachial plexus joining to form the median nerve, which crosses it obliquely from the lateral to the medial side. These structures must be carefully separated from it.
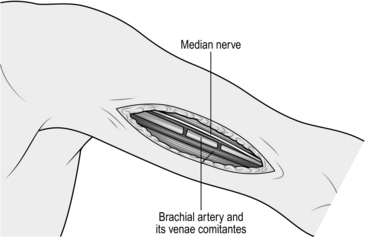
Fig. 23.14 Exposure of the proximal brachial artery.
3. It is more frequently necessary to expose the bifurcation of the brachial artery in order, for example, to perform a brachial embolectomy. To do so, make a ‘lazy-S’ incision (medially proximally and laterally distally) in the antecubital fossa, followed by division of the biceps aponeurosis (Fig. 23.15). Distal extension of this incision permits the radial, ulnar and anterior interosseous arteries to be followed into the forearm.
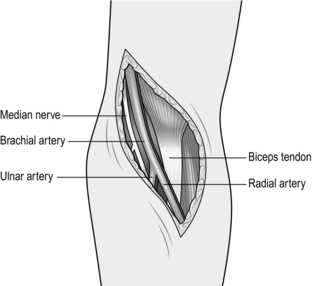
Fig. 23.15 Exposure of the distal brachial artery.
TYPES OF OPERATION
1. Direct repair, interposition grafting and patch grafting for arterial trauma
2. Surgical embolectomy or thrombectomy
3. Thrombolytic therapy, percutaneous suction and mechanical embolectomy
4. Endarterectomy, which, with the exception of carotid endarterectomy, has now been largely supplanted by bypass surgery as the treatment of choice for occlusive disease
6. Percutaneous and intra-operative (adjunctive) dilatation angioplasty and endovascular stenting for occlusive arterial disease. The basic technique involves the use of a guide-wire and a balloon dilatation catheter.1 Devices exist to assist recanalization of resistant occlusions, including lasers, rotational guide-wires, high-frequency electrocoagulation ablators and various types of atherectomy catheters. None of these has yet found a major role in the routine management of vascular disease, and lasers in particular, despite increasing technological sophistication, have so far proved disappointing. The use of balloon catheters (some with drug elution) has, however, made a major impact in recent years and in vascular centres the majority of patients with occlusive disease are treated by these methods
7. Inlay grafting for aneurysms
8. Endovascular stent-graft repair of aortic and peripheral aneurysms.
QUALITY CONTROL
1. Completion angiography. This continues to be the ‘gold-standard’ method. State of the art fluoroscopy is ideal but for infrainguinal reconstructions ‘on-table’ angiography is performed very easily using the simple X-ray equipment available in all standard operating theatres. Angiography allows graft and anastomotic assessment.
Place an X-ray plate wrapped within a sterile Mayo tray cover directly beneath the limb, and take an exposure while injecting 15–20 ml of contrast medium into the proximal end of the graft. Apply a clamp proximal to the injection site during exposure to obviate the necessity for accurate timing of the exposure. Observe proper radiation protection measures during this procedure and further reduce the radiation dose to yourself by interposing a long length of connecting catheter (for example an arterial line) between the syringe and the injection site.
For more proximal reconstructions, special X-ray equipment is required but other methods of quality control may be effective.
2. Intra-operative Doppler flowmetry. Intra-operative Doppler probes give an indication of flow and some can also give a waveform tracing which is helpful in ascertaining stenoses. It is also possible to use a simple hand-held Doppler probe placed in a finger of a sterile surgical glove with gel to assess flow.
3. Angioscopy. Fibreoptic endoscopes of little more than 1 mm in diameter are now available. Inserted at one end, such instruments will allow direct inspection of the interior of a graft and anastomosis. However, such instruments traumatize the flow surface and are expensive and for these reasons have been largely abandoned.
4. A satisfactory arterial reconstruction for occlusive disease restores either normal or improved blood flow to the distal circulation, and confirmation that this has occurred is a minimal requirement. The return of palpable pulses to vessels downstream of the reconstruction, for example in the pedal arteries, is a valuable sign and there are a number of simple and inexpensive devices available to supplement clinical assessment, including strain gauge and photoplethysmographs (digital pulse monitors), toe temperature probes, flat and hand-held Dopplers and pulse oximeters.
ARTERIAL OPERATIONS


REPAIR OF ARTERIAL INJURY
Appraise
1. Arterial injury is manifest by:


2. Suspicion of arterial injury is an indication for urgent angiography (CT angiography or digital subtraction angiography), except for haemorrhage, in which case proceed directly to surgical exploration unless you are in a centre which can offer radiological options such as embolization.
3. Angiographic discontinuity of a major limb vessel always requires urgent surgical exploration. Occlusion of a single tibial or forearm vessel is usually tolerated without ischaemic damage and does not as a rule require reconstruction.
4. Beware the concept of ‘arterial spasm’. It is true that the smooth muscle of arteries contracts protectively in response to injury so that an important vessel may appear quite small both angiographically and on direct inspection. However, luminal discontinuity is always due to a mechanical fault and demands surgical repair. Never attempt to treat such lesions with vasodilator drugs.
5. In the case of multiple injuries, co-operate closely with colleagues of other specialities in planning surgical treatment. Repair of damaged major arteries always takes precedence over orthopaedic fixation of fractures. However, there is a danger that vascular anastomoses may disrupted during subsequent manipulation of fractures. In these circumstances it may be advisable to restore vascular continuity initially by inserting a temporary intraluminal plastic shunt, and completing the repair once the fractures have been stabilized, when the length of the arterial defect can be accurately measured. Always check for venous disruption as well as arterial damage.
6. Run-in. This is not usually a problem in arterial trauma.
7. Run-off. There is a risk that blood clot may form and occlude vessels distal to the site of injury. The procedure must include measures to deal with this problem (see below), otherwise the run-off vessels are usually normal.
8. Conduit. In the case of limb injuries this is either the original artery repaired directly or an interposition graft of autologous vein. Since only short segments are required, problems are rarely encountered in finding a vein of suitable quality and calibre. If there has been extensive injury to both artery and major veins consider harvesting a segment of vein from the opposite leg or upper limb.
9. For closed injuries to major arteries (e.g. iliac, subclavian) with tearing or rupture of the vessel consider endovascular repair with a covered stent in hospitals with facilities for this type of procedure (see Endovascular repair of aortic and peripheral aneurysms, below).
Access
1. In the case of limb injury, prepare and drape the limb so as to permit direct inspection of skin perfusion and palpation of pulses distal to the site of injury.
2. Consider also the possibility that a segment of healthy undamaged vein of suitable size may need to be harvested for construction of a graft.
3. First, gain proximal control of the artery and then gain distal control. This requires a skin incision that extends well beyond the confines of the injury. Make this incision along the axis of the injured vessel and directly over it.
4. Do not enter the haematoma until the vessel has been dissected and controlled by passing rubber slings around it proximally and distally.
Assess
1. On entering the haematoma there may be brisk fresh bleeding, in which case apply clamps at the proximal and distal control points already prepared.
2. If there is complete disruption of the artery find the ends and apply soft clamps. It is unlikely that they will be actively bleeding at the time of exploration.
3. The traumatized vessel will be damaged some distance proximally and distally from the principal site of injury, therefore trim each end back a few millimetres at a time until normal undamaged intima is seen.
4. Assess the length of the defect. Attempt direct end-to-end anastomosis only if there will be no tension. In most cases it is more prudent to insert an interposition graft of autologous vein, even if this is only a centimetre in length.
5. If the artery is in continuity there may be bruising of the adventitia at the site of injury and absence of downstream pulsation. These are sure signs of internal disruption. The intima and inner layers of the media split transversely and the edges roll back to form a flap, which obstructs flow, causing secondary thrombosis. It is never sufficient, therefore, to simply inspect the outer surface of such a vessel and it is totally unacceptable to treat such lesions by topical application of vasodilator substances. Excise the damaged segment completely, cutting back each end of the artery as before to find healthy intima.
6. Active arterial bleeding usually signifies incomplete disruption or a lateral wall defect that inhibits protective retraction and constriction of the vessel.
Action
1. Before commencing repair of the artery check for adequate inflow and backflow. If either is inadequate pass a Fogarty catheter distally and proximally to withdraw any propagated clot and then instil heparinized saline.
2. If there are associated orthopaedic injuries consider inserting a temporary intraluminal shunt (see above).
3. The adventitia tends to prolapse over the end of a normal artery that has been cut across. Trim this back to prevent it intruding inside the anastomosis.
4. If direct end-to-end anastomosis is possible, accomplish it by the triangulation technique (see Basic techniques) and in most cases employ interrupted sutures in preference to continuous.
5. If the defect is too great to permit direct repair, harvest a segment of vein of appropriate size. Remember to reverse the vein to avoid obstruction to blood flow by competent valves. Complete the proximal anastomosis first, in end-to-end fashion, using the triangulation technique with interrupted sutures for small or inaccessible vessels or the oblique overlap technique for larger vessels. Apply a clamp to the distal end of the graft and allow arterial pressure to distend it in order to determine the optimum length to avoid both excessive tension and kinking. Finally, complete the distal anastomosis.
6. A small puncture or lateral wall defect, as may result from iatrogenic injury following arterial access for investigation or treatment, may be repaired by direct suture or by closing the arteriotomy with a patch.
Closure
1. Where possible, effect primary closure of the incision with suction drainage.
2. In the case of blast injuries and other causes of extensive skin and soft-tissue damage, observe the general principles of wound management. Where primary closure is either not possible or inadvisable, always cover the arterial repair with healthy viable tissue, which in practice usually means a muscle flap.
Aftercare
1. Except in cases where continued bleeding is a serious problem, maintain anticoagulation with heparin for several days.
2. Arrange regular half-hourly observation of the distal circulation during the immediate postoperative period and be prepared to re-explore immediately in the event of recurrent occlusion.
Complications
1. Early thrombosis or bleeding at the site of the repair demands immediate re-exploration and re-assessment.
2. A false aneurysm may result from a contained anastomotic leak and this also requires early re-exploration and repair.
3. The risk of associated deep venous thrombosis is high, so take appropriate preventative measures.
4. Repair of arterial injuries in young, healthy people is usually very successful and long-term disability associated with ischaemia is rare.
SURGICAL EMBOLECTOMY
Appraise
1. Embolic occlusion of a major artery results in acute ischaemia, which, if not relieved quickly, may progress to irreversible tissue damage and limb loss.
2. The differential diagnosis is from acute thrombosis occurring within an already diseased artery. Differentiation between these two conditions may be impossible on clinical grounds alone, especially since embolization is nowadays more commonly associated with ischaemic heart disease than valvular stenosis, and most patients therefore have generalized arteriosclerosis.
3. On examination, if there is an immediate threat to the viability of the limb with loss of power and movement and a neurosensory deficit then immediate surgical exploration is required irrespective of the cause.
4. Revascularization of a limb that is already totally non-viable invariably has fatal consequences due to reperfusion injury and is absolutely contraindicated. Urgent amputation may be life-saving.
5. Under other circumstances urgent angiography is indicated to establish the diagnosis and to permit proper appraisal of the various options for treatment.
6. Surgical embolectomy is indicated for embolic occlusion of:


7. For patients in whom there is no immediate threat to the viability of the limb, more distal emboli, such as those in the popliteal artery, are more appropriately treated by thrombolytic therapy.
8. Surgical embolectomy can be performed under local anaesthesia but general anaesthesia is preferable in the absence of serious anaesthetic risk.
9. Run-in, run-off and conduit usually are not relevant to surgical embolectomy in the absence of associated arterial disease.
Action
1. Make a short longitudinal arteriotomy. In the case of the femoral artery make this directly over the origin of the profunda artery.
2. Select an embolectomy catheter of a size appropriate to the vessel: 3F for axillary and brachial arteries, 4F for the superficial and profunda femoral arteries and 5F for the aortic bifurcation.
3. A number of different makes of embolectomy catheter are available. Choose one with a central irrigating lumen that permits injection of heparinized saline or X-ray contrast medium into the vessels beyond the balloon.
4. Pass the uninflated catheter proximally through the vessel beyond the clot. Inflate the balloon and withdraw the catheter slowly while adjusting the pressure within the balloon to accommodate changes in the diameter of the vessel. Avoid severe friction between the balloon and the arterial wall since this can cause intimal damage to the vessel.
5. Instruct an assistant to control bleeding from the vessel during this process by applying gentle traction to the rubber sling previously placed around it.
6. Repeat the procedure until no more thrombus is retrieved and adequate forward arterial flow is obtained from the vessel. Avoid unnecessary passages of the catheter.
7. Instil heparinized saline into the artery and gently apply a clamp.
8. Repeat the same procedure distally.
9. Fill the vessels with heparinized saline and close the arteriotomy. Directly suture the common femoral artery; consider using a small vein patch for the brachial artery.
PERCUTANEOUS THROMBOLYTIC THERAPY AND THROMBECTOMY
Prepare
1. Prior to the administration of thrombolytic therapy it is mandatory to ascertain that patients have no contraindication to it. Haemorrhagic pathologies, bleeding tendency, recent surgery and intracardiac thrombus are a few of the contraindications.
2. Streptokinase is antigenic and may induce severe anaphylactic shock if administered more than once. Therefore ascertain that the patient has never received streptokinase previously. Urokinase and tissue plasminogen activator (tPA) may be given repeatedly without risk of this specific complication but are more expensive.
3. Administer systemic anticoagulation with heparin.
4. Provision needs to be made for these patients to be cared for in a specialized unit with close monitoring for the duration of thrombolytic therapy.
Action
1. Puncture the common femoral artery with a Potts-Cournand needle and pass a short guide-wire into the superficial femoral artery.
2. Remove the needle and insert an introducer sheath over the wire.
3. Under X-ray control advance a long guide-wire through the vessel beyond the embolus.
4. Pass a small-bore catheter over the guide-wire so that the tip enters the clot.
5. Withdraw the guide-wire and infuse the thrombolytic agent according to the manufacturer’s instructions. Because the agent is infused locally into the thrombus relatively small amounts are required. The high incidence of serious bleeding complications associated with systemic administration is thereby reduced.
6. After 30–60 minutes ascertain by X-ray the progress of clot lysis and advance the catheter again over a guide-wire into the embolus. Lysis may occur over a period of hours or may need to continue for 24–48 hours, with repeated angiography to assess progress and repositioning of the wires. This requires close nursing supervision of the patient, with fastidious care of the intra-arterial lines and infusions.
7. More rapid and efficient lysis of thrombus can be achieved by the ‘pulse-spray’ technique. This involves pulsed high-pressure injection of the thrombolytic agent through a catheter with multiple side holes.
8. At the end of lysis, withdraw the catheter and apply pressure to the puncture site in the groin for a minimum period of 10 minutes to ensure haemostasis.
9. Thrombosed infrainguinal bypass grafts are best treated by mechanical thrombectomy in preference to thrombolysis. This avoids haemorrhagic complications and is associated with a reduced risk of embolization of fragmented thrombus into the peripheral vascular bed. The most effective device employs the Bernouilli effect to break up and aspirate the thrombus. A larger sheath is required and excessively prolonged application may induce haemolysis. In most cases adjuvant percutaneous angioplasty will be necessary to deal with causative stenotic lesions due to anastomotic intimal hyperplasia or progressive atheroma. Mechanical thrombectomy is not available in all hospitals.
Complications
1. In order to minimize haemorrhagic complications, monitor coagulation tests repeatedly and adjust the dose of thrombolytic agent accordingly.
2. There is a risk of blood clot forming around the catheter itself, therefore maintain heparin anticoagulation throughout the procedure. It is imperative that any arterial lines in situ have continuous infusions to prevent clot formation.
3. Groin haematomas will usually resolve spontaneously but expanding haematomas and false aneurysms require surgical repair.
4. Thrombolysis can cause spontaneous haemorrhage at other sites (for example brain, retroperitoneum), so careful monitoring of the patient is required.
AORTOBIFEMORAL BYPASS
Appraise
1. The indications for aortobifemoral bypass have decreased considerably since the advent of effective percutaneous angioplasty.
2. It is an appropriate procedure for total aortic occlusion, severe aortic bifurcation disease or diffuse widespread aortoiliac disease in patients with critical limb ischaemia or severely disabling claudication.
3. Localized iliac disease, stenoses or short occlusions can be treated by balloon angioplasty dilatation.
4. Manage extensive unilateral iliac disease by either a unilateral extraperitoneal bypass or a femoro-femoral crossover graft (see below).
5. Inflow. Ensure a graft takes its blood supply from an area of the aorta with adequate inflow and assess and consider the position of the proximal clamp, especially in the presence of calcified plaque which may be at risk of rupture.
6. Outflow. Very commonly patients with severe symptoms have multilevel disease with involvement also of the femoropopliteal arteries. The profunda femoris artery is nearly always patent but may be stenosed at its origin. There is evidence that the long-term patency of aortofemoral grafts is affected adversely when only one of the run-off vessels is patent.1,2 Consider concomitant femorodistal bypass, particularly in patients with critical ischaemia. In all other patients it is probably better to confine the operation to the proximal bypass initially and then appraise the merits of a second distal bypass at a later date. However, always correct any profunda origin stenosis at the time of aortofemoral bypass.
7. Conduit. Use a bifurcated polyester Dacron graft – either 14 mm × 7mm, 16 mm × 8 mm or 18 mm × 9 mm, depending on the diameter of the native vessels.
Prepare
1. The major risk associated with aortic surgery is that of cardiac complications. It is, therefore, appropriate for patients to undergo cardiac risk assessment before surgery. This might include evaluation of myocardial perfusion, measurement of left-ventricular ejection fraction and coronary angiography. Poor function might result in:

 A lesser procedure being offered (e.g. an extra-anatomic bypass)
 Intensive care facilities being arranged for postoperative care

2. For patients with known myocardial impairment it is essential to optimize left ventricular preload and afterload during the procedure; consider the need for trans-oesophageal monitoring.
3. On induction of anaesthesia and prior to skin incision administer intravenous broad-spectrum antibiotic.
4. The patient is fully anaesthetized with total muscular relaxation and placed supine on the operating table.
5. Insert arterial, central venous and peripheral venous lines in all patients and consider trans-oesophageal monitoring.
6. Insert a 14F urinary catheter.
7. Prepare the entire area from the level of the nipples to mid-thigh. Cover the genitalia with a small towel and apply an adhesive drape allowing access to the whole of the abdomen and both inguinal regions.
Access
1. Expose the common femoral arteries first.
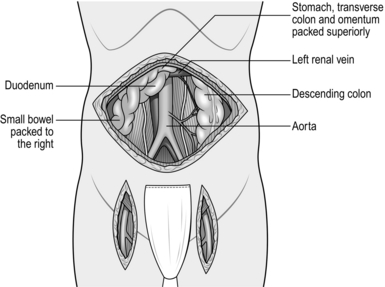
2. The abdominal aorta may be exposed through a vertical midline incision, a transverse supra-umbilical incision or an oblique muscle-cutting incision in the flank with an extraperitoneal approach. There are advantages and disadvantages associated with each of these. When only one intra-abdominal arterial anastomosis is anticipated, as, for example, in an aortobifemoral bypass, a transverse incision made directly over the site of the anastomosis gives adequate exposure and heals well with less postoperative pain than a vertical incision (Fig. 23.16).
Make the incision 2 cm above the umbilicus and extend 2–3 cm beyond the rectus sheath on each side. Divide the rectus muscles with diathermy in the same line as the skin incision. Locate and divide the superior epigastric arteries on both sides. Open the posterior rectus sheath and the peritoneum together; vessels in the edge of the falciform ligament should be ligated.
3. Perform a laparotomy and check all abdominal contents to exclude the presence of major pathology (e.g. malignancy) which may influence the decision to proceed.
4. Note the presence of other pathologies such as gallstones or peptic ulcer but do not attempt surgical treatment of these at the time of aortic reconstruction.
5. Displace the omentum and transverse colon superiorly, and the small bowel with its mesentery to the right. A self-retaining retractor system such as Omnitract allows the bowel to be retained within the abdomen, protected by large moistened abdominal packs behind retractor blades.
6. The aorta lies beneath the posterior parietal peritoneum with the duodenum anterior to it. Incise the peritoneum around the left margin of the duodenum and displace it superiorly and to the right to expose the aorta. This is usually crossed in the upper part of the dissection by the left renal vein, but beware, as occasionally the renal vein may travel behind the aorta.
7. Continue dividing the peritoneum inferiorly to the right of the inferior mesenteric artery to expose the aortic bifurcation and both common iliac arteries (Fig. 23.16). Consider the amount of dissection that needs to be performed in order to minimize damage to the nervi erigentes in this region.
Assess
1. Palpate the aorta and the iliac arteries to determine the extent of the disease. If there is a very localized block, consider endarterectomy or a local aortoiliac bypass. More commonly the disease is not localized and an aortobifemoral bypass is required. At this juncture select an appropriate area for the proximal anastomosis, avoiding as far as possible large calcified plaques. The segment between the renal vein and the inferior mesenteric artery is usually the most favourable.
2. If there is a total occlusion of the aorta, it is most appropriate to transect it and construct an end-to-end anastomosis with the graft. If the aorta is not totally occluded then many surgeons prefer to construct an end-to-side (onlay) anastomosis in order to preserve perfusion through the natural vessels into the internal iliac arteries. If the external iliac arteries are occluded then an end-to-side anastomosis is preferred as there may be no retrograde flow from the distal anastomoses into the iliac system, and ischaemia of the pelvic organs and buttocks may otherwise ensue.
3. Assess the inferior mesenteric artery. If it is a large vessel with a widely patent aortic ostium then preserve it carefully.
Action
1. In order to perform the proximal anastomosis choose an aortic clamp to either occlude the aorta completely, by applying a straight aortic clamp vertically down the sides of the aorta to the spine or by partially occluding the aorta and creating a window anteriorly through which an arteriotomy is performed. In occlusive disease there may be numerous collaterals, so take care not to damage these. If the occlusive disease is close to the take off of the renal arteries then consider gaining suprarenal control by exposing and gaining control of the aorta below the diaphragm. This is achieved by dissecting adjacent to the lesser curve of the stomach, taking care to avoid damage to the oesophagus.
2. Select a bifurcated Dacron graft of appropriate size to match the internal diameter of the aorta (see General principles) or, if performing an onlay technique, choose a graft which will allow adequate flow distally.
3. Give heparin 5000 IU intravenously and allow 3 minutes for it to circulate before applying the arterial clamps.
4. When performing thrombectomy of the infrarenal aortic stump take care to dissect a plane between the thrombus and aortic wall using a MacDonald’s or similar dissector. Dissection in the subintimal plane carries a risk of obstruction of the renal arteries by an intimal flap and must be avoided at all costs.
5. The body of bifurcated grafts is always much longer than is required. Trim away the excess, leaving only 1–2 cm, otherwise the ‘legs’ of the graft will come off at a sharp angle and may kink.
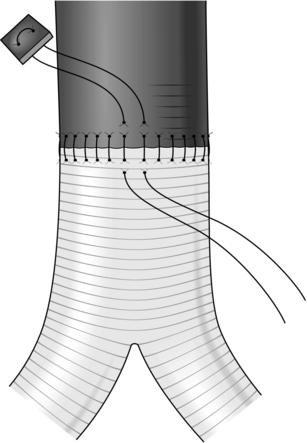
Construct an end-to-end anastomosis with 3/0 polypropylene sutures (Fig. 23.17).
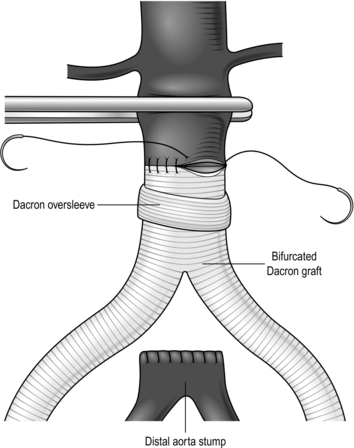
Fig. 23.17 Aortic anastomosis: end-to-end technique.
6. If an end-to-side anastomosis is considered appropriate (Fig. 23.18) and the aortic wall is soft it may be possible to apply a partially occluding clamp of Satinsky type. If the aorta is calcified it may be easier to apply two clamps, one above and the other below the anastomosis, but back-bleeding will occur from lumbar arteries, in this case on opening the aorta; control these vessels first with sutures. A bifurcated graft of 16 mm × 18 mm size is usually most appropriate. Cut the graft obliquely, removing the excess from the body. Construct an end-to-side anastomosis with 3/0 polypropylene sutures.
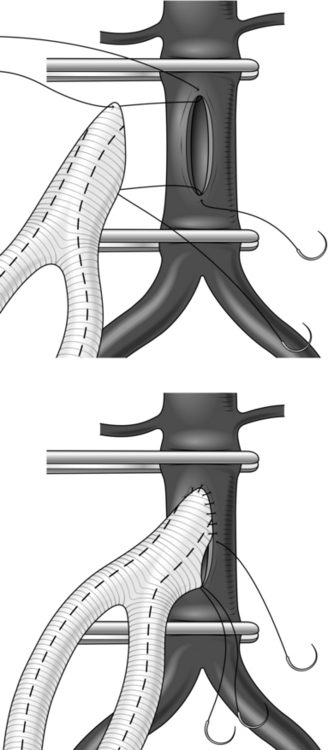
Fig. 23.18 End-to-side ‘onlay’ anastomosis.
7. On completion of the aortic anastomosis apply clamps to each limb of the graft and release the aortic clamp to test its integrity. Additional interrupted sutures may be required at this stage. Once the integrity of the suture line has been secured instil heparinized saline into the graft and reapply an arterial clamp distal to the suture line.
8. Make retroperitoneal tunnels through which to pass the limbs of the graft to the groin incisions. Do this by inserting a finger from the groin to the lateral side of the femoral artery in order to avoid damage to the vein. Insert a finger of your other hand beneath the peritoneum at the aortic bifurcation, ensuring that it passes beneath the ureters, and tunnel both fingers gently until they meet. Then pass a tunnelling instrument from the groin through this channel, attach the limb of the graft and gently deliver each limb to the femoral region.
9. Apply clamps to the common, superficial and profunda femoral arteries and make a longitudinal arteriotomy. If there is a profunda origin stenosis extend the arteriotomy towards the profunda artery to allow an endarterectomy to be performed and to allow the hood of the graft to be sutured across this region to optimize flow to the profunda femoris.
10. Apply gentle traction to the limb of the graft, sufficient to just draw out the crimping, then trim it obliquely to the required length and construct an end-to-side anastomosis with 5/0 polypropylene sutures. The distal anastomoses may be constructed simultaneously by two surgeons, but the graft should be vented through one of the anastomoses prior to completion in order to eliminate any clot that may have formed during clamping.
11. Tell the anaesthetist 2–3 minutes before you are ready to release the clamps, in order to ensure the patient is adequately filled and to reduce the effect of ischaemia reperfusion injury.
12. Close the posterior parietal peritoneum over the graft. If there is difficulty, cover the graft with omentum to avoid adhesion and erosion of the bowel with the attendant risk of late graft infection.
DIFFICULTY
1. Calcification in the wall of the aorta may prevent effective application of a clamp, or it may fracture and penetrate the wall, causing a tear, or it may not allow passage of a needle. It is important to avoid large calcified plaques and occasionally it may be necessary to apply a clamp at the level of the diaphragm above the visceral arteries. It is often possible to place sutures around calcified plaques. Exercise caution in removing such plaques because this may result in an extremely thin and friable aortic wall. Carefully repair rupture of the wall by a fractured plaque with adventitial sutures, if necessary buttressed by pledgets.
2. Beware of trying to close suture-line tears of the aorta with more stitches since this often makes matters worse. Reapply the clamps and carefully place an adventitial mattress suture buttressed with a pledget across the tear (Fig. 23.19).
Aftercare
1. Carefully monitor cardiac, respiratory and renal function and observe the peripheral circulation. Preoperatively, a decision should have been taken as to whether intensive care monitoring is required. Most patients can be looked after satisfactorily in a high-dependency area on a general ward.
2. Most patients develop a postoperative ileus and may require parenteral fluid support for 4–5 days.
3. The incidence of postoperative chest infection is particularly high in this group of patients; therefore ensure that they receive regular physiotherapy.
4. Maintain deep venous thrombosis prophylaxis.
5. Following discharge from hospital, patients require follow-up visits in the outpatient clinic at about 6 weeks, 6 months and 1 year. The late occlusion rate for these grafts is low and follow-up beyond 1 year is usually not required.
Complications
Remember five potential complications in particular:
1. Haemorrhage. A suspicion of intra-abdominal bleeding postoperatively demands immediate re-operation. ‘Haematological’ bleeding due to the effect of the heparin or other coagulopathy should be corrected accordingly, usually with infusions of fresh frozen plasma and platelets.
2. Graft occlusion. This results either from embolization of material trapped above the aortic clamp that was not flushed out or from a technical fault at one of the suture lines. This also requires immediate re-exploration. Try passing a Fogarty catheter from the groin first and ensure adequate inflow. Recurrent occlusion may indicate an outflow problem and requires either refashioning of the distal anastomosis or even a distal bypass procedure.
3. Renal failure. Application of a juxtarenal clamp nearly always results in some temporary impairment of renal function secondary to embolization. There is no evidence that the routine administration of renal dopamine, mannitol or other diuretic is of any benefit. Renal tubular necrosis may occur postoperatively if there has been excessive blood loss with associated hypotension. It usually recovers but haemodialysis or haemofiltration may be required. Total anuria immediately after operation may indicate occlusion of both renal arteries. Immediate imaging (Duplex ultrasound and CT aortography) is required and if there is absence of renal perfusion then urgent re-exploration with a view to renal artery reconstruction is required; however, the prognosis is often poor.
4. Myocardial infarction. This is the most common cause of postoperative mortality and close monitoring is advised.
5. Infection. This occurs in 2–3% of aortic grafts and can often be disastrous, resulting in loss of either life or limb. It may become manifest any time from days to years after operation. The symptoms are fever, backache and perhaps a purulent discharge from the wound. If nothing is done, a fatal haemorrhage occurs sooner or later. Computed tomography (CT) and microbiological culture of perigraft fluid are useful diagnostic tests. Occasionally infection is confined to one groin, in which case conservative management with antibiotics may be adequate. If the wounds in the groin dehisce surgery may be required to debride necrotic and infected tissue as well as systemic antibiotics; a sartorial flap may be raised to achieve adequate coverage of the arterial anastomosis. If the whole graft is infected it must be removed and replaced with an extra-anatomical axillofemoral bypass tunnelled and anastomosed away from the previous site of infection: a challenging procedure for the surgeon and possibly a devastating situation for the patient. Occasionally, graft infection is associated with erosion of the gastrointestinal tract (usually the duodenum) by the graft and this may result in formation of an aortoenteric fistula. Assume that gastrointestinal bleeding in a patient who has previously had an aortic graft is due to an aortoenteric fistula until proven otherwise. There is no reliable diagnostic test and the diagnosis is therefore made by a process of elimination. Urgent surgical treatment is essential but what form this should take is a matter of some controversy. If the graft is grossly infected it should certainly be removed completely. However, there are many reports of aortoenteric fistulae with local contamination alone being treated successfully by simple closure of the fistula reinforced by an omental patch. Increasingly an endovascular approach is being used, either as a temporizing measure or permanently, to treat aortoenteric fistulae.
REFERENCES
1. Harris PL, Cave-Bigley DJ, MacSweeney L. Aortofemoral bypass and the role of concomitant femorodistal reconstruction. Br J Surg 1985;22:317–20.
2. Harris PL, Jones D, How T. A prospective randomised clinical trial to compare in-situ and reversed vein grafts for femoropopliteal by-pass. Br J Surg 1987;74:252–5.
UNILATERAL AORTOFEMORAL/ILIOFEMORAL BYPASS
Access
1. Expose the common femoral artery.
2. Make a gently curved incision in the flank extending from the costal margin superiorly to the lateral edge of the rectus sheath 2–3 cm above the inguinal ligament inferiorly (Fig. 23.20).
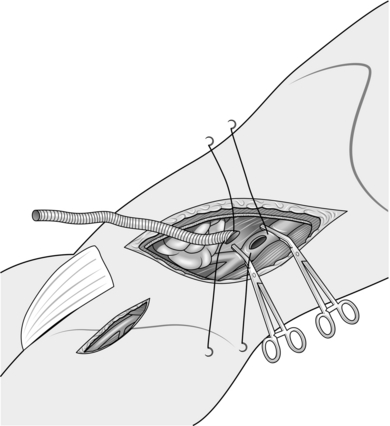
Fig. 23.20 Extraperitoneal iliofemoral bypass.
3. Divide the external oblique muscle and aponeurosis in the line of its fibres.
4. Cut the internal oblique and transversus muscles in the line of the incision using diathermy. Take care not to open the peritoneum. Repair any inadvertent holes immediately.
5. With finger dissection open up the retroperitoneal space and displace the peritoneal sac and its contents medially. The ureter usually displaces with the peritoneum. Identify it and protect it.
6. Identify the aortic bifurcation and the common and external iliac arteries. Use a fixed self-retaining retractor system to aid exposure.
Action
1. Select a straight Dacron graft of appropriate size. One of 8 mm in diameter is usually most appropriate, but occasionally grafts that are slightly larger or smaller may be required.
2. Administer heparin and allow 3 minutes for it to circulate.
3. For an anastomosis to the common iliac artery apply a clamp to the origin of this vessel and another one at a suitable point distally.
4. For an aortic anastomosis it may be possible to apply a partially occluding clamp of the Satinsky type. If the aorta is calcified, this is unsafe so apply occluding clamps to the aorta and both common iliac arteries; alternatively, consider using the occlusion balloons on an embolectomy catheter.
5. Make a longitudinal arteriotomy approximately 1.5 cm in length.
6. Take the previously prepared Dacron graft and trim the end obliquely to match the length of the arteriotomy.
7. Construct an end-to-side anastomosis with a continuous 4/0 polypropylene suture.
8. Apply a clamp to the graft just beyond the anastomosis and release the arterial clamp to test the suture line. Reinforce it if required (see Aortobifemoral bypass).
9. By finger dissection make a channel through to the groin incision, keeping to the lateral side of the artery to avoid damage to the vein. Draw the graft through this channel using either a tunnelling instrument or a straight aortic clamp.
10. Trim the graft to length and construct an end-to-side anastomosis to the common femoral artery with 5/0 polypropylene sutures (see Aortobifemoral bypass).
Complications
1. In addition to those described for aortobifemoral bypass, beware of acute arterial occlusion in the opposite limb.
2. Application of clamps at or close to the aortic bifurcation is associated with a high risk of embolic occlusion or thrombosis in the other common iliac artery. This must be checked for and corrected before anaesthesia is reversed.
3. Try passing a Fogarty catheter from the groin first. If this is not successful then consider performing a femoro-femoral crossover graft. Occasionally, a radiological approach with iliac angioplasty and stent insertion is possible.
MINIMALLY INVASIVE AND TOTALLY LAPAROSCOPIC AORTIC RECONSTRUCTION
Appraise
1. Minimally invasive techniques for reconstruction of the abdominal aorta and iliac arteries are being developed with the aim of minimizing surgical trauma, recovery time and postoperative complication rates.
2. Totally laparoscopic procedures are undertaken by a retroperitoneal approach, with or without gas insufflation. Special instrumentation including aortic clamps has been designed for the purpose. The technical aspects of the operation are based upon the principles of other established laparoscopic procedures.
3. Minimally invasive operations performed through short (8 cm) incisions using retractors designed specifically for the purpose represent a compromise between the conventional open and laparoscopic approaches. ‘Hand-assisted’ laparoscopic reconstruction is a further variation on this theme.
4. Obese patients and those with calcified aortas are not suitable for these procedures. Otherwise, the factors to be considered preoperatively are the same as those for aortofemoral bypass (see above).
5. Facilities for immediate ‘conversion’ to conventional open surgery in case of haemorrhage or other critical intra-operative complications are essential.
6. These procedures are currently performed in a few vascular centres by surgeons with specialist skills in these fields. Laparoscopic vascular surgery requires a high level of laparoscopic skill and should only be undertaken by trained and competent enthusiasts.
FEMORO-FEMORAL BYPASS AND ILIOFEMORAL CROSSOVER BYPASS
Appraise
1. These are alternative procedures to iliofemoral bypass for unilateral iliac artery disease and the results are comparable in terms of graft patency. Femoro-femoral bypass is virtually a subcutaneous procedure and if necessary it can be carried out under local anaesthetic in very unfit patients (Fig. 23.21).
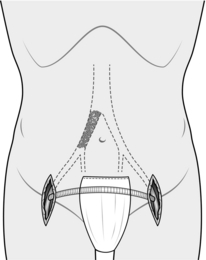
Iliofemoral crossover bypass has the important advantage of leaving the groin and femoral artery on the donor side undisturbed for possible future procedures. The angle between the graft and the donor artery is also in line with the direction of blood flow and this may have haemodynamic advantages. It is a more invasive operation than femoro-femoral bypass and requires a regional or general anaesthetic.
2. Inflow. Adequacy of inflow is a crucial factor for the success or failure of these operations as well as their effect on the perfusion of the donor limb. Reliance on subjective assessment of angiograms is unsafe and some objective test is therefore helpful. Intra-arterial cannulae are connected to pressure transducers in order to record pressure waves from radial and femoral arteries. If there is a pressure gradient under resting low-flow conditions, this represents inadequate inflow. If the diagnosis is in dispute, a bolus of papaverine 20 mg is then injected into the femoral artery by means of a three-way tap connected to the pressure line. This causes regional vasodilation and accelerates the blood flow into the limb. A radial to femoral pressure gradient in excess of 20 mmHg developing under high flow conditions is evidence of significant inflow stenosis.
There are three options possible following a positive pressure test:


3. Run-off. See Aortobifemoral bypass.
4. Conduit. It is necessary to use a prosthetic graft for this purpose, and 8-mm diameter externally supported Dacron or expanded PTFE grafts are most suitable.
Action
1. For femoro-femoral bypass expose both common femoral arteries.
2. For crossover iliofemoral bypass expose the common femoral artery in the recipient limb. On the donor side expose the external iliac artery by making a transverse incision 3–5 cm above the inguinal ligament and entering the retroperitoneum as previously described.
4. By finger dissection create a tunnel between the two incisions. For femoro-femoral bypass make a subcutaneous tunnel just above the superior pubic rami using blunt dissection to avoid damage to the bladder. In the case of a crossover iliofemoral bypass make an extraperitoneal tunnel passing deep to the rectus muscles. Draw the graft into the tunnel using either a tunnelling instrument or a large aortic clamp.
5. Give intravenous heparin and allow 3 minutes for it to circulate.
6. Apply clamps to the femoral or iliac arteries and make longitudinal arteriotomies.
7. Trim the ends of the graft obliquely to match the length of the arteriotomies.
8. Fashion end-to-side anastomoses on both sides with 5/0 Prolene or Gore-Tex sutures as appropriate (see General principles). Flush the graft and arteries before completing the anastomoses.
Closure
Close both wounds carefully in layers, ensuring haemostasis and thus avoiding the need for drains.
Complications
1. In addition to the risks of haemorrhage, occlusion and infection (see Aortobifemoral bypass) the main concern is the possibility of ischaemia in the donor limb.
2. Provided that the procedure described here has been followed correctly, inflow obstruction should have been eliminated, but there remains the risk of thrombosis or embolization in the distal vessels.
3. Acute ischaemia requires immediate re-exploration. Less severe ischaemia warrants angiography with a view to further elective surgery.
AXILLOFEMORAL BYPASS
Appraise
1. Indications for axillofemoral bypass are:
 Critical lower limb ischaemia in a patient with severe bilateral aortoiliac occlusive disease who is medically not fit for an aortobifemoral bypass (see Aortobifemoral bypass)


2. Run-in. Although occlusive disease is unusual in the upper limb arteries it is slightly more common on the left than the right side. Therefore, other considerations being equal, use the right axillary artery as the donor vessel. If critical ischaemia is confined to one leg and brachial artery pressures are equal, then use the axillary artery on the same side for the donor vessel.
3. Run-off. See Aortobifemoral bypass.
4. Conduit. Preformed axillobifemoral grafts with either right or left side-arms are available. When using a preformed graft, trim it in such a way as to ensure that its length from the junction of the side-arm to the distal anastomosis is as short as possible. The reason for this is that the velocity of flow in the graft is potentially halved beyond this point, with a greater risk of thrombosis in this segment. When constructing the bypass from separate axillofemoral and femoro-femoral components, use a 10-mm diameter graft for the former and an 8-mm graft for the crossover. Construct the crossover bypass first (see above, Femoro-femoral bypass) and anastomose the distal end of the axillofemoral component to it in end-to-side fashion. When infection of a pre-existing aortobifemoral graft is the indication for operation consider impregnating the graft with antibiotic. This is prepared by soaking the graft in a solution of rifampicin before implantation. An effectively treated graft turns uniformly brown in colour. A Dacron graft impregnated with silver, which is intended to resist infection, is also available commercially.
Prepare
1. General anaesthesia is required, with the patient supine on the operating table. The procedure can be performed under local anaesthetic with sedation being used for graft tunnelling.
2. It is necessary to prepare the skin and arrange the drapes in such a way as to make available the whole of the trunk and both legs to mid-thigh level. Place the donor arm in abduction so that there is no tension on the anastomosis to the axillary artery in this position. Use adhesive drapes to hold the towels in place.
3. Ensure that the anaesthetist places radial or brachial arterial lines on the side that is not going to be clamped.
4. Give prophylactic antibiotics as for aortobifemoral bypass.
Action
1. Expose the axillary artery and both common femoral arteries (Fig. 23.22; see Exposure of the major peripheral arteries).
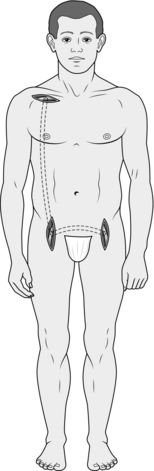
Fig. 23.22 Right axillobifemoral bypass.
2. Select 10-mm and 8-mm Dacron grafts of appropriate length or a preformed axillofemoral graft.
3. If possible, it is better to avoid making additional incisions over the course of the graft. Use a long tunnelling instrument inserted from the upper (axillary) incision. Pass it deep to the pectoralis major muscle and then subcutaneously in the anterior axillary line, finally curving forwards above the anterior superior iliac spine to the ipsilateral groin incision. Attach the end of the main stem of the graft to the tunneller and then draw it through to the upper incision. When using a preformed graft continue to pull it through until the junction with the side-arm lies at the upper end to the groin incision.
4. Pass the side-arm or femoro-femoral component through a subcutaneous suprapubic tunnel (see Femoro-femoral bypass).
5. Administer heparin and allow 3 minutes for it to circulate.
6. Apply clamps to the axillary and femoral arteries and make longitudinal arteriotomies approximately 1.5 cm in length.
7. When gauging the length of the graft, having the arm abducted ensures that there will be no tension on the anastomoses in this position.
8. Considerable time is saved if the anastomoses are constructed simultaneously. Trim the ends of the graft obliquely to match the length of the arteriotomies and complete the anastomoses in end-to-side fashion with 5/0 polypropylene suture.
9. Test each anastomosis, flush the graft and fill it with heparinized saline before finally releasing the clamps. Open the circulation into one leg at a time in order to reduce the risk of reperfusion injury.
Complications
1. Occasionally, seromas develops around these grafts and unless they become infected this should be allowed to settle spontaneously and not aspirated.
2. The risk of occlusion by thrombosis is greater than for other proximal bypass procedures. If this occurs, re-establish patency by thrombectomy, ensure there are no technical errors and commence long-term anticoagulation. An important cause of occlusion is angulation due to tension on the axillary artery and this should be corrected during secondary intervention.
ILIAC ARTERY ANGIOPLASTY AND STENTING
Appraise
1. Localized stenoses and short occlusions in the common iliac artery respond well to angioplasty. The addition of an intraluminal stent is indicated when:


2. This procedure may be undertaken as a sole therapeutic intervention and it has largely replaced open surgery for the management of localized iliac artery disease. Increasingly, angioplasty is being used in tandem with surgery to secure an adequate inflow in anticipation of an infrainguinal arterial reconstruction, in which case it may be undertaken percutaneously or intra-operatively through the exposed common femoral artery.
Assess
1. Puncture the common femoral artery through the purse string and insert a sheath in a proximal direction (see Basic techniques, Transluminal angioplasty).
2. Use a 0.035 inch J-wire to cross the lesion under fluoroscopic control.
3. Pass a ‘pigtail’ angiography catheter over the wire and, using a pump injector, obtain a digitally subtracted angiogram to visualize the lesion.
4. For further assessment of the lesion record ‘pull-through’ pressure measurements. Having crossed the lesion with a straight 4F angiography catheter over the guide-wire, connect it to a pressure transducer to record intraluminal pressure. Withdraw the catheter slowly through the stenosis and record the pressure gradient across it. Any pressure gradient under low-flow conditions is significant. For more accurate assessment repeat the process following injection of a vasodilator (e.g. papaverine 30 mg) intra-arterially into the limb (see above, Femoro-femoral bypass, Assess).
Action
1. Select a balloon catheter of appropriate size using the preoperative angiogram as a guide (see Basic techniques). A balloon with an inflated diameter of 8 mm and length of 4 cm is often appropriate; it is essential not to over-dilate the artery.
2. Obtain another angiogram to create a ‘road-map’. This allows a ‘live’ image of the balloon catheter to be superimposed over a stored image of the lesion to assist accurate positioning of the balloon.
3. Position the balloon over the guide-wire across the lesion and inflate it to the pressure as recommended by the manufacturer.
4. Use dilute contrast medium to dilate the balloon.
5. Observe the balloon by fluoroscopy as it expands. ‘Popping of the waist’ signals a good outcome.
6. Replace the balloon catheter with an angiography catheter and obtain a check angiogram to assess the result. If ‘pull-through’ pressure measurements were made prior to angioplasty repeat these now to ensure that the pressure gradient has been abolished.
7. Remove the introducer sheath and proceed with the femorodistal bypass procedure.
FEMOROPOPLITEAL AND INFRAPOPLITEAL SAPHENOUS VEIN BYPASS
Appraise
1. Chronic occlusion of the superficial femoral artery alone seldom if ever results in critical limb ischaemia.
2. Most stenoses or short occlusions in the superficial femoral artery can, if deemed appropriate, be treated successfully by percutaneous balloon angioplasty dilatation.
3. The patency rates of long femorodistal bypass grafts are not sufficiently good to warrant their application for non-critical disease.
4. The indications for elective femorodistal bypass surgery are critical limb ischaemia associated with extensive superficial femoral, popliteal and tibial artery occlusive disease, or extremely disabling intermittent claudication. Vascular trauma constitutes a frequent indication for emergency femorodistal bypass.
5. Inflow. An unimpeded inflow is an essential prerequisite for a successful outcome. Objective assessment is essential (see Femorofemoral bypass) and an additional procedure to enhance inflow (e.g. iliac artery angioplasty) may be required.
6. Run-off. Poor run-off is a major cause of femorodistal graft failure. It is essential to carefully select the site of the distal anastomosis in order to optimize outflow capacity. When the popliteal artery is visualized angiographically this vessel should normally be used. However, even with digital enhancement, preoperative angiographic assessment of tibial vessels may be unreliable, especially in the presence of critical ischaemia; the absence of images of these vessels on such films must not be accepted as evidence that they are definitely occluded. Objective tests such as pulse-generated run-off assessment1 have been largely abandoned. Preoperative Duplex ultrasound will help the planning of these procedures and identify patent distal vessels. Surgical exploration of the distal vessels and on-table angiography is the only reliable method for confirming non-operability. (See also Femoropopliteal and infrapopliteal prosthetic bypass.)
7. Conduit. There are two established methods for using the saphenous vein for femorodistal bypass grafting. These are the reversed and the in-situ techniques. A third method, the non-reversed transposed-vein technique, combines features of both of the original methods. Clinical evidence for the superiority of one of these methods over the others is lacking. Indeed, randomized studies to date indicate that reversed and in-situ grafts perform equally well in both femoropopliteal and infrapopliteal situations.2 Reversed vein grafts are associated with fewer complications. The quality of the vein itself, and particularly its diameter, does have an important effect on outcome. This can be assessed preoperatively by Duplex scanning. If the saphenous vein is inadequate (less than 3 mm in diameter or varicose), alternative sources of autologous vein should be sought (consider the short saphenous or arm veins) or a decision may be made to use a prosthetic graft. It is worthwhile deferring the definitive decision regarding a prosthetic graft until the vein has been exposed surgically. An ideal vein has few divisions, is free from postphlebitic thickening of the wall and has a fairly uniform diameter of not less than 4 mm. Unfortunately, not many conform to the ideal and clinical judgement has to be exercised in determining acceptability.
8. Note that longer grafts fare less well than shorter grafts and it is permissible in the absence of significant disease in the superficial femoral or popliteal arteries to use a distal donor site as a means of shortening a graft. Most grafts, however, should originate from the common femoral artery.
Prepare
1. Mark the course of the long saphenous vein with indelible ink before operation. If it is not visible on simple clinical examination use a Doppler ultrasound flow probe to follow its course or alternatively arrange for the vein to be ‘mapped’ by vascular scientists.
2. The leg is shaved, together with the pubic area and lower abdomen.
3. Under general or regional anaesthesia, the patient lies supine on the operating table. The knee of the affected leg is flexed to about 45° with the hip flexed and slightly externally rotated. Swab the whole area from the umbilicus to the ankle. Enclose the foot in a sterile transparent plastic bag. Place towels under the leg and over the abdomen. Retain the position of the towels over the genitalia and upper thigh with an adhesive drape.
Access/assess
1. Expose the common femoral artery and the proposed site for the distal anastomosis. If there is concern regarding the patency of the distal receiving vessel, consider performing an on-table angiogram. Ideally, this should communicate directly with the primary pedal arch.
2. Expose a sufficient length of the saphenous vein from the groin to the anticipated distal anastomosis by making an incision directly over it. If possible, leave intact skin bridges along the length of the vein harvest to reduce postoperative morbidity and skin breakdown. Assess its suitability for use as a graft (see above, Appraise).
Action
Reversed saphenous vein graft
1. This is the standard procedure first performed successfully by Jean Kunlin in Paris in 1942.3
2. Completely mobilize and remove the long saphenous vein. Ligate the tributaries with fine material a millimetre or so away from their junction with the main trunk to avoid any possibility of narrowing the graft. Transfix the saphenofemoral junction with a stitch.
3. Insert an umbilical catheter into the distal end of the vein, which will become the proximal end of the graft, and with a clamp at the other end gently distend it with heparinized blood (5000 IU of heparin in 50 ml of blood; Fig. 23.23). Secure any untied tributaries with fine ligatures and any small tears with 6/0 polypropylene mattress or figure-of-eight sutures inserted transversely.
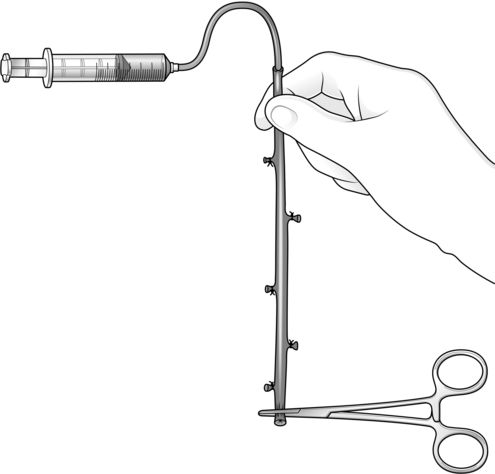
4. Take great care to handle the vein gently at all times. Do not pick it up with metal instruments, do not apply clamps to it (except at the very end during distension – this will be trimmed away prior to construction of the anastomosis), do not overdistend it, do not allow the vein to desiccate. A traumatized segment of vein may become the site of fibrous stricture formation following implantation and threaten the long-term patency of the graft (see below). Indicate the orientation of the vein by marking it with indelible ink.
5. Using a long tunneller, place the reversed vein in a route alongside the natural artery through the subsartorial canal and popliteal fossa but outside the abductor magnus tendon. Make sure it passes between the medial and lateral heads of the gastrocnemius muscle to enter the popliteal fossa. In the calf, place it in the plane between the gastrocnemius and soleus muscles. Note that it is technically easier to enter this plane with the tunneller inserted from the distal incision and advanced proximally than it is the opposite way round. If the distal anastomosis is to be made to the anterior tibial artery, cross the interosseous membrane just below the popliteal fossa, taking care to avoid damage to the plexus of veins in this area.
6. Be meticulous and ensure that the vein does not become twisted when laying it in its tunnel. Check that this has not occurred by gently distending it with heparinized blood after insertion.
7. Give intravenous heparin and allow 3 minutes for it to circulate.
8. The anastomoses may be completed simultaneously if two surgeons are available. Otherwise apply clamps to the femoral arteries, make an arteriotomy 1–2 cm in length, trim the graft and construct an end-to-side anastomosis with 5/0 polypropylene sutures. Allow the graft to run and check the anastomosis for haemostasis then apply a gentle clamp just proximal to the distal anastomosis, having confirmed correct vein orientation for the distal anastomosis. To assess flow within the graft open the vein graft and allow free flow of blood into a kidney dish for 5 seconds, measure this volume and calculate flow per minute: a flow rate of greater than 180 ml/minute is satisfactory.
9. Distally, treat the vessels gently and select the least traumatic clamps for haemostasis to allow the anastomosis to be sutured. Consider using slings as these may cause less damage. (see General principles).
10. Make an arteriotomy in the recipient vessel about 1 cm in length. Trim the vein graft obliquely to match the length of the arteriotomy and complete the anastomosis in end-to-side fashion with either 6/0 polypropylene for the popliteal artery or 7/0 polypropylene for the infrapopliteal arteries. Prior to distal clamp removal and restoration of blood flow remove the clamp from the vein graft and expel air and old blood then complete the anastomosis.
11. Remove all clamps. Observe the appearance of the graft, the recipient artery and the perfusion of the foot within the transparent plastic bag.
12. Consider performing completion imaging before closure of the wounds.
DIFFICULTY
1. The vein is inadequate. Short narrow segments can be resected and replaced with interposition grafts of autologous vein from other sites. If the whole vein is inadequate or missing (having been removed previously), consider using arm veins. This is often possible for femoropopliteal bypass, but impractical for longer grafts. It is preferable to use autologous vein rather than prosthetic graft in terms of patency. Use a prosthetic graft only if there are no adequate autologous veins available. (Fig. 23.24).
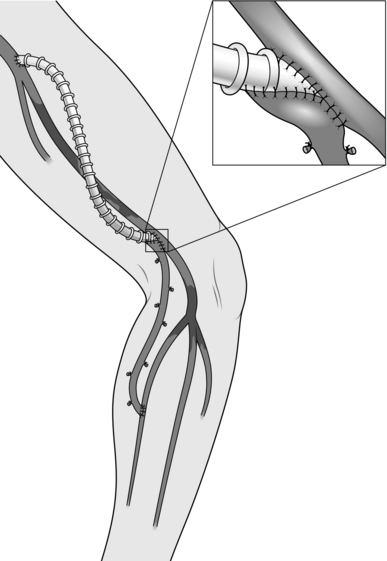
Fig. 23.24 Composite PTFE/autologous vein graft.
2. The graft is twisted. If this occurs despite all precautions, divide the graft at a convenient and readily accessible point, undo the twist and reanastomose the ends by the triangulation technique with 6/0 polypropylene sutures.
3. Completion angiogram shows a technical error at the distal anastomosis. Take down and reconstruct the anastomosis.
4. Completion angiogram shows embolic occlusion of the run-off vessels. Pass a small Fogarty catheter through a short incision in the graft made directly over the distal anastomosis.
In-situ saphenous vein graft
1. In this operation most of the vein is left undisturbed in its natural bed and the valves are destroyed by the passage of a valvulotome (Fig. 23.25).3,4
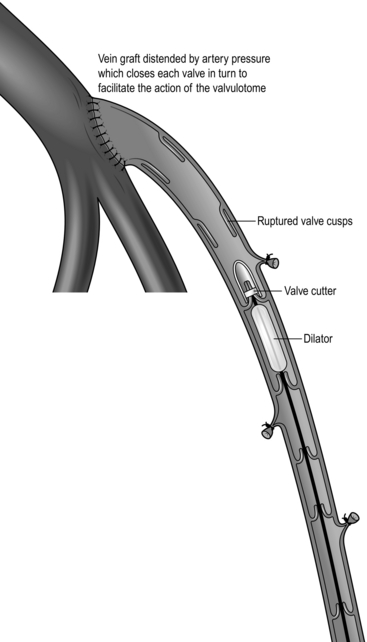
The potential advantages over the reversed operation are:


 It is claimed (but not proven) that smaller veins can be made to function more successfully by this technique than by the reversed method3
 Because the graft lies subcutaneously it is easily assessed by simple clinical examination.
On current evidence these advantages would seem to be more theoretical than practical but many surgeons prefer the in-situ operation, particularly for infrapopliteal bypass.
2. Expose the vein throughout the required length (using skin bridges if possible) and tie in continuity all visible tributaries, ensuring that the vein itself is not narrowed by placing the ligatures a millimetre or so away from the main trunk. Consider preserving the most proximal large tributary in the thigh to allow access of a cannula for on-table angiography later.
3. Carefully dissect the saphenofemoral junction and ligate and divide all tributaries at this level. Perform a flush ligation of the saphenofemoral junction to maximize the length of vein available. Mobilize the proximal 5–6 cm of the saphenous vein.
4. Give heparin and allow 3 minutes for it to circulate before application of arterial clamps.
5. With the leg straight, find the point on the femoral artery to which the proximal end of the saphenous vein can be anastomosed without tension. Apply clamps and make a short arteriotomy at this site.
6. Open the proximal end of the saphenous vein, find the first valve and excise its cusps under direct vision with fine scissors.
7. Construct the proximal anastomosis end-to-side with 6/0 polypropylene sutures and release the clamps, allowing the arterial pressure to distend the graft to the level of the first competent valve.
8. Mobilize the distal end of vein and divide it, allowing sufficient length for trimming prior to construction of the anastomosis.
9. Select a valvulotome of appropriate size. The valvulotome must not impact within the vein and it must not under any circumstances be used as a dilator. Most commonly, the smallest (2.5 mm diameter) instrument will suffice. Pass the valvulotome proximally through the graft to the upstream anastomosis and then withdraw it slowly (Fig. 23.25). Gently tug it as it catches on each valve to break the valve cusps and repeat this process after rotating the valvulotome through 90° to ensure that each of the cusps is ruptured. As the valve is made incompetent, arterial pressure closes the next in line, which once again facilitates the action of the valvulotome. Vigorous pulsatile bleeding on final withdrawal of the instrument indicates that all of the valves have been rendered incompetent. If this does not occur, pass the valvulotome again but try to avoid repeated unnecessary passages of the instrument. The absence of pulsatile bleeding despite destruction of the valves is due to persistence of a large perforating vein. Sometimes the presence of a localized palpable thrill will locate it, but if not it can be identified with an on-table angiogram.
10. Apply a soft clamp to the graft. Trim the distal end and complete the distal anastomosis in an end-to-side manner using 6/0 polypropylene for the popliteal artery or 7/0 polypropylene for the infrapopliteal arteries.
11. If the distal anastomosis is to be made to the anterior tibial artery, it is necessary to mobilize a sufficient length of the vein to allow it to be routed through the interosseous membrane to the lateral side of the calf.
12. For anastomosis to the infrageniculate popliteal artery the end of the vein should simply be turned into the popliteal fossa and a short anastomosis constructed to make a T-junction. An attempt to make this anastomosis oblique is likely to result in kinking and obstruction of the graft.
13. Consider performing a completion angiogram to confirm graft patency and run off and if necessary to locate and ligate residual tributaries.
Aftercare
1. Note the state of perfusion of the foot and mark the position of palpable or Doppler-audible pulses.
2. Evidence of deteriorating perfusion and loss of pulses warrants immediate re-exploration and re-assessment of the graft.
3. Keep the knee slightly flexed for 24 hours. Allow mobilization on the first day. Swelling of the leg is almost invariable after a successful reconstruction. Reassure the patient that this will resolve but may take several weeks to do so. In the meantime encourage leg elevation when resting.
4. A postoperative vein graft surveillance programme using Duplex ultrasound is worthwhile, as 20–30% of grafts develop intimal hyperplastic strictures within the first 6–9 months after implantation and these strictures are associated with a three-fold risk of occlusion during the first 12 months. Prophylactic treatment of such strictures, either by open surgery or balloon angioplasty dilatation, improves secondary patency rates by 10–15% at 12 months.4 Arrange surveillance scans at regular intervals for the first year. Strictures that require treatment are:


Treat short strictures in the body of the graft or at the distal anastomosis by balloon angioplasty dilatation. For maximum effect, higher than normal inflation pressures may be required (up to 20 atmospheres). Treat strictures over 1 cm in length and those at the proximal anastomosis by patch angioplasty, interposition grafting or jump grafting.
5. Except where specifically contraindicated, all patients should receive regular daily low-dose aspirin or clopidogrel as an antithrombotic agent and all patients should be prescribed a statin.
REFERENCES
1. Beard JD, Scott DJ, Evans JM, et al. Pulse generated run-off, a new method of determining calf vessel patency. Br J Surg 1988;75:361–3.
2. Harris PL, Jones D, How T. A prospective randomised clinical trial to compare in-situ and reversed vein grafts for femoro-popliteal by-pass. Br J Surg 1987;74:252–5.
3. Hall KV. The great saphenous vein used in-situ as an arterial shunt after extirpation of the vein valves. Surgery 1962;51:492–5.
4. Leather RP, Powers SR, Karmody AM. A re-appraisal of the in-situ saphenous vein arterial bypass. Its use in limb salvage. Surgery 1979;86:453–61.
FEMOROPOPLITEAL AND INFRAPOPLITEAL BYPASS WITH PROSTHETIC GRAFT
Appraise
1. The best prosthetic grafts perform almost as well as saphenous vein grafts when anastomosed to the popliteal artery above the knee. However, below the knee they are not nearly as effective as vein grafts and, if the distal anastomosis is to a single tibial or peroneal artery, patency rates at 2 years of approximately half those of veins are to be expected. Furthermore, when prosthetic grafts occlude they often result in loss of the distal run-off, with a high risk of limb loss.
2. Use of prosthetic grafts below the knee is justifiable only if there is no autologous vein available and must be strictly limited to those patients in whom the alternative to reconstruction is amputation.
3. Inflow. See Saphenous vein bypass.
4. Outflow. One reason why prosthetic grafts perform less well than autologous vein grafts is that they require a higher velocity of blood flow through them to prevent blood clot forming on the flow surface (a higher thrombotic threshold velocity). A restricted outflow tract is therefore less well tolerated. Attempts have been made to overcome the problem by creating an adjuvant arteriovenous fistula (Fig. 23.27) at or close to the distal anastomosis, thereby augmenting the run-off, but clinical trials indicate that this manoeuvre does not have sufficient value to justify its routine use.1
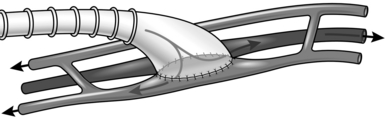
A second problem with prosthetic grafts is that platelets react with the alien flow surface. This causes them to adhere, particularly at the distal anastomosis, restricting the outflow further either by initiating thrombosis formation or by the later development of subintimal hyperplasia. The unnatural end-to-side configuration of the anastomosis itself probably also contributes by causing excessive flow disturbance. In order to try to overcome this problem the distal anastomosis has been modified by means of vein patches or cuffs.2,3 These adjuvant techniques are of proven benefit in terms of short- and long-term graft patency.
Action
1. Expose the common femoral artery and distal recipient vessel as previously described.
2. Select a graft of either 6 mm or 5 mm internal diameter and, using a long tunnelling instrument, pass it between the two incisions (see Reversed saphenous vein graft).
3. Give intravenous heparin and allow 3 minutes for it to circulate before the application of arterial clamps.
4. Construct end-to-side anastomoses to the common femoral and popliteal or tibial arteries using 5/0 and 6/0 sutures, respectively. If a PTFE graft has been chosen, consider using PTFE sutures.
5. If it has been decided to incorporate an interposition vein cuff at the distal anastomosis use the following technique:
Miller cuff (Fig. 23.26).2 Obtain a 3-cm length of autologous vein: the distal end of the saphenous vein from the ankle is suitable. Open the vein longitudinally to make a flat strip. Make an arteriotomy 1 cm in length, and suture the strip of vein to the edges of the arteriotomy using 7/0 polypropylene sutures for a tibial artery or 6/0 polypropylene for the popliteal artery. Commence the stitch in the middle of one side and suture the vein to the whole circumference of the arteriotomy. Then trim the excess of the vein strip away and complete the cuff by suturing the free edges together. Finally trim the graft to match the size of the vein cuff and construct an oblique end-to-end anastomosis with a continuous 6/0 polypropylene suture.
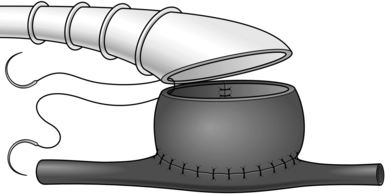
Fig. 23.26 The Miller cuff.
6. If a precuffed PTFE graft is used it is essential not to trim or adjust the shaped end of the graft in any way. Match the length of the arteriotomy to that of the ‘cuff’ and not vice versa. When using a precuffed graft it is helpful to perform the distal anastomosis before the proximal anastomosis and to draw the graft from the distal to the proximal wound during the tunnelling procedure.
Complications
1. Early thrombotic occlusion. In the event of early thrombosis of the graft, return the patient to theatre immediately for thrombectomy and careful reappraisal.

2. Late occlusion of a prosthetic graft warrants a new angiogram. It is often due to subintimal hyperplasia at or close to the distal anastomosis.
 Thrombolysis of the graft and dilatation of the outflow tract by balloon angioplasty
 Operative thrombectomy with patch angioplasty or a jump graft at the distal anastomosis

Although PTFE grafts can usually be re-opened it is sometimes preferable to replace the whole graft, particularly when it has been occluded for more than 3 weeks. The patency of grafts re-explored for occlusion is reduced and graft replacement has to be considered in the context of up-to-date imaging to assess patent distal vessels.
3. In common with other prosthetic grafts there is a risk of infection (see Aortobifemoral bypass).
PERCUTANEOUS BALLOON ANGIOPLASTY DILATATION FOR FEMOROPOPLITEAL OCCLUSIVE ARTERIAL DISEASE
Appraise
1. Percutaneous techniques are increasingly being used as the first-line treatment for femoral occlusions. Good results are being achieved following treatment of long femoral lesions using a deliberate subintimal technique.4 The use of novel long balloons for long lesions and wires to improve re-entry into the lumen are increasingly replacing traditional open surgery. It should be emphasized that these approaches should be performed by those with special skills and training.
2. Localized calcified lesions of the common femoral artery, the distal external iliac artery or proximal superficial femoral artery are usually best treated surgically with an endarterectomy or jump graft.
Complications
1. Arterial rupture and acute thrombosis, if not managed with a covered stent or aspiration of clot, will require urgent surgical intervention.
2. Expanding groin haematoma, if not stabilized with pressure, may require surgical intervention.
3. Be aware of the possibility of retroperitoneal haemorrhage if the patient shows signs of hypovolaemia without obvious blood loss. This is most likely to occur if arterial puncture was made proximal to the inguinal ligament. Urgent resuscitation followed by surgical repair under general anaesthesia is required.
4. Occasionally, a false aneurysm develops at the puncture site. In the first place, attempt treatment by manual compression using Duplex ultrasound scanning to localize the communication with the arterial lumen. It may be necessary to apply pressure for 30 minutes or more but this technique is usually successful even when applied some weeks after the procedure. In certain circumstances, direct injection of thrombin can be used under ultrasound guidance to occlude the false aneurysm. Alternatively, undertake open repair under local or general anaesthesia.
5. Stents in the superficial femoral artery tend to cause excessive myointimal hyperplasia and are rarely successful in the long term, therefore their use should be limited.
REFERENCES
1. Hamsho A, Nott D, Harris PL. Prospective randomised trial of distal arteriovenous fistula as an adjunct to femoro-infrapopliteal PTFE bypass. Eur J Vasc Endovasc Surg 1999;17:197–201.
2. Miller JH, Foreman RK, Ferguson L, et al. Interposition vein cuff for anastomosis of prosthesis to small artery. Aust N Z J Surg 1984;54:283–6.
3. Taylor RS, MacFarland RJ, Cox MI. An investigation into the causes of failure of PTFE grafts. Eur J Vasc Surg 1987;1:335–45.
4. Bolia A, Fishwick G. Recanalisation of iliac artery occlusion by subintimal dissection using the ipsilateral and the contralateral approach. Clin Radiol 1997;5:684–7.
REPAIR OF ABDOMINAL AORTIC ANEURYSM – OPEN SURGERY
Appraise
1. The infrarenal abdominal aorta is the commonest site for aneurysms. These are dangerous lesions, death being the likely outcome in the event of rupture. The rate of growth and the risk of rupture increase exponentially with the diameter of the aneurysm. Therefore, unless the patient is gravely ill from other causes, any aneurysm wider than 5.5 cm should be considered for intervention. The UK Small Aneurysm Trial showed that for smaller aneurysms conservative management with regular surveillance by ultrasound is preferable to operation.1
2. With improvements in anaesthetic management and progressive modification of surgical technique, the mortality rate associated with elective aneurysm surgery is less than 5% in the best centres. In the UK Small Aneurysm Trial the in-hospital mortality rate was 5.8%. Endovascular aneurysm repair (EVAR) is accepted internationally as a safe treatment for abdominal aortic aneurysms (AAA) greater than 5.5 cm in diameter, as a result of almost 15 years of experience of the technique. The EVAR and DREAM Trials confirmed a significant reduction in aneurysm-related mortality of 60%, which is maintained at 4 years after implantation. NICE Guidelines issued in 2006 stated ‘the current evidence on the efficacy and short-term safety of stent-graft placement in AAA appears adequate to support the use of this procedure provided that the normal arrangements are in place for consent, audit and clinical governance’. In the EVAR 1 Trial endovascular aneurysm repair resulted in a 30-day mortality rate of 1.7 % compared with 4.7% following open surgery.
The important open surgical principles are:


3. Emergency operation is indicated for a patient with an aneurysm who develops severe abdominal or back pain with or without circulatory collapse, unless he is already moribund. The mortality associated with emergency aneurysm surgery is between 30% and 60%. The overall risk of death from a ruptured aneurysm is, however, higher as approximately 50% of patients die before reaching hospital.
Prepare
1. Confirm the diagnosis by ultrasound scanning. Computed tomography (CT) with intravenous contrast is essential in order to make precise anatomical measurements if endovascular repair is being considered (see below, Endovascular repair of abdominal aortic aneurysm).
2. Detailed assessment of cardiac risk is essential before elective operation (see Aortobifemoral bypass).
3. Preoperative assessment of respiratory and renal function is also required.
4. For elective cases the patient is fully anaesthetized with total muscular relaxation. Arterial, central venous and transoesophageal monitoring are sited and a urinary catheter is positioned in the bladder. The use of a cell saver to minimize blood transfusions is helpful. The patient is placed on the operating table with a warming blanket to minimize heat loss. The entire area from the nipples to mid-thigh is prepared. A small towel is placed over the genitalia and an adhesive drape is applied so as to allow access to the whole of the abdomen and both inguinal regions.
5. For emergency cases, all essential vascular access lines and the urinary catheter are inserted and the abdomen prepared and draped prior to the induction of anaesthesia. The administration of a muscle relaxant may release tamponade of a retroperitoneal haematoma, with re-bleeding and catastrophic circulatory collapse. Therefore the anaesthetist must not commence anaesthesia until you indicate that you are ready to proceed. While preoperative preparations are being made, maintain the blood pressure at a low level: a systolic pressure of 60 to 80 mmHg is ideal. ‘Permissive’ hypotension reduces the risk of sudden catastrophic haemorrhage. Good venous access lines are essential at an early stage but, except in dire emergency, do not infuse fluid to augment the blood pressure until an aortic clamp has been applied.
6. Give a broad-spectrum intravenous antibiotic with induction of anaesthesia as prophylaxis against graft infection.
Access
1. Make a midline incision extending from the xiphisternum to the pubis, skirting the umbilicus.
2. Check the abdominal contents to exclude the presence of some other condition, such as malignant disease, which might alter the decision to operate on the aneurysm. Note the presence of gallstones or peptic ulcer for future reference only.
3. Displace the omentum and large bowel superiorly and the small bowel with its mesentery to the right. Cover with large moist abdominal packs and retain in place with the blades of a fixed self-retaining retractor system (Omnitract; Fig. 23.28).

4. The duodenum lies across the upper part of the aneurysm and must be displaced. To do this, make an incision in the parietal peritoneum to the left of the duodenum, which is then mobilized upwards and to the right. This completed, place deep narrow retractor blades on each side of the aorta, to expose the neck of the aneurysm and the renal vein crossing it.
5. Continue the incision of the peritoneum longitudinally over the surface of the aneurysm, passing to the right of the inferior mesenteric artery and across the bifurcation.
6. Position additional packs and retractor blades to expose the whole aneurysm and both common iliac arteries (see Fig. 23.28). Identify and protect the ureters on each side as they cross the iliac vessels.
7. In the case of an emergency operation for rupture, try to avoid ‘crash-clamping’ of the aorta without first mobilizing the duodenum and identifying the renal vein. If there is no free bleeding, proceed calmly with the first steps as described above. The presence of a haematoma distorts the anatomy and it is essential to dissect a plane close to the wall of the aorta. Once the neck of the aneurysm has been identified, carefully make a space on each side to accommodate the jaws of a straight clamp and apply this immediately from the front (Fig. 23.29). Then proceed with the remainder of the dissection. If there is free bleeding, obtain control initially by manual pressure against the vertebral column while an assistant packs away and retracts the abdominal contents. In extreme difficulties either apply a clamp at the level of the diaphragm after opening the lesser omentum and splitting the muscular fibres of the crus or use a balloon-occlusion catheter inserted through an incision in the aneurysm itself.
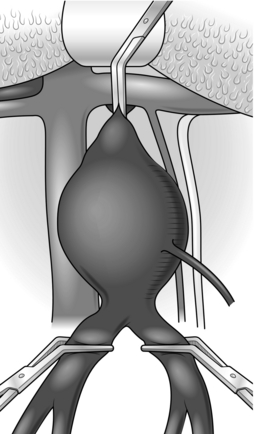
Fig. 23.29 Application of clamps.
Assess
1. Confirm the position of the neck of the aneurysm relative to the renal arteries: 95% of aneurysms are infrarenal. The minority of aneurysms that involve the visceral arteries, and particularly those extending into the chest, require much more complex and dangerous surgery. Most of these can be diagnosed preoperatively and should be referred to a specialized unit for further assessment and treatment.
2. The left renal vein, which crosses above the neck of most aneurysms, does not usually need to be divided: it can be mobilized to give additional proximal access. If necessary, it can be divided: this should be done well over to the right in order to preserve outflow from the kidney via the adrenal and gonadal veins. Even so, it has been demonstrated that renal function can be affected adversely.
3. Assess the aortic bifurcation and the iliac arteries. A minor degree of ectasia of the iliac arteries can be accepted and it should be possible to use a straight graft in 60–70% of patients. A bifurcated graft is required if the common iliac ostia have been separated by the aneurysm or if one or both of the iliac arteries are grossly aneurysmal. Occasionally, very severe calcification at the aortic bifurcation makes suturing at this site impossible.
4. Assess the inferior mesenteric artery. Usually it is totally occluded. However, if it is widely patent it is advisable to observe the effect of temporary clamping of this vessel on the bowel circulation before it is finally sacrificed. Ligate it close to the aorta or suture the ostium from within the sac in order to preserve its connections with the superior mesenteric artery via its ascending colic branch.
5. Decide whether to use a straight or bifurcated graft and of what size.
Action
1. Make no attempt to encircle either the aorta or the iliac arteries. To do so risks trauma to veins with serious venous bleeding.
2. Carefully dissect a narrow space on each side of the aorta and of both common iliac arteries to permit access for the jaws of straight or slightly angled clamps applied from the front.
3. In elective cases only, give heparin intravenously and allow 3 minutes for it to circulate before closing the clamps. Stabilize the aortic clamp by a ring of nylon tape around the handles of the clamp and tethered to the arm of the retractor or by the use of an assistant’s hand. Apply only sufficient pressure to occlude blood flow and no more (see Fig. 23.29).
4. Open the aneurysm longitudinally and proximally towards the neck of the aneurysm. ‘T’ the aortic side walls gently to aid with the reformation of the aortic wall. Scoop out the laminated thrombus, degenerate atheromatous material and liquid blood it contains. These contents sometimes bear an alarming resemblance to pus. Most aneurysms are in fact sterile, but about 10% yield a growth of organisms on culture.

5. Control back-bleeding from patent lumbar and median sacral arteries with figure-of-eight sutures of 3/0 polypropylene (Prolene) applied from inside the sac. Insertion of a Travers retractor to hold open the sac is often useful in order to display the ostia of the lumbar arteries and subsequently to facilitate the anastomoses (Fig. 23.30).
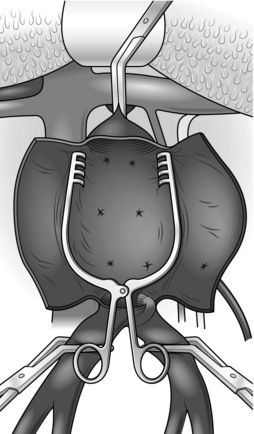
6. If a bifurcated graft is to be used, remember to trim it to leave only 3–4 cm of the main trunk above the bifurcation (see Aortobifemoral bypass.).
7. Using 3/0 polypropylene sutures, construct an end-to-end anastomosis to the proximal aorta. This is done from within the sac by the inlay technique (Fig. 23.31). Start suturing to one side of the midline at the back of the graft (see Basic techniques) to create a new back wall; it is usually easier to tie the graft down rather than use a parachute technique. Stitch from graft to aorta and take large bites to include all layers of the aortic wall each time. Finish in the midline anteriorly.

Fig. 23.31 The inlay technique of anastomosis.
8. Apply a soft clamp to the graft and gently release the aortic clamp to test the anastomosis. Place additional sutures or pledgeted sutures as required.
9. If a straight tube is to be used, construct a similar anastomosis at the aortic bifurcation.
10. If a bifurcated graft is necessary, it may be possible to construct an end-to-end anastomosis by the inlay technique to the iliac bifurcation on both sides. Alternatively, transect the iliac arteries and construct a standard end-to-end anastomosis or pass the limbs of the graft through tunnels to the groin for end-to-end anastomosis to the common femoral arteries (see Aortobifemoral bypass). Try to ensure that one of the internal iliac arteries is perfused orthogradely if at all possible.
11. Before completion of the distal anastomosis flush the graft to eliminate any blood clots and also to ensure that the recipient vessels bleed back satisfactorily. If this is not the case pass embolectomy catheters to retrieve any distal blood clots.
12. Give the anaesthetist several minutes warning before releasing the clamps and reperfuse one leg at a time in order to minimize reperfusion injury. In the case of a bifurcation graft the anastomosis on one side may be completed and this limb perfused before the second anastomosis is constructed. A slight fall in blood pressure on release of a clamp is reassuring evidence that the limb is in fact being adequately perfused.
13. Prior to closing ensure that all anastomoses are blood-tight and that there is no bleeding from any other source. Fold the redundant aneurysm sac over the graft and fix it with a number of synthetic absorbable sutures. Make sure that the graft is covered completely to minimize the risk of aortoenteric fistula in the future.
Closure
1. Close the posterior parietal peritoneum over the sac, making sure that the duodenum and small bowel cannot gain access to the graft or suture lines, with a risk of late graft infection or aortoenteric fistula.
2. Perform a mass closure of the abdomen with a permanent suture rather than an absorbable suture as there is a higher incidence of incisional hernia in patients with aneurysms, thought to be related to a connective tissue abnormality. Drains are not normally indicated.
Aftercare
1. Following an emergency operation it is a good policy to maintain positive-pressure ventilation for 12–24 hours after operation. This ensures adequate oxygenation of the blood during a period of potential cardiovascular instability and is also considerably more convenient and kinder to the patient if he has to be returned to theatre for any reason.
2. Maintain cardiac monitoring for as long as is indicated until stability is achieved.
3. Frequently, patients develop a postoperative ileus and require nasogastric suction and intravenous infusions.
4. Deep venous thrombosis prophylaxis is necessary until full mobility is re-established.
5. After an uncomplicated recovery the patient is usually ready for discharge from hospital 6–8 days after operation, depending on their co-morbidities.
Complications
There are six important potential complications to remember:
1. Haemorrhage. Early re-exploration is mandatory upon the suspicion of continuing internal bleeding. It may be arising from the anastomosis or from other sources such as a torn mesenteric vessel. ‘Haematological’ bleeding due to heparin or other coagulopathy can be recognized by appropriate tests and must be corrected with appropriate blood products.
2. Occlusion. This results either from embolization of material trapped above the aortic clamp that was not flushed out, from thrombosis in the distal vessels during clamping or from a technical fault at one of the suture lines. Try passing a Fogarty catheter proximally and distally from the groin first, but be prepared to re-explore the graft if this is unsuccessful.
3. Renal tubular necrosis. This is common following rupture of an aneurysm and is due to prolonged hypotension. It may be part of a multiple organ failure syndrome, in which case the prognosis is very poor. Isolated renal tubular necrosis often recovers, although a period of support by haemodialysis or haemofiltration may be required. Total anuria immediately after the operation suggests the possibility of occlusion of both renal arteries. Arrange urgent Duplex ultrasound to assess renal perfusion and consider whether re-exploration is indicated, with a view to renal artery reconstruction. Such decisions can only be made on an individual patient basis.
4. Adult respiratory distress syndrome (ARDS). This is unfortunately not uncommon following emergency operations for ruptured aneurysm, particularly if there has been massive blood loss. It usually becomes apparent within 24 hours but can develop more insidiously over a few days. Mechanical ventilatory support with a high concentration of inspired oxygen and positive end-expiratory pressure is often required to maintain adequate blood gases. The prognosis is generally poor, especially if secondary infection follows.
REPAIR OF THORACIC AND THORACOABDOMINAL ANEURYSMS
Appraise
1. While repair of a localized aneurysm of the descending thoracic aorta is a relatively straightforward operation, extensive thoracoabdominal aneurysms (type 2) represent a formidable challenge to the vascular surgeon. Both of these procedures require vascular and cardiothoracic surgical facilities and expertise and should therefore be confined to a few highly specialized units. It is inappropriate to describe them in detail here, but knowledge of the principles involved is important.
2. The application of a clamp to the thoracic aorta dramatically increases the afterload on the heart and is likely to precipitate acute left ventricular failure. At the same time the abdominal viscera and the spinal cord are deprived of a blood supply, with a high risk of multiple organ failure and paraplegia.
3. Left heart bypass using an external pump obviates both of these problems.
4. Perfusion of the spinal cord during clamping of the thoracic aorta is a function of intra-arterial pressure, which is reduced, and cerebrospinal fluid (CSF) pressure, which increases. The insertion of a spinal drain as part of the anaesthetic preparation is helpful and allows monitoring and maintenance of the cerebrospinal fluid pressure at a low level (10 cmH2O). This helps to maintain perfusion of the spinal cord and reduces the incidence of paraplegia.
5. Surgical repair of extensive thoracoabdominal aneurysms without left heart bypass and CSF tapping carries risks of death and paraplegia, both in the order of 20%. Application of the above measures reduces these risks by half.
Prepare
1. CT angiography is required to build up a precise picture of the extent of the aneurysm preoperatively.
2. A rigorous preoperative assessment including assessment of the cardiac, pulmonary and renal systems is also mandatory.
3. Following the administration of general anaesthesia, a double lumen endotracheal tube is inserted by the anaesthetist and arterial and venous lines are inserted. Transoesophageal monitoring is also usually established. The urinary bladder is catheterized.
4. A spinal drain is inserted and connected to a reservoir, the height of which can be adjusted to maintain CSF pressure at the desired level.
5. The patient must be positioned on the table to permit both left thoracotomy and exposure of the abdominal aorta. Support the chest in a left lateral position but rotate the pelvis forward so that the trunk is twisted slightly. Correct positioning of the patient is vital to allow access to the chest and to the abdomen.
6. Prepare and drape the whole of the chest, abdomen and both groins.
Access
1. For thoracic aneurysms make an incision over the fifth intercostal space. For thoracoabdominal aneurysms make an incision over the sixth or seventh space and extend it across the costal margin to the midline of the abdomen and then inferiorly to the pubis. Divide the diaphragm around its margin to permit the wound to be opened widely with a rib retractor and to preserve its function. Do not split the diaphragm into the aortic hiatus. Reflect the spleen, pancreas and left colon to the right to expose the abdominal aorta. The kidney and suprarenal gland may also be reflected or left in situ. Alternatively, the incision in the abdomen can be extended to allow access to the retroperitoneum, thereby removing the need for visceral medial rotation. Using this incision does, however, limit access to the right common iliac artery.
2. Expose the left common femoral or external iliac artery to permit arterial line access for the extracorporeal pump.
Action
1. When all dissection has been completed administer heparin to achieve full anticoagulation.
2. Establish left heart bypass (left atrium to left common femoral artery).
3. Apply clamps. In the case of extensive aneurysms isolate the proximal site of anastomosis with clamps in the first place in order to maintain uninterrupted perfusion of the viscera for as long as possible.
4. Open the aneurysm, extract the thrombus and assess the intercostal arteries.
5. The artery of Adamkewicz that supplies the spinal cord usually arises from one of the intercostal arteries between D8 and D12 level. Widely patent intercostal arteries at this level should be preserved and reimplanted into the graft within a patch of aorta. Smaller intercostal arteries at other levels may be oversewn.
6. Select a graft (usually 28 or 30 mm or may be larger) and complete the proximal anastomosis with 3/0 polypropylene by an end-to-end inlay technique (Fig. 23.32).
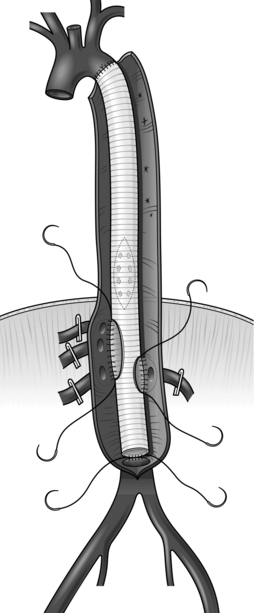
7. Apply a clamp to the graft and check the anastomosis for leaks. Have a low threshold to buttress the entire anastomosis with either buttressed sutures or a ring of Teflon which is sutured concurrently with the native thoracic aorta and graft.
8. Pass the distal end of the graft through the aortic hiatus in the diaphragm.
9. After applying distal clamps, open the remainder of the aneurysm and verify the position of the visceral arteries. Implant these and the intercostals, if patent, using aortic patches. Usually it is possible to include the coeliac axis, superior mesenteric and right renal arteries in one patch (Carrel patch), leaving the left renal artery to be implanted separately. Perfusion of the viscera can be maintained with additional cannulae from the cardiac pump, thereby reducing warm ischaemia time.
As an alternative to constructing an aortic patch bearing the abdominal visceral arteries, use a graft incorporating branches of each of the visceral arteries (Coselli graft). This obviates the risk of subsequent aneurysmal dilatation of the patch.
10. Finally, complete the distal aortic or iliac anastomoses and release the clamps.
11. When satisfactory haemostasis has been achieved discontinue left heart bypass, remove the cannulae, repair the access vessels and reverse full heparinization.
12. Close the aneurysm sac over the graft.
13. Close the wound in layers, taking care to repair the diaphragm. Two chest drains are inserted superiorly and inferiorly to drain blood and to allow lung expansion.
Complications
1. Haemorrhage, anuria, adult respiratory distress syndrome, myocardial infarction. See Repair of abdominal aortic aneurysm.
2. Paraplegia. Ensure that CSF pressure is optimized. Infarction of the spinal cord is irreversible, therefore rehabilitation with moral and physical support is the essential and only appropriate response to established paraplegia.
ENDOVASCULAR REPAIR OF ABDOMINAL AORTIC ANEURYSM
Appraise
1. The first reported operation to repair an abdominal aortic aneurysm by endovascular deployment of a stent-graft combination within the aneurysm sac was undertaken by Parodi in 1990.1 Since then the technology of endovascular stent-grafts has evolved rapidly and there are now a large number to choose from.
2. Endovascular aneurysm repair has the attributes of a minimally invasive operation. The procedure itself carries a very low risk and the recovery time is much shorter than that associated with conventional open operation.
3. For ‘fixation’ the endograft relies upon a stent, with or without hooks or barbs attached, and for ‘seal’ to exclude the aneurysm sac from the circulation it relies upon firm contact between the fabric of the graft and the vessel wall at each end. These functions demand the existence of a ‘neck’ of at least 15 mm in length between the lower renal artery and the start of the aneurysm and adequate distal ‘landing zones’.
4. It is essential to match the size of the endograft to that of the vessels within which it is to be implanted. Over-sizing of the diameter of the stent-graft relative to that of the arteries, in the order of 10–20%, is necessary to ensure adequate fixation and seal. Devices with a proximal neck diameter of up to 36 mm are available.
5. The length of the device is critical also. It is permissible to cross the renal arteries with an uncovered stent but in order to achieve an effective seal it is necessary to position the top of the covered part of the stent immediately below the renal arteries without overlapping their ostia. Distally it is permissible to cross one but not both internal iliac arteries.
6. Access for the device is via the common femoral artery and it is essential that the iliac arteries can permit the passage of the introducer systems. Iliac arteries should measure 7 mm or greater and should not be too tortuous or heavily calcified. If the iliac arteries preclude the passage of the introducer systems then either a conduit can be performed on to the distal common iliac artery (10-mm Dacron graft) or a ‘trial by angioplasty’ can be performed to dilate the vessel.
7. Bifurcated endografts are now the norm and may be one-piece or modular designs, which are assembled in situ during the operative procedure.
8. Aneurysms of the descending thoracic aorta can also be repaired successfully by straight endografts introduced from the groin or via the abdominal aorta or an infrarenal aortic graft. The risk of operative complications, including paraplegia and death, appears to be much lower than that associated with open repair.
9. All endovascular procedures require a significant degree of accurate planning with CT imaging and investment in a full range of consumables and devices. Fenestrated and branched endoluminal devices, which permit endovascular repair of aneurysms in the visceral or thoracoabdominal region, are only undertaken by specialist vascular units and are not the remit of this chapter.
Prepare
1. The clinical indications for endovascular repair are similar to those for open repair (see above). However, some patients who are unfit for the open operation may be able to tolerate the less-invasive endovascular procedure.
2. For accurate measurements of the aneurysm and adjacent arteries and assessment of the access route, obtain CT scans in a dynamic format which can be viewed on a work station. Angiograms performed with an intraluminal measuring catheter in situ (calibrated angiograms) may provide useful additional information, but modern dynamic CT angiography obviates the need for this invasive test in all but a few patients. Be sure that the minimal anatomical criteria, as defined by the device manufacturer, are satisfied.
3. Preoperative assessments of cardiac, respiratory and renal function are required as for open aneurysm repair (see above).
4. General anaesthesia is to be preferred. If regional anaesthesia is used, facilities for general anaesthesia must be immediately available in case conversion to open repair becomes necessary.
5. Place the patient supine upon a radiolucent operating table and prepare as for open aneurysm repair, including the administration of a broad-spectrum antibiotic on induction of anaesthesia (see above).
6. Consideration as to the positioning of the imaging equipment is also required.
Access
1. For endovascular repair with a bifurcated endograft, access to both common femoral arteries is required. Although percutaneous access is possible with some types of device, the benefit is marginal and it is recommended that the common femoral arteries are exposed on both sides. Because the exposure required is limited, use short transverse incisions placed one finger’s breadth above the groin crease and directly over the femoral pulse, rather than a classical vertical incision. It is not essential to dissect the profunda femoris artery. Apply Silastic loops or nylon tapes to the common femoral artery.
2. The choice of side of access for the body and ipsilateral limb of the device is dependent upon the anatomical configuration and distribution of disease in the iliac arteries and the direction of any angulation of the neck of the aneurysm.
3. Having exposed the common femoral arteries, give heparin 5000 IU intravenously.
4. Through the contralateral common femoral artery position a pigtail angiography catheter within the aorta just above the expected level of the renal arteries (see above, Basic techniques, for steps required). Obtain an angiogram to determine precisely the position of the renal arteries relative to bone structures or a radio-opaque measuring scale placed under the patient.
5. Via the ipsilateral side pass an angiography catheter over a standard 0.035 inch guide-wire into the suprarenal aorta. Through this catheter exchange the standard guide-wire for a long, super-stiff guide-wire (for example, a Lunderquist) and position it in the ascending aorta. Remove the catheter and introduce the stent-graft over the wire.
6. Manoeuvre the X-ray equipment to ensure that the origin of the renal arteries is in the centre of the image as viewed on the screen, taking into account the angulation of the aneurysm. This step is essential to avoid error when positioning the stent-graft.
7. Via the angiography catheter on the contralateral side obtain an angiogram and mark the position of the lowest renal artery.
8. Carefully adjust the position of the endograft within its introducer sheath so that the upper margin of the fabric of the graft is aligned with the lower border of the lowest renal artery.
9. Under fluoroscopic control deploy the body of the graft according to the procedure specified by the manufacturer. Usually, fine adjustment of the position of the device is possible after deployment of the upper one or two rows of the stent and another angiogram may be obtained at this stage. However, remember to withdraw the angiography catheter into the sac of the aneurysm before deploying the device fully.
10. It is now necessary to pass a guide-wire into the short leg (contralateral limb) on the body of the graft from the opposite groin. Radio-opaque markers are located at strategic points on the device for guidance. Withdraw the angiography catheter from the sheath in the common femoral artery and replace it with a catheter with a shaped end (e.g. cobra) or multipurpose-angled, to assist manipulation of the wire into the limb under fluoroscopic control.
11. Successful cannulation of the contralateral limb can be confirmed by checking that the guide-wire has been advanced into the lumen of the device by passing a pigtail catheter over the wire and observing that it can be rotated within the device without catching or deforming.
12. Exchange the standard 0.035 inch guide-wire for a super-stiff wire advanced well above the renal arteries.
13. Advance the second limb within its introducer system over the super-stiff wire and position it within the short limb on the body of the device under fluoroscopic control using, as a guide, the radio-opaque markers sutured on the stent-grafts provided for this purpose. When you are satisfied with the position deploy the second limb in accordance with the manufacturer’s instructions. Modern modular stent-grafts are provided with a choice of limbs of different lengths and diameters.
14. Depending on the manufacturer’s recommendations, consider using an intraluminal balloon to gently mould the stent-graft and its components.
15. The basic procedure is now completed (Fig. 23.33) but it is essential to obtain a completion angiogram to ascertain that the position of the device is satisfactory and especially to identify ‘endoleaks’. When satisfied with the angiographic appearances remove all sheaths, catheters and guide-wires, close the femoral arteriotomies with 5/0 polypropylene sutures and restore blood flow to both limbs.
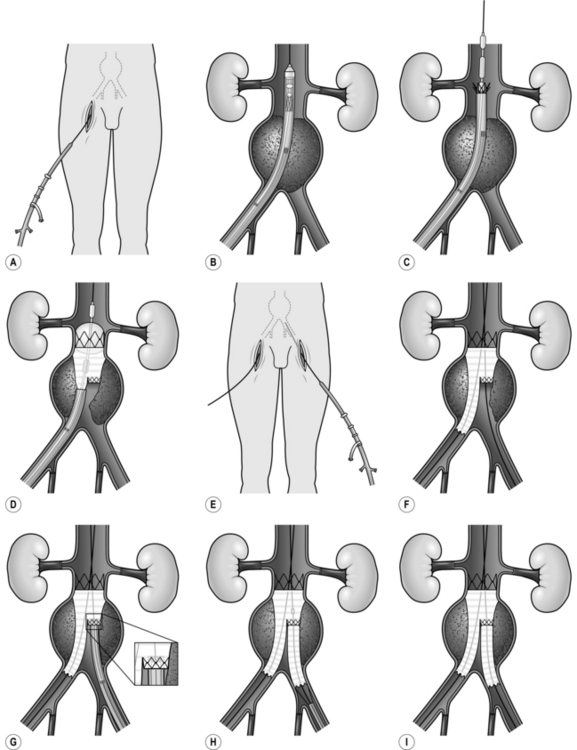
18. Close the groin incisions and check to ensure that the peripheral circulation is satisfactory.
REPAIR OF POPLITEAL ANEURYSM
Appraise
1. After the abdominal aorta, the popliteal artery is the second most common place for aneurysms to occur. Sixty per cent are bilateral.
2. Popliteal aneurysms are dangerous because of their tendency to thrombosis with peripheral embolization. Initially, mural thrombus develops within the aneurysm and, possibly because of repeated flexion of the knee joint, fragments break away and embolize into the distal vessels. Because the emboli are small this process can occur insidiously so that the peripheral vascular bed gradually silts up until the aneurysm itself suddenly thromboses completely. Reconstructive surgery is often impossible because of the absence of patent vessels distally to receive a graft, and acute ischaemia from thrombosis of a popliteal aneurysm frequently results in loss of the limb. It has been suggested that thrombolytic therapy prior to operation may give better results than surgery alone. There is also a risk of haemorrhage from rupture of popliteal aneurysms but this is much less common.
3. Most popliteal aneurysms should be operated upon electively even if asymptomatic, especially when they contain intraluminal thrombus, which can be identified by ultrasound scanning.
4. Endovascular repair of popliteal aneurysms with a covered endoluminal stent or endograft is an option that can be considered in patients with co-morbidites which preclude open surgery. Good long-term results are being achieved with nitinol stents, which have flexibility and endurance.
5. Proximal and distal ligation of the aneurysm in combination with a bypass graft, by a medial approach, is the traditional approach preferred by many surgeons. The technique is the same as for femoropopliteal bypass graft, with ligation of the aneurysm proximally and distally. The conduit of choice is the long saphenous vein, which is usually of good calibre. Some studies have shown that up to one-third of aneurysms treated by this method continue to expand due to pressurization of the sac by geniculate collateral arteries.1 Therefore, a direct posterior approach with insertion of an inlay graft is discussed below.
Access
1. Make a vertical ‘lazy-S’ incision over the popliteal fossa. Incise the popliteal fascia and fat pad in the same line to expose the ‘diamond’ defined by the hamstring muscles above and the two bellies of the gastrocnemius muscle below (see Exposure of the major peripheral arteries, Popliteal artery, above).
2. The popliteal artery lies medial and deep to the popliteal vein. Most aneurysms originate 1 or 2 cm distal to the adductor opening and terminate proximal to the anterior tibial branch. Divide any veins draining the gastrocnemius muscle, which may be found crossing the distal popliteal artery to gain access to the popliteal vein. Take care to protect the sural, lateral popliteal and common peroneal nerves, all of which are particularly vulnerable.
3. Pass silastic loops around the popliteal artery proximal and distal to the aneurysm.

4. The short saphenous vein arises behind the lateral malleolus at the ankle and takes a posterolateral course to enter the popliteal vein at a variable point above the level of the knee joint. In its distal half it is subcutaneous but penetrates the deep fascia to become subfascial proximally. Identify it in the distal popliteal fossa and trace it distally by incising the skin and deep fascia overlying it. Take great care to avoid injury to the sural nerve that runs alongside it. Harvest an adequate length and prepare it for use as a reversed vein graft (see Basic principles).
Action
1. Give intravenous heparin to the patient.
2. Apply clamps proximal and distal to the aneurysm.
3. Incise the aneurysm longitudinally along its whole extent. Oversew vessels that are back-bleeding into the sac, using 4/0 polypropylence figure-of-eight sutures placed across their orifices.
4. Inlay a reversed autologous vein graft with end-to-end anastomoses by the parachute method, using 4/0 or 5/0 polypropylene sutures. The distal limit of the aneurysm may be obscured by the nerves crossing it, making an inlay anastomosis difficult and therefore unsafe. In this case transect the popliteal artery distal to the aneurysm and construct a direct end-to-end anastomosis.
5. Close the wound in layers with a suction drain to the popliteal fossa.
CAROTID ENDARTERECTOMY
Appraise
1. Controversy surrounding this operation was dispelled by the publication of two randomized clinical trials in the early 1980s – one from Europe2 and the other from America.3 Both trials showed a significant benefit from surgery for patients with transient cerebral ischaemic attacks and a stenosis at the origin of the internal carotid artery of greater than 70%. Those with a mild stenosis of less than 30% fared better with medical therapy than with surgery, while no clear-cut conclusions could be drawn regarding those with a moderate stenosis of between 30% and 70%. A change in practice in the UK, with aggressive investigation and treatment for transient ischaemic events and cerebral infarction with Hyper Acute Stroke Units, has changed the treatment pathways such that it is now recommended that carotid endarterectomy should be performed within 14 days of the acute event; in some centres surgery within 48 hours is being achieved, the emphasis being on the need to prevent further embolic events from the carotid pathology.
2. The main indication for carotid endarterectomy is, therefore, transient cerebral ischaemic attacks and proven cerebral infarcts with an internal carotid artery stenosis greater than 70%.
3. Patients who have suffered a complete stroke and show no improvement in their neurological symptoms are not thought to gain any benefit from this surgery.
4. Surgical intervention for ‘strokes in evolution’ has potential to prevent or limit the effects of completed stroke in some patients, but there is also a risk of aggravating the condition and this indication is therefore controversial.
5. There is little convincing evidence that patients with symptoms of vertebrobasilar insufficiency benefit from carotid endarterectomy.
6. Total occlusion of the internal carotid artery is a contraindication to surgery.
7. Do not forget that carotid endarterectomy is a prophylactic operation. It will not improve symptoms due to a previous stroke but, in patients with symptomatic lesions of greater than 70%, it will reduce the risk of the patient suffering another ipsilateral stroke from approximately 20% within 3 years to 2% over the same period.
8. Because it is a prophylactic procedure, the complication rate associated with the operation must be extremely low. The justification for carotid endarterectomy is based on the assumption of a combined operative mortality and stroke rate of less than 5%. It is, therefore, essential that those undertaking this operation should maintain an accurate audit of their results and be prepared to refer their patients elsewhere if they cannot achieve this level of performance.
9. Endovascular approaches to the treatment of carotid artery disease have been disappointing, with unacceptably high stroke rates despite the use of cerebral protection devices. At the time of writing carotid endarterectomy remains the ‘gold standard’.
Prepare
1. Duplex scanning accurately diagnoses the presence of internal carotid artery stenosis. Conventional carotid angiography carries a risk of stroke of approximately 1% and is normally to be avoided. If detailed imaging of the carotid artery and intracranial vessels is required, CT or magnetic resonance angiography is used.
2. CT scanning of the brain confirms whether or not the patient has suffered infarction (not haemorrhage) prior to surgery being considered.
3. Dual antiplatelet therapy (aspirin and dipyridamole) is usually commenced as soon as a cerebral infarct has been diagnosed and should be continued after the operation.
4. Under either general or regional anaesthesia the patient is placed supine on an operating table and the head of the table is raised slightly in order to reduce pressure in the neck veins (reverse Trendellenberg position). The patient’s head, supported on a head ring, is turned slightly to the opposite side with the neck extended. The preparation and towelling include the pinna, which is bent forwards and supported in this position by an adhesive drape. This is to allow access for the sternomastoid muscle to be raised from the mastoid process should exposure of the artery be required at a high level.
5. Local anaesthesia in the form of a regional cervical plexus block has the advantage that the patient is able to cooperate in order to identify impaired cerebral perfusion and the need for a cerebral protection shunt (see below). However, general anaesthesia is preferred by many surgeons and patients. A randomized trial of general or local anaesthetic (GALA Trial) did not demonstrate any significant difference in terms of clinical outcome for either method.
Access
1. Make an oblique skin incision along the anterior border of the sternomastoid muscle extending from the mastoid process to the sternoclavicular joint (Fig. 23.34). Divide all subcutaneous tissue and the platysma muscle in the same line. Cutaneous nerves crossing the line of the incision must be sacrificed and this will leave an area of permanent numbness beneath the line of the jaw. The great auricular nerve should, however, be preserved.
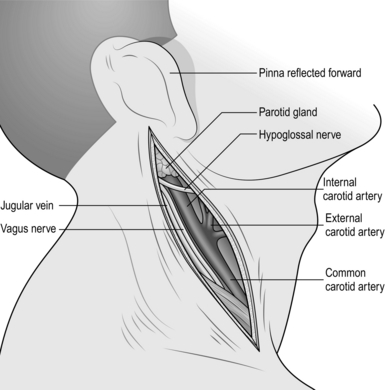
Fig. 23.34 Exposure of the carotid arteries.
2. Mobilize the anterior border of the sternomastoid muscle and retract it posteriorly.
3. Identify the facial vein and divide it between ligatures. This allows the internal jugular vein to be displaced posteriorly. There may be additional venous tributaries that need to be divided. In the upper part of the incision mobilize the jugular lymph nodes and retract them posteriorly. Take care to avoid damage to the hypoglossal nerve, which sometimes loops surprisingly low into the neck and may be quite superficial. Find the ansa hypoglossi (also known as the ansa cervicalis) nerve on the surface of the carotid sheath and trace it upwards to locate the hypoglossal nerve. The ansa hypoglossi, which supplies the strap muscles, may be cut without any discernible functional disability. Incision into the lower pole of the parotid gland results in troublesome bleeding; therefore, dissect a plane posterior to this structure. The digastric muscle lies beneath it but does not impede access to the artery.
4. Open the carotid sheath initially towards the lower end of the incision to expose the common carotid artery. The vagus nerve lies posteriorly and deep to the artery and is not usually at risk, but its position should be noted so that it can be safeguarded. Pass a nylon tape or rubber sling carefully around the common carotid artery. Expose the carotid bifurcation and trace the internal carotid artery, which lies posterior to the external artery superiorly. It is important to remember that the artery may contain loose thrombotic or atheromatous material which could be dislodged by rough handling, with dire consequences. Therefore, use gentle sharp dissection and do not occlude or otherwise manipulate the vessel until you are ready to apply clamps. Dissecting the tissues off the vessel rather than vice versa is good surgical technique in this situation. Identify and protect the hypoglossal nerve, which must sometimes be lifted off the artery and gently retracted with a soft rubber sling. A small artery and vein loop backwards over the hypoglossal nerve and these should be divided to allow the nerve to be displaced forwards. Clear as much of the artery as possible distal to the bifurcation and very carefully pass a narrow sling around it.
5. Dissect the origin of the external carotid artery and its superior thyroid branch. Pass a single rubber sling around both of these vessels. A single sling used in this way ensures that the ascending pharyngeal artery, which arises from the posterior aspect of the internal carotid artery close to its origin, is also controlled. If slings are placed around the superior thyroid and internal carotid arteries separately, troublesome back-bleeding may be encountered from this vessel following arteriotomy and during dissection of the atheromatous plaque.
6. You are now ready to clamp the arteries, but before proceeding make sure that you know what you are going to do about protecting the brain from ischaemic damage during clamping and that all the necessary instruments are readily to hand.
Cerebral protection
1. The majority of patients will tolerate prolonged clamping of the internal carotid artery without suffering ischaemic damage to the brain, but it is essential to employ a policy that will protect the minority who are at risk.
2. The use of temporary plastic shunts (see General principles) has entirely replaced controlled hypothermia as the method of choice. They are simpler and safer.
3. Shunts may be used routinely or selectively. If used selectively, some test must be employed to identify those in whom they are needed. These include:
 Internal carotid artery stump pressure measurement. After the administration of heparin, clamps are applied to the external and common carotid arteries and the pressure in the internal carotid artery is measured with a needle probe connected to a transducer. The pressure measured in this way provides an assessment of the adequacy of the collateral circulation through the circle of Willis. Different criteria have been applied, but a mean pressure in excess of 60 mmHg with a good pulsatile pressure wave pattern is often said to indicate adequate perfusion of the relevant hemisphere. If these criteria are met, then the operation proceeds without a shunt. If not, a shunt is inserted first.


4. In certain circumstances a shunt is required and this is described below. There are small risks associated with shunts related to intimal damage to the artery and air emboli. However, these risks become negligible with familiarity of use.
Action
1. Select the arterial clamps and make sure they are immediately available, together with the Javid shunt and associated large and small ring clamps. Apply a Spencer Wells haemostat to the centre of the shunt.
2. Give heparin intravenously in a dose of 1000 IU for each 10 kg body weight and allow 3 minutes for it to circulate.
3. Apply clamps to the internal carotid, the common carotid and external carotid arteries in that order.
4. Make a longitudinal arteriotomy commencing on the common carotid and extending into the internal carotid beyond the distal limit of the atherosclerotic plaque.
5. Insert the Javid shunt into the common carotid artery and retain it with the larger ring clamp (Fig. 23.35). Temporarily release the Spencer Wells clamp and allow a little bleeding from the end of the shunt to ensure that it is completely filled and that all air has been ejected. Make a loop with the shunt and insert the other end into the distal internal carotid artery, ensuring that it enters freely without catching and that no air becomes trapped in the process. Apply the ring clamp and, after checking again to ensure there is no air trapped within the shunt, release the Spencer Wells clamp. There are at least 3 or 4 minutes of safe clamping time and without hurrying it usually takes less time than this to initiate flow through the shunt.
6. While an assistant holds open the loop of the shunt, commence the endarterectomy. Using a MacDonald’s or Watson-Cheyne blunt dissector, find the plane in the common carotid artery. Develop this around the whole circumference and then cut the ‘core’ across neatly. Continue the endarterectomy distally and define the ostium of the external carotid artery. It may be best to terminate the endarterectomy here by cutting across it but the atheroma may extend for only a few millimetres into this vessel, in which case it often lifts out cleanly.
The most important part of the endarterectomy is its termination in the internal carotid artery. In most cases the atheroma ‘feathers’ away and the plaque lifts out without leaving any edge. If the atheroma does continue distally in this vessel and the plaque must be cut across, place a number of Kunlin sutures across the edge in order to prevent any chance of internal flap dissection (Fig. 23.36). This should rarely be necessary.
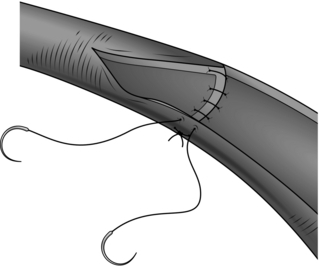
7. Once the core has been removed pay meticulous attention to the endarterectomized surface of the artery, recovering all loose flakes and strands, and flush it with heparinized saline (see General principles).
8. Close the arteriotomy with a patch. Simple closure without a patch may be acceptable if the diameter of the internal carotid artery is exceptionally large; which is sometimes the case in male patients. However, there is good scientific evidence to support the routine use of patches and there should, therefore, be few exceptions to this practice. Vein patches are associated with a risk of spontaneous rupture in this situation, with catastrophic consequences; therefore, patches of prosthetic materials are preferred. These are now manufactured specifically for this purpose. Roll the loop of the shunt towards the proximal end of the arteriotomy and commence the closure in the internal carotid. Use 6/0 polypropylene sutures. Finally, clamp the shunt and remove it. Re-apply clamps to the carotid vessels and complete the closure of the arteriotomy. Flush all vessels before tightening the last stitches.
9. Declamping. Remove the clamp from the internal carotid artery, allow blood to fill back into the bifurcation, displacing air through the suture line, and then re-apply the clamp to the internal carotid more proximal than previously placed, at the level of the bifurcation, to maximize flow into the external carotid artery and minimize emboli to the internal carotid artery. Remove the clamp from the external carotid and then from the common carotid. After three or four heart beats, finally remove the clamp again from the internal carotid artery. The purpose of this declamping procedure is to ensure that any retained air bubbles or small fragments of thrombus pass harmlessly into the external carotid and not into the brain.
Closure
1. Use a continuous 2/0 absorbable suture for the platysma muscle and a subcuticular suture for skin closure. Consider whether a small suction drain is needed (it may not be).
2. Reverse the heparin only if bleeding is excessive. Consider whether blood products are required if the patient is on dual antiplatelet therapy and has significant oozing.
Aftercare
1. Observe the pulse rate and blood pressure at quarter-hourly intervals for the first hour, half-hourly for 2 hours and then hourly.
2. Observe and chart neurological signs quarter-hourly for the first 3 hours.
3. If a drain was inserted, consider removal within 24 hours.
4. Discharge home when stable, usually on the second postoperative day.
Complications
1. Postoperative bradycardia and hypotension. This may be associated with stimulation of the nerve to the carotid body. There is, however, no evidence that injecting the nerve with a local anaesthetic agent, as advocated by some surgeons, is of value. Administer atropine at intervals to increase the heart rate and cautiously give more fluid intravenously.
2. Postoperative hypertension. This must be controlled, if excessive, by the administration of appropriate drugs.
3. Stroke. If the patient develops a sudden severe neurological defect within the first few hours after operation this may be due to thrombotic occlusion of the artery. Scan the artery with Duplex ultrasound. If there is no flow in the artery or the results are equivocal, return the patient to theatre immediately and re-explore the vessel. A less-severe neurological defect should simply be observed since it is likely to be transient and due to other causes.
4. Neck haematoma. A large tense haematoma is a potential cause of airways obstruction due to a combination of compression and laryngeal oedema and is dangerous. All wound haematomas of any size should be drained by re-opening the wound under local anaesthesia. Do not wait for a stridor or other evidence of airway obstruction before taking action.
5. Cranial nerve lesions. Temporary dysfunction of the hypoglossal or cervical branch of the facial nerve caused by retraction is common. Trauma to the hypoglossal nerve causes deviation of the protruded tongue to the ipsilateral side. Recovery within a few days is usual but, if permanent, most patients adapt well. Injury to the vagus nerve is manifest by hoarseness. In severe and permanent cases Teflon injections into the vocal cord by an ENT surgeon may help. The glossopharyngeal nerve is rarely damaged since it lies above and deep to the carotid bifurcation. However, injury to it is potentially troublesome since the patient may have difficulty in swallowing.
6. Late occlusion of the internal carotid artery. Surveillance by Duplex scanning shows that approximately 12% of carotid arteries become occluded within 5 years of endarterectomy. This is due to subintimal fibrous hyperplasia; it occurs slowly and is almost invariably asymptomatic. It must nevertheless be regarded as an undesirable outcome. Antiplatelet agents may help and there is evidence that the incidence is reduced by the routine application of patch closure rather than direct suturing of the arteriotomy. The indication for late surgical re-intervention is re-stenosis without total occlusion, accompanied by recurrent transient cerebral ischaemia symptoms. Such a lesion is likely to be due to recurrent atheroma rather than subintimal fibrous hyperplasia.
REFERENCES
1. Kirkpatrick UJ, McWilliams RG, Martin J, et al. Late complications after ligation and bypass for popliteal aneurysm. Br J Surg 2004;91:174–8.
2. European Carotid Surgery Trial Collaboration Group. MRC European Carotid Surgery Trial: interim results for symptomatic patients with severe (70–90%) or with mild (0–29%) carotid stenosis. Lancet 1991;357:1235–43.
3. National Institute of Neurological Disorders and Stroke. Clinical alert: benefit of carotid endarterectomy for patients with high grade stenosis of the internal artery. Stroke 1991;22:816–7.
EVAR Trial Participants. Endovascular aneurysm repair versus open repair in patients with abdominal aortic aneurysm (EVAR Trial 1): randomised controlled trial. Lancet. 2005; 365(20):2179–2186.
EVAR Trial Participants. Endovascular aneurysm repair and outcome in patients unfit for open repair of abdominal aortic aneurysm (EVAR Trial 2): randomised controlled trial. Lancet. 2005; 365(20):2187–2192.
The United Kingdom EVAR Trial Investigators. Endovascular repair of aortic aneurysm in patients physically ineligible for open repair. N Engl J Med. 2010; 362(20):1863–1872.
The United Kingdom EVAR Trial Investigators. Endovascular repair of aortic aneurysm in patients physically ineligible for open repair. N Engl J Med. 2010; 362:1872–1880.
[/level-membership-for-surgery-category][not-level-membership-for-surgery-category]23
Arteries
Exposure of the major peripheral arteries
Unilateral aortofemoral/iliofemoral bypass
Iliac artery angioplasty and stenting
Femoropopliteal and infrapopliteal saphenous vein bypass
Femoropopliteal and infrapopliteal bypass with prosthetic graft
Repair of abdominal aortic aneurysm – open surgery
Repair of thoracic and thoracoabdominal aneurysms
INTRODUCTION
INDICATIONS FOR OPERATION
1. Injury. This may result from sharp or blunt trauma secondary to assault or road traffic accident. Iatrogenic injuries are becoming more prevalent as a consequence of percutaneous arterial access for diagnostic procedures and treatments such as coronary interventions. Challenging self-induced injuries are also seen as a result of intravenous drug addiction.
2. Aneurysm. This is defined as a pathological, permanent dilatation of an artery. Arterial aneurysms may involve the aorta and/or peripheral arterial system. The three main sites for aneurysms are the abdominal aorta, femoral and popliteal arteries. Most vascular surgeons consider the aorta to be dilated once it is twice its normal diameter; for non-aortic vessels an arterial aneurysm is defined by an increased diameter of 50% or more. Aneurysmal disease secondary to atherosclerosis is responsible for considerable morbidity and mortality in the developed world and the prevalence of abdominal aortic aneurysm is increasing. Vascular disease is rarely localized and it is essential to exclude co-existent pathology in other vessels.
Infected (mycotic) aneurysms are much less common than those caused by degenerative disease. True mycotic aneurysms result from septic emboli of cardiac origin (endocarditis), which may result in multiple aneurysms at different sites. With an ageing population, microbial aneurysmal arteritis is seen more frequently than true mycotic aneurysms; this results from bacterial seeding into diseased arterial intima with subsequent pseudoaneurysm formation, the most common infecting organisms being the Salmonella species, Escherichia coli, Staphylococcus species and Klebsiella pneumoniae. In approximately 25% of cases no organisms are isolated.
3. Occlusion and stenosis. Most arterial occlusions result from thrombosis of a diseased vessel and are part of a generalized atherosclerotic process. Surgical intervention is not always necessary and careful assessment and management of risk factors is required before surgery is planned. Less commonly an artery is blocked by an embolus. Sudden occlusion of an otherwise normal major artery may threaten both the limb and the life of the patient and warrants emergency intervention either by embolectomy or dissolution of the occlusion. The management of acute-on-chronic limb ischaemia is quite different: this develops following thrombotic occlusion of a previously diseased vessel and cannot usually be treated effectively with thrombectomy alone.
The sections which follow assume that the patient has already been critically evaluated and the need for operation established.
GENERAL PRINCIPLES
EQUIPMENT
Instruments
1. Clamps. A good selection of lightweight vascular clamps is essential. The DeBakey Atraugrip range is suitable for large intra-abdominal and thoracic vessels. For smaller vessels (e.g. femoral, popliteal, subclavian, brachial and carotid arteries), miniature clamps of the Castaneda type designed for paediatric cardiac surgery are ideal. The springs should be gentle and not cause intimal damage. A selection of small ‘bulldog’ clamps is useful to control bleeding while minimizing arterial damage. Alternatively, control of small distal vessels can be gained with the use of fine nylon loops or smooth, round-ended atraumatic intraluminal catheters.
2. Dissecting instruments. Handle arteries gently, and only with non-toothed forceps such as the DeBakey Atraugrip range. Following an initial arteriotomy with an appropriate-sized scalpel blade (a No. 15 for infrainguinal surgery), Pott’s scissors angles in two planes are required for lengthening the arterial incisions. For dissection within the vessel, in order to remove adherent thrombus or elevate the plaque in an endarterectomy, Watson-Cheyne and James MacDonald’s dissectors are ideal. Long tunnelling instruments are necessary for conveying grafts between unconnected incisions.
3. Catheters and shunts. Atraumatic (umbilical) catheters ranging from 3F to 6F in size are useful for intraluminal irrigation and to control small vessels. In addition, a range of the Pruitt type catheters are helpful as they have dual ports to irrigate and occlude vessels. These catheters are particularly useful where heavily calcified vessels may preclude the use of traditional vascular clamps, which may cause iatrogenic injury. A similar size range of Fogarty embolectomy catheters is also required. Catheters with a central lumen allow their introduction over a guidewire under fluoroscopic control, to facilitate intra-operative radiological imaging as well as the instillation of anticoagulant solutions, for example heparinized saline or tissue plasminogen activator (tPA).
It is sometimes necessary to employ an intraluminal shunt as a temporary bypass during reconstruction of a vessel, most commonly in carotid endarterectomy or during arterial and venous reconstruction following trauma. There are two basic types: the Javid and Pruitt-Inihara. A Javid shunt is a tapered plastic tube with a bulbous expansion at each end; these allow large and small ring clamps to be applied to the outside of the vessel once the shunt has been introduced into the artery (see Fig. 23.35).
Fig. 23.35 Application of the Javid shunt.
The second type is a modification of the Pruitt catheter described above, with a balloon at each end to retain it in place and to control bleeding, and a side-arm for withdrawal of blood or air from the lumen.
4. Endovascular equipment. For the most part, percutaneous procedures are the remit of the interventionalist and/or the vascular specialist. Procedures may involve both open and endoluminal techniques. It is paramount that procedures involving radiation and contrast medium are undertaken by appropriately trained staff with the requisite certification. For the non-specialist a basic understanding of the guidewires (variety of diameters, thickness, lengths and coatings as well as stiffness, depending on usage, tip shapes and steering capabilities), catheters and sheaths available is all that is required. It is not recommended that surgeons lacking the requisite training and skills undertake these techniques.
5. Sutures, needle-holders and suture clamps. Arteries are always sewn with non-absorbable stitches. There are three types:
Fine monofilament material such as polypropylene (Prolene) has the advantage of being very smooth and slipping easily through the tissues so that a loose suture can be drawn tight. The material possesses a slight ‘memory’ which can easily be compensated for with familiarity of use. Its main disadvantage is that it has a tendency to fracture with direct handling with metal instruments.
Grafts and stents
1. Dacron. This is an inert polymer that is spun into a thread and then either woven or knitted; it is available as straight or bifurcated grafts measuring from 5 to 40 mm in diameter. In general, the knitted variety with a velour lining is preferred as its porosity leads to better anchoring of the internal ‘neointimal’ surface. The original knitted grafts needed to be carefully preclotted with blood taken from the patient prior to the administration of heparin and in an emergency such as a ruptured aneurysm it was necessary to use a woven graft, which leaks less. However, most vascular surgeons now use knitted grafts that have been presealed with bovine collagen, gelatin or albumin. These grafts have very low porosity at the time of insertion and so do not require preclotting. Dacron grafts perform well when used to bypass large arteries with a high flow-rate (e.g. the aorta and iliac arteries) and are the conduit of choice in these situations provided there is no obvious infection present. In general, Dacron grafts are used above the groin and PTFE below the groin. Dacron grafts are available with external ring supports to prevent compression or kinking.
2. Expanded polytetrafluoroethylene (PTFE) is more expensive than Dacron, but its performance is superior for reconstruction of small arteries. PTFE grafts are again available with an external polypropylene ring support to prevent compression or kinking of the graft. It is essential to use this type of graft when traversing a joint (for example the knee joint). Further developments in this field include preshaped grafts which are manufactured from PTFE to reproduce an anastomosis of ‘ideal’ configuration without the need to form a vein cuff at the distal anastomosis. The long-term patency rate is inferior to that of vein grafts.
3. Biological. The first arterial substitutes tried were arterial or venous allografts or xenografts but these degraded and were abandoned. Grafts from cryopreserved human umbilical veins have been advocated for bypass procedures in the presence of infection; however they are prone to aneurysmal dilatation and therefore their use is limited.
4. Compliant grafts. Prosthetic grafts are stiff and non-compliant and hence their patency is inferior to that of human vessels. Newer grafts developed using nanotechnology have an excellent compliance profile; they are currently in clinical trials and may prove to be a significant new material in the armamentarium of the vascular surgeon.
5. Stents and stent-grafts. Metallic stents made from either stainless steel or nitinol may be used as an adjunct to balloon angioplasty in order to maintain patency of a vessel. There are two types: balloon expandable (e.g. Palmaz stent) and self-expanding (e.g. Wallstent). Stent-grafts are used for endovascular aneurysm repair and are made of polyester/PTFE attached to a metal stent (either stainless steel or nitinol, which is a nickel–titanium alloy). The metal stent provides both radial and longitudinal support, with the aneurysm being excluded from the circulation by the graft material. Endografts are usually self-expanding but balloon expandable devices have been made. All endoluminal stent-grafts rely on being oversized by 10–15% relative to the normal diameter of the artery in which they are placed. One further variable is the proximal fixation method, which usually consists of hooks or barbs which secure the device to the proximal aortic wall to minimize distal migration. Most stent-grafts are either bifurcated aortoiliac or uni-iliac devices and are either one piece or modular in design. If a uni-iliac device is deployed, the contralateral iliac artery has to be occluded, usually with a radiological plug, and a femoro-femoral crossover graft performed to allow perfusion of the contralateral lower limb.
GENERAL CONSIDERATIONS
Antibiotics. Infection is disastrous in vascular surgery and antibiotic cover is essential, particularly if a prosthesis is to be used. The local regimen should be consulted; however, appropriate cover for Staphylococcus should be given intravenously before the first incision is made.
Anticoagulation. Before arteries are clamped systemic anticoagulation should be given, this is calculated at 70 units of heparin per kg (approximately 5000 units of heparin for a standard 70 kg person given intravenously) and is given 2 minutes before arterial clamps are applied. In complex thoracoabdominal open or endovascular procedures the heparin regimen differs and is usually determined and controlled by regular monitoring of the ACCT with appropriate reversal at the end of the procedure.
BASIC TECHNIQUES OF ARTERIAL REPAIR, ANASTOMOSIS AND TRANSLUMINAL ANGIOPLASTY
Arteriotomy
Simple suture
1. Longitudinal arteriotomies in large or medium-sized arteries can usually be closed by simple suture (Fig. 23.1).
2. Use the finest suture material compatible with the thickness and quality of the arterial wall. The aim is to produce an everted suture line that is leak-proof, with apposition of the intima. This is quite different from bowel anastomosis, where the mucosa is deliberately inverted into the lumen and tension on the sutures is minimal to prevent necrosis of the edges. There is no need to use everting mattress sutures which would narrow the lumen: a simple over-and-over stitch is adequate provided that care is taken to ensure that the intima turns outwards. The needle must pass through all layers of the arterial wall with every stitch. The inner layers must be included to ensure good intimal apposition and to prevent flap dissection, and the outer layers must be included since the main strength of the arterial wall resides in its adventitia. A good surgical assistant who follows your stitches and maintains firm, even tension on the suture at all times is important. Experience is required in order to judge the spacing and size of each bite, and this varies with the size and nature of the artery. Occasionally, for example in aortic aneurysm repair, large irregular stitches may be required but in general evenly spaced regular stitching is best.
Closure with a patch
1. Close vessels of less than 4 mm in diameter with a patch in order to avoid narrowing of the lumen (Fig. 23.2).
2. This technique may also be used to widen the lumen of a vessel that has become stenosed by disease (e.g. the profunda femoris artery). For small vessels use a patch of autologous vein. Do not use the proximal end of the long saphenous vein for this purpose. Use either a segment taken from the ankle, a tributary or a piece of vein from another site (e.g. an arm vein). For larger vessels prosthetic material (either Dacron or PTFE) or bovine or equine patches may be used. When cutting the patch to shape, always ensure that the ends are rounded rather than tapered to a sharp point: this prevents narrowing of the lumen caused by clustering of sutures at the pointed end. After shaping the patch use a single double-ended stitch commencing close to one end and working around each side. Do not finish the stitching at the apex as knots here are at risk of causing significant narrowing: carry one of the sutures around to the other side to complete the closure and tie the knot a short distance to one side. This technique permits direct vision of the internal suture line and allows final trimming of the patch to be delayed until closure is nearly complete in order to ensure a perfect match for size.
End-to-end anastomosis
1. For small delicate arteries this is accomplished most safely by applying the principles of the triangulation technique originally described by Carrel.1 Join the vessels with a suture placed in the centre of the back or deepest aspect of the anastomosis (Fig. 23.3). Be sure to tie the knot on the outside. Place two more sutures so as to divide the circumference of the vessels equally into three. Any disparity in calibre can be compensated for at this stage. If the vessel is small it is better to insert interrupted sutures to prevent narrowing. Use the three original stay sutures to apply gentle traction and to rotate the vessel and facilitate exposure of each segment of the anastomosis in turn. Complete the back two segments first, leaving the easiest segment at the front to be finished last.
2. For larger vessels it is permissible to use continuous sutures. Cut the ends of the vessels to be joined obliquely then make a short incision longitudinally to create a spatulated shape and reduce the risk of narrowing at the anastomosis.
3. A different technique of end-to-end anastomosis, the inlay technique, is routinely used in open operations for aneurysms (see below).
End-to-side anastomosis
1. This is the standard form of anastomosis for bypass operations. It should be oblique and its length should be 2–2.5 times the diameter of the lumen of the graft. To avoid narrowing the lumen, it is important that the end of the graft is fashioned into a spatulated shape, which on completion of the anastomosis has a smooth curved ‘cobra-head’ appearance rather than an angulated ‘V’ appearance. The end of the anastomosis in the angle with the native vessel is referred to as the ‘heel’ and the other end as the ‘toe’. Place a double-ended stitch at the heel and another at the toe and run sutures along each margin, ending with a knot at the halfway point on each side. Alternatively, start with a double-ended suture at the heel and leave the toe free. Run the suture up each side to beyond the midpoint and then place the suture in a ‘rubber-shod’ clamp to prevent damage. Take a new double-ended suture and start at the toe end and suture around the apex towards the midpoint on either side and then tie to the previously retained threads. This is sometimes known as the ‘four-quadrant technique’ (Fig. 23.4), and has the advantage of keeping the inside of the suture line in view as much as possible.
The ‘toe’ and ‘heel’ are the most crucial points of an end-to-side anastomosis. To ensure that the toe is completed as smoothly as possible, offset the starting point of the ‘toe’, suturing a few millimetres to one side or the other of the apex. In order to further reduce the risk of causing a stricture at this point, some surgeons prefer to place a few interrupted sutures around the toe. It is essential that this end of the anastomosis is performed under direct vision and to ensure that each stitch is placed carefully without causing narrowing.
2. A stricture of the heel may be avoided by stenting the vessel with an intraluminal catheter of appropriate size until this portion of the anastomosis is complete. An alternative method is the ‘parachute’ technique (Fig. 23.5). This is particularly useful where access is difficult and good visualization of the anastomosis is impaired, but it is applicable to most situations. With the graft and the recipient artery separated, place a series of running sutures between them at what will become the heel of the anastomosis. These sutures are then pulled tight as the vessels are approximated.
Transluminal angioplasty (Fig. 23.6)
Fig. 23.6 Percutaneous angioplasty.
1. Angioplasty is performed by appropriately trained vascular interventionalists. Most patients with symptoms secondary to peripheral arterial occlusion are now treated with endoluminal techniques rather than open surgery. Prior to offering patients transluminal angioplasty, optimize the patient’s risk factors with best medical therapy, cessation of smoking and a supervised exercise programme.2
It is paramount to consider these patients in the context of a multidisciplinary meeting. Most surgeons and radiologists will not offer angioplasty to patients with calf claudication as the risks may outweigh the benefits. Angioplasty and, if required, placement of a stent may be warranted in patients with buttock claudication with iliac stenosis, as the risks of emboli and consequent limb loss are lower. Patients with critical ischaemia and tissue loss should be considered for an endoluminal approach.
Patients with diabetes mellitus may present with challenging long occlusions extending from superficial femoral to crural vessels in tandem with significant co-morbidites. In these patients an endoluminal approach may be offered in isolation or in conjunction with surgical revascularization: subintimal angioplasty may be preferred to a transluminal approach; however, this should not be undertaken without due consideration and by an experienced endovascular specialist. Specialist equipment such as the ‘Outback’ catheter and ‘Ree kross’ balloon can achieve endoluminal revascularization of long occlusions and may result in a successful outcome in patients with critical limb ischaemia or tissue loss who may not be candidates for traditional surgery.
2. Essential requirements are fluoroscopy with ‘subtraction’ and ‘road-mapping’ functions and skilled radiographic assistance. Use a radiolucent operating table.
3. Ensure all operating theatre staff are properly protected against radiation.
4. In the case of elective procedures ensure that patients are prescribed antiplatelet therapy at least 48 hours prior to the procedure. Minimize contrast-induced renal damage by ensuring adequate rehydration with intravenous fluids pre and post procedure.
5. Consider giving mild sedation and oxygen; ensure regular non-invasive monitoring of blood pressure, heart rate and oxygen saturation. Well-chosen music in the operating room may help patients to relax.
6. Transluminal angioplasty can be undertaken percutaneously or using an open technique to expose the relevant artery. Be aware that this technique may be used concurrently with open arterial reconstruction (for example, iliac angioplasty and femorodistal bypass).
7. If the chosen entry vessel cannot easily be palpated consider using ultrasound to locate the vessel, allowing accurate single puncture entry. An introducer sheath is always used and permits repeated endovascular access with minimal trauma to the vessel. The size of sheath required is determined by the procedure to follow – balloon angioplasty usually requires a 4–7F sheath; stent placement may require a larger catheter. All manufacturers recommend the appropriate sheaths on their instructions and packaging.
8. The common femoral artery is the access vessel for most endovascular procedures and it is important to be familiar with its position with reference to surface landmarks (see Exposure of the common femoral artery, below).
9. For percutaneous access, clean the skin and apply drapes as for an open procedure. Inject a small amount of local anaesthetic at the chosen puncture site and make a nick in the skin with a no. 11 scalpel blade. While palpating the common femoral artery with the fingers of one hand introduce a Potts-Cournand or similar needle. These needles have a central trocar that allows blood to ‘flashback’ into a chamber on the hub when the lumen of the vessel is entered. Angle the needle to facilitate access of the guide wire in the direction required and to avoid puncture of the back wall or creation of a false lumen and dissection. For infrainguinal procedures, puncture the artery just distal to the inguinal ligament, allowing room to manoeuvre the tip of the needle within the lumen of the common femoral artery whilst negotiating the guide wire into the superficial femoral artery. Note that the inguinal ligament lies approximately 2 cm proximal to the groin crease. Care should be taken to identify the landmarks accurately in all patients: do not be misled in obese patients whose groin crease will be significantly lower than the inguinal ligament. For access to the upstream iliac arteries the puncture site may be a little lower, but take care to avoid unintended puncture of the superficial or profunda femoris arteries. When no pulse is palpable or percutaneous access is difficult use an ultrasound-guided arterial puncture technique. Alternatively, ‘cut-down’ onto the common femoral artery under local infiltration anaesthesia.
10. When ‘flashback’ occurs you should observe strong pulsatile flow from the needle. Unless there is severe inflow obstruction, the absence of pulsatile flow from the needle indicates that the tip is not properly positioned within the lumen. Do not attempt to advance a guide wire, but re-position the needle to gain access to the arterial lumen.
11. When satisfied with the position of the needle, advance a short J guide-wire down the trocar (normally a suitable wire is packaged as a part of the introducer set) and check with fluoroscopy. A guide-wire that is within the lumen passes without resistance: if resistance is encountered do not apply force as this is likely to result in dissection of the subintimal plane. Stop, withdraw the guide-wire and readjust the position of the needle. For downstream procedures the guide-wire must be manipulated into the superficial femoral artery by adjusting the angle of the needle. This requires that stiff metallic rather than soft plastic or Silastic needles are used. Simple fluoroscopy without contrast is usually sufficient to guide this manoeuvre, but if persistent difficulty is encountered obtain a road-map by injection of contrast through the needle. Never pass a hydrophilic guide-wire through a metallic needle: the hydrophilic coating will be stripped off by the needle when the wire is withdrawn, with potentially dire consequences.
12. If angioplasty is to be performed through the exposed common femoral artery (see Exposure of the common femoral artery, below), do not clamp and open the artery. Place a purse-string suture of 5/0 polypropylene (Prolene) around the artery before puncturing the vessel directly with a Potts-Cournand needle. Then proceed in the same way as for a percutaneous procedure.
13. When you are satisfied that the guide-wire is in place, withdraw the needle and insert the introducer sheath with its dilator. Remove the dilator. Flush the sheath with heparinized saline through the side channel, which is fitted with a tap. This channel can also be used for injection of contrast medium in order to obtain an angiographic image of the lesion.
14. Withdraw the short guide-wire and replace it with the wire chosen to navigate the lesion to be treated. The size of guide-wire required is indicated on the packaging of the balloon catheter – most often 0.035 inches in diameter for peripheral arterial procedures. Introduce it through the sheath floppy end first, using the small plastic introducer cone that comes with the wire to penetrate the valve. If difficulty is encountered in crossing the lesion use a hydrophilic guide-wire. Always wipe the guide-wire with a swab soaked in heparinized saline after removing a catheter as dried blood on the surface obstructs the smooth passage of a subsequent catheter.
15. If navigation of the guide-wire has been difficult, pass an appropriately sized catheter across the lesion and obtain an angiogram to ensure that the natural lumen has been entered beyond the lesion before passing a balloon catheter. If a subintimal space has been entered consider abandoning the procedure.
16. For most applications select a balloon catheter of 4 cm in length. For accurate sizing of the balloon obtain an angiogram using a measuring catheter with 1 cm markings. Match the size of the balloon to the diameter of the unstenosed artery. However, this degree of precision is not normally necessary: for lesions in the superficial femoral artery balloons with a diameter of 6 mm, and for iliac lesions 8 mm, are usually appropriate. Be cautious when selecting catheters for female patients with small arteries.
17. Use a hand-operated syringe driver to inflate the balloon to a pressure of 5–10 atmospheres with a 50/50 mixture of contrast medium and saline. Observe the shape of the balloon as it inflates; ‘popping’ of the ‘waist’ caused by the stenosis indicates that the plaque has given way and, usually, a satisfactory outcome. It is not necessary to maintain inflation of the balloon for more than a few seconds but a second inflation helps smooth the irregularities of the flow surface that result from splitting and fissuring of the plaque.
18. Obtain a completion angiogram to assess the final result. Remember that some irregularity of the flow surface at the site of angioplasty is usual. This tends to remodel naturally within a few weeks. Also, dilatation may continue to occur at the angioplasty site for a short time. If a significant stenosis remains, or if a large intimal flap has developed following iliac artery angioplasty, consider the use of an intraluminal stent. Stents do not perform well in arteries below the groin and should only be used in exceptional circumstances.
19. Following withdrawal of the introducer sheath apply digital pressure to the puncture site for a minimum of 10 minutes, and longer if needed, before applying a dressing and moving the patient. Give clear instructions to the nursing staff regarding duration of bed rest prior to mobilization to minimize haematoma and pseudoaneurysm formation. If the artery has been exposed, tie the purse-string suture to secure haemostasis or apply clamps and proceed with the open procedure.
20. Unless contraindicated, prescribe subcutaneous heparin or low-molecular-weight heparin postoperatively. Monitor peripheral perfusion and the groin for signs of haematoma or formation of a false aneurysm. Ensure post procedure antiplatelet therapy is continued indefinitely.
EXPOSURE OF THE MAJOR PERIPHERAL ARTERIES
Common femoral artery
1. The common femoral artery needs to be exposed more frequently than any other vessel in the body and it is important to know how to do this swiftly and correctly (Fig. 23.7).
Fig. 23.7 Exposure of the common femoral artery.
KEY POINTS
Anatomy
2. The position of the groin crease does not correspond to that of the inguinal ligament, but lies distal to it by 2–3 cm.
3. The midpoint of the incision should roughly correspond to the groin crease. Inexperienced surgeons tend to make the incision too low. When limited exposure of the common femoral artery is required (e.g. access for an endovascular intervention), it is permissible to use a transverse incision, which heals better and less painfully than a vertical incision crossing the groin crease. Position a transverse incision two fingers breadth above the groin crease.
4. Deepen the incision through the subcutaneous fat, taking care not to cut across any lymph nodes. Expose the femoral sheath and incise it longitudinally to expose the artery. The femoral vein lies medially and must be protected, but the femoral nerve on the lateral side lies in a deeper plane and is not usually at risk. However, do not be over zealous with positioning of a self-retainer, as the nerve can easily be stretched and a neuropraxia ensues.
5. Dissect a length of the common femoral artery and without undue force pass a Lahey clamp around the back of the artery in order to draw through a plastic sling. Gently lift the artery with the sling and identify its branches and its bifurcation into the superficial and profunda femoral arteries. Isolate these similarly with slings. Take care to avoid damage to the profunda vein, a tributary of which always passes anterior to the main stem of the profunda artery. For a more extensive exposure of the profunda femoris artery divide this vein between ties.
6. If exposure of the greater saphenous vein is required at the same operation make a ‘lazy-S’ incision, commencing vertically over the artery at the inguinal ligament and then deviating medially over the vein in the upper thigh.
7. Transection of the many lymphatics in the femoral triangle may cause a troublesome lymphocele or lymphatic fistula after the operation. There is no sure way of avoiding this, but approach the artery from its lateral rather than its medial side and gently reflect any lymph nodes and visible lymph vessels off the femoral sheath with minimal damage. If there are any obvious lymph leaks at the time of surgery suture the lymphatic channels closed with 6/0 Prolene.
Popliteal artery
1. The popliteal artery can be exposed above and below the knee by medial approaches. Prior to embarking on this surgery decide which part of the artery needs to be accessed and consider how the patient should be positioned on the operating table. The most inaccessible part lies directly behind the joint line and if its exposure at this level is required a posterior approach is essential (see paragraph 4 below).
2. To expose the supragenicular part of the artery the patient is placed supine with adequate support to flex the lower thigh and knee; a longitudinal incision is then made over the medial aspect of the lower thigh (Fig. 23.8). If you intend to perform a bypass with a saphenous vein graft, mark the vein before surgery; otherwise the incision should correspond with the anterior border of the sartorius muscle – the tendency is to place this incision too anteriorly. Deepen the incision to expose the sartorius muscle, which is retracted posteriorly to reveal the neurovascular bundle enveloped by the popliteal fat pad. The artery lies on the bone and the nerve lies some distance away with the vein in between. The popliteal artery is always surrounded by a plexus of veins, which must be carefully separated and divided in order to avoid troublesome bleeding.
3. In order to expose the infrageniculate popliteal artery, make an incision on the medial aspect of the calf along the border of the gastrocnemius muscle (Fig. 23.9). To optimize exposure to this area the tendons of sartorius, semitendinosus and gracilis can be divided. If the greater saphenous vein is to be harvested identify the vein first along an appropriate length before continuing the dissection between the medial head of gastrocnemius and the tibia to reveal the neurovascular bundle. The vein is exposed first and this has to be lifted carefully away to give access to the artery. By dividing the soleus muscle along its attachment to the medial border of the tibia it is possible to expose the origin of the anterior tibial artery and the whole extent of the tibioperoneal trunk through this incision. If necessary, completely divide the medial head of gastrocnemius; this results in little functional disability.
4. If exposure of the whole length of the popliteal artery is required it is better to use a posterior approach. With the patient placed prone, make a ‘lazy-S’ incision (medial proximally to lateral distally) through the popliteal fossa. Deepen the incision through the popliteal fascia and fat pad and define the diamond between the hamstring muscles above and the two heads of gastrocnemius below; then follow the lesser saphenous vein into the neurovascular bundle. In a posterior approach the popliteal artery will be superficial, with the vein and nerve lying deeper.
Tibial arteries
1. The proximal end of the anterior tibial artery is relatively inaccessible, but the remainder of this vessel and its terminal dorsalis pedis branch can be readily exposed through lateral or anterior incisions made directly over the vessels. Retract the tibialis anterior and extensor digitorum longus muscles anteriorly to reveal the artery lying on the interosseous membrane (Fig. 23.10). If exposure of the proximal anterior tibial artery is required this can be achieved very effectively by excision of the upper part of the fibula with disarticulation of the proximal tibiofibular joint. The common peroneal nerve, which winds around the neck of the fibula, must be protected carefully. This approach destroys the lateral ligament of the knee and, while this is well tolerated in elderly, relatively immobile patients, it is best avoided in younger and fitter individuals.
Fig. 23.10 Exposure of the anterior tibial artery.
2. The peroneal artery can also be exposed through a lateral incision following removal of a segment of fibula. The peroneal artery lies directly deep to the fibula: it is accompanied only by vein and has no neurovascular bundle. Take care to divide and tie the veins which interdigitate around the artery. Do not be tempted to use diathermy to gain haemostasis. In most cases, however, it is preferable to expose this vessel by a medial approach (see below).
3. To expose the posterior tibial artery, make a longitudinal incision on the medial aspect of the calf centred over the junction between gastrocnemius muscle and its Achilles tendon. Incise the deep fascia and develop the plane between the gastrocnemius and soleus muscles to reveal the posterior tibial vessels and nerve lying on the surface of soleus beneath a layer of fascia (Fig. 23.11). Alternatively, the posterior tibial artery and its terminal lateral plantar branch may be exposed by an incision made directly over it, as it lies behind the medial malleolus where it is covered only by deep fascia, and then following it into the foot.
Fig. 23.11 Exposure of the posterior tibial artery.
4. To expose the peroneal artery by a medial approach, split the lateral fibres of soleus and flexor hallucis longus muscles. This reveals the artery surrounded by its concomitant veins in the depths of the wound.
Subclavian artery
1. Make a transverse incision 1 cm above the medial third of the clavicle; divide the platysma muscle in the same plane (Fig. 23.12). This exposes the clavicular head of the sternocleidomastoid muscle, which is divided, and also a fat pad containing the scalene lymph nodes. Dissect and retract this fat pad superiorly off the surface of the scalenus anterior muscle. Identify the phrenic nerve, which passes obliquely from lateral to medial across the front of this muscle to lie along the medial border of its tendon and usually separated from it by a few millimetres. Pass the blade of a MacDonald’s dissector behind the tendon of scalenus anterior muscle, in such a way as to protect the phrenic nerve, and divide the tendon by cutting down on to the dissector with a pointed scalpel blade. Retraction of the muscle superiorly exposes the subclavian artery with its vertebral, internal mammary and thyrocervical branches. The first thoracic nerve root and the lower trunk of the brachial plexus cross the first rib above and posterolateral to the artery. The subclavian vein is deep to the clavicle and is not normally seen through this approach. On the left side the thoracic duct enters the confluence of the internal jugular and subclavian veins. If it is damaged, ligate it to prevent the development of a troublesome postoperative chylous fistula.
Fig. 23.12 Exposure of the subclavian artery.
2. Extensive exposure of the subclavian artery can be obtained by excision of the inner two-thirds of the clavicle, although this is rarely necessary. The two most common operations on the subclavian artery are carotid-subclavian anastomosis or bypass for a proximal occlusion (subclavian steal syndrome) and repair of a subclavian aneurysm (this is usually a misnomer since most so-called subclavian aneurysms involve the first part of the axillary artery). The former is usually completed without difficulty through the approach described above, and the latter is most conveniently accomplished with separate incisions above and below the clavicle to expose the subclavian and axillary arteries (see below).
3. Operations that involve direct exposure of the origin of the subclavian artery have been largely superseded by extrathoracic bypass procedures (carotid-subclavian and subclavian-subclavian bypass). On the rare occasions when direct exposure is considered essential this is best achieved by splitting the manubrium and upper sternum.
Make a right-angled incision with a horizontal component above the medial third of the clavicle and a vertical component in the midline over the manubrium and upper sternum. Complete the supraclavicular exposure of the artery as described above. Deepen the vertical incision through the subcutaneous tissue and periosteum. The periosteum is extremely vascular and diathermy is required to seal the small arteries. Commencing at the suprasternal notch, open a retrosternal plane by finger dissection, and then, with a sternal chisel and hammer or a properly protected reciprocating saw, divide the manubrium and sternum in the midline and spread the edges with a self-retaining retractor. Dissection of the thymus and anterior mediastinal fat is necessary to expose the arch of the aorta and the origins of the supra-aortic vessels. The innominate vein is stretched across the upper part of the incision and must be protected. It is not usually necessary to divide the sternal tendon of the sternocleidomastoid muscle. Close with peristernal wire or strong nylon sutures, taking care to avoid damage to the internal mammary and intercostal arteries when inserting them.
The origin of the left subclavian artery, which arises far back on the aortic arch, can also be exposed through a posterolateral thoracotomy through the bed of the second or third ribs.
AXILLARY AND BRACHIAL ARTERIES
1. Access to the axillary artery is most often required for axillofemoral bypass and occasionally for subclavian aneurysm repair (see above). For an axillofemoral bypass procedure consider placing the arm in abduction to facilitate estimating the length of the graft required. Make a horizontal incision 1 cm below the lateral third of the clavicle, and split the fibres of pectoralis major muscle (Fig. 23.13). This exposes the infraclavicular fat pad, beneath which lies the pectoralis minor muscle. Divide the tendon of this muscle close to its origin at the tip of the acromion process. Some branches of the acromiothoracic vessels may need to be divided. Find the axillary artery surrounded by the cords of the brachial plexus, which must be carefully protected. The axillary artery can be a friable vessel and care should be taken when slings and clamps are applied. Care should also be taken when performing an anastomosis that the back wall of the artery is not inadvertently incorporated in to the suture line.
Fig. 23.13 Exposure of the axillary artery.
2. The proximal brachial artery is found in the groove between biceps and brachialis muscles on the inner aspect of the upper arm (Fig. 23.14). At this point it is still enclosed by cords of the brachial plexus joining to form the median nerve, which crosses it obliquely from the lateral to the medial side. These structures must be carefully separated from it.
Fig. 23.14 Exposure of the proximal brachial artery.
3. It is more frequently necessary to expose the bifurcation of the brachial artery in order, for example, to perform a brachial embolectomy. To do so, make a ‘lazy-S’ incision (medially proximally and laterally distally) in the antecubital fossa, followed by division of the biceps aponeurosis (Fig. 23.15). Distal extension of this incision permits the radial, ulnar and anterior interosseous arteries to be followed into the forearm.
Fig. 23.15 Exposure of the distal brachial artery.
TYPES OF OPERATION
1. Direct repair, interposition grafting and patch grafting for arterial trauma
2. Surgical embolectomy or thrombectomy
3. Thrombolytic therapy, percutaneous suction and mechanical embolectomy
4. Endarterectomy, which, with the exception of carotid endarterectomy, has now been largely supplanted by bypass surgery as the treatment of choice for occlusive disease
6. Percutaneous and intra-operative (adjunctive) dilatation angioplasty and endovascular stenting for occlusive arterial disease. The basic technique involves the use of a guide-wire and a balloon dilatation catheter.1 Devices exist to assist recanalization of resistant occlusions, including lasers, rotational guide-wires, high-frequency electrocoagulation ablators and various types of atherectomy catheters. None of these has yet found a major role in the routine management of vascular disease, and lasers in particular, despite increasing technological sophistication, have so far proved disappointing. The use of balloon catheters (some with drug elution) has, however, made a major impact in recent years and in vascular centres the majority of patients with occlusive disease are treated by these methods
7. Inlay grafting for aneurysms
8. Endovascular stent-graft repair of aortic and peripheral aneurysms.
QUALITY CONTROL
1. Completion angiography. This continues to be the ‘gold-standard’ method. State of the art fluoroscopy is ideal but for infrainguinal reconstructions ‘on-table’ angiography is performed very easily using the simple X-ray equipment available in all standard operating theatres. Angiography allows graft and anastomotic assessment.
Place an X-ray plate wrapped within a sterile Mayo tray cover directly beneath the limb, and take an exposure while injecting 15–20 ml of contrast medium into the proximal end of the graft. Apply a clamp proximal to the injection site during exposure to obviate the necessity for accurate timing of the exposure. Observe proper radiation protection measures during this procedure and further reduce the radiation dose to yourself by interposing a long length of connecting catheter (for example an arterial line) between the syringe and the injection site.
For more proximal reconstructions, special X-ray equipment is required but other methods of quality control may be effective.
2. Intra-operative Doppler flowmetry. Intra-operative Doppler probes give an indication of flow and some can also give a waveform tracing which is helpful in ascertaining stenoses. It is also possible to use a simple hand-held Doppler probe placed in a finger of a sterile surgical glove with gel to assess flow.
3. Angioscopy. Fibreoptic endoscopes of little more than 1 mm in diameter are now available. Inserted at one end, such instruments will allow direct inspection of the interior of a graft and anastomosis. However, such instruments traumatize the flow surface and are expensive and for these reasons have been largely abandoned.
4. A satisfactory arterial reconstruction for occlusive disease restores either normal or improved blood flow to the distal circulation, and confirmation that this has occurred is a minimal requirement. The return of palpable pulses to vessels downstream of the reconstruction, for example in the pedal arteries, is a valuable sign and there are a number of simple and inexpensive devices available to supplement clinical assessment, including strain gauge and photoplethysmographs (digital pulse monitors), toe temperature probes, flat and hand-held Dopplers and pulse oximeters.
ARTERIAL OPERATIONS
REPAIR OF ARTERIAL INJURY
Appraise
1. Arterial injury is manifest by:
2. Suspicion of arterial injury is an indication for urgent angiography (CT angiography or digital subtraction angiography), except for haemorrhage, in which case proceed directly to surgical exploration unless you are in a centre which can offer radiological options such as embolization.
3. Angiographic discontinuity of a major limb vessel always requires urgent surgical exploration. Occlusion of a single tibial or forearm vessel is usually tolerated without ischaemic damage and does not as a rule require reconstruction.
4. Beware the concept of ‘arterial spasm’. It is true that the smooth muscle of arteries contracts protectively in response to injury so that an important vessel may appear quite small both angiographically and on direct inspection. However, luminal discontinuity is always due to a mechanical fault and demands surgical repair. Never attempt to treat such lesions with vasodilator drugs.
5. In the case of multiple injuries, co-operate closely with colleagues of other specialities in planning surgical treatment. Repair of damaged major arteries always takes precedence over orthopaedic fixation of fractures. However, there is a danger that vascular anastomoses may disrupted during subsequent manipulation of fractures. In these circumstances it may be advisable to restore vascular continuity initially by inserting a temporary intraluminal plastic shunt, and completing the repair once the fractures have been stabilized, when the length of the arterial defect can be accurately measured. Always check for venous disruption as well as arterial damage.
6. Run-in. This is not usually a problem in arterial trauma.
7. Run-off. There is a risk that blood clot may form and occlude vessels distal to the site of injury. The procedure must include measures to deal with this problem (see below), otherwise the run-off vessels are usually normal.
8. Conduit. In the case of limb injuries this is either the original artery repaired directly or an interposition graft of autologous vein. Since only short segments are required, problems are rarely encountered in finding a vein of suitable quality and calibre. If there has been extensive injury to both artery and major veins consider harvesting a segment of vein from the opposite leg or upper limb.
9. For closed injuries to major arteries (e.g. iliac, subclavian) with tearing or rupture of the vessel consider endovascular repair with a covered stent in hospitals with facilities for this type of procedure (see Endovascular repair of aortic and peripheral aneurysms, below).
Access
1. In the case of limb injury, prepare and drape the limb so as to permit direct inspection of skin perfusion and palpation of pulses distal to the site of injury.
2. Consider also the possibility that a segment of healthy undamaged vein of suitable size may need to be harvested for construction of a graft.
3. First, gain proximal control of the artery and then gain distal control. This requires a skin incision that extends well beyond the confines of the injury. Make this incision along the axis of the injured vessel and directly over it.
4. Do not enter the haematoma until the vessel has been dissected and controlled by passing rubber slings around it proximally and distally.
Assess
1. On entering the haematoma there may be brisk fresh bleeding, in which case apply clamps at the proximal and distal control points already prepared.
2. If there is complete disruption of the artery find the ends and apply soft clamps. It is unlikely that they will be actively bleeding at the time of exploration.
3. The traumatized vessel will be damaged some distance proximally and distally from the principal site of injury, therefore trim each end back a few millimetres at a time until normal undamaged intima is seen.
4. Assess the length of the defect. Attempt direct end-to-end anastomosis only if there will be no tension. In most cases it is more prudent to insert an interposition graft of autologous vein, even if this is only a centimetre in length.
5. If the artery is in continuity there may be bruising of the adventitia at the site of injury and absence of downstream pulsation. These are sure signs of internal disruption. The intima and inner layers of the media split transversely and the edges roll back to form a flap, which obstructs flow, causing secondary thrombosis. It is never sufficient, therefore, to simply inspect the outer surface of such a vessel and it is totally unacceptable to treat such lesions by topical application of vasodilator substances. Excise the damaged segment completely, cutting back each end of the artery as before to find healthy intima.
6. Active arterial bleeding usually signifies incomplete disruption or a lateral wall defect that inhibits protective retraction and constriction of the vessel.
Action
1. Before commencing repair of the artery check for adequate inflow and backflow. If either is inadequate pass a Fogarty catheter distally and proximally to withdraw any propagated clot and then instil heparinized saline.
2. If there are associated orthopaedic injuries consider inserting a temporary intraluminal shunt (see above).
3. The adventitia tends to prolapse over the end of a normal artery that has been cut across. Trim this back to prevent it intruding inside the anastomosis.
4. If direct end-to-end anastomosis is possible, accomplish it by the triangulation technique (see Basic techniques) and in most cases employ interrupted sutures in preference to continuous.
5. If the defect is too great to permit direct repair, harvest a segment of vein of appropriate size. Remember to reverse the vein to avoid obstruction to blood flow by competent valves. Complete the proximal anastomosis first, in end-to-end fashion, using the triangulation technique with interrupted sutures for small or inaccessible vessels or the oblique overlap technique for larger vessels. Apply a clamp to the distal end of the graft and allow arterial pressure to distend it in order to determine the optimum length to avoid both excessive tension and kinking. Finally, complete the distal anastomosis.
6. A small puncture or lateral wall defect, as may result from iatrogenic injury following arterial access for investigation or treatment, may be repaired by direct suture or by closing the arteriotomy with a patch.
Closure
1. Where possible, effect primary closure of the incision with suction drainage.
2. In the case of blast injuries and other causes of extensive skin and soft-tissue damage, observe the general principles of wound management. Where primary closure is either not possible or inadvisable, always cover the arterial repair with healthy viable tissue, which in practice usually means a muscle flap.
Aftercare
1. Except in cases where continued bleeding is a serious problem, maintain anticoagulation with heparin for several days.
2. Arrange regular half-hourly observation of the distal circulation during the immediate postoperative period and be prepared to re-explore immediately in the event of recurrent occlusion.
Complications
1. Early thrombosis or bleeding at the site of the repair demands immediate re-exploration and re-assessment.
2. A false aneurysm may result from a contained anastomotic leak and this also requires early re-exploration and repair.
3. The risk of associated deep venous thrombosis is high, so take appropriate preventative measures.
4. Repair of arterial injuries in young, healthy people is usually very successful and long-term disability associated with ischaemia is rare.
SURGICAL EMBOLECTOMY
Appraise
1. Embolic occlusion of a major artery results in acute ischaemia, which, if not relieved quickly, may progress to irreversible tissue damage and limb loss.
2. The differential diagnosis is from acute thrombosis occurring within an already diseased artery. Differentiation between these two conditions may be impossible on clinical grounds alone, especially since embolization is nowadays more commonly associated with ischaemic heart disease than valvular stenosis, and most patients therefore have generalized arteriosclerosis.
3. On examination, if there is an immediate threat to the viability of the limb with loss of power and movement and a neurosensory deficit then immediate surgical exploration is required irrespective of the cause.
4. Revascularization of a limb that is already totally non-viable invariably has fatal consequences due to reperfusion injury and is absolutely contraindicated. Urgent amputation may be life-saving.
5. Under other circumstances urgent angiography is indicated to establish the diagnosis and to permit proper appraisal of the various options for treatment.
6. Surgical embolectomy is indicated for embolic occlusion of:
7. For patients in whom there is no immediate threat to the viability of the limb, more distal emboli, such as those in the popliteal artery, are more appropriately treated by thrombolytic therapy.
8. Surgical embolectomy can be performed under local anaesthesia but general anaesthesia is preferable in the absence of serious anaesthetic risk.
9. Run-in, run-off and conduit usually are not relevant to surgical embolectomy in the absence of associated arterial disease.
Action
1. Make a short longitudinal arteriotomy. In the case of the femoral artery make this directly over the origin of the profunda artery.
2. Select an embolectomy catheter of a size appropriate to the vessel: 3F for axillary and brachial arteries, 4F for the superficial and profunda femoral arteries and 5F for the aortic bifurcation.
3. A number of different makes of embolectomy catheter are available. Choose one with a central irrigating lumen that permits injection of heparinized saline or X-ray contrast medium into the vessels beyond the balloon.
4. Pass the uninflated catheter proximally through the vessel beyond the clot. Inflate the balloon and withdraw the catheter slowly while adjusting the pressure within the balloon to accommodate changes in the diameter of the vessel. Avoid severe friction between the balloon and the arterial wall since this can cause intimal damage to the vessel.
5. Instruct an assistant to control bleeding from the vessel during this process by applying gentle traction to the rubber sling previously placed around it.
6. Repeat the procedure until no more thrombus is retrieved and adequate forward arterial flow is obtained from the vessel. Avoid unnecessary passages of the catheter.
7. Instil heparinized saline into the artery and gently apply a clamp.
8. Repeat the same procedure distally.
9. Fill the vessels with heparinized saline and close the arteriotomy. Directly suture the common femoral artery; consider using a small vein patch for the brachial artery.
